Running Puppeteer in Docker
In a standard software engineering team, code testing is one of the procedures followed before shipping products to production. Unit testing, end-to-end (E2E) testing, and automating user actions are different ways to test the usability and functionality of your web application. Puppeteer shines in all these areas.
Puppeteer is a Node.js library that allows you to interact with headless and headful Chrome or Chromium browsers to perform various tasks, such as taking screenshots, generating PDFs from web pages, and automating file downloads and uploads.
However, running Puppeteer consistently across different environments can be challenging. Docker, a containerization tool, helps you create isolated environments that run consistently across any infrastructure. Therefore, running Puppeteer in Docker simplifies the setup process and ensures that it works perfectly in every environment, from a developer's machine to the production server.
What is a container?
If you're not familiar with containers in programming, think of them as large, strong boxes used for shipping big items from one place to another. Manufacturers and wholesalers who purchase goods in bulk from different parts of the world load them into a container and ship them to their destination. When the container arrives, the items inside it are the same as those that were loaded unless they were tampered with during transport.
With that understanding, a container, in the programming context, refers to a lightweight, standalone package that contains everything (resources, dev dependencies, code, settings, etc.) needed to run an application. Having many containers on a single system does not cause conflict because they're isolated from each other, which makes them more efficient, faster, and consistent across different environments.
How does Docker work?
Docker simplifies the process of managing containers and allows developers to package an application and its dependencies into a single unit (container). Afterward, it can be shipped to run on other machines without errors. In other words, Docker allows you to develop, ship, and run container applications.
Docker containers are portable, ensuring that an application runs the same way in different environments.
Docker Image vs. Container
Looking at the definitions, you might need clarification on the two. They're different but closely related. A Docker image is an executable package that includes everything needed to run an application, while a container is the execution environment created from a Docker image.

According to Usama Jamil:
The Docker image is the blueprint, while the Docker container is the live, operational version of that blueprint that brings your application to life in a controlled and predictable manner.
-- Python on Docker: how to dockerize Python applications
Setting up Docker
- You can install Docker on your Windows, Linux, or Mac devices by following the instructions on the respective operating system guide on the Docker documentation website.
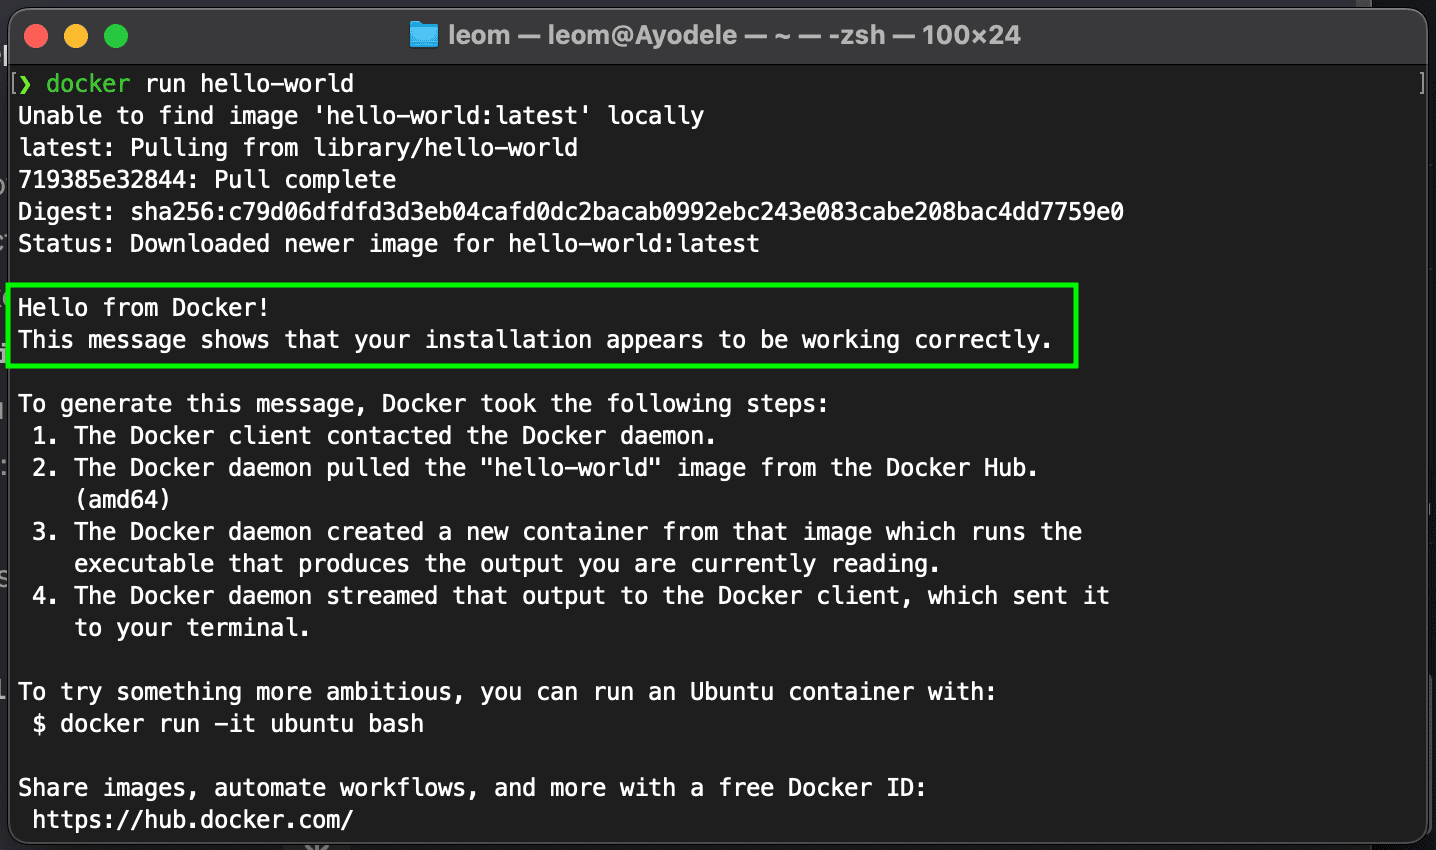
- Verify your installation by running
docker --versionin your terminal. You can also rundocker run hello-world. This will download ahello-worldtest image and run it in a container; if successful, it will print “Hello from Docker!”
Basic Docker commands
- Pulling an image:
docker pull image-name: replace the image-name with the docker image you want to pull from the Docker hub. - Running a container:
docker run image-name. - Managing containers:
docker pswill list all the running containers;docker stop container-idwill stop the container whoseIDyou passed in the command;docker rm container-idwill remove the container you passed to itsIDin the command. - Building a Docker image:
docker build -t your-image-namewill build the image in your current working directory.
Now that you're familiar with Puppeteer and Docker, you can progress into creating and running Puppeteer in a Docker container.
Creating the Dockerfile
The Dockerfile is a script that contains the commands and dependencies that will assemble the Docker image. Below is the step-by-step procedure for creating a Dockerfile for running Puppeteer.
- Creating the base image: You can start with a
nodeimage as the base. - Dependencies: Install
puppeteer. If there are any other commands to install any library that your Puppeteer package depends on, include them. - Application: Copy your application files into the image
npm init -y to initialize node in your project folder.By now, a package.json file would have been created for you. Modify it to look like the sample below. (You can change the author to your name if you like.)
{
  "name": "docker-ppt",
  "version": "1.0.0",
  "description": "a simple project for testing how to run puppeteer in a docker container",
  "main": "puppeteer-script.js",
  "type": "module",
  "scripts": {
    "test": "echo \\"Error: no test specified\\" && exit 1"
  },
  "keywords": [
    "puppeteer",
    "docker",
    "container"
  ],
  "author": "Apify",
  "license": "ISC"
}
The next step is to create a Puppeteer script that you will run in the Docker container to confirm the successful setup of the container. Create a file in your code editor, puppeteer-script.js, and put the code below in it.
Puppeteer script
import puppeteer from 'puppeteer';

const browser = await puppeteer.launch({
    headless: new,
    args: ['--no-sandbox', '--disable-setuid-sandbox'],
});

const page = await browser.newPage();

try {
    // Navigate to the page
    await page.goto('<https://blog.apify.com>', { waitUntil: 'load', timeout: 60_000 }); // 60 seconds timeout

    // Take a screenshot
    await page.screenshot({ path: 'apify.jpeg', fullPage: true });

    console.log('Puppeteer script executed successfully.');
} catch (error) {
    console.error('Error running Puppeteer script:', error);
} finally {
    // Close the browser
    await browser.close();
}
The final step is to create a Dockerfile in the project directory. Create a file, and name it Dockerfile then put the code below in it.
Dockerfile
FROM node:20.11.1

# Install the latest Chrome dev package and necessary fonts and libraries
RUN apt-get update \\
    && apt-get install -y wget gnupg \\
    && wget -q -O - <https://dl-ssl.google.com/linux/linux_signing_key.pub> | gpg --dearmor -o /usr/share/keyrings/googlechrome-linux-keyring.gpg \\
    && echo "deb [arch=amd64 signed-by=/usr/share/keyrings/googlechrome-linux-keyring.gpg] <https://dl-ssl.google.com/linux/chrome/deb/> stable main" > /etc/apt/sources.list.d/google.list \\
    && apt-get update \\
    && apt-get install -y google-chrome-stable fonts-ipafont-gothic fonts-wqy-zenhei fonts-thai-tlwg fonts-khmeros fonts-kacst fonts-freefont-ttf libxss1 dbus dbus-x11 \\
      --no-install-recommends \\
    && rm -rf /var/lib/apt/lists/* \\
    && groupadd -r apify && useradd -rm -g apify -G audio,video apify

# Determine the path of the installed Google Chrome
RUN which google-chrome-stable || true

# Switch to the non-root user
USER apify

# Set the working directory
WORKDIR /home/apify

# Copy package.json and package-lock.json
COPY --chown=apify:apify package*.json ./

# Install Puppeteer without downloading bundled Chromium
RUN npm install puppeteer --no-save

# Copy your Puppeteer script into the Docker image
COPY --chown=apify:apify . .

# Update the PUPPETEER_EXECUTABLE_PATH to the correct Chrome path (placeholder, update based on the output of `which google-chrome-stable`)
ENV PUPPETEER_SKIP_CHROMIUM_DOWNLOAD=true \\
    PUPPETEER_EXECUTABLE_PATH=/usr/bin/google-chrome-stable

# Set the command to run your Puppeteer script
CMD ["node", "puppeteer-script.js"]
Breakdown of the Dockerfile
FROM node:20.11.1: This line specifies the base image for the Docker container. It uses a specific Node.js version 20 image.- The
RUNline updates the package lists for the Debian-based image, installswgetandgnupg(needed for adding the Google Chrome repository), adds the Google Chrome signing key, adds the Chrome repository to the system's software sources, and then installs Google Chrome along with various fonts and libraries necessary for Chrome to run correctly. It also installsdbusanddbus-x11which are system message buses and interfaces needed by Chrome. The-no-install-recommendsoption minimizes the size of the installation by skipping optional packages. && rm -rf /var/lib/apt/lists/*: This part of the command removes the package lists downloaded byapt-get updateto keep the Docker image size small.&& groupadd -r apify && useradd -rm -g apify -G audio,video apify: creates a non-root user namedapify(with a group also namedapify) and adds the user to theaudioandvideogroups. This is a security best practice for running applications inside Docker containers.RUN which google-chrome-stable || true: Attempts to locate thegoogle-chrome-stableexecutable in the system's PATH and outputs its location. The|| trueensures that this command doesn't cause the build process to fail if the executable isn't found. This step is mostly for debugging and doesn't affect the Docker image.USER apify: Switches the user context to theapifyuser for subsequent commands and when running the container.WORKDIR /home/apify: Sets the working directory inside the container to/home/apify.COPY --chown=apify:apify package*.json ./: Copiespackage.jsonandpackage-lock.json(if they exist) into the working directory, setting ownership to theapifyuser.RUN npm install puppeteer --no-save: Installs Puppeteer without saving it topackage.jsondependencies and without downloading Chromium, as the Dockerfile configures Puppeteer to use the installed version of Google Chrome.COPY --chown=apify:apify . .: Copies the rest of the application's files into the working directory, setting ownership to theapifyuser.ENV PUPPETEER_SKIP_CHROMIUM_DOWNLOAD=true PUPPETEER_EXECUTABLE_PATH=/usr/bin/google-chrome-stable: Sets environment variables to skip the Chromium download by Puppeteer and to use the installed Google Chrome as Puppeteer's browser executable.CMD ["node", "puppeteer-script.js"]: execute thePuppeteerscript usingNode.js.
Building and running the Docker image
- To build your Puppeteer Docker image, start the
dockerdesktop application that was installed earlier if you had it closed. You can now use the terminal of your code editor to run thisdocker build -t docker-ppt .command. Thedocker-pptcan have any name of your choice. After a successful build, you can now run the image. - To run the image, run the
docker run docker-pptcommand in the terminal.
With all the setup done, the Docker environment will be consistent regardless of where you are running the container.
Output
- After the Docker file has run, you should see a successful statement in the terminal. You can then go to your Docker application, click on the container menu, then click on the container name, and click on the log tab. You’ll see the same message you saw in your terminal (either successful or failed). An image representation of this is shown below.

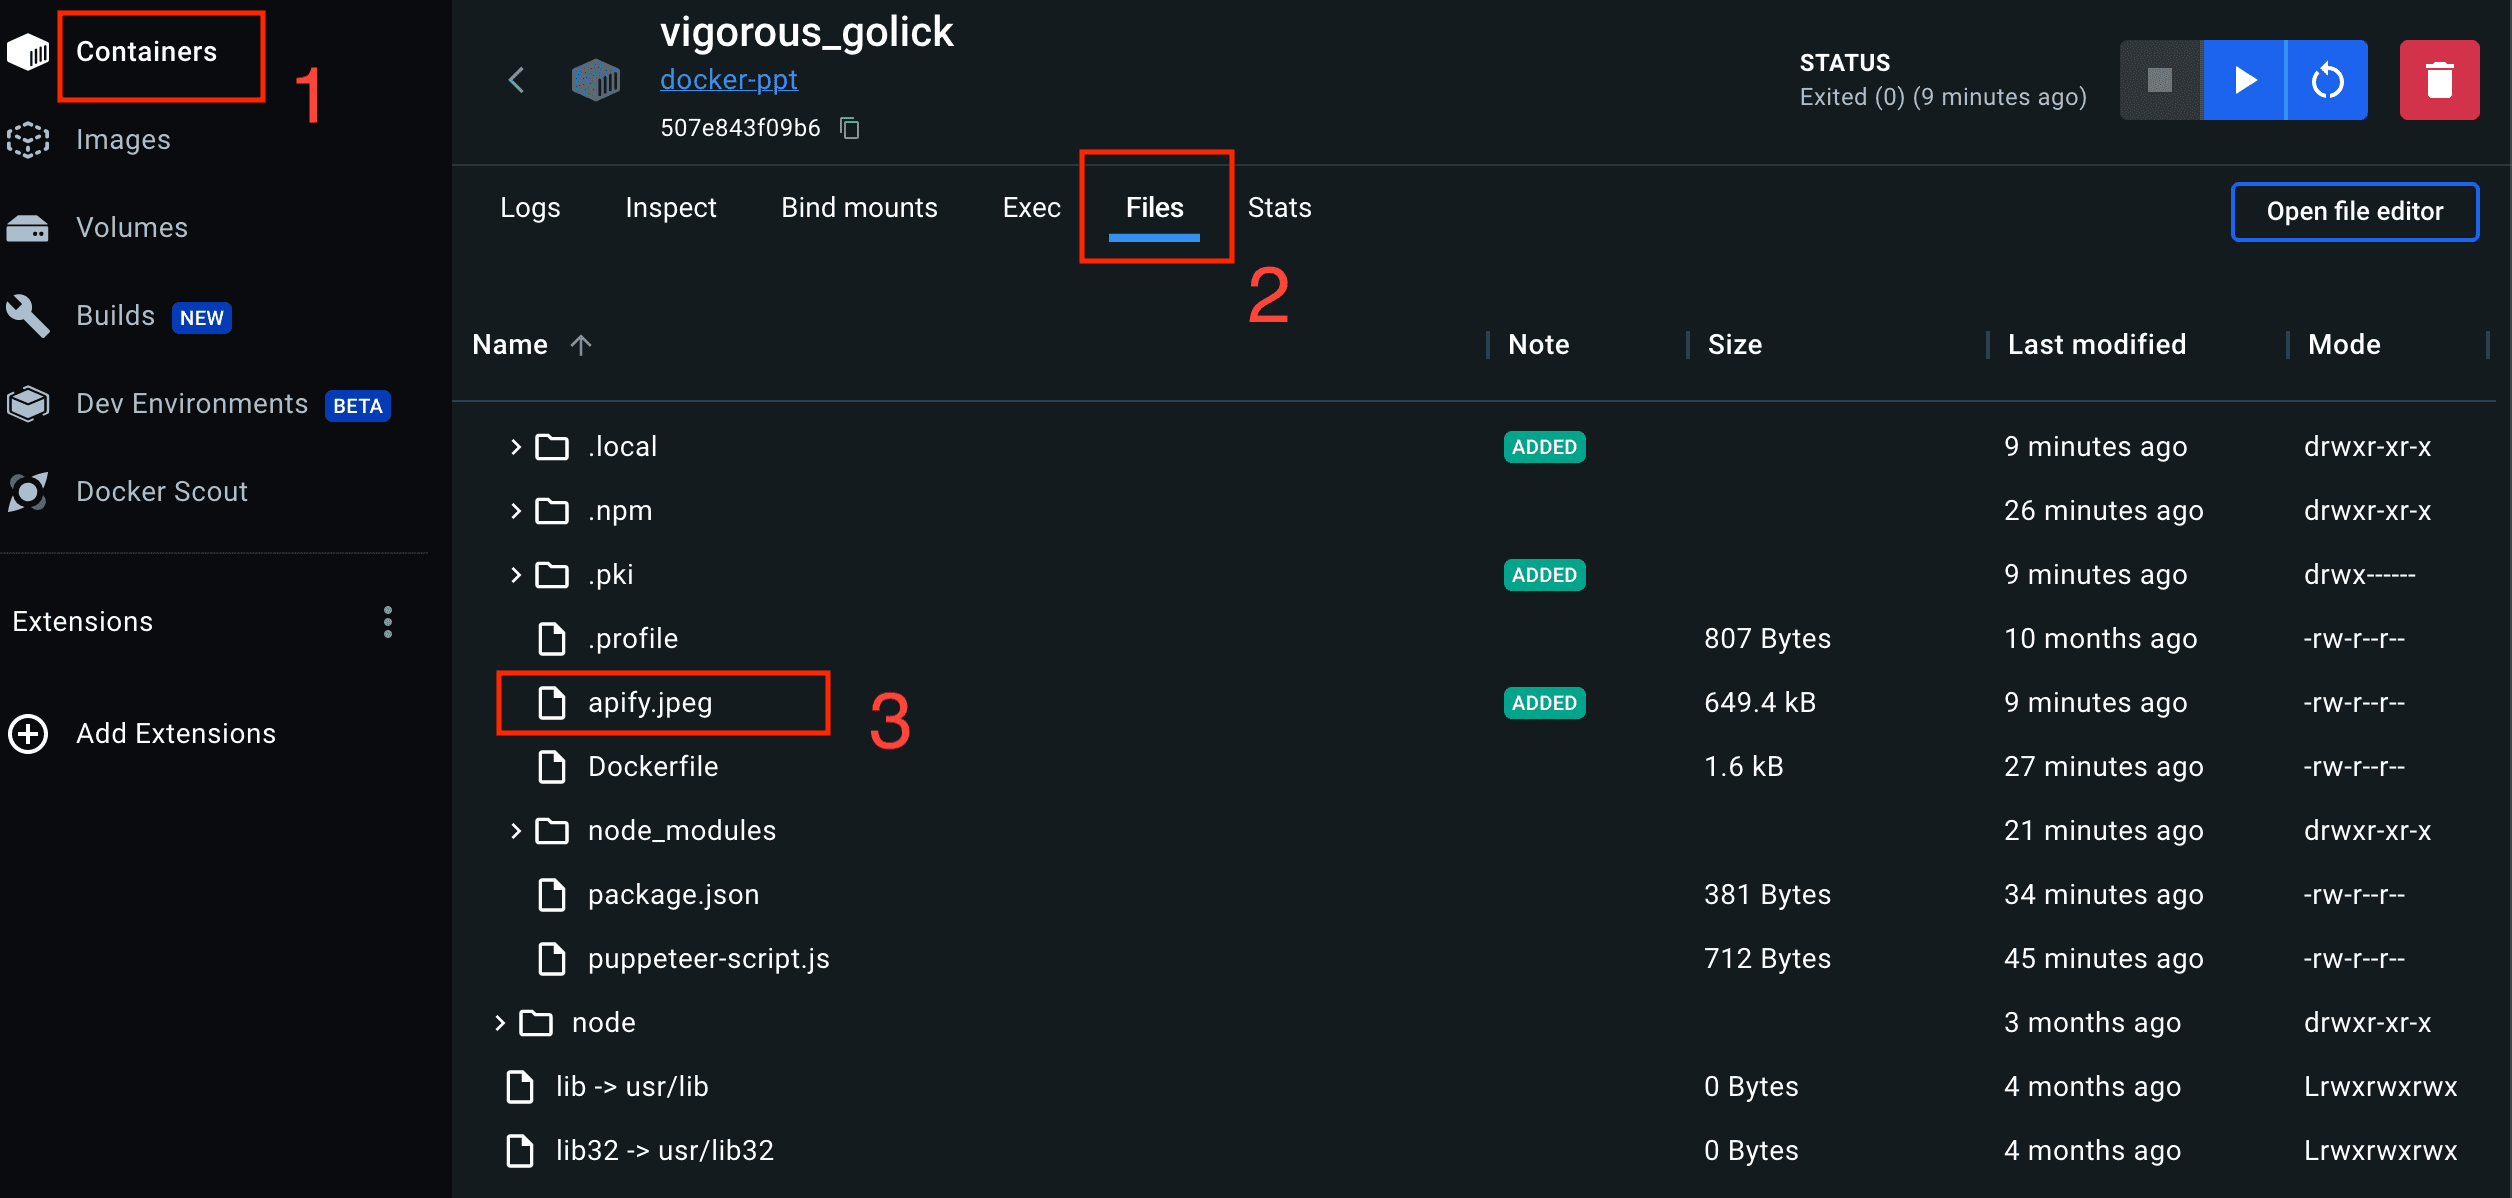
- The second step is to check for the downloaded screenshot in the file directory. Click on the click on the files tab, then the whole
docker image filewill be loaded. Click onhome, select theuser(which isapifyfor this example), scroll down a bit, and you’ll find the downloaded file.
You have successfully created and run Puppeteer in a Docker container. You can find all the codes in this GitHub repository.
Performance and issues
To optimize performance, consider running Puppeteer with --no-sandbox in Docker, but be aware of the security implications.
Also, if you encounter issues, check that all necessary dependencies are installed in your Dockerfile and that your Puppeteer script is correctly referencing paths and URLs.
The challenges of memory consumption
A critical issue with a containerized environment like Docker is the unpredictable memory consumption of different websites when automated with tools like Puppeteer. This is because the memory footprint can vary significantly from one site to another.
For instance, automating tasks on a resource-heavy site like Airbnb might consume several gigabytes of memory per open tab, whereas a more lightweight site like Wikipedia might only use a fraction of that.
Processing multiple pages concurrently in a scenario where the pages of one site are consuming much more memory than the pages of another can lead to significant discrepancies in resource allocation. This variability makes it difficult to optimize resource usage and maintain stability, especially when scaling to handle multiple pages or tasks simultaneously.
The solution to memory consumption: Crawlee and AutoscaledPool
Crawlee is a web scraping and browser automation library developed by Apify, and one of its core features is the AutoscaledPool. It is designed to efficiently manage multiple resource-intensive tasks that can be executed simultaneously. The pool dynamically adjusts the number of tasks it runs based on the system's CPU and memory availability and the state of the JavaScript event loop. Below is a detailed explanation of its key aspects and functionalities:
- Task management:
AutoscaledPoolonly starts new tasks if there is enough CPU power and memory available and the JavaScript event loop is not overloaded. It relies on theSnapshotterclass to obtain information about CPU and memory usage, which can be from local system resources or the Apify cloud infrastructure. - Core functions: To use
AutoscaledPool, you need to implement three functions:runTaskFunction,isTaskReadyFunction, andisFinishedFunction. These functions define the tasks to run, whether more tasks are ready to be processed, and whether the pool should finish running. - Running the pool: The pool starts by calling
AutoscaledPool.run()and periodically checking if more tasks are ready or if they should be finished. It manages optimal concurrency and continues until all tasks are completed or an error occurs. - Concurrency control:
AutoscaledPoolhas properties to control concurrency, including:minConcurrency: Gets the minimum number of tasks running in parallel.maxConcurrency: Gets the maximum number of tasks running in parallel.desiredConcurrency: Estimates the number of parallel tasks the system can currently support.currentConcurrency: Shows the number of parallel tasks currently running.
- Aborting the pool: The
abort()method can be used to stop the pool. It resolves the promise returned by therun()function but does not guarantee to abort all running tasks. - Example usage: An example usage of
AutoscaledPoolis provided in the documentation, demonstrating how to instantiate and run the pool with specified task functions.
This feature is particularly useful in scenarios where resource-intensive tasks need to be managed efficiently, ensuring optimal use of system resources without overloading the CPU or memory.
Conclusion and next steps
By following this guide, you've learned how to set up Puppeteer in a Docker container. This setup ensures that your automated browser tasks and tests run consistently across different environments.
Now you can experiment with more complex Puppeteer scripts and Docker configurations to enhance your web development and testing capabilities.