We're Apify. You can build, deploy, share, and monitor your web scrapers and crawlers on the Apify platform. Check us out.
What is Puppeteer?
Puppeteer is a browser automation library for JavaScript that uses the DevTools protocol to programmatically control Chromium or Chrome browsers. With more than 90K stars on GitHub, it is the de facto standard in headless browser automation. Puppeteer is written in TypeScript, which makes it easy to start with because of great code completion in IDEs.
Other libraries with similar functionality are Selenium, which is very popular outside the JavaScript world, and Playwright, a younger step-brother of Puppeteer.
With Puppeteer, you can use (headless) Chromium or Chrome to open websites, fill forms, click buttons, extract data and generally perform any action that a human could when using a computer. This makes Puppeteer a really powerful tool for web scraping, but also for automating complex workflows on the web.
You don’t need to be familiar with Puppeteer or web scraping to enjoy this tutorial, but knowledge of HTML, CSS, and JavaScript is expected.
In this tutorial, you’ll learn how to:
- Start a browser with Puppeteer
- Click buttons and wait for actions
- Extract data from a website
Our Puppeteer scraper project
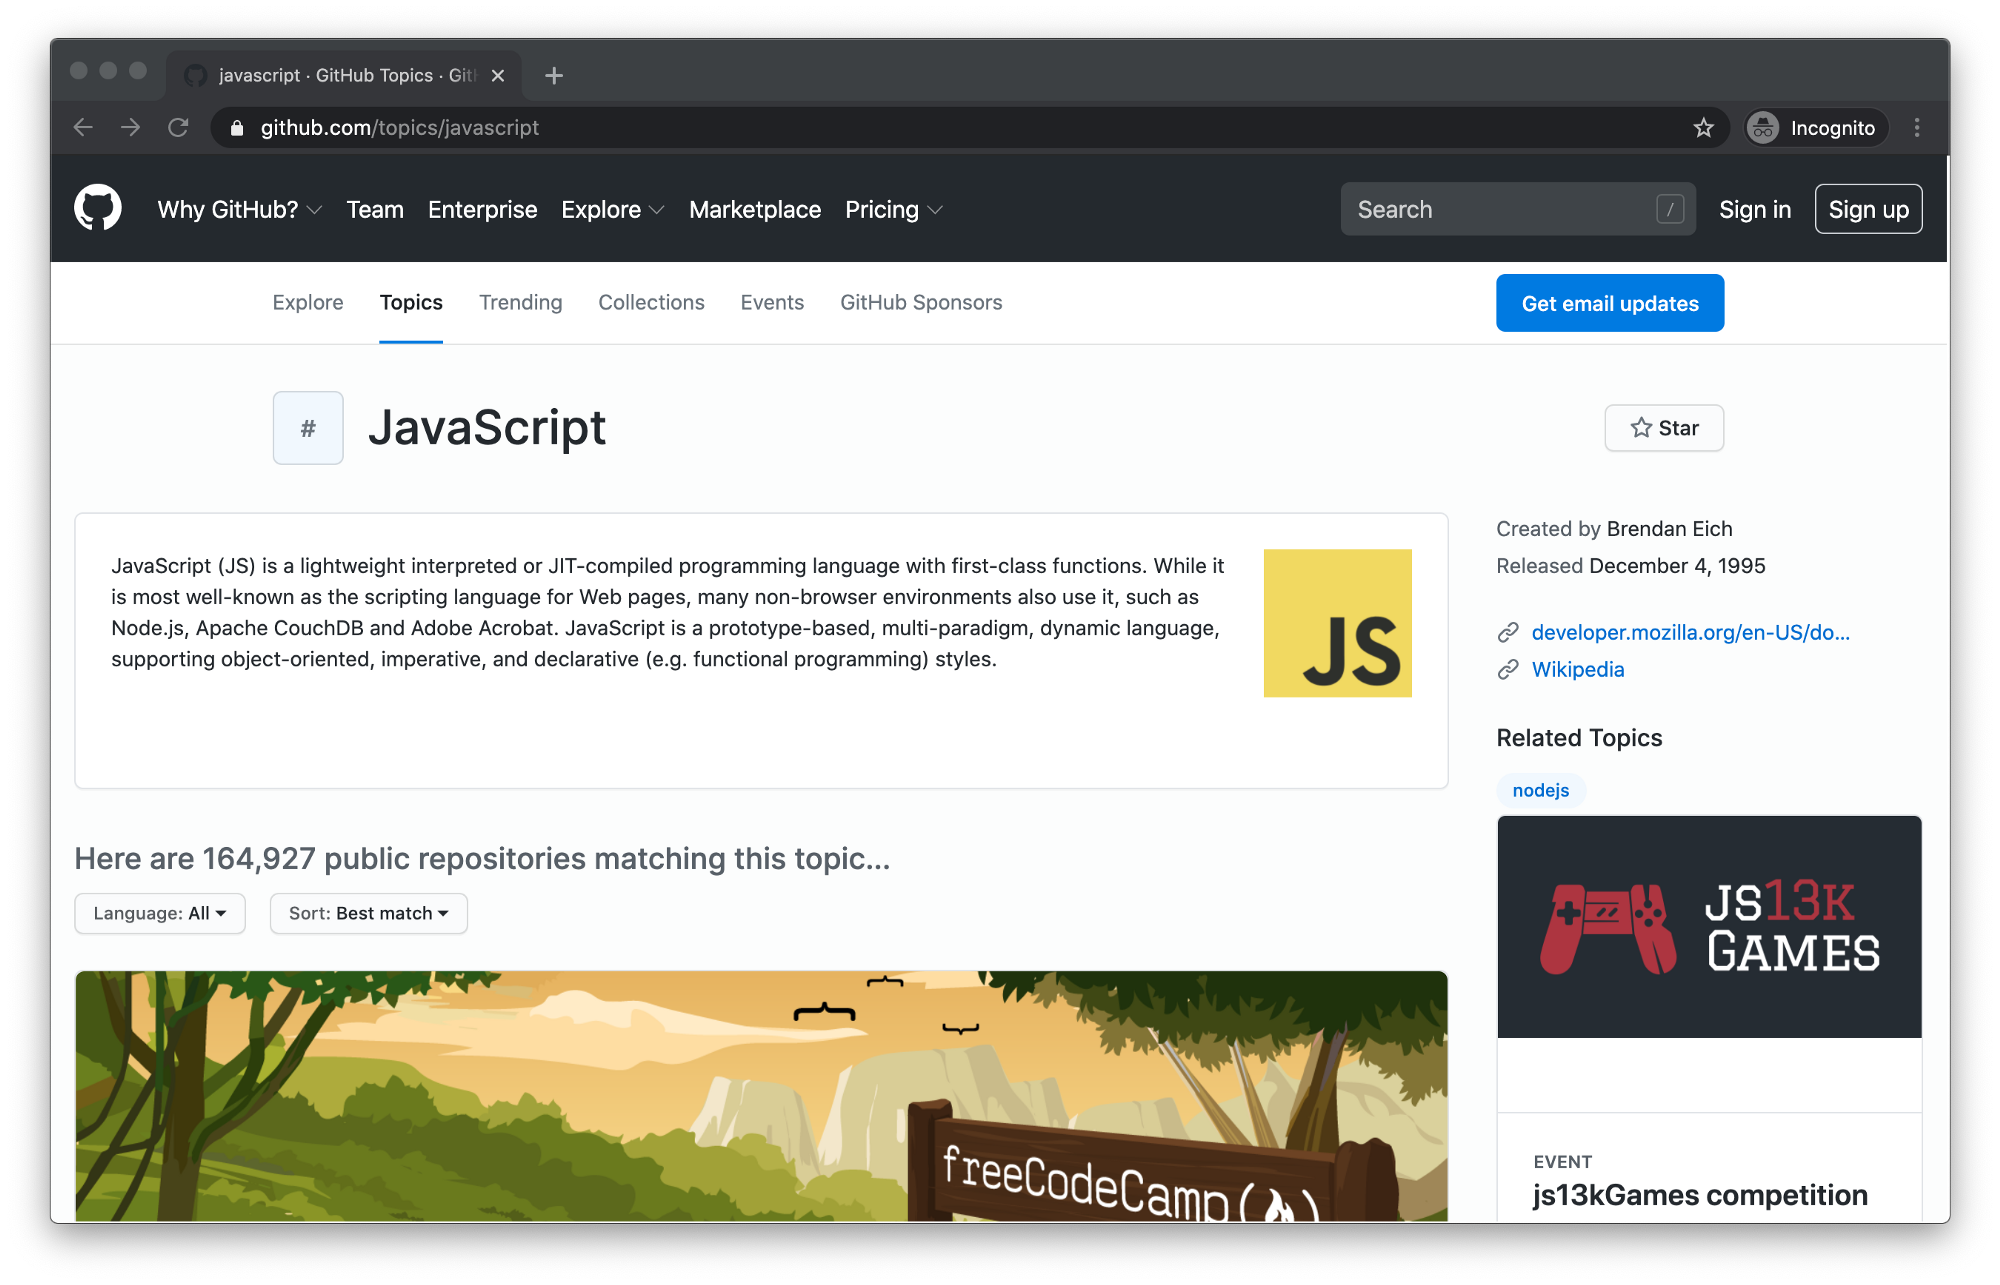
To showcase the basics of Puppeteer, we will create a simple scraper that extracts data about GitHub Topics. You’ll be able to select a topic and the scraper will return information about repositories tagged with this topic.

We will use Puppeteer to start a browser, open the GitHub topic page, click the Load more button to display more repositories, and then extract the following information:
- Owner
- Name
- URL
- Number of stars
- Description
- List of repository topics
How to install Puppeteer
To use Puppeteer you’ll need Node.js and a package manager. We’ll use NPM, which comes preinstalled with Node.js. You can confirm their existence on your machine by running:
node -v && npm -v
To get the most out of this tutorial, you need Node.js version 16 or higher. If you’re missing either Node.js or NPM or have unsupported versions, visit the installation tutorial to get started.
Now that we know our environment checks out, let’s create a new project and install Puppeteer.
mkdir puppeteer-scraper && cd puppeteer-scraper
npm init -y
npm i puppeteer
The first time you install Puppeteer, it will download browser binaries, so the installation may take a bit longer.
Complete the installation by adding "type": "module" into the package.json file. This will enable use of modern JavaScript syntax. If you don't do this, Node.js will throw SyntaxError: Cannot use import statement outside a module when you run your code. Learn more about ECMAScript modules in Node.js.
{
    "type": "module",
    "name": "puppeteer-scraper",
    // ... other fields
}
Building a Puppeteer web scraper
Creating a scraper with Puppeteer is surprisingly easy, even if you have no previous scraping experience. If you understand JavaScript and CSS, it will be a piece of cake.
In your project folder, create a file called scraper.js and open it in your favorite code editor. First, we will confirm that Puppeteer is correctly installed and working by running a simple script.
import puppeteer from 'puppeteer';

// Open the installed Chromium. We use headless: false
// to be able to inspect the browser window.
const browser = await puppeteer.launch({
    headless: false
});

// Open a new page / tab in the browser.
const page = await browser.newPage();

// Tell the tab to navigate to the JavaScript topic page.
await page.goto('https://github.com/topics/javascript');

// Pause for 10 seconds, to see what's going on.
await new Promise(r => setTimeout(r, 10000));

// Turn off the browser to clean up after ourselves.
await browser.close();
Now run it using your code editor or by executing the following command in your project folder.
node scraper.js
If you saw a Chromium window open and the GitHub Topics page successfully loaded, congratulations, you just robotized your web browser with Puppeteer.
Loading more repositories
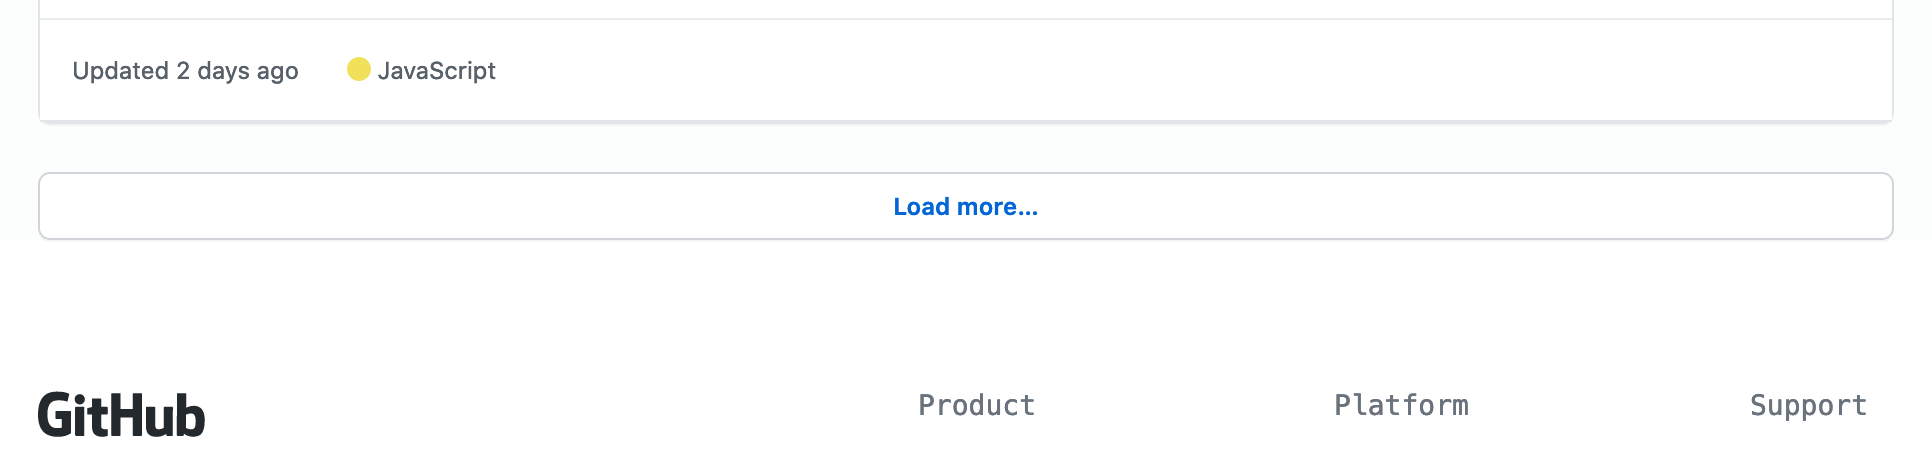
When you first open the topic page, the number of displayed repositories is limited to 20. You can load more by clicking the Load more… button at the bottom of the page.
There are three things we need to tell Puppeteer to load more repositories:
- Wait for the Load more button to render on the page.
- Click the Load more button.
- Wait for the repositories to load.
Clicking buttons is extremely easy with Puppeteer. By prefixing text/ to a string you’re looking for, Puppeteer will find the element that includes this string and click it.
await page.click('text/Load more');
However, it's important to mention that if the button is not loaded on the page yet, Puppeteer will not automatically wait for it to appear and this could create race conditions and break your scraper. Let's extend the code to wait for the button to render.
const buttonSelector = 'text/Load more';
await page.waitForSelector(buttonSelector);
await page.click(buttonSelector);
After clicking, you need to wait for the repositories to load. If you didn't, the scraper could finish before the new repositories show up on the page, and you would miss that data. page.waitForFunction() allows you to execute a function inside the browser and wait until the function returns true.
await page.waitForFunction(() => {
    const repoCards = document.querySelectorAll('article.border');
    // GitHub displays 20 repositories per page.
    // We wait until there's more than 20.
    return repoCards.length > 20;
});
To find that article.border selector, we used browser DevTools, which you can open in most browsers by right-clicking anywhere on the page and selecting Inspect. It means: Select the <article> tag with the border class.
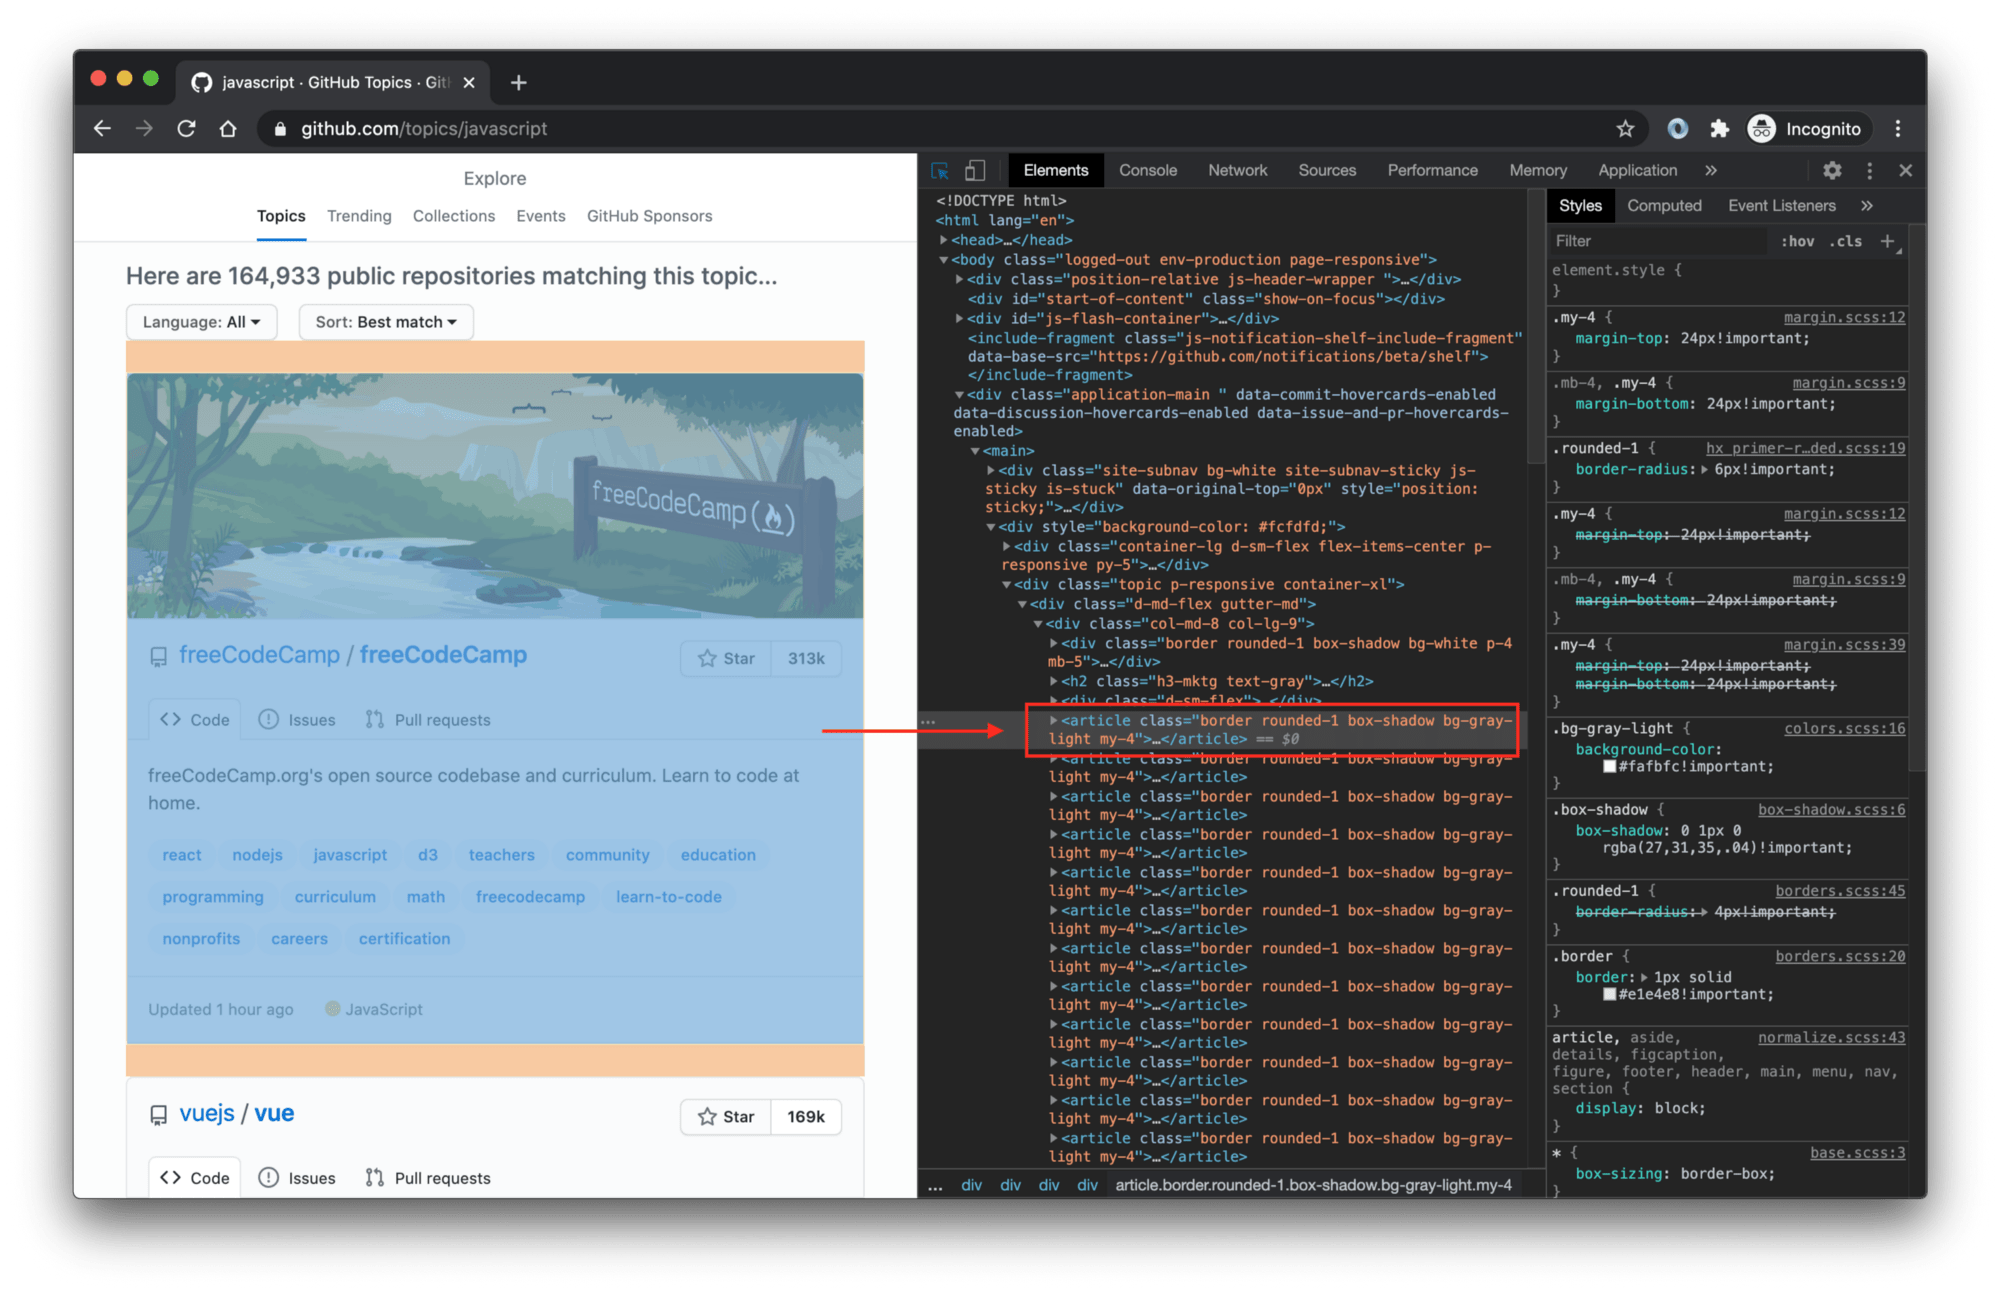
If you're not familiar with DevTools and CSS selectors, visit the Web scraping for beginners course in the Apify Academy. It's free and open-source.
Let’s plug this into our code and do a test run. I've removed earlier comments to make it easier for you to find new changes.
import puppeteer from 'puppeteer';

const browser = await puppeteer.launch({
    headless: false
});

const page = await browser.newPage();

await page.goto('https://github.com/topics/javascript');

// Wait for the Load more button to render
// on the page and click it.
const buttonSelector = 'text/Load more';
await page.waitForSelector(buttonSelector);
await page.click(buttonSelector);

// Tell Puppeteer to keep watching for more than
// 20 repository cards to appear in the page.
await page.waitForFunction(() => {
    const repoCards = document.querySelectorAll('article.border');
    return repoCards.length > 20;
});

await new Promise(r => setTimeout(r, 10000));
await browser.close();
If you watch the run, you’ll see that the browser first scrolls down and clicks the Load more button, which changes the text into Loading more. After a second or two, you’ll see the next batch of 20 repositories appear. Great job!
Extracting data with Puppeteer
Now that we know how to load more repositories, we will extract the data we want. To do this, we’ll use the page.$$eval() function. It tells the browser to find certain elements and then execute a JavaScript function with those elements. Here's the extraction code:
const repos = await page.$$eval('article.border', (repoCards) => {
    return repoCards.map(card => {
        const [user, repo] = card.querySelectorAll('h3 a');
        const stars = card.querySelector('#repo-stars-counter-star')
            .getAttribute('title');
        const description = card.querySelector('div.px-3 > p');
        const topics = card.querySelectorAll('a.topic-tag');

        const toText = (element) => element && element.innerText.trim();
        const parseNumber = (text) => Number(text.replace(/,/g, ''));

        return {
            user: toText(user),
            repo: toText(repo),
            url: repo.href,
            stars: parseNumber(stars),
            description: toText(description),
            topics: Array.from(topics).map((t) => toText(t)),
        };
    });
});
It works like this: page.$$eval() finds our repositories and executes the provided function in the browser. We get repoCards which is an Array of all the repo elements. The return value of the function becomes the return value of the page.$$eval() call. Thanks to Puppeteer, you can pull data out of the browser and save them to a variable in Node.js. Magic ✨
If you’re struggling to understand the extraction code itself, be sure to check out this guide on working with CSS selectors and this tutorial on using those selectors to find HTML elements.
And here’s the code with extraction included. When you run it, you’ll see 40 repositories with their information printed to the console.
import puppeteer from 'puppeteer';

const browser = await puppeteer.launch({
    headless: false
});

const page = await browser.newPage();

await page.goto('https://github.com/topics/javascript');
const buttonSelector = 'text/Load more';
await page.waitForSelector(buttonSelector);
await page.click(buttonSelector);
await page.waitForFunction(() => {
    const repoCards = document.querySelectorAll('article.border');
    return repoCards.length > 20;
});

// Extract data from the page. Selecting all 'article' elements
// will return all the repository cards we're looking for.
const repos = await page.$$eval('article.border', (repoCards) => {
    return repoCards.map(card => {
        const [user, repo] = card.querySelectorAll('h3 a');
        const stars = card.querySelector('#repo-stars-counter-star')
            .getAttribute('title');
        const description = card.querySelector('div.px-3 > p');
        const topics = card.querySelectorAll('a.topic-tag');

        const toText = (element) => element && element.innerText.trim();
        const parseNumber = (text) => Number(text.replace(/,/g, ''));

        return {
            user: toText(user),
            repo: toText(repo),
            url: repo.href,
            stars: parseNumber(stars),
            description: toText(description),
            topics: Array.from(topics).map((t) => toText(t)),
        };
    });
});


// Print the results 🚀
console.log(`We extracted ${repos.length} repositories.`);
console.dir(repos);

await new Promise(r => setTimeout(r, 10000));
await browser.close();
Summary
So far you've learned how to start a browser with Puppeteer, and how to control its actions with some of Puppeteer’s most useful functions: page.click() to emulate mouse clicks, page.waitForSelector() to wait for elements to render on the page, page.waitForFunction() to wait for actions in the browser and page.$$eval() to extract data from a browser page. But no real scraping project finishes after scraping one page. Scraping is predominantly used to build large datasets for data analytics.
Let's simulate this by extending this tutorial to scrape not only the first 40 repositories, but any number of them. To do this we will have to click the Load more button repeatedly, not just once.
Further, we will add scraping of the number of commits in the main branch of each of the collected repositories. This number is not available on the topics page, so we'll have to visit each repository page individually and get it from there. Our scraper will learn to crawl.
Crawling with Puppeteer
While Puppeteer is absolutely amazing for controlling browsers, it's not primarily a web scraping tool. It is possible to crawl with Puppeteer, but trust me, it's painful. You have to open browsers, close browsers, open tabs, close tabs, keep track of what you already crawled, what failed and needs to be retried, handle all errors, so they don't crash your crawler, manage memory and CPU so that too many open tabs do not overwhelm your machine. It's doable, but I'd much rather focus on crawling, not browser management.
Comfortable scraping and crawling with Puppeteer is better done together with another library. This library is called Crawlee, and it's also free and open-source, just like Puppeteer. Crawlee wraps Puppeteer and grants access to all of Puppeteer's functionality, but also provides useful crawling and scraping tools like error handling, queue management, storages, proxies or fingerprints out of the box.
Crawlee installation
You can add crawlee into your project by installing it with NPM in the puppeteer-scraper directory you created earlier:
npm install crawlee
Crawlee will recognize that Puppeteer is already installed and will be able to use it right away. To quickly test this, let's create a new file crawlee.js and use the following code inside the file:
// Crawlee works with other libraries like Playwright
// or Cheerio as well. Now we want to work with Puppeteer.
import { PuppeteerCrawler } from 'crawlee';

// PuppeteerCrawler manages browsers and browser tabs.
// You don't have to manually open and close them.
// It also handles navigation (goto), errors and retries.
const crawler = new PuppeteerCrawler({
    // Request handler gives you access to the currently
    // open page. Similar to the pure Puppeteer examples
    // above, we can use it to control the browser's page.
    requestHandler: async ({ page }) => {
        // Get the title of the page just to test things.
        const title = await page.title()
        console.log(title);
    }
})

// Here we start the crawler on the selected URLs.
await crawler.run(['https://github.com/topics/javascript']);
The above code uses the PuppeteerCrawler class of Crawlee to manage Puppeteer and crawl the web with it. This time, it only opens one page and gets its title. For a test, this is enough.
node crawlee.js
After executing the above command, you'll see several log lines printed by Crawlee and among them the following line. This means that everything's working as expected.
javascript · GitHub Topics · GitHub
Make the headless browser's window visible
You probably noticed that no browser window opened. That's because Crawlee (same as Puppeteer) runs headless by default. If you want to see what's going on in the browser, you have to switch headless to false.
// Don't forget to import the sleep helper function.
import { PuppeteerCrawler, sleep } from 'crawlee';

const crawler = new PuppeteerCrawler({
    // Launch all browsers in headless mode.
    headless: false,
    requestHandler: async ({ page }) => {
        const title = await page.title()
        console.log(title);
        // We can use the sleep helper to stop
        // the page from closing too quickly.
        await sleep(10000);
    }
})

await crawler.run(['https://github.com/topics/javascript']);
Scrolling with Puppeteer
Now that we know Crawlee and Puppeteer work together as expected, we can leverage some of Crawlee's tools to help us scrape the commit counts of the top 100 JavaScript repositories. First, let's take a look at clicking the Load more button enough times to load 100 repos.
Crawlee has a function for exactly this purpose. It's called infiniteScroll and it can be used to automatically handle websites that either have infinite scroll - the feature where you load more items by simply scrolling, or similar designs with a Load more button. Let's see how it's used.
import { PuppeteerCrawler, sleep } from 'crawlee';

const crawler = new PuppeteerCrawler({
    headless: false,
    requestHandler: async ({ page, infiniteScroll }) => {
        const title = await page.title()
        console.log(title);

        // The crawler will keep scrolling and ...
        await infiniteScroll({
            // clicking this button, until ...
            buttonSelector: 'text/Load more',
            // this function returns true, which will
            // happen once GitHub has displayed 100 repos.
            stopScrollCallback: async () => {
                const repos = await page.$$('article.border');
                return repos.length >= 100;
            },
        })

        await sleep(10000);
    }
})

await crawler.run(['https://github.com/topics/javascript']);
After adding the new code and running the above example, you should see Puppeteer automating the clicking and scrolling until there are 100 repos visible on the page. Extending this to 200 or 1000 repos is as simple as changing the number in stopScrollCallback. Although for really high numbers, you might need to use proxies.
Adding our Puppeteer code to Crawlee
As mentioned earlier, Crawlee only wraps Puppeteer, so you can easily reuse the scraping code you wrote in the first section of this tutorial. As a reminder, this is the scraping code we used to extract data from the repo cards.
const repos = await page.$$eval('article.border', (repoCards) => {
    return repoCards.map(card => {
        const [user, repo] = card.querySelectorAll('h3 a');
        const stars = card.querySelector('#repo-stars-counter-star')
            .getAttribute('title');
        const description = card.querySelector('div.px-3 > p');
        const topics = card.querySelectorAll('a.topic-tag');

        const toText = (element) => element && element.innerText.trim();
        const parseNumber = (text) => Number(text.replace(/,/g, ''));

        return {
            user: toText(user),
            repo: toText(repo),
            url: repo.href,
            stars: parseNumber(stars),
            description: toText(description),
            topics: Array.from(topics).map((t) => toText(t)),
        };
    });
});
To use it in our Crawlee crawler, you simply paste it after the infiniteScroll to extract all the data. The crawler then prints the results to the console. After the crawler's done its job, you'll see data from 100 repos logged to the terminal.
import { PuppeteerCrawler, sleep } from 'crawlee';

const crawler = new PuppeteerCrawler({
    headless: false,
    requestHandler: async ({ page, infiniteScroll }) => {
        const title = await page.title()
        console.log(title);

        await infiniteScroll({
            buttonSelector: 'text/Load more',
            stopScrollCallback: async () => {
                const repos = await page.$$('article.border');
                return repos.length >= 100;
            },
        })

        // This is exactly the same code as we used with pure Puppeteer.
        const repos = await page.$$eval('article.border', (repoCards) => {
            return repoCards.map(card => {
                const [user, repo] = card.querySelectorAll('h3 a');
                const stars = card.querySelector('#repo-stars-counter-star')
                    .getAttribute('title');
                const description = card.querySelector('div.px-3 > p');
                const topics = card.querySelectorAll('a.topic-tag');

                const toText = (element) => element && element.innerText.trim();
                const parseNumber = (text) => Number(text.replace(/,/g, ''));

                return {
                    user: toText(user),
                    repo: toText(repo),
                    url: repo.href,
                    stars: parseNumber(stars),
                    description: toText(description),
                    topics: Array.from(topics).map((t) => toText(t)),
                };
            });
        });

        // Print the repos to the console
        // to make sure everything works.
        console.log('Repository count:', repos.length);
        console.dir(repos);

        await sleep(10000);
    }
})

await crawler.run(['https://github.com/topics/javascript']);
Now that you've extracted all the information that's available on the topic page, let's get the commit counts. Those are only available on the individual repository pages. This means we'll have to take all the links you have collected, visit them with Puppeteer and extract the commit counts from their HTML.
Crawling extracted URLs
Crawlee gives us an easy way to crawl with Puppeteer, because it will handle enqueueing, network errors and retries for you, without sacrificing full control of each individual page. To add the repositories to the queue, let's use the URLs you already extracted.
Since the code is quite long now, we will always show the new segments first and then the complete, runnable example.
First we need to add an import of the Request class.
import { PuppeteerCrawler, Request } from 'crawlee';
Then, at the end of the requestHandler we add new code that adds more pages to the request queue.
// Turn the repository data we extracted into new requests to crawl.
const requests = repos.map(repo => new Request({
    // URL tells Crawlee which page to open
    url: repo.url,
    // labels are helpful for easy identification of requests
    label: 'repository',
    // userData allows us to store any JSON serializable data.
    // It will be kept together with the request and saved
    // persistently, so that no data is lost on errors.
    userData: repo,
}));

// Add the requests to the crawler's queue.
// The crawler will automatically process them.
await crawler.addRequests(requests);
Thanks to the code above, Crawlee will open all the individual repository pages, but we have created a problem. Now we have two kinds of pages to process. The initial topic page and then all the repository pages. They require different logic. For now, let's solve it with a simple if statement, but later in the tutorial we will use a Router to clean the code.
In Crawlee, requests are best identified by their assigned label. That's why we added the repository label to the requests in the previous code example.
// inside the requestHandler
const title = await page.title()
console.log(title);

// We need to separate the logic for the original
// topic page and for the new repository page.
if (request.label === 'repository') {
    // For now, let's just confirm our crawler works
    // by logging the URLs it visits.
    console.log('Scraping:', request.url);
} else {
    // The original, topic page code goes here.
}
Now that we made sure that we have correct logic for the individual page types, let's change the stopScrollCallback to stop scrolling immediately by changing the number of repos to 20. This will let us get results faster in the test runs.
// At the top of the file.
const REPO_COUNT = 20;

// Inside stopScrollCallback
return repos.length >= REPO_COUNT;
Great. It's time to run the crawler to confirm that we set up everything correctly. You can try to make the above changes in your code yourself, or you can use the complete runnable code below.
import { PuppeteerCrawler, Request } from 'crawlee';

const REPO_COUNT = 20;

const crawler = new PuppeteerCrawler({
    headless: false,
    requestHandler: async ({ request, page, infiniteScroll }) => {
        const title = await page.title()
        console.log(title);

        if (request.label === 'repository') {
            console.log('Scraping:', request.url);
        } else {
            await infiniteScroll({
                buttonSelector: 'text=Load more',
                stopScrollCallback: async () => {
                    const repos = await page.$$('article.border');
                    return repos.length >= REPO_COUNT;
                },
            });

            const repos = await page.$$eval('article.border', (repoCards) => {
                return repoCards.map(card => {
                    const [user, repo] = card.querySelectorAll('h3 a');
                    const stars = card.querySelector('#repo-stars-counter-star')
                        .getAttribute('title');
                    const description = card.querySelector('div.px-3 > p');
                    const topics = card.querySelectorAll('a.topic-tag');

                    const toText = (element) => element && element.innerText.trim();
                    const parseNumber = (text) => Number(text.replace(/,/g, ''));

                    return {
                        user: toText(user),
                        repo: toText(repo),
                        url: repo.href,
                        stars: parseNumber(stars),
                        description: toText(description),
                        topics: Array.from(topics)
                            .map((t) => toText(t)),
                    };
                });
            });

            console.log('Repository count:', repos.length);
            const requests = repos.map(repo => new Request({
                url: repo.url,
                label: 'repository',
                userData: repo,
            }));

            await crawler.addRequests(requests);
        }
    }
})

await crawler.run(['https://github.com/topics/javascript']);
As you'll see after running the above code, scraping with an open browser window can get a bit overwhelming. We recommend you turn off headful mode now and only turn it on when you need it for debugging.
// Delete this option in PuppeteerCrawler
headless: false
Extracting commit counts
We're almost there. The last thing missing is extracting the commit counts from individual repos. To do that, we need to get back to browser DevTools and take a look at the page's structure.
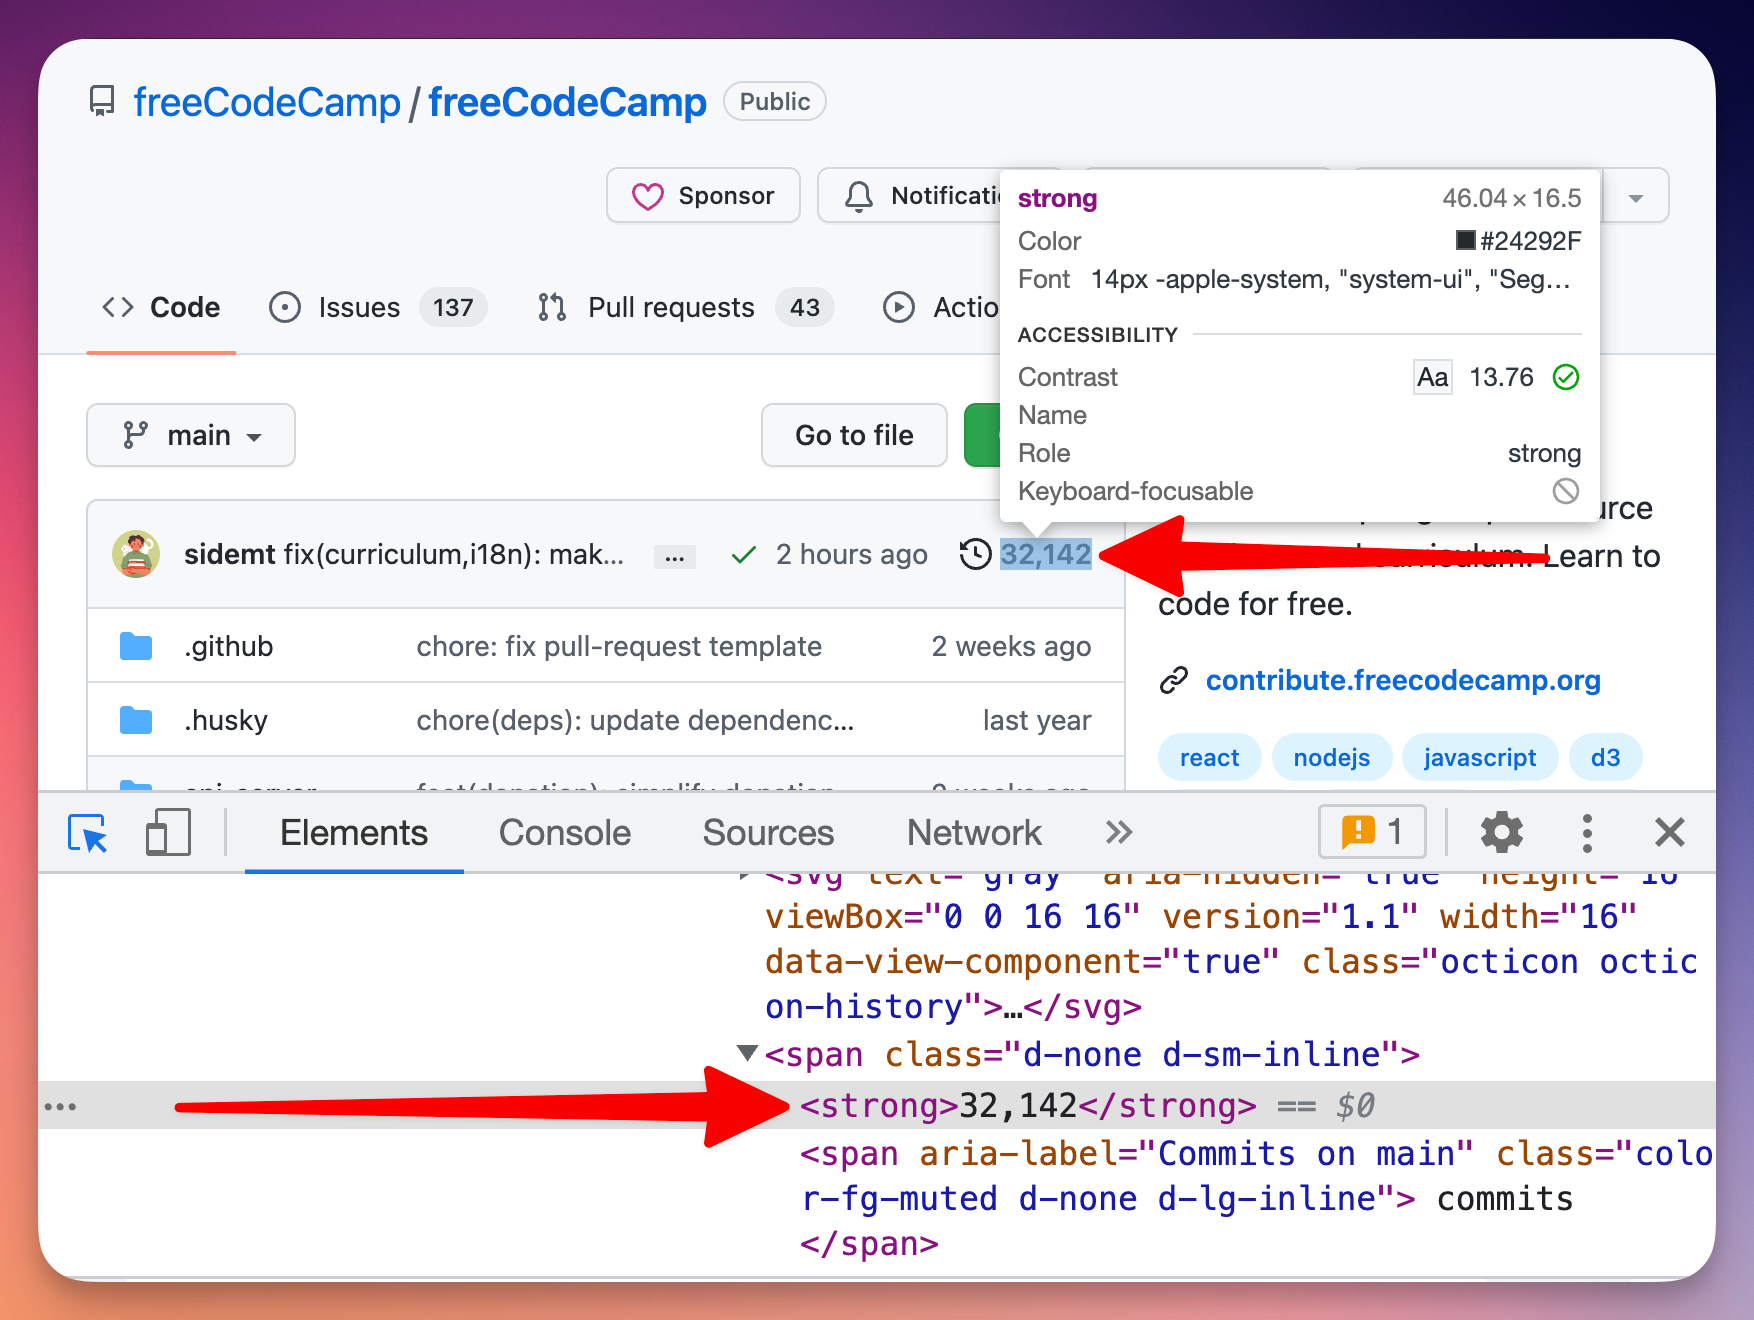
Now that we know how the HTML looks like, the only remaining thing to do is to extract it using a CSS selector.
Using CSS selectors with Puppeteer
After inspecting the page's HTML we found that the commit count can be isolated using the following CSS selector:
span.d-none.d-sm-inline > strong
We can use the page.$eval() function of Puppeteer to find any element using a CSS selector and extract its text using the selector we found in DevTools. Puppeteer will find the element for us in the page and execute a function that gets the text. As earlier, it's important to first wait for the element to appear on the page, in case it's rendered dynamically.
const commitCountSelector = 'span.d-none.d-sm-inline > strong';
await page.waitForSelector(commitCountSelector);
const commitText = await page.$eval(commitCountSelector, (el) => el.textContent);
Parsing the commit count
In any case, the CSS selector will only get us so far. Before we save the commit count, we have to clean the string from extra characters and turn it into a number.
const numberStrings = commitText.match(/\d+/g);
const commitCount = Number(numberStrings.join(''));
Finally, we combine all this code into the first part of our if statement and here's the complete, runnable example.
import { PuppeteerCrawler, Request } from 'crawlee';

const REPO_COUNT = 20;

const crawler = new PuppeteerCrawler({
    requestHandler: async ({ request, page, infiniteScroll }) => {
        const title = await page.title()
        console.log(title);

        if (request.label === 'repository') {
            const commitCountSelector = 'span.d-none.d-sm-inline > strong';
            await page.waitForSelector(commitCountSelector);
            const commitText = await page.$eval(commitCountSelector, (el) => el.textContent);
            const numberStrings = commitText.match(/\d+/g);
            const commitCount = Number(numberStrings.join(''));
            console.log(commitCount);
        } else {
            await infiniteScroll({
                buttonSelector: 'text=Load more',
                stopScrollCallback: async () => {
                    const repos = await page.$$('article.border');
                    return repos.length >= REPO_COUNT;
                },
            });

            const repos = await page.$$eval('article.border', (repoCards) => {
                return repoCards.map(card => {
                    const [user, repo] = card.querySelectorAll('h3 a');
                    const stars = card.querySelector('#repo-stars-counter-star')
                        .getAttribute('title');
                    const description = card.querySelector('div.px-3 > p');
                    const topics = card.querySelectorAll('a.topic-tag');

                    const toText = (element) => element && element.innerText.trim();
                    const parseNumber = (text) => Number(text.replace(/,/g, ''));

                    return {
                        user: toText(user),
                        repo: toText(repo),
                        url: repo.href,
                        stars: parseNumber(stars),
                        description: toText(description),
                        topics: Array.from(topics)
                            .map((t) => toText(t)),
                    };
                });
            });

            console.log('Repository count:', repos.length);
            const requests = repos.map(repo => new Request({
                url: repo.url,
                label: 'repository',
                userData: repo,
            }));

            await crawler.addRequests(requests);
        }
    }
})

await crawler.run(['https://github.com/topics/javascript']);
When you run the above code, you will see the commit counts of all repositories logged to the console.
Saving extracted data
But logging the data to console is not very useful in production, so let's use Crawlee's Dataset class to save the scraped data to the disk.
import { PuppeteerCrawler, Request, Dataset } from 'crawlee';

// ... inside requestHandler

await Dataset.pushData({
    ...request.userData,
    commitCount,
});
Remember that we saved all the information about the repo we extracted from the topic page to the userData property of our requests. Now we can easily merge this data with our commitCount and save the whole object to disk. This will create a JSON file for each repository in the following directory.
./storage/datasets/default
You can go there to inspect the files, and you'll find JSONs like this.
{
	"user": "vuejs",
	"repo": "vue",
	"url": "https://github.com/vuejs/vue",
	"stars": 201555,
	"description": "🖖 Vue.js is a progressive, incrementally-adoptable JavaScript framework for building UI on the web.",
	"topics": [
		"javascript",
		"framework",
		"vue",
		"frontend"
	],
	"label": "repository",
	"commitCount": 3544
}
To make it even easier to process the data, we can save it to a CSV or one big JSON with one line of code.
// This should be added as the very last
// function call. After await crawler.run()
await Dataset.exportToCSV('repositories');
Crawlee will save the CSV in this location:
./storage/key_value_stores/default/repositories.csv
The final runnable code looks like this. We could also increase REPO_COUNT back to 100 to get the top 100 JavaScript repositories, but this will most likely lead to getting your IP rate limited by GitHub. So let's increase it only to 40. You can use proxies to deal with the rate limit.
import { PuppeteerCrawler, Request, Dataset } from 'crawlee';

const REPO_COUNT = 40;

const crawler = new PuppeteerCrawler({
    requestHandler: async ({ request, page, infiniteScroll }) => {
        const title = await page.title()
        console.log(title);

        if (request.label === 'repository') {
            const commitCountSelector = 'span.d-none.d-sm-inline > strong';
            await page.waitForSelector(commitCountSelector);
            const commitText = await page.$eval(commitCountSelector, (el) => el.textContent);
            const numberStrings = commitText.match(/\d+/g);
            const commitCount = Number(numberStrings.join(''));

            await Dataset.pushData({
                ...request.userData,
                commitCount,
            });
        } else {
            await infiniteScroll({
                buttonSelector: 'text=Load more',
                stopScrollCallback: async () => {
                    const repos = await page.$$('article.border');
                    return repos.length >= REPO_COUNT;
                },
            });

            const repos = await page.$$eval('article.border', (repoCards) => {
                return repoCards.map(card => {
                    const [user, repo] = card.querySelectorAll('h3 a');
                    const stars = card.querySelector('#repo-stars-counter-star')
                        .getAttribute('title');
                    const description = card.querySelector('div.px-3 > p');
                    const topics = card.querySelectorAll('a.topic-tag');

                    const toText = (element) => element && element.innerText.trim();
                    const parseNumber = (text) => Number(text.replace(/,/g, ''));

                    return {
                        user: toText(user),
                        repo: toText(repo),
                        url: repo.href,
                        stars: parseNumber(stars),
                        description: toText(description),
                        topics: Array.from(topics)
                            .map((t) => toText(t)),
                    };
                });
            });

            console.log('Repository count:', repos.length);
            const requests = repos.map(repo => new Request({
                url: repo.url,
                label: 'repository',
                userData: repo,
            }));

            await crawler.addRequests(requests);
        }
    }
})

await crawler.run(['https://github.com/topics/javascript']);
await Dataset.exportToCSV('repositories');
When you run this code, you'll see the crawler printing the individual page titles into the console, and after it finishes, you'll find your CSV in the location shown above.
Deployment to the cloud
At this point of the tutorial, I'll take the opportunity to do a bit of self-promotion. I'm the COO of Apify, a cloud platform that helps you develop, run, and maintain your web scrapers easily and efficiently. It comes with tons of features like queue storages and proxies, and it supports Puppeteer without any extra configuration. You can run the above scraper, save results and control everything with a powerful API, and you can do it 10 times faster than on AWS or similar universal clouds.
To learn more visit our homepage or jump directly to the Getting Started course in the Apify Academy, where you can find more free courses on Puppeteer and web scraping in general.
Bonus: routing
Earlier, I mentioned that there's a better way of structuring your code with Puppeteer and Crawlee than to put everything into a single function. In this section we'll explore the Router class of Crawlee and how you can use it to make your code more manageable.
So far, we kept all our code in a single file called crawlee.js. We will add a new file router.js and move all our request handling logic there. Thanks to a router, we can split the code we had in requestHandler into as many functions as we want and the crawler will automatically route the logic based on the label we used for each Request.
// router.js
import { createPuppeteerRouter, Dataset, Request } from 'crawlee';

// We create a Puppeteer specific router to
// get intellisense and typechecks for our IDE.
export const router = createPuppeteerRouter();

const REPO_COUNT = 40;

router.use(async (ctx) => {
    // This is for middlewares - functions that will be
    // executed on all routes, irrespective of label.
})

router.addHandler('repository', async (ctx) => {
    // This handler will execute for all requests
    // with the 'repository' label.
});

router.addDefaultHandler(async (ctx) => {
    // This handler will execute for requests
    // that don't have a label.
});
We can then move our existing logic into this skeleton and the router.js file will look like this.
// router.js
import { createPuppeteerRouter, Dataset, Request } from 'crawlee';

export const router = createPuppeteerRouter();

const REPO_COUNT = 40;

router.use(async ({ page }) => {
    const title = await page.title()
    console.log(title);
})

router.addHandler('repository', async ({ page, request }) => {
    const commitCountSelector = 'span.d-none.d-sm-inline > strong';
    await page.waitForSelector(commitCountSelector);
    const commitText = await page.$eval(commitCountSelector, (el) => el.textContent);
    const numberStrings = commitText.match(/\d+/g);
    const commitCount = Number(numberStrings.join(''));

    await Dataset.pushData({
        ...request.userData,
        commitCount,
    });
});

router.addDefaultHandler(async ({ page, infiniteScroll, crawler }) => {
    await infiniteScroll({
        buttonSelector: 'text=Load more',
        stopScrollCallback: async () => {
            const repos = await page.$$('article.border');
            return repos.length >= REPO_COUNT;
        },
    });

    const repos = await page.$$eval('article.border', (repoCards) => {
        return repoCards.map(card => {
            const [user, repo] = card.querySelectorAll('h3 a');
            const stars = card.querySelector('#repo-stars-counter-star')
                .getAttribute('title');
            const description = card.querySelector('div.px-3 > p');
            const topics = card.querySelectorAll('a.topic-tag');

            const toText = (element) => element && element.innerText.trim();
            const parseNumber = (text) => Number(text.replace(/,/g, ''));

            return {
                user: toText(user),
                repo: toText(repo),
                url: repo.href,
                stars: parseNumber(stars),
                description: toText(description),
                topics: Array.from(topics)
                    .map((t) => toText(t)),
            };
        });
    });

    console.log('Repository count:', repos.length);
    const requests = repos.map(repo => new Request({
        url: repo.url,
        label: 'repository',
        userData: repo,
    }));

    await crawler.addRequests(requests);
})
If this is still too much for you, feel free to split it even more. For example, one route per file. With the crawling logic removed, crawlee.js is now very short and readable.
// crawlee.js
import { Dataset, PuppeteerCrawler } from 'crawlee';
import { router } from './router.js';

const crawler = new PuppeteerCrawler({
    requestHandler: router
})

await crawler.run(['https://github.com/topics/javascript'])
await Dataset.exportToCSV('repositories');
When you run crawlee.js, it will behave exactly the same as before the split, but thanks to the router, the code will be much easier to read and maintain.
What to learn next?
So there you have it. A complete web scraping and crawling tutorial for Puppeteer. If you're interested in learning more about Puppeteer, and web scraping in general, visit our free academy course where we explore Puppeteer features in more detail in step-by-step lessons with code examples and detailed explanations.
If you're only starting out and would like to learn the basics of web scraping, our Web scraping for beginners course explains the basic concepts and gets you ready to tackle more difficult challenges.
Get started quickly with Puppeteer scraping templates