
If you work in the software industry, you may have heard the plaintive sentence, "but it works on my side". You might then immediately recognize the struggle to achieve smooth deployment and consistent performance across different environments.
Dependency issues are a constant source of headaches during the development and deployment process. Each web app often requires a set of libraries and configurations during the development phase. Installing the same libraries and configurations again during the deployment phase causes frustration and it's a huge waste of time.
Understanding Python virtual environments
Python virtual environments are great for managing dependencies, making sure everything stays neatly packaged. However, they fall short when you need to manage other components like databases, web servers, or system configurations.

Introduction to containers
Then there are containers. In the real world, we use containers to ship goods from one place to another. In a similar way, we use virtual containers to ship code from one machine to another. Containers package up whole application setups that work the same in any environment. This has made deploying easier, faster, and more secure.
Containers work well for different kinds of technology and small services, which fits in well with how things are done today in the software industry. And tools like Docker have helped a lot to make containers popular for solving problems in getting the software ready to run.
In this tutorial, I'll explain how to use Docker from very basic to advanced levels. By the end of it, you will have learned how to containerize Python web applications and find out about some debugging techniques.
What is Docker and how does it work?
Docker is a platform that lets you develop, ship, and run applications across different environments. In simple terms, it lets you build applications, wrap them along with their dependencies into a container, and then ship these containers to run on other machines. So you can relax and focus on making great Python apps without the stress of deployment.
How does Docker architecture work?
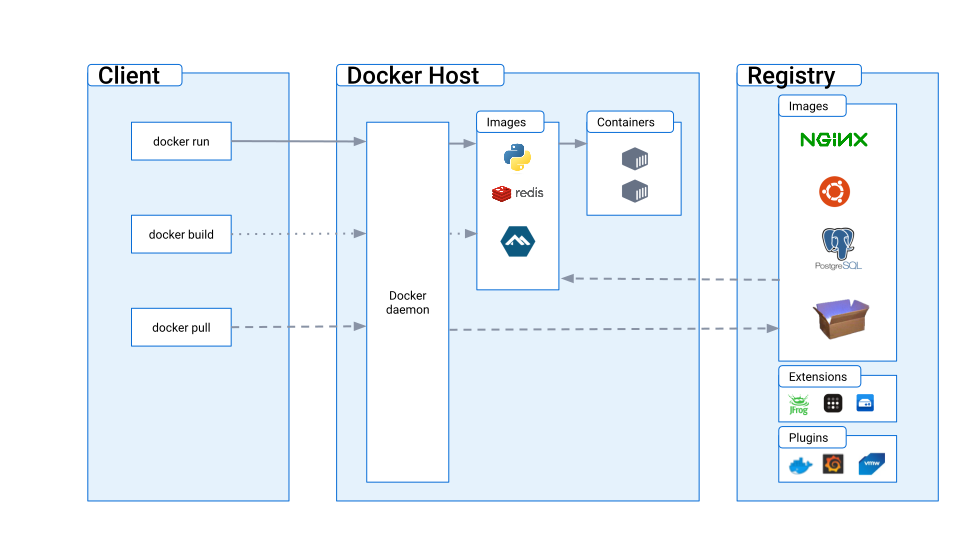
There are three main components of the docker:
- Client: the interface you use to interact with Docker.
- Docker host: the machine where Docker is installed and running.
- Registry: the storage component for Docker images.
Let's look at them one by one in detail.
What is a Docker Client?
In simple words, the client is the terminal that allows you to enter commands and perform operations. Whatever you want to do or whichever operation you want to operate, you perform it through the docker client.
What is a Docker host?
Docker host is the machine on which the docker is installed, like your computer, any cloud service, etc. All the operations are performed on it, like creating images, running containers, and so on.
Before going into the details, let's first explain some Docker components, like Dockerfiles, images, and containers.
What is a Dockerfile?
A Dockerfile is just a simple text file containing all the instructions for building an image. It includes a series of commands and settings that specify which base image to use, what packages and dependencies to install, what files to include, and how to configure the environment. It allows us to automate the process of creating a consistent and reproducible image for our application or service.
Once a Dockerfile is created, you can use the docker build command to build a Docker image based on the instructions in the file.
What is a Docker image?
A Docker image is a lightweight, standalone, executable software package that contains all the necessary components to run an application, including code, runtime, system libraries, and settings.
Once an image is built, you can share, distribute, and run it on any system that supports Docker. You can also store docker images in an online registry (such as Docker Hub, just one of many registries where you can store images.). You can also create versions of the uploaded images to track changes and update your application over time.

The role of the base image in Docker
A base image is a starting point for building new images. It's the foundation upon which you can add new layers to create a new image. Base images typically contain the bare minimum configurations to run an application, such as an operating system and essential system libraries.
For example, if you're developing a Python application, instead of starting from scratch and setting up a whole operating system, installing Python, and configuring everything, you can use a Python-based image with everything already set up.
What is a Docker container?
A Docker container is like a running instance of a Docker image. It's your application in action, complete with all the dependencies it needs to function. When you run a Docker image, it becomes an active container that operates in isolation from other containers, ensuring that the application runs consistently regardless of where the container is deployed. Containers are ephemeral by nature, meaning they can be started, stopped, and destroyed very easily, providing a dynamic and flexible environment for development, testing, and deployment.
Containers can also communicate with each other, but they remain isolated in terms of file systems, processes, and network interfaces. This isolation ensures that applications within containers are shielded from external influences.
The Docker image is the blueprint, while the Docker container is the live, operational version of that blueprint that brings your application to life in a controlled and predictable manner.
What is the Docker registry?
The Docker registry acts as the storage hub for Docker images and extensions. Think of it like an app store where you can pull any image you need and run it in your container. You can create an image locally and push it on the Docker hub, which can later be used anywhere on any system in any environment.
What is a Docker daemon?
The most important thing that is used for communication between these three components is the Docker daemon. The Docker daemon acts as a middleman between these components, reads commands from the Client, and performs operations depending on the command.

Setting up the Docker environment
So, before trying anything more practical, let's look at how to set up Docker locally.
- First of all, visit the official Docker website and download the Docker installation file appropriate for your device.
- If you're on a Mac, drag the installation file into the Applications folder. If you're on Windows, click the downloaded file.
- Once setup is completed, enter the command
docker versionin the terminal, and you will see a result like this:
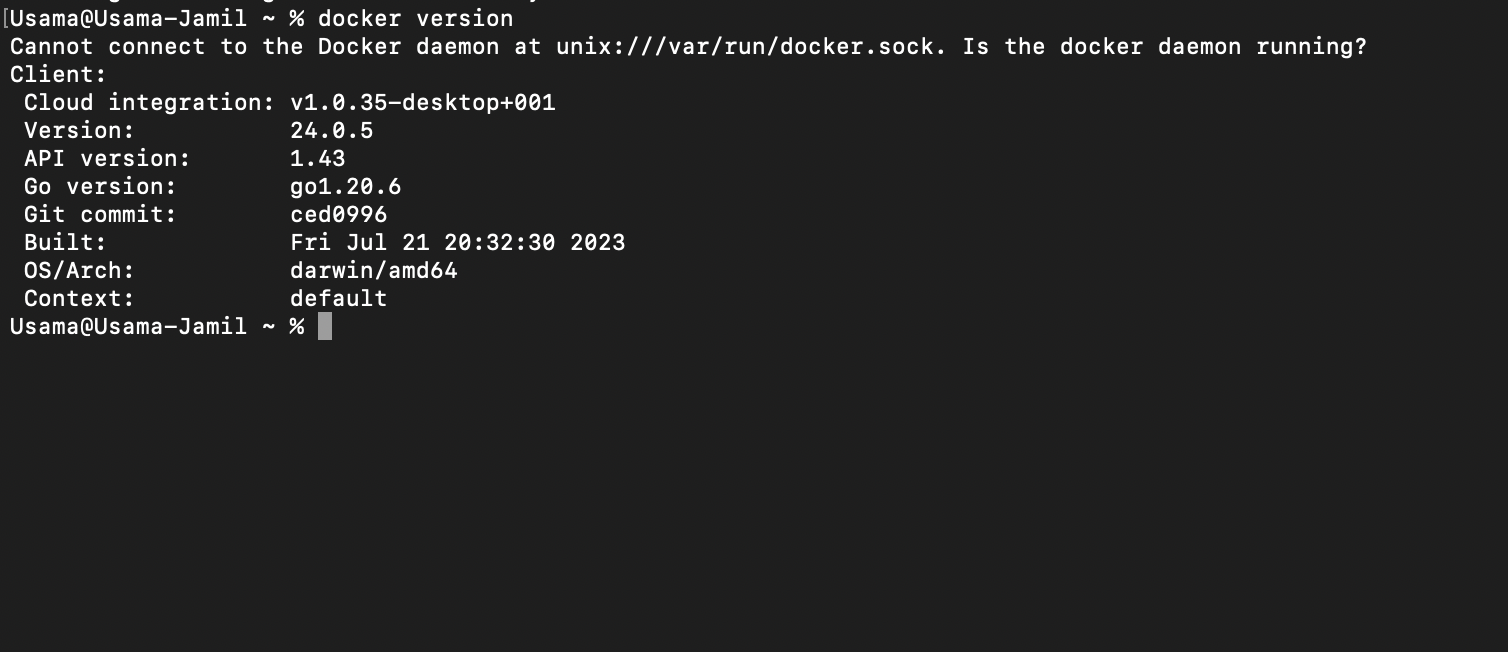
This tells you that that Docker has been installed successfully.
How to create a Dockerfile
The first step in the containerization of an app is creating a Dockerfile that contains all the commands and dependencies required to run that application. Here are some commonly used commands:
FROM: specifies the base image to start fromWORKDIR: sets the working directory inside the containerCOPY: copies files or directories from the host to the containerRUN: executes a commandCMD: specifies the default command to run when the container startsEXPOSE: indicates the ports on which the container will listen
Note that there is no extension for the Dockerfile. It's simply named Dockerfile.
Let's say you have a simple Python file called app.py and you want to execute that file using Docker.
# app.py file
print("Hello, Docker!")
Let's create a Dockerfile in the same directory as app.py. The Dockerfile for this app would look like this:
# Use an official Python runtime as a base image
FROM python:3.9-slim
# Set the working directory in the container
WORKDIR /app
# Copy the current directory contents into the container at /app
COPY . /app

# Run app.py when the container launches
CMD ["python", "app.py"]
In the Dockerfile above, first, we have imported the official base image for Python. Then selected our working directory, copied all the commands from the folder, and added to the /app, which is our working directory. In the end, we have added two commands as list items with the CMD command.
python app.py in the container's shell. The reason it's split into a JSON array is to bypass the shell and execute the command directly, which can be more efficient and secure.Once the Dockerfile is completed, the next step is to create an image from this Dockerfile. Let's do that.
Building and managing Docker images
To create an image from the Dockerfile, you just need to enter a single command with the name of the image on your terminal. For that, you need to go to the same directory where your Python application is present with the docker file. Enter the command:
docker build -t python-app .
This command will create a docker image named python-image. Let's break it down:
docker build: tell the docker you want to build a new image.t python-app: thetflag is used to name the image, and the namepython-imagefor the new image..: the last part points to the location of the Dockerfile,.means the current working directory. If your Dockerfile is elsewhere, replace the.with the path to that location.
Image building takes time, so you might need to wait a minute or two.
Managing Docker Images
After creating images, you can manage them and do different operations like listing or removing images. Let's see a few of these:
- List images: shows all the locally created images using the command:
docker images
- Tagging images: this is the process of assigning different tags to an image. Tags are mostly used to denote versions or organize images in different categories. For example:
docker tag python-app:latest python-app:1.0
This command will add a new tag 1.0 to the image my-python-app. This is the pattern of the pattern of the command above:
docker tag SOURCE_IMAGE[:TAG] TARGET_IMAGE[:TAG]
Here, the source and target image is the same. We are using the word "target image" because we can also give a new name to the image as well.
Let's break this command into pieces:
SOURCE_IMAGE[:TAG]: this is the image you want to assign a tag to.
latest to the image. That's why we have used it above.TARGET_IMAGE[:TAG]: this part can be used to assign a new name or a new tag to the image. You can change both as well. You can write the original name with a new tag here if you want the same name.
- Removing images: you can also remove images from the docker images directory by using this command:
docker rmi my-app
The flag rmi removes the image with a name specified in the command.
Getting started with Docker Hub
Once you have created your images locally, you can also upload them online to a platform called Docker Hub before you can access them from anywhere.
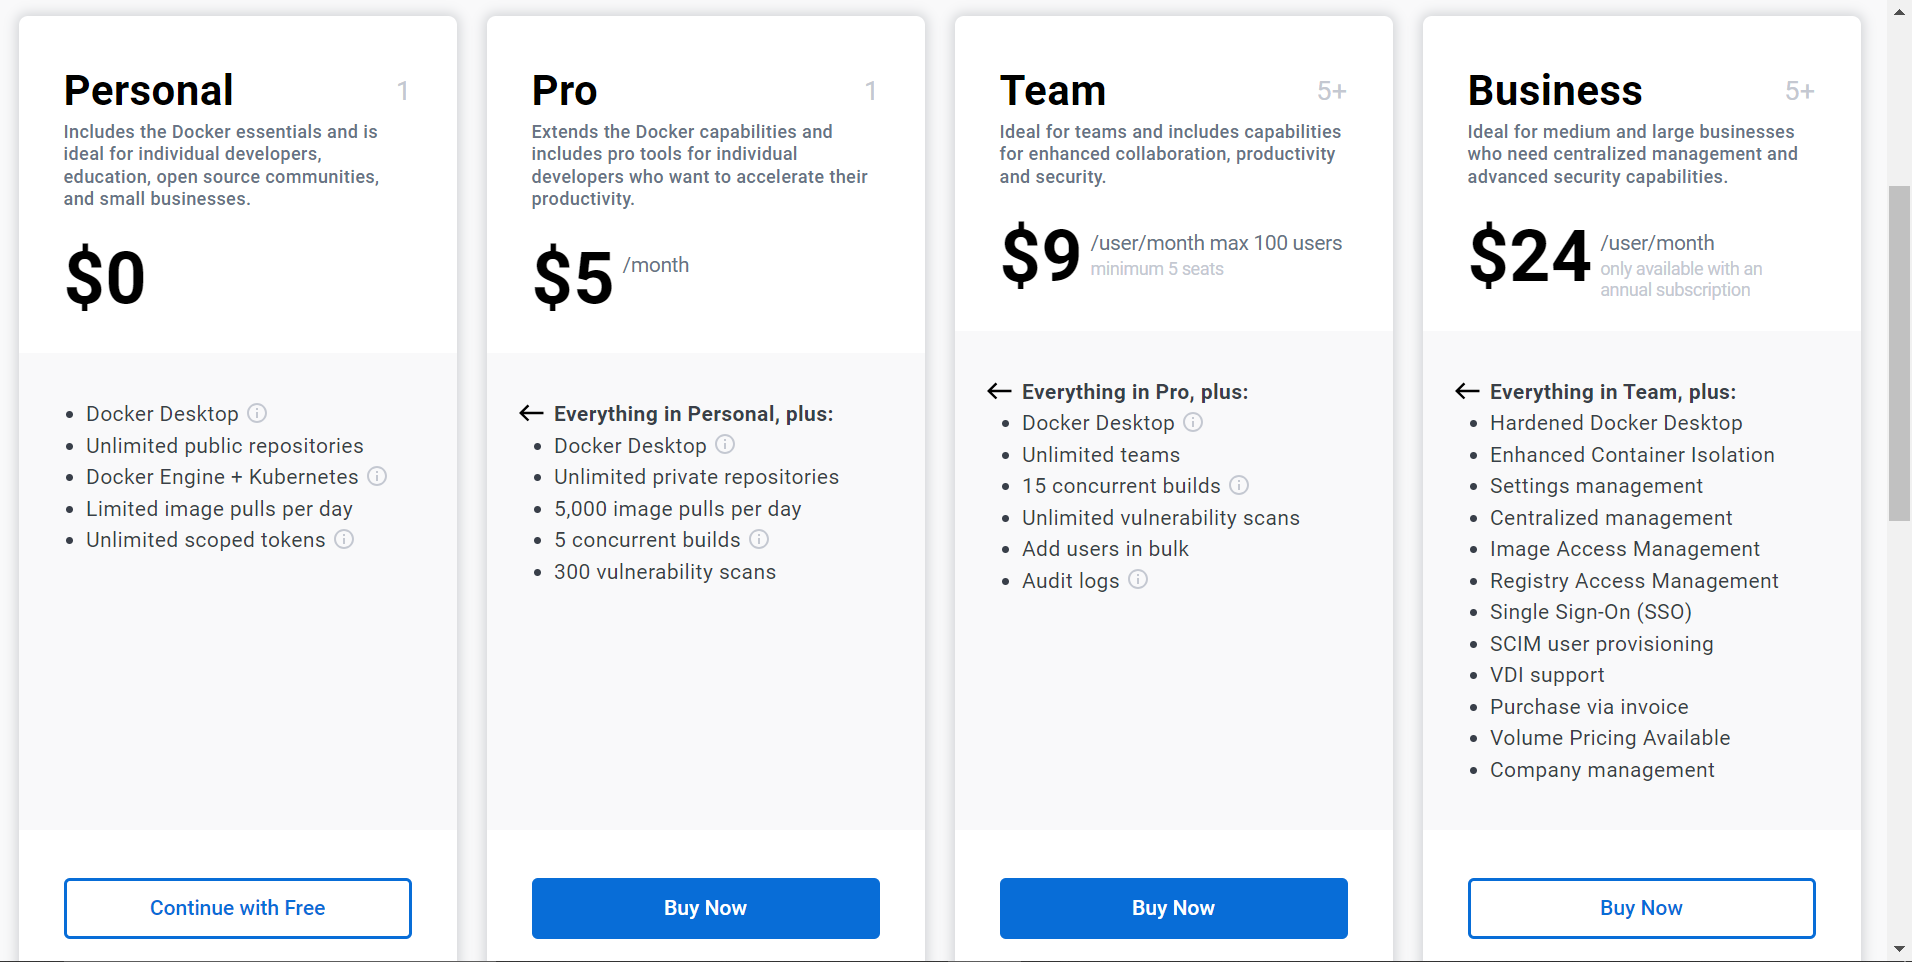
First of all, you need to create an account at Docker Hub. Select a plan and you can start using Docker Hub. In the example below, we're using a Personal plan that is absolutely free.
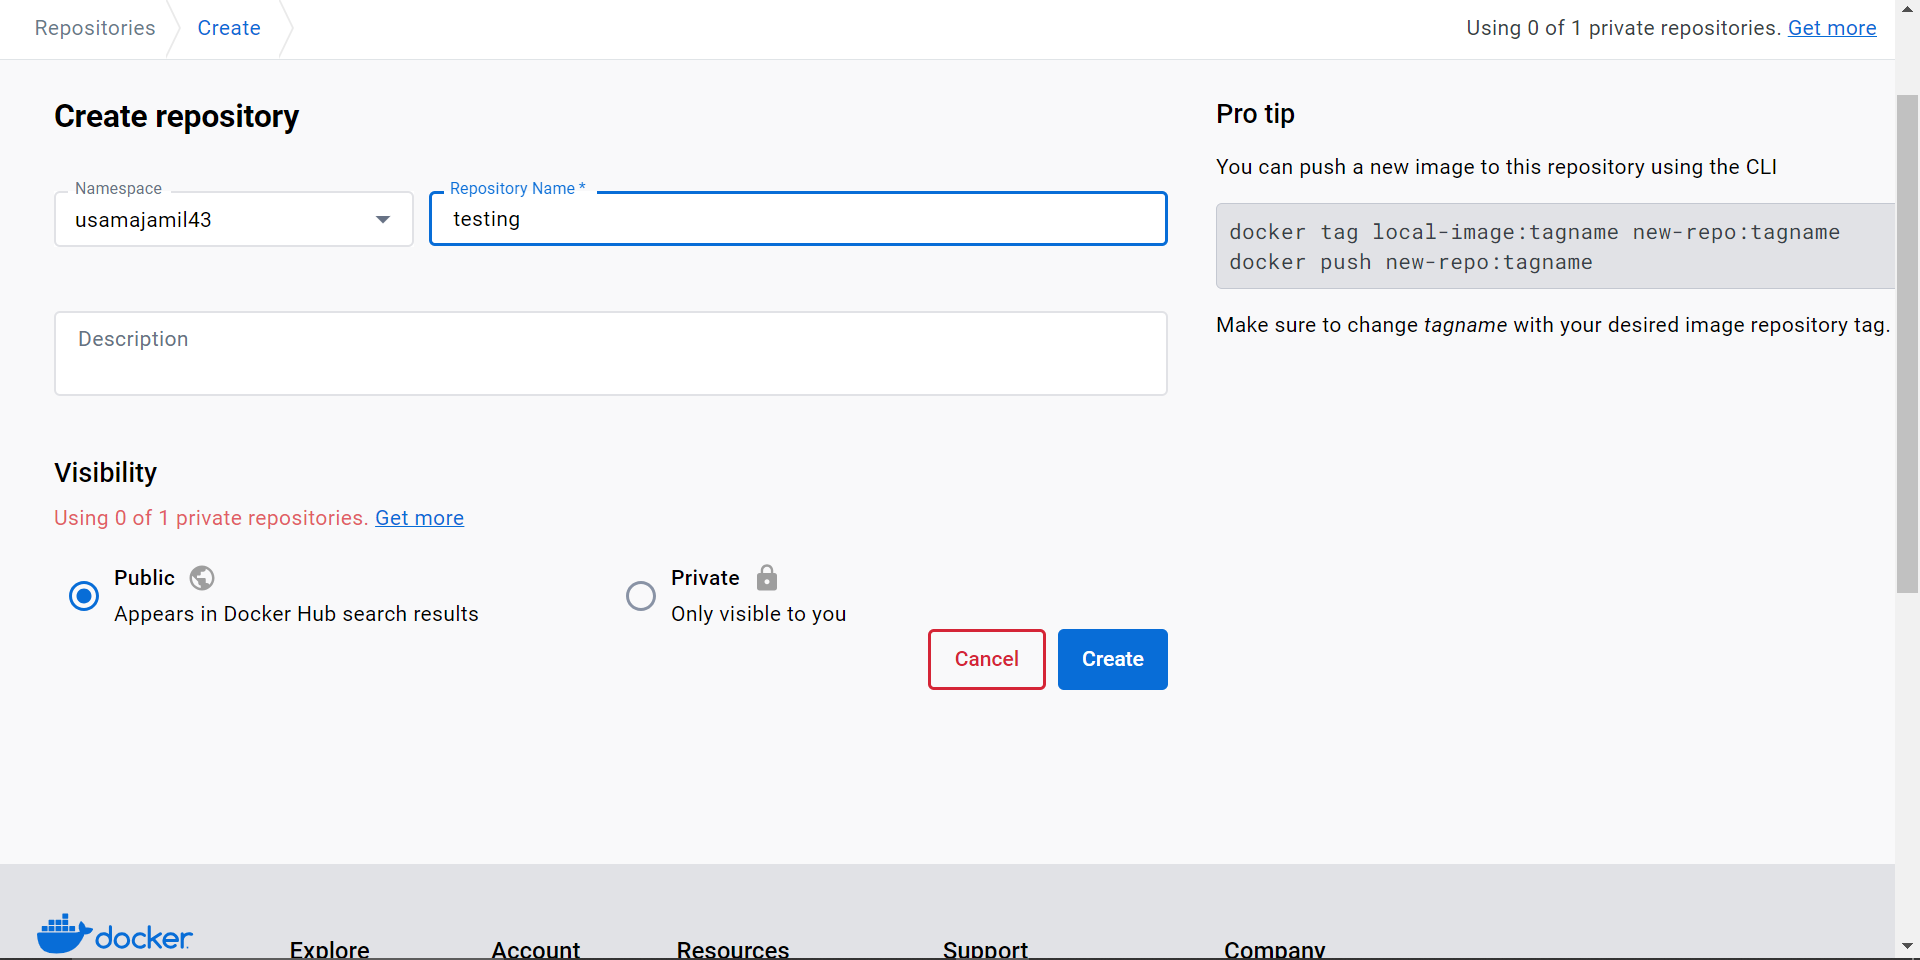
After choosing a plan, you need to create a repository where you will push the image. Add the name of the repository and click on the Create button.
Now, you're ready to push the image from your terminal. First, log in through the terminal by using the command docker login . After this, the terminal will ask you to add credentials.
- The first step is adding a tag with a username to the image. Let's do this:
docker tag python-app:latest usamajamil32/python-app:1.0
- The next step is to push the image to Docker Hub like this:
docker push usamajamil32/python-app:1.0
How to pull Docker images from Docker Hub
Think of Docker Hub as a huge library of Docker images. Pulling an image is as simple as taking a book off the shelf. You can grab pre-built images or even share your own.
Many organizations and developers publish their images here, and you can find official and community-contributed images. You can search by image name, category, or even by technology stack.
For example, you can pull the official Python image with the 3.8 tag like this:
docker pull python:3.8
Running your applications in Docker containers
You just need to enter a single command to run your applications in a container. Let's say you want to run the Python application you created earlier. The command should look like this:
docker run python-app
If you want to expose your application to a specific port, you can use this command:
docker run -p 8000:8000 python-app
That command docker run -p 8000:8000 python-appis instructing Docker to run a container from the image named python-app and map port 8000 inside the container to port 8000 on the host machine.
- The first
8000before the colon is the port number on the host machine. - The second
8000is the port number inside the container. - The
pflag tells Docker to create this mapping, so when someone connects to port 8000 on the host machine, the connection is forwarded to port 8000 inside the container.
How to set environment variables in Docker containers
You can also set environment variables when running your container. This can be handy for configuration:
docker run -e VARIABLE=value python-app
This command sets an environment variable VARIABLE with the value value inside the container. The -e flag helps us to set the environment variables.
Docker Compose for multi-container applications
Up to now, we have only discussed running a single container. What if we want to run two containers in parallel, like frontend and backend? How will they communicate, and how can we run them in parallel? Well, there is an advanced concept called Docker compose that allows us to connect and communicate between two multiple containers.
What is Docker Compose?
Docker Compose is a tool for defining and running multi-container Docker applications. You can define all our services, networks, and volumes in a single file named docker-compose.yml, which is considered to be the heart of the Docker Compose. You can then use Compose commands to build, deploy, and run them together.

Running multiple Docker containers
Let's take a simple example where we'll be running two services:
- A Python web application
- A Redis server
The Python application will connect to the Redis server to increment and retrieve a counter value. This method will help you understand how two containers interact with each other using Docker Compose.
First, let's create a file called app.py with the following content:
from flask import Flask
import redis
app = Flask(__name__)
cache = redis.Redis(host='redis', port=6379)
# Define the endpoint
@app.route('/')
def hello():
    count = cache.incr('hits')
    return f'Welcome to Docker Compose! You have visited this link {count} times.'

if __name__ == "__main__":
    # Define the port the and map it to 0.0.0.0
    app.run(host="0.0.0.0", port=8000)
The code above sets up a simple Flask web application and connects to a Redis instance to increment and retrieve a counter.
Next, we need to create a Dockerfile in the same directory with the following content:
FROM python:3.8
WORKDIR /app
COPY . /app
RUN pip install flask redis
CMD ["python", "app.py"]
Create a Docker compose file
Here comes the important part, where we will create a file named docker-compose.yml in the same directory with the following content:
version: '1'
services:
  web:
    build: .
    ports:
      - "8000:8000"
  redis:
    image: "redis:alpine"
Let's break this file and see how things are working here:
- The first line specifies the version of the Docker Compose file format being used.
- The
servicessection defines the individual containers that will interact with each other.
Now, let's see each service individually.
web:
  build: .
  ports:
    - "8000:8000"
web is the name of the service, and the build build command will build the Dockerfile present in the same directory. And lastly, we define the ports for our web application. This will allow our web application running inside the container to be accessed at http://localhost:8000
Let's see the second service:
redis:
  image: "redis:alpine"
The redis is the name of the second service, a Redis database. Instead of building from a Dockerfile, We are telling the Docker Compose to use the redis:alpine image that is available on Docker Hub.
Build Docker compose
Open the terminal and run the following command in the same directory containing docker-compose.yml file:
docker-compose up --build
This command will build the Python web application image, pull the Redis image, and start both containers.
After the execution has been completed, open a web browser and navigate to http://localhost:8000. You should see a greeting message with a counter that increments each time you refresh the page.
Best practices for dockerizing applications
Creating a Dockerfile is very straightforward, but following some best practices may help us make our containers more secure, efficient, and maintainable.
Here are a few tips:
- Use the official Python image that matches the application's Python version. For example,
FROM python:3.8-slimto use Python 3.8. If you don’t want additional packages in your application, you can use the slim variants of Python images that are smaller and more secure. - Use
&&to chain commands together to minimize the number of layers and reduce the image size. - List down all the dependencies in a
requirements.txtfile and install them usingRUN pip install -r requirements.txt. - Keep the configuration outside the container by using environment variables. If we hard-code these configurations inside the container, we'd have to rebuild the container for each environment.
- Expose only the ports that our container will use. Use the EXPOSE directive in the Dockerfile to expose ports. By using
EXPOSE, we're providing information to anyone using the image about which ports the application is designed to use. - Regularly update the base images and dependencies to include security patches.
Troubleshooting Docker issues
While working with Docker and containers, you may get stuck on a few issues. Let's discuss some typical issues and how we can address them:
1. Container networking issues
- Problem: Containers cannot communicate with each other or the host.
Solution:
- Inspect networking configuration: use
docker network inspectto examine the network configuration.
2. Port conflicts
- Problem: The port is already in use, and you can't bind a container to it.
Solution:
- Find the conflicting process: Use
netstat -tulnto find out what is using the port. - Choose a different port: Bind the container to a different port using the
poption:docker run -p 8080:80 my-image.
3. Debugging within containers
- Problem: Something is wrong inside the container, and you need to debug it.
Solution:
- Access the container shell: Use
docker exec -it container_name /bin/bashto get a shell inside the container. - Inspect logs: View the container logs using
docker logs container_name.
4. Docker daemon issues
- Problem: The Docker daemon is not responding or misbehaving.
Solution:
- Restart the Docker daemon: Sometimes, a simple restart can fix many issues:
systemctl restart docker. - Check daemon logs: Inspect the Docker daemon logs (usually found in
/var/log/docker) to identify any underlying issues.
5. Image and container storage issues
- Problem: Running out of space because of images, containers, or volumes.
Solution:
- Clean up unused images: Use
docker system pruneto remove unused objects. - Manage volumes properly: Delete unnecessary volumes using
docker volume rmand be mindful of data persistence needs.
If you're an eager Pythonista, you might like to explore web scraping with Python or even learn why Python is used for web scraping.