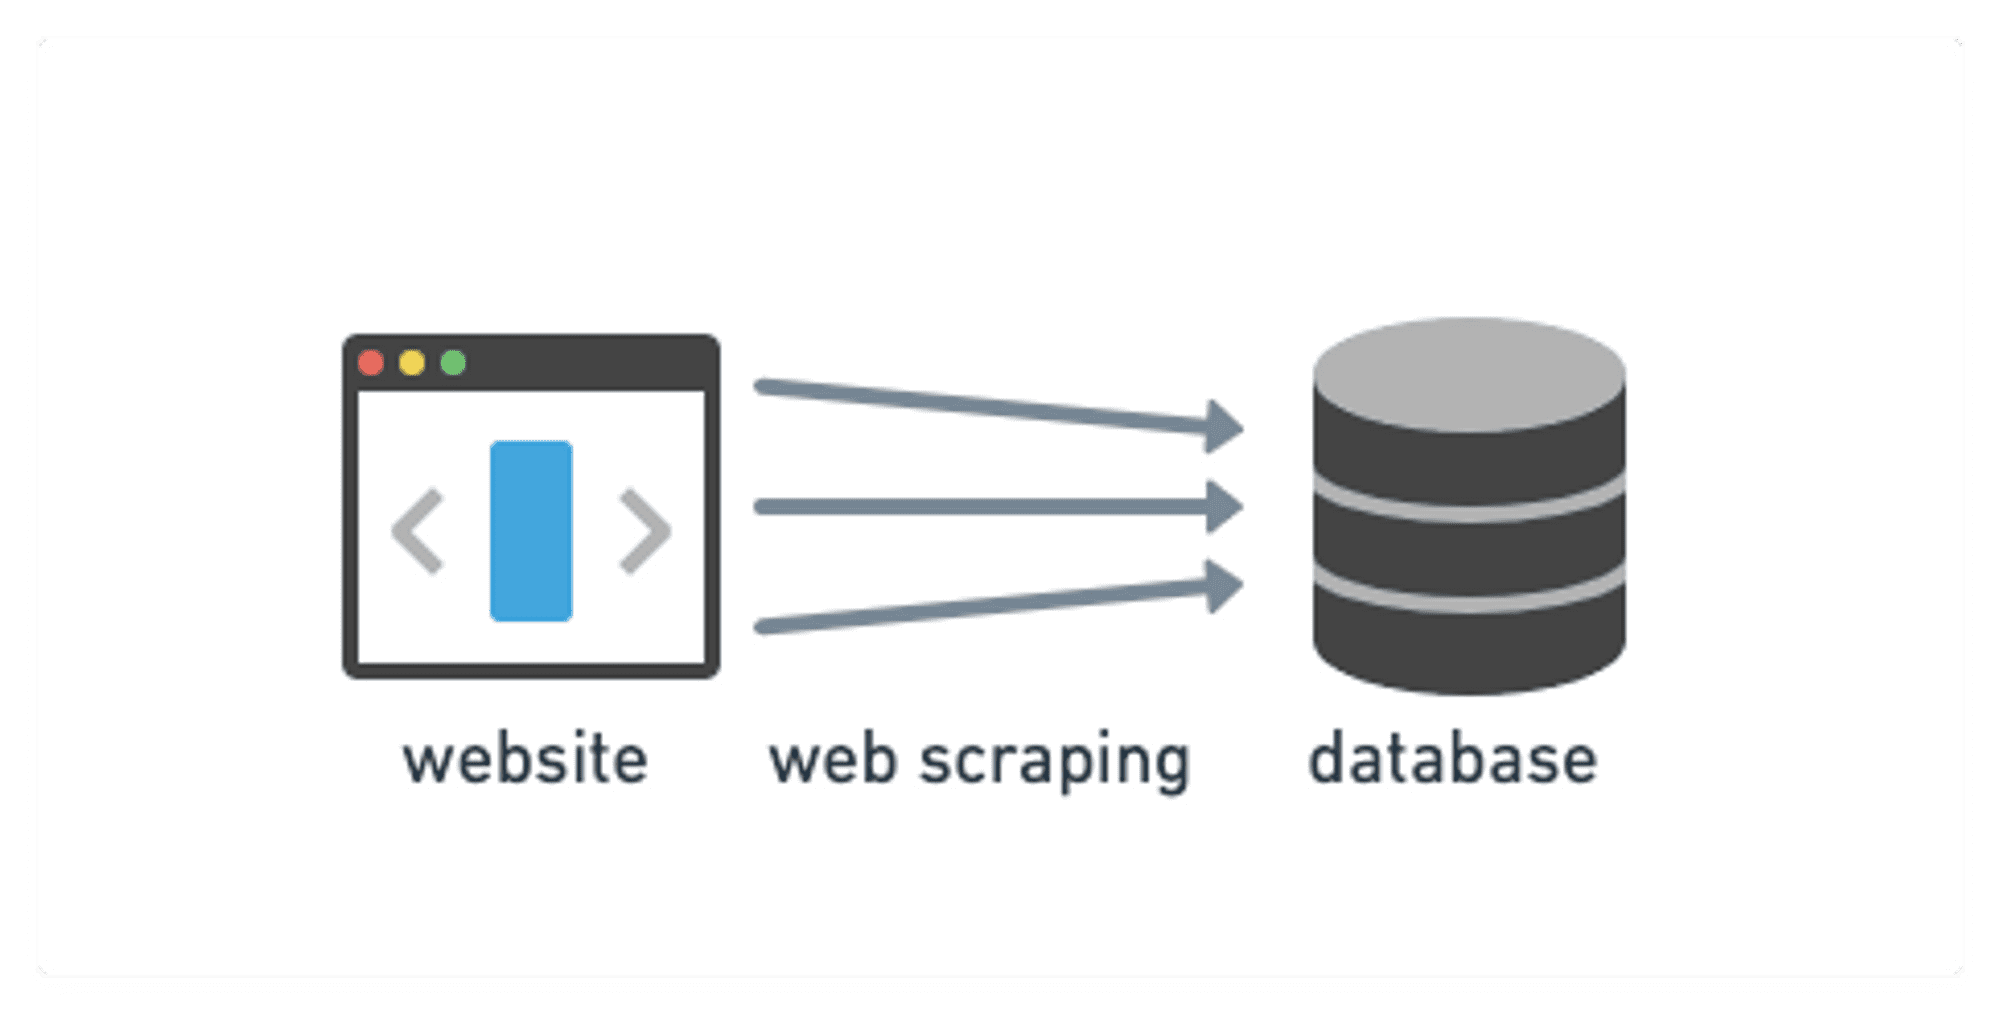
Web scraping is basically an automated process of extracting data from different websites using a bot or software. Once fetched, the data is stored in a database – like an Excel sheet, JSON, or XML.
It's an outstanding method for researchers and business people who need to gather large amounts of data quickly and efficiently. For instance, an e-commerce website's owner can use web scraping to keep an eye on the pricing information of a competitor's website.
What is Cheerio?
Now, what is Cheerio all about? Well, Cheerio is JavaScript technology used for web scraping in server-side implementations, and it's designed explicitly for Node.js. It's a lightweight library that allows you to crawl web pages and extract data using CSS-style selectors. Cheerio can load HTML as a string and returns an object to extract data using its built-in methods.
One of the best things about Cheerio is that it runs directly in Node.js without a browser, making it faster and more efficient than other web scraping tools. It was first released in 2010 by Matt Mueller and has gained significant popularity among developers due to its versatility and ease of use.
Why use Cheerio for web scraping?
Let's explore the reasons to use Cheerio:
- Its jQuery-like syntax makes HTML manipulation and data extraction easier for developers familiar with jQuery.
- It's super easy to set up, even for beginner developers.
- Its modularity allows us to extend it with Node modules and customize it according to our needs.
- The best thing about Cheerio is it doesn't require any browser for data extraction. Because it's designed explicitly for Node.js, we can use it on the server side without any worries.
That's enough for an introduction to web scraping and Cheerio. Let's get our hands dirty and jump into the environment.
Getting started with Cheerio and web scraping
Prerequisites
Before diving into the code, there are a few prerequisites for learning Cheerio.
- An IDE installed
- Basic knowledge of JavaScript and Node.js
- Basic knowledge of Devtools
Setting up the Cheerio environment
To set up your development environment, you'll need to install Node.js on your local machine. For that, head to the Node.js website and download the appropriate installer for your operating system.
Using the NPM package
Once Node.js is installed, you'll use a package manager called npm to install and manage all the third-party libraries in Node.js. Luckily, npm comes bundled with Node.js, so you don't need to install anything extra.
Now that you've set up Node js and npm, you can create a new Node js project using the command line interface. From there, you can add Cheerio js as a dependency and start using it to extract data and manipulate HTML easily.
mkdir webscraper
cd webscraper
npm init -y
npm install cheerio
Use simple commands to ensure you have Node.js and Cheerio installed correctly.
 node -v

 npm list cheerio
You can review the installation process and fix the issue if anything goes wrong, such as downloading the wrong Node.js installer, network connectivity, missing dependencies, etc.
Next, you need to specify the module format. We'll use ES modules in this tutorial because it allows us to use modern JavaScript features, such as await, that will be used in the later section of this tutorial. To specify the format, we'll go to the package.json and add the following field:
"type": "module",Let's do that:
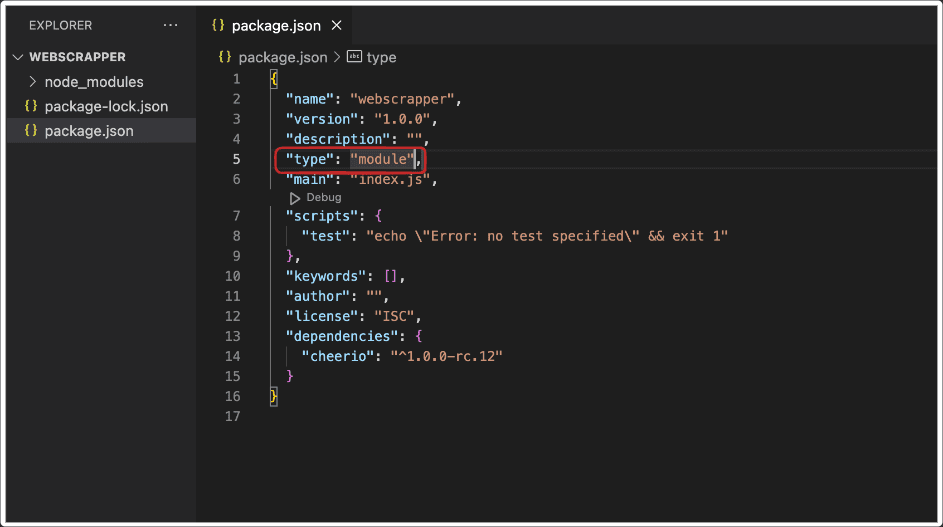
We've completed our installations and made the environment ready. Now let's learn about the Cheerio API.
The Cheerio API
The Cheerio API refers specifically to the set of methods and functions provided by the Cheerio library. These methods help you to extract and modify HTML very quickly.
The selector API in Cheerio can be accessed through the $() method, which has the following structure:
$(selector, [context], [root])
It takes three arguments: the first is compulsory, and the other two are optional.
- The
selectorargument specifies the elements you want to select from the HTML document. It can be a string, DOM element, array of elements, or Cheerio objects. - The optional
contextargument is actually the scope of where to begin looking for the target elements. It can be a string, DOM element, array of elements, or Cheerio objects. If no context is specified, it searches the entire document. - The optional
rootargument is usually the markup string you want to traverse or manipulate. It can be used to specify a different root element for the selected elements.
Once the elements have been selected, you can use other functions to manipulate them. For example, use the attr() function to get or set the value of an attribute or the text() function to get or set the text content of an element.

Crawls websites using raw HTTP requests, parses the HTML with the Cheerio library, and extracts data from the pages using a Node.js code. Supports both recursive crawling and lists of URLs.
How to scrape web pages with Cheerio
Now it's time to dive into some practical examples of using Cheerio for web scraping and HTML parsing. For that, create an index.js file in your directory or by using the command line.
touch index.jsYou'll need to load the HTML or XML document you want to parse using the load function.
Load the HTML
You can load the HTML using the load function. This function takes a string containing the HTML as an argument and returns an object.
// import the library
import cheerio from 'cheerio';
//Load the HTML string.
const $ = cheerio.load(`
  <body>
    <h1>Hello from Cheerio</h1>
  </body>
`);$, which is a common convention used to refer to jQuery objects in JavaScript.After executing this line of code, you can manipulate the HTML by calling methods on the $ object provided by Cheerio.
Cheerio selectors
Cheerio makes it easy to select elements using CSS-style selectors. It allows you to select elements based on tag, class, and attribute values.
tag nameThe `tagName` selector lets you select elements with a specific tag name. For example, to select all h3 tags in the document, you can use the selector like this:
import cheerio from 'cheerio';
const $ = cheerio.load(`
    <body>
       <h3>I'm learning Cheerio</h3>
       <h3>It's super easy</h3>
    </body>
`);
const $divItems = $('h3');
console.log($divItems.text());   //Output: I'm learning Cheerio It's super easy
The selector 'h3' gets all the <h3> elements from the document and returns a Cheerio object stored in the $divItems object.
.text() method in Cheerio is used to extract the text content of an HTML element. It's used on a Cheerio object representing a single element or a collection of elements.class nameYou can also select elements with their class names using the '.className' selector. Let's take an example to get all the elements with a class name, classSelector.
import cheerio from 'cheerio';
const $ = cheerio.load(`
    <body>
        <h3 class="classSelector"> Learning platforms: </h3>
        <ul>
            <li class="classSelector">Apify</li>
            <li>Coursera</li>
            <li class="classSelector">Udemy</li>
            <li>Freecodecamp</li>
        </ul>
    </body>
`);
const $selection = $('.classSelector');    //Select the classSelector class
console.log($selection.text()); //Output: Learning platforms: Apify classSelectorYou can select an element with its attribute using the '[atrribute]' selector. The value of the attribute filters out attributes further.
import cheerio from 'cheerio';
const $ = cheerio.load(`
    <body>
      <h3>Terms and Conditions: </h3>
      <form>
        <button name="Accept" type="submit">Accept</button>
        <button name="Reject" type="submit">Reject</button>
      </form>
    </body>
  `);
const $selectedElements = $('[name]'); //Selects both the buttons
console.log($selectedElements.text()); $('[name=Accept]').The attribute selectors can be used with any HTML attribute, not just
data-* attributes. For example, $('img[alt="example"]') will select all img elements with an alt attribute having a value of "example".Combining Cheerio selectors is an effective way to select specific elements from an HTML. Here are a few examples:
- Selecting an element with a particular tag and class:
$('h3 .class ')- Selecting all the elements that match a selector:
$('ul > li')- Selecting the next sibling element:
$('p + ul')- Selecting all elements that match multiple selectors:
$('h1, h2, h3')- Selecting elements based on their position in the document:
$('li:nth-child(odd)') //This selects all odd-numbered li elements in the document.These are just a few examples of how selectors can be combined to select elements that match multiple criteria. By using various combinations of selectors, you can select very specific elements within an HTML document.
Traversing the DOM
Cheerio provides methods for navigating in any direction of the selected elements. For example, find the child or parent of any selected element. Let's discuss them one by one.
findThe find method helps us to further filter out the selected elements based on any selector. It takes a selector as an argument and returns a new group of elements based on that.
import cheerio from 'cheerio';
const $ = cheerio.load(`
  <div class="parent">
    <p>Hello, world!</p>
    <span>How are you?</span>
    <p class="day">Have a nice day!</p>
  </div>
`);
const welcome = $('.parent').find('.day');
console.log(welcome.text()) //Output : Have a nice day!
In the example above, first, we selected the element with the parent class, and then from that element, we found an element with a class name .day.
childrenThe children method allows us to select the children of any selected element. Let's take an example.
import cheerio from 'cheerio';
const $ = cheerio.load(`
  <div class="parent">
    <p>Hello, world!</p>
    <span>How are you?</span>
    <p class="day">Have a nice day!</p>
    <div>
      <span class="day">
          Granchildren of ".parent" class
        </span>
      </div>
  </div>
`);
const welcome = $('.parent').children('span');
console.log(welcome.text()) //Output: How are you?
If there's no argument passed to the children function, it will return all the child elements.
find searches for matching descendant elements at any level below the selected element, whereas children only looks for direct child elements of the selected element.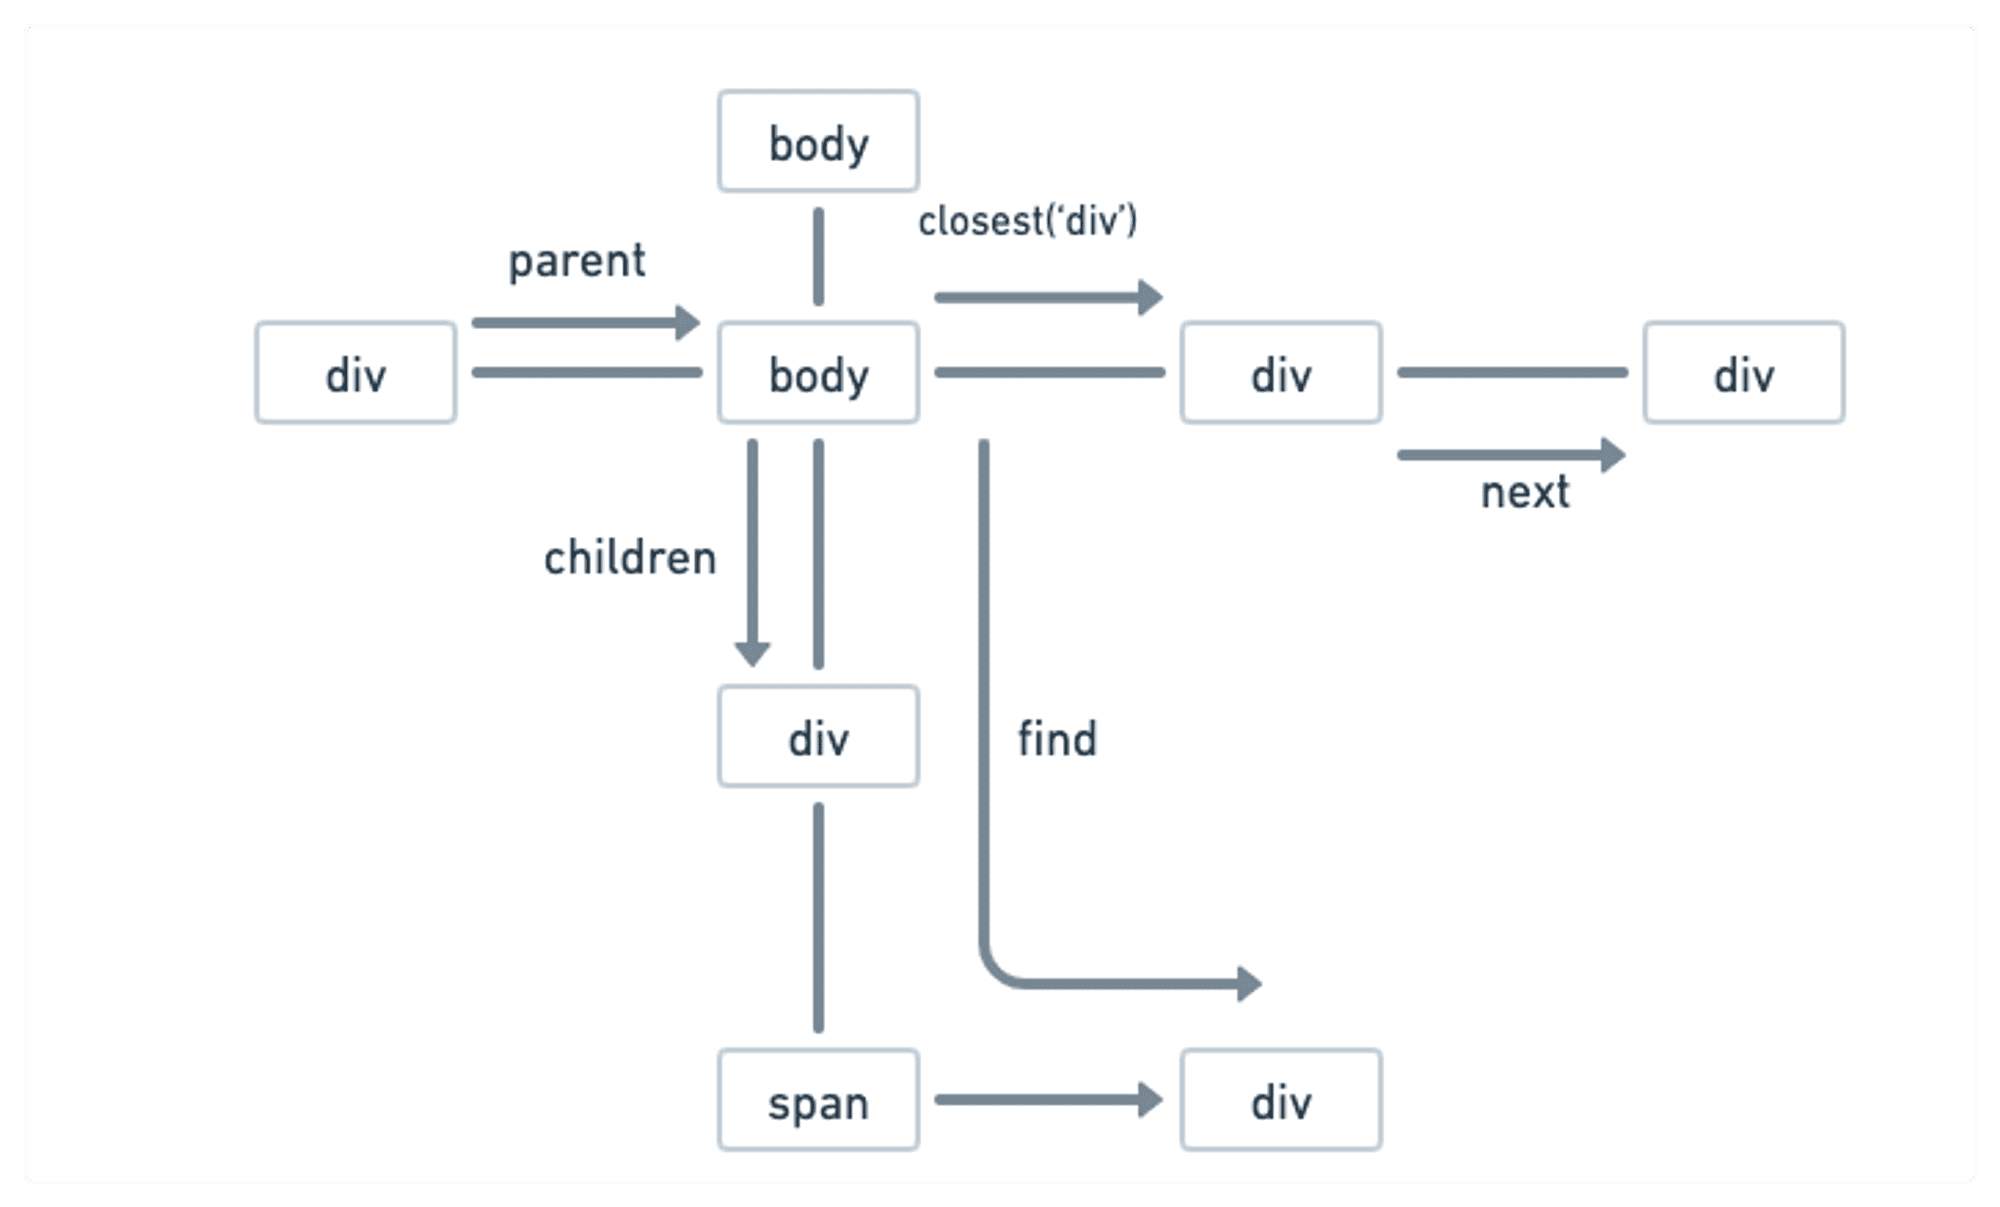
There are many other methods, but we'll not go into all the details. Let's just have a quick look at these:
contents: This method works just likechildren. Additionally, it also selects the comments from the HTML string.parent: It gives us the parent of the selected element.parents: It gives us all the parents of the element till the root element.parentsUntil: We can specify the limit of the parents using this method and how far we want to go upwards.closest: It allows us to select the nearest parent element of a specific type that matches a given Cheerio selector. For example,$('.child').closest('div').nextandprev: Thenextmethod allows us to select the next element and theprevmethod gives us the previous element.
There are so many other methods provided by Cheerio. If you're interested in learning more, you can see the documentation here.
How to loop over elements
If you recall, JavaScript methods like each, map, etc., facilitate looping over elements to perform specific operations. For example, let's look at each function and see how they work.
import cheerio from 'cheerio';
const $ = cheerio.load(`
  <body>
      <h3 class="classSelector"> Learning platforms: </h3>
      <ul>
          <li class="classSelector">Apify</li>
          <li>Coursera</li>
          <li class="classSelector">Udemy</li>
          <li>Freecodecamp</li>
      </ul>
  </body>` );
const listItems = $('li')
listItems.each((index, element) => {
   console.log($(element).text());
 });
The each method takes a callback function as an argument. It has two parameters: the first one is the index starting from zero, and the second is the current element.
Selecting elements using regular expressions
To use regular expressions with Cheerio, we can use the .match() function provided by JavaScript. The following example finds all the email addresses that have @ in an HTML document:
import cheerio from 'cheerio';
const $ = cheerio.load(`
    <body>
      <ul class="email">
        <li>Apify@gmail.com</li>
        <li>ondra@gmail.com</li>
        <li>Chris</li>
        <li>amanda@gmail.com</li>
        <li>notAnEmail</li>
        <li>notAnEmailAtAll</li>
        <li>Queue</li>
        <li>jamesbond@gmail.com</li>
      </ul>
    </body>`);
const emails = []
const userNames = $('.email li');  //Get the emails
userNames.each((index,el) => {    // Iterating over the emails
  const regex = /@/;             //  Expression to be matched
  const email = $(el).text().match(regex); // Match the text of each li item with the expression
  if(email){
    emails.push(email.input)       //Push, if the return value is not NULL
  }
});
console.log(emails);match() function returns an object if it matches with an expression or returns null if it doesn't. That's the reason we're using email.input to get the text from the object.Filtering elements
With filtering, you can select only the specific elements you want and ignore the rest. Cheerio provides several methods for filtering elements within a selection, like filter, not, has, etc. Let's go through them one by one.
filterThe filter method in Cheerio works just like the filter method of JavaScript. It lets you cherry-pick elements based on a specific selector. It's super handy when you're dealing with large amounts of data and want to narrow down the focus.
Let's look at an example of filtering li with a specific class.
import cheerio from 'cheerio';
var $ = cheerio.load(`
<ul class="birds">
  <li class="parrot">
    <span class="sharp">Parrots</span> are beautiful birds with <span class="beaks">sharp beaks</span>
  </li>

  <li class="sharp">
    They are superfast.
  </li>

  <li class="crow">
    Crows are smart
  </li>

</ul>
`);
var $selectedElements = $('li .parrot');  // Get a 'li' with 'parrot' class
var $parrot = $('span').filter('.sharp');  //. Filter the span elements with a className 'sharp'
console.log($parrot.text());notThe not method is opposite to the filter method. With this clever tool, you can easily exclude elements we don't want and focus on the important ones. It can save us much time and effort, especially when dealing with extensive data.
We'll take the previous example, but we won't select those with the sharp class this time.
import cheerio from 'cheerio';
var $ = cheerio.load(`
<ul class="birds">
  <li class="parrot">
    <span class="sharp">Parrots</span> are beautiful birds with <span class="beaks">sharp beaks</span>
  </li>

  <li class="sharp">
    They are superfast.
  </li>

  <li class="crow">
    Crows are smart
  </li>

</ul>
`);
var $selectedElements = $('li .parrot') // Get a 'li' with 'parrot' class
var $parrot = $('span').not('.sharp');   // Exclude elements with a className 'sharp'
console.log($parrot.text()); // Output: sharp beakshasWhile web scraping with Cheerio, you might want to find elements that contain a specific child element, like a span or an image. The has method works the same way. It takes a Cheerio selector as an argument and returns a child element that matches the selector.
For example, here we're searching for products that are on a discount:
import cheerio from 'cheerio';
const script = `
<div class="product">
  <h2 class="name">Product 1</h2>
  <span class="price">$10</span>
  <span class="discount">20% off</span>
</div>
<div class="product">
  <h2 class="name">Product 2</h2>
  <span class="price">$20</span>
</div>
<div class="product">
  <h2 class="name">Product 3</h2>
  <span class="price">$30</span>
  <span class="discount">10% off</span>
</div>`;
const $ = cheerio.load(script);
const discountedProducts =        // search for a parent element that has a child with a
$('.product').has('.discount');  // class name discount

console.log(discountedProducts.text())
//Output : Product 1
//          $10
//          20% off

//        Product 3
//        $30
//        10% off
This is handy when web scraping e-commerce websites and looking for discounted products. It allows you to filter out the products that have a discount quickly.
eqThe eq works just like an array indexing from the selected elements. It allows us to select an element from a specific index.
Let's look at an example where we select the second element from li elements.
import cheerio from 'cheerio';
const $ = cheerio.load(`
    <ul>
      <li>Item 1</li>
      <li>Item 2</li>
    </ul>
`);
  const secondItem = $('li').eq(1);
console.log(secondItem.text()); //Output: Item 2 4 to the .eq function, it will return nothing.first and lastThe methods first and last work the same way as accessing elements from the array. The first method returns the first element from the selection, and the last method returns the last element.
Here's an example in which we select the last and first element of the ol:
import cheerio from 'cheerio';
const $ = cheerio.load(
    `<ol>
      <li>Item 1</li>
      <li>Item 2</li>
      <li>Item 3</li>
    </ol>`
  );
  const firstItem = $('li').first();
  const lastItem = $('li').last();
  console.log(firstItem.text(),"  ",lastItem.text()) //Output: Item 1  Item 3
What would happen if the selection contained just one element? The first and last elements would be the same.
How to extract data from HTML tags using Cheerio
We've learned to extract data from HTML documents in a simple way. However, what if the data you need to extract is large and needs to be structured? That's where Cheerio's objects come in. They allow us to extract data from the HTML in a structured way.
You can specify what data you want to extract by passing the keys and values to the object. The keys in the map object represent the names of the properties you want to create, while the values are the Cheerio selectors you'll use to extract the data.
Here's an example:
import cheerio from 'cheerio';
const $ = cheerio.load(`
    <div class="book-info">
        <h2 class="book-title">The Great Gatsby</h2>
        <p class="author">By F. Scott Fitzgerald</p>
        <p class="release-date">Released: April 10, 1925</p>
        <p class="price">Price: $12.99</p>
    </div>
`);
const structuredData = {
    Book_Title: $('.book-title').text(),
    Author: $('.author').text(),
    Release_Data:$('.release-date').text(),
    Price: $('.price').text()
};
console.log(structuredData);
We're creating a JavaScript object structuredData with properties Book_Title , Author , Release_Data , and Price . We're using the class selectors to select all the elements. The output will be an object with the extracted data:
{
  Book_Title: 'The Great Gatsby',
  Author: 'By F. Scott Fitzgerald',
  Release_Data: 'Released: April 10, 1925',
  Price: 'Price: $12.99'
}
What if we have multiple books and want to get all of them from the document? Let's look into that.
import cheerio from 'cheerio';
const $ = cheerio.load(`
    <div class="book-info">
        <h2 class="book-title">The Great Gatsby</h2>
        <p class="author">By F. Scott Fitzgerald</p>
        <p class="release-date">Released: April 10, 1925</p>
        <p class="price">Price: $12.99</p>
    </div>
    <div class="book-info">
        <h2 class="book-title">To Kill a Mockingbird</h2>
        <p class="author">By Harper Lee</p>
        <p class="release-date">Released: July 11, 1960</p>
        <p class="price">Price: $10.99</p>
    </div>
    <div class="book-info">
        <h2 class="book-title">1984</h2>
        <p class="author">By George Orwell</p>
        <p class="release-date">Released: June 8, 1949</p>
        <p class="price">Price: $9.99</p>
    </div>
`);
const books = [];
const books1= $('.book-info')
books1.each((index,book)=>{
    const structuredData = {
        Book_Title: $(book).find('.book-title').text(),
        Author: $(book).find('.author').text(),
        Release_Data:$(book).find('.release-date').text(),
        Price: $(book).find('.price').text()
    };
    books.push(structuredData)
})
console.log(books);
The output of the code is an array of objects:
  [
   {
    Book_Title: 'The Great Gatsby',
    Author: 'By F. Scott Fitzgerald',
    Release_Data: 'Released: April 10, 1925',
    Price: 'Price: $12.99'
  },
  {
    Book_Title: 'To Kill a Mockingbird',
    Author: 'By Harper Lee',
    Release_Data: 'Released: July 11, 1960',
    Price: 'Price: $10.99'
  },
  {
    Book_Title: '1984',
    Author: 'By George Orwell',
    Release_Data: 'Released: June 8, 1949',
    Price: 'Price: $9.99'
  }
]
This code uses the each method to iterate over a collection of selected .book-info elements. For each element, the code creates an object structuredData that contains the extracted data. The data is extracted using the find method to search for child elements with the suitable classes.
Finally, the structuredData object is pushed to the books array using the push method. This result is an array of objects, each representing a book and containing the extracted data.
How to write extracted data in a file
What if we want to store the scraped data in our local storage? We'll use the example above to store the data in a JSON file. We can use the built-in fs module in Node. It allows us to interact with the file system on a computer. Here's how you can modify the code to write the books array to a JSON file:
import cheerio from 'cheerio';
import fs from 'fs';           // Import the "fs" module

const $ = cheerio.load(`
    <div class="book-info">
        <h2 class="book-title">The Great Gatsby</h2>
        <p class="author">By F. Scott Fitzgerald</p>
        <p class="release-date">Released: April 10, 1925</p>
        <p class="price">Price: $12.99</p>
    </div>
    <div class="book-info">
        <h2 class="book-title">To Kill a Mockingbird</h2>
        <p class="author">By Harper Lee</p>
        <p class="release-date">Released: July 11, 1960</p>
        <p class="price">Price: $10.99</p>
    </div>
    <div class="book-info">
        <h2 class="book-title">1984</h2>
        <p class="author">By George Orwell</p>
        <p class="release-date">Released: June 8, 1949</p>
        <p class="price">Price: $9.99</p>
    </div>
`);
const books = [];
const books1= $('.book-info')
books1.each((index,book)=>{
    const structuredData = {
        Book_Title: $(book).find('.book-title').text(),
        Author: $(book).find('.author').text(),
        Release_Data:$(book).find('.release-date').text(),
        Price: $(book).find('.price').text()
    };
    books.push(structuredData)    //push the object to the array
})
const jsonData = JSON.stringify(books); //Convert the array to JSON format

fs.writeFile('books.json', jsonData, () => {     //Using the fs.writeFile , it's used to write data in a file
  console.log('Data written to file'); //Display "Data written to file" in the call back function.
});books.json: The file in which we will write data. If the file is already there, it will just write data in it; if it's not, it will first create the file and then write data in it.
jsonData : Data to be written in the file.()=>{} : A callback function that will be called after the data has been written to the file.How to handle errors and exceptions with Cheerio
As a student of web scraping with Cheerio, you may encounter errors and exceptions as you work with the code. Don't worry: this is a common experience for most beginners. We're exploring how to handle these errors and exceptions so that you can become a more confident and successful web scraper developer.
To handle errors, you can use try-catch blocks in your code. A try block allows you to try a block of code when you're not sure if the code will execute or not and catch any errors that might occur. If an error occurs, the catch block will execute, allowing you to handle the error appropriately.
Here's an example of how to use try-catch blocks with Cheerio:
try {
  const $ = cheerio.load(html);
} catch (err) {
  console.log(err);
  }
This code uses a try-catch block to handle errors that might occur while loading an HTML document. Overall, this code ensures that the program does not crash if an error occurs during the loading of the HTML document and provides a way to handle the error.
How to use Axios with Cheerio
Have you ever wondered how to get the HTML document of a web page? Axios allows you to make HTTP requests and get the HTML document of a website.
To use Axios in your scraping project, you need to install it in your environment by entering the following command:
npm install axiosWe'll use the Axios library in the following example.
Scraping multiple pages using Cheerio
It's worth noting that there's a difference between pagination and scraping multiple pages. Pagination refers to dividing content into separate pages, often with navigation links to move between them. On the other hand, scraping multiple pages involves extracting data from many pages of a website, whether they're paginated or not.
Why does this matter? When scraping paginated content, you can use the navigation links to move between pages and extract data from each page. However, when scraping multiple pages that are not paginated, you'll require a different approach to identify and extract the data you need.
Let's see how we can scrape multiple pages with Cheerio.
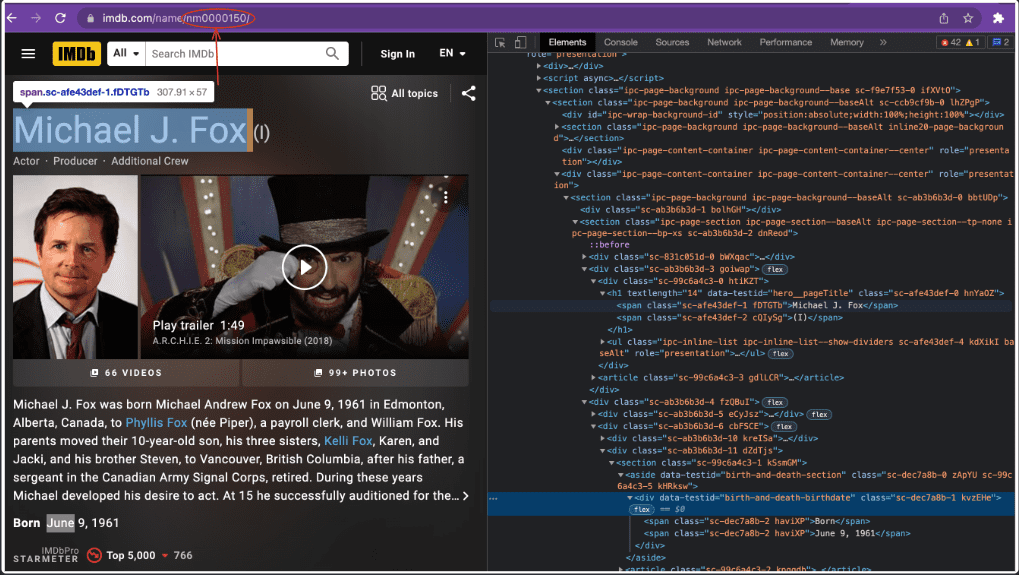
You can see in the link that the website is using pagination, and each Actor is at a different link. You can use Cheerio to extract different Actors from different pages using a loop. Let's do this.
import axios from 'axios';
import cheerio from 'cheerio';
const Actors = [];    //Declare an empty actors array to store actors' data.
for (let i = 0; i < 5; i++) { // It means we will change the last digit of the url to get the data of another actor
    const url = `https://www.imdb.com/name/nm000015${i}`;  //Change the last digit of the data
    const response = await axios.get(url, { headers });   // Add headers to axios request
    const $ = cheerio.load(response.data);
    const name = $('h1 .sc-afe43def-1').text();        // Get the name of the actor
    const Date_of_Birth = $('.sc-dec7a8b-2').eq(1).text()          // Get the Date of Birth
    Actors.push({ name, Date_of_Birth });
}
console.log(Actors);
But when we try to access the website to fetch data, we get a 403 error because the server has detected that the request is coming from an automated script. It's a very common anti-scraping technique used by most modern websites. So, we need to find a way to tackle this problem. One way is to use headers in our Axios request to act like an actual browser request. In this example, we'll use a user agent that indicates that the request is made from an actual browser rather than an automated script.
Let's see how we can do this:
import axios from 'axios';
import cheerio from 'cheerio';
const Actors = [];    //Declare an empty actors array to store actors' data.
for (let i = 0; i < 5; i++) { // It means we will change the last digit of the url to get the data of another actor
    const url = `https://www.imdb.com/name/nm000015${i}`;  //Change the last digit of the data
    const response = await axios.get(url, { headers });   // Add headers to axios request
    const $ = cheerio.load(response.data);
    const name = $('h1 .sc-afe43def-1').text();        // Get the name of the actor
    const Date_of_Birth = $('.sc-dec7a8b-2').eq(1).text()          // Get the Date of Birth
    Actors.push({ name, Date_of_Birth });
}
console.log(Actors);
Challenges of web scraping with Cheerio
Like all web scraping libraries, Cheerio has its pros and cons. We have already discussed the pros of using Cheerio. Now let's discuss the challenges you might face while working with Cheerio.
Dynamic websites and JavaScript
Let's start with one of the biggest challenges of web scraping with Cheerio: dealing with dynamic websites and JavaScript. Nowadays, modern websites use dynamic content and JavaScript to update or modify the page content without needing an entire page to reload. That can make it tough to scrape the website with Cheerio alone. The content may not be fully loaded or loaded asynchronously after the initial page load.
When Cheerio loads an HTML page, it only sees the static HTML content. Any JavaScript or dynamic content that's loaded later is hidden from Cheerio. That can be a letdown if the website you're trying to scrape uses JavaScript to load or modify content.
Anti-scraping measures
Do you know why some scrapers get blocked and don't work as efficiently as they should? There are various anti-scraping techniques that block web scrapers. Let's discuss a few of these:
- CAPTCHAs: CAPTCHAs are tests that are designed to differentiate between human users and bots. They require users to complete a task, such as typing in a sequence of letters or identifying objects in an image.
- IP blocking: Websites block IP addresses that are associated with web scraping. This means that if a particular IP address is identified as a scraper, the website will block all requests from that IP address.
- User-agent detection: User-agent detection is a technique that identifies the type of browser or device that is being used to access the website. Websites can use this information to identify scrapers, as many scrapers use non-standard user agents.
- Dynamic web pages: Some websites use dynamic web pages that are generated using JavaScript. These pages can be more difficult to scrape, as the content is generated on the fly and may not be present in the page source.
As a web scraper developer, it's important to be aware of these anti-scraping measures and to take steps to avoid them. This may include using rotating proxies or user agents, cookies, implementing delays between requests, and much more. You can learn about these measures here.
Performance issues
When working with large amounts of data or complex HTML structures, using intermediate results to optimize performance is common. That means storing the results of certain operations and reusing them later rather than re-calculating them each time. jQuery can do that to optimize performance because it's designed to run in a browser with more memory.
However, Cheerio is designed to run in Node.js, which has a more limited memory than the browser. As a result, Cheerio has a hard time saving intermediate results. It can quickly run into memory issues when working with large datasets.
Without the ability to save intermediate results, Cheerio has to parse the entire HTML document to perform each operation. It can be slow and resource-intensive, especially when working with large documents.
Congratulations on completing the basics of web scraping and Cheerio! Now it's time to level up and learn a few advanced concepts of web scraping.
Advanced web scraping with Cheerio
Scraping websites with dynamic content
Advanced websites load data at runtime, making it difficult to extract data using Cheerio. That's where other libraries come in to help out. Let's take a look at some of these libraries.
- Puppeteer
Before we start learning Puppeteer, let's discuss where Cheerio fails. While Cheerio is an excellent tool, it fails when it comes to parsing websites that load data at runtime and need a browser to open them. Now, what Puppeteer does for us is that it helps us open the website in a browser known as a headless browser that acts like a browser, but in reality, it's not. Once the website is loaded using Puppeteer, we can use Cheerio to load its HTML and do whatever we want. Pretty amazing, right?
Here are some of the core functions provided by Puppeteer:
puppeteer.launch([options]): This function launches an instance of Chrome or Chromium with a set of options specified in an object. It returns a Promise that resolves to an instance of theBrowserclass.browser.newPage(): This function creates a new blank page in the browser instance. It returns a Promise that resolves to an instance of thePageclass.page.goto(URL, [options]): This function navigates to the specified URL. It returns a Promise that resolves when the page is loaded.page.content(): This function returns the HTML content of the current page. It returns a Promise that resolves to a string.browser.close()is a function in Puppeteer that is used to close the browser instance that was opened withpuppeteer.launch(). It will terminate the browser process and all of its pages.
These are just some of the functions provided by Puppeteer. There are other functions available as well.
To install Puppeteer in your environment, run the following command:
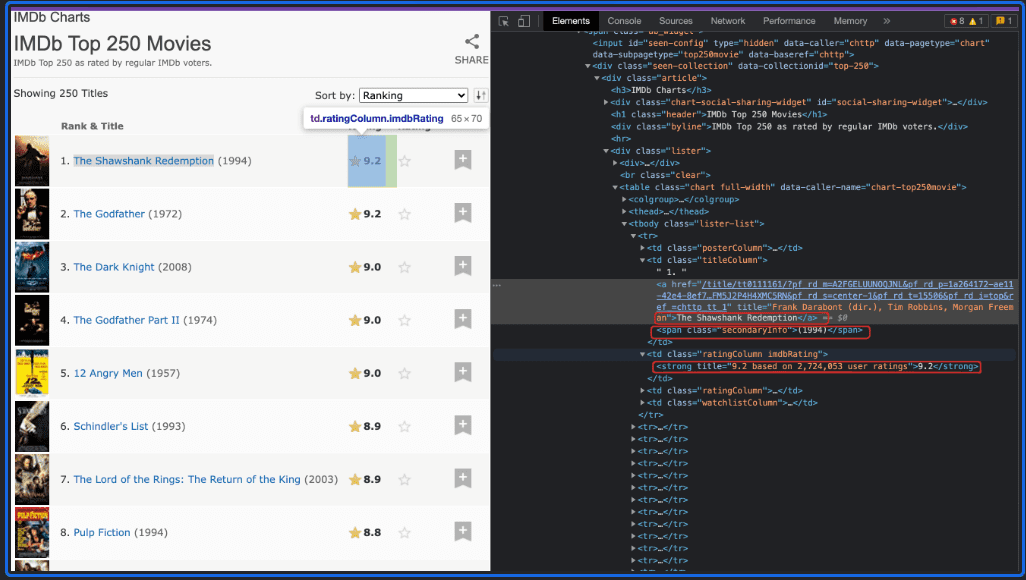
npm install puppeteerLet's take a closer look at how this works with an example. We want to extract the Top 250 Movies from the IMDb website in this example.
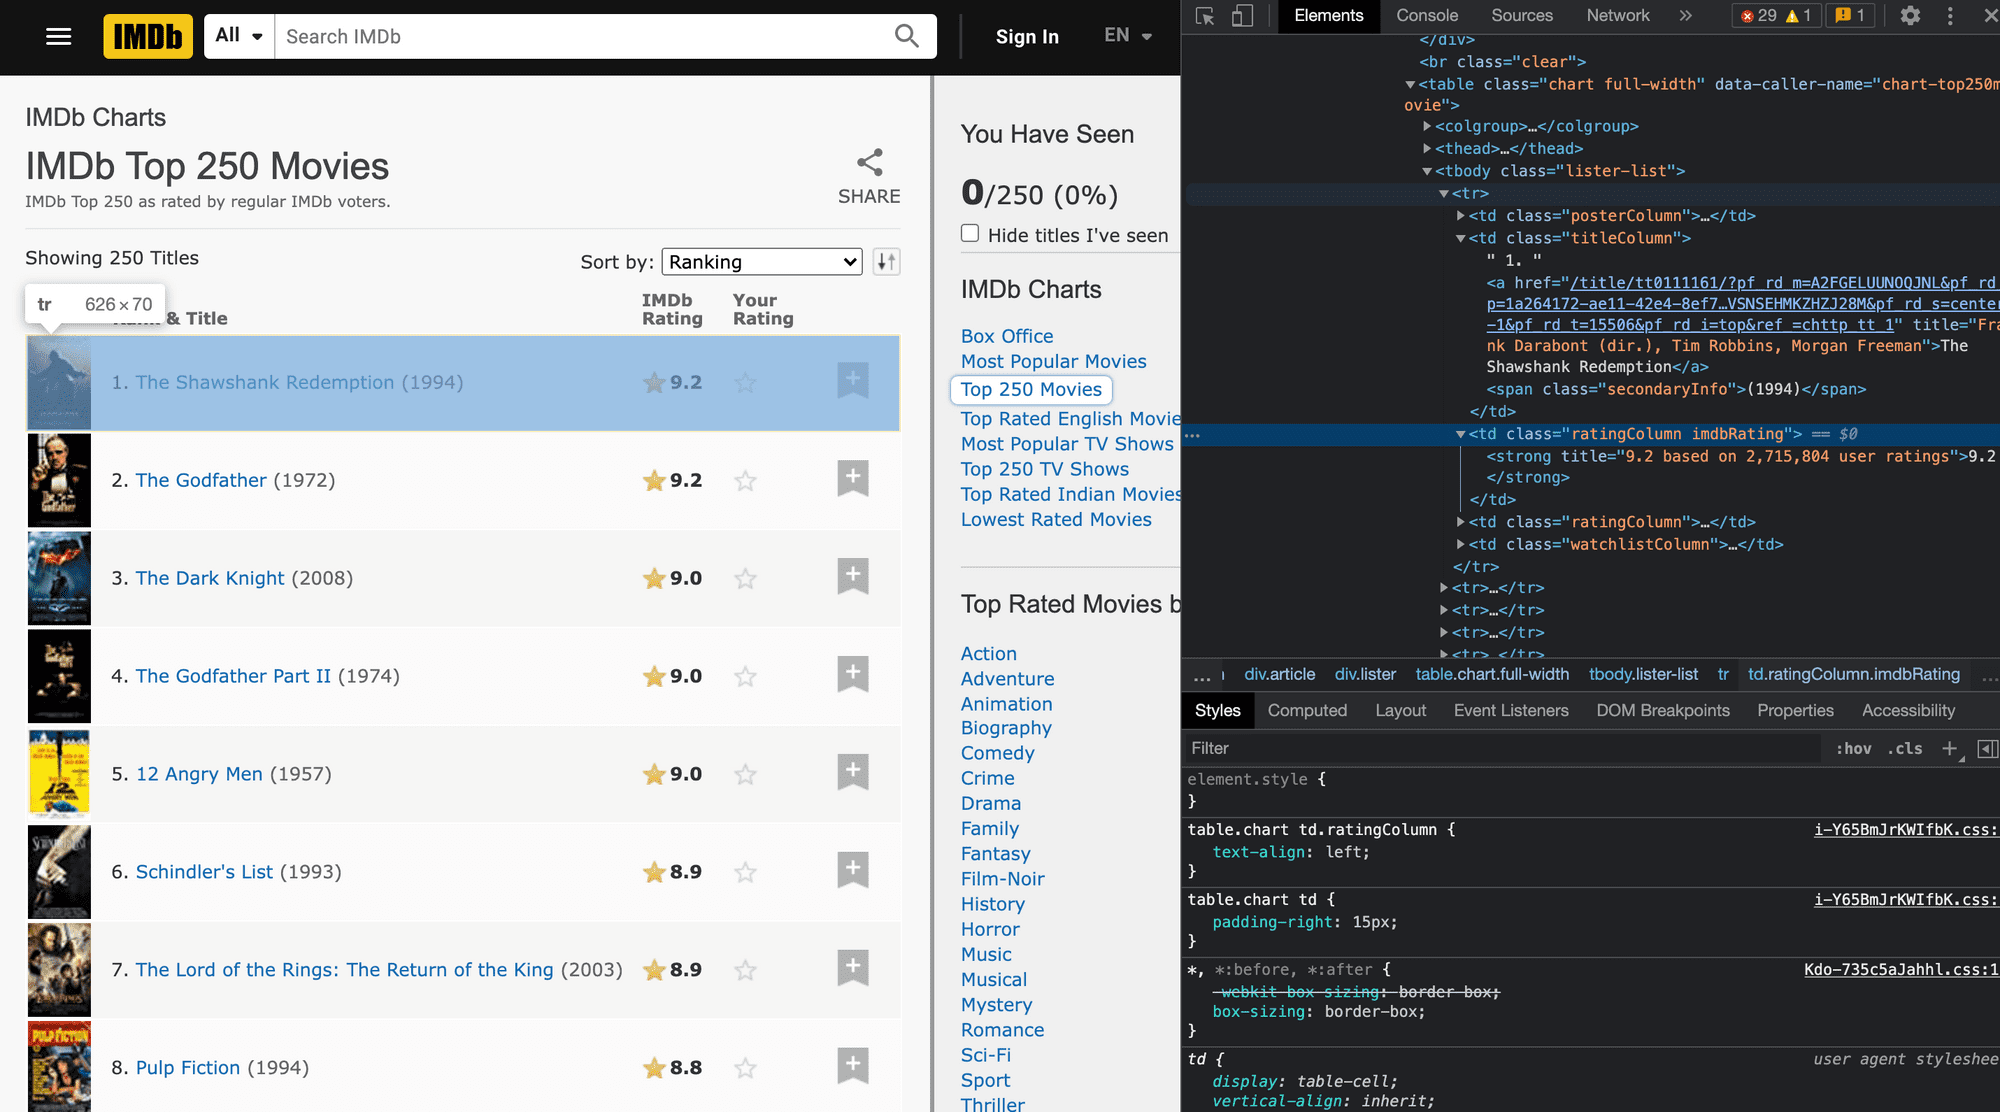
As we can see from the image above, all the movies are in one body tag <tbody> having a class of lister-list, and each movie is the <tr> .Now, let's start using puppeteer with Cheerio.
import puppeteer from 'puppeteer';
import cheerio from 'cheerio';
 (async () => {
   const browser = await puppeteer.launch(); //Launch the browser
   const page = await browser.newPage();    //Open a new page
  await page.goto('https://www.imdb.com/chart/top');   //The opened page goes to the link provided in the .goto() function
  const html = await page.content();       //Get the content of the page using the .content() function
  const $ = cheerio.load(html);
  const movies = [];
  const moviesTr = $('tbody.lister-list tr') //Select all the table rows using the Cheerio selectors
  moviesTr.each((i, movie) => {             //Iterate over all the movies one by one
   const title = $(movie).find('.titleColumn a').text()
   const year = $(movie).find('.titleColumn .secondaryInfo').text()
   const rating = $(movie).find('.ratingColumn strong').text()
   movies.push({title, year, rating});   //Push the extracted data
   });
console.log(movies);
  await browser.close();
})();- Playwright
Playwright is also an open-source Node.js library that was developed by the same team that developed Puppeteer. It is a powerful and versatile alternative to Puppeteer. The Puppeteer team needed a tool that could automate not just the Chromium-based browsers but other browsers like Firefox and Safari. So, they developed Playwright, which supports other browsers as well.
To install Playwright in your environment, run the following command:
npm install playwrightLet's implement the above code with Playwright.
import { chromium } from 'playwright'; //import chromium from playwright
import cheerio from 'cheerio';

(async () => {
const browser = await chromium.launch(); // Launch the browser
const context = await browser.newContext(); // Create a new context
const page = await context.newPage(); // Create a new page
await page.goto('https://www.imdb.com/chart/top'); // Navigate to the provided URL
const html = await page.content(); // Get the page content
const $ = cheerio.load(html);
const movies = [];
const moviesTr = $('tbody.lister-list tr'); // Select all the table rows using the Cheerio selectors
moviesTr.each((i, movie) => { // Iterate over all the movies one by one
const title = $(movie).find('.titleColumn a').text();
const year = $(movie).find('.titleColumn .secondaryInfo').text();
const rating = $(movie).find('.ratingColumn strong').text();
movies.push({title, year, rating}); // Push the extracted data
});
console.log(movies);
await browser.close(); // Close the browser
})();
Playwright is a more flexible and powerful automation framework than Puppeteer, which makes it an excellent alternative for advanced web automation.
How to implement authentication
What if a website requires authentication? That's another challenge, but don't worry: we've got you covered. It's not possible to extract data from such websites without logging in. Therefore, we need to find a way to authenticate ourselves through our code to open the page from where we can extract the data.
For this purpose, we need the help of the Puppeteer library, which will do the authentication task. And obviously, our well-known tool, Cheerio, will extract the data. With Puppeteer and Cheerio, we can automate the authentication process and extract the data we need.
Let's look at an example to understand how to implement authentication with Cheerio and Puppeteer. We'll try to authenticate the newsapi website, which looks like this:
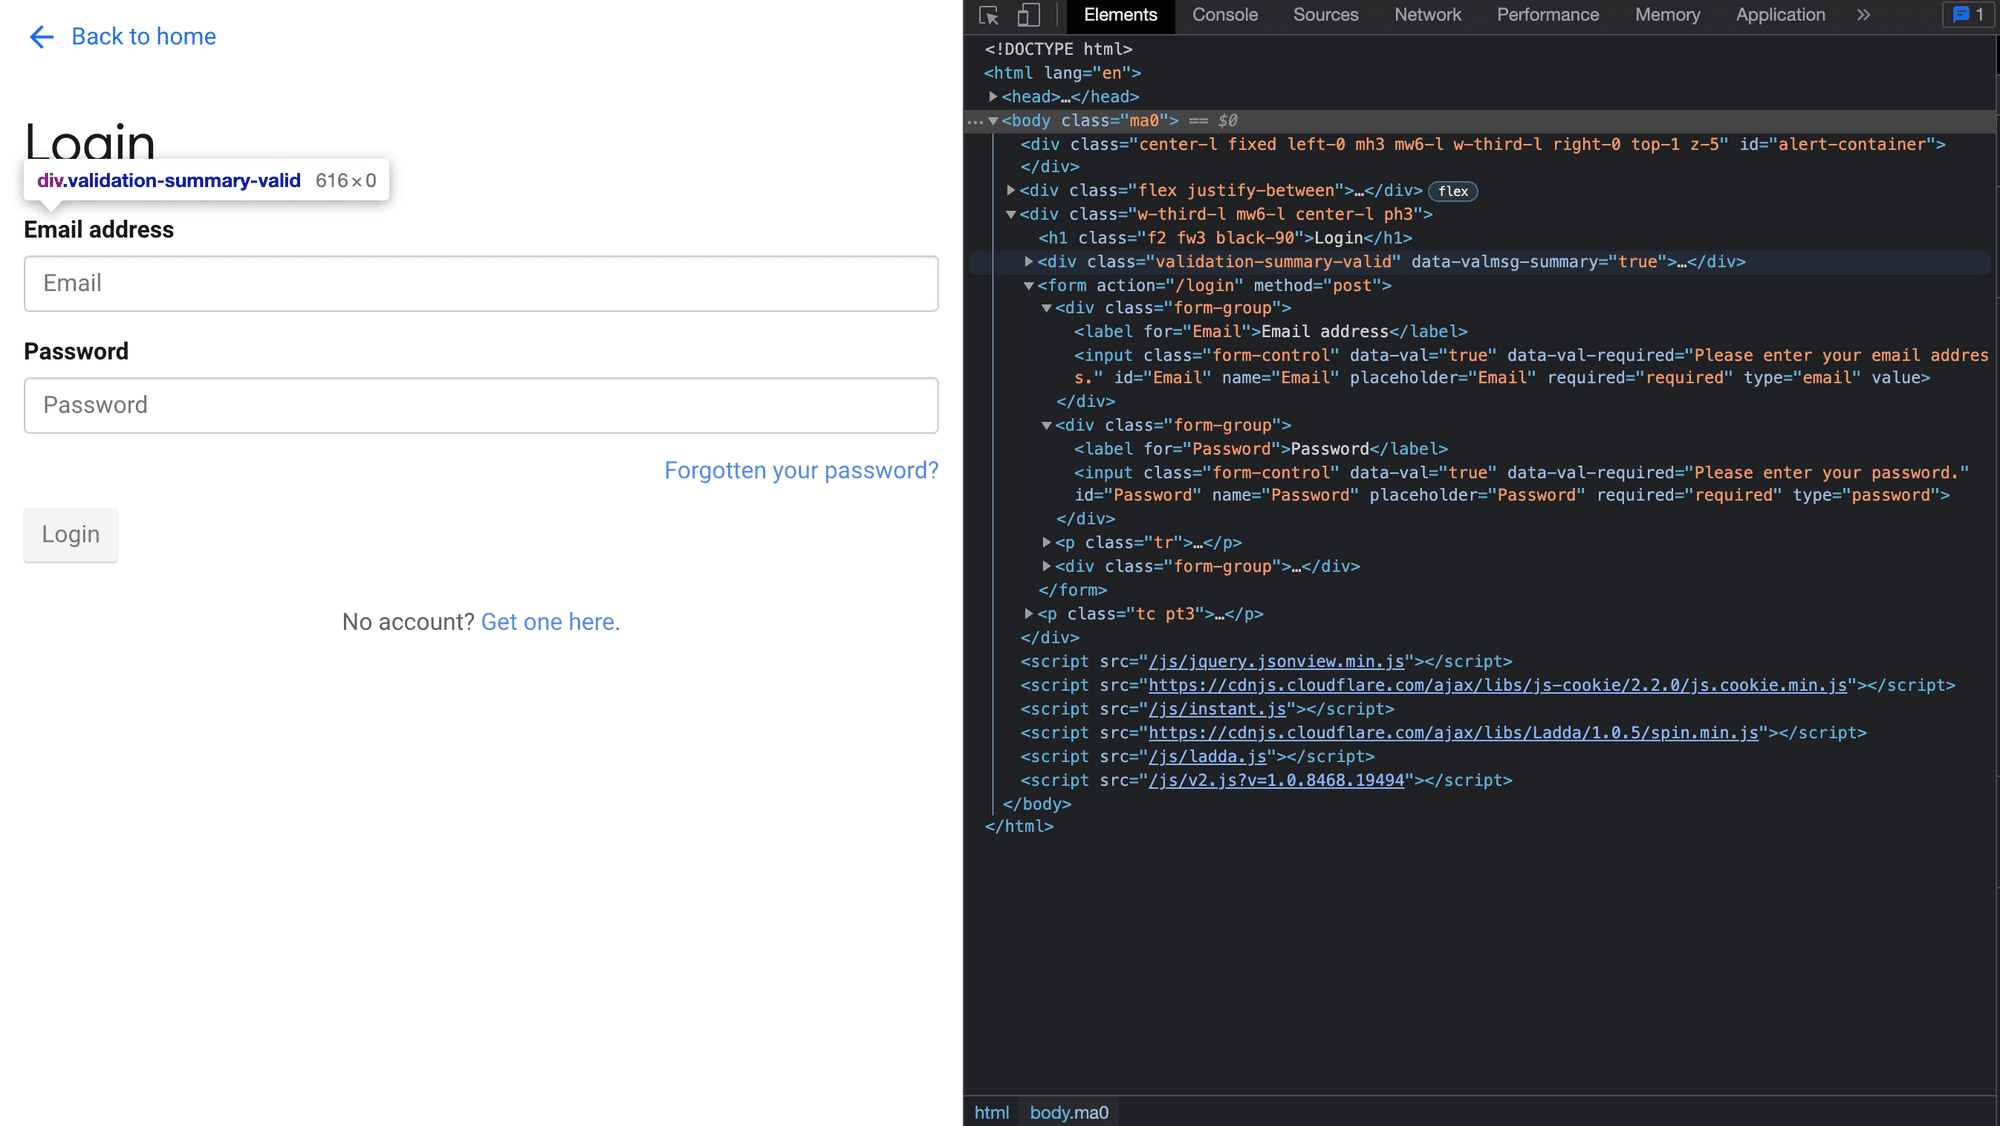
Let's dive into the code and see how this magic happens:
import puppeteer from 'puppeteer';
import cheerio from 'cheerio';
(async () => {
    const browser = await puppeteer.launch(); //Launch the browser using .launch() function
    const page = await browser.newPage(); //Open a new page using .newPage() function

    await page.goto('https://newsapi.org/login'); //The opened page goes to the link provided in the .goto() function

    await page.type('#Email', 'your_email'); //Enter the email and password in the respective input fields
    await page.type('#Password', 'you_password');   //The await waits for the website to load these fields.

    await page.click('button[type=submit]'); //Click the submit button

    await page.waitForNavigation(); //Wait for the website to finish the login process
    await page.goto('https://newsapi.org/account'); //Go to the home page
    //Now we can manipulate the website according to our needs
    const html = await page.content();
    const $ = cheerio.load(html);
    console.log($('.mb2').text());
    await browser.close();
  })();
How to handle asynchronous requests, errors, and retries
When web scraping with Cheerio, it's important to consider errors and retries to ensure our code is reliable and robust. As we saw earlier, error handling allows us to prevent and detect possible errors and whether the error occurs while fetching the website. It would require retries, and that's what we'll cover now. We'll see how things go from requesting a website, handling errors, and trying again. We've already seen the axios library for making HTTP requests. That same axios library allows us to retry the HTTP requests as well.
To use axios-retry, first we need to install it as a dependency and import it into our file.
npm install axios-retryLet's see an example.
const axios = require('axios');
const axiosRetry = require('axios-retry');
axiosRetry(axios, {
  retries: 3,
  retryDelay: (retryCount) => {
    return retryCount * 2000; // multiple the retry time with 2000 miliseconds
  },
});
async function scrapeWebsite() {
  try {
    const response = await axios.get('link-to-the-website');
  } catch (error) {
    console.error(error);
  }
}
scrapeWebsite();
First, scrapeWebsite will be called, and it will try to fetch the website provided in the axios.get function. If the request fails, then the axiosRetry function will be called. It will try to fetch the data three times, and the time between each try increases to a multiple of 2,000 milliseconds. The function will return an error if it gets nothing after three attempts.
How to use a testing framework with Cheerio
It's important to test your code thoroughly before it goes into production. By testing with various inputs and outputs, we can be confident that the code works correctly and meets our requirements. Deploying code without proper testing can lead to unexpected problems, which can cause delays and additional costs to the project. Therefore, testing the code is a good practice to ensure the quality and reliability of the software.
Let's see how we can use a framework to test our Cheerio codes.
Test code with Jest
Jest is a popular framework developed to test JavaScript applications. It was developed by Facebook, and one of its key features is that it can run tests in parallel, which makes it super fast and efficient. It's easy to set up and test the codes.
Let's see how we can add Jest to our environment.
- Open the terminal and enter the command below:
npm install --save-dev jestWe have passed this --save-dev optional argument to make that this dependency is only needed in the development phase.
- Open the package.json and replace:
"test": ""with the following:
"test": "node --experimental-vm-modules node_modules/.bin/jest"- Write the tests in the .test file and enter the command below to see the results:
npm testHow to write a test with Jest
Let's use some code that we wrote earlier in this Cheerio tutorial.
function getBookInfo(htmlString) {
  const $ = cheerio.load(htmlString);
  const structuredData = {
    bookTitle: $('.book-title').text().trim(),
    author: $('.author').text().trim(),
    releaseDate: $('.release-date').text().trim(),
    price: $('.price').text().trim()
  };
  return structuredData;
}
export default getBookInfo;
We have a function named getBookInfo that accepts an HTML string as an input and returns an object named structuredData. In the end, we're exporting the function so that we can test it in our test.js file.
Let's see how well this code is working. We'll open our IDE and create a file name structureData.test.js and write the following code.
import getBookInfo from './index'; //Import the function getBookInfo
test('getBookInfo returns the correct book information', () => {
  const htmlString = `
    <div class="book-info"> //HTML string that will be used for testing
      <h2 class="book-title">The Great Gatsby</h2>
      <p class="author">By F. Scott Fitzgerald</p>
      <p class="release-date">Released: April 10, 1925</p>
      <p class="price">Price: $12.99</p>
    </div>`;
//Declare a test having two arguments. The first argument is the description,
//The second argument is an anonymous function that will return if the test fails or not.
  const bookInfo = getBookInfo(htmlString);
  expect(bookInfo).toEqual({
    bookTitle: 'The Great Gatsby',
    author: 'By F. Scott Fitzgerald',
    releaseDate: 'Released: April 10, 1925',
    price: 'Price: $12.99'
  });
});
//The .expect() function takes the results as an argument
// .toEqual() compares the results with the desired outcome.
Like this, we can write as many tests using Jest as we want for our code, like missing values, extra spaces, etc.
Finding and fixing bugs in your Cheerio code
While creating scraping scripts and manipulating the DOM, we might encounter some challenges, but we have tools and strategies to make the process easier.
- Unit tests: Testing the code before deployment and ensuring it works correctly can save us from major problems. Unit testing ensures that we get the expected results. Different technologies like Jest and Mocha are used for this.
- Console.log: The console.log is often used for debugging programs by writing it at various positions in the code. The same is used to troubleshoot Cheerio programs.
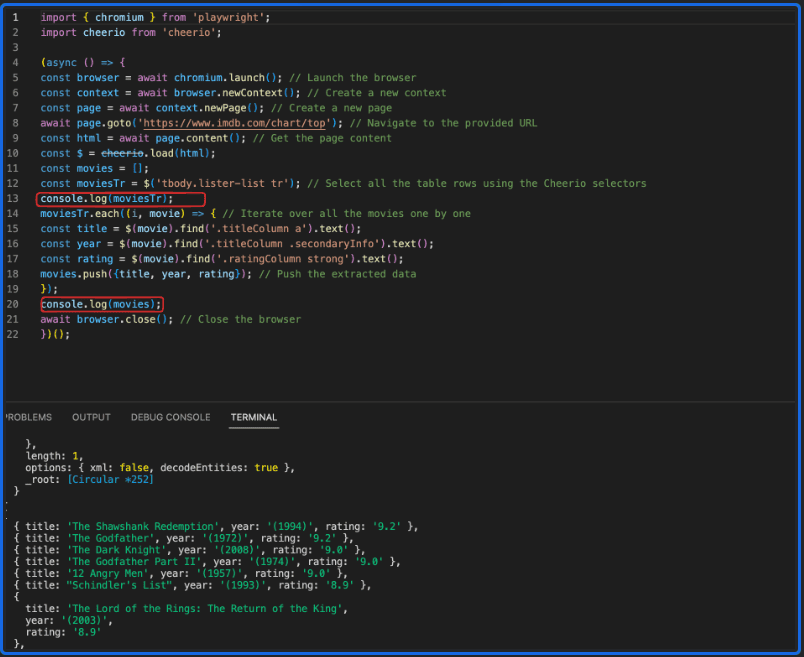
- Browser developer tools: The browser developer tools can be used to inspect the DOM and spot problems in the code. Such tools include Chrome DevTools.
Best practices for web scraping with Cheerio
The following approaches can be used to optimize our code and improve performance.
- Handling dynamic content: As we mentioned earlier, dynamic content creates a lot of issues while extracting data, so it's a good practice to always keep in mind that Cheerio may not help us in this scenario. We need to use other libraries to load the HTML and perform operations using Cheerio.
- Handling complex selectors: It can be tricky to work on websites that use complex selectors, i.e., nested selectors. It's recommended to break down the selectors and select elements very carefully.
- Handling version compatibility issues: Cheerio has different versions that may not be compatible with specific versions of Node.js or other libraries. Check compatibility before using Cheerio, and update to the latest version if necessary.
You can visit this great blog post to learn more about scraping websites more efficiently using Cheerio.
Alternatives to Cheerio
Let's explore some of the alternatives to web scraping with Cheerio. We'll look at the pros and cons of these libraries as well.
| Library | Advantages | Disadvantages | Maintenance/Up-to-date? |
|---|---|---|---|
| Cheerio | Lightweight, fast, and easy to use |
Limited functionality for dynamic web pages |
Maintained and up-to-date |
| Puppeteer | Full-fledged automation tool with Chrome DevTools integration |
Requires more setup than Cheerio, slower, resource-intensive |
Maintained and up-to-date |
| JSDOM | Lightweight, allows for easy DOM manipulation |
Limited functionality for dynamic web pages |
Maintained and up-to-date |
| NightmareJS | High-level API, supports multiple browsers |
Slower than Puppeteer, outdated and not maintained |
Outdated and not maintained |
| PhantomJS | Lightweight, supports multiple browsers |
Outdated and not maintained | Outdated and not maintained |
| Playwright | Multi-browser support, faster than Puppeteer |
Requires more setup than Cheerio, resource-intensive |
Maintained and up-to-date |
| node-html-parser | Supports parsing of dynamic HTML, easy to use |
Limited functionality for web automation |
Maintained and up-to-date |
| got-scraping | Lightweight, fast, and easy to use | Developed specifically to address drawbacks of modern scraping tools |
Maintained and up-to-date |
Let's take a peek at the downloads of these packages as well.
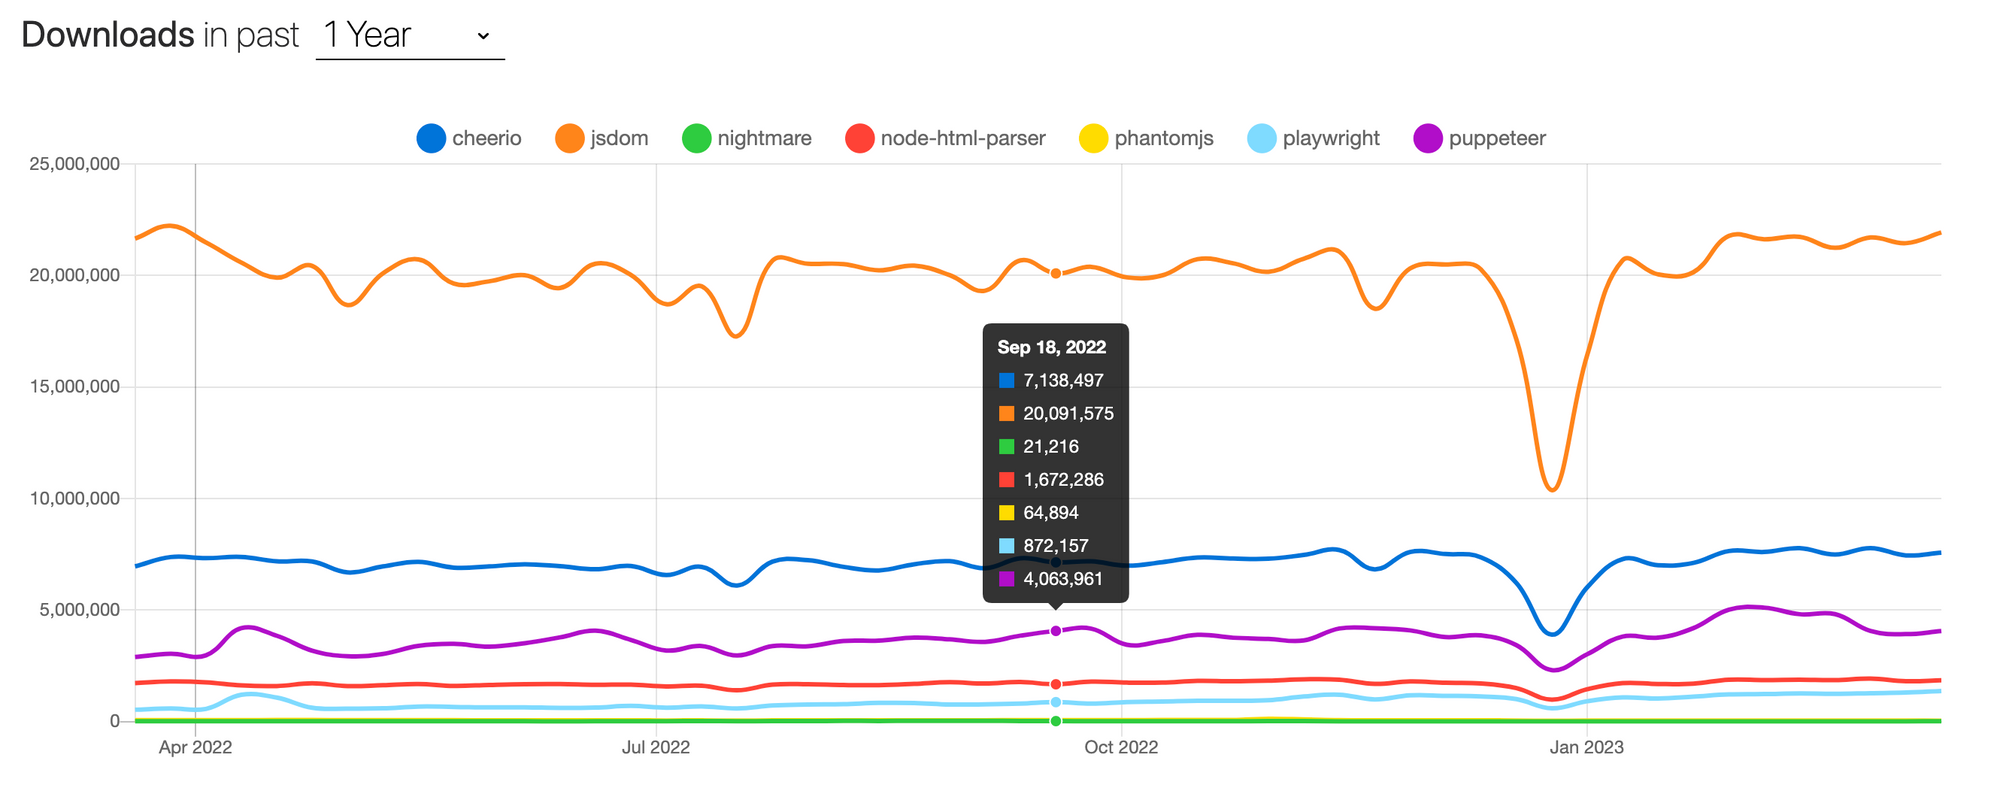
Conclusion
Cheerio is a robust and adaptable framework with an easy-to-use API for parsing and manipulating HTML. With its jQuery-like syntax, extracting data from web pages and manipulating the HTML to meet your needs is simple.
Although Cheerio is an excellent scraping tool in many cases, it does have its challenges, such as anti-scraping measures, dynamic websites, and performance issues. Yet, refined approaches and tools can assist you in overcoming these challenges and achieving your web scraping objectives.
As you may have observed, this blog post by no means tries to pitch Cheerio as the ultimate scraping tool. Cheerio has its fair share of shortcomings and areas to improve. Having said that, Cheerio still looks pretty promising. Also, it's always easy to switch to alternative tools after mastering it.
As the saying goes, Perpetuam Uitae Doctrina (lifelong learning). Complimenting this tutorial with practice is essential. Also, a good tutorial is neither perfect nor the only source of information on the subject. So, if you have any feedback for improvement, please let us know. Happy learning!
Frequently asked questions
What is Cheerio js?
Cheerio js is an easier and more efficient way to extract data in Node.js. It's a lightweight library that allows us to crawl web pages and extract data using CSS-style selectors. It enables us to load HTML as a string and returns an object that can be used for extracting data.
What are the benefits of Cheerio?
Cheerio's jQuery-like syntax is a big advantage for many developers. Setting it up is easy compared to other tools. Even beginners can get started with just a little bit of configuration. Cheerio is also modular and can be extended with Node.js modules. Another big advantage of Cheerio is that it requires no browser. Cheerio's compatibility with Node.js makes it a preferred choice among Node.js development companies for server-side web scraping and parsing. This synergy allows for efficient and scalable solutions, leveraging the full potential of Node.js's asynchronous capabilities.
How do you install Cheerio in Node.js?
Head over to your working environment and open the terminal. Enter the command npm install cheerio. Create a new Node js project using the command line interface. From there, add Cheerio js as a dependency and start using it to extract data and manipulate HTML easily.
How do you scrape data from a single web page using Cheerio?
You can specify what data you want to extract by passing the keys and values to the object. The keys in the map object represent the names of the properties you want to create on the object, while the values are the Cheerio selectors you'll use to extract the data.
How do you use Puppeteer with Cheerio?
Use Puppeteer to open the website in a headless browser. Once the website is loaded using Puppeteer, you can use Cheerio to load its HTML.
How do you scrape data from multiple pages using Cheerio and pagination?
When scraping paginated content, you can use the navigation links to move between pages and extract data from each one. However, when scraping multiple pages that aren't paginated, you'll need to use a different approach to identify and extract the data you need.
How do you handle errors while scraping with Cheerio?
To handle errors, we can use try-catch blocks in our code. A try block allows us to try a block of code when we're not sure whether the code will execute and catch any errors that might occur. If an error occurs, the catch block will execute, allowing us to handle the error appropriately.
How do you write scraped data to a local file using Cheerio?
Store the data in a JSON file. You can use the built-in fs module in Node.js, which lets you interact with the file system on a computer.


