Most e-commerce teams rely on dashboards or third-party tools to track competitor prices, stock, and product trends. But those tools are slow to update, hard to customize, or just don’t show what you really need.
Building your own scraper gives you control. You can get real-time data, monitor exactly what matters, and automate everything on your terms.
Here are the benefits of building your own e-commerce scraper:
- Live price tracking to keep margins competitive
- Automated product syncs to eliminate outdated listings
- Review and rating information to guide product decisions
- Market-wide research to inform launches or expansions
- Flexible data flows for ML, BI tools, or custom dashboards
The problem is that building a scraper, particularly for e-commerce sites that are large and complex, isn't exactly an easy feat, unless you really know what you're doing.
This tutorial will guide you through the process, so you can create a solution that is sturdy and reliable – in less than 30 minutes.

How to scrape products from e-commerce sites
In this tutorial, we'll build an e-commerce scraper with just a few lines of JavaScript, then integrate it with Gmail to receive the collected data directly in our email inbox. Finally, we'll configure the scraper to run on a schedule to fully automate our data extraction process. Zappos.com will be our target website.
Tools for scraping e-commerce websites
Every website is different, so the tools you use will depend on the target website. Our decision about what tool to use for e-commerce data scraping is primarily based on whether or not the target website loads content dynamically. In other words, it depends on whether it requires JavaScript to load the data on the page or if we can access the data with plain HTTP requests.
Additionally, you can look for XHR requests received by the website in the Network tab, and if you are lucky enough to find a request containing the data you need, you can simply perform API scraping.
A quick way to check if the website requires JavaScript to load its contents is to use the browser developer tools to disable JavaScript and then browse around the target website to see if the data we want is still displayed on the web page.
To turn off JavaScript:
Open DevTools by right-clicking the webpage and selecting
Inspect. Or, pressCtrl+Shift+I (Windows, Linux)orCommand+Option+I (macOS)Press
Ctrl+Shift+P (Windows, Linux)orCommand+Shift+P (macOS)to open the Command Menu.Type
javascript, and then select the Disable JavaScript option. You will see a yellow warning icon next to the Sources tab reminding you that JavaScript is disabled. Note that JavaScript will remain disabled for as long as you have DevTools open.Refresh the page to verify whether the website depends on JavaScript to load its content.
As shown in the video, the content on Zappos.com loads even after we disable JavaScript. This means we can use Cheerio Scraper to send plain HTTP requests and parse the resulting HTML response to extract data from this website. Cheerio is usually the best choice for scraping static web pages due to its significant performance advantage compared to Puppeteer or Playwright, which run headless browsers.
Cheerio Scraper
So, now that we know what tool to use, let’s go to the Cheerio Scraper page on the Apify website and click on Try for Free.
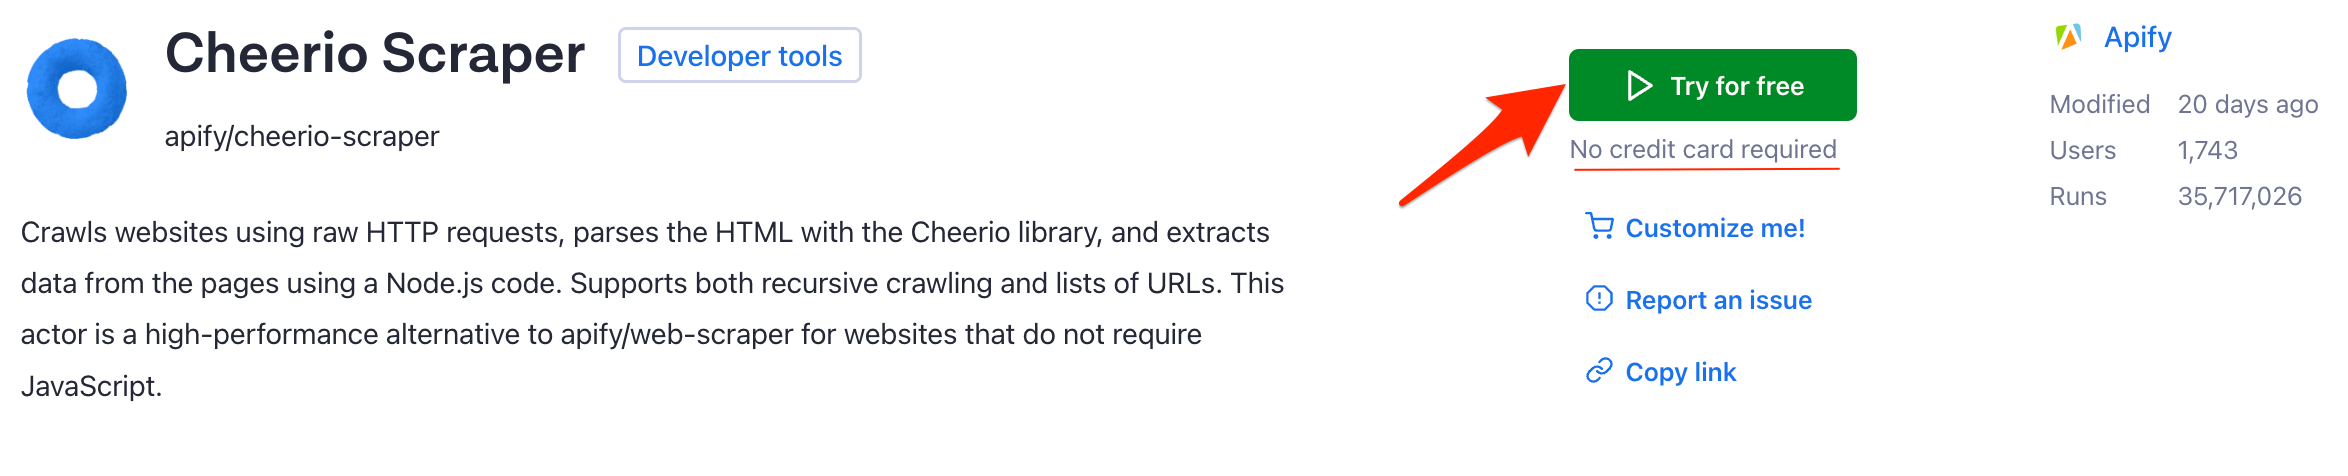
Don’t worry. You don’t have to provide your credit card information, and the free plan has no time limit. So, if you don’t already have an Apify account, sign up, and if you have one, just log in and let’s move on to the Cheerio Scraper’s configuration page.
Configuration
You can see the available input options on the scraper's configuration page. In this e-commerce scraper tutorial, we will use the Start URLs, Glob Patterns, Link selector, and Page function fields. That’s how our final actor configuration will look like. 👇
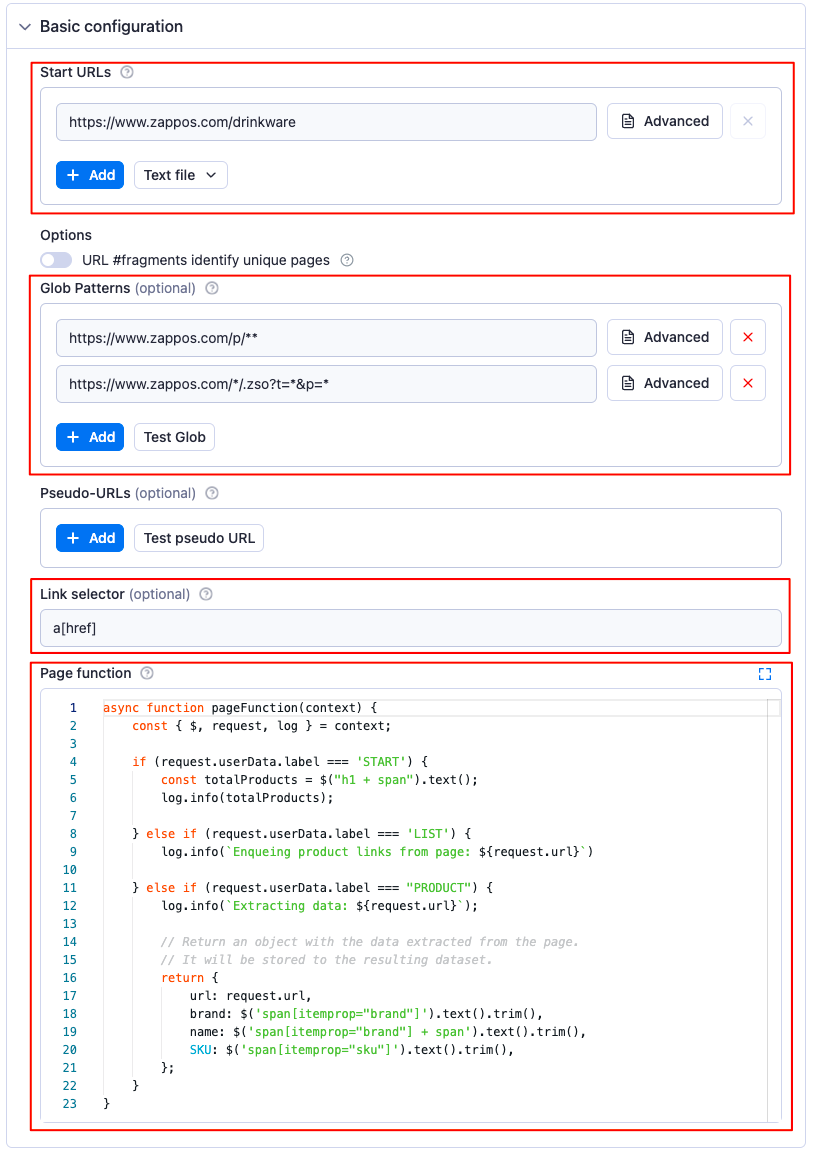
Cool, now that we know the information the scraper requires to function, it’s time to do some detective work to find the relevant selectors and URLs we need to scrape our target website. 🕵️
The Start URL
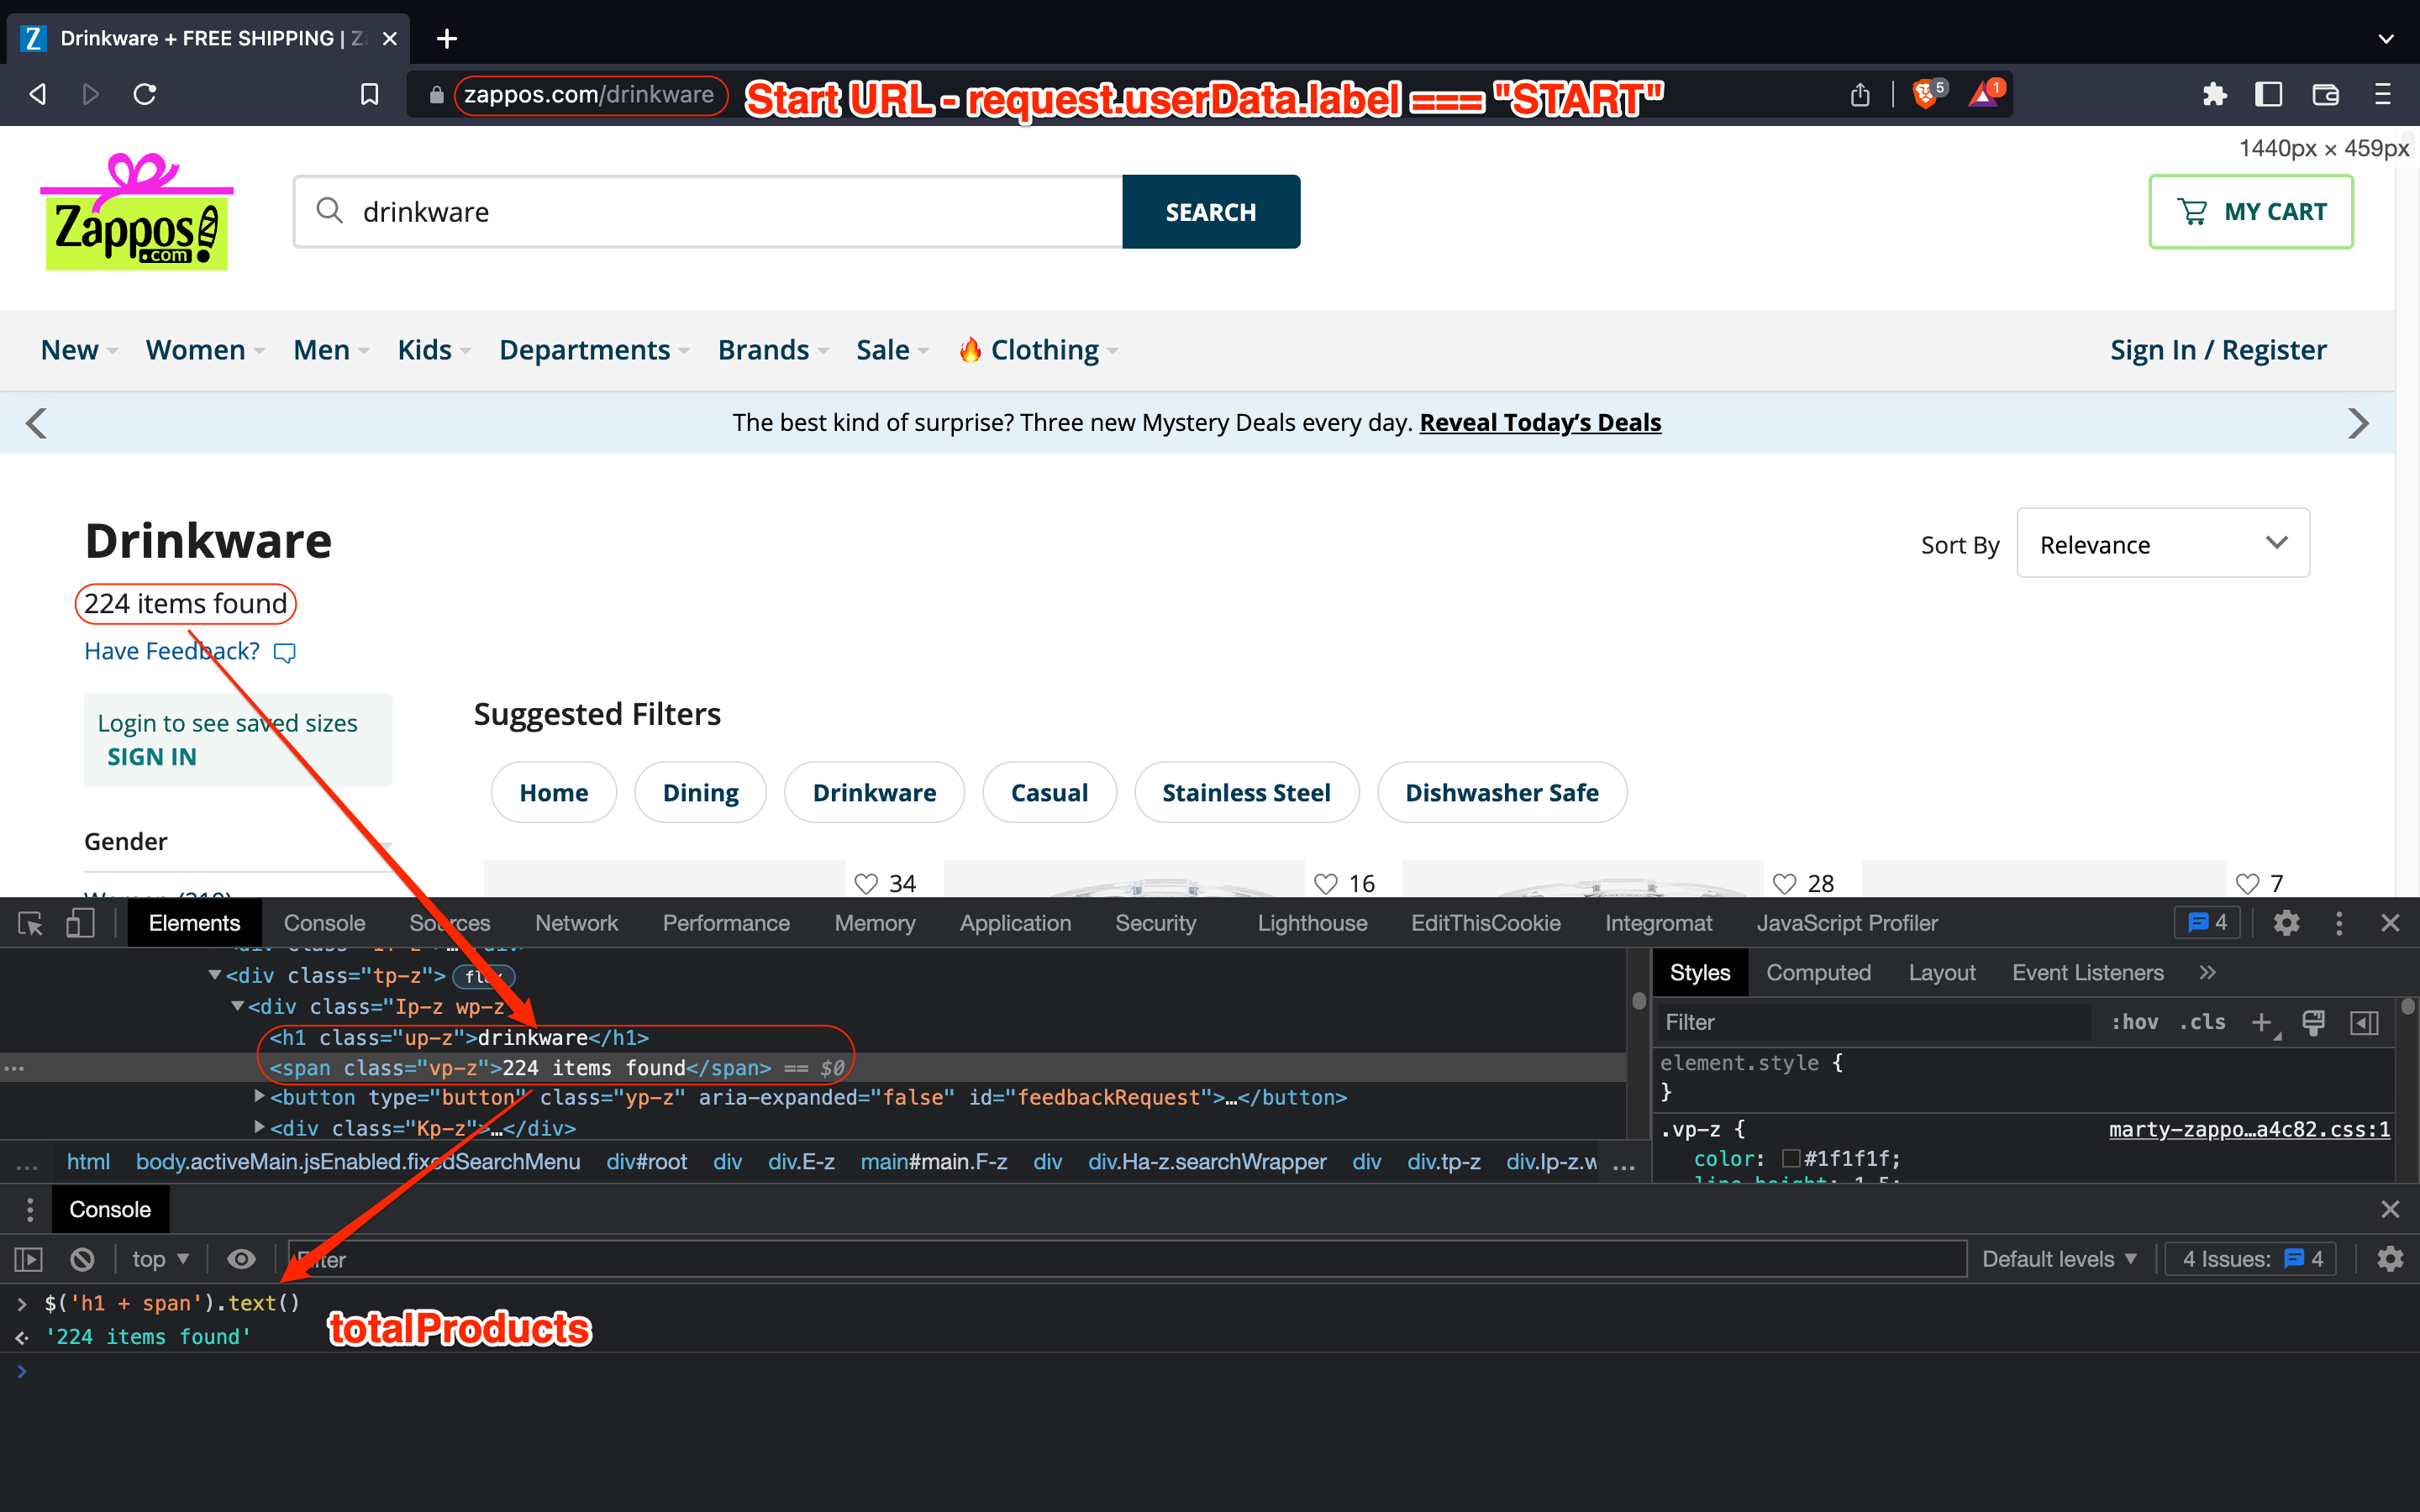
In this tutorial, we want to extract all the data from the products list resulting from a specific keyword search in the Zappos.com store. In this case, we’re searching for drinkware.
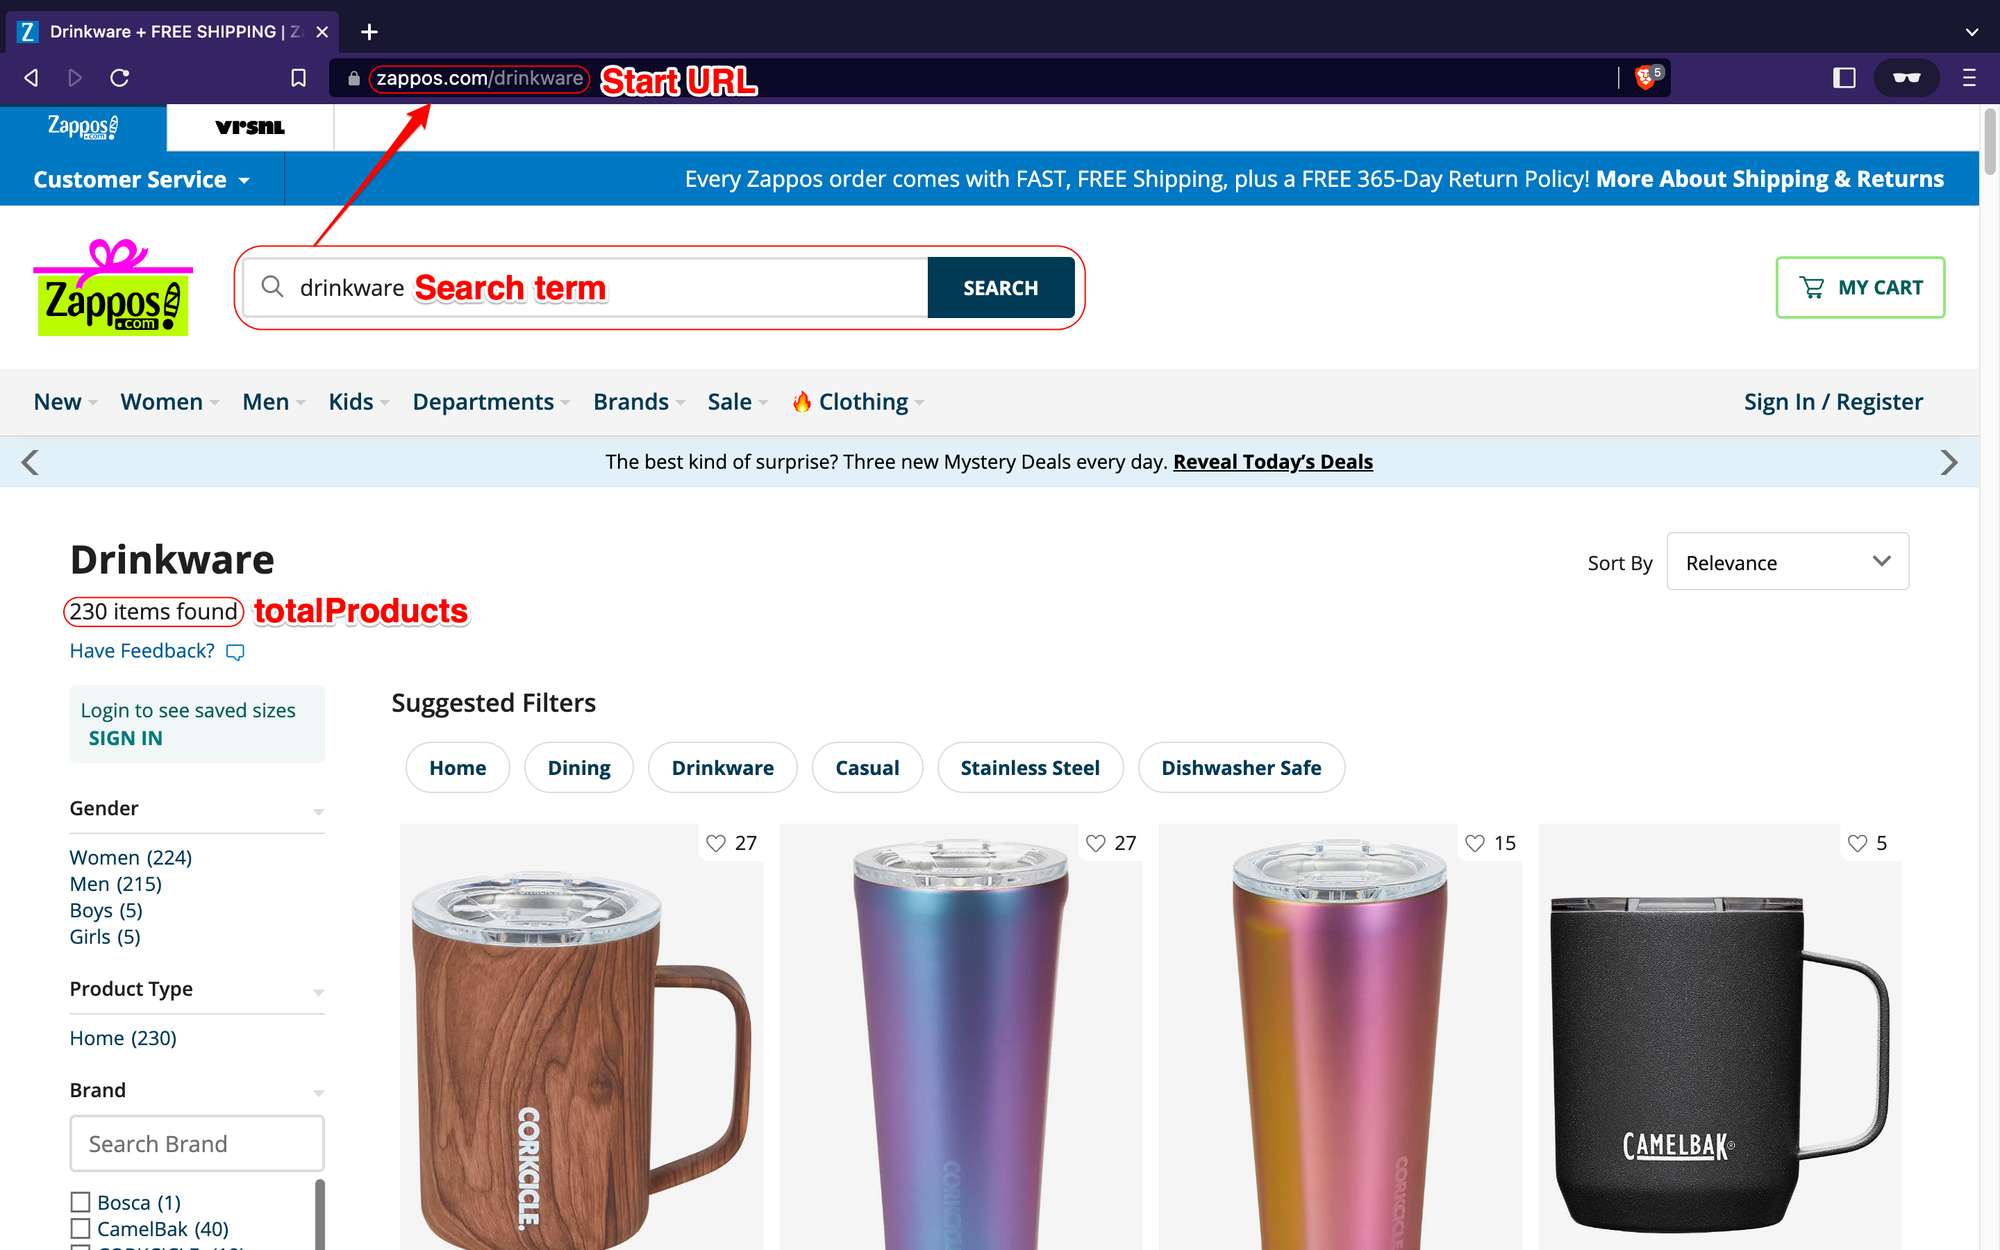
On the first store page, we can find the Start URL for the selected search term (https://www.zappos.com/drinkware) and the total number of products found. So, let’s paste the URL to the Start URL field on the Cheerio Scraper configuration page.

As for the total number of products found, we’ll soon get back to it once we start writing our scraper’s Page function.
Finding product URLs
The next step is to find the URL pattern for the products displayed on each store page. This will enable us to use the Glob Patterns field to match those patterns and filter the product URLs we want to scrape.
To find the right URLs, let’s visit any of the product pages displayed on the store and analyze the URL pattern.
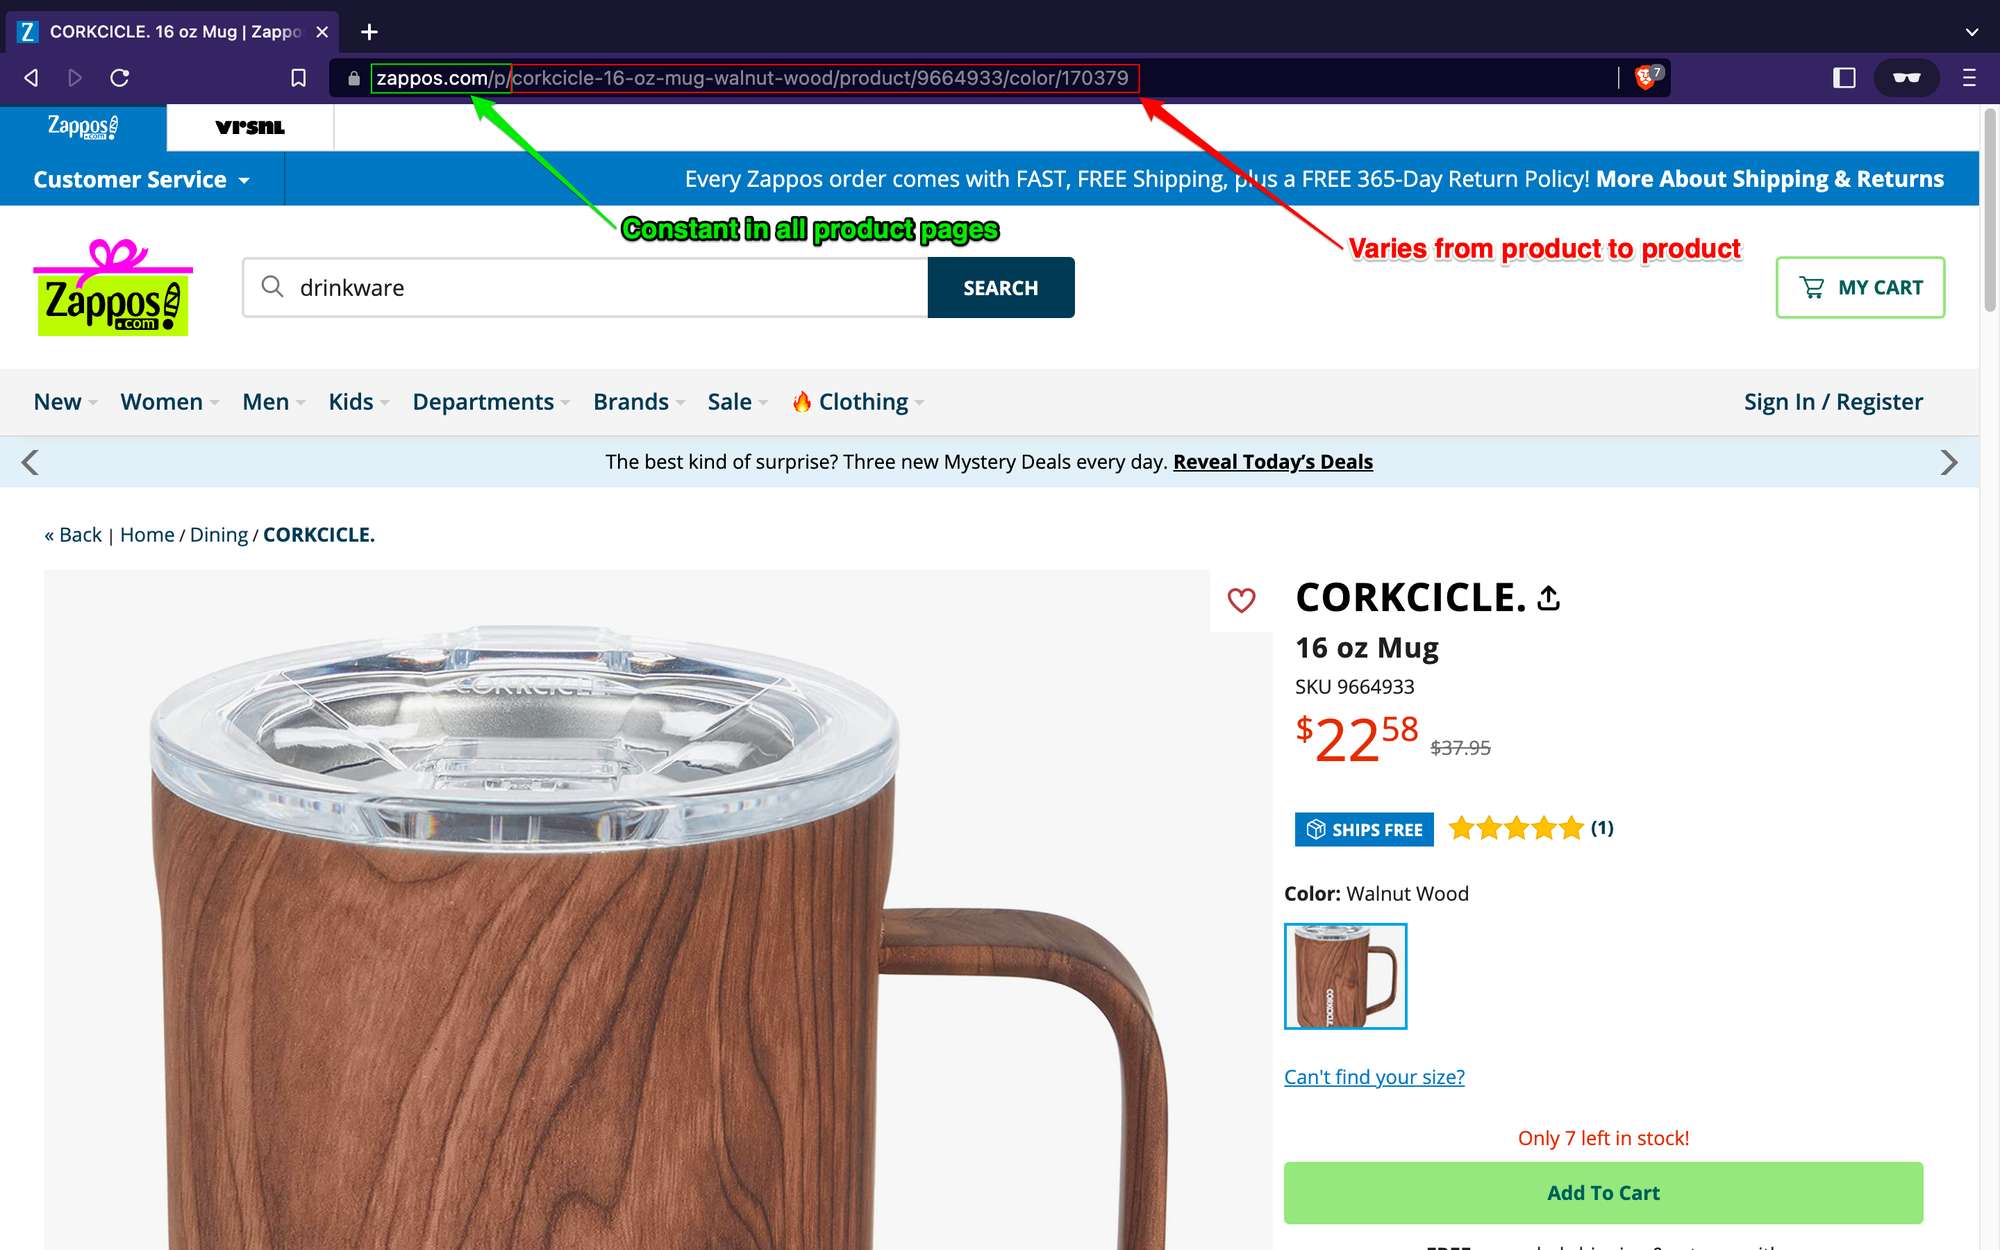
After analyzing the URL pattern of a couple of products on Zappos.com, you’ll realize that the first part of the URL (i.e., https://www.zappos.com/p/**) is always the same for all product pages, while the rest of the URL might vary depending on the product. With this information, we can easily write a simple glob pattern to match all product URLs on each store page.
Glob patterns and link selector
Before we continue, here is a quick refresher on some basic glob patterns that we’ll use in this tutorial:
| Character | Description |
|---|---|
* |
Matches any character zero or more times, except for / |
** |
Matches any character zero or more times, including / |
And that’s how our configuration will look after we fill in the input fields with relevant patterns to match our desired URLs:
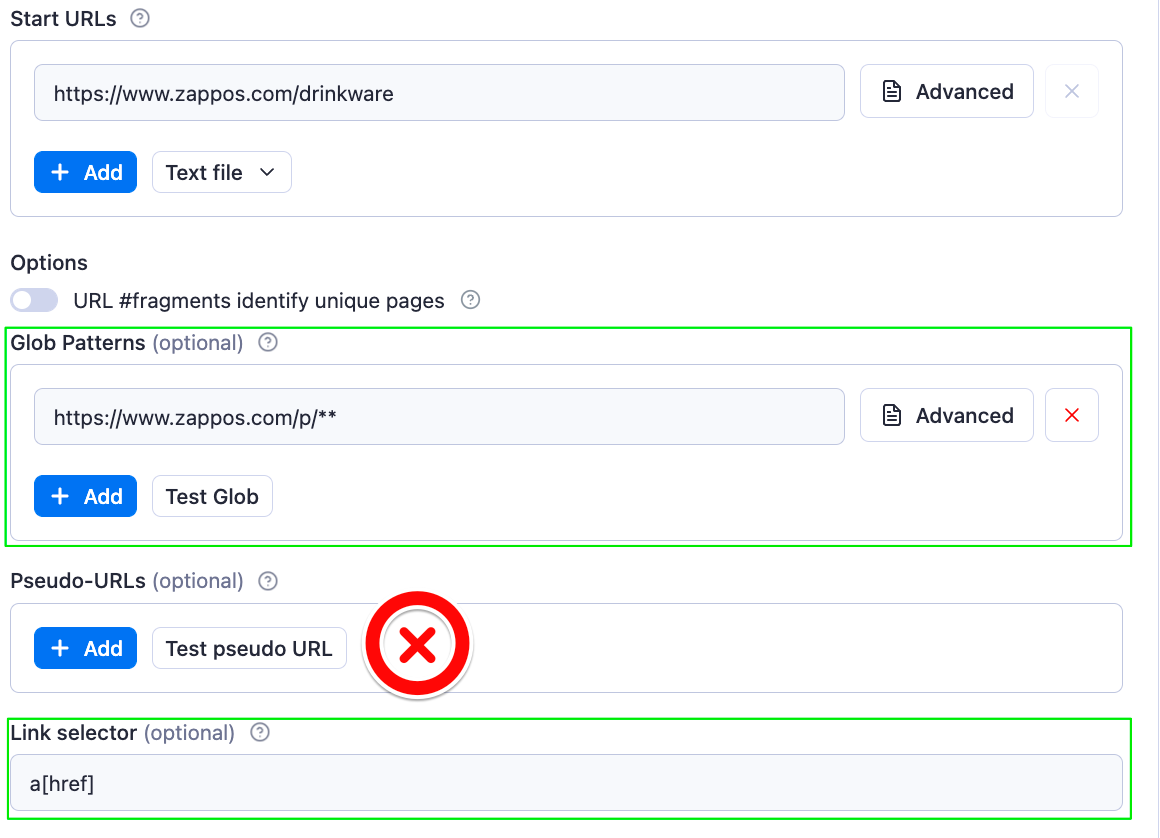
Great! Now, let’s quickly break down the purpose of each input field highlighted in the image above.
The Link selector field takes a CSS selector stating which links on the page shall be followed and added to the queue of URLs. By using a[href] as input, we are telling the scraper to follow all links on the page. And now, we can easily filter which links should be added to the queue of URLs by defining either a set of Glob patterns or Pseudo-URLs. Since we’re using Glob patterns in this tutorial, we can leave the Pseudo-URLs field empty.
Additionally, the scraper offers us a handy Test Glob feature that we can use to validate patterns and make sure they are working as expected. So, let’s grab a few product links and test our pattern.
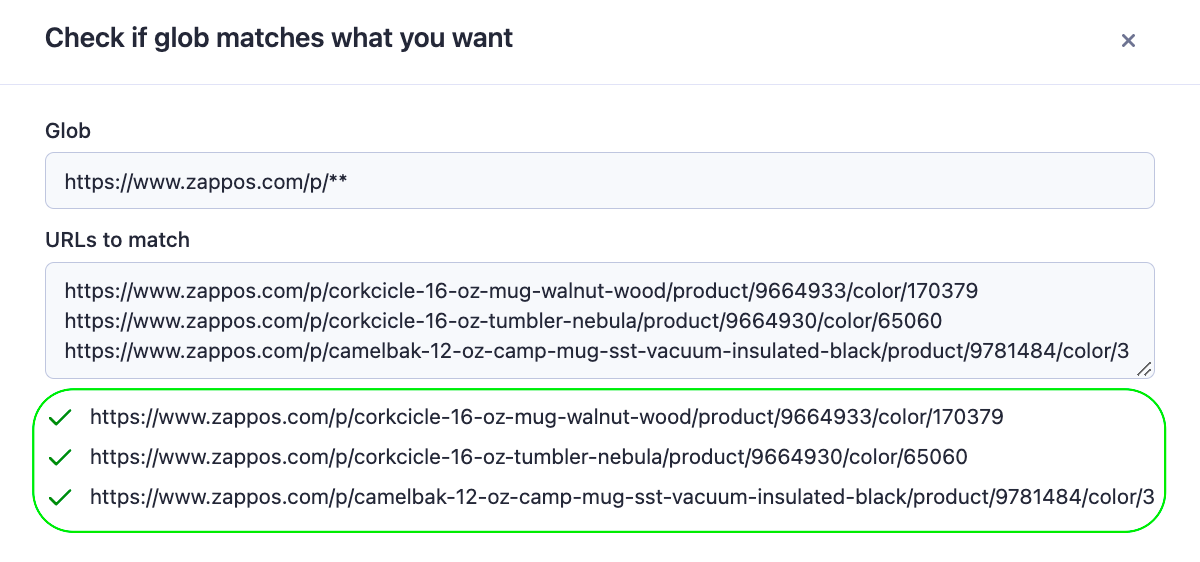
Nice! The pattern is indeed matching the expected URLs. Now that we understand how patterns work let’s follow a similar process to handle the store pagination and enqueue all product links from the remaining result pages.
Pagination
In the example below, we can see that the second page of the store has the following URL structure: https://www.zappos.com/.
If you visit a few more pages, you’ll notice that this structure remains consistent across all store pages that result from a search query.
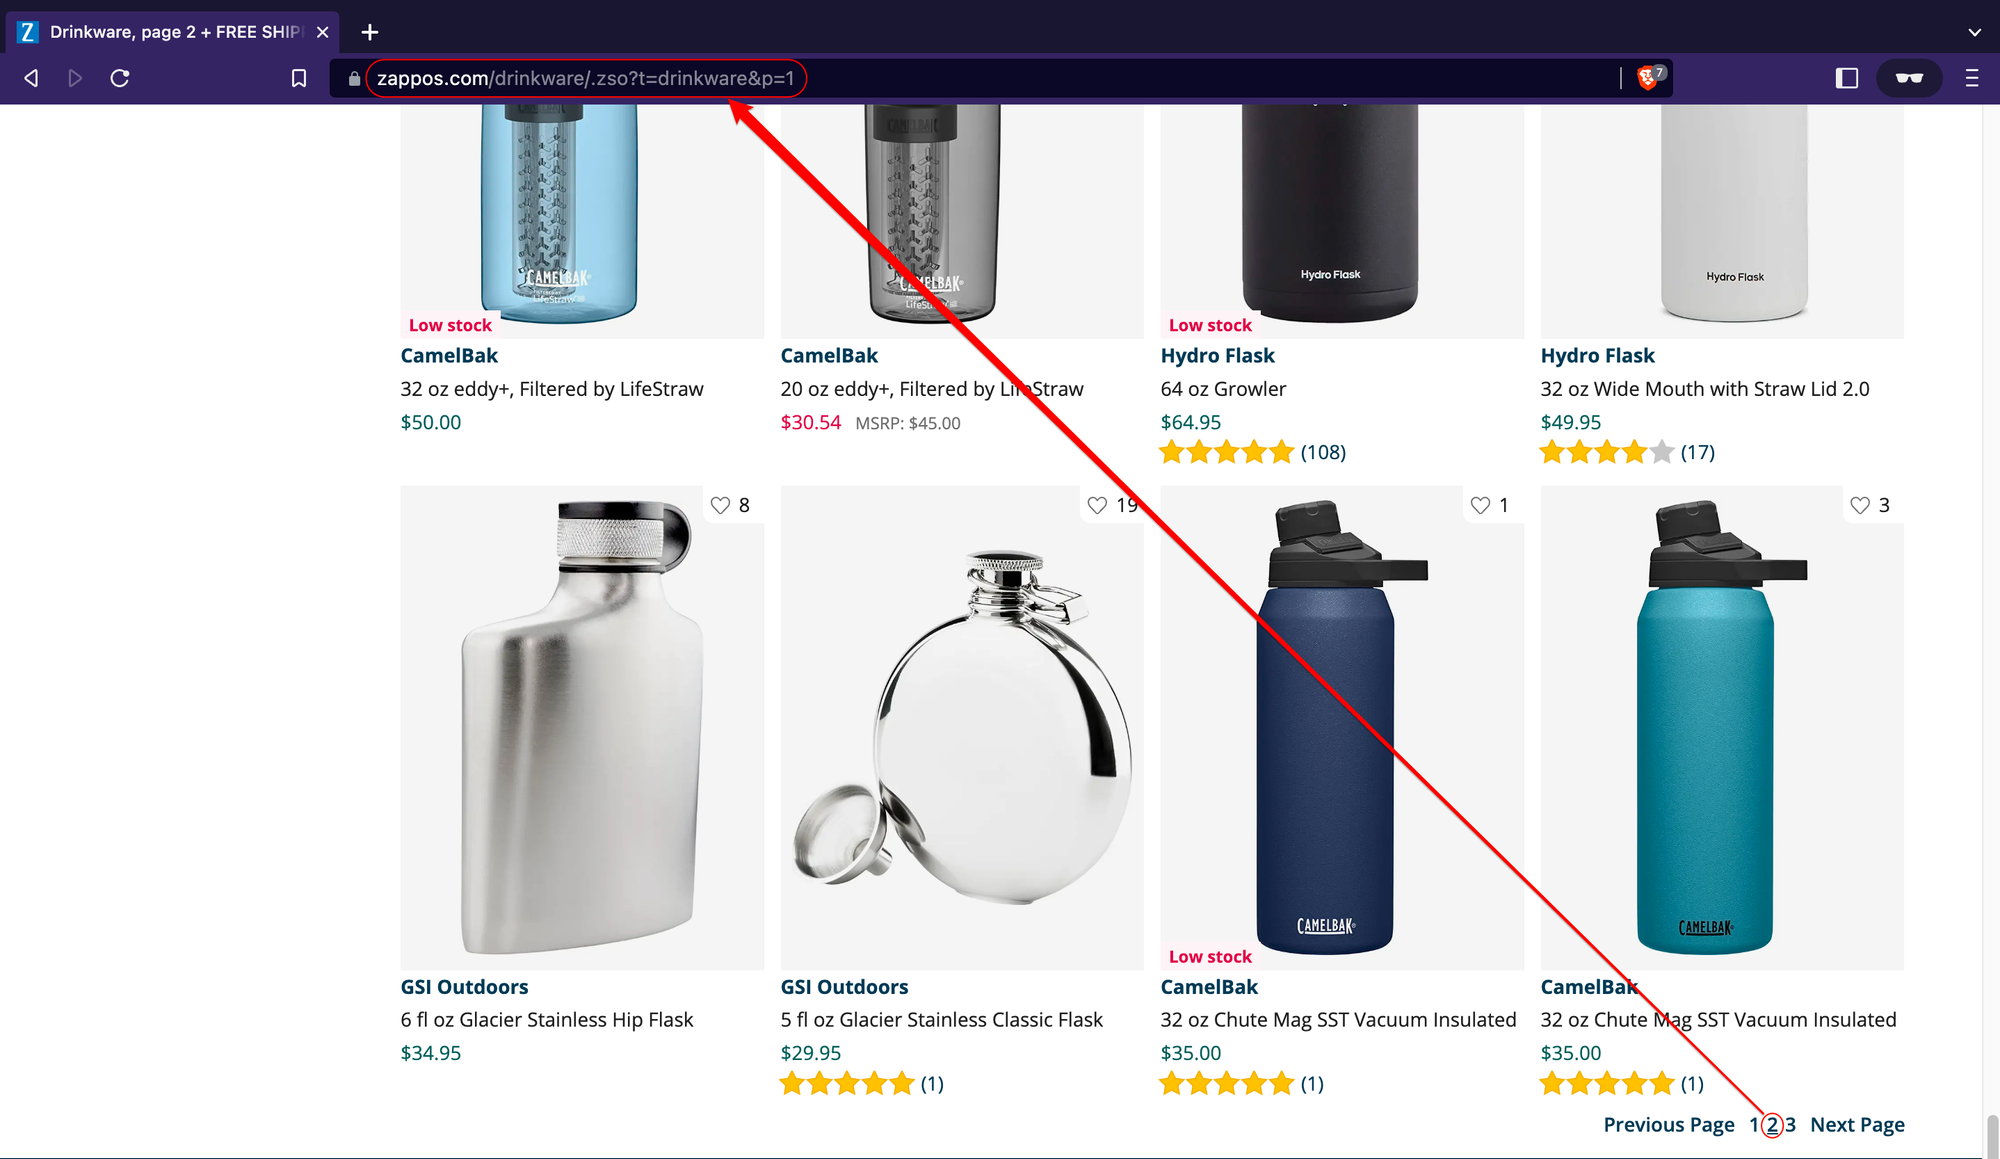
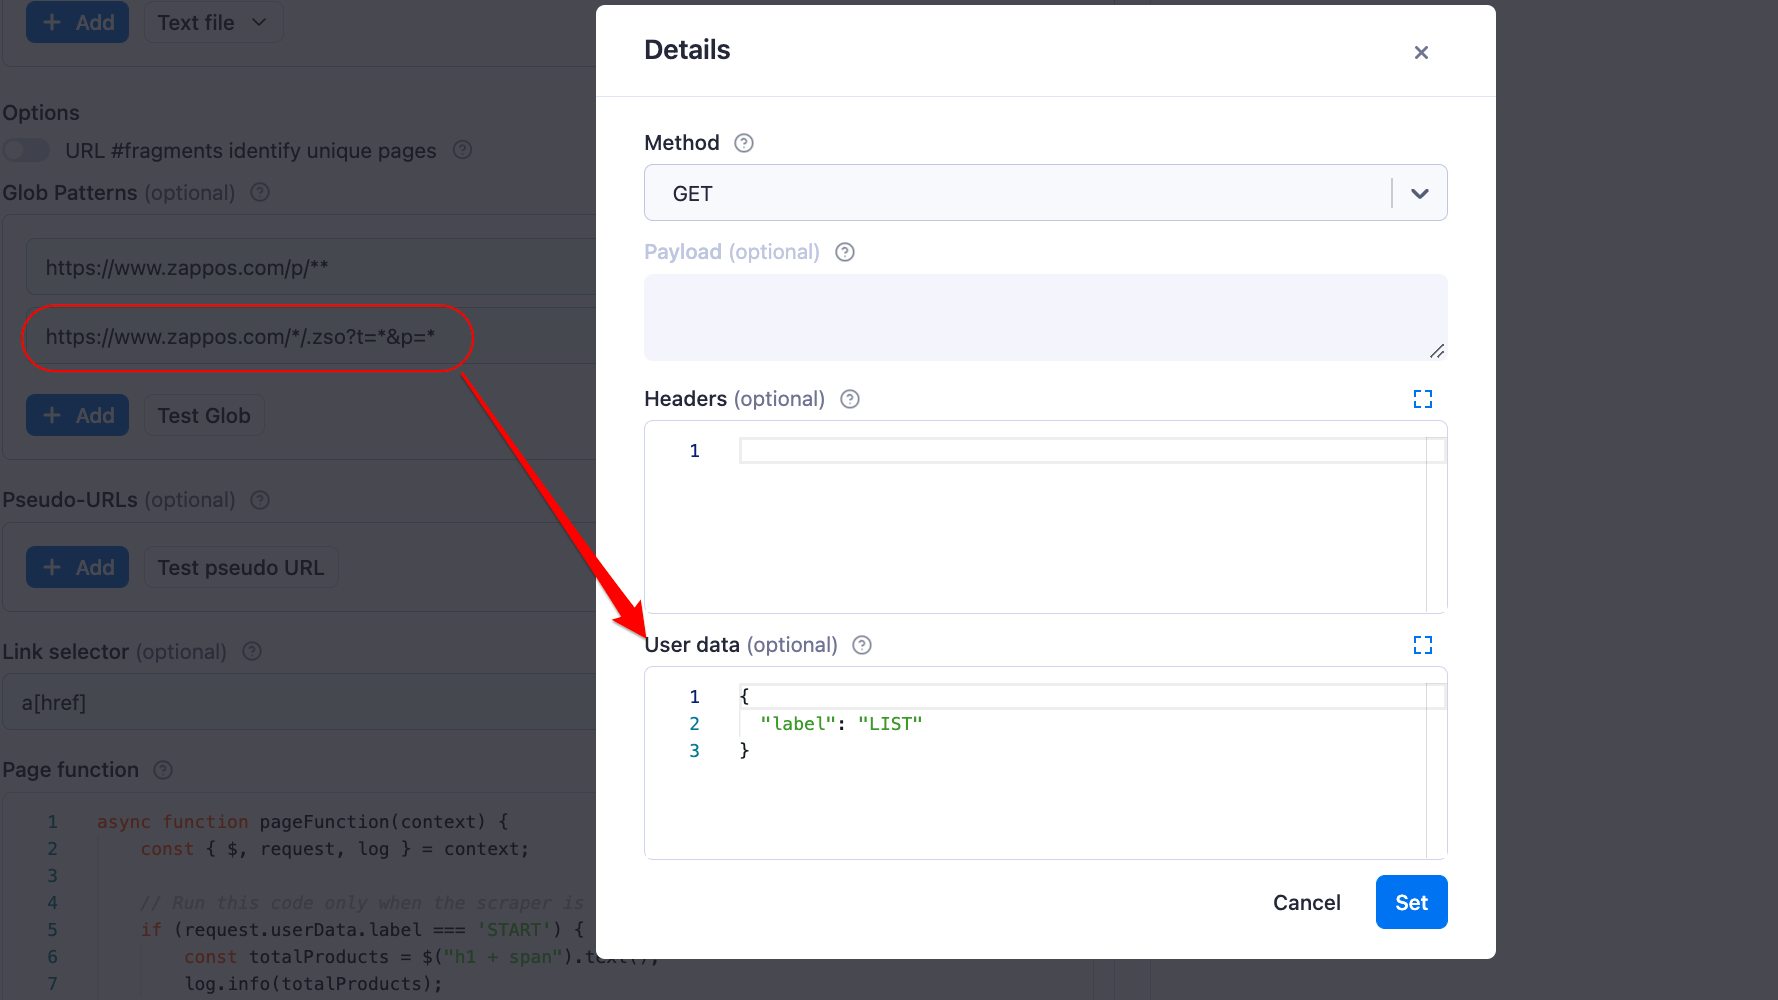
Knowing this, we can write another glob pattern to match all resulting pages, regardless of the search term provided. This is how the pattern will look: https://www.zappos.com/*/.zso?t=*&p=*
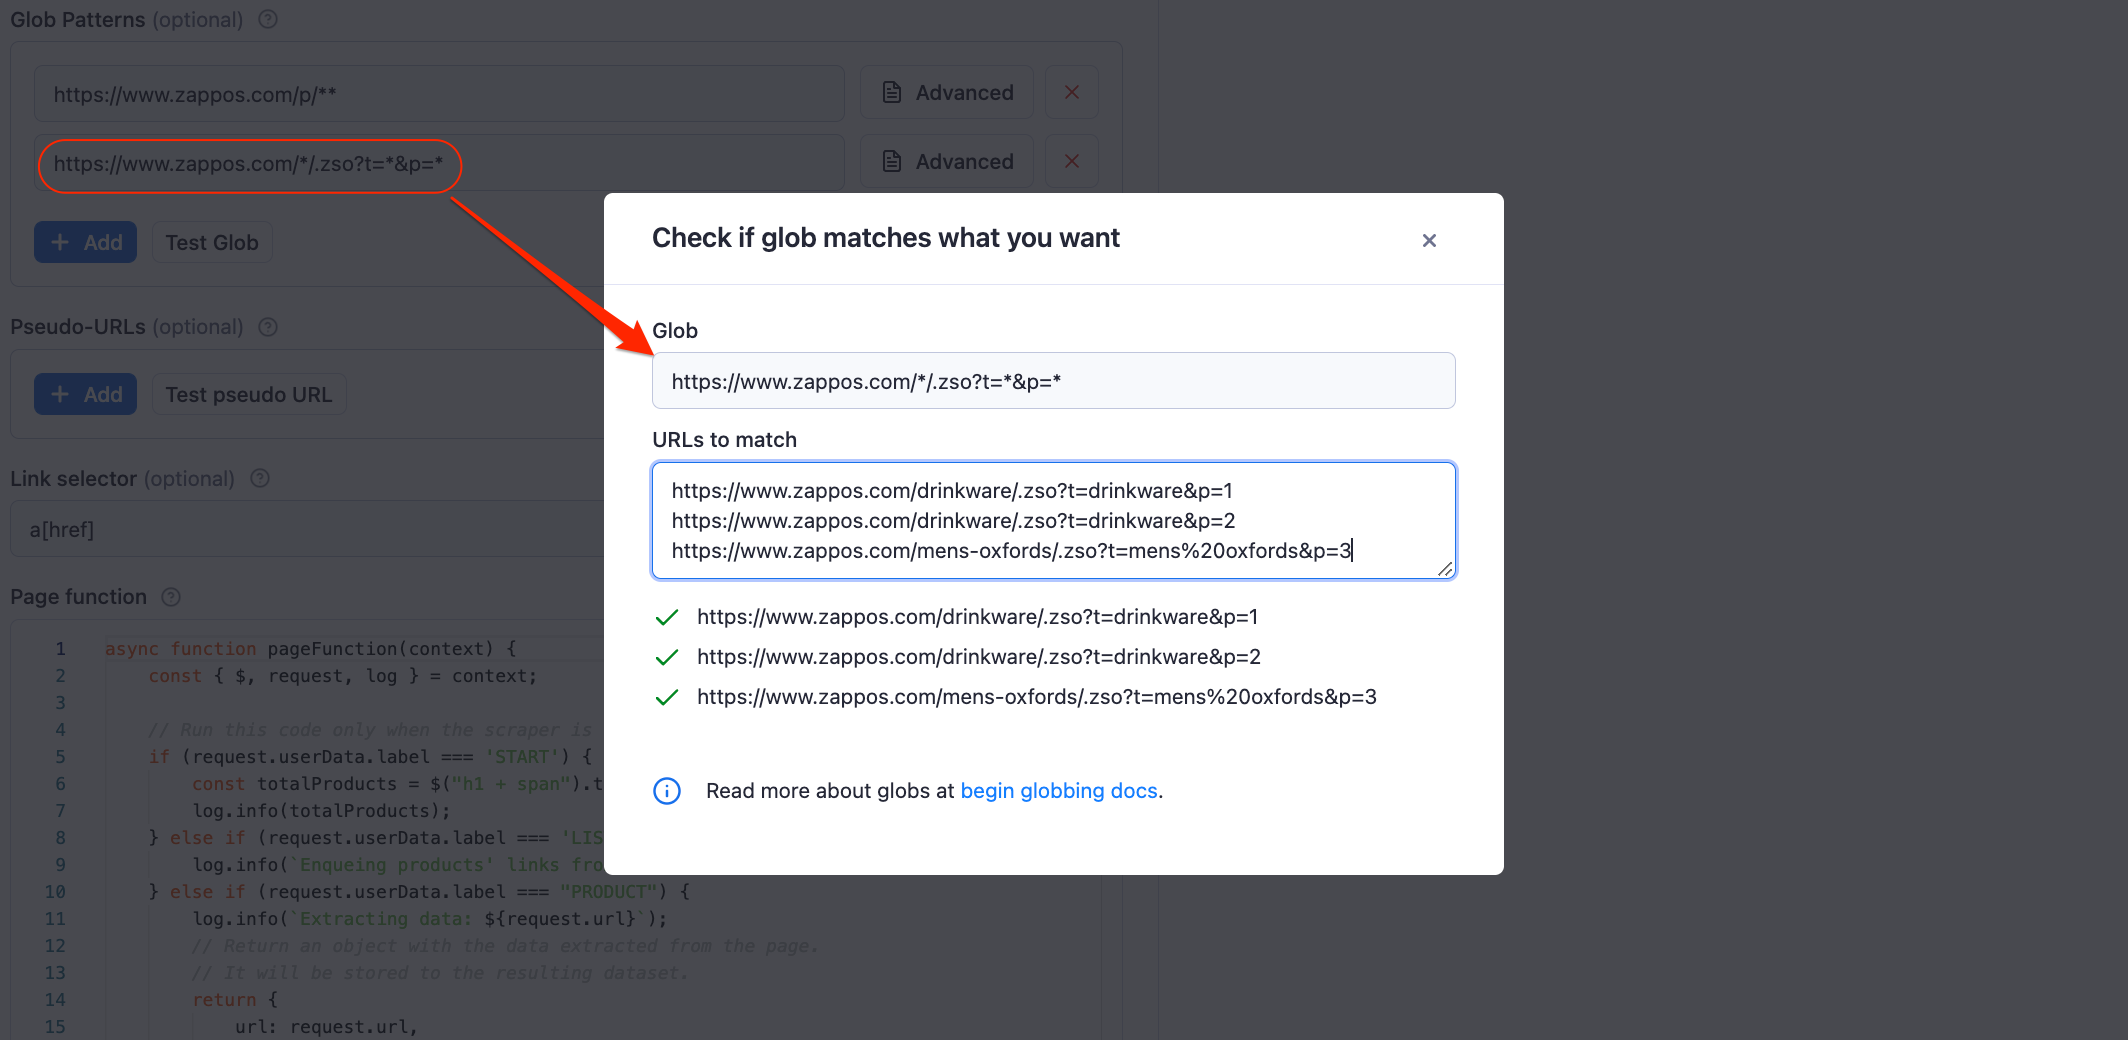
And that’s it! As you can see, our pattern matches all the page URLs and passes the glob tests.
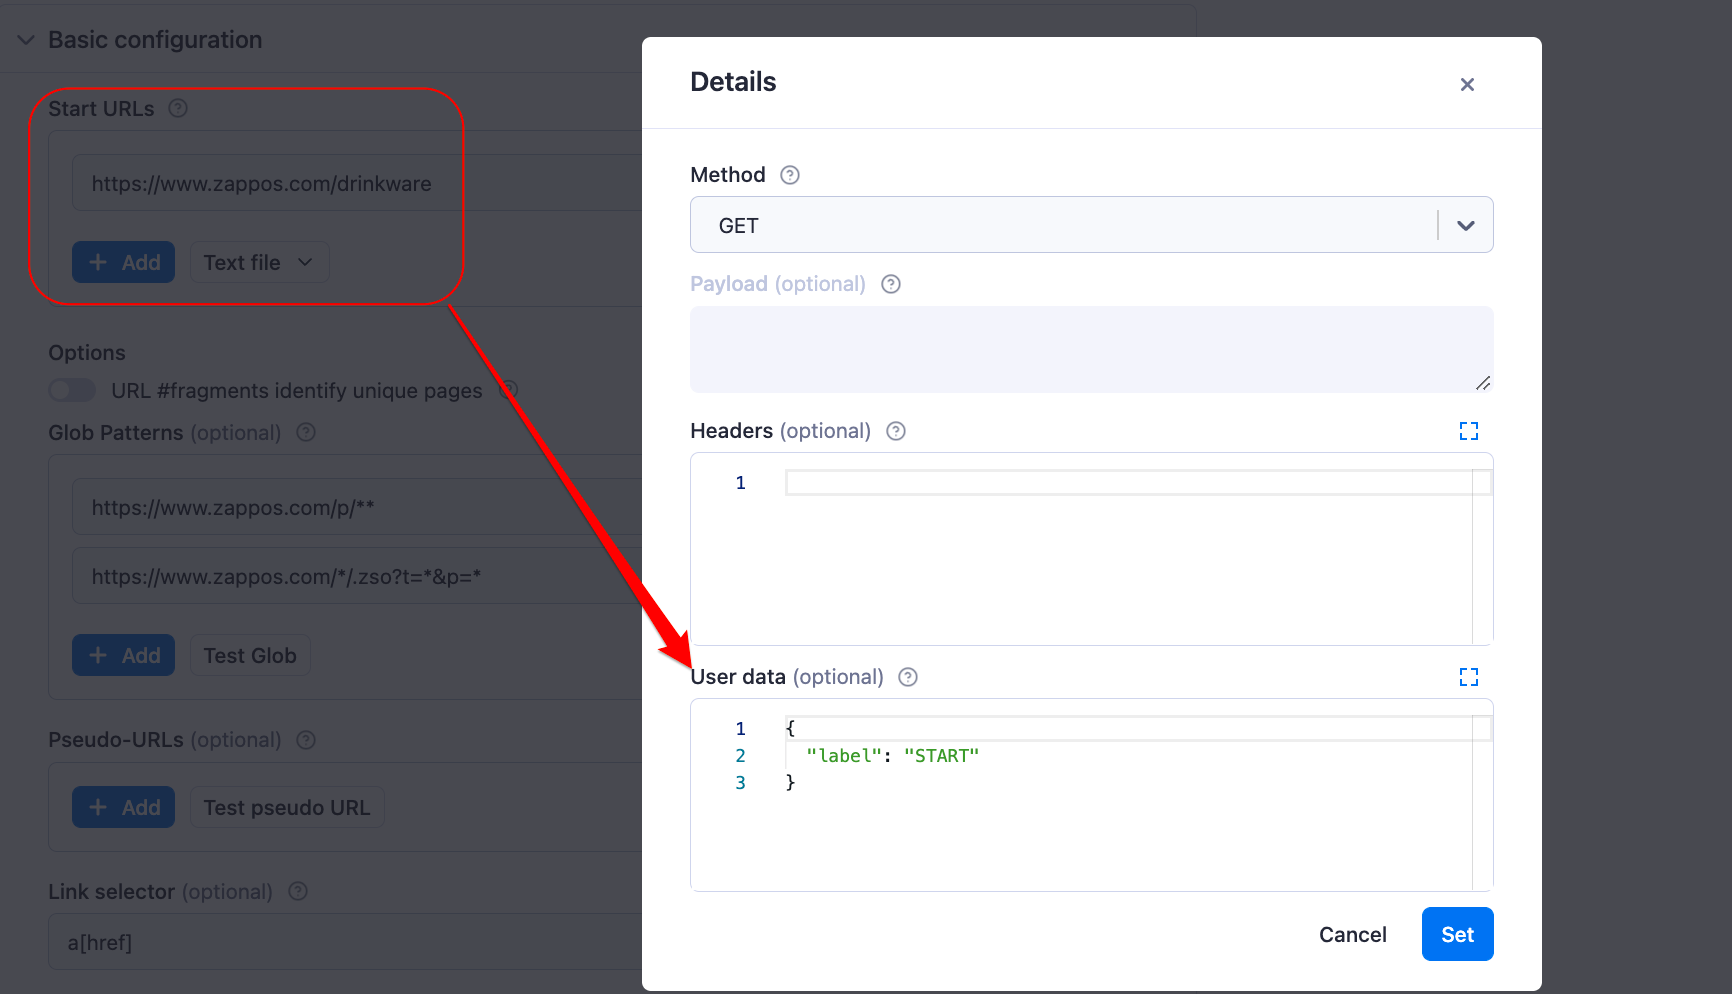
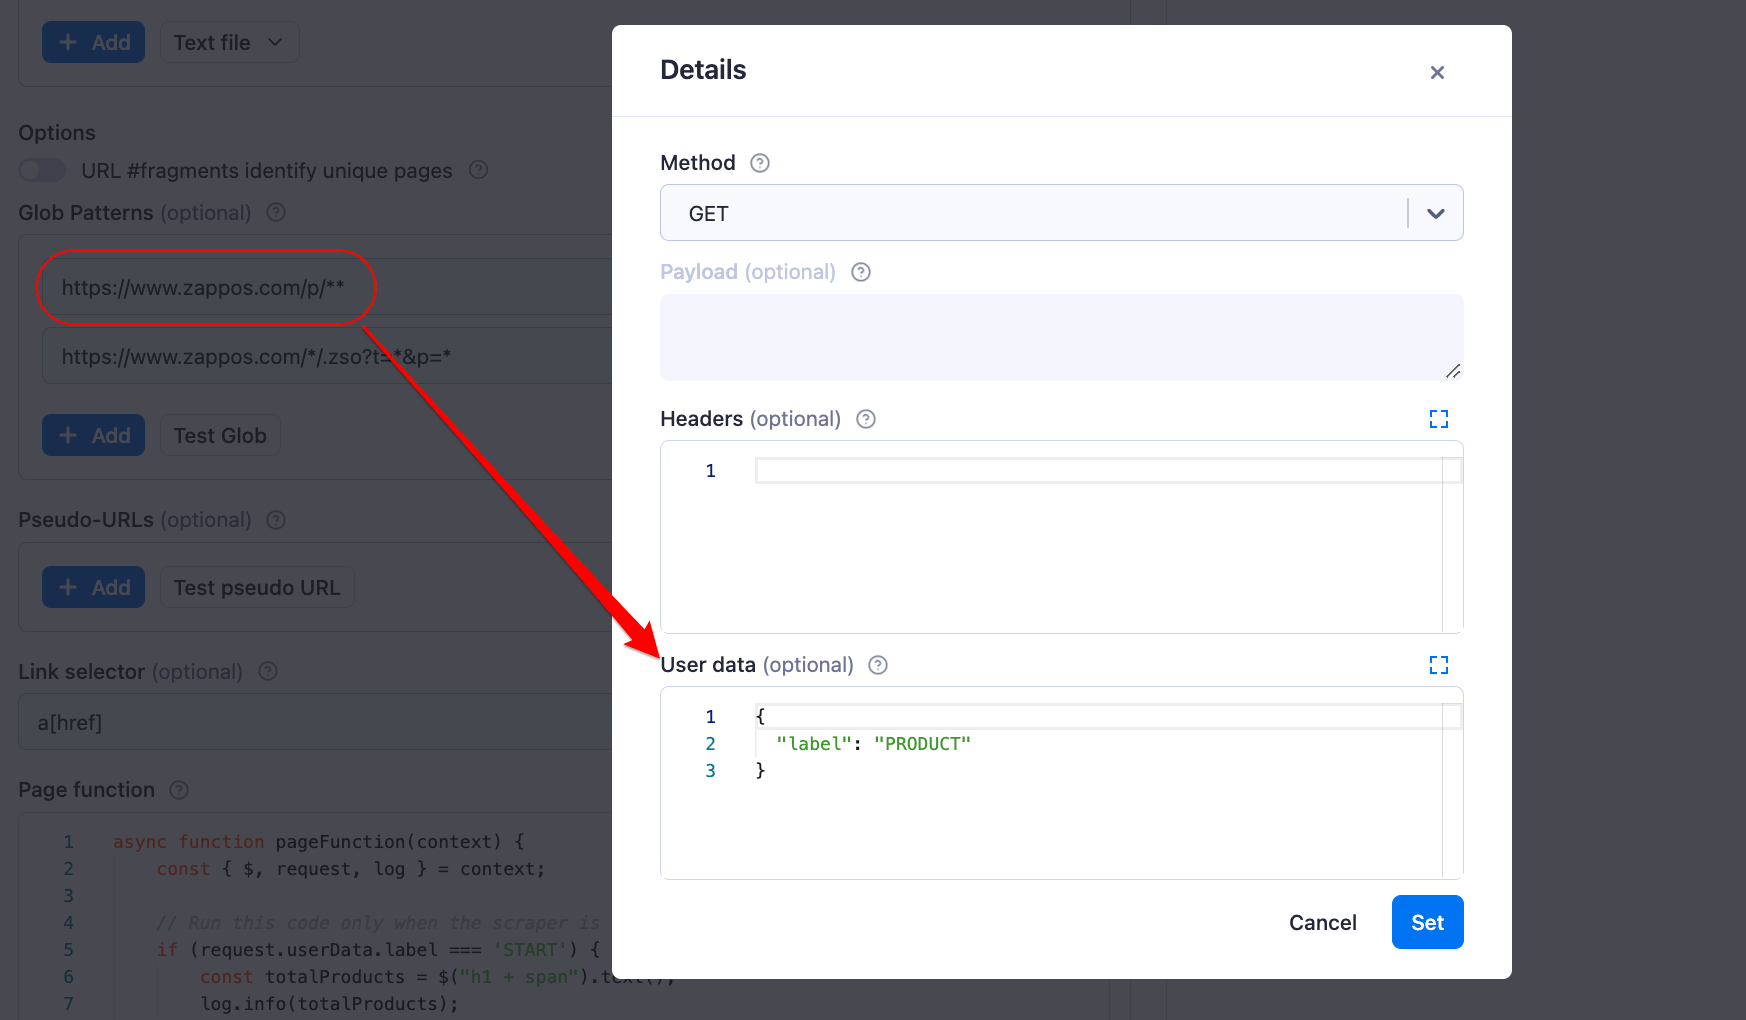
Great! We’re almost done with our scraper. But, before we continue to the Page function section, let’s first give a descriptive label to each of the request URLs according to the type of page we’re accessing.
We can do that by clicking on the Advanced button right next to the Start URLs and Glob Patterns fields. Then, we can pass the label as a JSON object to the User data field.
Note that you can give the labels any name you want, but in this tutorial, we’ll use the label names “START,” “PRODUCT,” and “LIST” for our start URL, product, and pagination pages, respectively.
The purpose of defining labels will become clear when we start writing the Page function in the next step of the tutorial.
Page function
By default, the Cheerio Scraper will execute the function defined in the Page function field on every loaded page. This feature adds utility and flexibility to the scraper, enabling you to use it to scrape data, perform actions or enqueue new URLs.
However, we might not always want to perform the same action on every page we visit. Some use cases require us to define specific logic for different types of pages, and that’s where the labels we defined in the last section come into play.
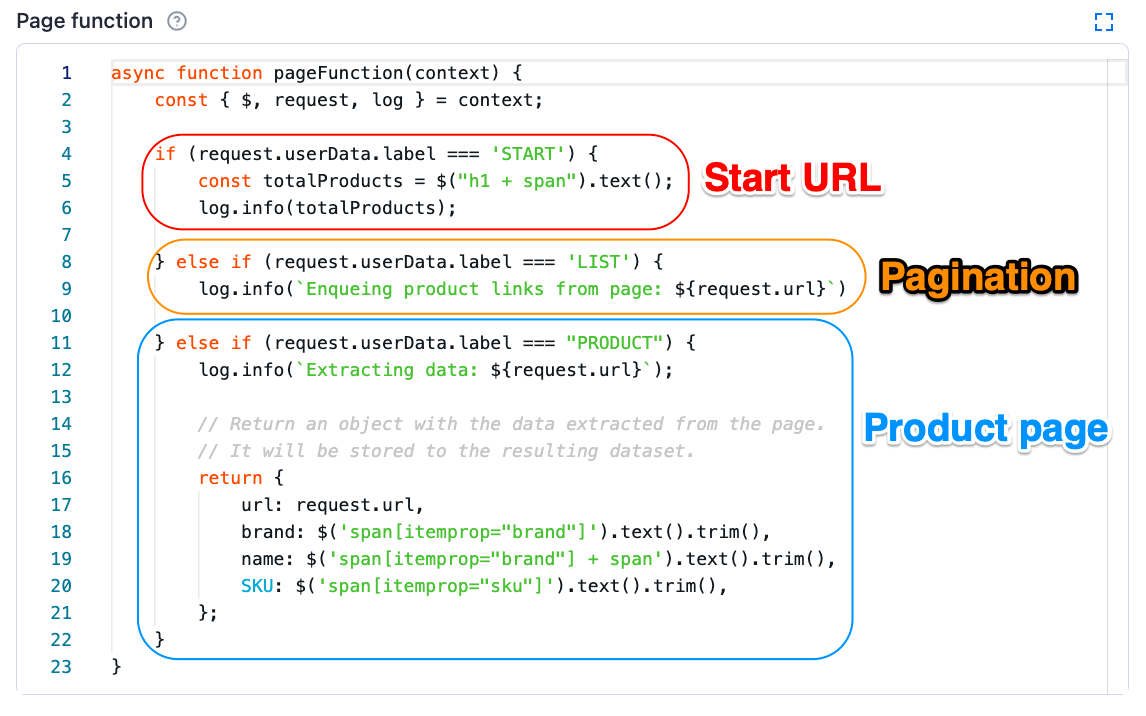
As illustrated in the image above, we can access the label values by writing request.userData.label and then using a simple if else statement to specify what sections of the code should run on which page.
For example, it would be useful to log the total number of items we can expect to scrape at the beginning of the run, but we want to log this information only once and not on every page we access. To achieve this, we can simply tell the scraper to check if the request label value equals “START.” If true, it should scrape the total number of products and print its value to the scraper’s log history.
After finding the desired selector, we can write the first part of our page function:
async function pageFunction(context) {
    const { $, request, log } = context;

if (request.userData.label === 'START') {
        const totalProducts = $("h1 + span").text();
        log.info(totalProducts);
    }
};
For the second part, let’s give our users some feedback every time the scraper accesses a new page and enqueues new product links. To do that, we can add a else if clause to our if statement to check whether the current URL has a label equal to “LIST.” If so, we can use a JavaScript template literal to log a short text describing what the scraper is doing on this particular URL.
async function pageFunction(context) {
    const { $, request, log } = context;

    if (request.userData.label === 'START') {
        const totalProducts = $("h1 + span").text();
        log.info(totalProducts);

    } else if (request.userData.label === 'LIST') {
        log.info(`Enqueueing product links on page: ${request.url}`)
    }
};
Finally, let’s define the logic for the product pages. To do this, we have to go to one of the product pages listed on the store and find the relevant selectors for the data we want to scrape, in this case, the product’s brand, name, and SKU.
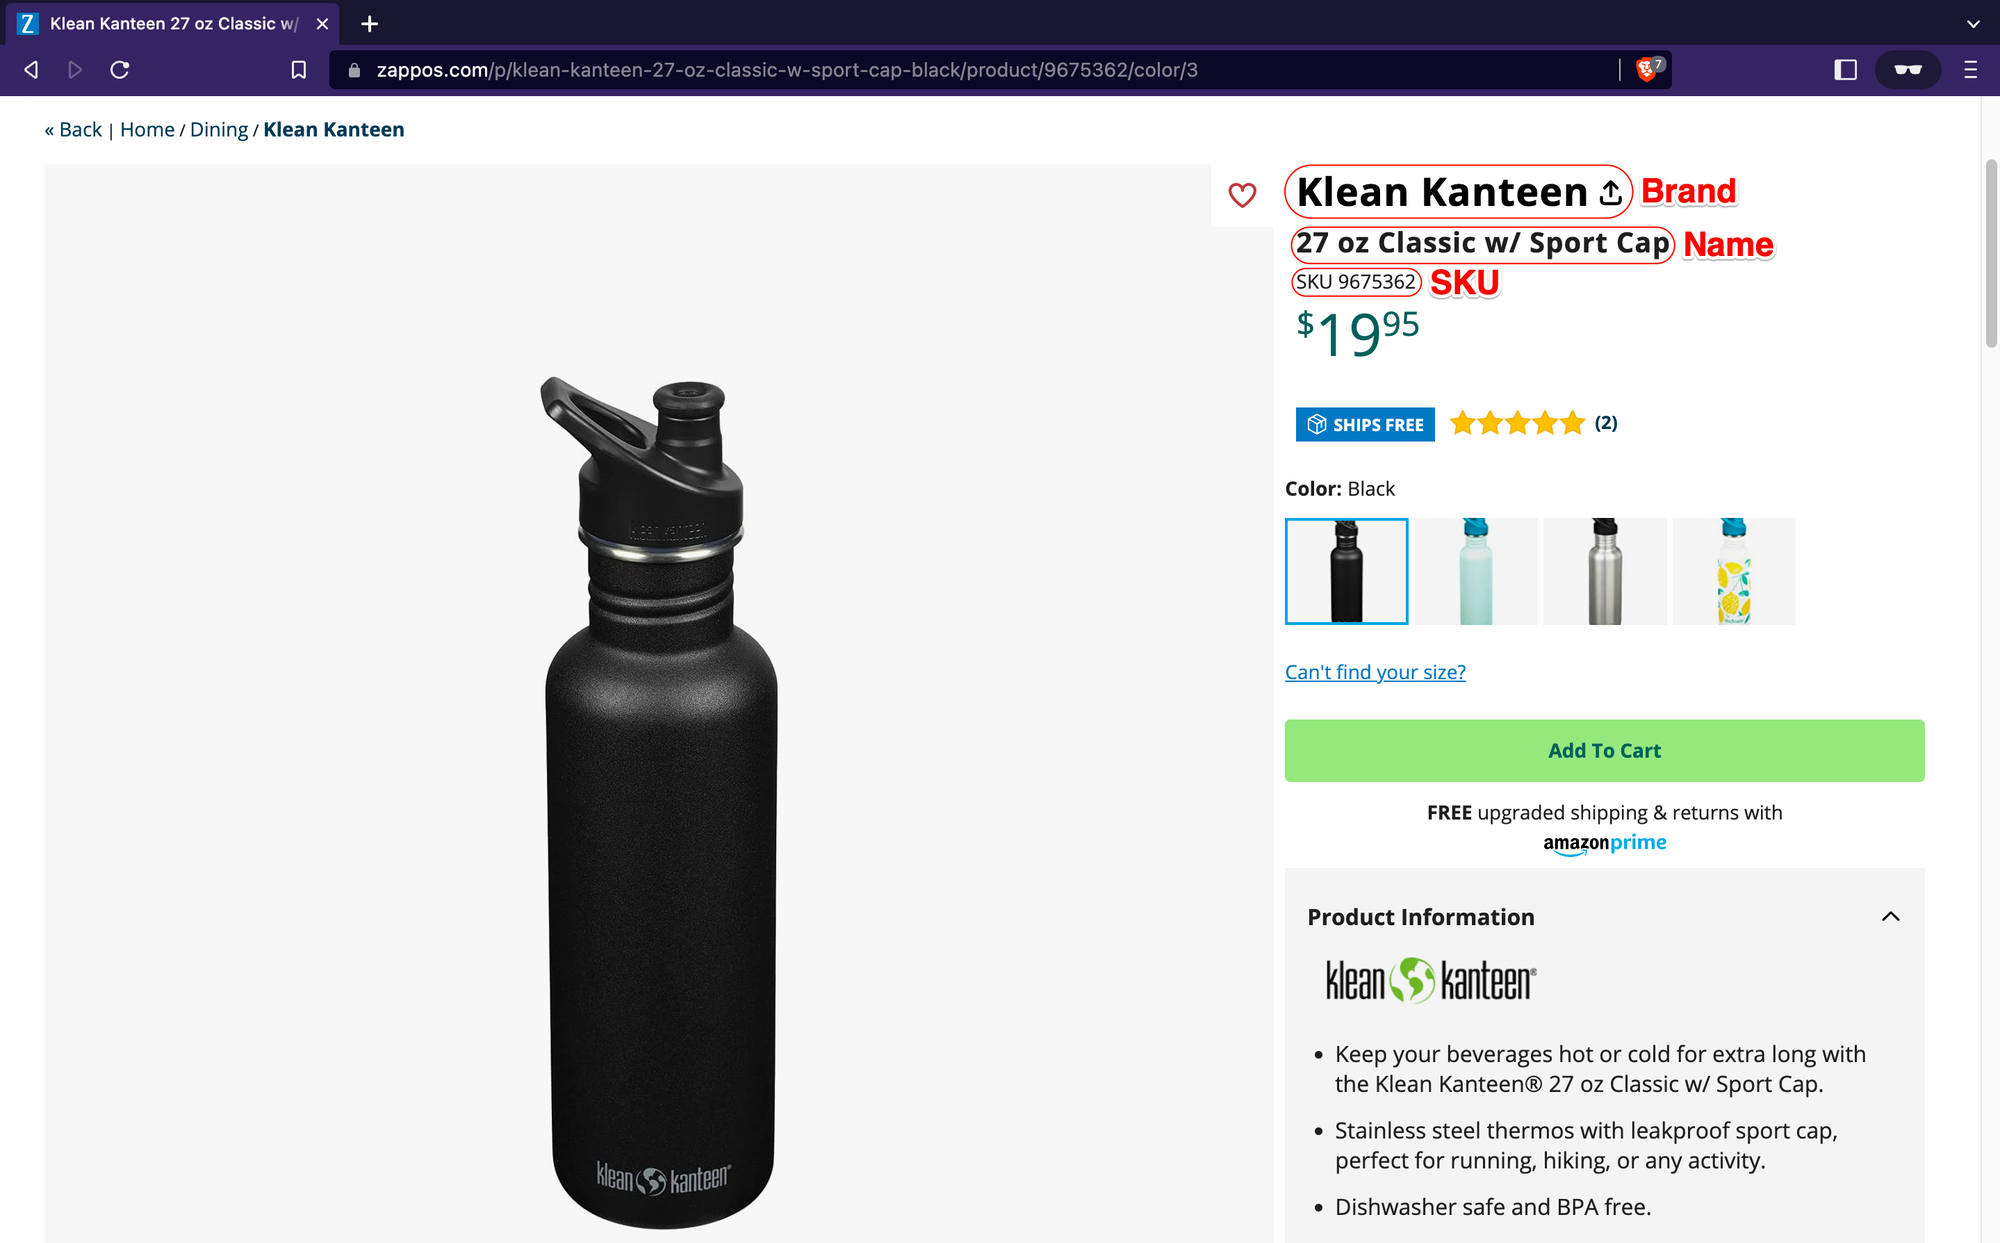
Now, let’s open the browser dev tools and find the CSS selectors for each highlighted product data.
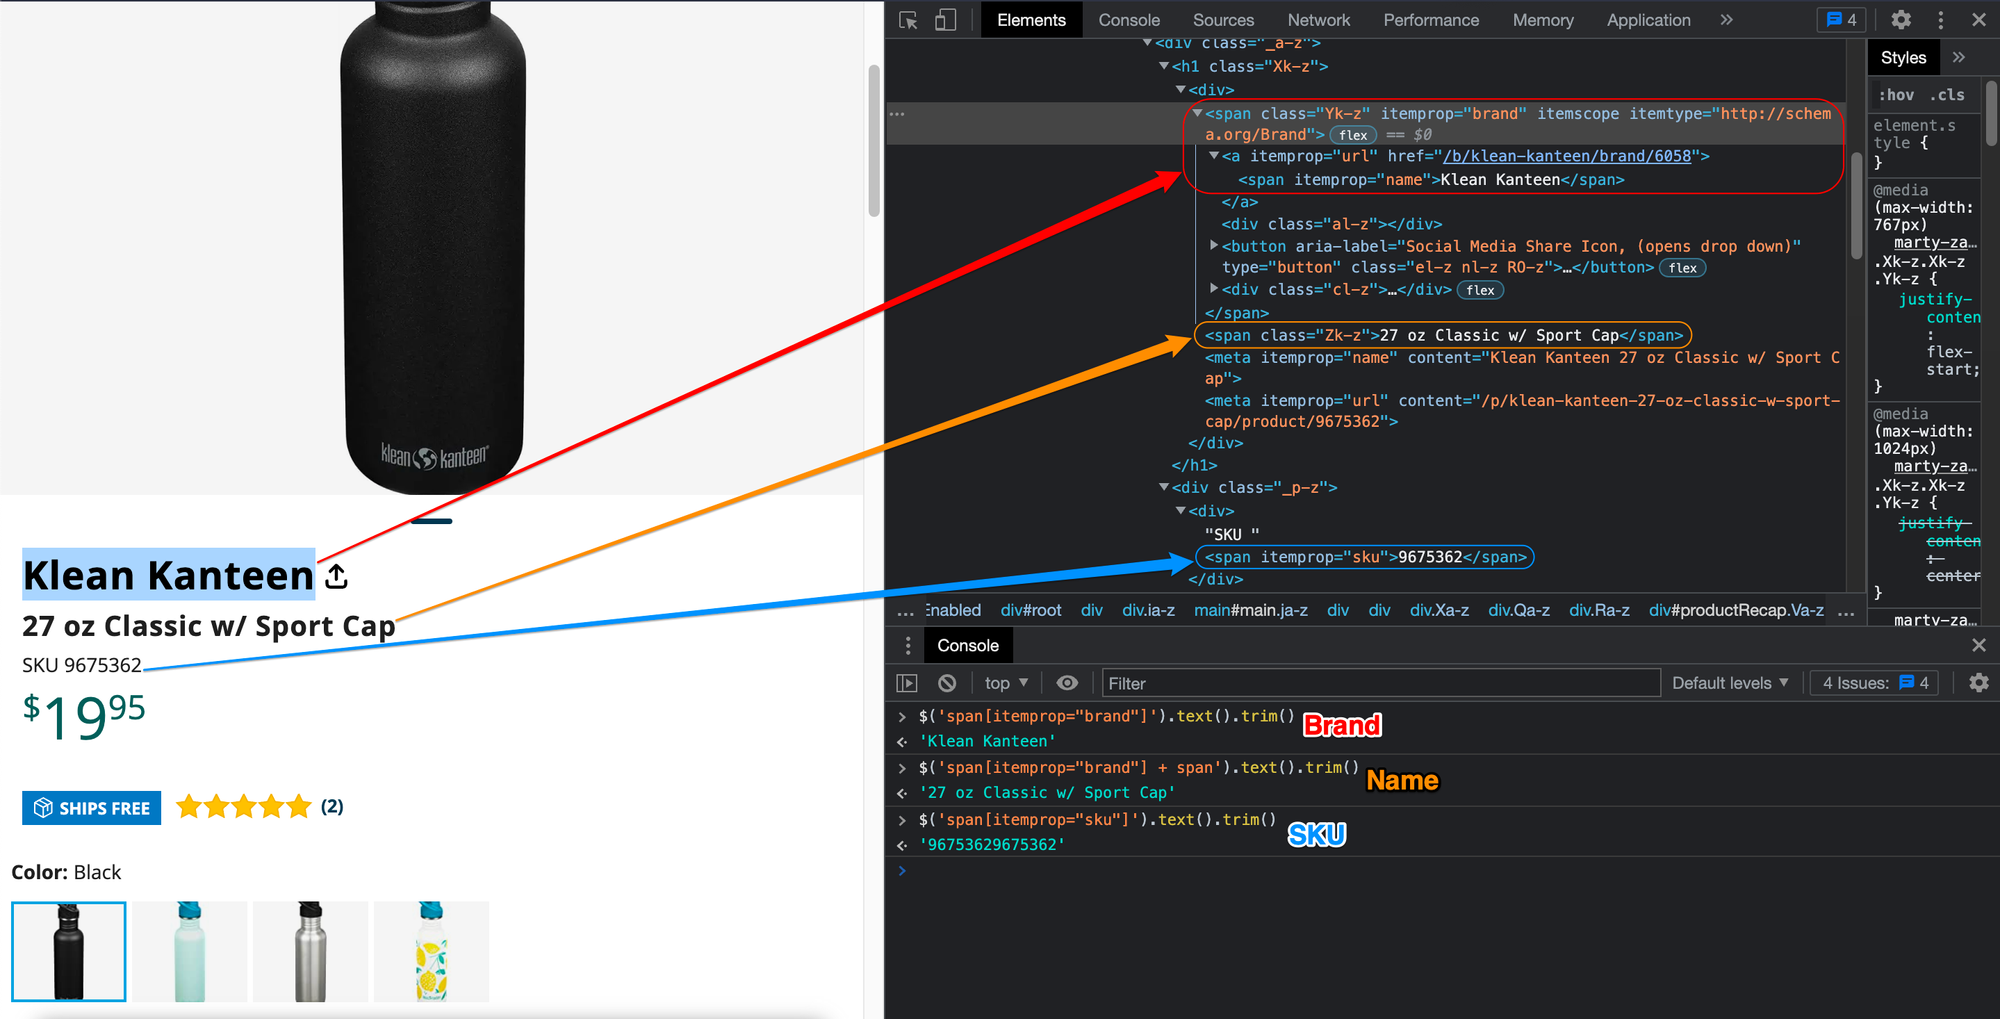
Great! Now that we’ve found the selectors let’s add yet another else if clause to check for requests with the “PRODUCT” label. Then, we can log a message to the console informing the users about the action the scraper is performing on that particular page and, as the last step, return an object containing the scraped data.
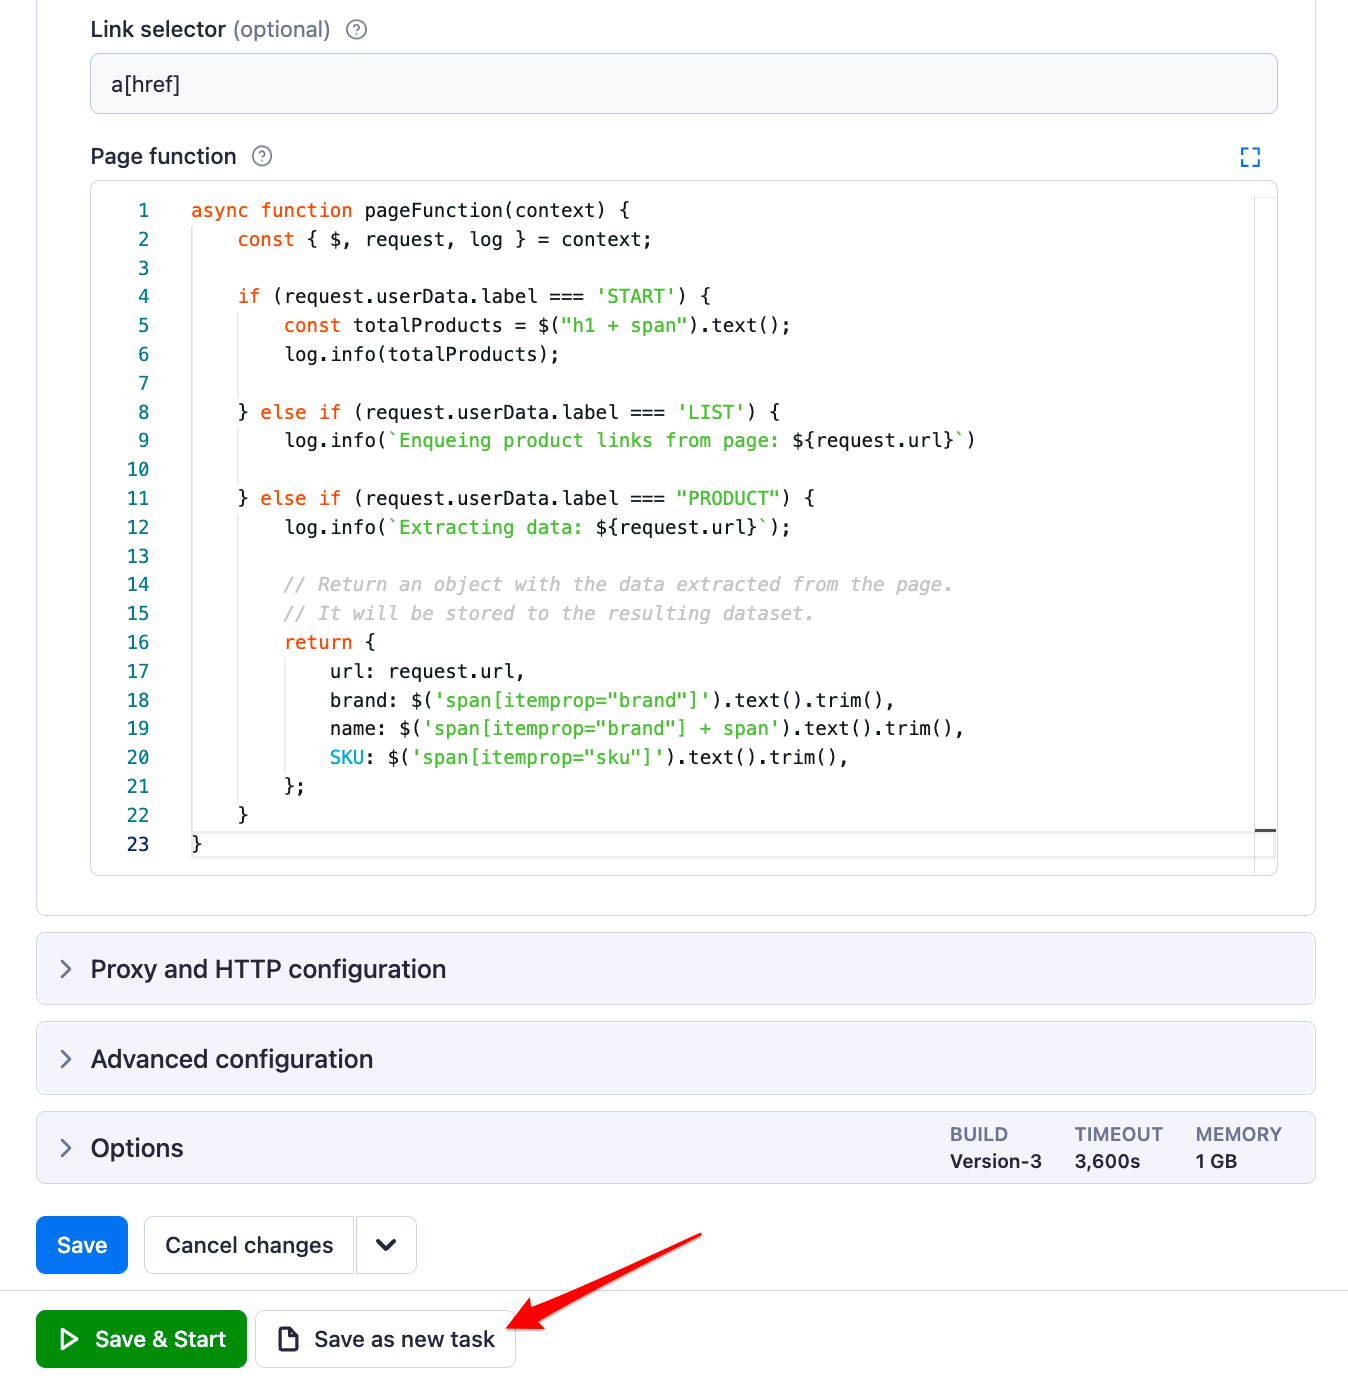
async function pageFunction(context) {
    const { $, request, log } = context;

    if (request.userData.label === 'START') {
        const totalProducts = $("h1 + span").text();
        log.info(totalProducts);

    } else if (request.userData.label === 'LIST') {
        log.info(`Enqueing products' links from page: ${request.url}`)

    } else if (request.userData.label === "PRODUCT") {
        log.info(`Extracting data: ${request.url}`);

        // Return an object with the data extracted from the page.
        // It will be stored to the resulting dataset.
        return {
            url: request.url,
            brand: $('span[itemprop="brand"]').text().trim(),
            name: $('span[itemprop="brand"] + span').text().trim(),
            SKU: $('span[itemprop="sku"]').text().trim(),
        };
    }
}
Proxy configuration
Proxies are an important part of web scraping, as they greatly reduce the chances that your scraper will get blocked.
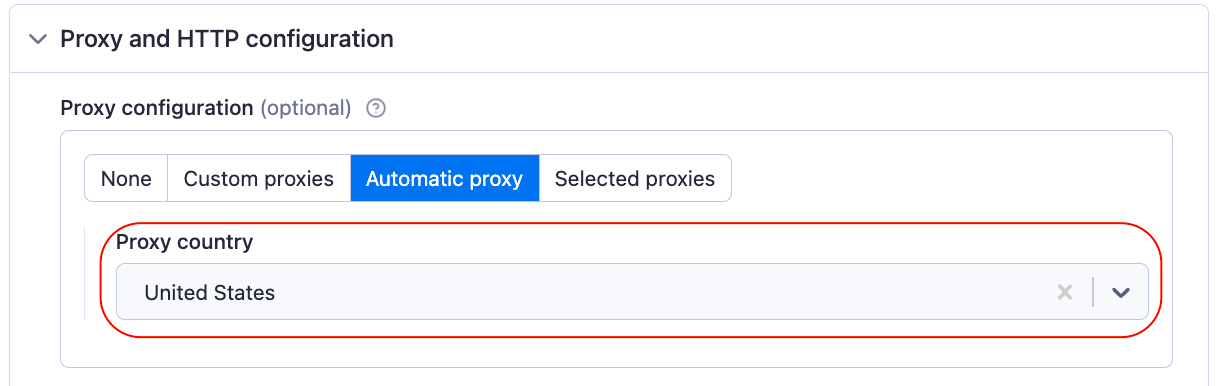
Every Apify Universal Scraper defaults to the Automatic proxy configuration. However, you can still select specific proxy countries (e.g., United States) or change the configuration to use your own proxies or even select specific proxy groups.
Note that some e-commerce websites change the product information displayed (such as currency and language) based on the country the request is coming from. So, it is a good idea to specify the Proxy country you want to use for scraping.
Save your scraper configuration
Before we run the scraper, let’s quickly save our configuration as a task by clicking on the “Save as a new task” button at the bottom of the configuration page.
Task makes it easier for us to run this same scraper configuration in the future and use it with other platform features, such as scheduling and integrations.
Running the scraper
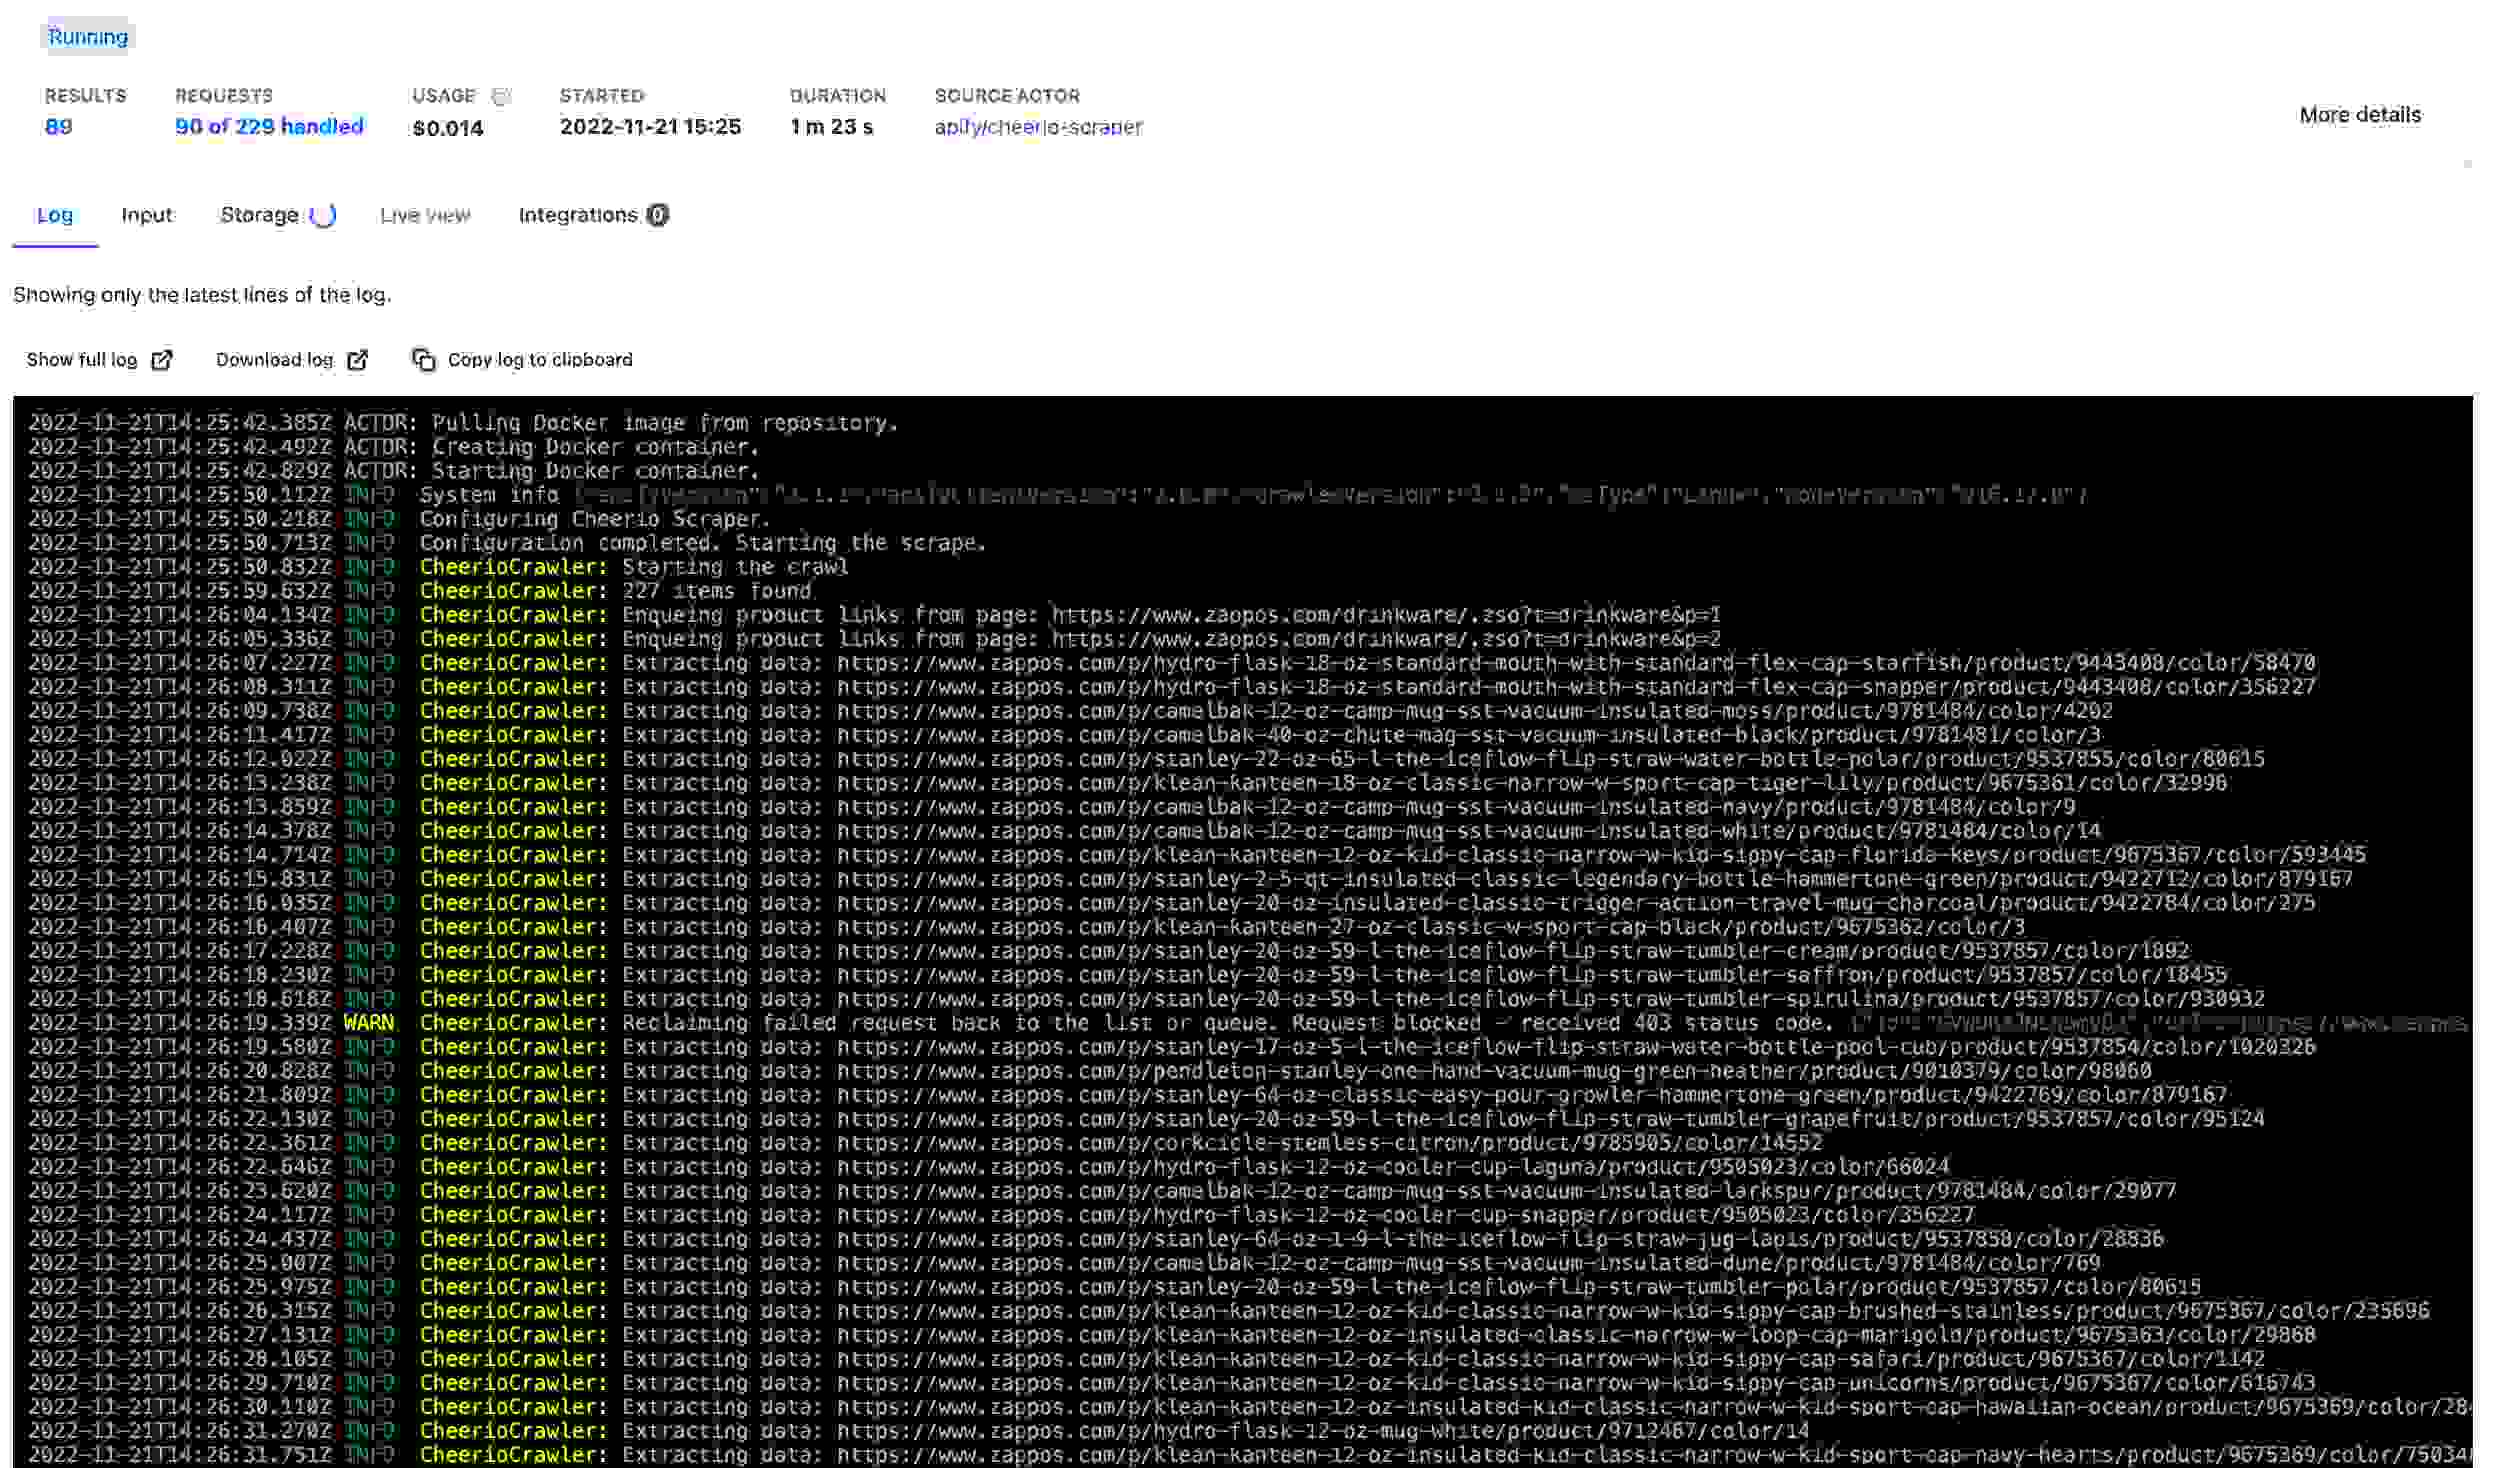
Now that everything is set up, it’s time to run the scraper and get our data. To do that, click on the “Start” button.
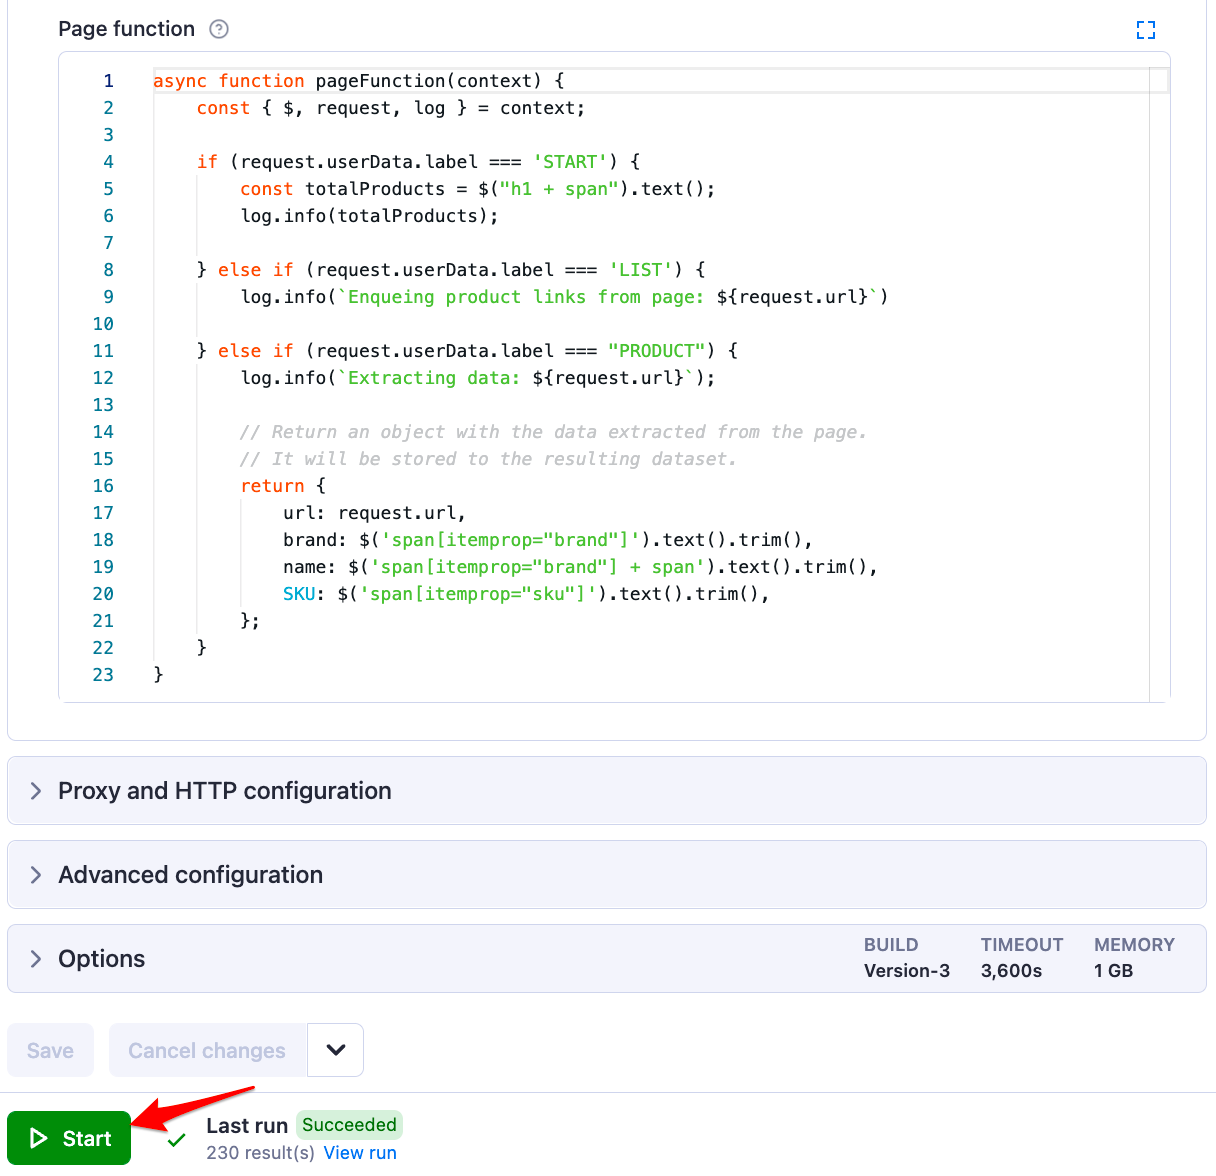
The run might take a few minutes, but thanks to the logs we added, we can follow the scraper’s activity by watching the Log tab.
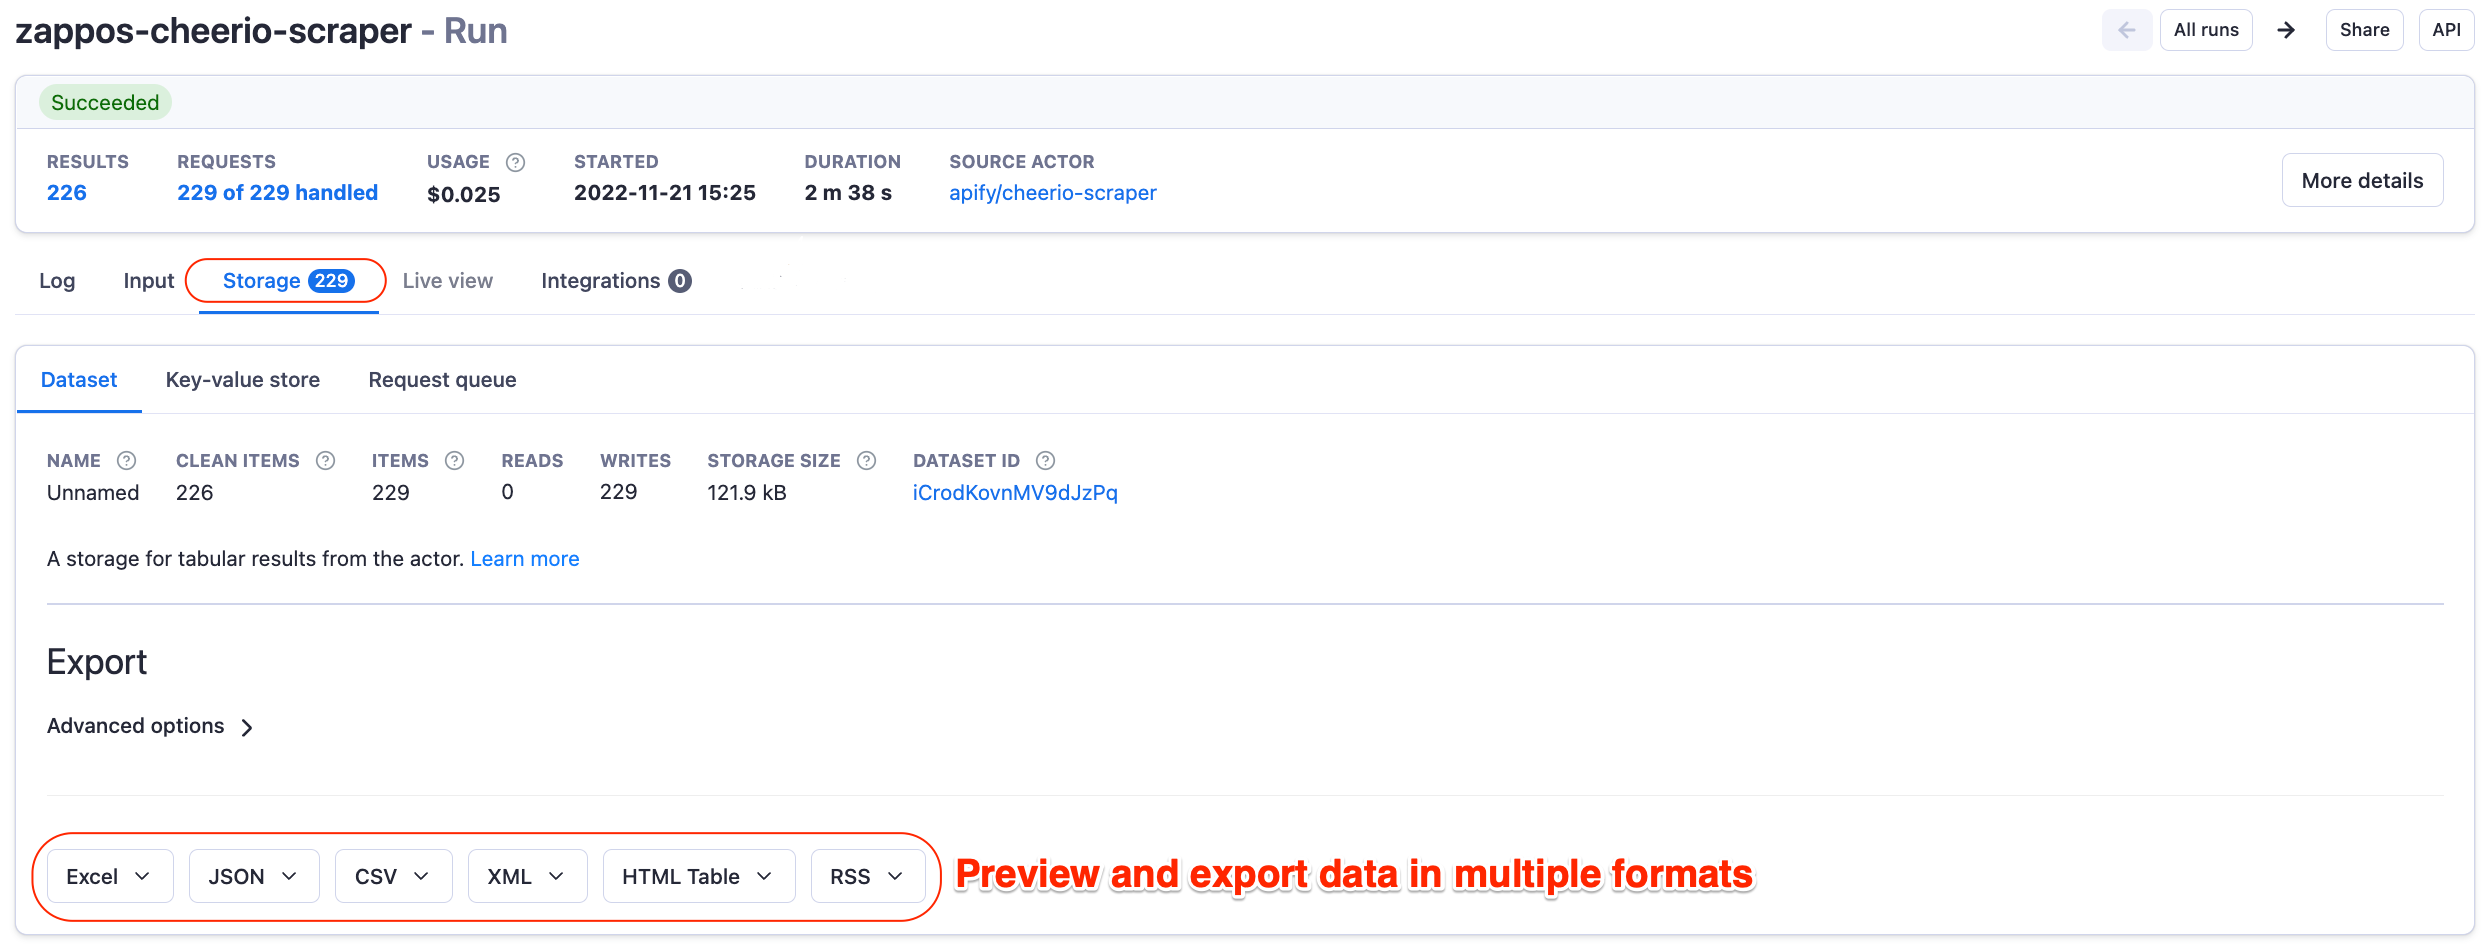
Once the scraper finishes its run, you can preview and export the data in the Storage tab.
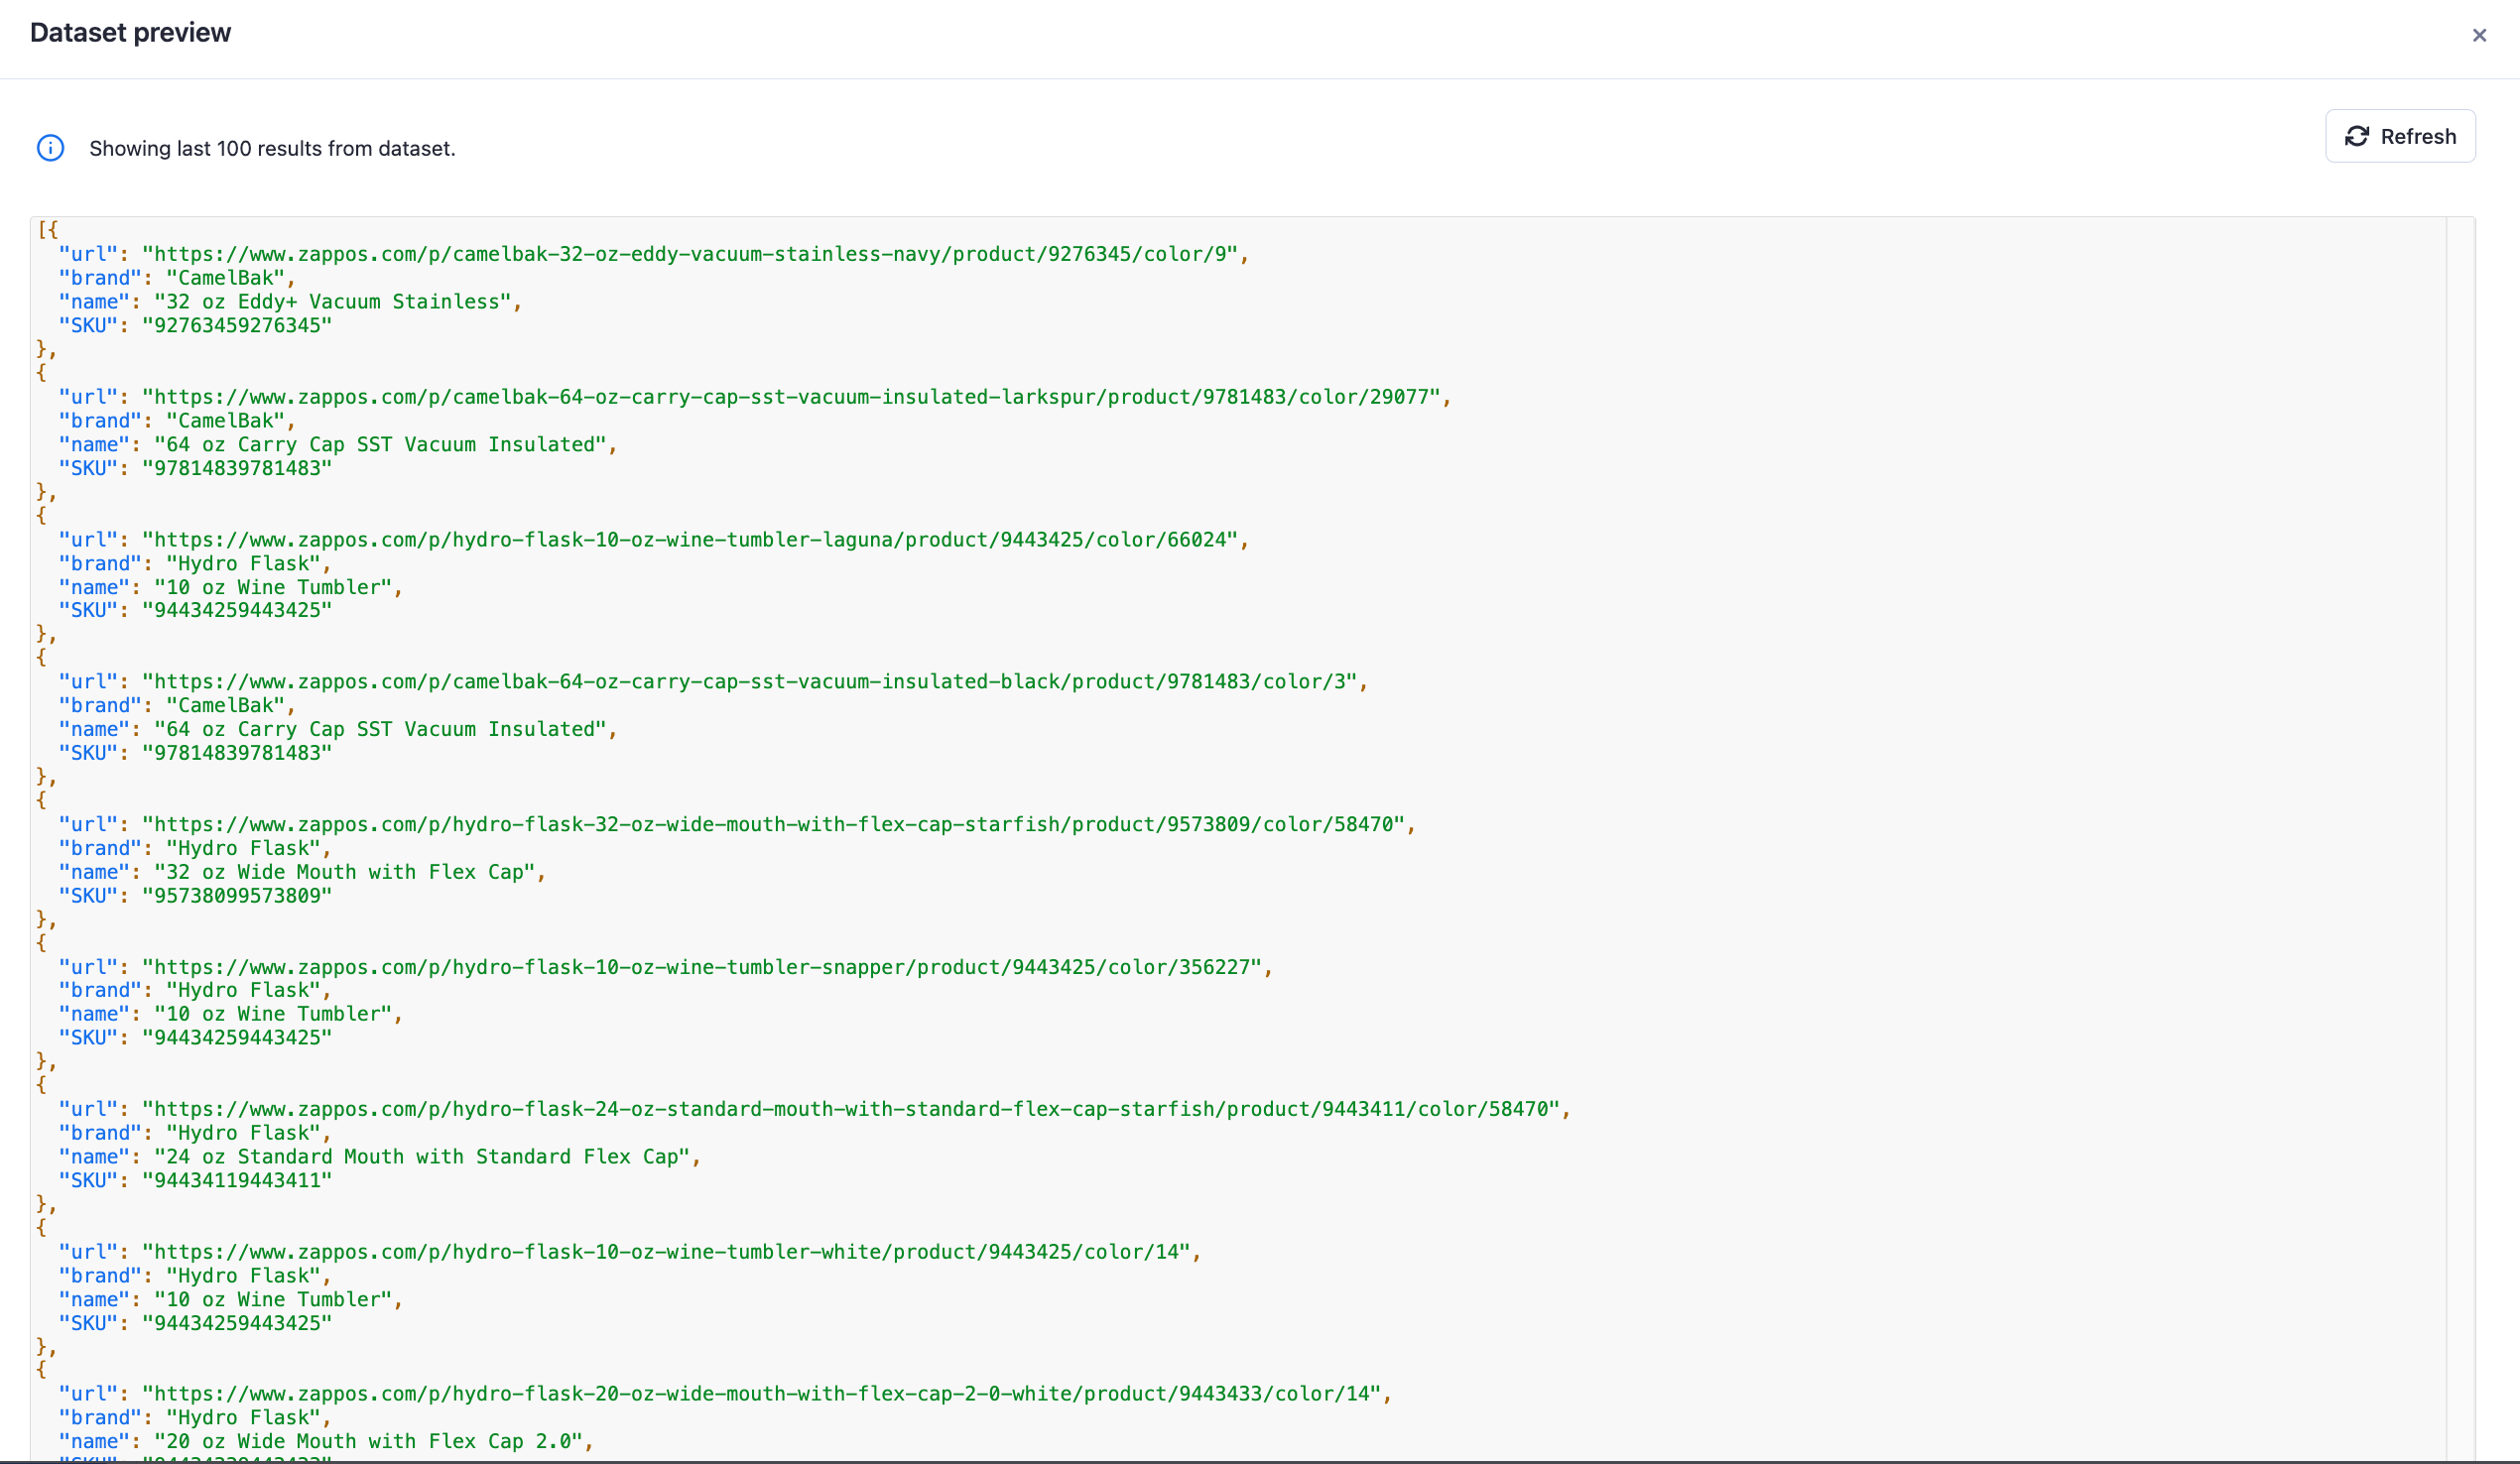
And this is how our scraped data looks in JSON:
Congratulations, you now have a fully functional e-commerce web scraper that you can easily tweak to fit your needs!
Still, having to come to the platform and run the scraper every time you need data is not the most efficient use of your time.
In the next sections, we will integrate our scraper task with Gmail to have the data delivered directly to our inbox and then schedule the scraper to run automatically so we can fully automate the whole e-commerce data extraction process!
Receive scraped e-commerce data directly to your email
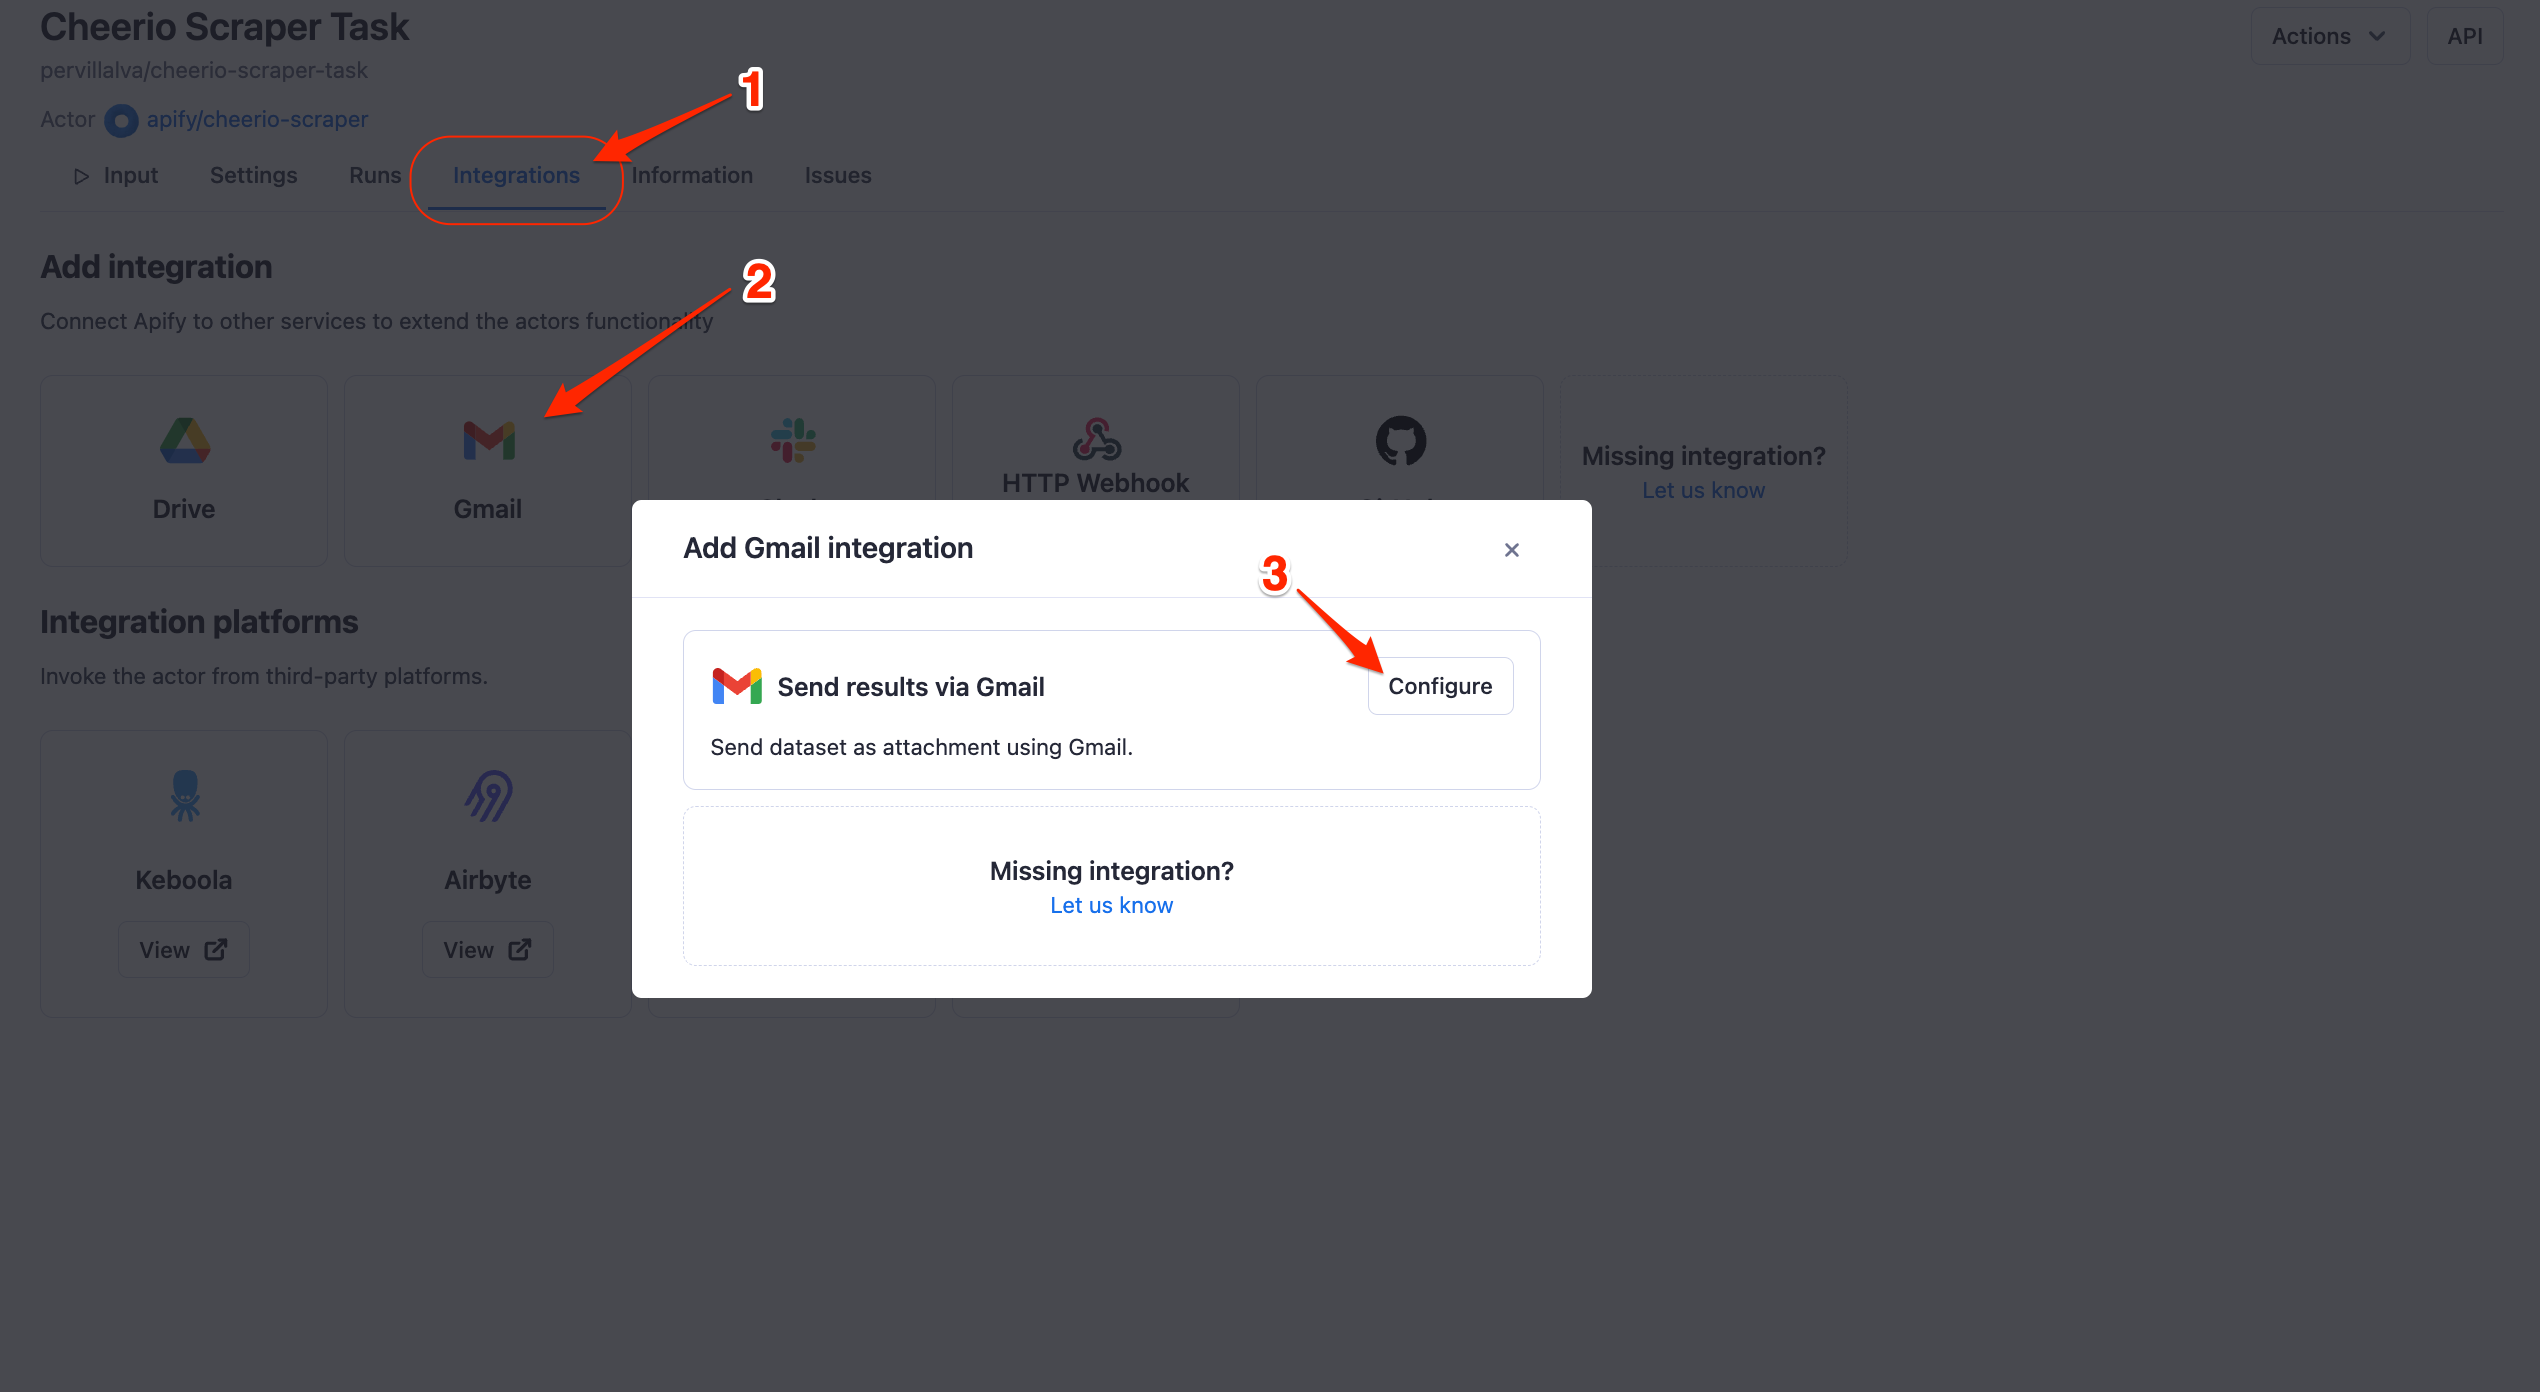
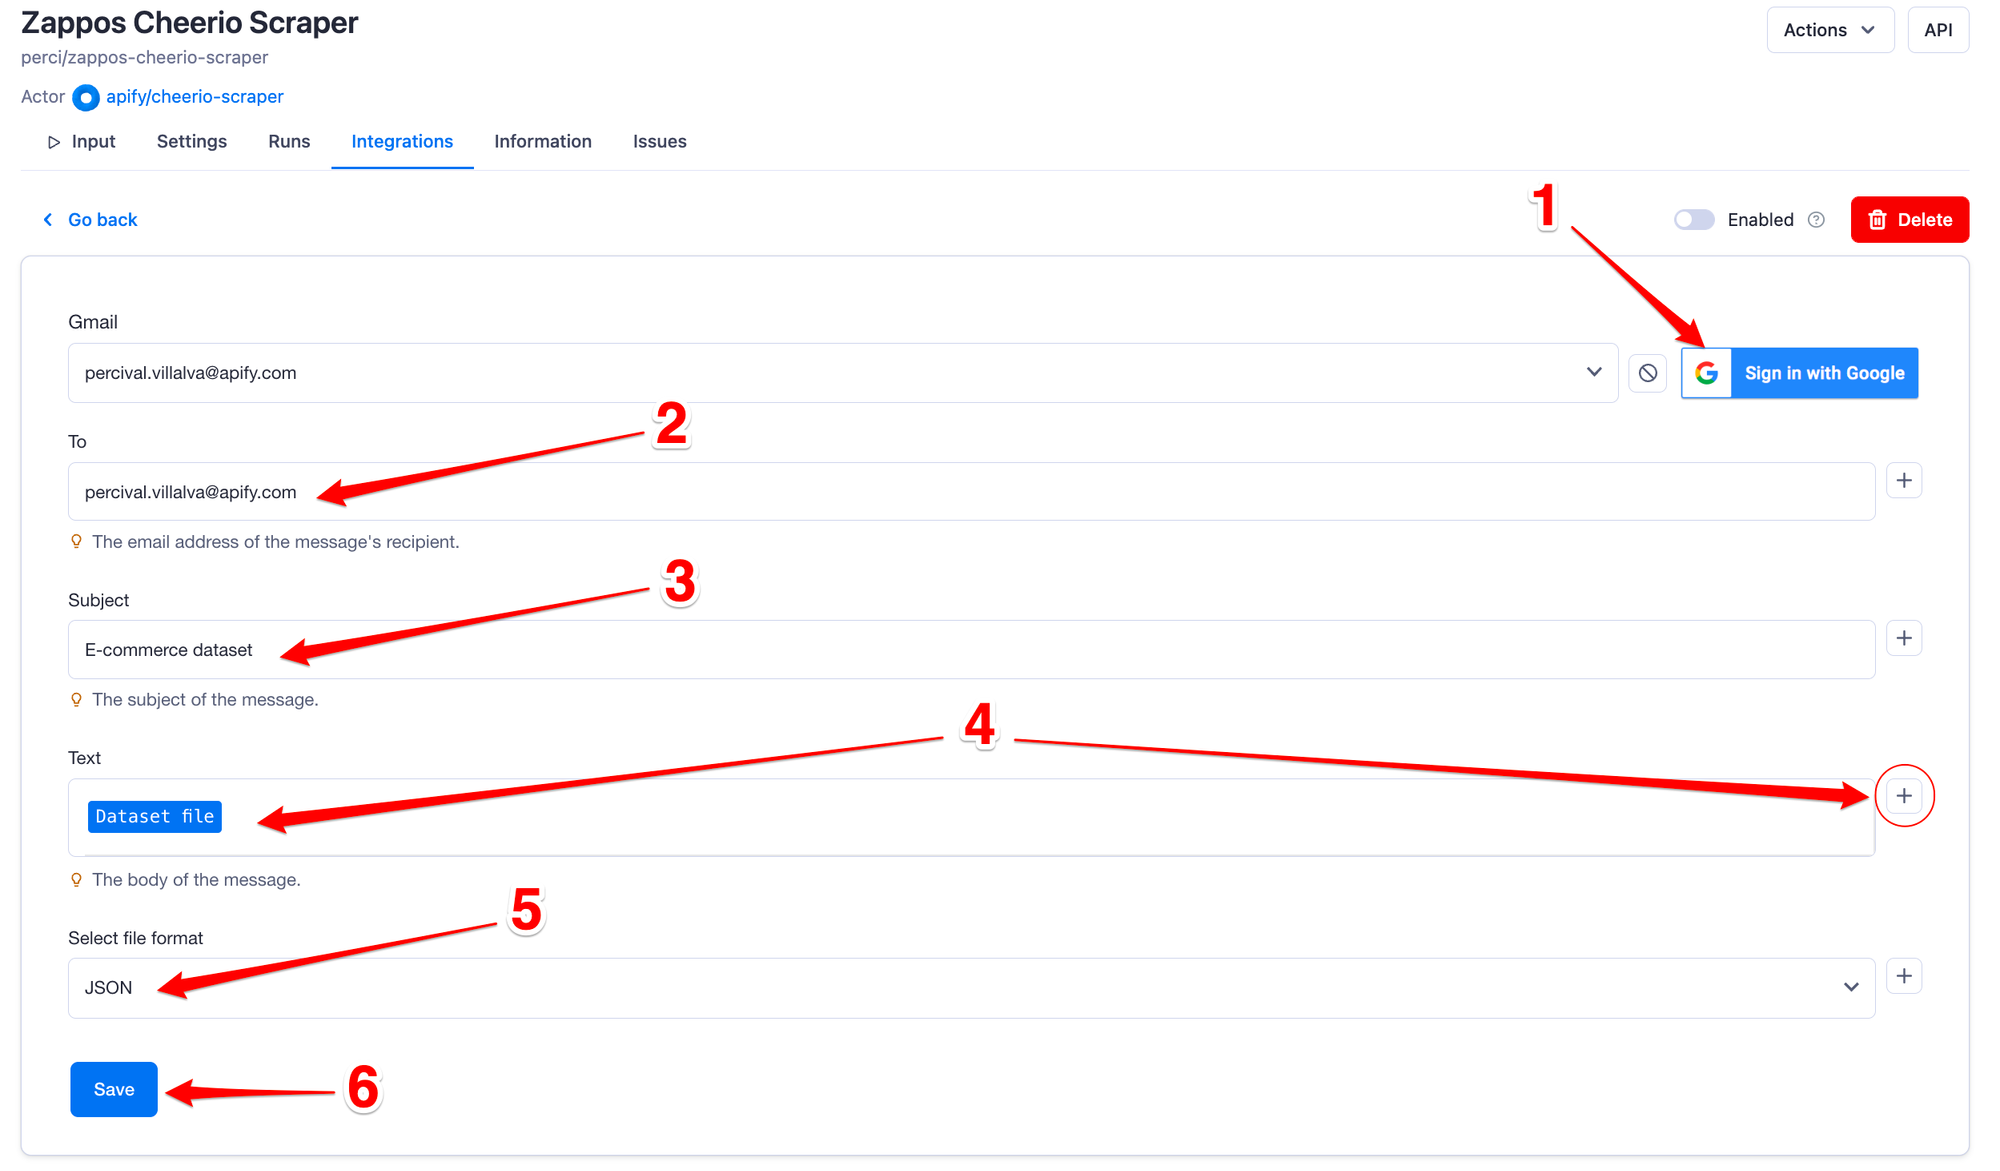
To set up the integration, first, go to the integrations tab and then click add integration. You will then see all the available integrations on the Apify platform. Now select Gmail and click configure.
After that, follow the steps to configure your integration:
Click the “Sign in with Google” button. You’ll be prompted to select the Google account you want to send the email from. Select the desired account and then click allow.
Choose the email to which you’d like to send the actor run information.
Write the email’s subject line.
Define the content of the body of your email. You can access the scraper run variables, such as the dataset ID and dataset file, by clicking on the + button on the right side of the input field.
Select the format of the attached file from the options available.
Hit the save button, then click “Yes” to enable your integration.
Now that the integration is saved and enabled, you can click the “Start” button to run your task. Just wait for the run to finish, and once it’s complete, you can find your actor results in your email inbox.
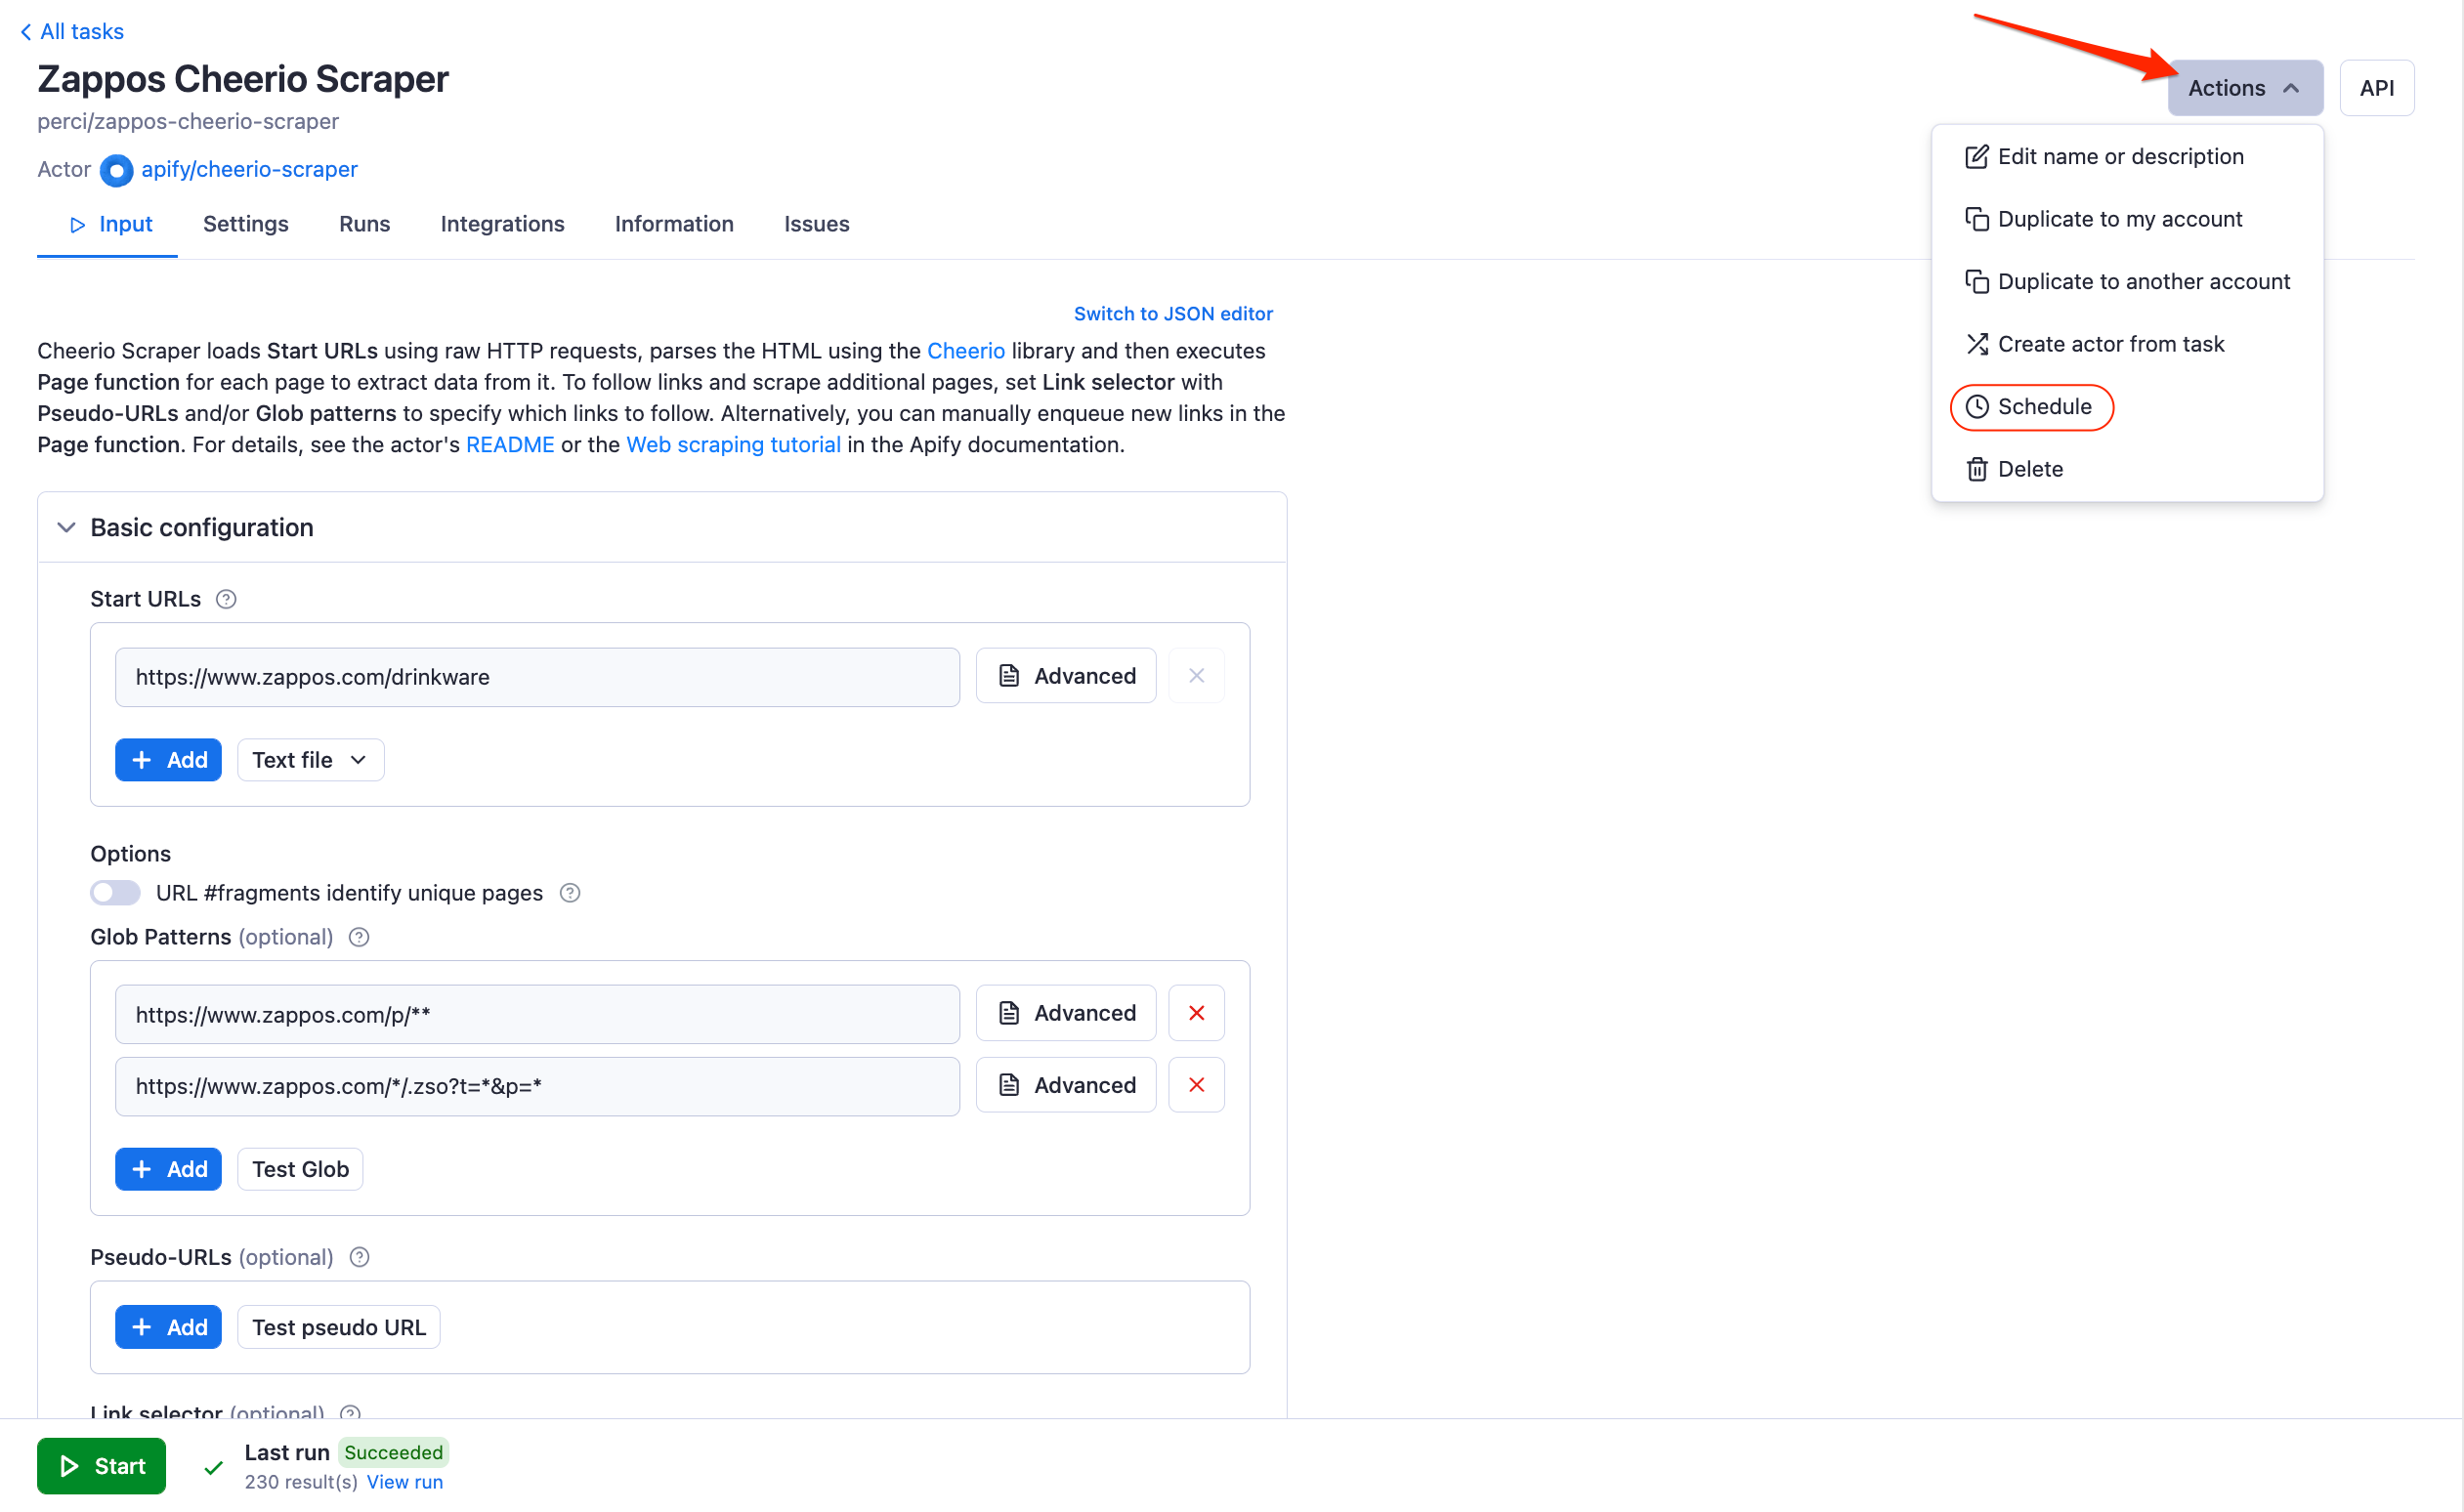
Scheduling e-commerce data scraping
You can access the scheduling feature under the “Actions” dropdown menu at the top right side of your actor task screen. We will be prompted to give a nice descriptive name so we can easily find it later in the “Schedules” tab.
In the Schedule configuration settings, we can select how often we want our schedule to run and the timezone that should be followed by the schedule.

And that’s it! Our e-commerce scraper will now run daily, scrape the data from the target website, and send it directly to our inbox.
If you need a custom solution for scraping e-commerce websites, you can get a premium solution customized for your business by Apify’s professional services team
Next steps for e-commerce web scraping
Cheerio Scraper is a powerful and efficient tool in your scraper’s arsenal. Still, there are times when you would need to use a real browser to load JavaScript to scrape dynamic content. In these situations, using other Universal Scrapers such as Puppeteer, Playwright, or Web Scraper are your best bet.
All the concepts you learned during this tutorial are valid for all the other Apify Universal Scrapers, and you should now be able to quickly adjust your configuration settings to fit any other scrapers.
Beyond that, you can also use Apify’s open-source web scraping library, Crawlee, to build scrapers from scratch and have complete control over your code. Crawlee can be used with both Node.js and with Python.
If you want to get started with Crawlee and learn more about web scraping in general, make sure to visit Crawlee’s documentation, Apify’s web scraping academy, and watch our video tutorial, How to build an Amazon Scraper in Node.js with Crawlee.