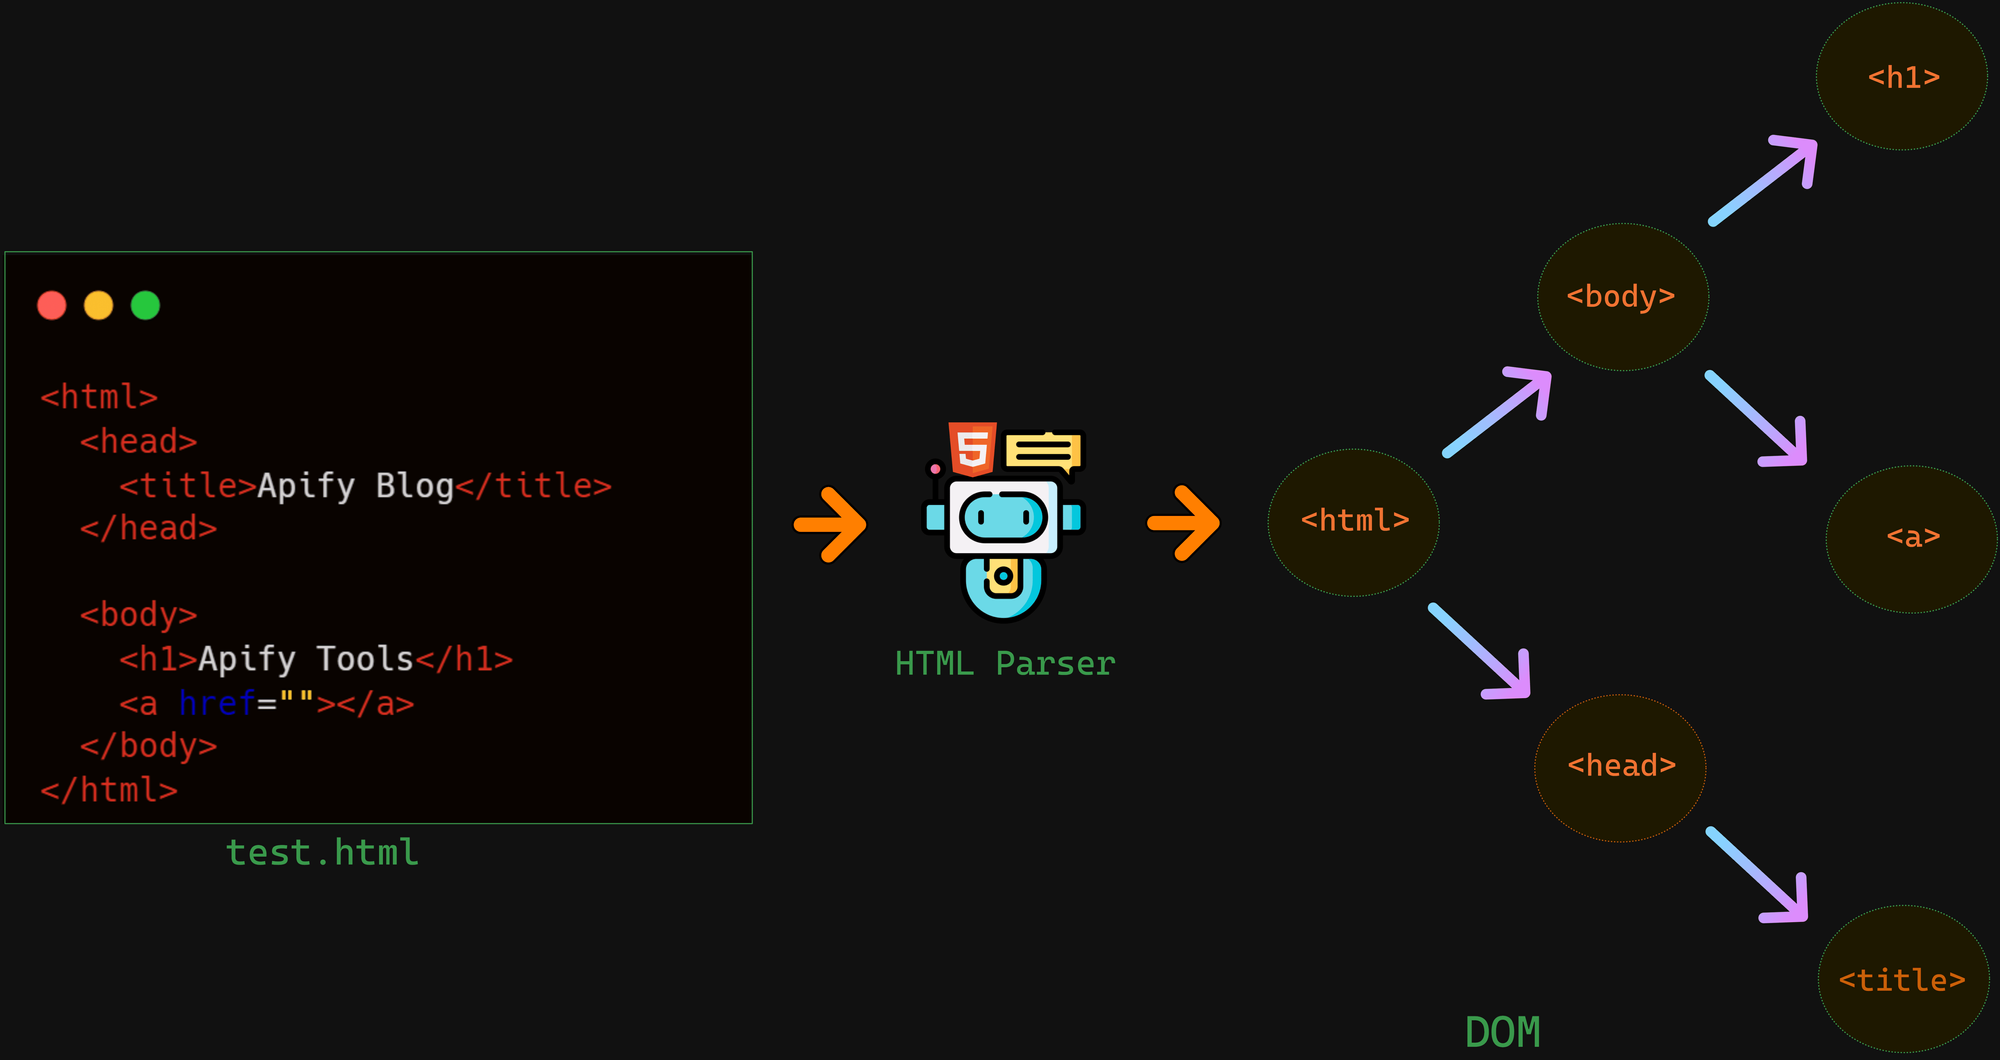
The internet is full of information, but most of its data is not structured for further processing. Web scraping is the best method of retrieving web data to put it into a structured format. However, web pages are written in HTML (Hypertext Markup Language). So to read the data from a web page, you first have to parse the HTML.
By data parsing, I mean dividing the HTML code into tags, attributes, etc., and organizing these elements into a tree-like structure called a DOM (Document Object Model). With the DOM, you can access and read the data you need and store it any way you want.
Parsing HTML is a method you can use for lots of things, from web scraping to data mining. Python is one of the most popular languages for web scraping and working with data, and Python libraries like Beautiful Soup and PyQuery are great for parsing HTML.
In this blog post, we'll look at how to parse HTML using Python with PyQuery and Beautiful Soup. We'll also discuss which library is best and why. Finally, we'll take a look at advanced HTML parsing techniques and troubleshooting tips.
Overview of Beautiful Soup and PyQuery
PyQuery and Beautiful Soup offer powerful features for parsing HTML documents quickly and efficiently. These HTML parsing libraries are actively maintained, lightweight, high-performance, and have strong community support.
Beautiful Soup
Beautiful Soup is a popular library for parsing HTML files. It's widely used for web scraping and is easy to learn and apply. Beautiful Soup is a Python library, so you need to install it before using it.
Once you’ve installed Beautiful Soup, you can use its various functions to scrape data from HTML files. To scrape data from a web page, you’ll also need to use the requests module to perform HTTP requests and fetch the page's HTML.
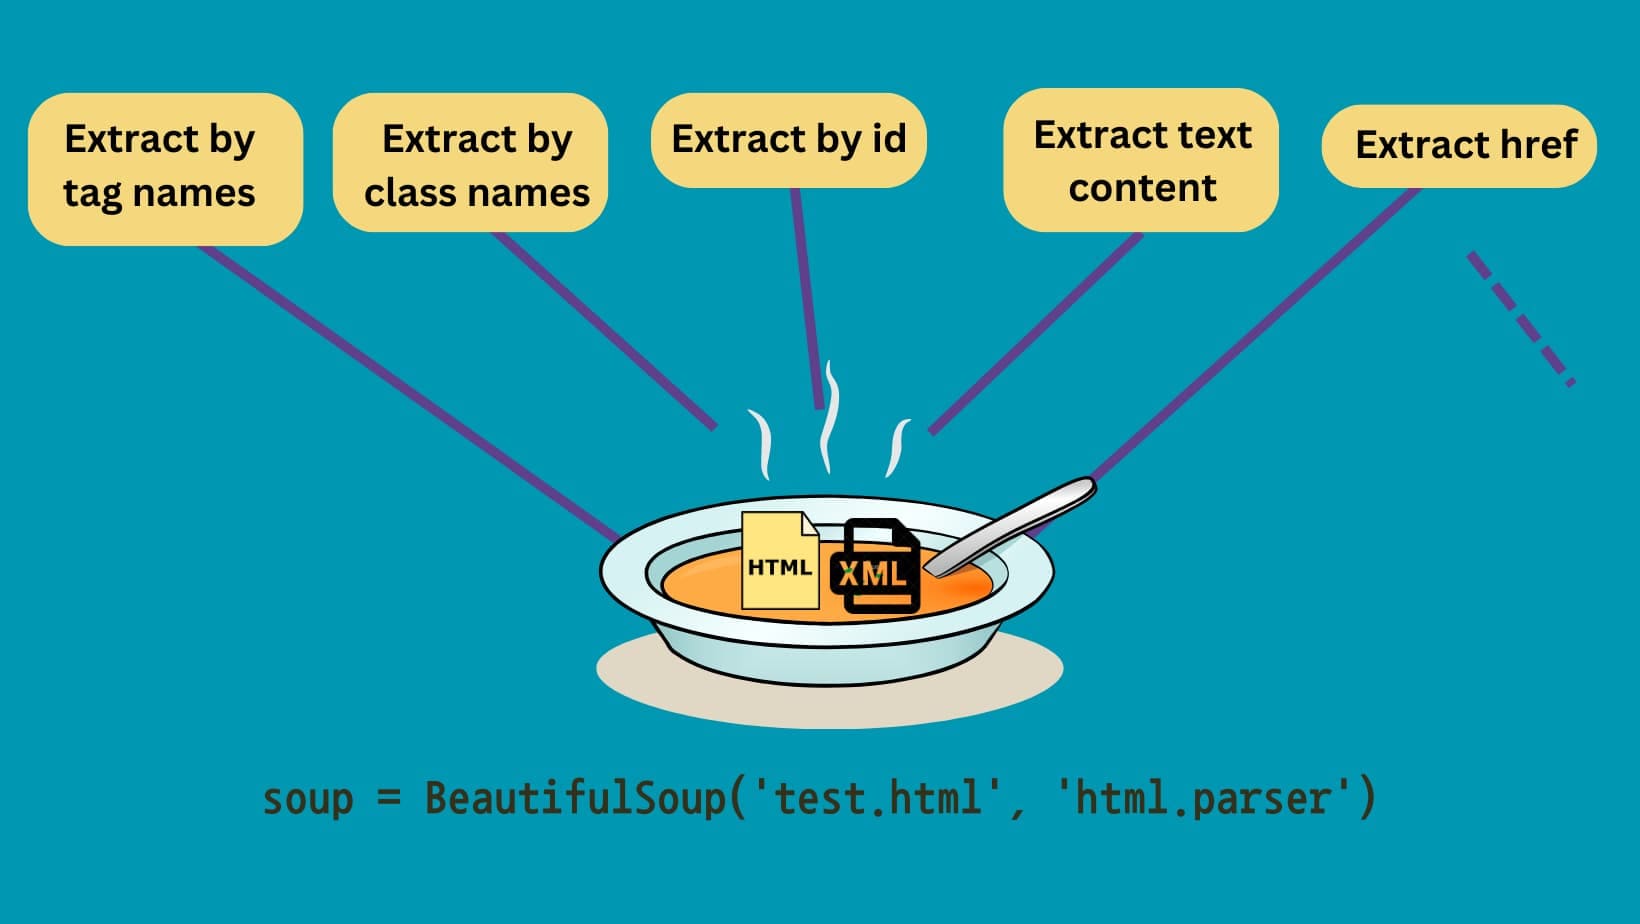
When you parse an HTML file using Beautiful Soup, a tree-like structure called soup is created. This tree retains the hierarchical structure of the HTML document, making it easy to navigate through the tree to extract data using methods such as find_all(), find(), and select().
Beautiful Soup has some common use cases, like web scraping (extracting stock prices, articles, and product info), data extraction (parsing an HTML document, extracting a specific piece of content, link, or title), data cleaning (removing unnecessary HTML tags and attributes), and more.
PyQuery
PyQuery is a powerful Python library that makes parsing HTML documents easy. It has a syntax and API similar to jQuery for parsing, manipulating, and querying HTML documents. It allows you to manipulate the document in various ways, such as adding elements, changing text or content, and modifying attributes.
With PyQuery, you can select elements from an HTML document with CSS selectors and XPath expressions, and it also offers some custom functions like filter(), eq(), and slice() to refine sections.
To work with PyQuery, you'll need to create a PyQuery object from an HTML file. Then you can use PyQuery to navigate the HTML structure, manipulate the text, and get data from it.
PyQuery is a popular choice for developers who are familiar with jQuery and prefer a similar syntax for HTML parsing in Python. Common use cases are web scraping, data extraction, and HTML manipulation.
Setup environment
Let's begin by installing all the necessary packages. Together with Beautiful Soup and PyQuery, we are going to need the Requests library for HTTP communication. Make sure you’ve got a Python interpreter and pip package manager already installed on your system. If you don't, please refer to the official Python documentation.
If you do have a Python interpreter installed, but you're missing pip, you can install it using the following command:
python -m ensurepipInstall the Pip package manager.
You can make sure that you have both Python and pip successfully installed on your computer by using the following command:
python --version && pip --versionMake sure both Python and Pip are installed on our system.
Expected output:
Python 3.11.7
pip 23.2.1 from /home/user/.local/lib/python3.11/site-packages/pip (python 3.11)
We're going to use Python 3.11 and Pip 23.2 in this blog post.
Install Requests, Beautiful Soup and PyQuery
Now use pip to install all the required Python packages:
pip install \
  requests==2.31.0 \
  beautifulsoup4==4.12.3 \
  pyquery==2.0.0
Install the packages we're going to use.
After the installation is complete, check if all the packages have been successfully installed by using the pip show command.
pip show beautifulsoup4 requests pyqueryMake sure our packages are successfully installed.
Name: beautifulsoup4
Version: 4.12.3
Summary: Screen-scraping library
Home-page:
Author:
Author-email: Leonard Richardson <leonardr@segfault.org>
License: MIT License
Location: /home/vdusek/Projects/playground/.venv/lib/python3.12/site-packages
Requires: soupsieve
Required-by:
---
Name: requests
Version: 2.31.0
Summary: Python HTTP for Humans.
Home-page: https://requests.readthedocs.io
Author: Kenneth Reitz
Author-email: me@kennethreitz.org
License: Apache 2.0
Location: /home/vdusek/Projects/playground/.venv/lib/python3.12/site-packages
Requires: certifi, charset-normalizer, idna, urllib3
Required-by:
---
Name: pyquery
Version: 2.0.0
Summary: A jquery-like library for python
Home-page: https://github.com/gawel/pyquery
Author: Olivier Lauzanne
Author-email: olauzanne@gmail.com
License: BSD
Location: /home/vdusek/Projects/playground/.venv/lib/python3.12/site-packages
Requires: cssselect, lxml
Required-by:
Expected output for pip show command.
Now that you know what Beautiful Soup is and how to install it, let's get right into HTML parsing.
First, I'll show you how to perform basic HTML parsing from an HTML file. Then we’ll move on to parsing actual web pages.
Basic HTML parsing with Beautiful Soup
Create a new HTML file in your code editor, and copy and paste the following HTML code. We’ll use this code to understand some fundamental parsing techniques.
test.html file:
<html>
  <head>
    <title>Apify Blog</title>
  </head>
  <body>
    <header>
      <div class="nav">
        <ul id="navlist" style="height:100px">
          <li class="apify"><a href="https://apify.com">Apify.com</a></li>
          <li class="store"><a href="https://apify.com/store">Apify Store</a></li>
          <li class="documentation"><a href="https://apify.com/docs">Documentation</a></li>
          <li class="help"><a href="https://apify.com/help">Help</a></li>
        </ul>
      </div>
    </header>
    <div class="post">
      <h2 class="title">First Blog</h2>
      <p class="content">
        Python and APIs - Part 1: How to use Python to connect and interact with
        APIs
        <a href="https://blog.apify.com/python-and-apis/">Click here</a>
        In the first part of this Python and APIs series, you'll learn how to
        use Python to connect and interact with APIs.
      </p>
    </div>
    <div class="post">
      <h2 class="title">Second Blog</h2>
      <p class="content">
        6 things you should know before buying or building a web scraper:
        <a href="https://blog.apify.com/6-things-to-know-about-web-scraping/">Click here</a>
        From understanding the complexity of target websites to legal
        considerations, discover what we wish we'd been telling our customers
        from day one.
      </p>
    </div>
  </body>
</html>
Import the Beautiful Soup library, then open the HTML file using file handling techniques. Create a soup object by passing the HTML file to the BeautifulSoup constructor.
from bs4 import BeautifulSoup

with open('test.html') as f:
    soup = BeautifulSoup(f, 'html.parser')
Now that the soup object is created, let's retrieve the title of the "test.html" file. The title can be found at the location "head → title".
print(soup.head.title) # Output: <title>Apify Blog</title>
To get the text of the title, you can use the .text function.
print(soup.head.title.text) # Output: Apify Blog
Suppose you want to retrieve the text of the first <li> tag, located at "body → div → ui".
print(soup.body.div.ul.li.text) # Output: Apify.com
Have you noticed anything strange about the code snippet above?
No? Well, the strange thing is the multiple dots. You’re at the sixth level of the HTML tree, and navigating through all of those levels can be tedious.
Thankfully, Beautiful Soup provides two special methods called find() and find_all(), which you can use to retrieve HTML elements without having to navigate through the tree.
Let's start with the find_all() method. The find_all() method takes a string as an argument and returns a list of elements that match the provided string. For example, if you want all of the div elements with the class post, use the below code:
div_post = soup.find_all('div', class_='post')
print(div_post)
Here’s the output:
[<div class="post">
<h2 class="title">First Blog</h2>
<p class="content">
        Python and APIs - Part 1: How to use Python to connect and interact with
        APIs
        <a href="https://blog.apify.com/python-and-apis/">Click here</a>
        In the first part of this Python and APIs series, you'll learn how to
        use Python to connect and interact with APIs.
      </p>
</div>, <div class="post">
<h2 class="title">Second Blog</h2>
<p class="content">
        6 things you should know before buying or building a web scraper:
        <a href="https://blog.apify.com/6-things-to-know-about-web-scraping/">Click here</a>
        From understanding the complexity of target websites to legal
        considerations, discover what we wish we'd been telling our customers
        from day one.
      </p>
</div>]
The find_all() method returns a list of all the div tags that have the class="post" attribute. Now let's extract the content and links inside each div tag. To do this, you can use the find() method. The find() method works the same as find_all(), but it returns the first matching element instead of a list.
for post in div_post:
    # Find all the <h2> tags inside the <div> with the class post that also has the class
    # title, and then print the text using the (.text) method.
    title = post.find('h2', class_='title').text

    # Find all the <p> tags inside the <div> with the class post that also has a content
    # class, and then print the text using the (.text) method.
    content = post.find('p', class_='content').text

    # Find all the href attributes of <a> tags inside the <div> with the class post.
    link = post.find('a')['href']
    print('Title: ', title)
    print('Content: ', content)
    print('Link: ', link)
Here’s the code output:
Title: First Blog
Content:
        Python and APIs - Part 1: How to use Python to connect and interact with
        APIs
        Click here
        In the first part of this Python and APIs series, you'll learn how to
        use Python to connect and interact with APIs.

Link: https://blog.apify.com/python-and-apis/

Title: Second Blog
Content:
        6 things you should know before buying or building a web scraper:
        Click here
        From understanding the complexity of target websites to legal
        considerations, discover what we wish we'd been telling our customers
        from day one.

Link: https://blog.apify.com/6-things-to-know-about-web-scraping/
Now, what if you want the whole text of the HTML file? You can use the get_text() method.
print(soup.get_text())
This produces the following output:
Apify Blog

Apify.com

Apify Store

Documentation

Help

First Blog

        Python and APIs - Part 1: How to use Python to connect and interact with
        APIs
        Click here
        In the first part of this Python and APIs series, you'll learn how to
        use Python to connect and interact with APIs.

Second Blog

        6 things you should know before buying or building a web scraper:
        Click here
        From understanding the complexity of target websites to legal
        considerations, discover what we wish we'd been telling our customers
        from day one.
Scraping a website – Beautiful Soup in action
Now that you’ve got a basic understanding of Beautiful Soup, let's scrape a website to better understand HTML parsing.
For this purpose, we’ll use a website that’s specifically designed for scraping: crawler-test.com.
Making an HTTP request
First, you need to make an HTTP request to the above URL using the Python Requests library to extract the content from a web page. This is why we included installing the Requests library as a prerequisite above.
import requests

# Make an HTTP Request
target_url = 'https://crawler-test.com/'
response_data = requests.get(target_url)

print('Response status: ', response_data.status_code)
print('Response content: ', response_data.text[:15])
Here’s the code output:
Response status:  200
Response content:  <!DOCTYPE html>
We made an HTTP request to the URL, and it returned a status code of 200, which means that the request was successful. Then we printed the text up to 15 characters because otherwise, the returned text would have been very large.
Parsing the response
When you make an HTTP request, you receive some data as a response. This data is the HTML content of the web page. The HTML content is hidden inside the response_data.text, so we simply pass it to the BeautifulSoup constructor for parsing.
We parse the HTML content because after parsing, it becomes a tree-like structure. This makes it easy for us to navigate through the tree using built-in methods.
import requests
from bs4 import BeautifulSoup

# Make an HTTP Request
target_url = 'https://crawler-test.com/'
response_data = requests.get(target_url)

# Parse the HTML content
soup = BeautifulSoup(response_data.text, 'html.parser')
Getting started with scraping HTML
Use the find_all() and find() methods to extract HTML tags from the parsed HTML. For example, if you want to extract the title, headings, and links, you can use the following code:
title = soup.find('title')
link = soup.find_all('a', href=True)  # List of 'a' tags
heading = soup.find('h1')
print(title)
print(link)
print(heading)
You’ll get the title, heading of level one, and a list of <a> tags as the output.
To find an HTML element by class name, pass the class name as a dictionary argument to the find_all() method. For example, if you want to extract all the h3 headings of the class panel-header, you can use the following code:
container = soup.find_all('div', {'class': 'panel'})

heading_text = []

for box in container:
    title = box.find('h3')
    heading_text.append(title.text)

print(heading_text)
Now let's see what this code does. Every panel class has a panel-header class, and every panel-header class has an h3heading, as you can see in the visual below.
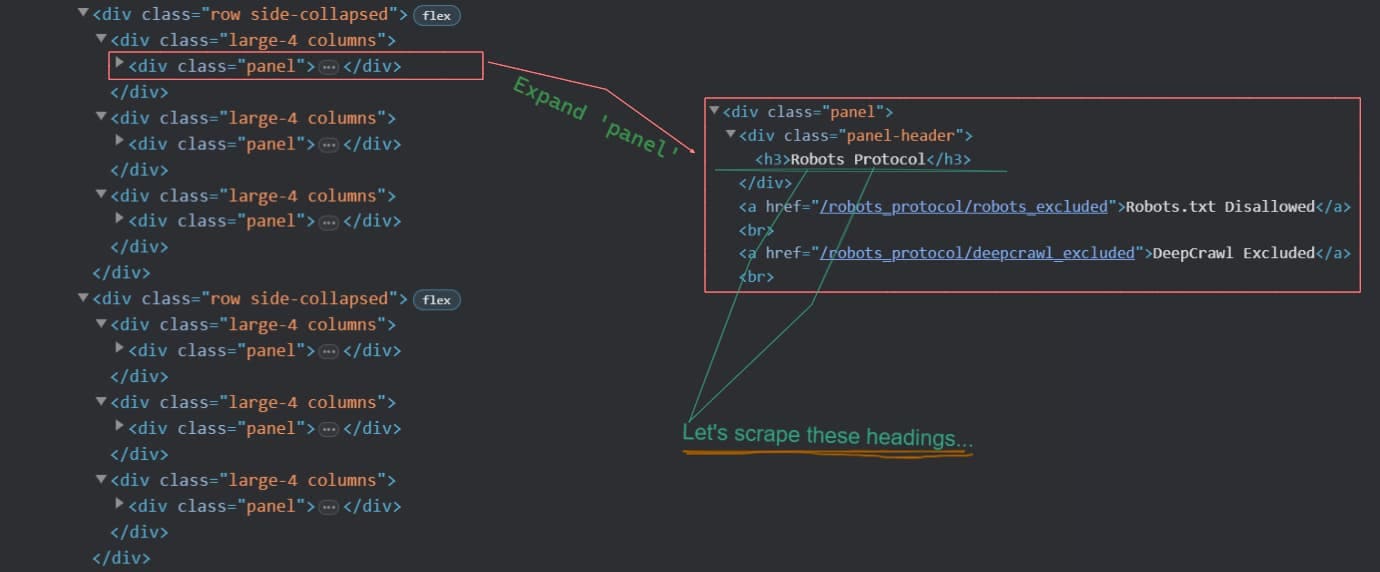
We’ll first create a container by using the find_all() method. Then we’ll loop through each of the boxes present inside the container.
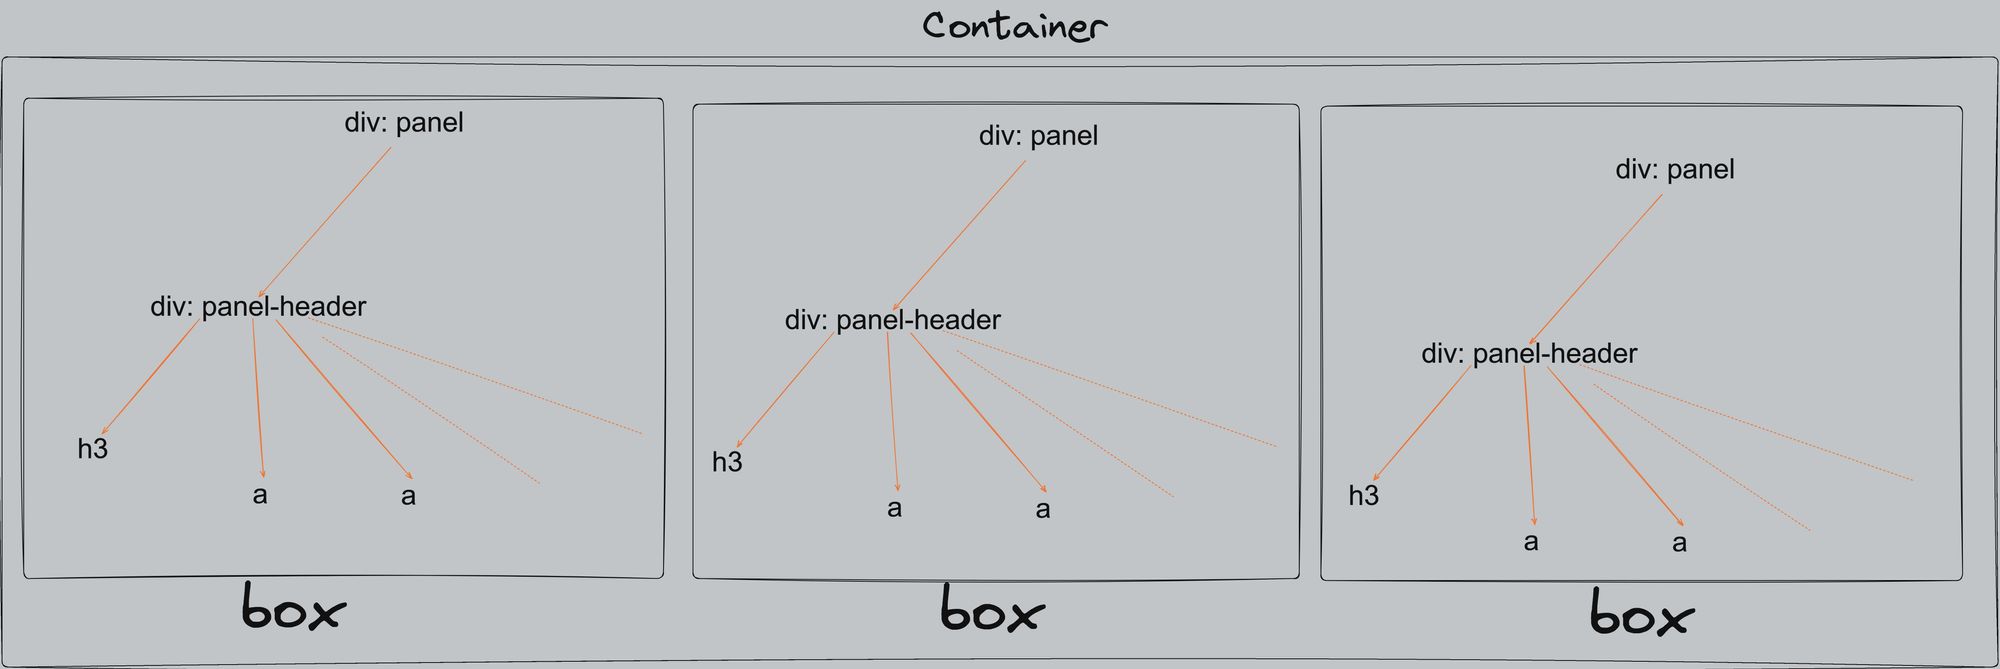
Here’s the output:
['Mobile', 'Description Tags', 'Encoding', 'Titles', 'Robots Protocol', 'Redirects', 'Links', 'URLs', 'Canonical Tags', 'Status Codes', 'Social Tags', 'Content', 'Other']
To find an HTML element by its ID name, pass the ID name to the id parameter of the find() method. In the image below, we want to extract the div with the ID header. This HTML div part focuses on the header of this website.
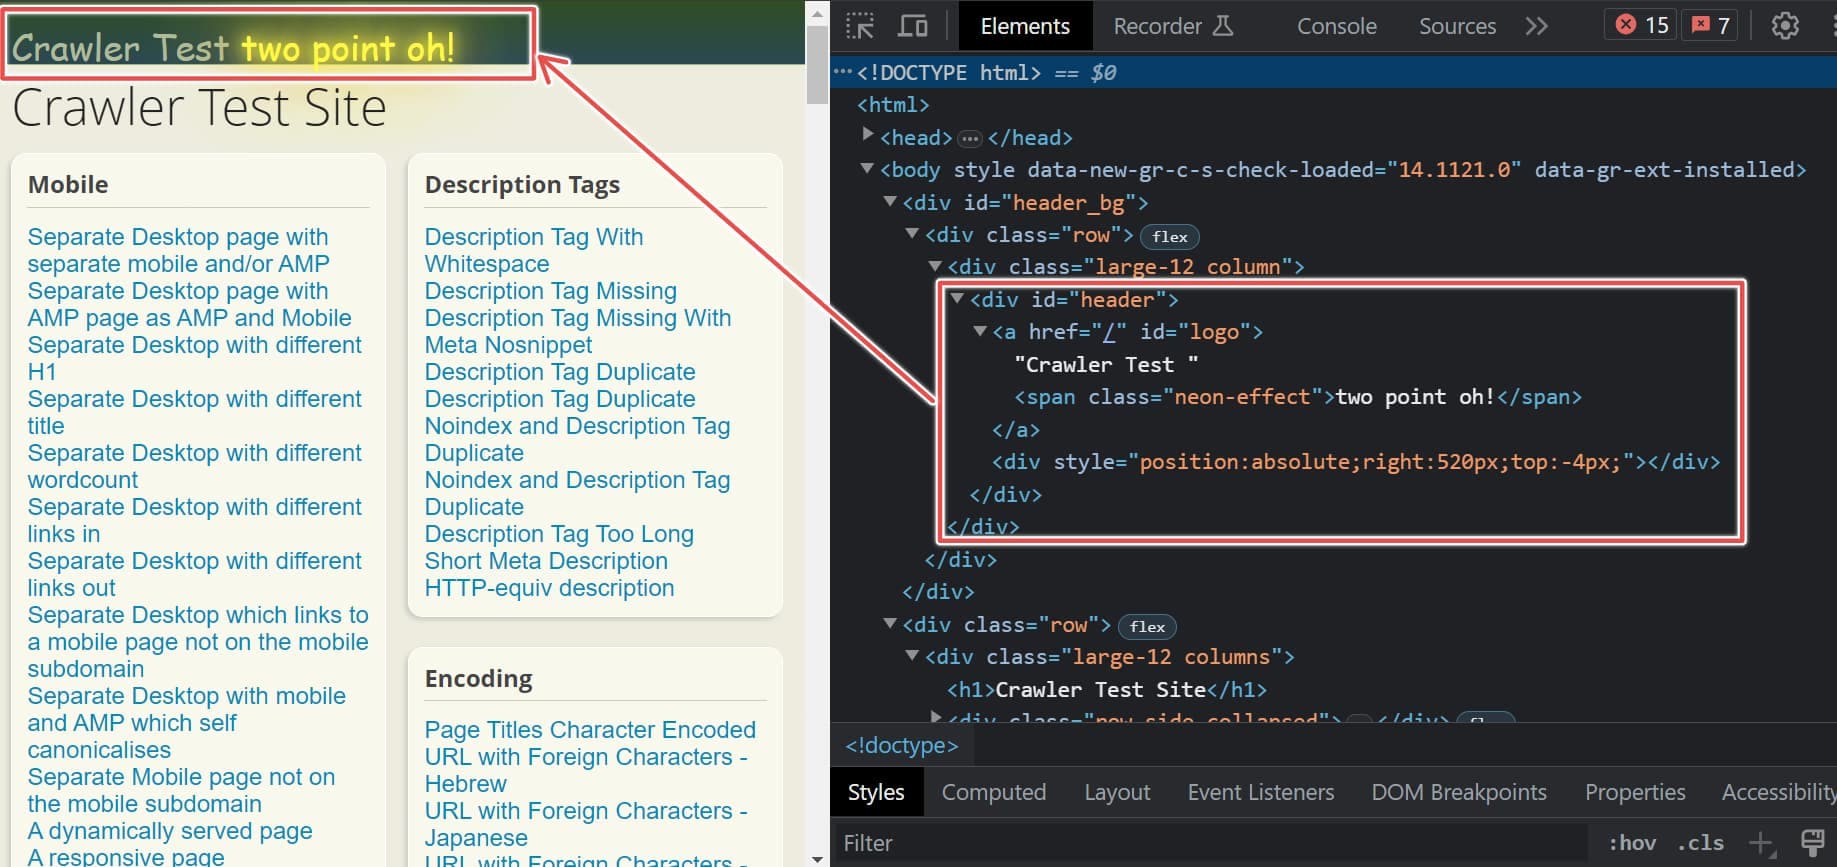
print(soup.find(id='header'))
This produces the following output:
<div id="header">
<a href="/" id="logo">Crawler Test <span class="neon-effect">two point oh!</span></a>
<div style="position:absolute;right:520px;top:-4px;"></div>
</div>
Another approach to selecting elements is to use the select() method and pass the CSS selector as a string to the method.
# Display all <div> tags that have the panel-header class.
print(soup.select('div .panel-header'))

# Display all the <h3> headings that are inside the panel-header class.
print(soup.select('div .panel-header > h3'))

# Display all the <a> tags that are inside the panel class.
print(soup.select('div .panel > a'))
Great! We’ve explored some useful methods of Beautiful Soup to parse HTML in Python.
There are hundreds of other Beautiful Soup methods (some of which are quite advanced) that can be used for various purposes. We’ll discuss some of those advanced HTML parsing techniques later.
Basic HTML parsing with PyQuery
Let's dive into HTML parsing with PyQuery. If you’re already familiar with jQuery (a JavaScript library), then the syntax will be easy for you to understand. If you’re not experienced with jQuery, don't worry, you’ll still be able to understand PyQuery easily.
As we did with Beautiful Soup, we’ll first look at HTML parsing with PyQuery using an HTML file. Then we’ll move on to parsing real-world web pages. I hope you’ve got the HTML file (test.html) that we created in the previous section ready!
Import the PyQuery library. Then, open the HTML file using file handling techniques. Create a PyQuery object by passing the HTML data to the pq constructor.
from pyquery import PyQuery

with open('test.html', 'r') as file:
    html_content = file.read()
    pq = PyQuery(html_content)
Cool! The PyQuery object has been created. Now, suppose you want the text of all the <h2> headings. To do this, you can pass the string "h2" to the PyQuery object and use the .text() method to extract the text.
text = pq('h2').text()
print(text)  # Output: First Blog Second Blog
What if you want to extract the HTML of the particular tag instead of text? To do this, you can use the .html() method.
text = pq('ul').html()
print(text)
Here’s the code output:
<li class="apify"><a href="https://apify.com">Apify.com</a></li>
<li class="store"><a href="https://apify.com/store">Apify Store</a></li>
<li class="documentation"><a href="https://apify.com/docs">Documentation</a></li>
<li class="help"><a href="https://apify.com/help">Help</a></li>
You can retrieve the attributes of a particular tag using the .attr() method. For example, in the code below, we retrieve the id and style attributes of the ul tag.
tag = pq('ul')
print(tag.attr('id'))
print(tag.attr('style'))
Now let's play with <a> tags. You can print all <a> tags with the proper HTML, print only the text of the <a> tags, and print specific <a> tags.
To retrieve all <a> tags with their HTML, simply pass the <a> tag as a string to the PyQuery object. This will create a list of all the <a> tags, and then you can loop through the tags and print them one by one.
Additionally, we’re passing the loop variable to the PyQuery object. This is because if we print the variable directly (print(i)), it’ll print the location at which the tag is present, such as <Element a at 0x230d97b3500>.
for i in pq('a'):
    print(pq(i))
Here’s the output:
<a href="https://apify.com">Apify.com</a>
<a href="https://apify.com/store">Apify Store</a>

<a href="https://apify.com/docs">Documentation</a>

<a href="https://apify.com/help">Help</a>
<a href="https://blog.apify.com/python-and-apis/">Click here</a>
        In the first part of this Python and APIs series, you'll learn how to
        use Python to connect and interact with APIs.

<a href="https://blog.apify.com/6-things-to-know-about-web-scraping/">Click here</a>
        From understanding the complexity of target websites to legal
        considerations, discover what we wish we'd been telling our customers
        from day one.
To retrieve the text content of only the <a> tag, use the .text() method.
for i in pq('a'):
    print(pq(i).text())
This produces the following output:
Apify.com
Apify Store
Documentation
Help
Click here
Click here
To retrieve a specific tag, you can use the eq() method. Simply pass the index of the tag as an argument. For example, to retrieve the first <a> tag, pass 0 as an argument to the eq() method. To retrieve the second <a> tag, pass 1, and so on.
print(pq('a').eq(0))  # Output: <a href="https://apify.com">Apify.com</a>
print(pq('a').eq(0).text())  # Output: Apify.com
Scraping a website - PyQuery in action
Now that you’ve got a basic understanding of PyQuery, let's scrape a website to better understand HTML parsing with PyQuery. For this purpose, we’ll use the same website as before: https://crawler-test.com/
Making an HTTP request
First, you need to make an HTTP request to the above URL using the Python Requests library to extract the content from a web page.
import requests

# Make an HTTP Request
url = 'https://crawler-test.com/'
response = requests.get(url)

print('Response status: ', response.status_code)
print('Response content: ', response.text[:15])
Here’s the code output:
Response status:  200
Response content:  <!DOCTYPE html>
Again, we made an HTTP request to the URL, and it returned a status code of 200, which means that our request was successful.
Parsing the response
When you make an HTTP request, you receive some data as a response. This data is the HTML content of the web page. The HTML content is hidden inside the response.text, so we simply pass it to the PyQuery constructor for parsing.
import requests
from pyquery import PyQuery

url = 'https://crawler-test.com'

# Send a GET request to the URL and store the response
response = requests.get(url)

# Create a PyQuery document from the response text
document = PyQuery(response.text)
A parsed PyQuery object has been created and named document. You can now use the built-in methods to scrape the information from the HTML of the web page.
Getting started with scraping HTML
First, let's retrieve the title of the URL using the .text() method.
print(document('title').text()) # Output: Crawler Test Site
To retrieve the text of all heading 3 elements within the panel-header class of a div element, you can pass the class name as a string to the constructor and then use the find() method to extract the text of all the heading 3 elements.
target_div = document('.panel-header')

headings = target_div.find('h3')

for heading in headings:
    print(heading.text)
Here’s the output:
Mobile
Description Tags
Encoding
Titles
Robots Protocol
Redirects
Links
URLs
Canonical Tags
Status Codes
Social Tags
Content
Other
Let's retrieve all the div elements that have id = header. To do this, you can pass the selector div#header to the document constructor. The #header selector indicates that this is an ID selector.
target_div = document('div#header')
print(target_div)
Here’s the code output:
<div id="header">
            <a href="/" id="logo">Crawler Test <span class="neon-effect">two point oh!</span></a>
            <div style="position:absolute;right:520px;top:-4px;"/>
          </div>
To retrieve the text of all <a> elements within all elements that have id=header, you can first find all elements that have the ID of header and then pass the <a> element.
header = document('#header')
a_tag = header('a')
print(a_tag.text())
This creates the following output:
Crawler Test two point oh!
Let's retrieve the link inside the specified tag. First, we’ll extract all the <a> tags with the ID of logo and then use the .attr() method to retrieve the link by passing the href attribute as a string. Unfortunately, this <a> tag only has / in the href attribute.
logo_links = document('a#logo')
print(logo_links.attr['href'])  # Output: /
You can retrieve all the links on a web page, but it would be better if you could also add some filters. For example, you might want to retrieve all the links that have a particular keyword in the link or in the text of the <a> tag.
In the following code, we’re trying to extract all the links that have HTTP keywords in their text.
all_links = document('a')

# Use the filter() function to select only links with certain criteria
filtered_links = all_links.filter(lambda _, elem: 'Status' in PyQuery(elem).text())
print(filtered_links)
Here’s the output:
<a href="/description_tags/description_http_equiv">HTTP-equiv description</a>
<a href="/status_codes/status_100">100 HTTP Status</a>
<a href="/status_codes/status_101">101 HTTP Status</a>
<a href="/status_codes/status_102">102 HTTP Status</a>
..
..
..
Now, what if you want to filter all the tags that have a particular keyword in their links? To do this, you need to use the .attr('href') function so that you can directly search for the keyword in the link.
filtered_links = all_links.filter(lambda _, elem: 'status_codes' in PyQuery(elem).attr['href'])
print(filtered_links)
This produces the following output:
<a href="/status_codes/status_100">100 HTTP Status</a>
<a href="/status_codes/status_101">101 HTTP Status</a>
<a href="/status_codes/status_102">102 HTTP Status</a>
<a href="/status_codes/status_200">200 HTTP Status</a>
..
..
..
Great! Now we’ve also explored some useful PyQuery methods to parse HTML in Python. There are also some advanced PyQuery methods that can be used for various purposes. We’ll look at these below.
Advanced HTML parsing techniques
We've covered the basics of HTML parsing with PyQuery and Beautiful Soup. Now let's look at some advanced HTML parsing techniques. You're gonna learn how to parse HTML using regular expressions, how to fix broken HTML, how to remove unnecessary tags, and the concept of parents, children, and siblings.
Parsing HTML with regex
One method of parsing HTML is through the use of regular expressions (regex). Let's say you want to scrape all the p tags from the HTML content. For this, use the following regular expression pattern:
pattern = r'<p.*?>(.*?)</p>'
Let's break down that pattern:
.*?matches any character zero or more times until it reaches the first>character.(.*?)captures the text between the<p>and</p>tags.
Beautiful Soup:
import re
from bs4 import BeautifulSoup

with open('test.html', 'r') as f:
    html_content = f.read()

soup = BeautifulSoup(html_content, 'html.parser')
p_tags = re.findall(r'<p .*?>(.*?)</p>', str(soup), re.DOTALL)

for p in p_tags:
    print(f'Found Paragraph: {p}')
PyQuery:
import re
from pyquery import PyQuery

with open('test.html', 'r') as f:
    html_content = f.read()

doc = PyQuery(html_content)

p_tags = re.findall(r'<p .*?>(.*?)</p>', str(doc), re.DOTALL)

for p in p_tags:
    print(f'Found Paragraph: {p}')
There are various methods in regular expressions (RegEx) for forming different patterns according to your needs. But we’ll not delve any deeper into RegEx here. For more information, you can refer to the official documentation.
Find parent, child(ren), and sibling(s)
To find the parent, use the find_parent() method. You can print the name of the parent using the .name attribute.
from bs4 import BeautifulSoup

with open('test.html', 'r') as f:
    html_content = f.read()

soup = BeautifulSoup(html_content, 'html.parser')

target_element = soup.find('li')

parent = target_element.find_parent()
print('Parent:', parent.name)
Here’s the code output:
Parent: ul
To find the first child of an HTML element, use the find_child() method. To find all the children of an HTML element, use the find_children() method.
target_element = soup.find('ul')

print('Single Child:')
print(target_element.findChild())

print('Children:')
print(target_element.findChild())
This produces the following output:
Single Child: <li class="apify"><a href="<https://apify.com>">Apify.com</a></li>

Children:
[<li class="apify"><a href="https://apify.com">Apify.com</a></li>, <a href="<https://apify.com>">Apify.com</a>, <li class="store">
<a href="https://apify.com/store">Apify Store</a>
</li>, <a href="https://apify.com/store">Apify Store</a>, <li class="documentation">
<a href="https://apify.com/docs">Documentation</a>
</li>, <a href="https://apify.com/docs">Documentation</a>, <li class="help"><a href="https://apify.com/help">Help</a></li>, <a href="https://apify.com/help">Help</a>]
To find the next sibling after an HTML element, use the find_next_sibling() method.
target_element = soup.find('h2')
sibling = target_element.find_next_sibling()
print('Sibling', sibling)
print('Sibling name', sibling.name)
Here’s the code output:
Sibling:
<p class="content">
        Python and APIs - Part 1: How to use Python to connect and interact with
        APIs
        <a href="https://blog.apify.com/python-and-apis/">Click here</a>
        In the first part of this Python and APIs series, you'll learn how to
        use Python to connect and interact with APIs.
</p>

Sibling name: p
To find all the next siblings after an HTML element, use the find_next_siblings() method.
target_element = soup.find('li')
sibling = target_element.find_next_siblings()
print(sibling)
This produces the following output:
[<li class="store">
<a href="https://apify.com/store">Apify Store</a>
</li>, <li class="documentation">
<a href="https://apify.com/docs">Documentation</a>
</li>, <li class="help"><a href="https://apify.com/help">Help</a></li>]
You can also find the previous sibling before an HTML element using the find_previous_sibling() method. Also, to find all the previous siblings, use the find_previous_siblings() method.
target_element = soup.find('p')
sibling = target_element.find_previous_sibling()
print(sibling)
Here’s the output:
<h2 class="title">First Blog</h2>
Unknown tags
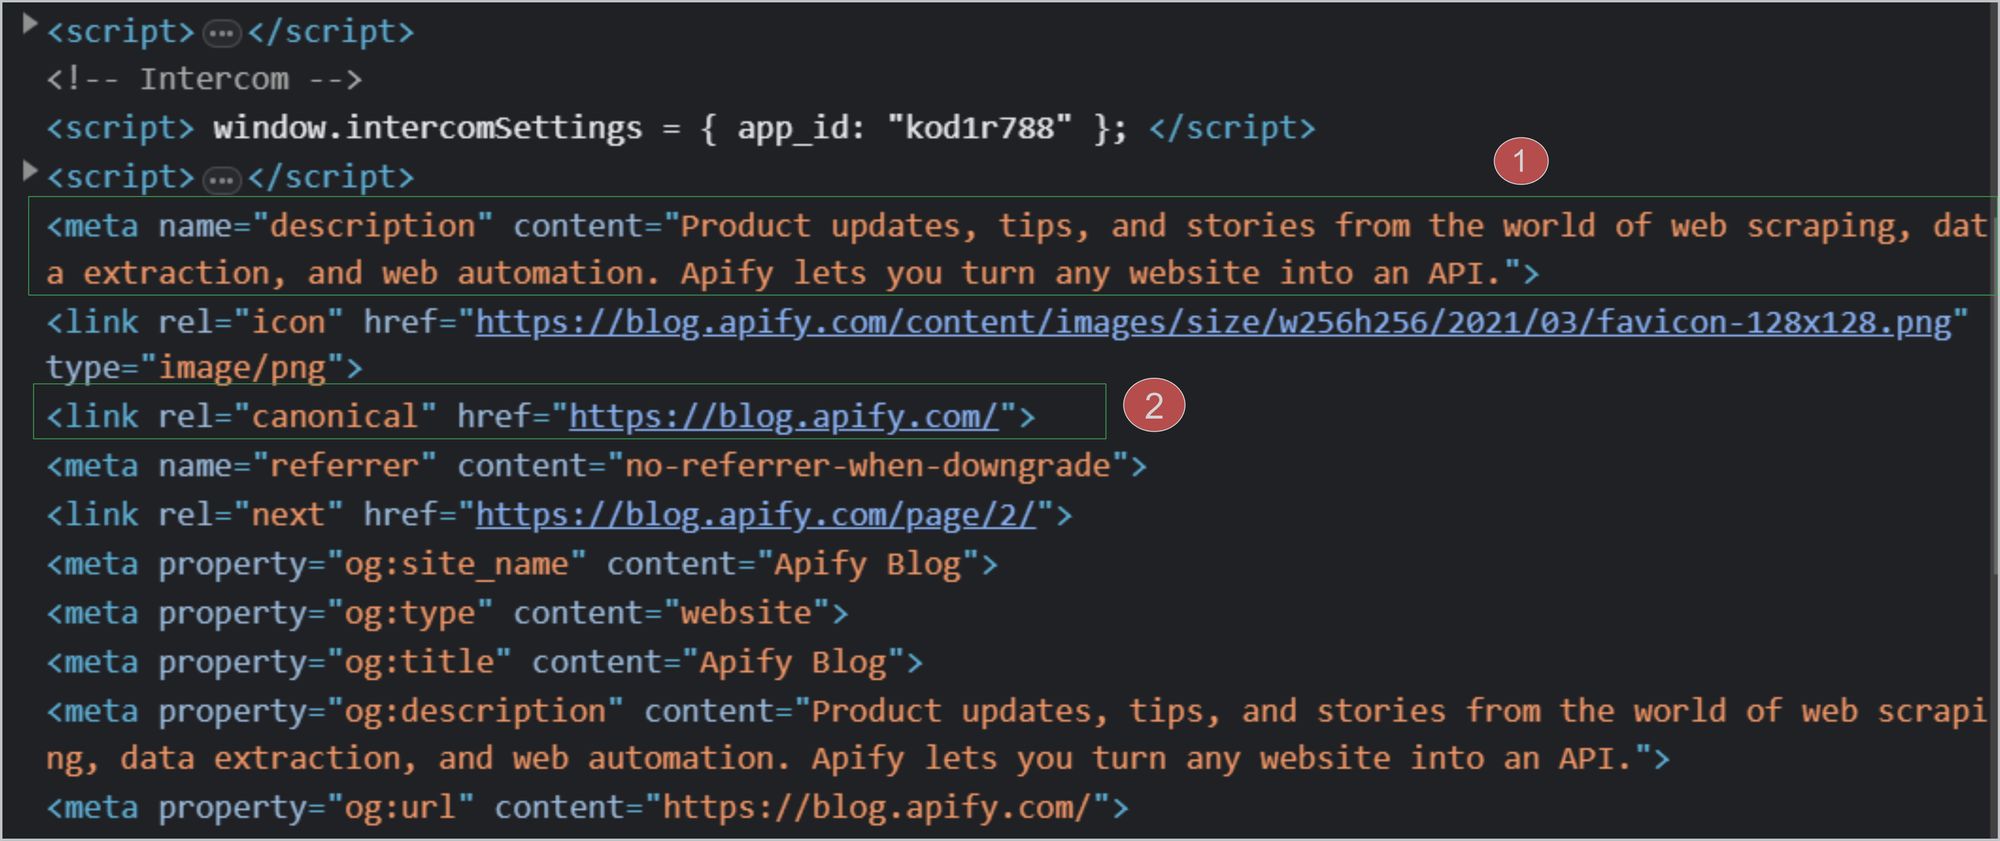
You may have heard of the <description> tag and <canonical> tag. These tags are found in the head of every HTML file, but not many people talk about them or learn how to use canonical URLs. So, let's retrieve the <description> tag and <canonical> tag using Beautiful Soup and PyQuery.
Below is an image of the HTML from the URL https://blog.apify.com/. We’ll try to retrieve these tags from this URL. You can see the <description> and <canonical> tags in the image.
Beautiful Soup:
import requests
from bs4 import BeautifulSoup

url = 'https://blog.apify.com/'

response = requests.get(url)

html_text = response.text
soup = BeautifulSoup(html_text, 'html.parser')

# Extract description tag
description_tag = soup.find('meta', attrs={'name': 'description'})
description = description_tag['content'] if description_tag else ''

# Extract canonical tag
canonical_tag = soup.find('link', attrs={'rel': 'canonical'})
canonical = canonical_tag['href'] if canonical_tag else ''

print('Description:', description)
print('Canonical:', canonical)
PyQuery:
import requests
from pyquery import PyQuery

url = 'https://blog.apify.com/'
response = requests.get(url)

html_text = response.text
doc = PyQuery(html_text)

# Extract description tag
description = doc('meta[name="description"]').attr('content') or ''

# Extract canonical tag
canonical = doc('link[rel="canonical"]').attr('href') or ''

print('Description:', description)
print('Canonical:', canonical)
Here’s the code output:
Description: Product updates, tips, and stories from the world of web scraping, data extraction, and web automation. Apify lets you turn any website into an API.

Canonical: https://blog.apify.com/
Removing specific HTML Tags
To remove specific HTML tags, you can use the decompose() method. In the code below, we’re trying to remove the litag that has a help class.
Beautiful Soup:
from bs4 import BeautifulSoup

with open('test.html') as f:
    soup = BeautifulSoup(f, 'html.parser')

for li_tag in soup.find_all('li', class_='help'):
    li_tag.decompose()

# Get the modified HTML
modified_html = str(soup)
print(modified_html)
PyQuery:
from pyquery import PyQuery

with open('test.html', 'r') as f:
    html_content = f.read()

# Create a PyQuery object
doc = PyQuery(html_content)

# Remove all <li> tags with class="help"
doc('li.help').remove()

# Get the modified HTML
modified_html = doc.html()
print(modified_html)
Sometimes you’ll get HTML content that is very messy with empty tags. To remove these, you can use the .extract() method.
from bs4 import BeautifulSoup

# Read the HTML file
with open('test.html') as f:
    soup = BeautifulSoup(f, 'html.parser')

# Find and remove empty tags
for tag in soup.find_all():
    if len(tag.get_text(strip=True)) == 0:
        tag.extract()

# Print the cleaned HTML
print(soup)
Fix broken HTML
Sometimes we might forget to close tags. Other times, open tags are deleted by mistake. In that case, you can fill in the missing HTML elements using the prettify() method.
What exactly does this method do? Suppose you’ve got the following HTML file that does not have the closing tags </ul> and </div>. The prettify() method will add these closing tags.
broken1.html:
<div class="nav">
  <ul id="navlist" style="height: 100px">
    <li class="apify"><a href="https://apify.com">Apify.com</a></li>
    <li class="help"><a href="https://apify.com/help">Help</a></li>
If you have an HTML file in which the opening tags are missing, see the following file. The prettify() method will remove the closing tags in this case as well.
broken2.html:
<li class="apify"><a href="https://apify.com">Apify.com</a></li>
    <li class="help"><a href="https://apify.com/help">Help</a></li>
  </ul>
</div>
Here's the code:
from bs4 import BeautifulSoup

with open('file_name.html', 'r') as f:
    html_content = f.read()

soup = BeautifulSoup(html_content, 'html.parser')
print(soup.prettify())
This is the output for broken1.html:
<div class="nav">
 <ul id="navlist" style="height: 100px">
  <li class="apify">
   <a href="https://apify.com">
    Apify.com
   </a>
  </li>
  <li class="help">
   <a href="https://apify.com/help">
    Help
   </a>
  </li>
 </ul>
</div>
And here’s the output for broken2.html:
<li class="apify">
 <a href="https://apify.com">
  Apify.com
 </a>
</li>
<li class="help">
 <a href="https://apify.com/help">
  Help
 </a>
</li>
Other Methods - first/last and odd/even
Look at both boxes in the image below. The first <a> tag occurs in the left box, and the last <a> tag occurs in the right box. We can retrieve the first and last elements using the first() and last() methods of pyquery. To do this, we simply pass the tag for which we want to find the first and last occurrence, followed by a colon, and then the first() or last()function.
You can also retrieve the particular tag in the odd or even occurrence. For example, if you want to retrieve all the text of the <a> tag in an odd or even manner, you would use the odd() or even() function, similar to the first() or last()functions.
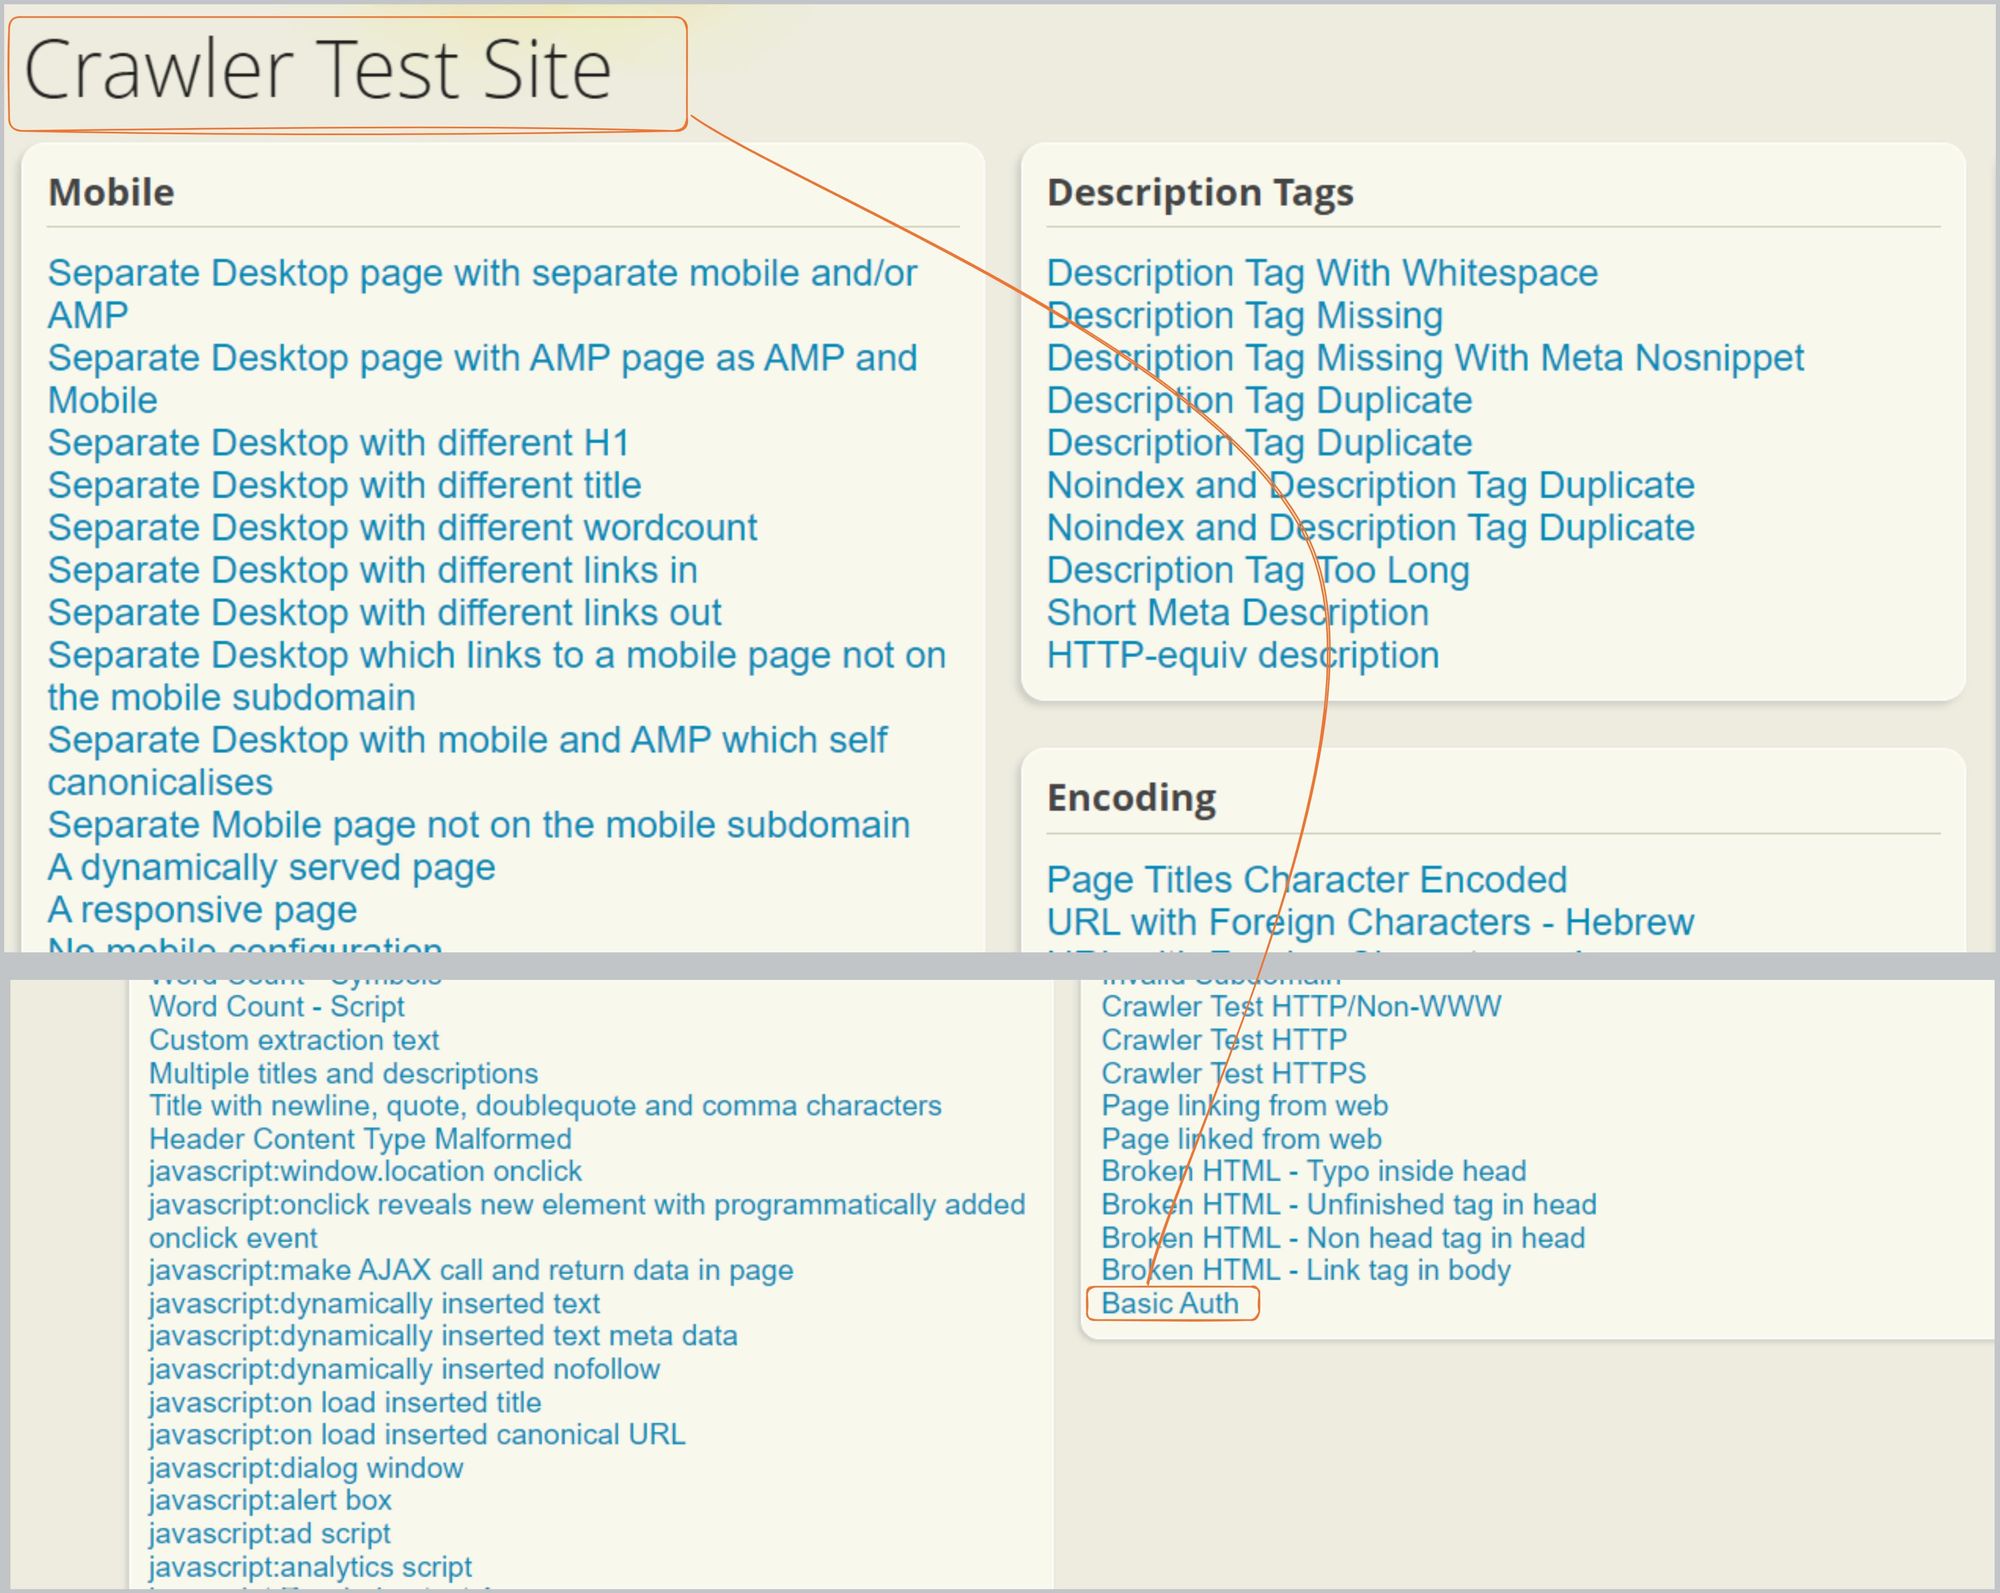
The code below should help give you a better understanding. We’re only retrieving the first and last <a> tags.
first_li = document('a:first')
print(first_li.text())  # Output: Crawler Test two point oh!

last_li = document('a:last')
print(last_li.text())  # Output: Basic Auth
Now let's retrieve a tag in odd and even forms. You’ll get a list of elements, so to print line by line, use the each() function as shown below:
import requests
from pyquery import PyQuery

url = 'https://crawler-test.com/'
response = requests.get(url)
document = PyQuery(response.text)

odd_lis = document('a:odd')
odd_lis.each(lambda item: print(item))
Here’s the output:
Separate Desktop page with separate mobile and/or AMP
Separate Desktop with different H1
Separate Desktop with different wordcount
Separate Desktop with different links out
Separate Desktop with mobile and AMP which self canonicalises
A dynamically served page
No mobile configuration
An AMP page which also has a dedicated mobile page
..
..
..
..
..
..
Troubleshooting HTML parsing issues
When working with HTML parsers, you may need to troubleshoot some issues. Here are some suggestions for fixing an HTML parser in Python:
- Make sure there are no syntax errors in your code.
- Be sure to import the parser correctly or try a different parser, such as lxml or html5lib.
- Make sure you’re using the latest version of Python.
- Check the HTML source code for errors.
If you don't understand what Beautiful Soup is doing to your HTML, pass it to the diagnose() function (new in Beautiful Soup 4.2.0). You'll get a report showing how the different parsers handle your document. See the code below.
from bs4.diagnose import diagnose

with open('test.html') as f:
    data = f.read()

print(diagnose(data))
Suppose this is our html file - closing tags are missing.
<div class="nav">
  <ul id="navlist" style="height: 100px">
    <li class="apify"><a href="https://apify.com">Apify.com</a></li>
    <li class="help"><a href="https://apify.com/help">Help</a></li>
When we pass the file to the diagnose function, it will automatically add the closing tags. This is one use case. If you look at the output of diagnose(), you may be able to figure out the problem. If not, you can paste the output of diagnose()when you ask for help in any community platform like GitHub or Stack Overflow.
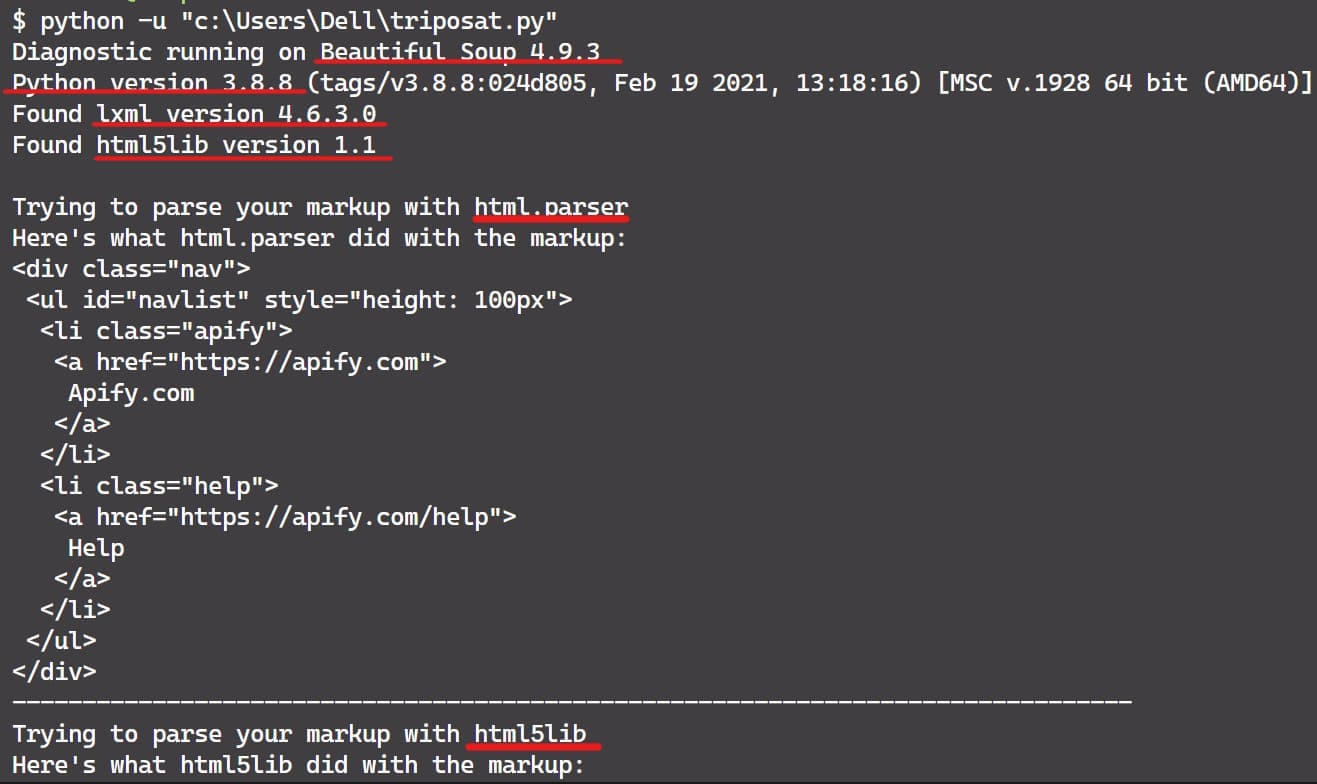
Since HTML tags and attributes are not case-sensitive, all three HTML parsers convert them to lowercase. That is, the markup <TAG_NAME></TAG_NAME> is converted to <tag_name></tag_name>. To preserve mixed-case or uppercase tags and attributes, you'll need to parse it as XML.
soup = BeautifulSoup(html_content, 'xml')A common error that can occur is SyntaxError: Invalid syntax. It's caused by running the Python 2 version of Beautiful Soup under Python 3 without converting the code.
You can also get ImportError: No module named html.parser. This error is caused by running the Python 3 version of Beautiful Soup under Python 2.
You may also encounter this error: ImportError: No module named BeautifulSoup. This can arise by writing Beautiful Soup 4 code without knowing that the package name has changed to bs4.
PyQuery vs. Beautiful Soup
PyQuery and Beautiful Soup are both great Python libraries for working with HTML and XML documents. We‘ve looked at these libraries in depth, so let's compare them.
PyQuery uses LXML internally for fast XML and HTML manipulation. LXML is written in C, which makes it fast and lightweight. However, the speed difference is negligible unless you are working with very large documents.
This GitHub gist code will help you test the response times of Beautiful Soup and PyQuery, as well as other similar libraries. I ran this code, and the output was shocking:
==== Total trials: 100000 =====
bs4 total time: 18.1
pq total time: 2.2
lxml (cssselect) total time: 2.2
lxml (xpath) total time: 1.7
As you can see from the above result, there's a huge difference in speed between Beautiful Soup and PyQuery.
Beautiful Soup is great for parsing malformed HTML. It can handle common mistakes and inconsistencies in HTML markup. Beautiful Soup has more built-in functions than PyQuery. That’s why web scraping developers love it. PyQuery is fast and efficient if you have perfectly formatted HTML documents, but it doesn't work well with poorly formatted documents.
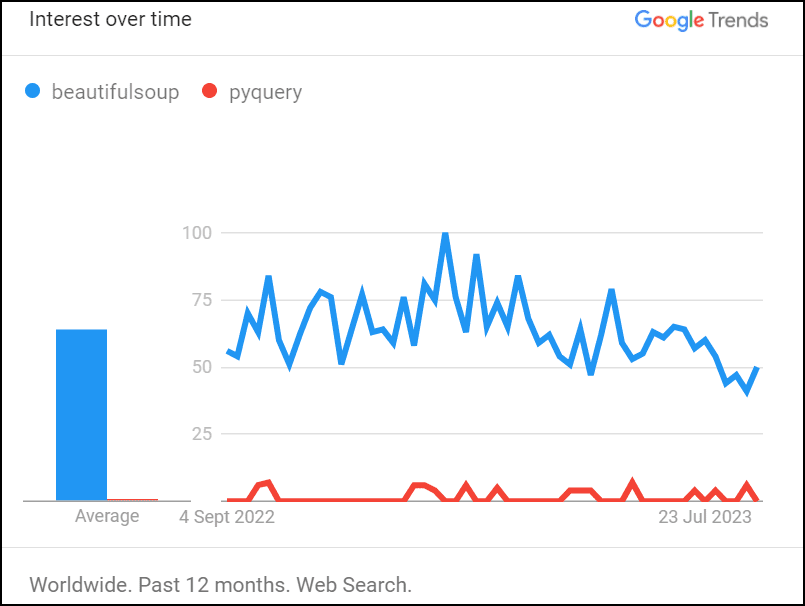
Both PyQuery and Beautiful Soup have active community support. However, Beautiful Soup has a more active community and more learners. There are around 32,276 questions tagged with Beautiful Soup on Stack Overflow, while there are very few questions tagged with PyQuery.
Have a look at the interest over time of Beautiful Soup and PyQuery:
Here's a summary of the key differences between the PyQuery and Beautiful Soup libraries:
Finishing up
You've gained some valuable insights into how to parse HTML in Python. You’ve also received some troubleshooting advice and a helpful comparison between both libraries. Either can be a good choice for working with HTML and XML files in Python.
Now that you’ve read this blog post, here are a few things you might like to do next:
- Compare PyQuery and BeautifulSoup with other Python HTML parsers.
- Learn more about PyQuery and Beautiful Soup from their official documentation.
- Use both libraries to build real-world applications, such as a web scraper that can analyze and extract data from websites.
- Create a scraper on the Apify platform using a Python code template.


