A talent sourcing strategy that relies solely on inbound applications is largely a bet on luck.
Waiting for candidates to come to you means you only surface the people who happen to see your ad and act on it, leaving you with a thin slice of the professionals who can actually do the job.
The best fit for your role might be actively searching on another platform, or they may be employed elsewhere with quiet plans to leave. If they never cross paths with your job ad, they are automatically disqualified. The solution, then, isn’t a wider ad campaign strategy, but a more proactive one.
The workflow you’ll build in this tutorial solves this problem by using Apify to collect public LinkedIn profile data for eligible candidates in the specific niches you're hiring for, while OpenAI processes that data and evaluates it against the job requirements, returning the strongest matches for the role.
Zapier connects the workflow together and hosts an extensive catalog of integrations that further extend the project’s capabilities.
Prerequisites
Overview of the Zap workflow
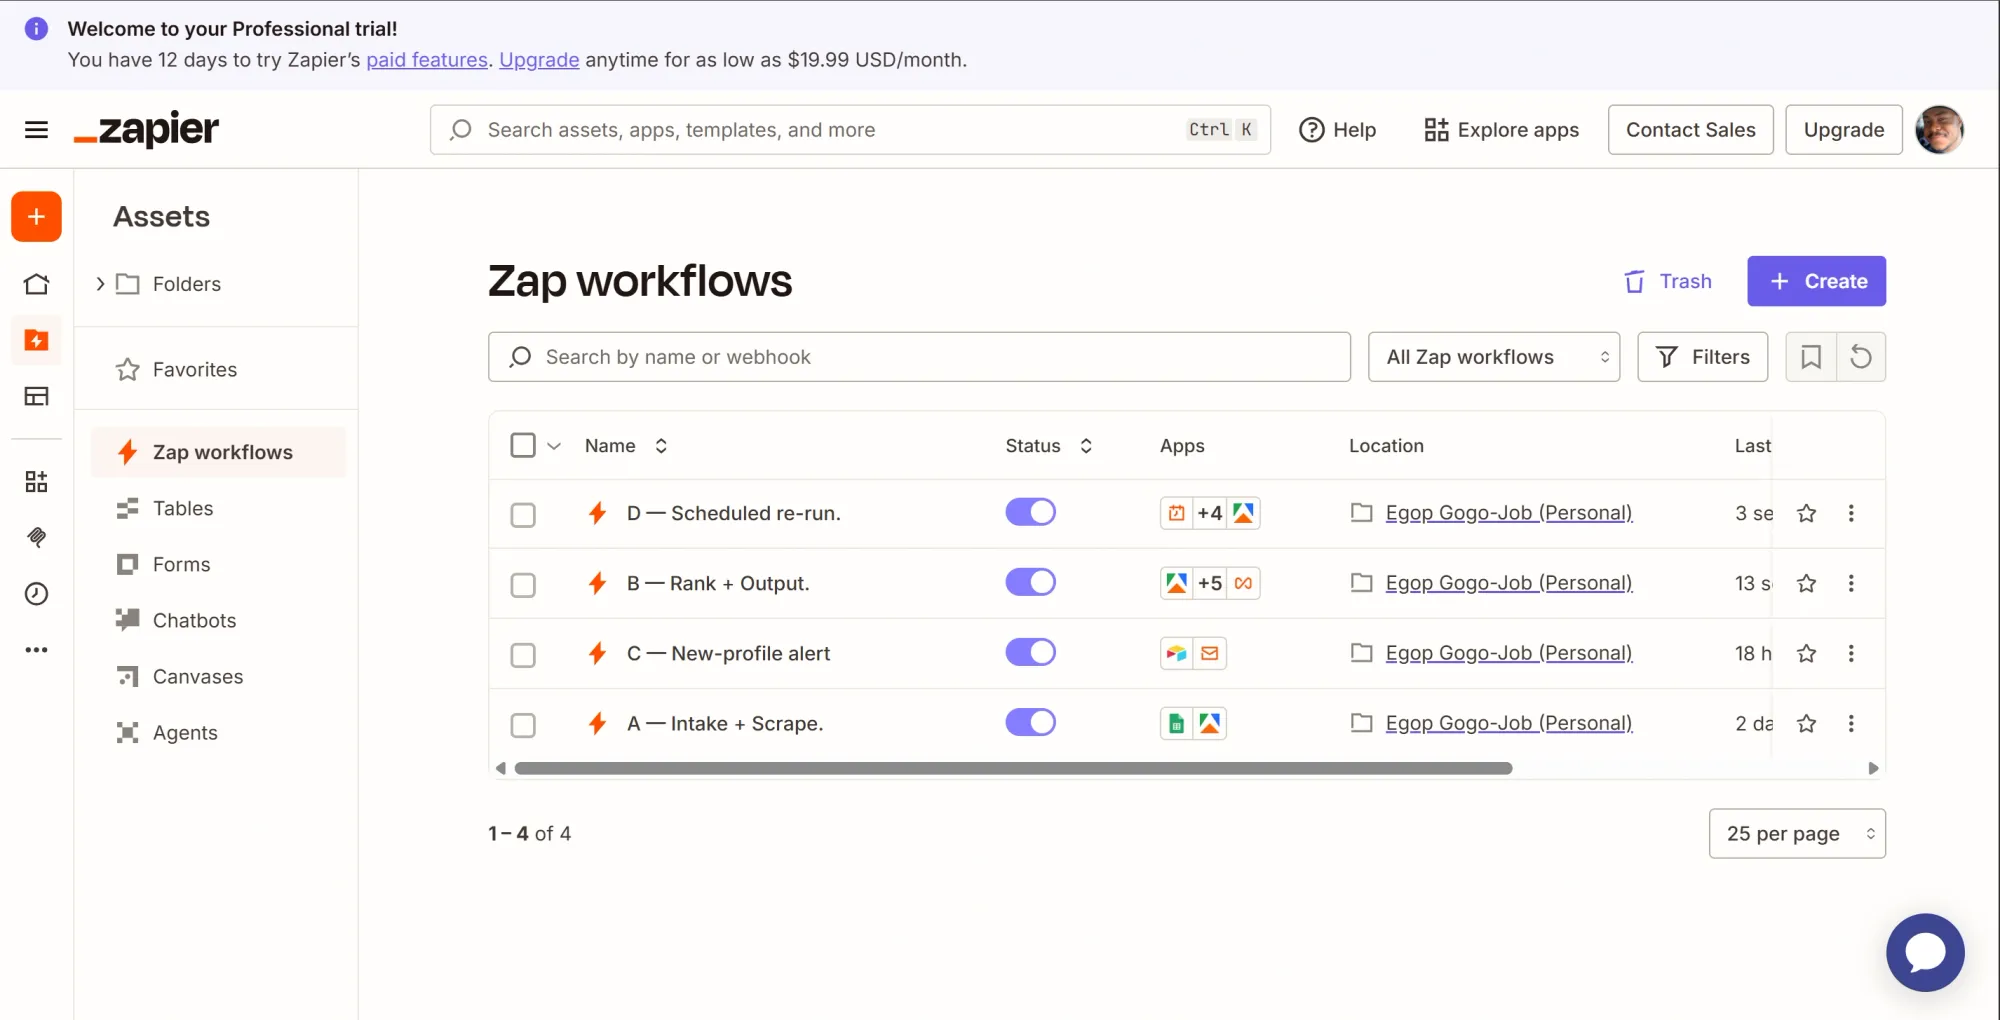
This system uses four specialized Zaps to automate talent sourcing. Zap A monitors Google Sheets to scrape relevant LinkedIn profiles via Apify, while Zap B matches the candidates using OpenAI and filters out duplicates before creating new candidate cards. Zap C then emails you an alert only when fresh candidates are discovered. Finally, Zap D runs daily to re-scrape open positions, relying on Zap B's filtering to ensure you only see new talent.
Phase 1: Accounts and credentials setup
Zapier connects to Google, OpenAI, and Airtable through its own in-app sign-in, which you’ll use as you build each step. What you do need upfront are three API tokens and a base ID.
To avoid confusion, you can use a single project name across all configurations unless specific sections of this tutorial state otherwise.
Step 1: Grab your Apify API token
- Sign up at apify.com if you don't already have an account.
- Go to Apify Console.
- On the left-hand sidebar menu, click on Settings, then navigate to the API & Integrations tab.
- Under "Personal API tokens," copy your default token or click Add new token to create a new one, then give it a name.
- Click the copy icon to copy the token and save it somewhere temporary.

Step 2: Generate an OpenAI API key
- Go to platform.openai.com and log in or sign up.
- On the left sidebar, navigate to API keys.
- Click Create new secret key, name it, and leave the permissions as they are.
- Copy the key immediately and save it alongside your Apify token.
- OpenAI API operates on a prepaid system, so make sure you have at least $5 in your credit balance.
Step 3: Create your Airtable base and generate a token
- Go to airtable.com, log in or sign up.
- Click Create and select Build an app on your own, then give it a name. You will add its columns in Phase 3; for now, the base just needs to exist so the token has something to point at.
- While that base is open, copy the segment of the browser URL that starts with
appand ends before a forward slash (/). That’s your base ID, save it (looks like this: appbxxxQbvxxWSsx). - Now go to airtable.com/create/tokens, click Create new token, and name it.
- Under Scopes, add
data.records:read. - Under Access, select the base you just created.
- Click "Create token", copy it immediately, and save it alongside your Apify and OpenAI keys.
Step 4: Create a Zapier account
- Go to zapier.com and sign up.
- The free trial period is enough to build this project. However, if you wish to subscribe to Zapier, just click Upgrade in the top-right corner and follow the steps.
Phase 2: Build the data stores
Google Sheets stores the job details and serves as the trigger point, while the project results appear in Airtable. You’ll build both before the Zaps, so the fields exist to map against.
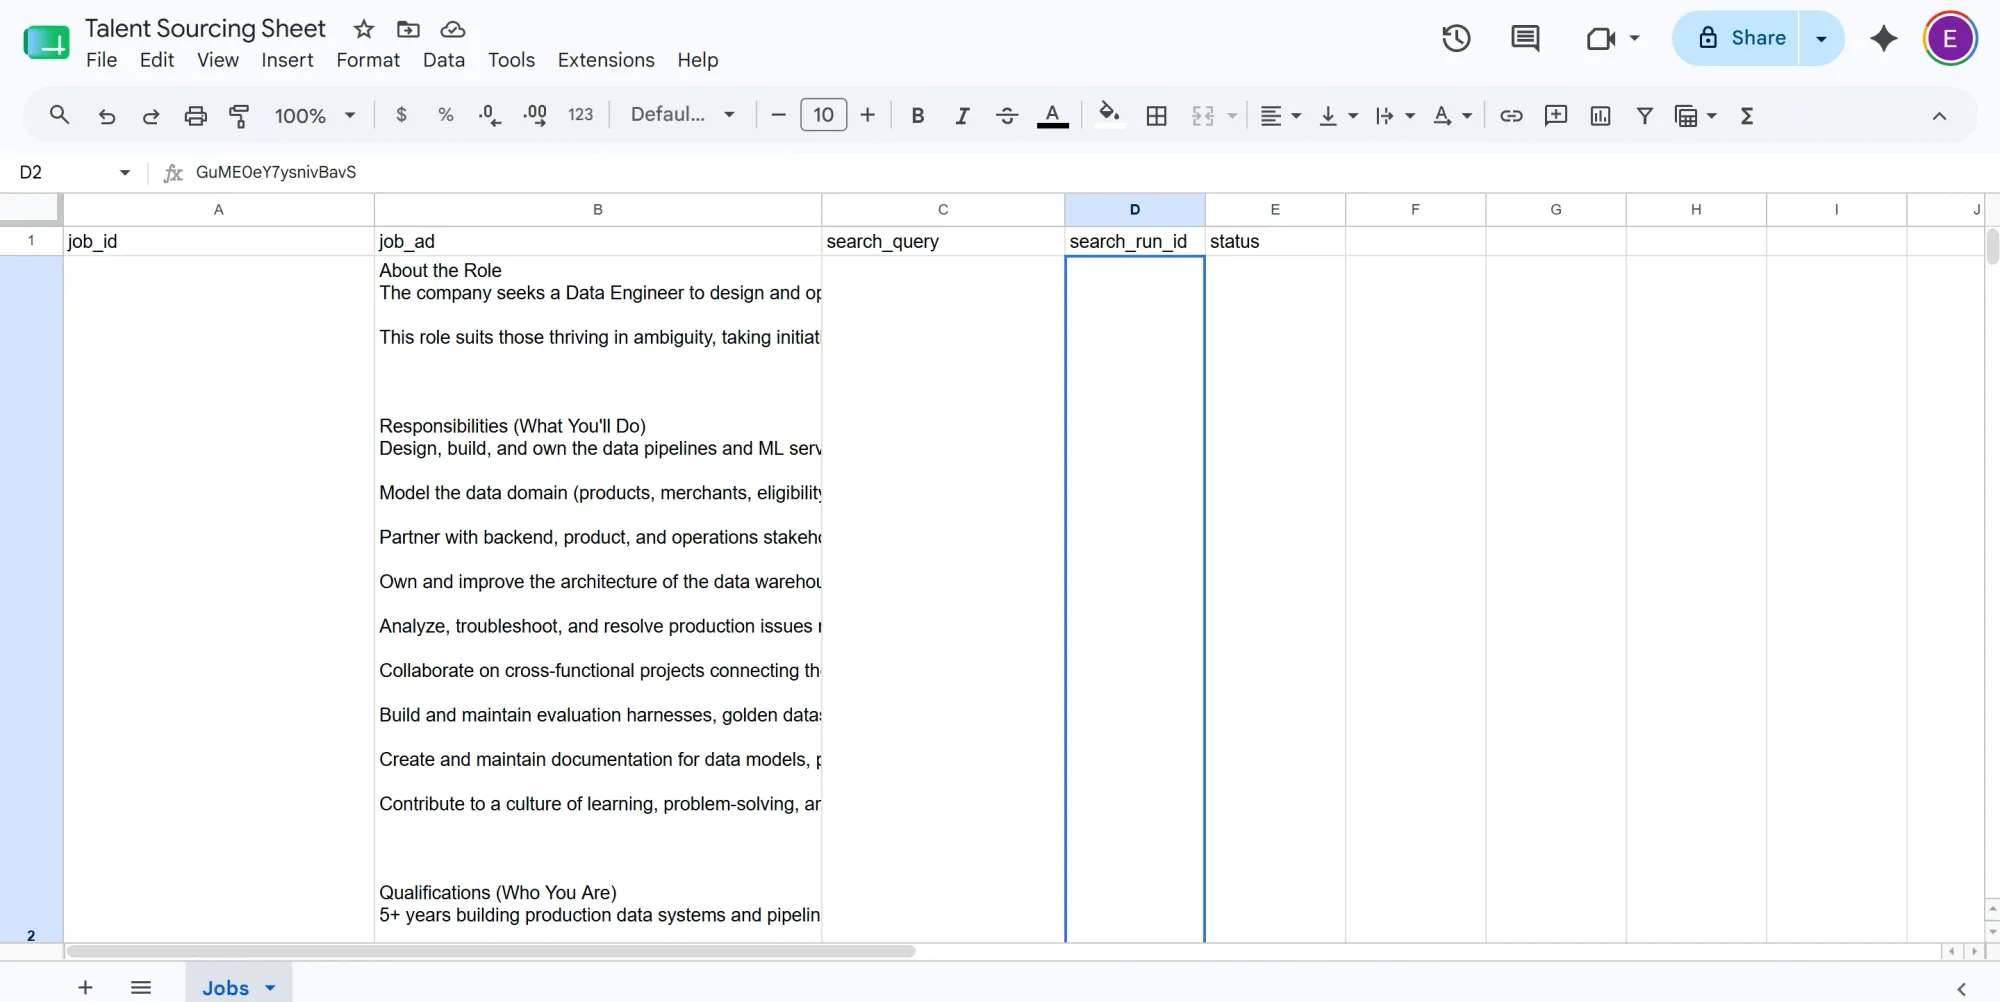
Step 1: The Jobs sheet
- In your Google Sheets, create and name a new Sheet.
- Rename the first tab to Jobs. In row 1, add these headers, left to right:
job_id|job_ad|search_query|search_run_id|status
This sheet is the control panel. You only ever touch three columns: job_id (input number), job_ad (a real job ad), and search_query (what gets scraped). search_run_id is how a finished scrape gets tied back to its job, and status is the on/off switch that the daily rerun reads.
Step 2: The Airtable base
You already created and named this base in Phase 1. Now you’ll attach two tables and fields within it. Click the + icons within the blank base to create new items, then hover over the edges of each column and click the dropdown to edit them.
- Open the Talent Sourcing base from Phase 1, rename its default table to Candidates, delete the sample rows, and set up these fields:
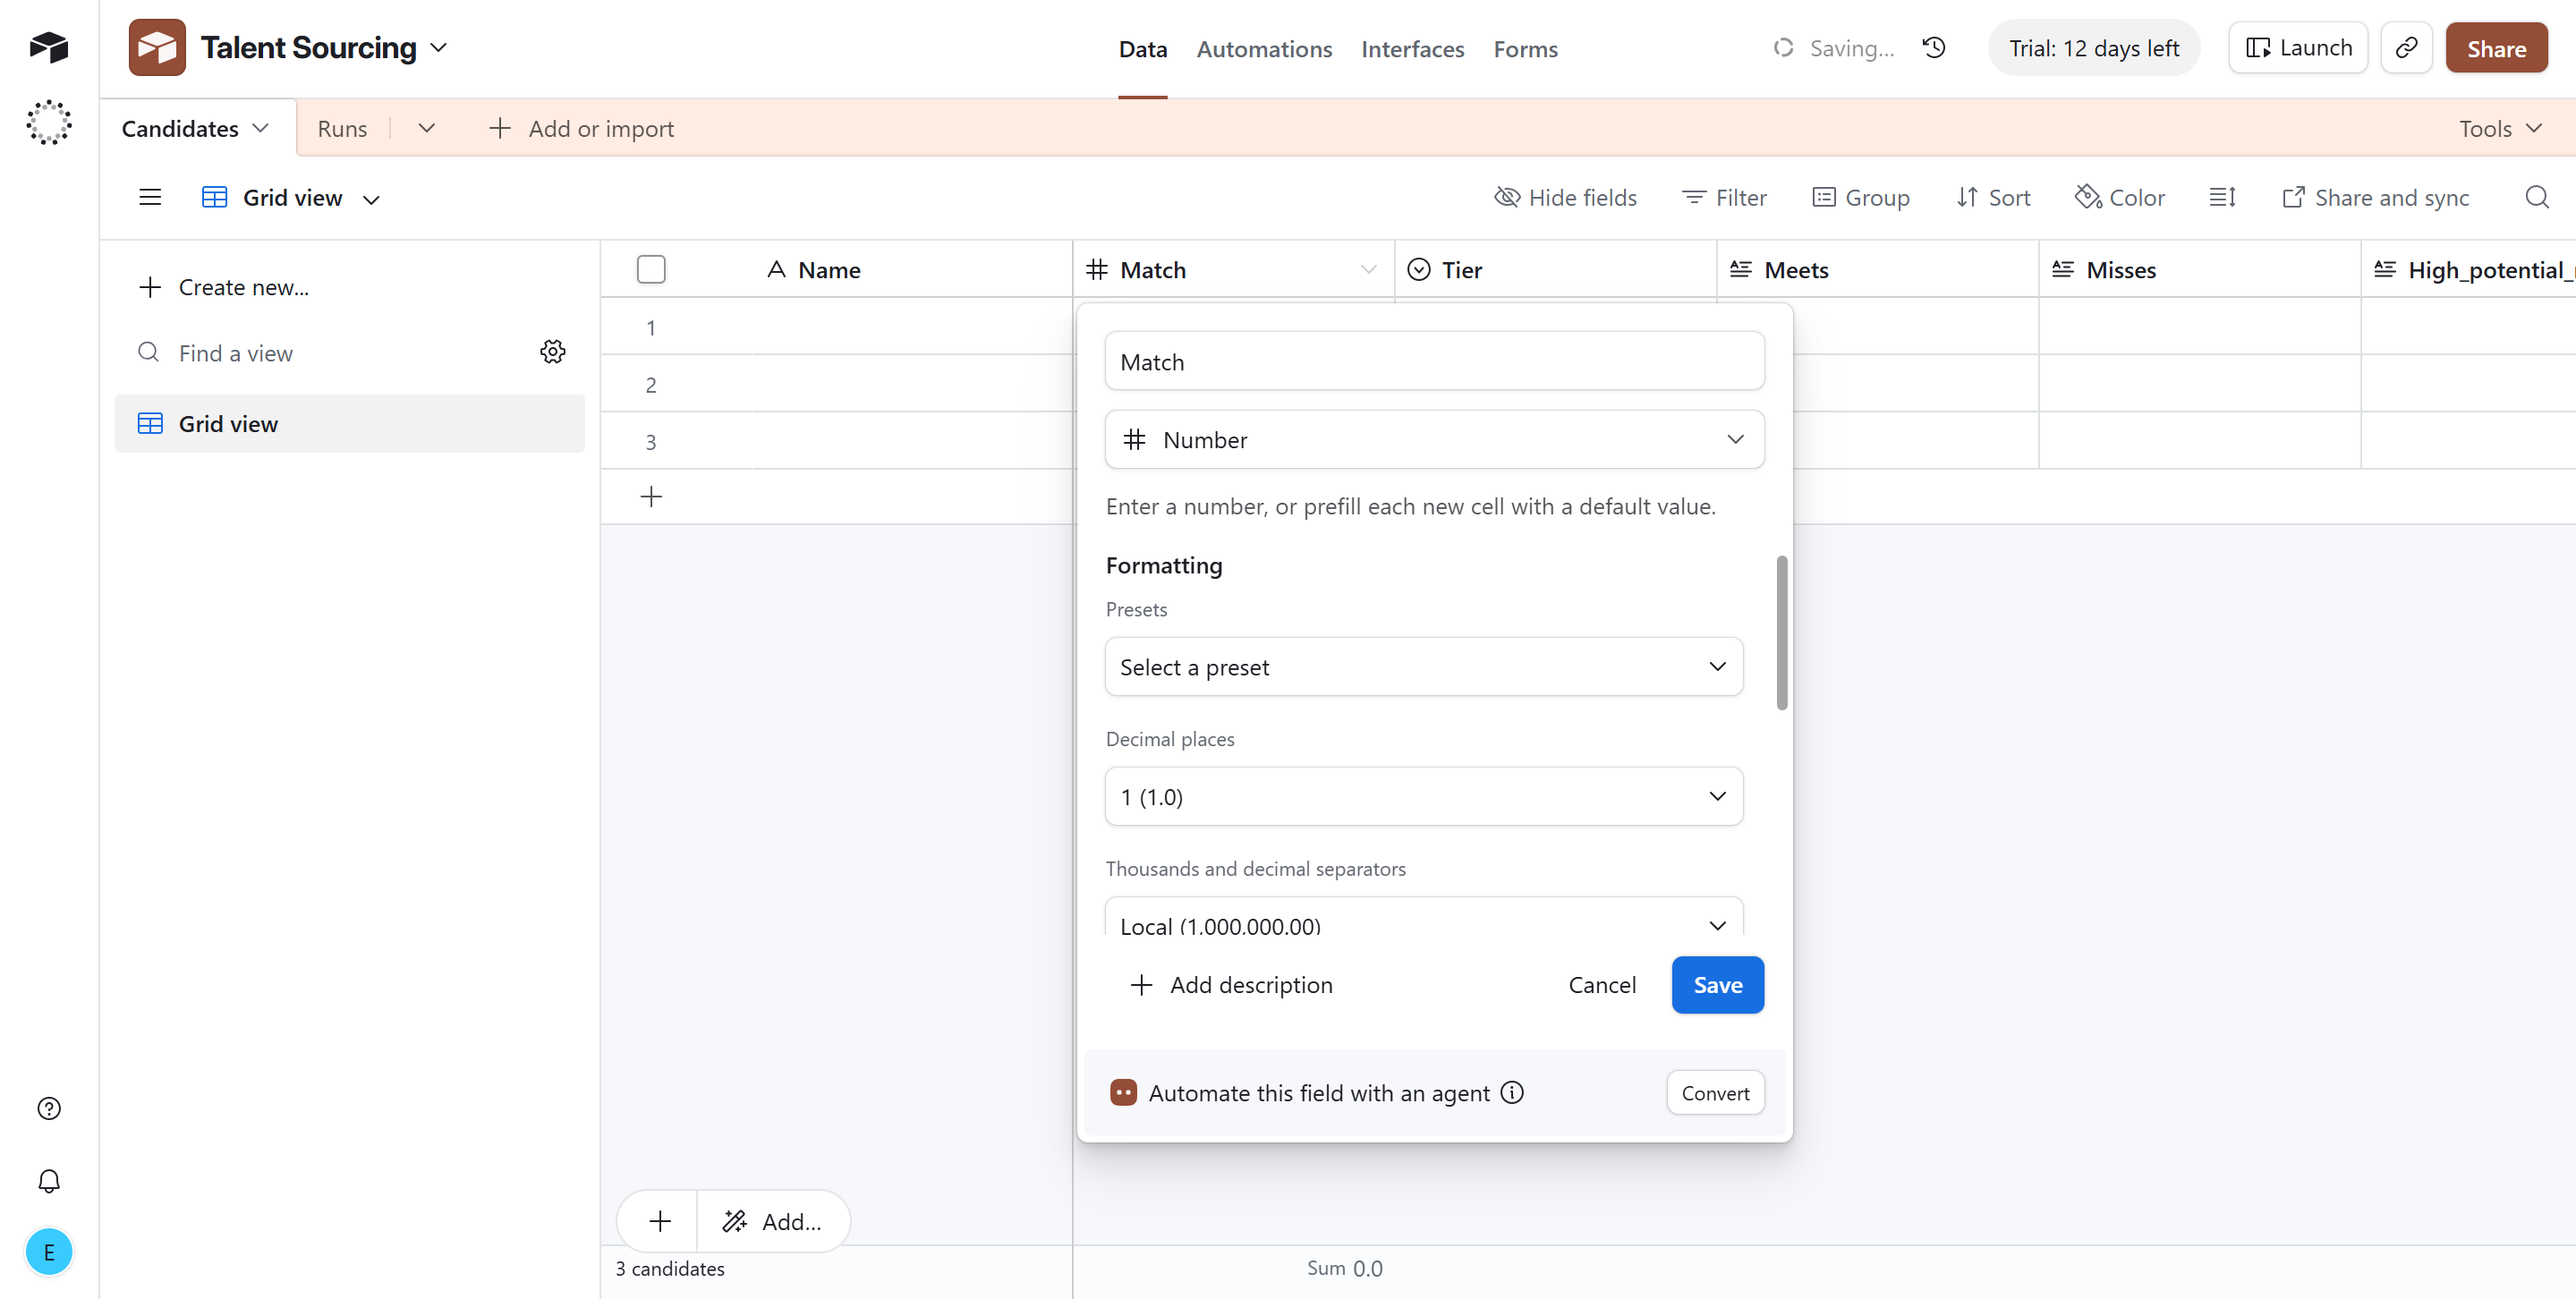
- Name (Single line text)
- Match (Number)
- Tier (Single select, options spelled exactly
strong_match,high_potential,partial,weak, each with a color) - Meets, Misses, High potential reason, Outliers (Long text)
- Email (Email)
- LinkedIn (URL),
- Job (Single line text),
- Job ID (Single line text),
- Added (Created time), Airtable fills this automatically.
- Add a second table, name it Runs, with these fields:
- Summary (Single line text)
- Job title (Single line text)
- New candidates (Number)
- Total scored (Number)
- Link (URL)
- Logged (Created time), automatic.
- In the Candidates table, sort the grid by Added, newest first.
- Copy the URL of the Candidates grid view from your browser and save it.
The Candidates table is where you’ll read results. The two fields doing invisible work are LinkedIn, which the pipeline uses to recognize someone it has already logged, and Job ID, which scopes that recognition to a single role. The Runs table is not for reading; it exists solely so that each new row corresponds to one alert, and writes a summary of the event that fires Zap C.
Phase 3: Zap A - Intake and scrape
The three steps below trigger on a new job, run the Actor, and stash the run ID.
Step 1: Trigger - new row in the Jobs sheet
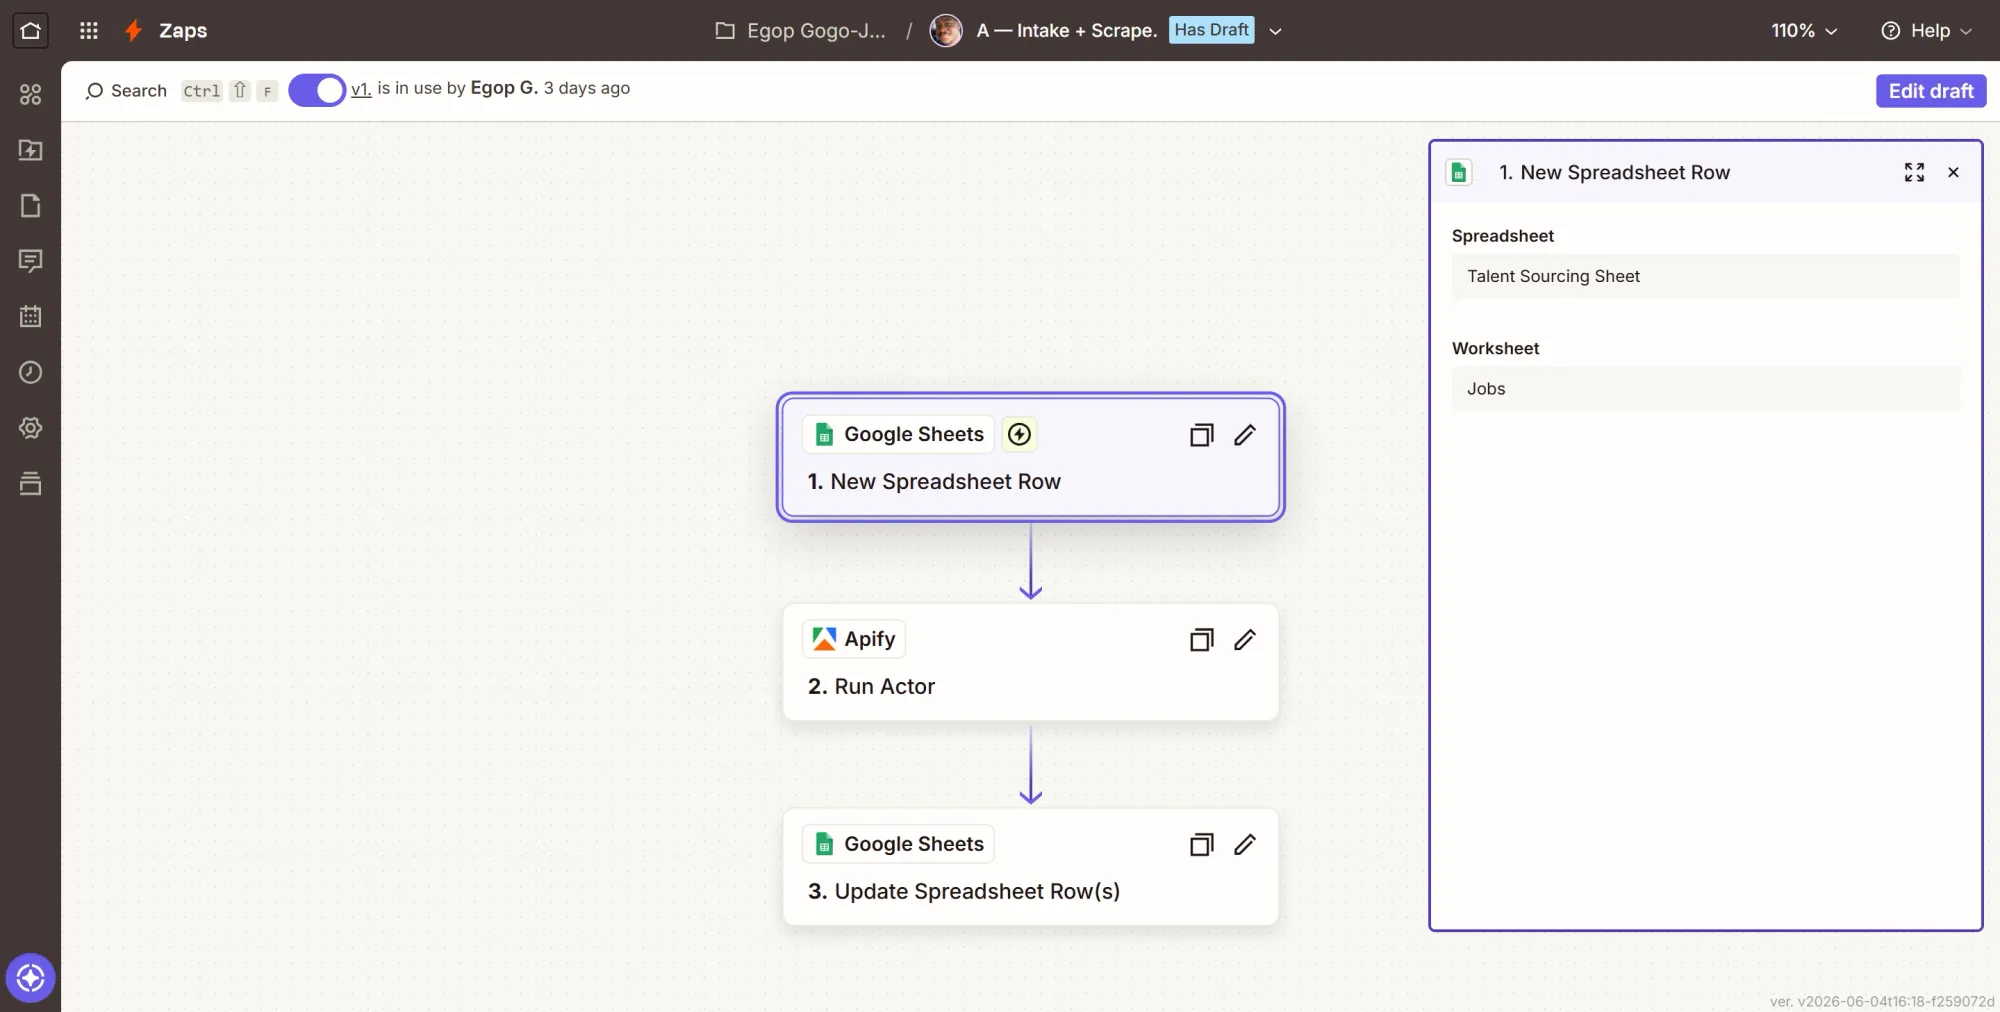
- In Zapier, click Create, then Zaps, and rename the Zap draft to “A - Intake + Scrape”.
- Click the Trigger card, search Google Sheets, and select it.
- Event: New Spreadsheet Row, click Continue.
- Account: click Sign in, complete the Google pop-up, allow access, and click Continue.
- Configure: Spreadsheet = Talent Sourcing Sheet, Worksheet = Jobs. Continue.
- Test: click Test trigger. Zapier pulls your JOB-001 row. Continue with selected record.
This node is the entry point. Every time you add a job row, it fires once and hands the rest of the Zap that row's job_ad and search_query.
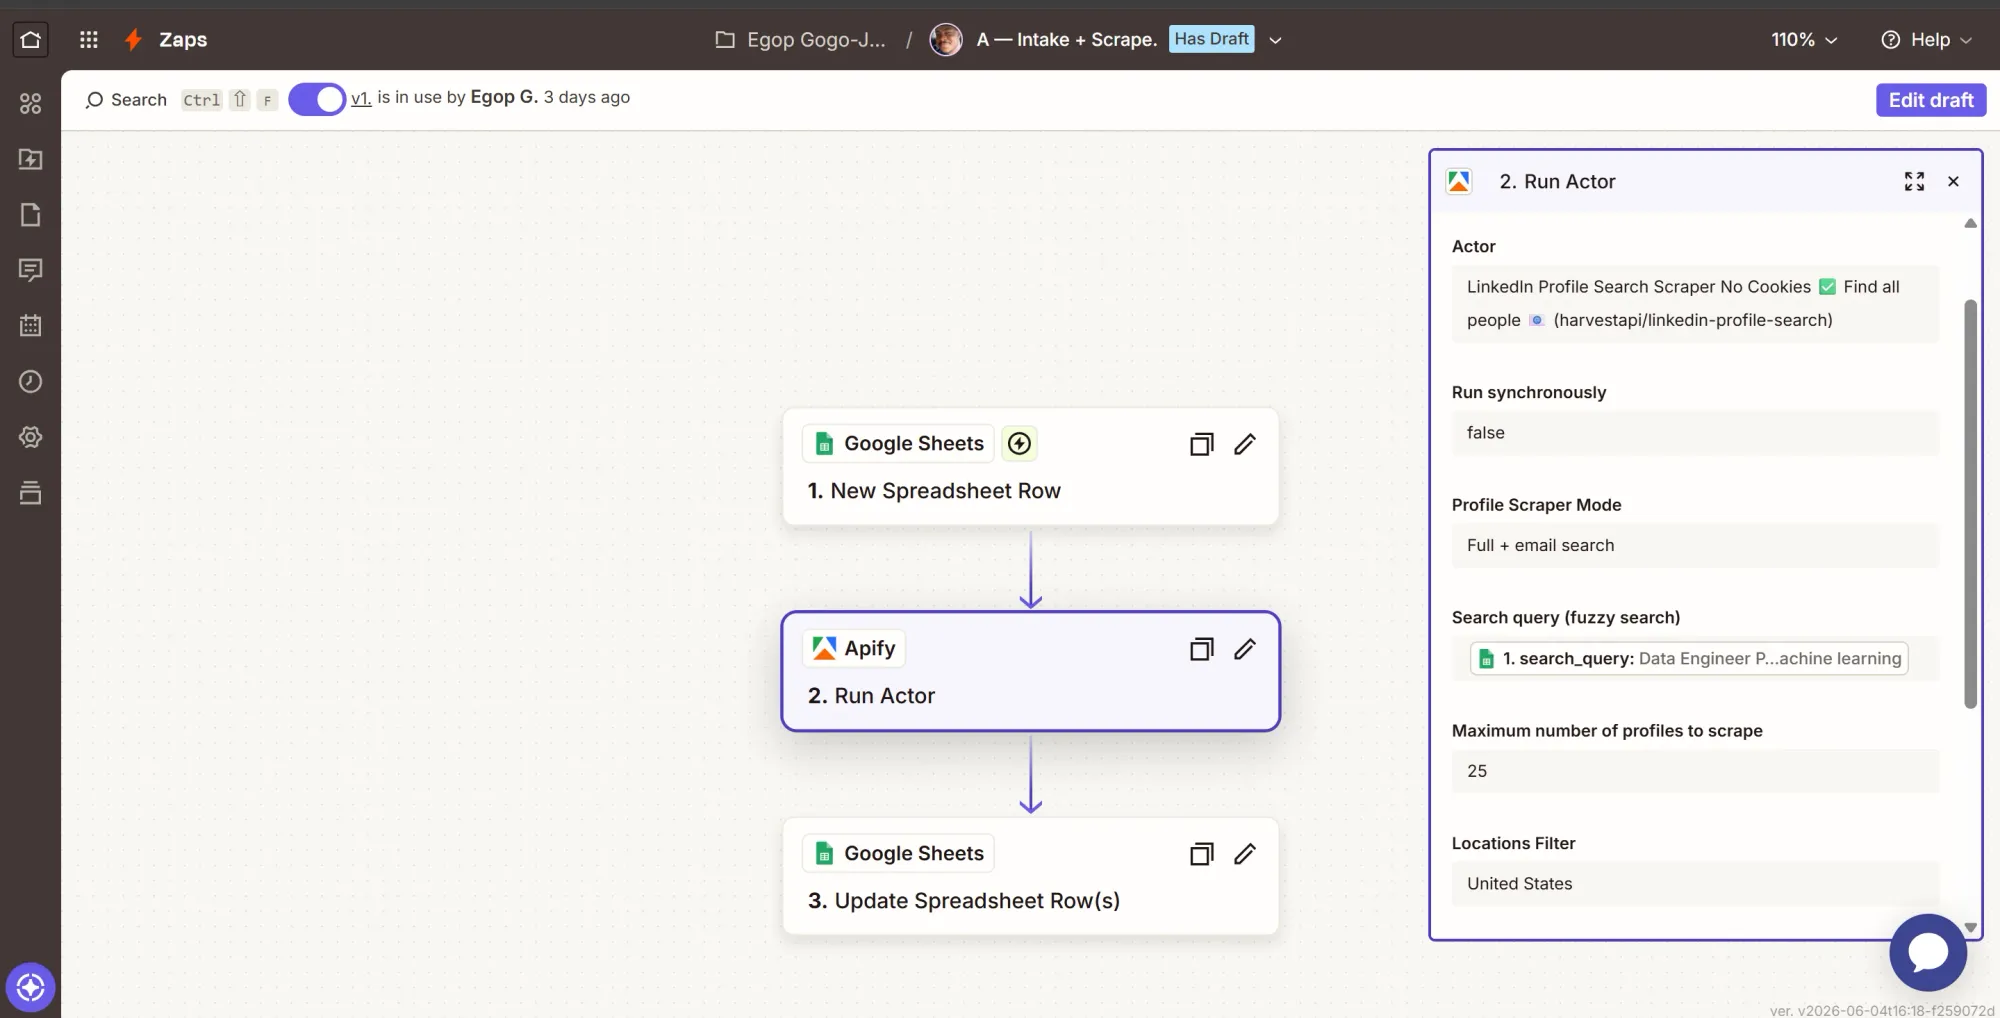
Step 2: Action - launch the scrape
- Click +, search Apify, and select it.
- Event: Run Actor.
- Account: connect your Apify account (paste APIFY_TOKEN if asked), click Continue.
- Configure. In the Actor field, search LinkedIn Profile Search Scraper by harvestapi, or paste the ID
M2FMdjRVeF1HPGFcc. Zapier then renders the Actor's input as form fields:- Search Query: insert the trigger's Search Query field.
- Profile Scraper Mode: Full + email search.
- Max Items:
25. - Run synchronously: No (Zap B catches completion through its own trigger).
- Location: Either leave this alone if you’re targeting remote, global, or input the specific region you’re scouting for.
- Continue, then Test step. This launches a real run. The output contains a run ID.
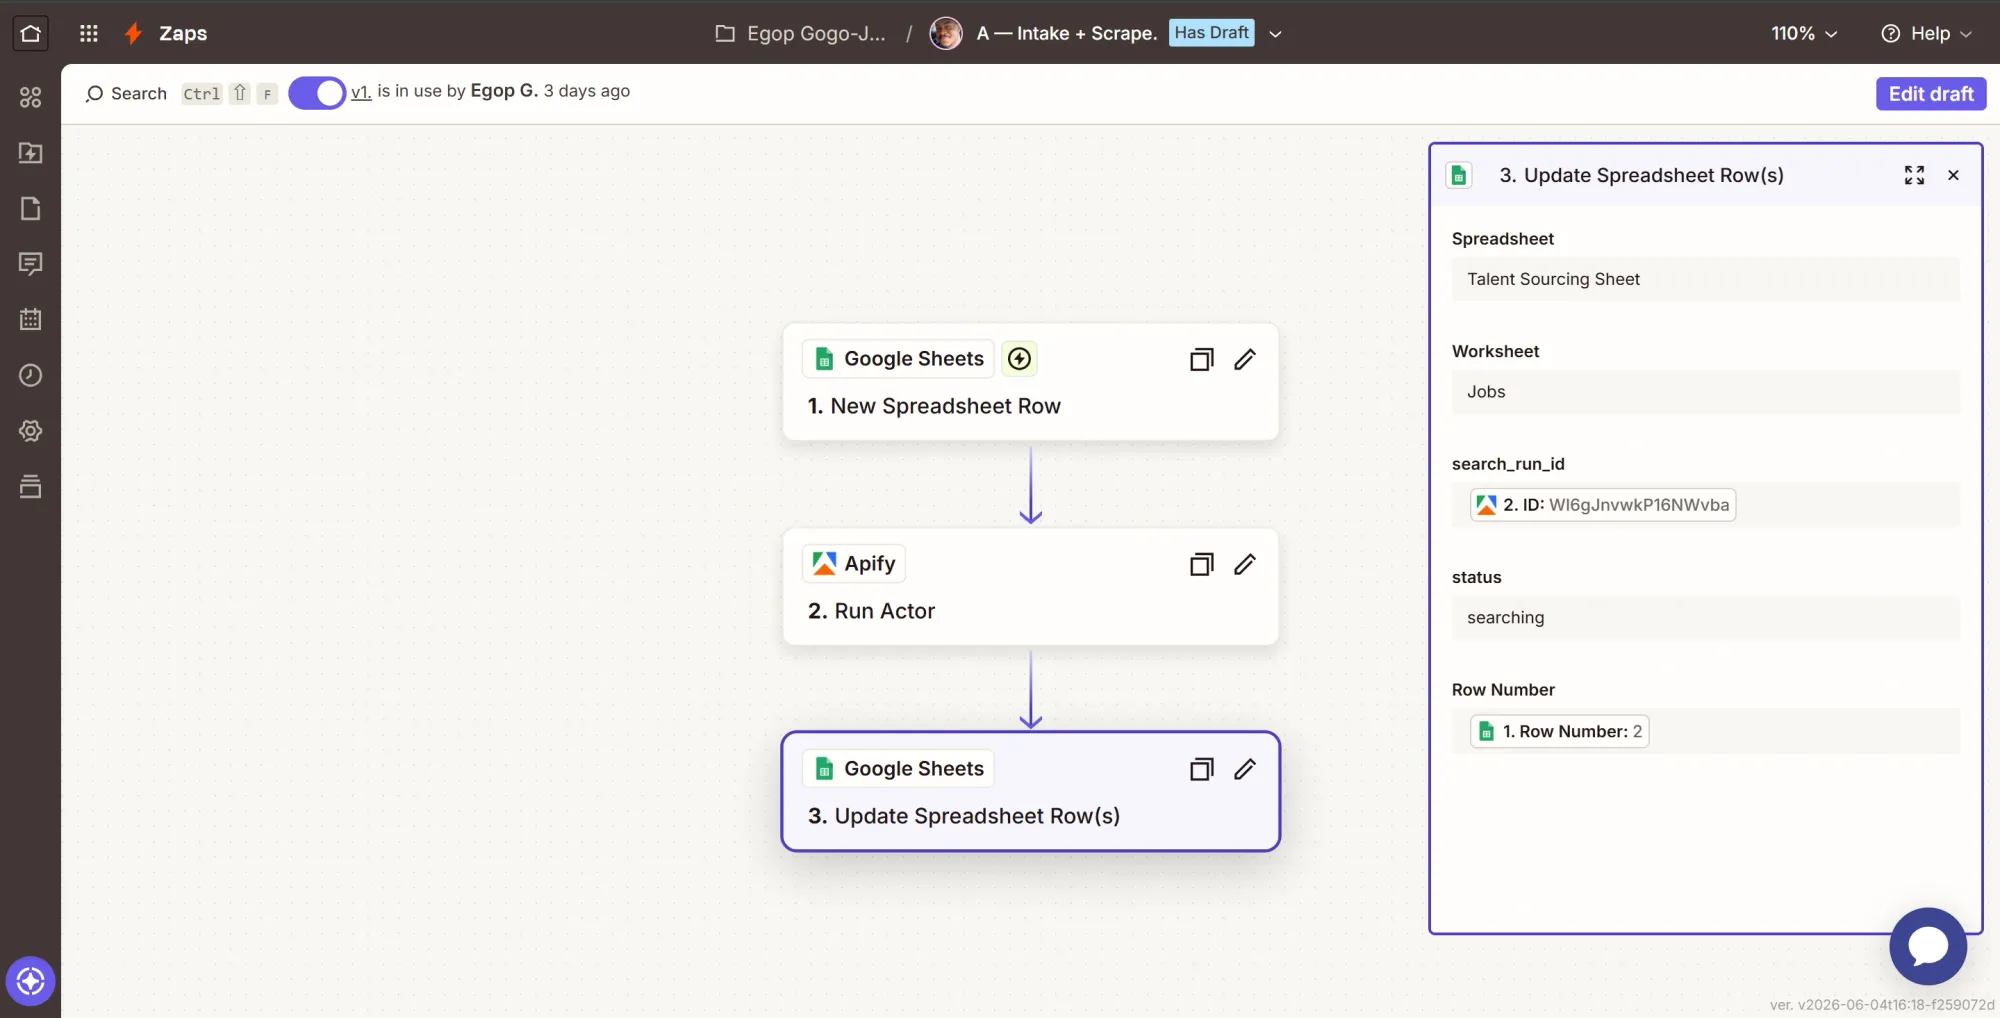
Step 3: Action - save the run id on the row
- Click +, search Google Sheets, select it.
- Event: Update Spreadsheet Row(s).
- Configure:
- Spreadsheet = Talent Sourcing Sheet, Worksheet = Jobs.
- Row Number: insert the trigger's Row Number field. This targets the row that fired.
- search_run_id: map the ID from the Run Actor step, not the Actor ID. The Actor ID is the same on every run; the ID is unique per run.
- status: type
searching. - Leave
job_id,job_ad, andsearch_queryblank.
- Continue, then Test step. Confirm JOB-001 now shows a
search_run_id. - Click Publish to make this Zap go live.
Apify's Finished Actor Run in the next Zap (Zap B) below triggers when a run finishes, but not which job it was for. By writing the run ID to the job row here, Zap B can match the finished run's ID to the sheet and pull the correct job ad.
Phase 4: Zap B - Rank, deduplicate, write the board, log the run
This Zap reacts to the finished scrape from the previous one (Zap A), ranks it, drops any candidate already on the board for that job, writes the new people, and logs a run.
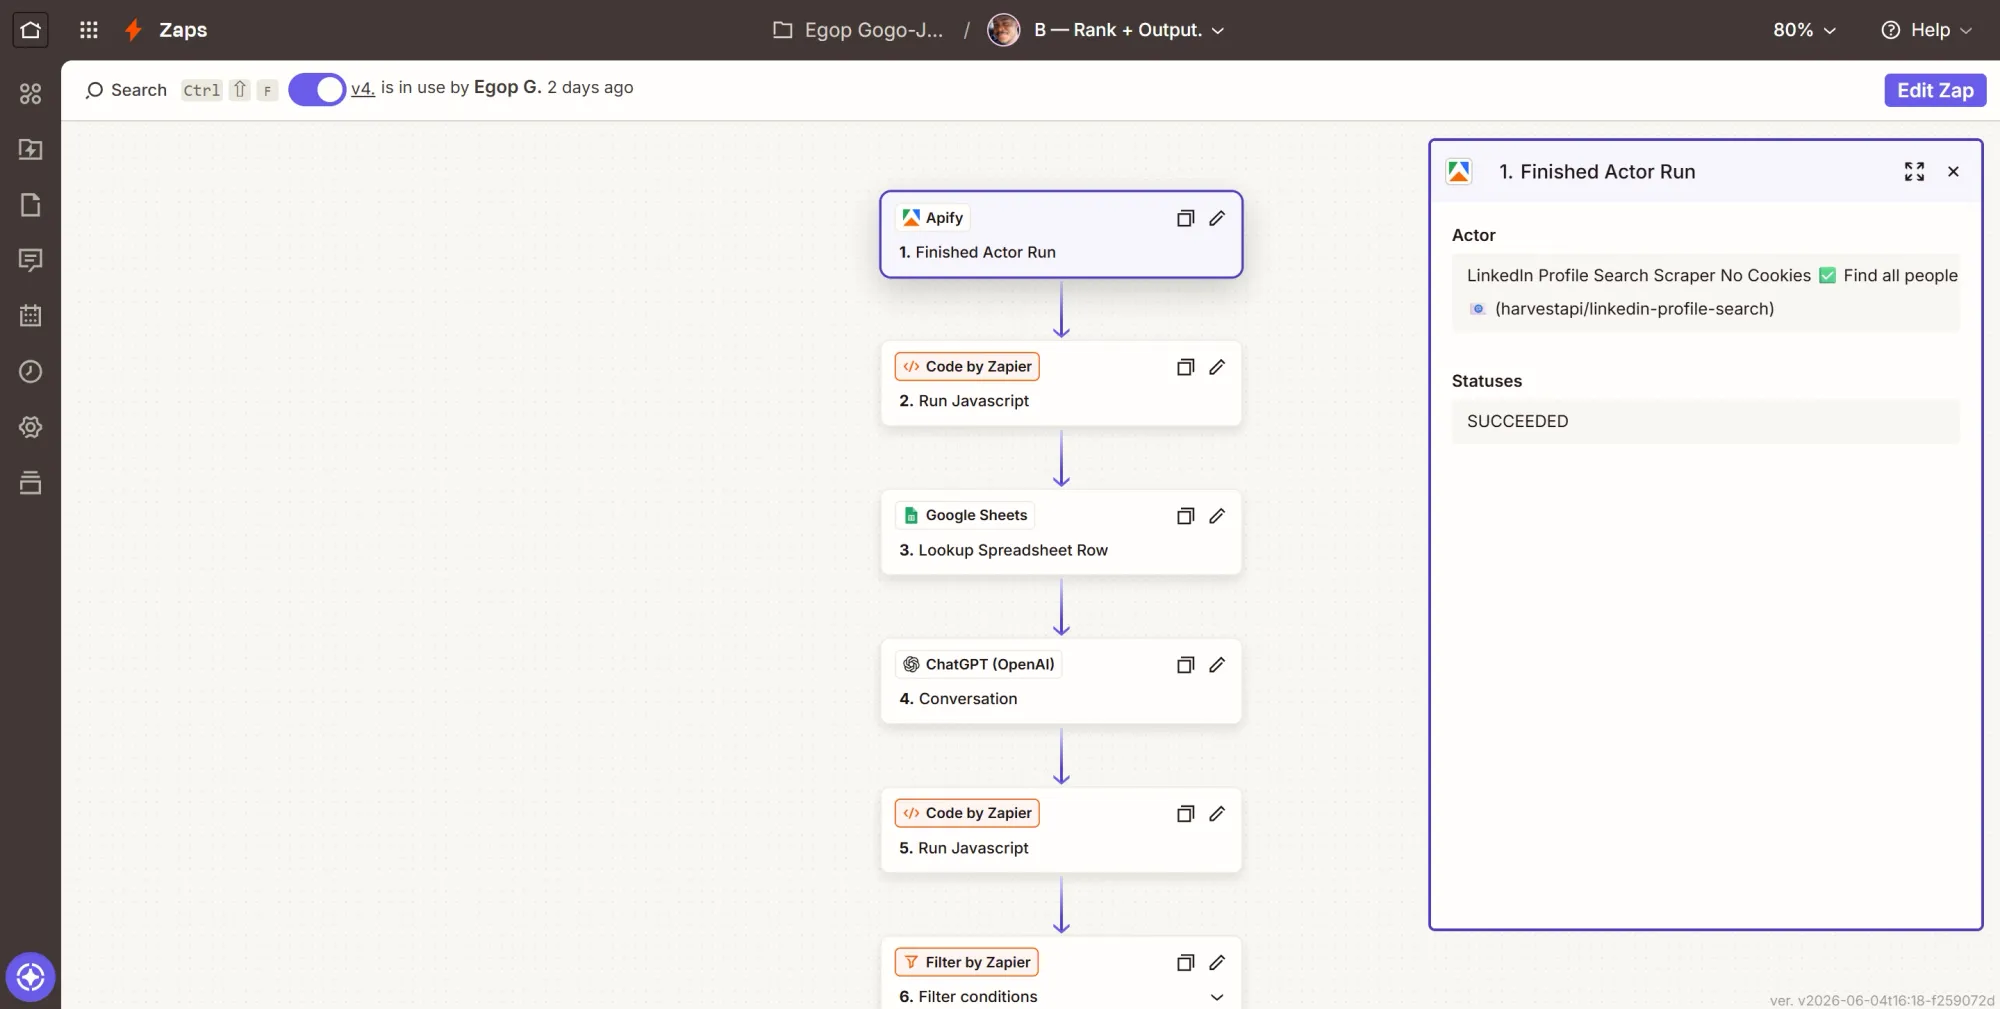
Step 1: Trigger - Finished Actor Run
- Create a new Zap, rename it “B - Rank + Output”.
- Click the Trigger card, search Apify, and select it.
- Event: Finished Actor Run.
- Account: pick your Apify connection.
- Configure: in the Actor field, select the harvestapi LinkedIn Actor (ID
M2FMdjRVeF1HPGFcc). If there is a status option, set it to Succeeded. - Test: click Test trigger.
Step 2: Action - fetch and trim the profiles
Your large language model (LLM) analyzing 25 raw profiles, scraped repeatedly, can easily blow past token limits. This particular action helps trim each profile to the fields that matter.
- Click +, search for Code by Zapier, and select it.
- Event: Run JavaScript.
- Input Data: add two items.
datasetId= map the trigger's Default Dataset ID.token= paste your APIFY_TOKEN.
- Code: paste this.
const url = `https://api.apify.com/v2/datasets/${inputData.datasetId}/items?clean=true&format=json`;
const res = await fetch(url, { headers: { Authorization: `Bearer ${inputData.token}` } });
const items = await res.json();

// harvestapi returns "emails" as an array (strings or objects); pull the first usable one
function firstEmail(e) {
  if (!Array.isArray(e) || !e.length) return null;
  const f = e[0];
  return typeof f === "string" ? f : (f.email || f.value || f.address || null);
}

// keep the rich signal, and drop the noise (image/logo URLs, ids, _meta)
const slim = items.map(p => ({
  name: [p.firstName, p.lastName].filter(Boolean).join(" "),
  url: p.linkedinUrl,
  headline: p.headline,
  location: (p.location && (p.location.parsed?.text || p.location.linkedinText)) || null,
  openToWork: p.openToWork || false,
  hiring: p.hiring || false,
  verified: p.verified || false,
  connections: p.connectionsCount || null,
  followers: p.followerCount || null,
  about: (p.about || "").slice(0, 1200),
  topSkills: p.topSkills || null,
  email: firstEmail(p.emails),
  experience: (p.experience || []).slice(0, 8).map(e => ({
    title: e.position,
    company: e.companyName,
    type: e.employmentType || null,
    from: e.startDate?.text || null,
    to: e.endDate?.text || null,
    duration: e.duration || null,
    desc: (e.description || "").slice(0, 700),
    skills: (e.skills || []).slice(0, 12)
  })),
  education: (p.education || []).map(ed => ({
    school: ed.schoolName,
    degree: ed.degree,
    field: ed.fieldOfStudy,
    period: ed.period || null
  })),
  skills: (p.skills || []).map(s => s.name).slice(0, 40),
  certifications: (p.certifications || []).map(c => ({ title: c.title, by: c.issuedBy || null })).slice(0, 15),
  projects: (p.projects || []).map(pr => ({ title: pr.title, desc: (pr.description || "").slice(0, 300) })).slice(0, 8),
  honorsAndAwards: (p.honorsAndAwards || []).map(h => h.title).slice(0, 8),
  volunteering: (p.volunteering || []).map(v => ({ role: v.role, org: v.organizationName })).slice(0, 6),
  languages: (p.languages || []).map(l => l.name + (l.proficiency ? ` (${l.proficiency})` : "")),
  publications: (p.publications || []).map(pub => pub.title).slice(0, 6)
}));

return { profilesJson: JSON.stringify(slim), count: slim.length };
- Continue, then Test step.

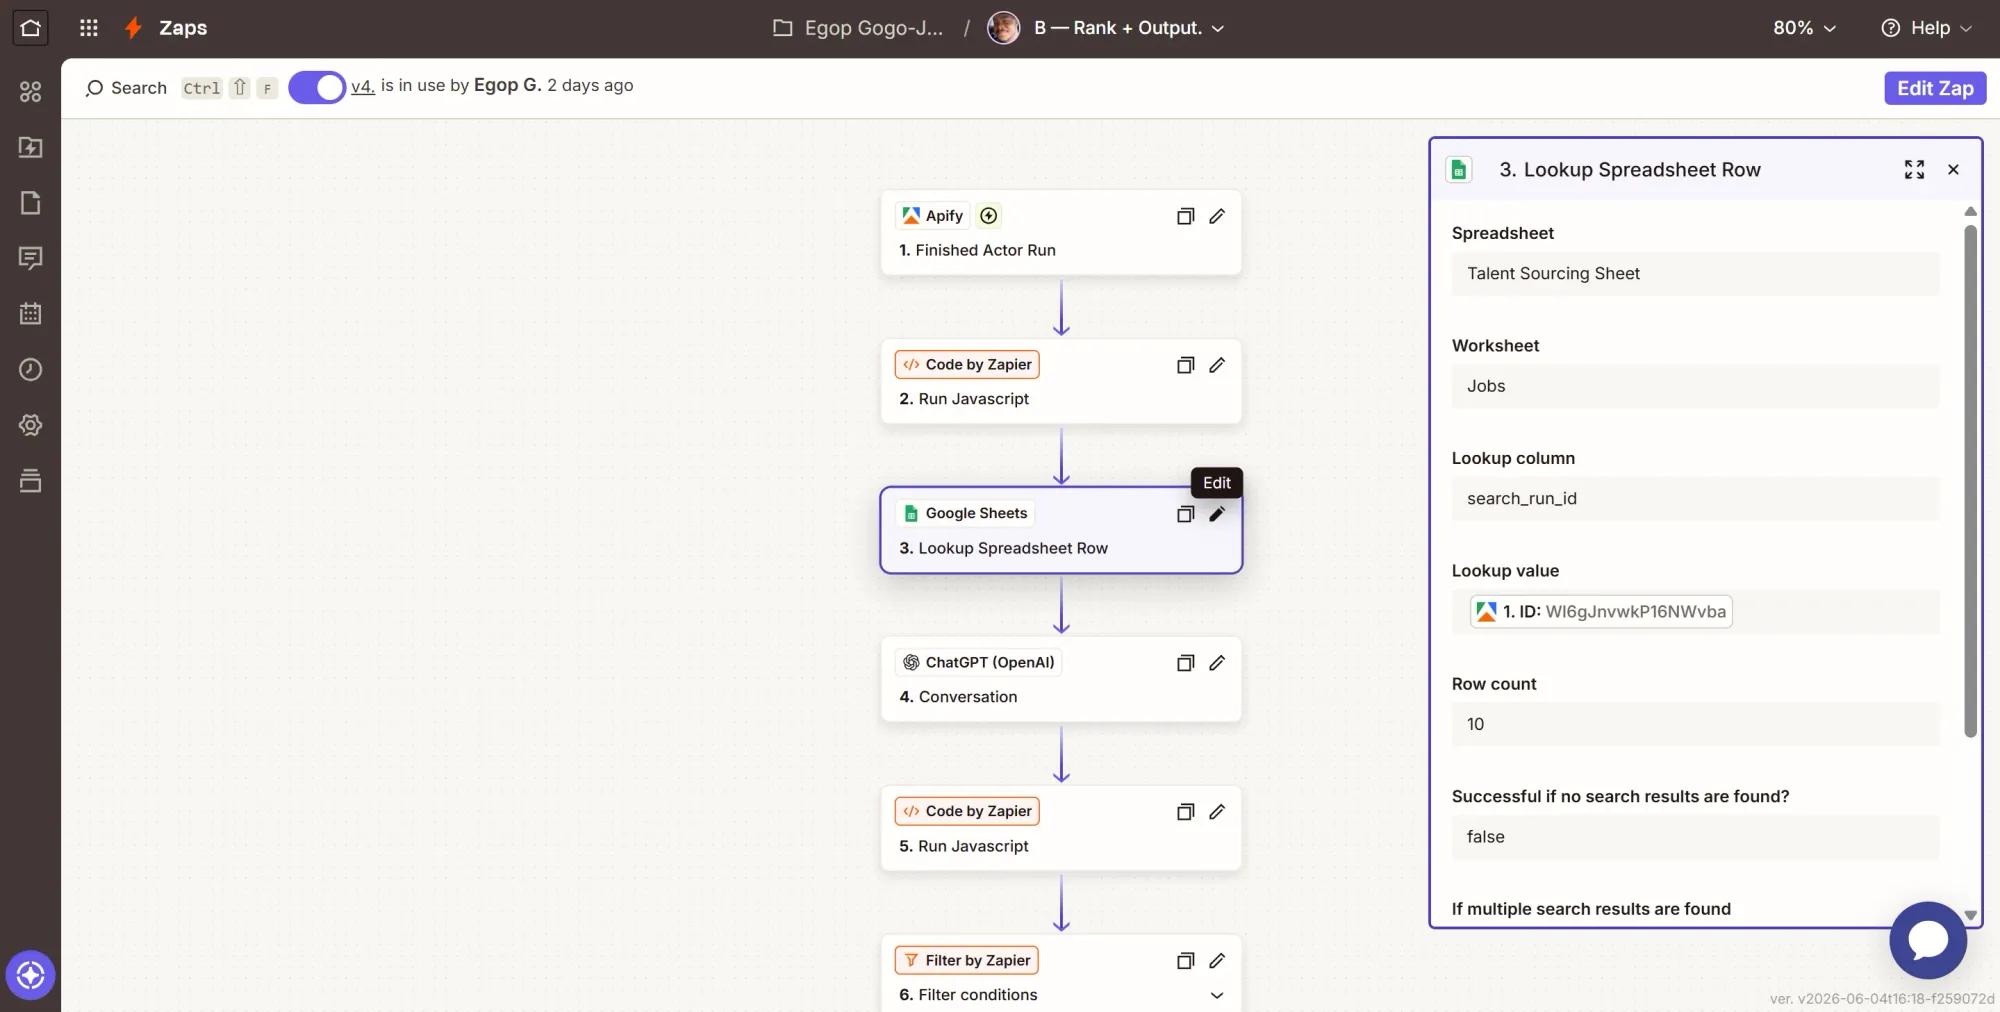
Step 3: Action - look up the job ad
- Click +, search Google Sheets, select it.
- Event: Lookup Spreadsheet Row.
- Configure:
- Spreadsheet = Talent Sourcing Sheet, Worksheet = Jobs.
- Lookup Column:
search_run_id. - Lookup Value: map the trigger's ID (the run ID).
- Continue, then Test step. This is the other half of the trigger sheets node. The finished run carries an ID; this step finds the job row whose search_run_id matches that ID and returns the
job_adandjob_id.
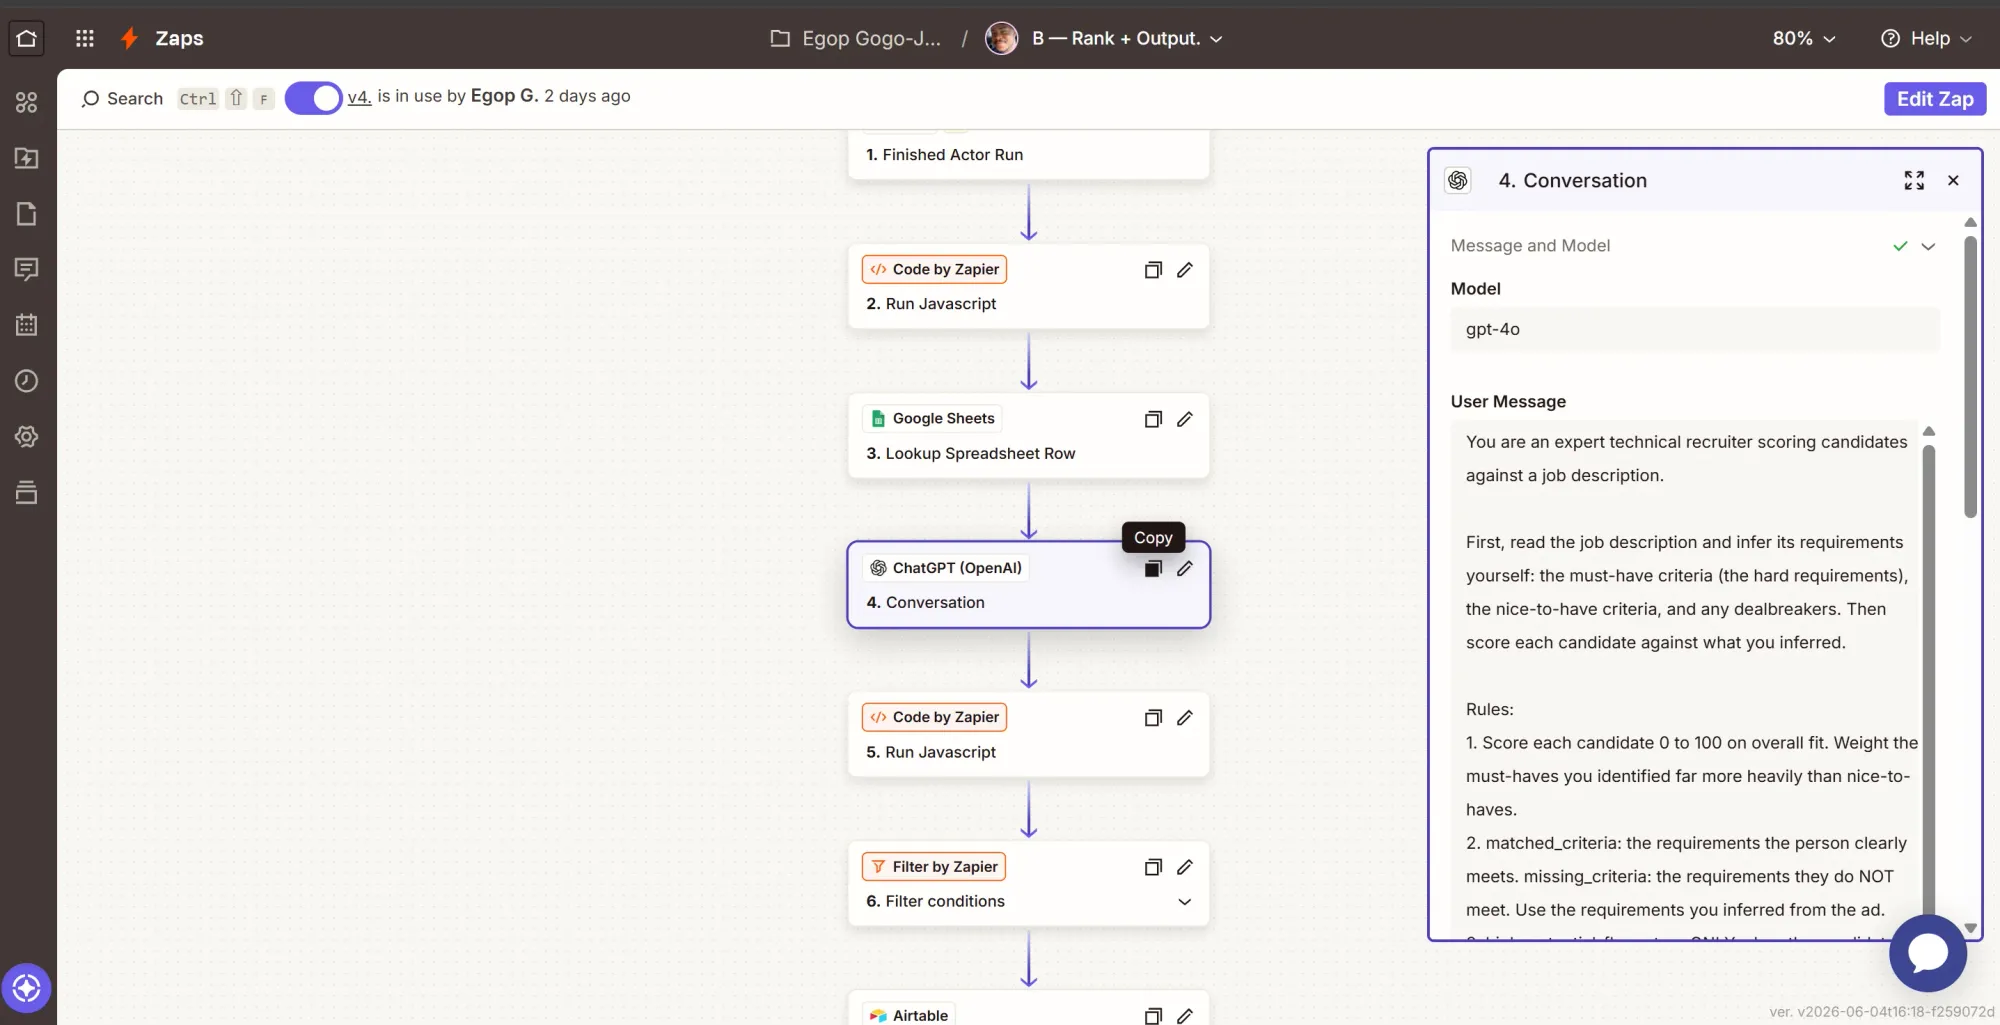
Step 4: Action - ask OpenAI to score and rank
- Click +, search ChatGPT (OpenAI), select it.
- Event: Conversation.
- Account: click Sign in, paste your OPENAI_KEY.
- Configure:
- Model:
gpt-4o - Max Tokens: at least
4000. - User Message: paste the block below, then replace
PASTE_JOB_ADwith the Lookup step'sjob_adandPASTE_PROFILES_JSONwith the Code step'sprofilesJson.
- Model:
You are an expert technical recruiter. From the job description, infer the must-have requirements, the nice-to-haves, and any dealbreakers, then score every candidate against them using only data present in their profile. Invent nothing.

For each candidate, return:
- match_percentage: 0-100 fit, weighting must-haves far above nice-to-haves.
- tier: strong_match (80+, no must-have missed), high_potential (strong but misses a must-have), partial (40-79), weak (below 40).
- matched_criteria / missing_criteria: requirements they clearly meet / clearly miss.
- high_potential_flag: true only when strong overall, yet missing at least one must-have. In high_potential_reason, name the strength and the exact must-have missed; otherwise use "".
- unique_outliers: 1-4 traits distinctive to this specific person and grounded in their data, never generic. If they are openToWork, you may note they are actively looking.
- verdict: one blunt sentence.
- email: copy it exactly from the profile, or null. Never guess or construct one.

Sort candidates by match_percentage, highest first. Return ONLY this JSON, no prose and no markdown fences:
{"job_title": string, "candidates": [{"name": string, "linkedin_url": string, "current_title": string, "match_percentage": number, "tier": string, "matched_criteria": [string], "missing_criteria": [string], "high_potential_flag": boolean, "high_potential_reason": string, "unique_outliers": [string], "verdict": string, "email": string or null}]}

JOB DESCRIPTION:
PASTE_JOB_AD

CANDIDATES (JSON array):
PASTE_PROFILES_JSON
- Continue, then Test step.
The model infers what the role actually needs from the ad, then scores each person against it, separates true strong matches from high-potential people who miss a few hard requirements, and pulls out the genuinely distinctive details from each profile. It is told to use only what is in the data and to return null for a missing email, so it never fabricates contact details.
Step 5: Action - parse the answer and drop anyone already on the board
This step ensures that alerts are only for new candidates for the role. It parses the model's JSON, reads the LinkedIn URLs already logged for this job, and keeps only candidates you have not written under this job before.
- Click +, search Code by Zapier, select it.
- Event: Run JavaScript.
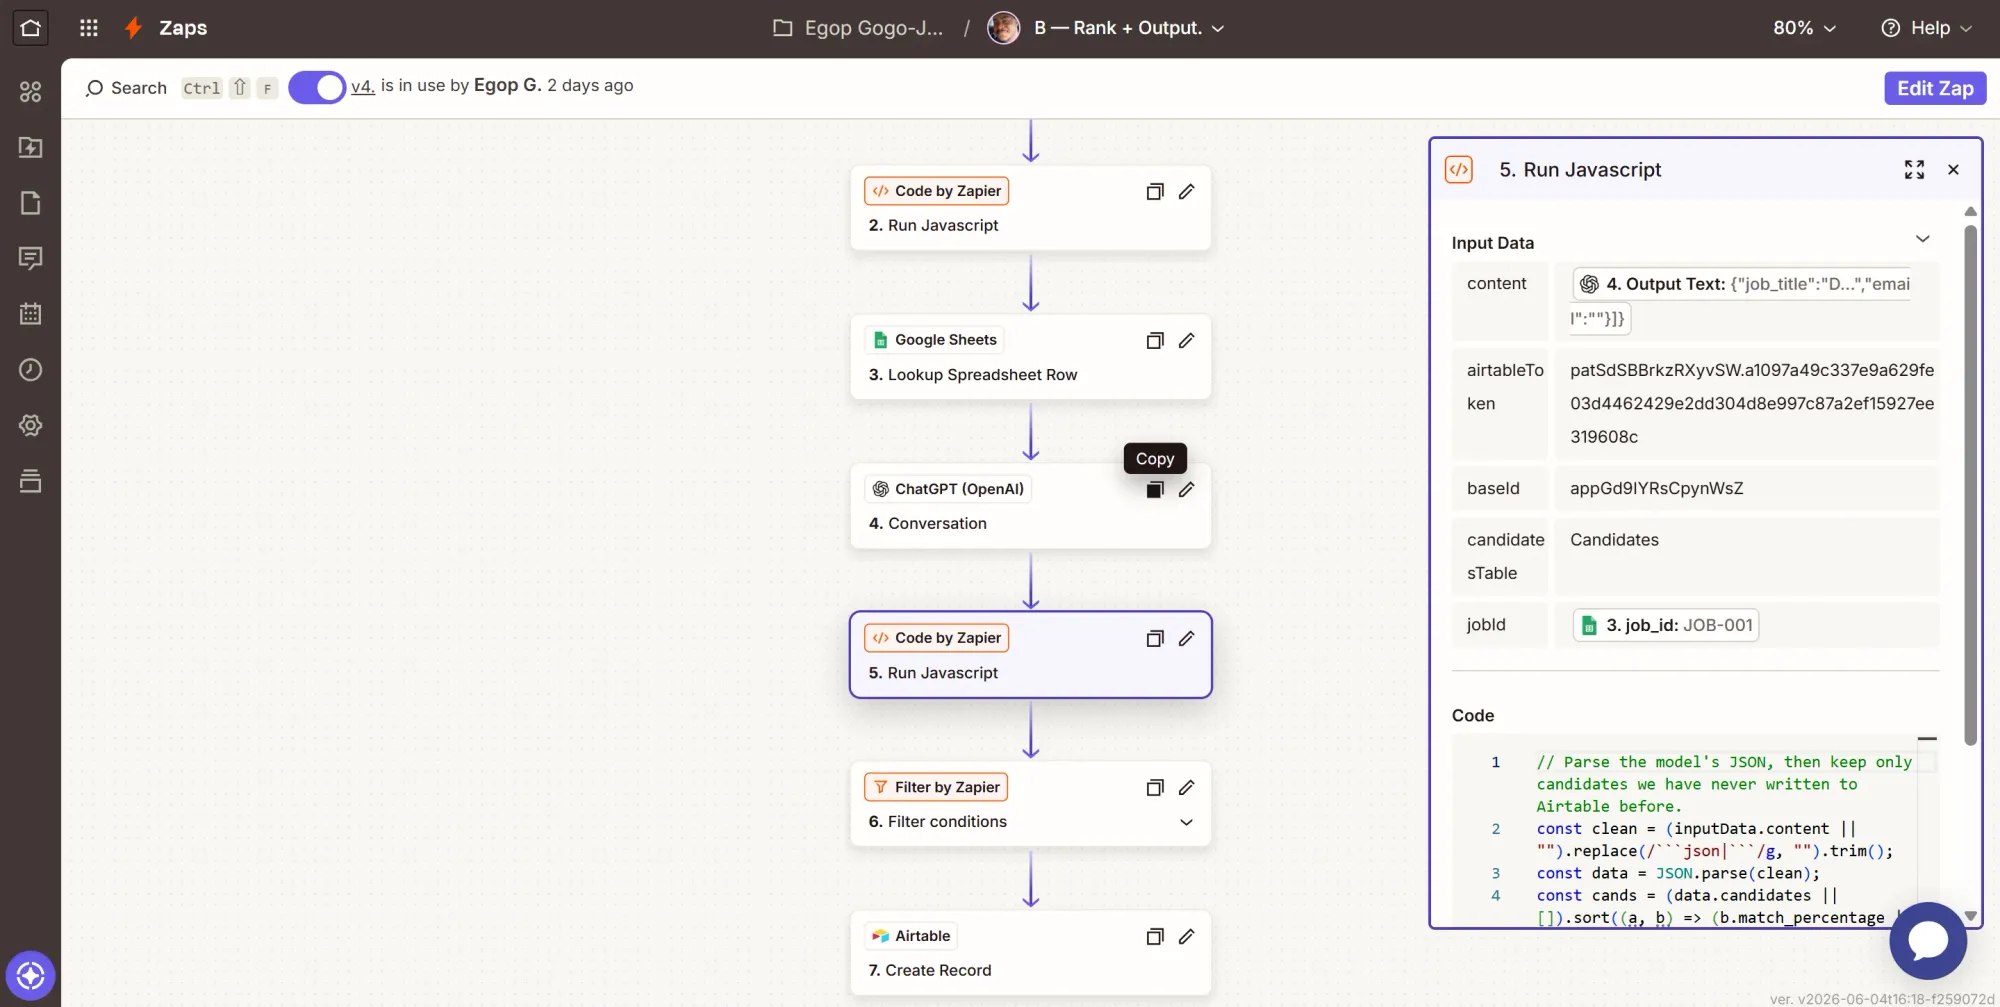
- Input Data:
content= the ranking step's Output Text (the JSON reply).airtableToken= paste your AIRTABLE_TOKEN.baseId= paste your BASE_ID.candidatesTable= typeCandidates.jobId= map the Lookup step's job_id. This scopes the dedupe to the current job.
- Code: paste this.
const data = JSON.parse((inputData.content || "").replace(/```json|```/g, "").trim());
const jobTitle = data.job_title || "the role";
const cands = (data.candidates || []).sort((a, b) => (b.match_percentage || 0) - (a.match_percentage || 0));
const norm = u => String(u || "").trim().toLowerCase().replace(/\\/+$/, "");

// LinkedIn URLs already logged under THIS job (paginated), so re-running a job stays silent
const headers = { Authorization: `Bearer ${inputData.airtableToken}` };
const table = encodeURIComponent(inputData.candidatesTable || "Candidates");
const filter = encodeURIComponent(`{Job ID} = "${String(inputData.jobId || "").replace(/"/g, '\\\\"')}"`);
const seen = new Set();
let offset = "", guard = 0;
do {
  const u = `https://api.airtable.com/v0/${inputData.baseId}/${table}?fields%5B%5D=LinkedIn&filterByFormula=${filter}&pageSize=100${offset ? `&offset=${encodeURIComponent(offset)}` : ""}`;
  const j = await (await fetch(u, { headers })).json();
  if (j.error) throw new Error("Airtable read failed: " + JSON.stringify(j.error));
  (j.records || []).forEach(r => { const l = r.fields?.LinkedIn; if (l) seen.add(norm(l)); });
  offset = j.offset || "";
} while (offset && ++guard < 50);

const rows = cands.filter(c => c.linkedin_url && !seen.has(norm(c.linkedin_url))).map(c => ({
  name: c.name,
  match: c.match_percentage,
  tier: c.tier,
  matched: (c.matched_criteria || []).join("; "),
  missing: (c.missing_criteria || []).join("; "),
  high_potential_reason: c.high_potential_flag ? c.high_potential_reason : "",
  outliers: (c.unique_outliers || []).join("; "),
  email: c.email || "",
  url: c.linkedin_url,
  job: jobTitle
}));

const newCount = rows.length, totalCount = cands.length;
const summary = newCount
  ? `${newCount} new candidate${newCount === 1 ? "" : "s"} for ${jobTitle}, out of ${totalCount} scored this run. Top new match: ${rows[0].name} at ${rows[0].match}%.`
  : `No new candidates for ${jobTitle}. All ${totalCount} scored were already logged under this job.`;

return { rows, newCount, totalCount, jobTitle, summary };
- Continue, then Test step.
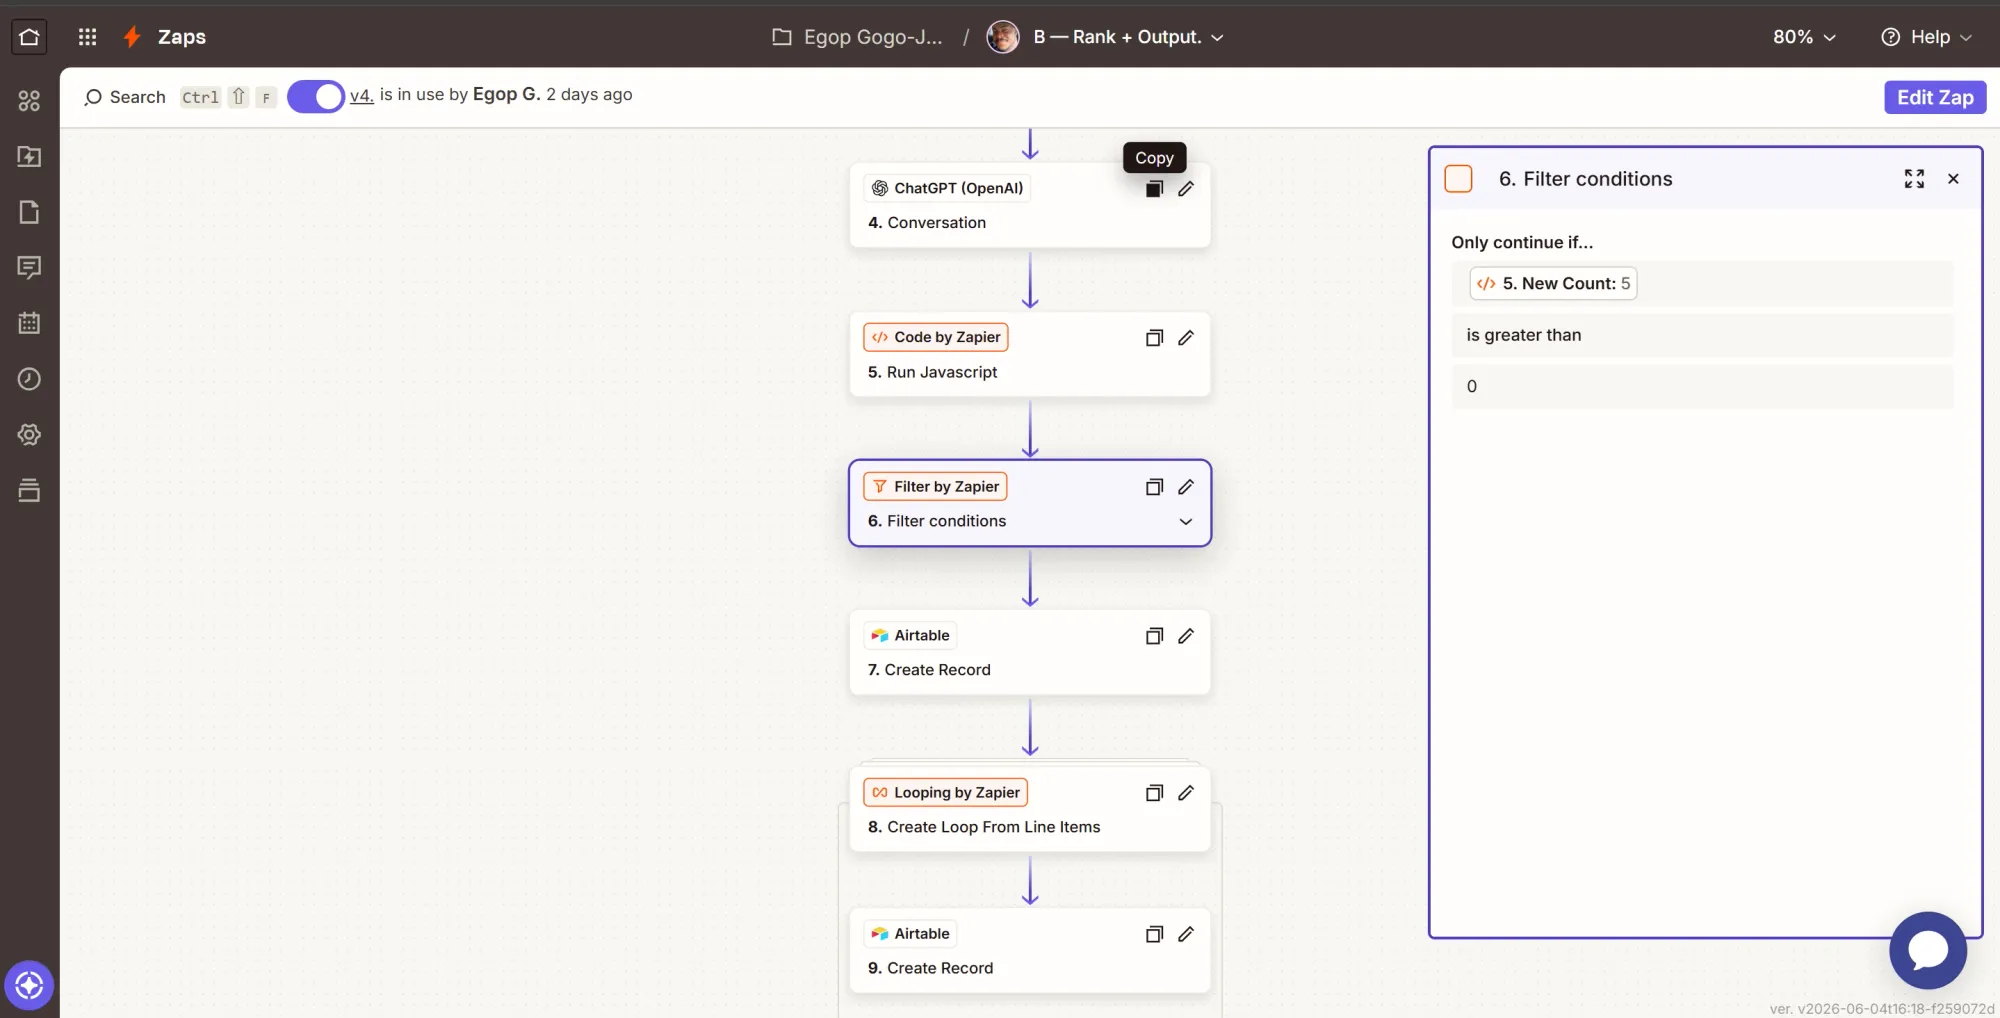
Step 6: Filter - stop unless this run added someone new
This action filters to ensure that if the run produced no new people, the Zap stops immediately.
- Click +, search for Filter by Zapier, and select it.
- Only continue if: the dedupe step's New Count (
newCount), condition (Number) Greater than, value0. - Click Continue to add the next action.
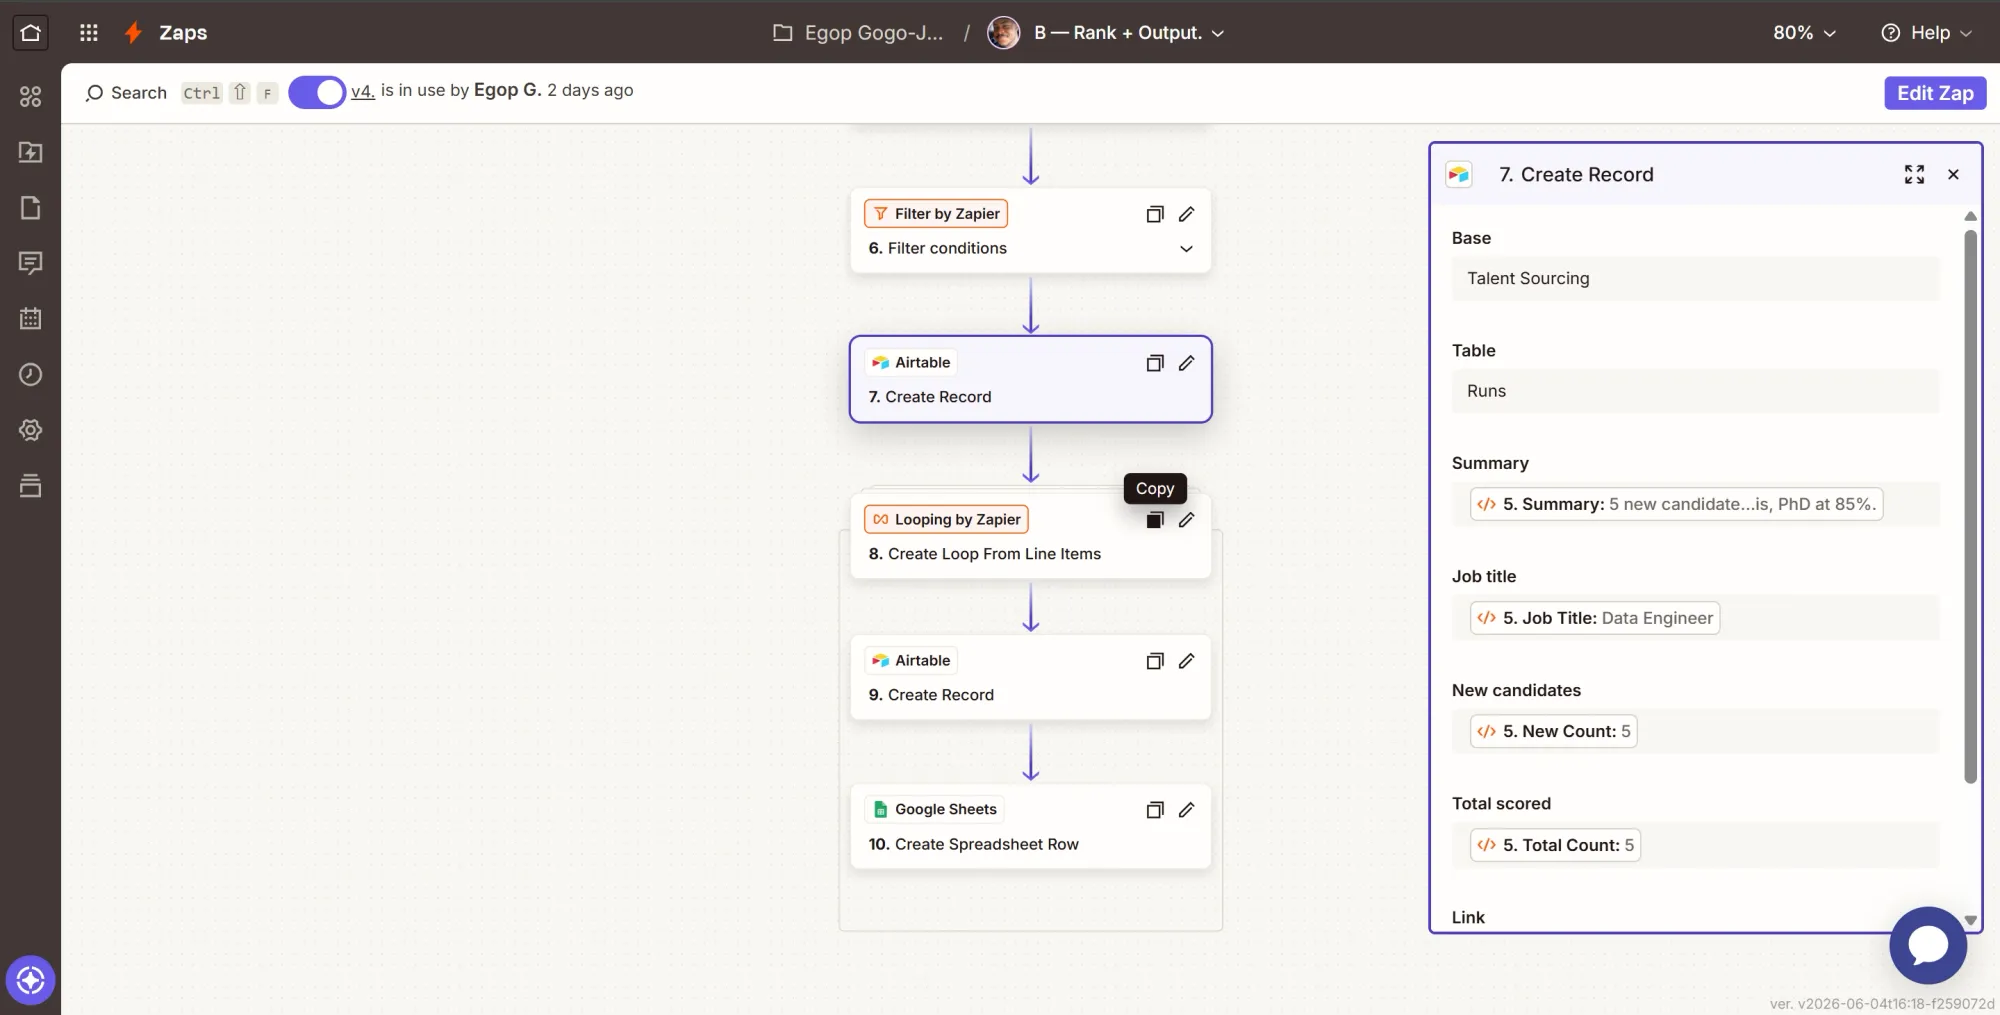
Step 7: Action - log the run
- Click +, search Airtable, select it.
- Event: Create Record.
- Account: click Sign in and connect Airtable through Zapier's OAuth popup (separate from the read token).
- Configure:
- Base = Talent Sourcing, Table = Runs.
- Summary = dedupe step
summary. - Job title = dedupe step
jobTitle. - New candidates = dedupe step
newCount. - Total scored = dedupe step
totalCount. - Link = paste your BOARD_LINK.
- Continue, then Test step.
This action writes one summary row per run that brought in new people, and that single write is the event that the next Zap (Zap C) watches out for.
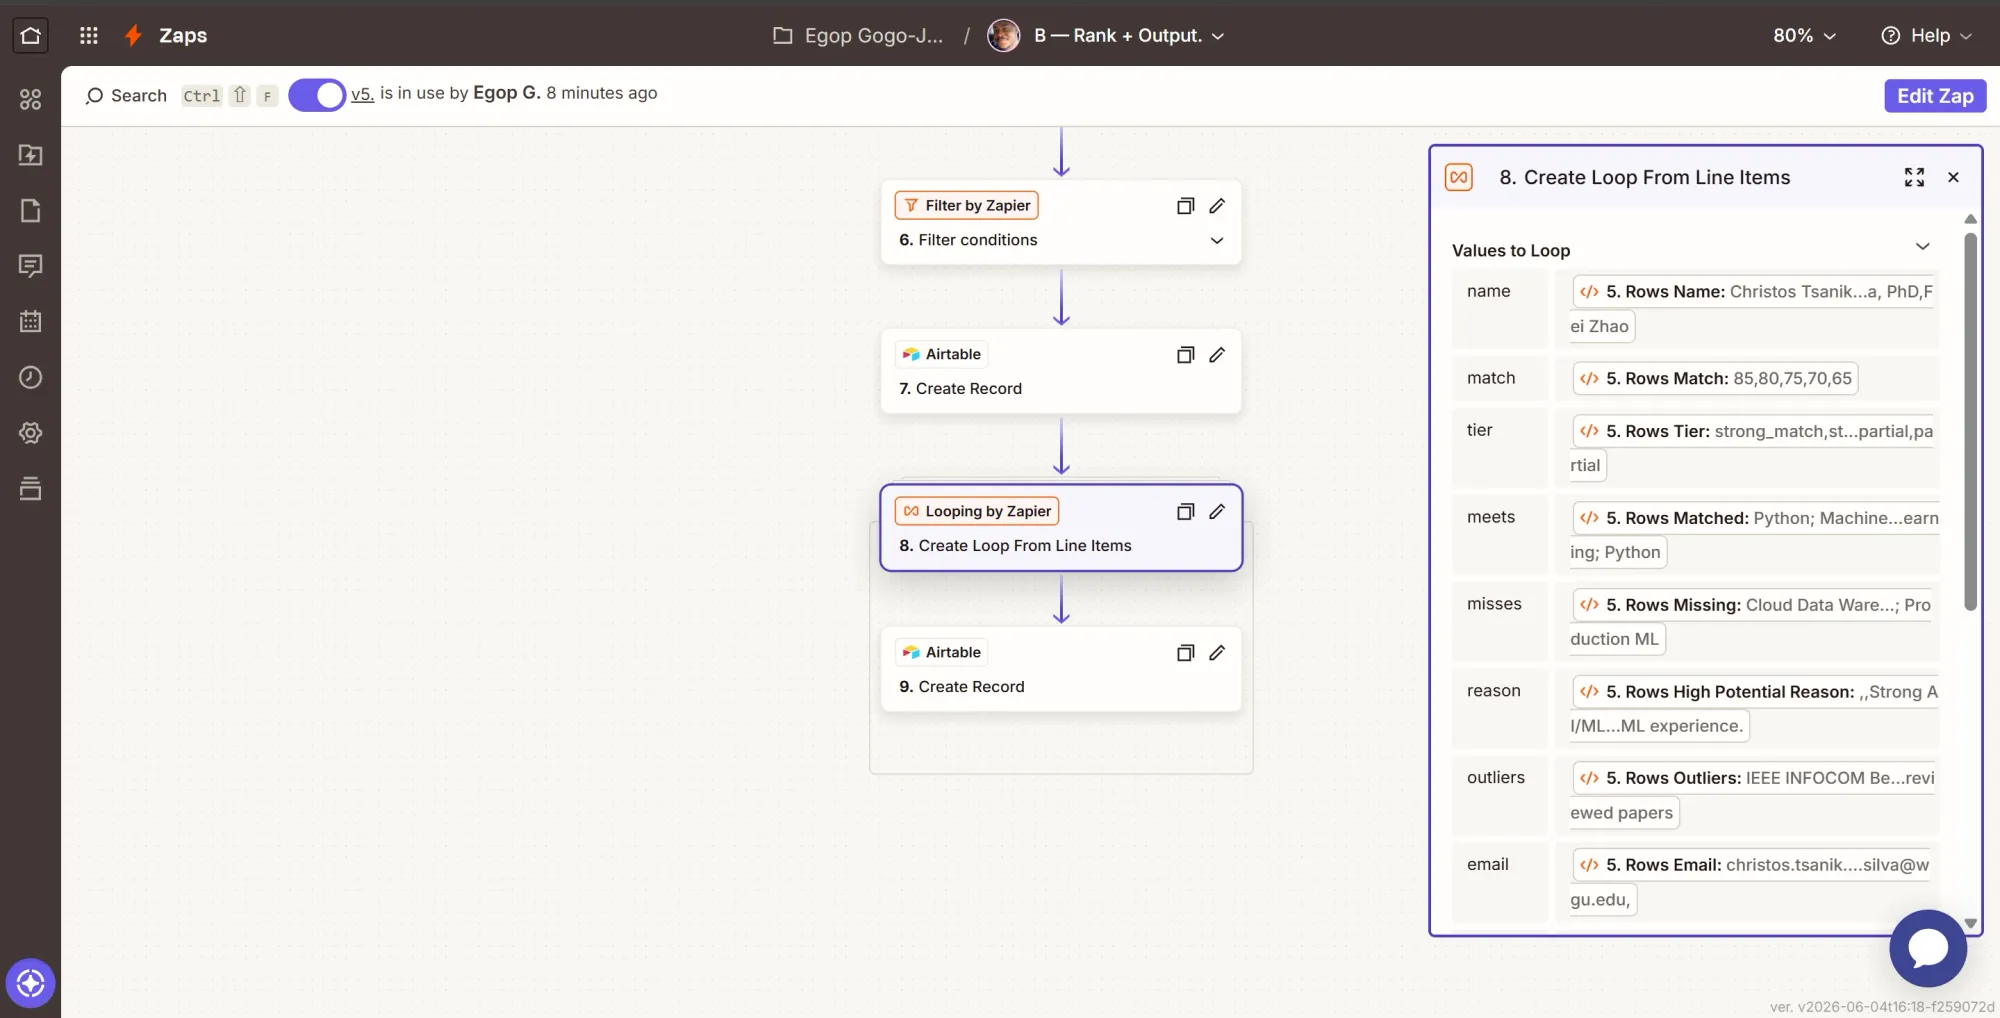
Step 8: Loop over the new candidates
- Click +, search Looping by Zapier, and select it.
- Event: Create Loop From Line Items.
- Values to Loop: add one entry per field, typing the key on the left and inserting the matching list from the “Filter by Zapier” step on the right:
name=rows name,match=rows match,tier=rows tier,meets=rows matched,misses=rows missing,reason=rows high_potential_reason,outliers=rows outliers,email=rows email,url=rows url,job=rows job
- Continue, then Test step.
The loop here turns the lists from Step 5, the second Code by Zapier action, into one iteration per new candidate, so every step after it runs once per person.
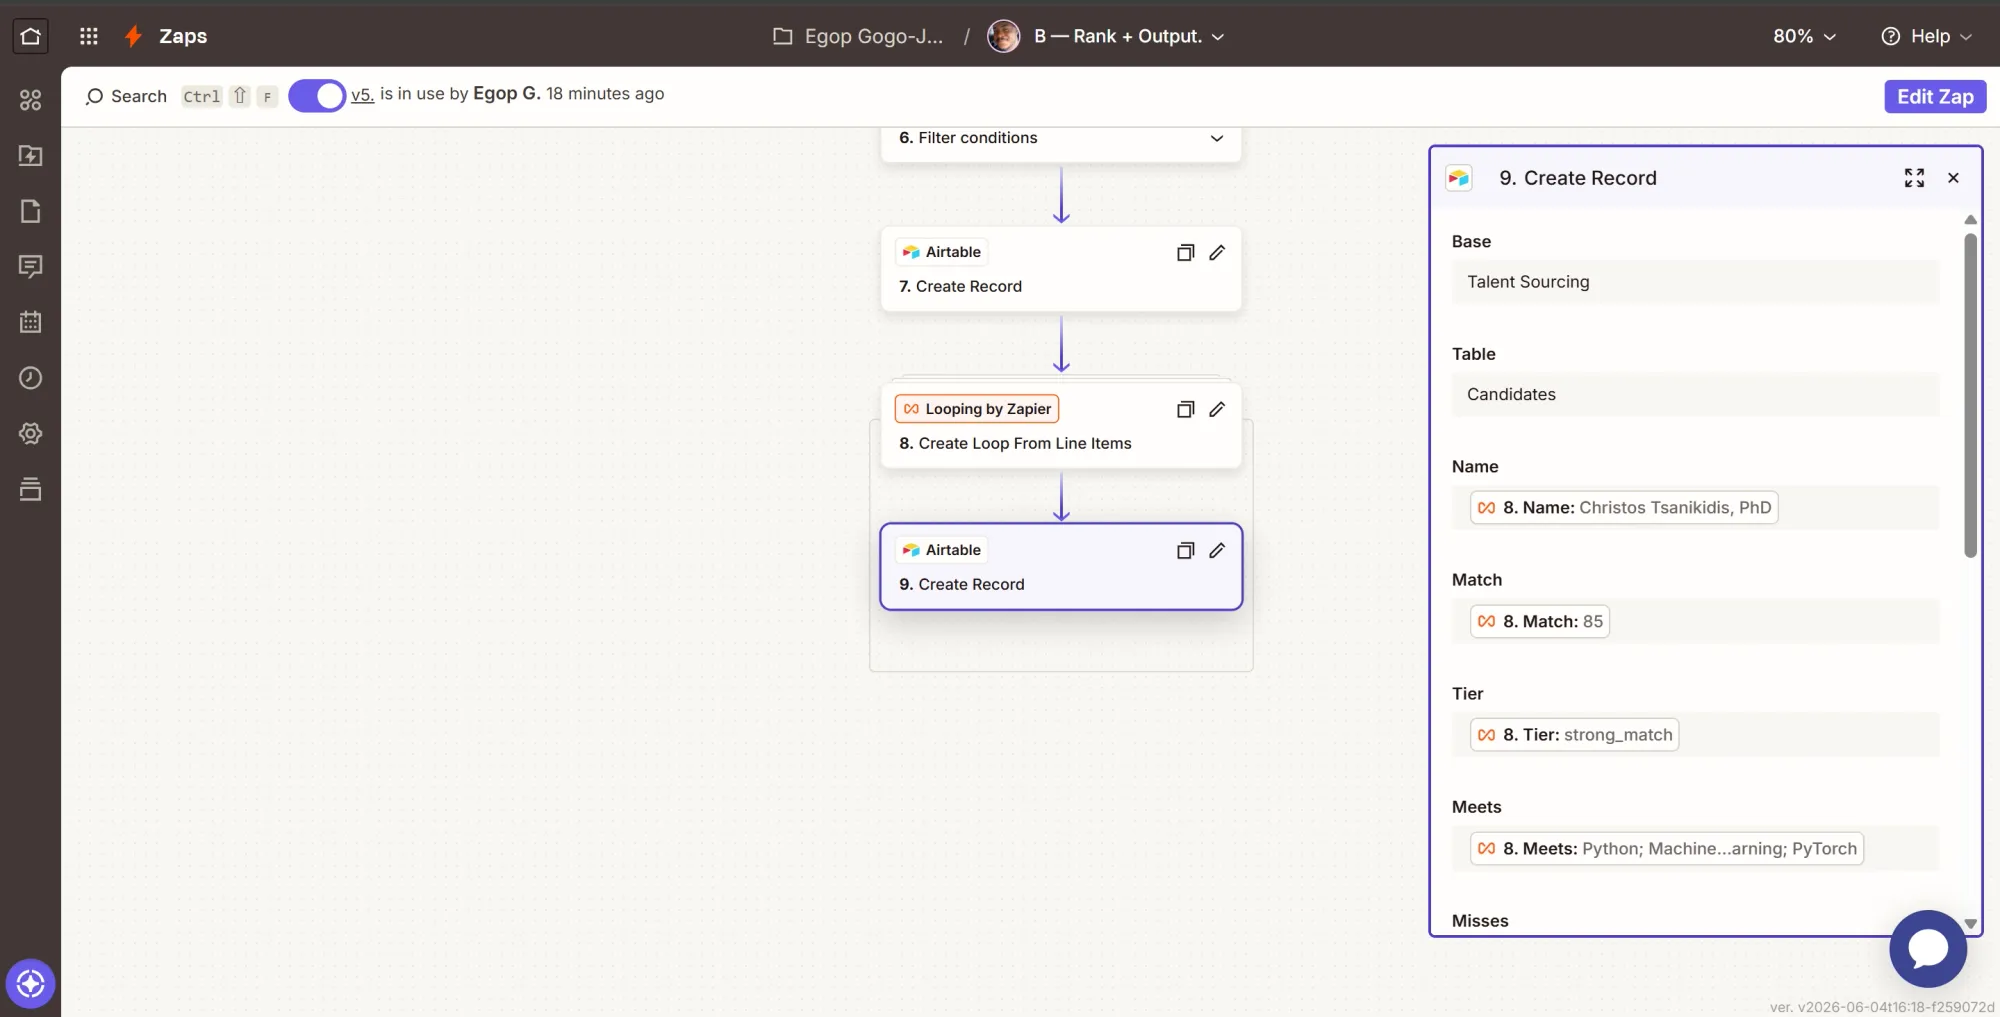
Step 9: Write each candidate to the board
- Click +, search Airtable, select it.
- Event: Create Record.
- Configure:
- Base = Talent Sourcing, Table = Candidates.
- Map Name, Match, Tier, Meets, Misses, High potential reason, Outliers, and Email from the matching loop values.
- LinkedIn = loop
url. This must be filled; it is the dedupe key for the next run. - Job = loop
job. - Job ID = the Lookup step's
job_id(constant for the run).
- Continue, then Test step.
- Click Publish, and this Zap B will go live.
This step creates one card per candidate. The LinkedIn URL and Job ID are the most important fields to map. The LinkedIn URL prevents duplicates by letting future runs recognize candidates already on your board. The Job ID ensures that this check applies only to the specific role you are hiring for.
Phase 5: Zap C - New-profile alert
Zap C triggers when a new “Runs” row appears, which also means new candidates. Once the run is concluded, it sends you an email pointing to the Airtable board.
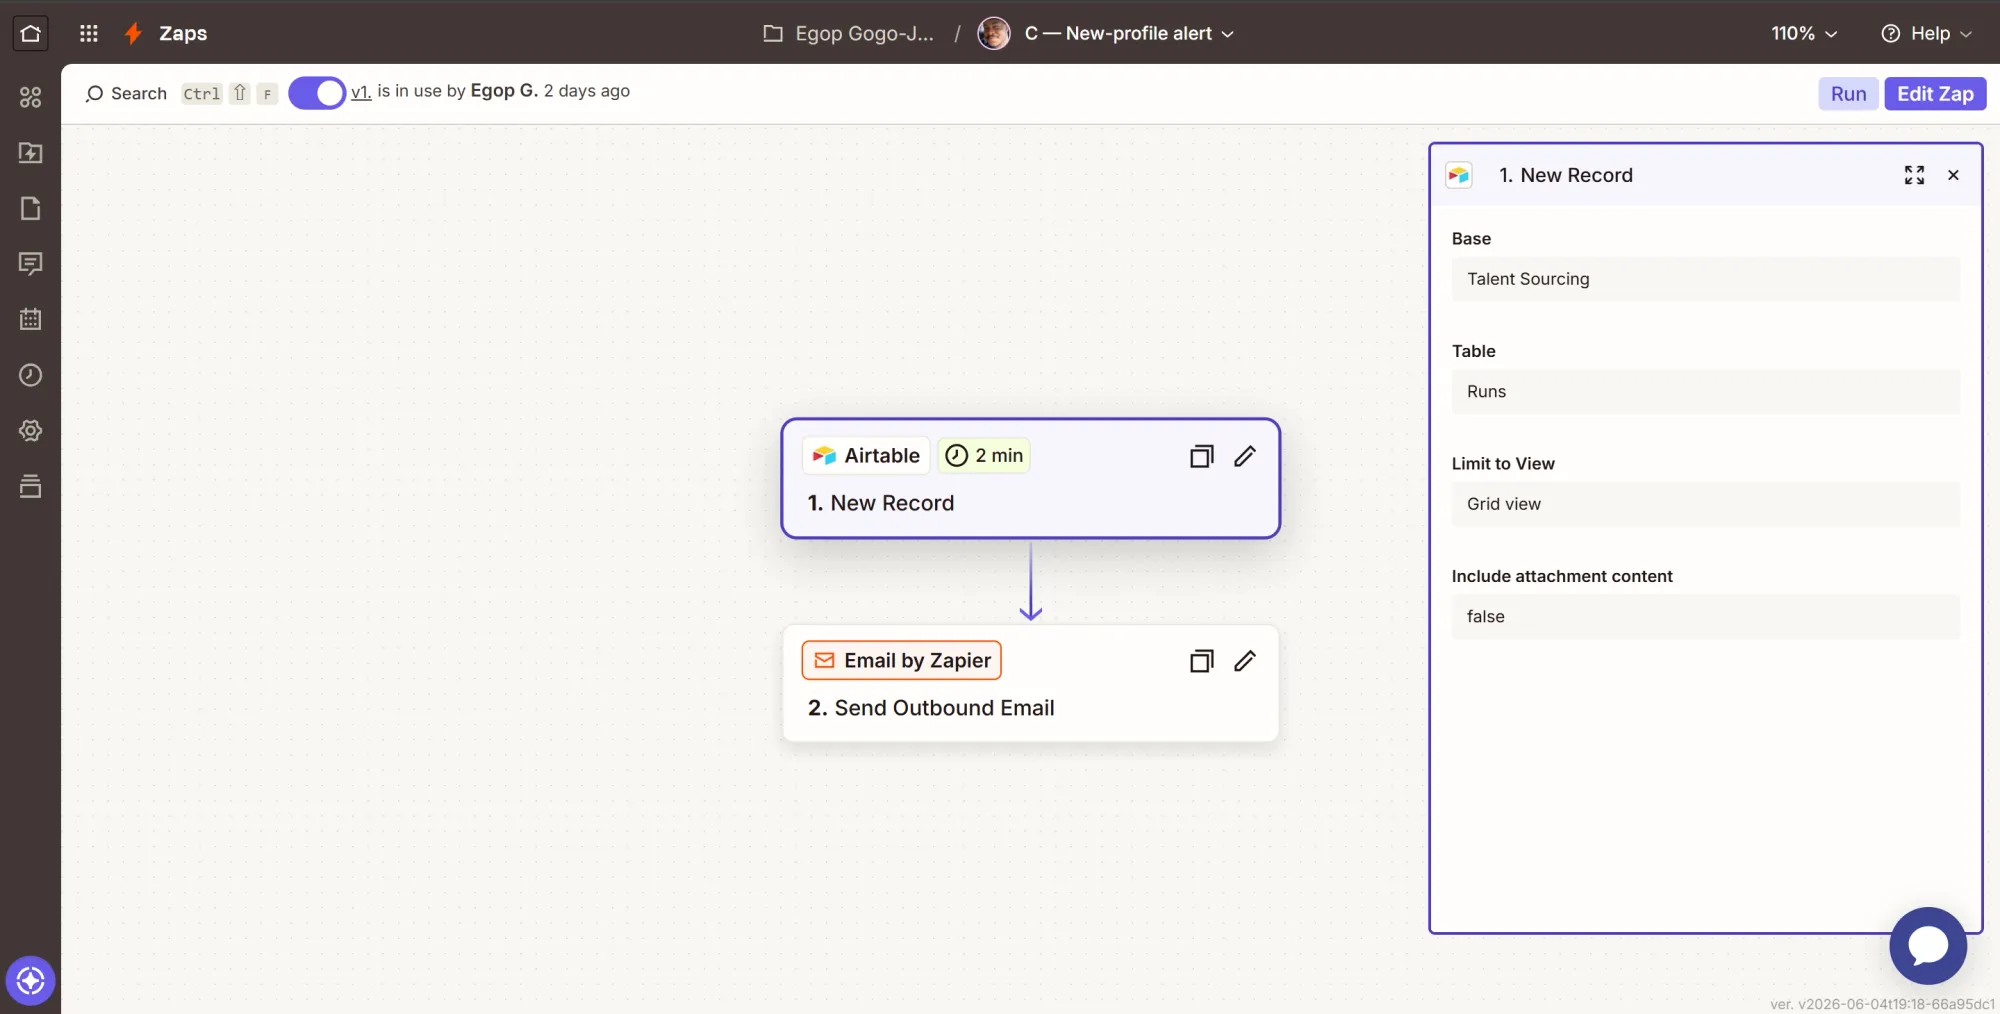
Step 1: Trigger - New Record in the Runs table
- Create a new Zap, rename it “C - New-profile alert”.
- Click the Trigger card, search Airtable, select it.
- Event: New Record.
- Account: pick your Airtable connection.
- Configure: Base = Talent Sourcing, Table = Runs.
- Test: click Test trigger.
This entire sequence ensures the workflow is event-driven, not just scheduled. The “Runs” table only ever gets a row when Zap B's filter passed, meaning real new people landed.
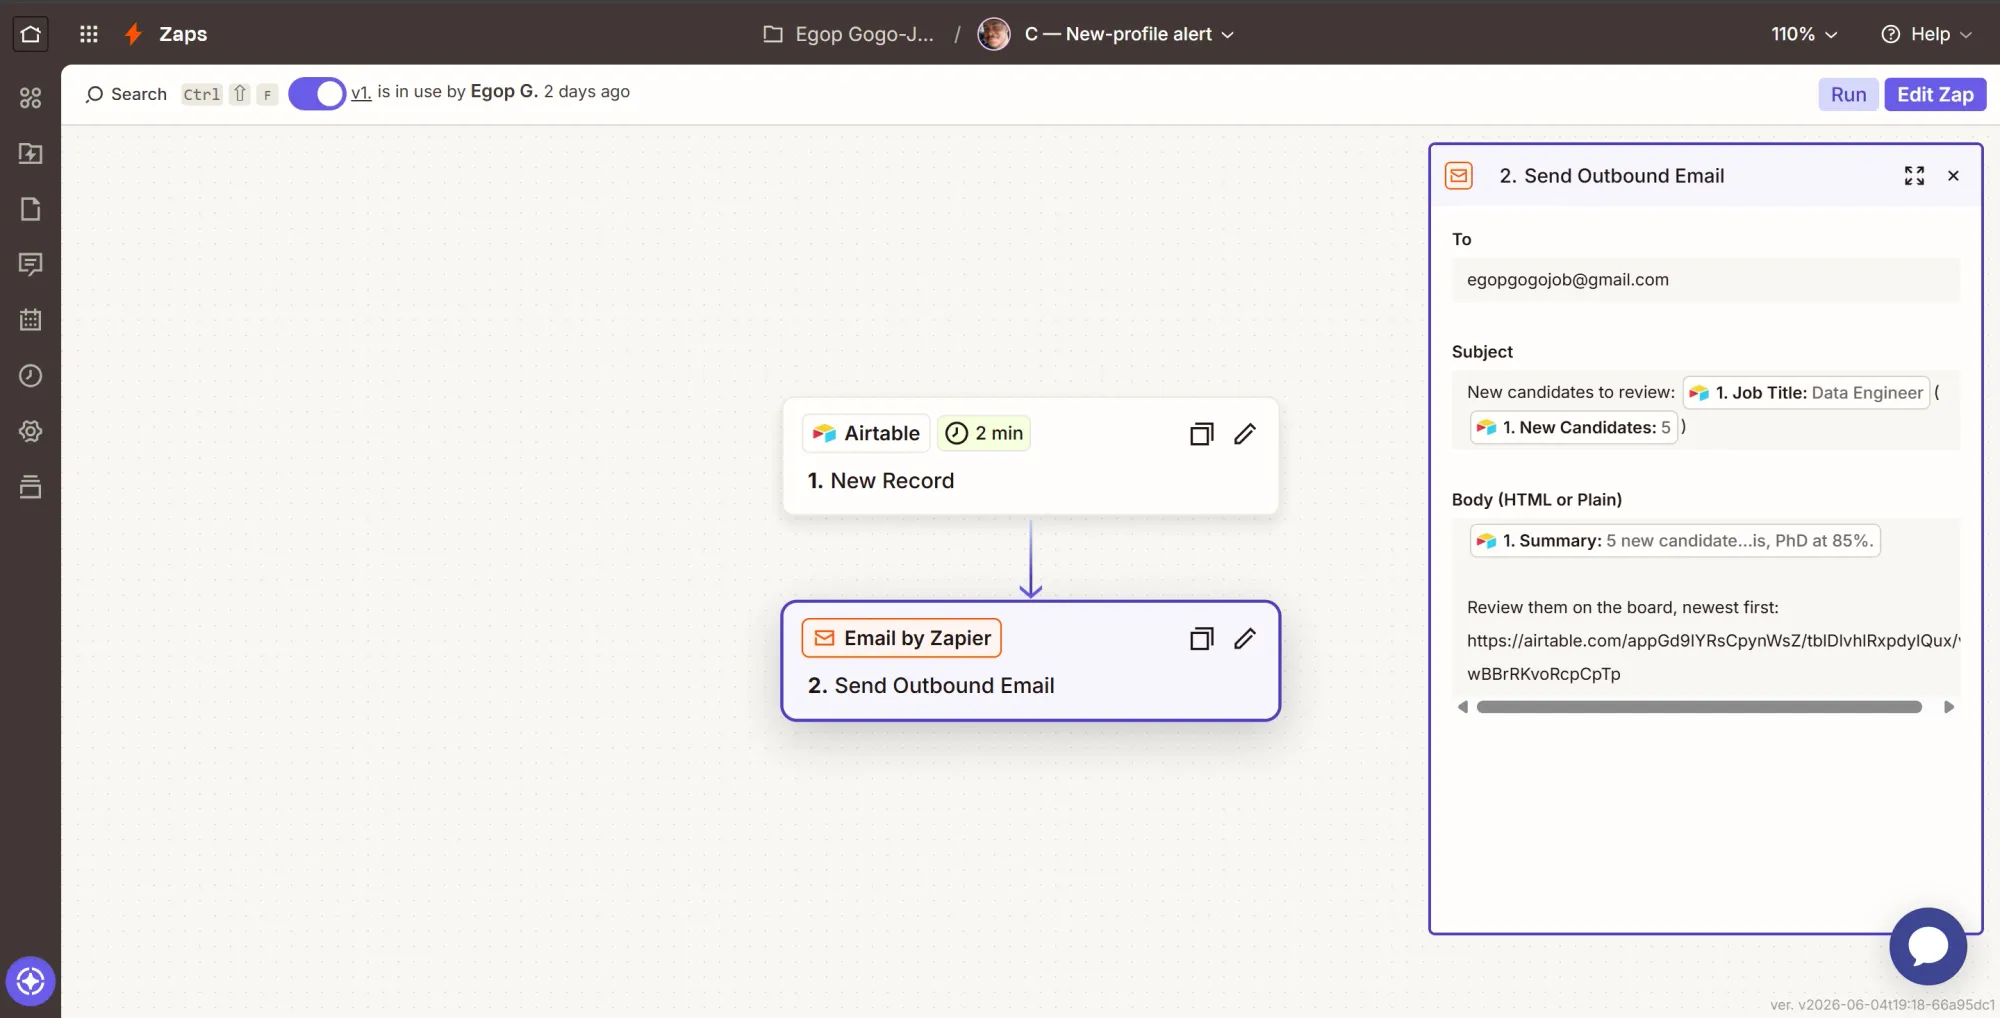
Step 2: Send the alert
- Click +, search Email by Zapier, select it.
- Event: Send Outbound Email.
- Configure:
- To: your email address.
- Subject: type
New candidates to review:then insert the trigger's Job title. - Body (Plain text here): insert the trigger's Summary, then on a new line type
Open the board (newest at the top):and insert the Airtable URL link pointing at the Candidates table.
- Click Continue, then Test step. Check your inbox.
- Click Publish, and Zap C is live.
Phase 6: Zap D - Scheduled daily re-run
Zaps A through C only discover new candidates when a scrape runs, and so far, a scrape only runs when you add a job by hand. Zap D is what keeps the pipeline hunting on its own. It runs daily, reads every open job from the sheet, and re-launches the scrape for each one. The schedule triggers the scrape, not the alert, because the deduplication code already guarantees you only hear about genuinely new people.
Step 1: Trigger - daily schedule
- Create a new Zap, rename it “D - Scheduled rerun”.
- Click the Trigger card, search Schedule by Zapier, and select it.
- Event: Every Day. Set a time (8 or 9 am works). Continue and test.

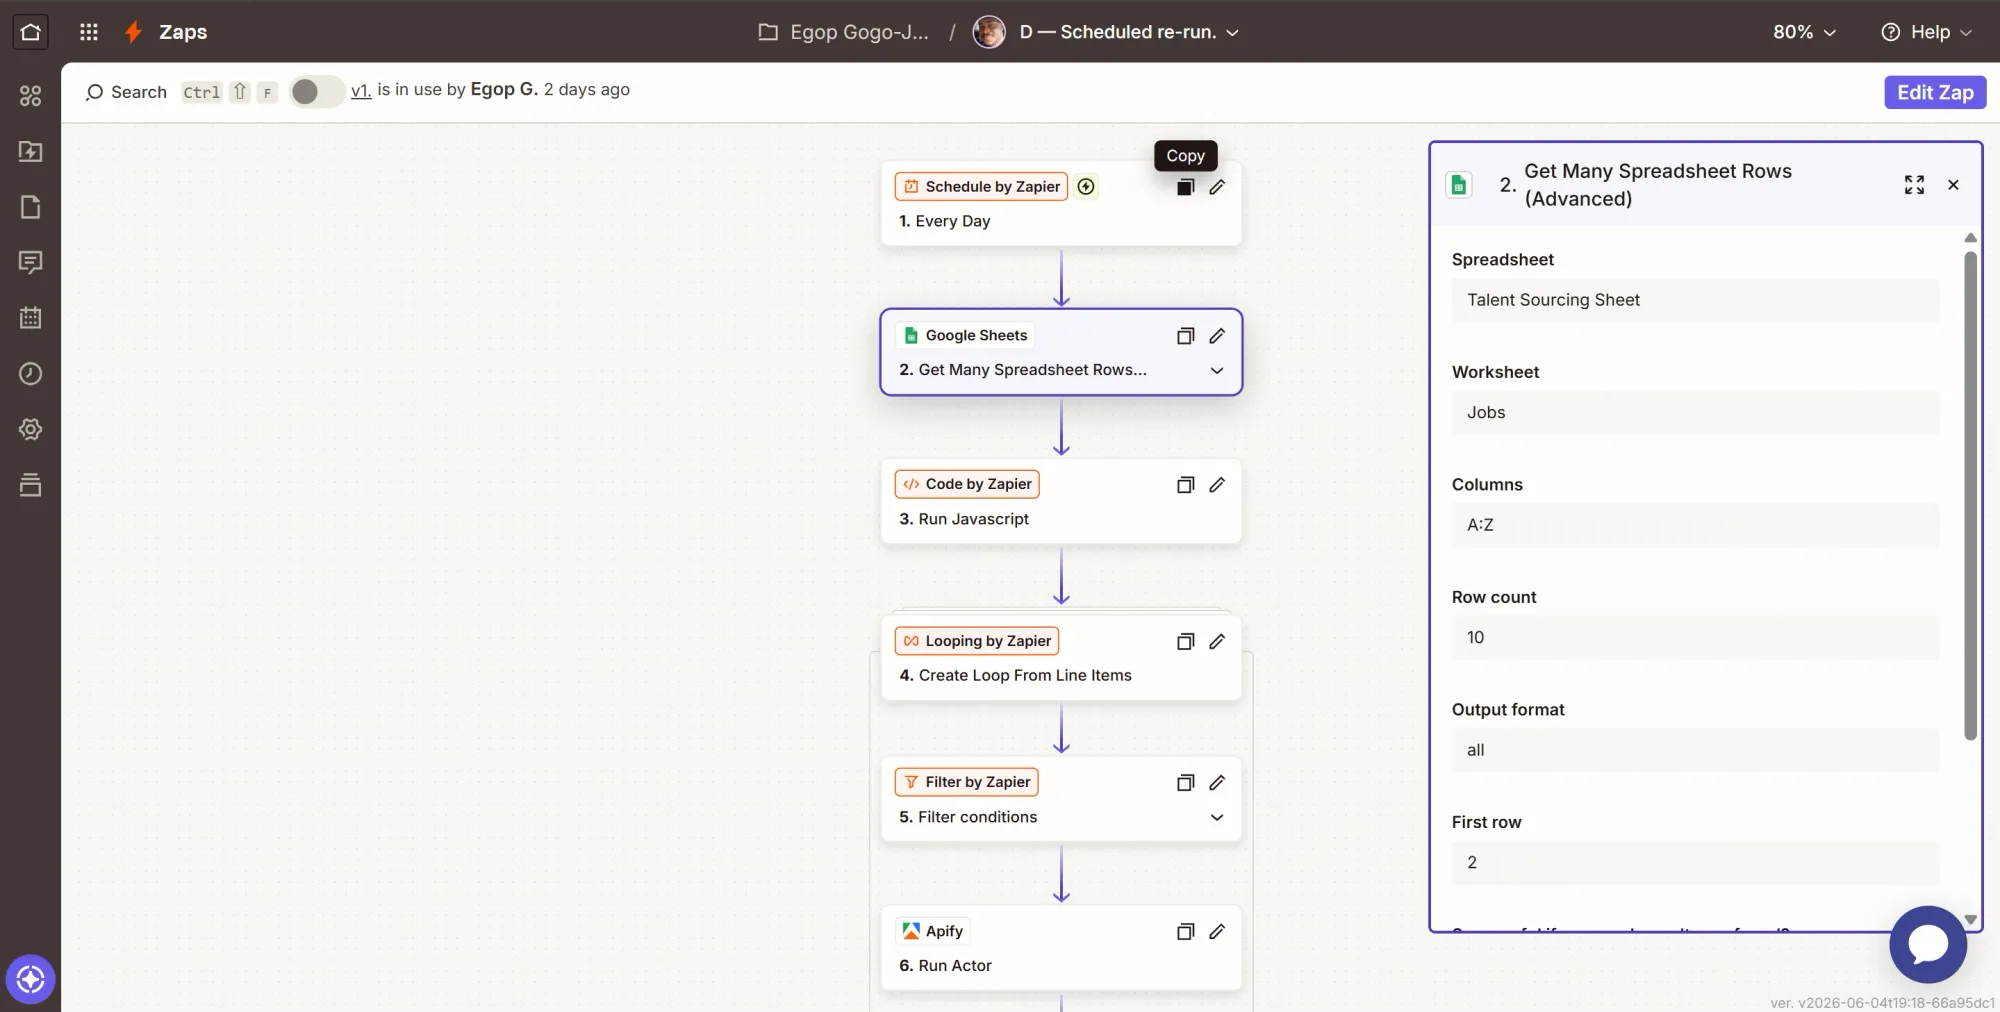
Step 2: Action - pull every job row
- Click +, search Google Sheets, select it. Event: Get Many Spreadsheet Rows (Advanced).
- Configure:
- Spreadsheet = Talent Sourcing Sheet, Worksheet = Jobs.
- Columns =
A:Z. First row =2(row 1 is your headers). Row count =10(raise it if you ever keep more than 10 jobs). - Output format = All (this is what populates the Raw Rows JSON that the next step reads).
- Continue and test. Confirm it returns all your job rows.
A single-row lookup won't work here because the rerun has to walk through every open job at once. This action returns all of them. The piece you will use is Raw Rows, the JSON version of the data, which the Code step parses into clean lists.
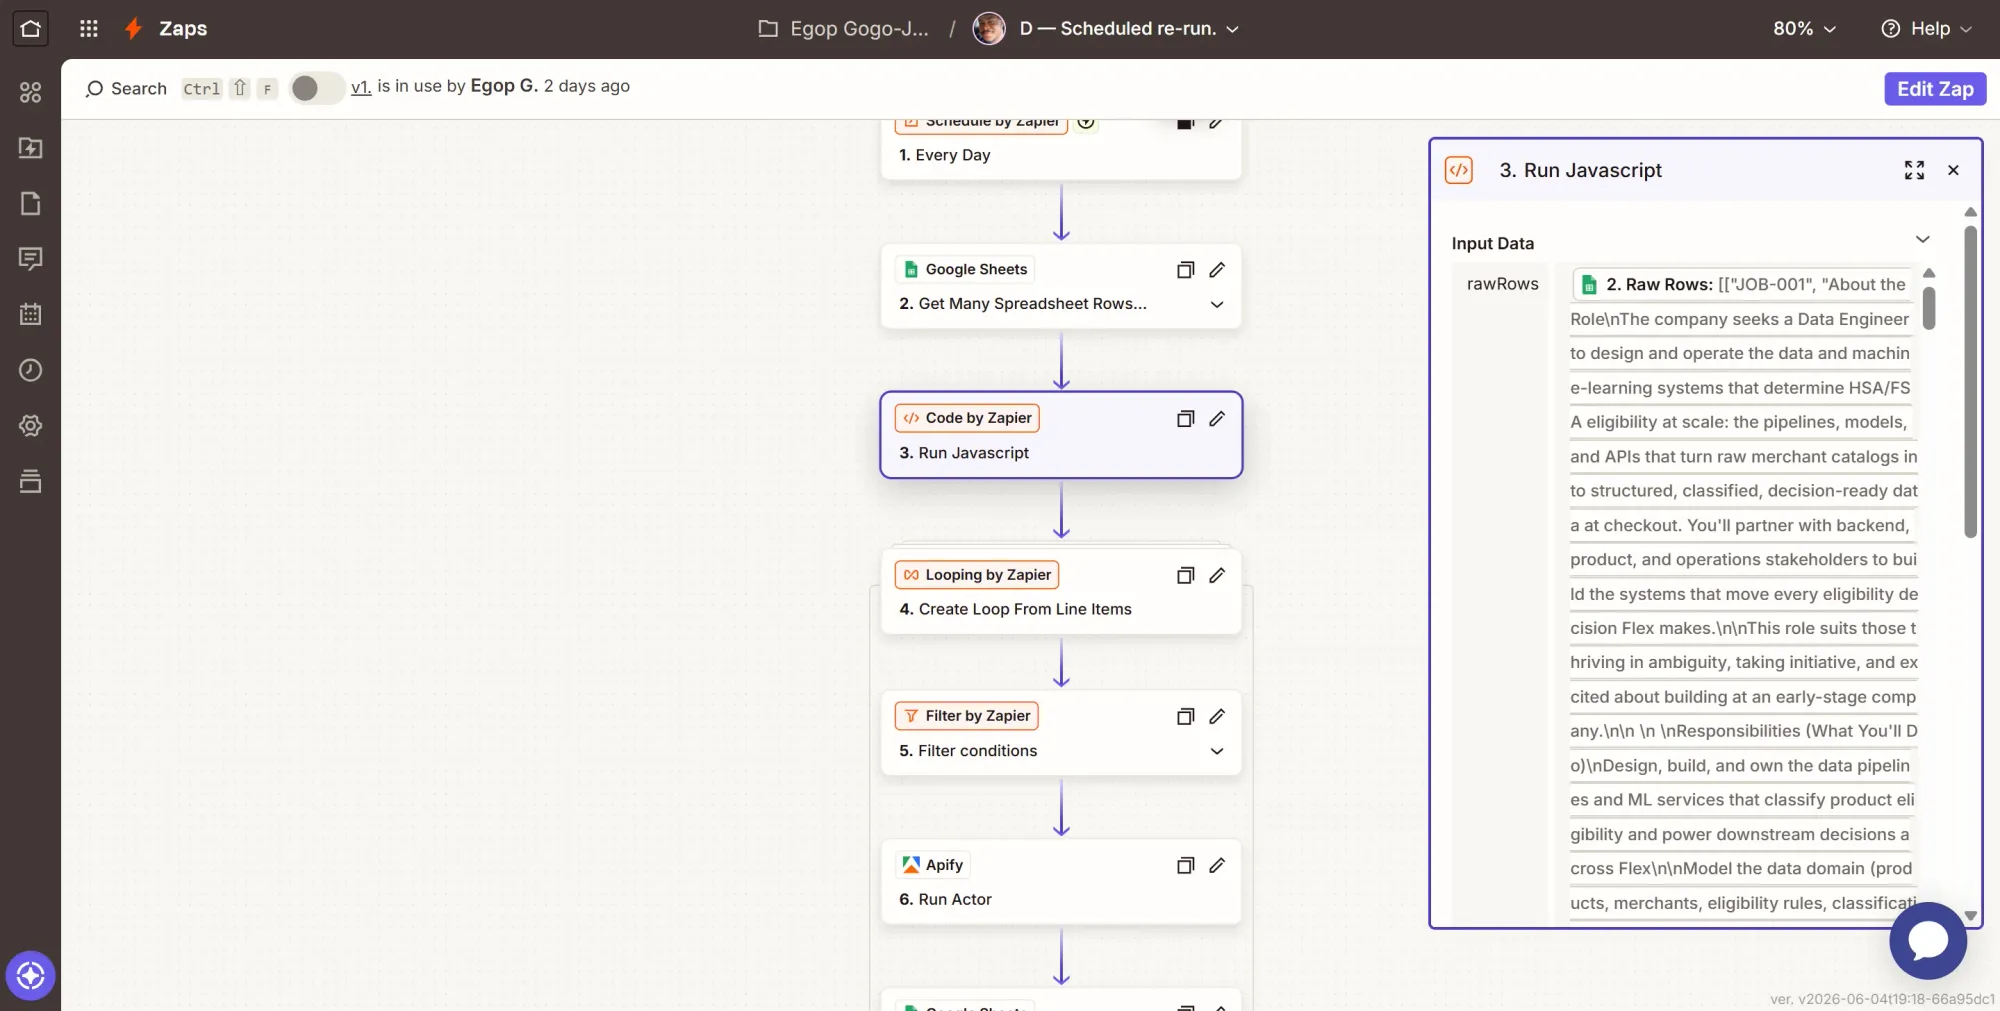
Step 3: Action - flatten the rows into clean lists
- Click +, search Code by Zapier, select it.
- Event: Run JavaScript.
- Input Data: one item,
rawRows= map the Get Many step's Raw Rows. - Code: paste this.
let data = inputData.rawRows;
if (typeof data === "string") {
  data = JSON.parse(data);
}

const jobIds = [];
const queries = [];
const statuses = [];
const rowNumbers = [];

data.forEach((row, i) => {
  const cells = Array.isArray(row) ? row : Object.values(row);
  jobIds.push(cells[0]);     // A = job_id
  queries.push(cells[2]);    // C = search_query
  statuses.push(cells[4]);   // E = status
  rowNumbers.push(i + 2);    // sheet row, headers in row 1, data starts row 2
});

return { jobIds, queries, statuses, rowNumbers };
- Continue and test.
Without this step, the loop receives every column of a row mashed into a single text string, making it impossible to isolate the search query or job status. Flattening the data into aligned lists keeps the loop clean and usable.
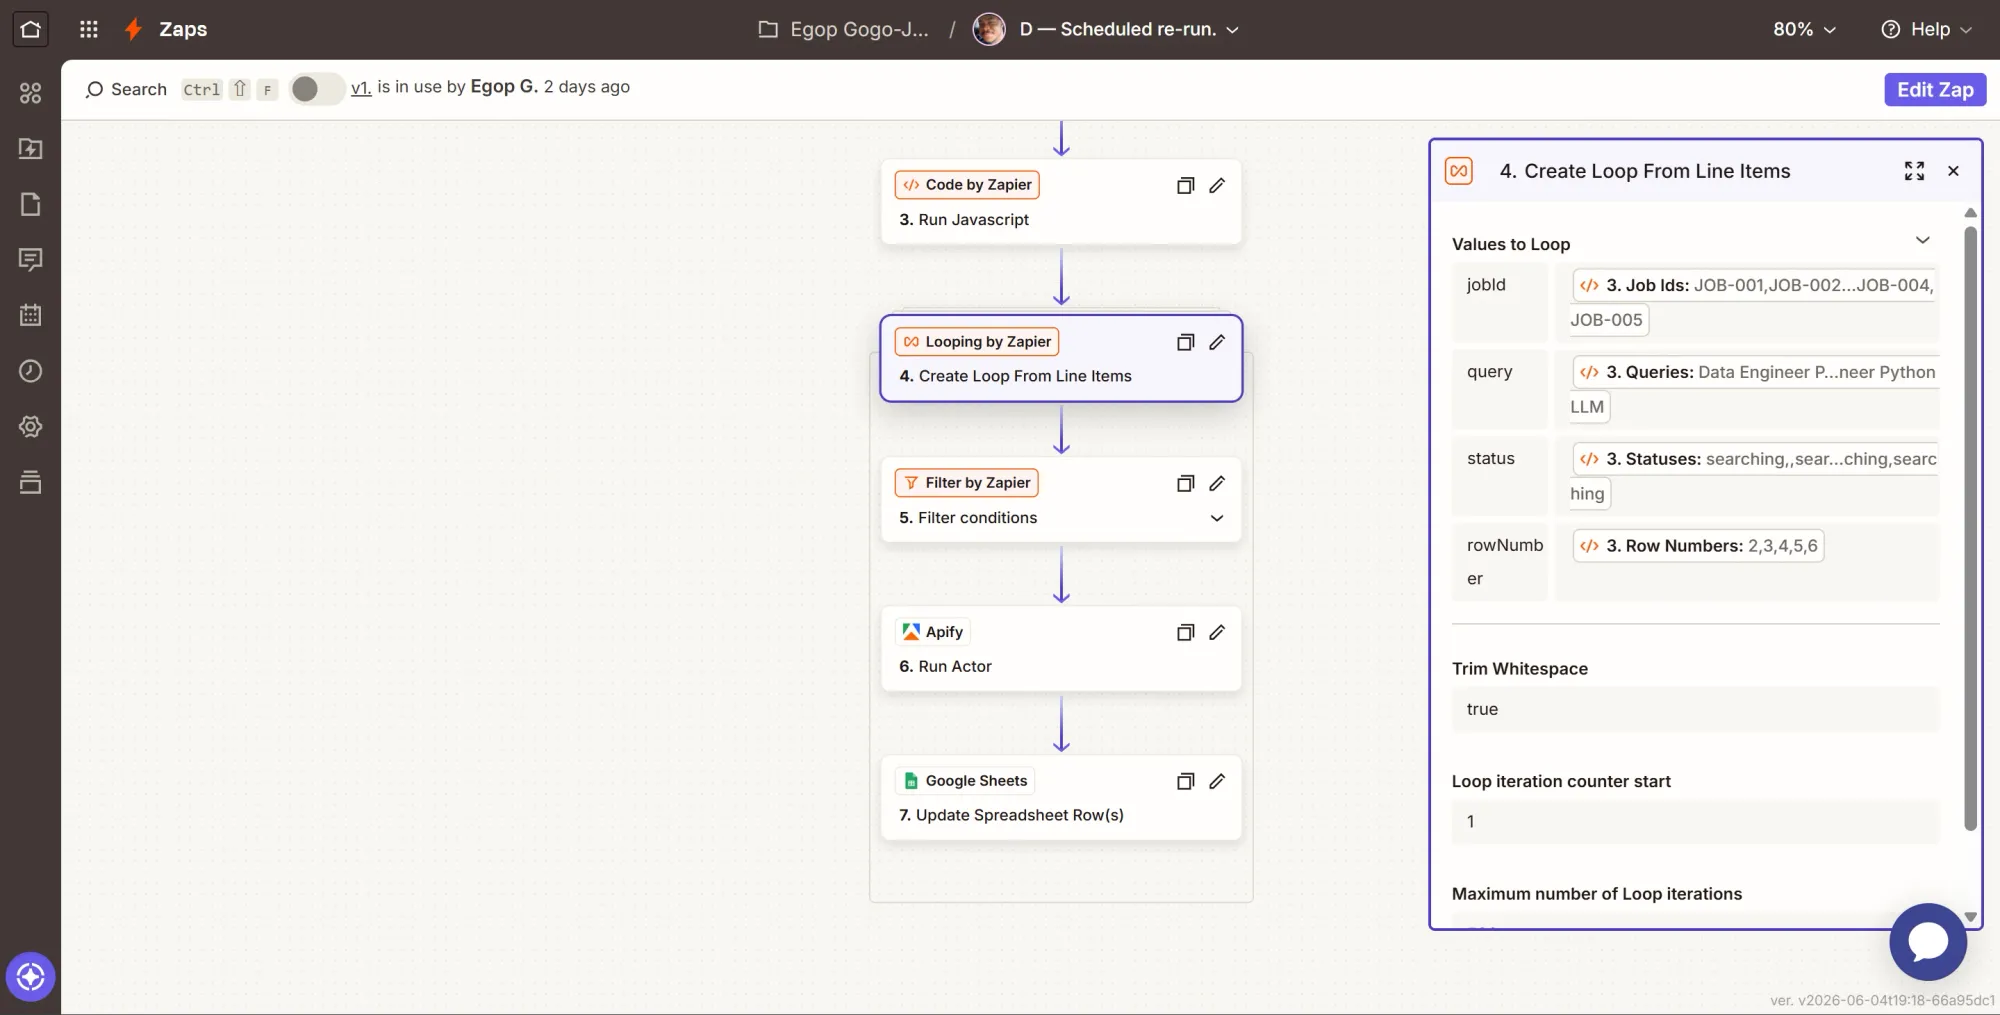
Step 4: Loop over the jobs
- Click +, search Looping by Zapier, select it.
- Event: Create Loop From Line Items.
- Values to Loop: add four, each mapped to a list from the Code step:
jobId=Job Ids,query=Queries,status=Statuses,rowNumber=Row Numbers
- Continue and test.
This combines the four lists so the system processes one job per iteration. Inside each loop, you have direct access to the jobId, query, status, and rowNumber for that specific job. Everything after this runs exactly once per job.
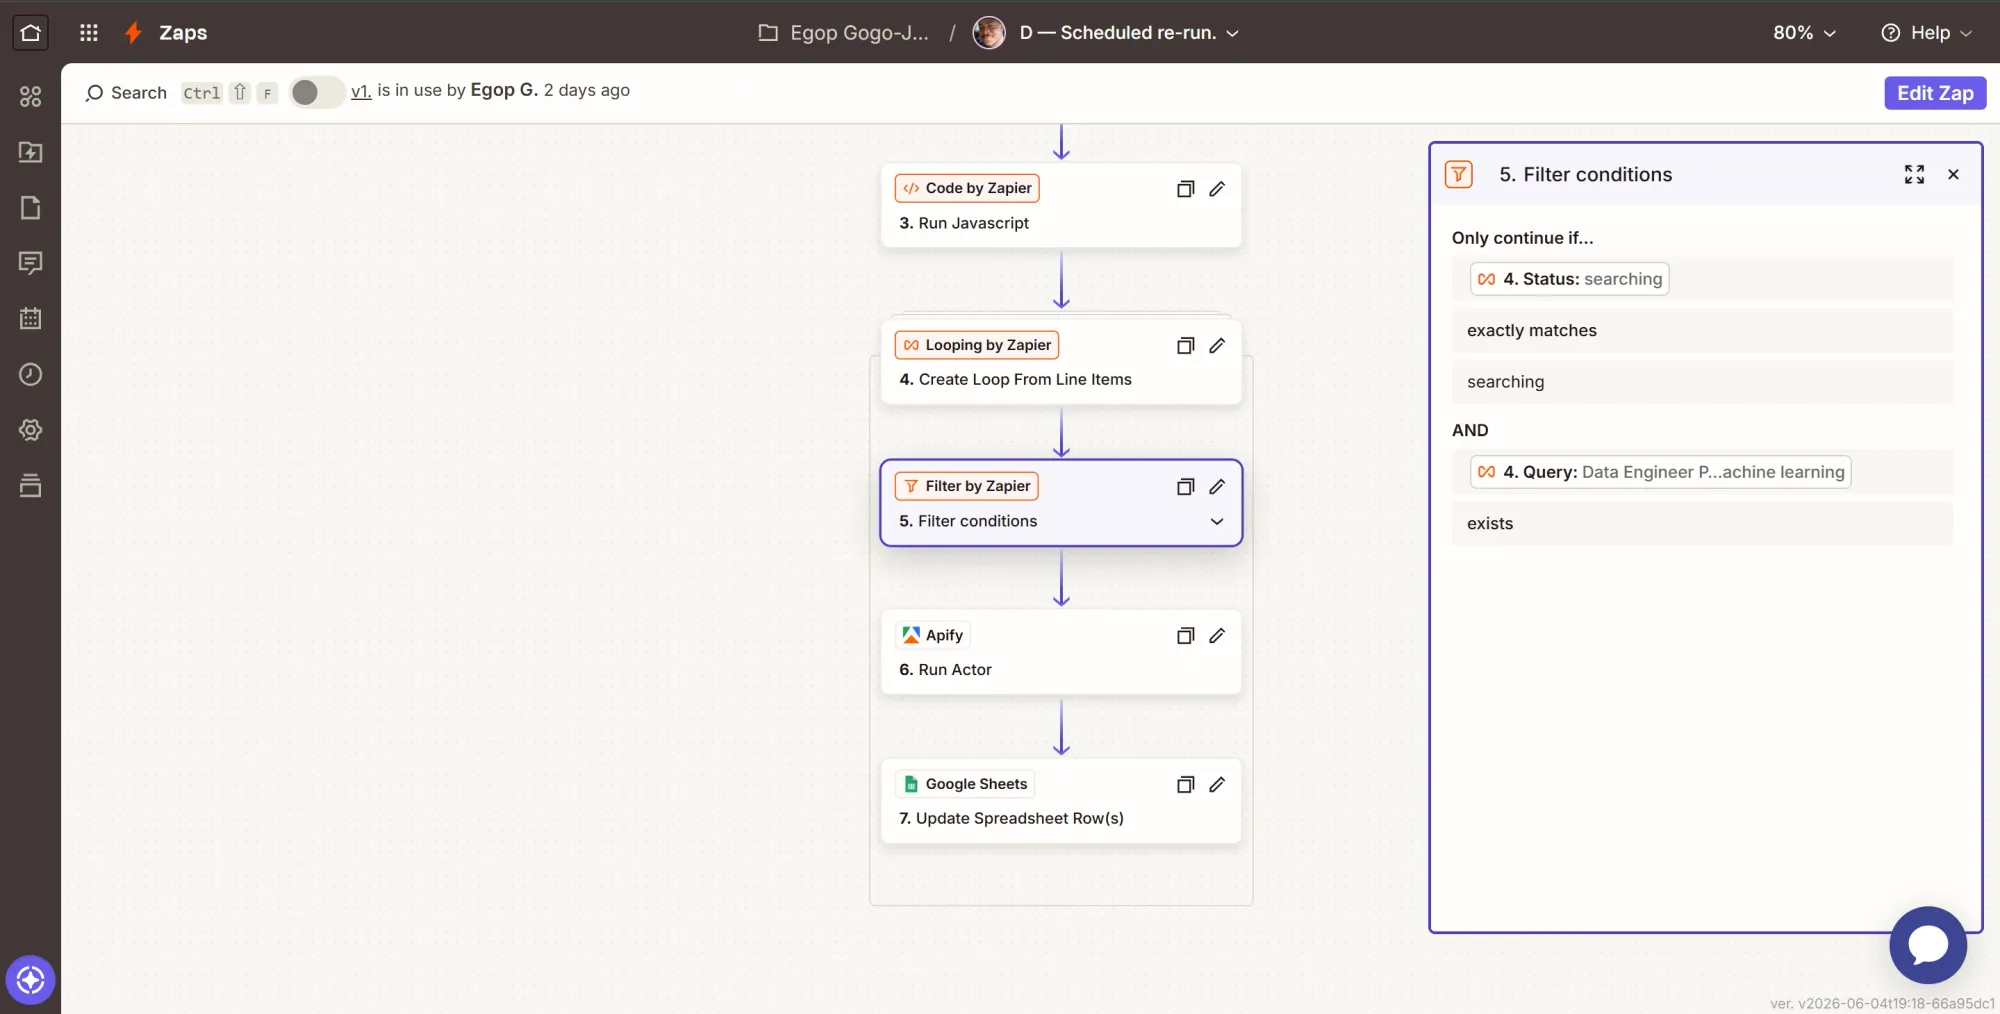
Step 5: Filter - only rerun open jobs with a query
- Click +, search for Filter by Zapier, and select it.
- Only continue if (two conditions joined with And):
status(from the loop) (Text) Exactly matchessearchingquery(from the loop) (Text) Exists
- Continue.
Step 6: Action - re-launch the scrape
- Click +, search Apify, select it.
- Event: Run Actor.
- Configure it identically to Zap A's Run Actor: same Actor (
harvestapi/linkedin-profile-search), Profile Scraper Mode Full + email search, Max Items 25, run asynchronously. The one difference: map Search Query to the loop'squery. - Continue and test.
This is the same scrape Zap A runs, just driven by the loop instead of a new intake row. It’s not a second Actor; it’s the same one called again, once per open job, on the schedule. Each finished run flows into Zap B exactly as an intake scrape would.

Step 7: Action - stamp the new run ID back
- Click +, search Google Sheets, select it.
- Event: Update Spreadsheet Row(s).
- Configure:
- Spreadsheet = Talent Sourcing Sheet, Worksheet = Jobs.
- Row: map the loop's Row Number. This targets the right job's row.
- search_run_id: map the ID from the Run Actor step (Step 6), not the Actor ID.
- Leave every other column blank.
- Continue, then test.
- Click Publish. Zap D is live, and the whole pipeline now runs on its own.

Phase 7: Test the pipeline end-to-end
Add a real job to your Jobs sheet and let the published Zaps run. Confirm that the candidates land on your Airtable board and you receive an email alert. If you want to test the deduplication logic, rerun the exact same job. You’ll notice that the system recognizes existing profiles and prevents duplicate entries.
Summary
The next time your team has an opening, you don’t have to post it and hope. You now have a system that finds qualified people, ranks them against your exact requirements, and surfaces what sets each one apart.
LinkedIn Profile Search Scraper is exclusive to Apify Store, and the free tier gives you $5 in monthly credits to run the whole build at no cost. For a wider reach, there are other Actors on Apify Store that scrape platforms, such as Twitter, Upwork, and Medium.
And, if you have an idea for an Actor of your own, in this space or any other, you can build, share, and monetize it on Apify, the largest marketplace of tools for web data and AI.