A step-by-step guide to learning how to scrape a website. Learn how to connect to a web page, parse its HTML content, and extract data from it. We will cover how to scrape a website using a Python script and a no-code tool. By the end, you'll have a thorough understanding of the skills and steps required to do web scraping!
What is web scraping?
Web scraping is the process of extracting data from websites. You can do it manually, but it's typically performed using automated software or custom scripts. These tools connect to a site, access specific pages, parse their HTML content, select HTML elements, and extract data from them. The information you can scrape from a site includes text, images, links, and more. For a deeper understanding, refer to our in-depth piece on the definition of web scraping.
Prerequisites for web scraping
- Knowledge of how the Web works, specifically HTTP and JavaScript renderingTo perform web scraping, you usually need to meet the following prerequisites:
- Knowledge of the DOM, HTML, and CSS selectors
- Understanding the difference between a static site and a dynamic site
Web scraping is generally performed using a script. Python is one of the best languages for scripting and it comes with several libraries for web scraping. So, it's going to be the programming language of reference for this article!
To perform web scraping in Python, you need:
- Python 3 installed locally
- A Python IDE, such as Visual Studio Code with the Python extension or PyCharm
- Basic knowledge of Python and async programming
Since you'll see how to deploy your script to Apify, you'll also need:
- An Apify account
- Some knowledge of how Apify works
How to scrape a website
Learn how to scrape a website using Python in a complete guided example. The target site of the sample scraping script will be "Headphones" page of the Warehouse e-commerce site:
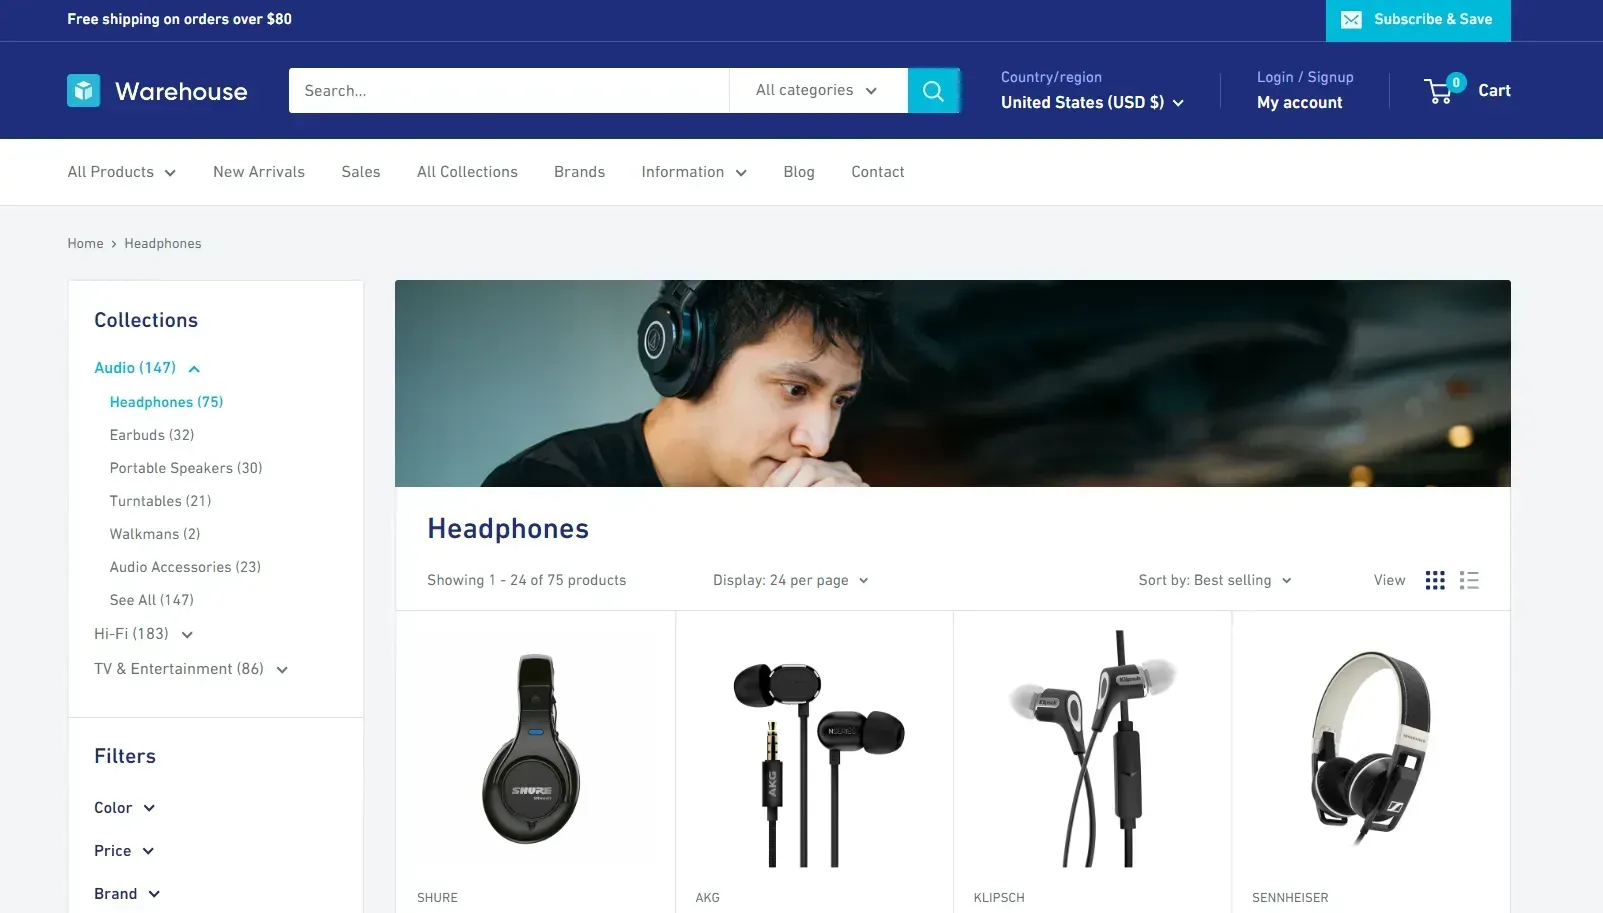
Note that you can easily adapt what you'll learn here to any other site.
This section will guide you through the process of scraping a website via the following steps:
- Inspect the target website
- Choose the scraping libraries
- Set up the Python project
- Connect to the site
- Parse the HTML content
- Analyze the DOM elements
- Select all items on the page
- Prepare the scraping logic
- Scrape the product information
- Store the scraped data
- Put it all together
- Deploy to Apify
Let's dive in!
Step 1: Inspect the target website
Before digging into coding, you should spend some time getting familiar with your target site.
Open your browser and connect to the website to be scraped. Visit the "Headphones" page, right-click on the background, and select the "Inspect" option. The DevTools will open:
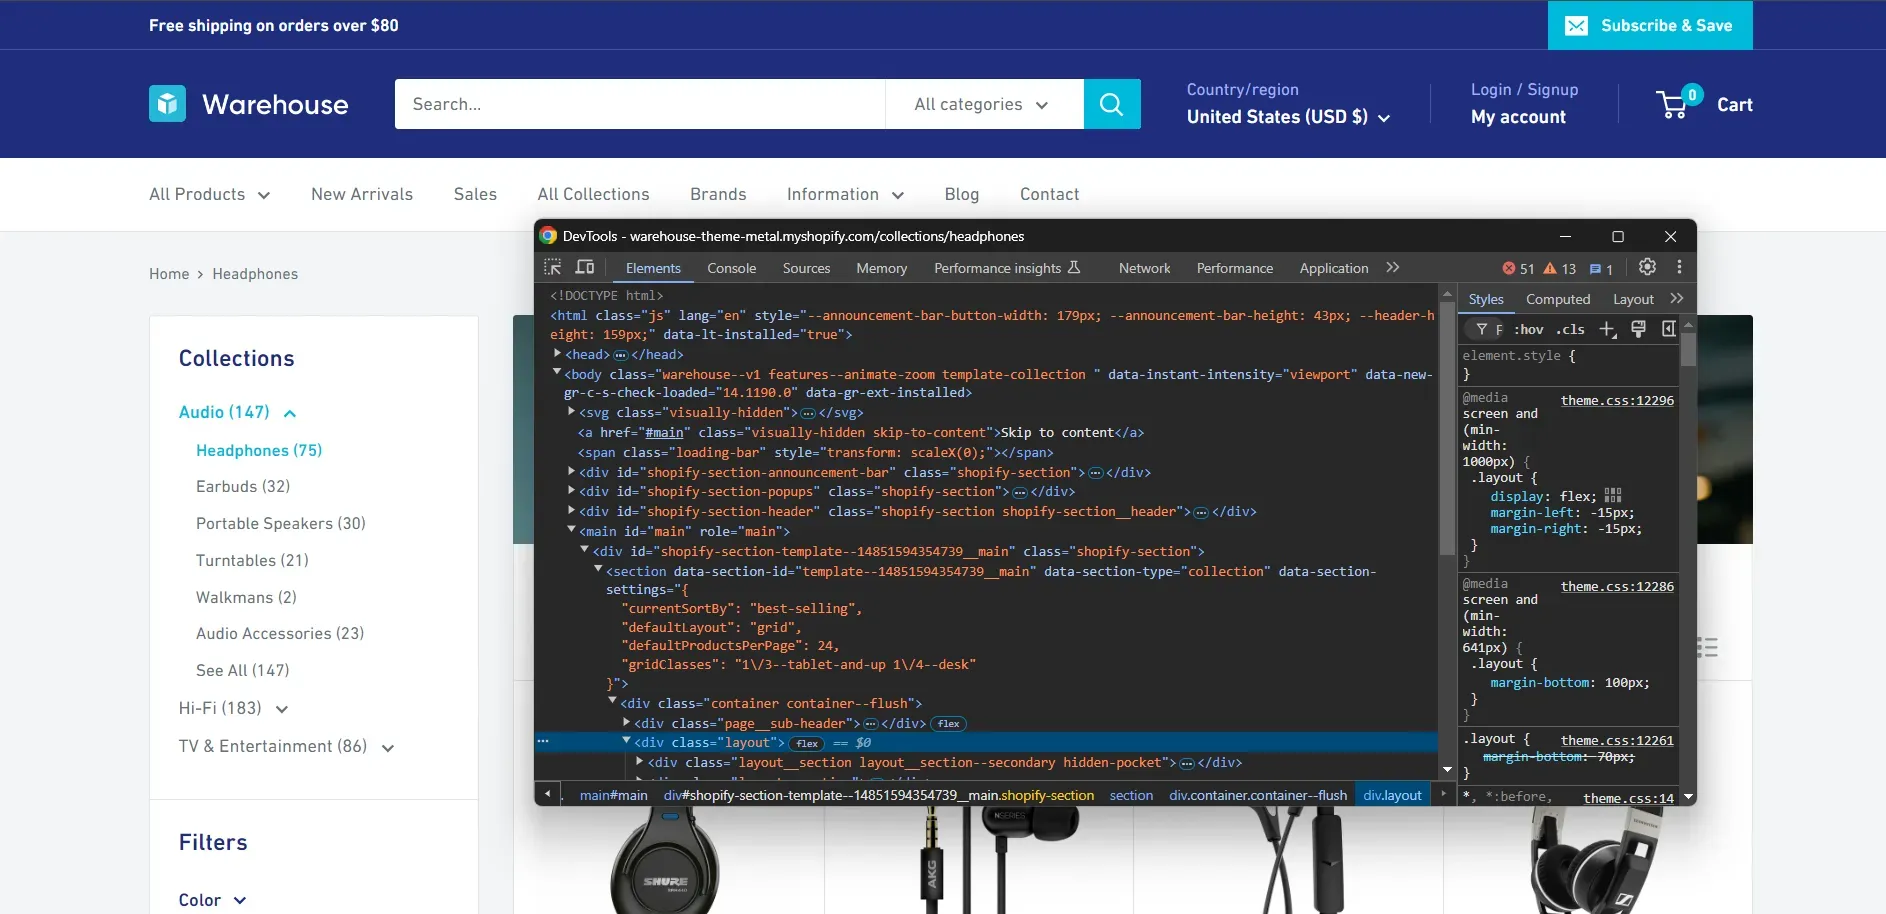
Reach the "Network" tab and reload the page. Now, take a look at the Fetch/XHR requests that the page makes:
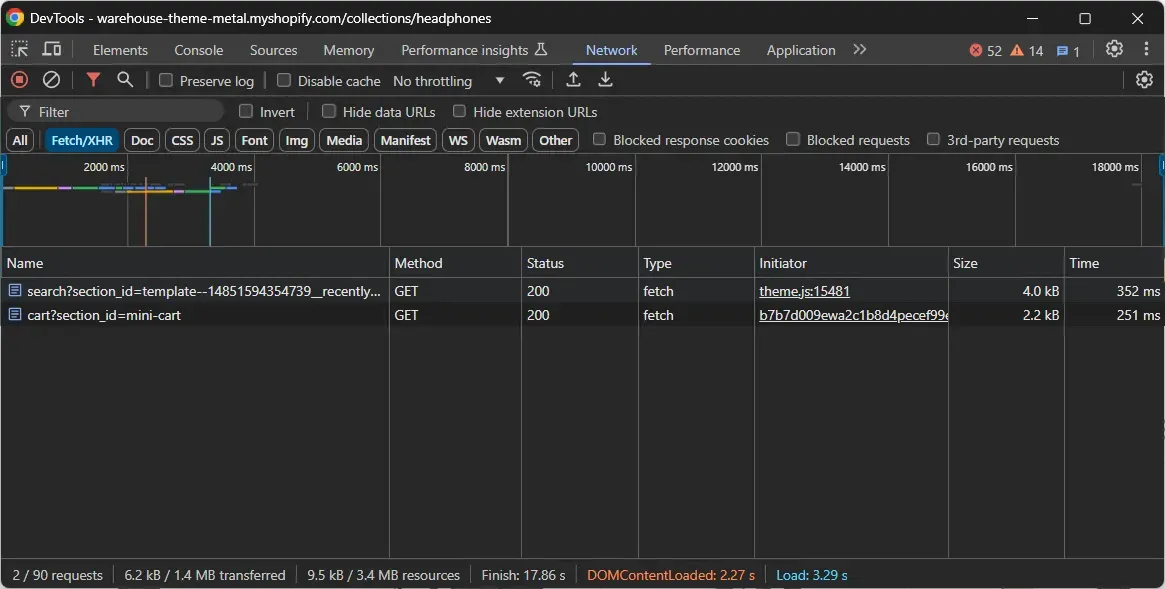
You'll see that the page makes two requests dynamically in the browser. Expand them and notice how they return data related to your recently visited items and cart.
In other words, the items on the page aren't retrieved during the page rendering. This means the HTML page returned by the server already contains all the items. So, the target webpage isn't dynamic.
As a result, you can scrape the website with the following two tools:
- An HTTP client: To connect to the page and retrieve its HTML document
- An HTML parser: To parse the HTML document and extract data from it.
You could still use a browser automation tool like Playwright, but doing so would only add unnecessary resource overhead.
Step 2: Choose the scraping libraries
You now know that you need an HTTP client and an HTML parser to extract data from the target site. The recommended scraping libraries are:
- HTTPX: A modern and fast Python HTTP client that supports asynchronous requests and HTTP/1.1 and HTTP/1.2.
- Beautiful Soup: A powerful library for parsing HTML and XML documents in Python. It provides an intuitive API to navigate the parse tree and extract data from it.
Note: Both packages appear in the list of the best Python web scraping libraries.
Step 3: Set up the Python project
Web scraping is not a one-time task. Online pages keep getting updated, so you need to periodically run your data extraction scripts. What if you wanted to automate this process or retrieve the scraped data on the fly via an API? This is where Apify comes into play!
Turning your scraping task into an Apify Actor gives you access to these benefits:
- Easy deploy: Deploy your code with just a single CLI command.
- Automate scheduling: Set up your Actor to run at regular intervals, so you always have up-to-date data without manual intervention.
- Access via API: Get the data scraped by your script via API.
- Data Storage: Automatically export the scraped data in several formats, including JSON, CSV, XML, Excel, HTML Table, RSS, and JSONL.
- Scalability: Run your Actor on Apify's infrastructure, which can handle large-scale scraping tasks without requiring you to manage the underlying servers.
- Proxy integration: Avoid IP bans and limitations with simplified integration with rotating proxies.
- Monitoring and logging: Take advantage of Apify's monitoring tools to track the performance of your scraping task.
To get started, install the Apify CLI and create a new Actor with:
apify create
Give your Actor a name, select Python as the programming language, and install the "BeautifulSoup + HTTPX" template.
The Apify CLI will initialize a Python project containing the Actor definition. Open this folder in your favorite Python IDE.
Your project directory will contain the following file structure:
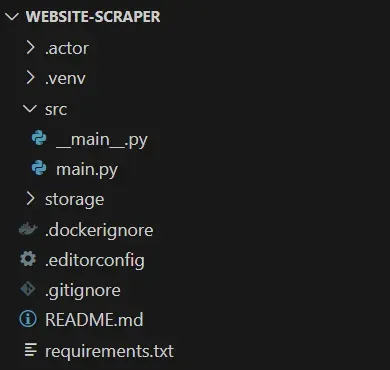
Explore the files in the src folder. Focus your attention on the async with Actor section in main.py. Right now, it contains sample Python scraping logic. Clear the section and get ready to replace it with custom scraping logic:
from bs4 import BeautifulSoup
from httpx import AsyncClient
from apify import Actor


async def main() -> None:
    async with Actor:
        # your Actor scraping logic...
Don't forget that you can run your Actor locally for testing purposes with:
apify run
Step 4: Connect to the site
Use HTTPX to retrieve the HTML document associated with the target URL:
# target page to scrape data from
url = "https://warehouse-theme-metal.myshopify.com/collections/headphones"

try:
    # make a GET request to the target URL
    async with AsyncClient() as client:
      response = await client.get(url)
except Exception:
    Actor.log.exception(f"Cannot extract data from {url}.")
Under the hood, the get() method performs an async HTTP GET request to the specified URL. The server will then respond with the HTML document of the requested web page. In particular, you can find the raw HTML code of the page in the reponse.text attribute.
In case of a network error, the raised exception is intercepted and a special message is logged.
Step 5: Parse the HTML content
Parse the HTML document returned by the server with the BeautifulSoup() function:
soup = BeautifulSoup(response.text, "html.parser")
The first argument is the raw HTML string while the second specifies the parser to use.
The soup variable now holds a BeautifulSoup object, which exposes methods to navigate the parse tree, select nodes, and scrape data.
Step 6: Analyze the DOM elements
Before jumping into the data retrieval logic, you need to inspect the DOM of the target page. Specifically, you have to understand how to select the HTML elements containing the data of interest.
So, open the target page in the browser, right-click on an item node, and select the "Inspect" option:
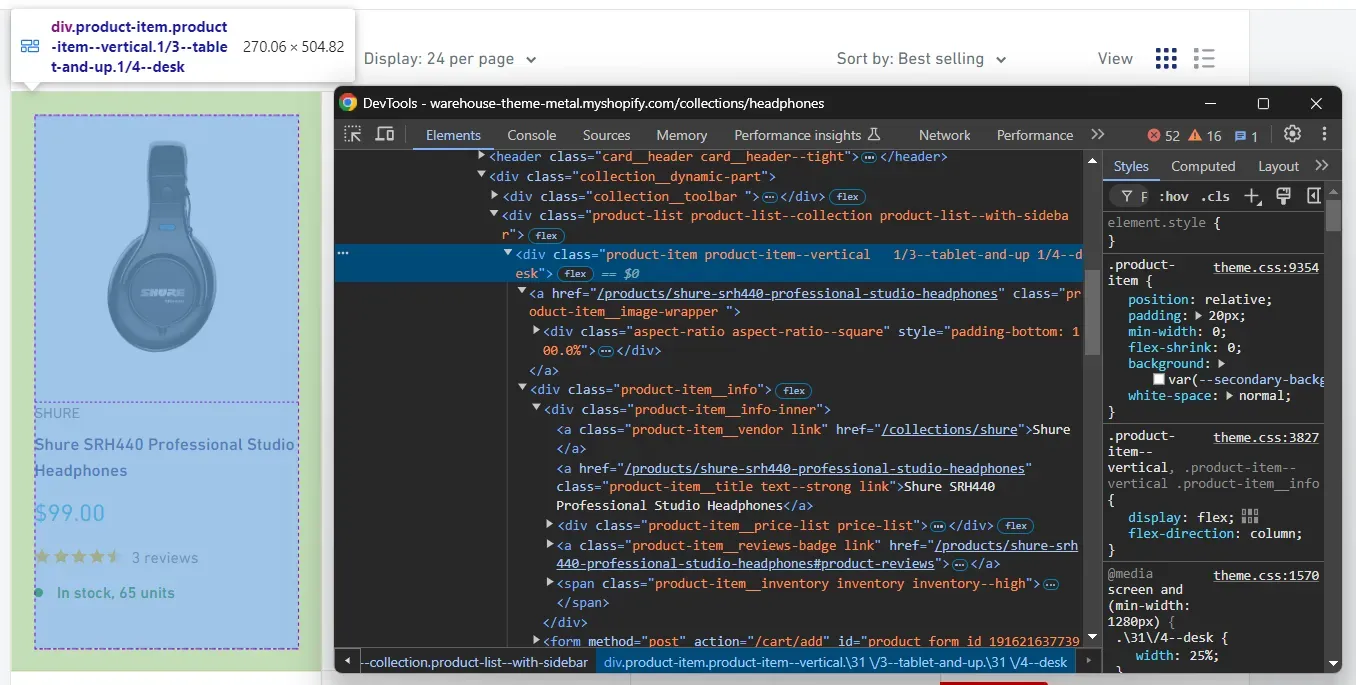
Here, you can notice that each item on a page is a .product-item HTML node that contains:
- The brand name in the
.product-item__vendornode - A title in the
.product-item__titlenode - A price in the
.pricenode - A rating score and review info in the
.ratingelement - Stock information in the
.product-item__inventoryelement
If you aren't familiar with this process, read our guide on inspecting elements with the DevTools.
Step 7: Select all items on the page
Use the Beautiful Soup select() method to apply the .product-item CSS selector to the page:
item_elements = soup.select('.product-item')
The item_elements list will now contain all the HTML elements on the page.
Step 8: Prepare the scraping logic
The target page contains several items, and you want to scrape them all. Initialize a new list where to store the scraped data:
items = []
Next, iterate over item_elements:
for item_element in item_elements:
    # scraping logic...
Time to retrieve data from each HTML item node and populate the items list accordingly.
Step 9: Scrape the product information
Use the methods provided by Beautiful Soup to select the nodes of interest inside each item element. Let's start by scraping an item's image!
First, select the image node:
image_element = item_element.select_one("img")
select_one() returns the first node that matches the specified CSS selector.
You can now find the image URL in the src attribute:
image_element["src"]
Beautiful Soup enables you to the access HTML attribute values of a node as in a regular Python dictionary.
If you inspect the image node again, you will see that the URLs in src have this format:
"//warehouse-theme-metal.myshopify.com/cdn/shop/products/12405_976__2_2139873a-527f-4c6c-9e7c-be6aa0eacbe4.jpg?v=1559126290&width=1378"
Append the "https:" string to get the full URL:
image_url = "https:" + image_element["src"]
For text elements, you can simply extract the data of interest as below:
brand_element = item_element.select_one(".product-item__vendor")
brand_name = brand_element.text
The text attribute returns the text information contained in the selected HTML node.
In some cases, you also have to perform some data cleaning operations:
price_element = item_element.select_one(".price")
price = price_element.text.replace("Sale price", "").strip()
This removes the "Sale price" string from the price text and trims all extra spaces or newlines. Discover more in our article on data cleaning in Python.
That's required because the price node contains a hidden text element:

The info of interest may also be spread across multiple nodes, as with the .rating element below:

To address this scenario, you need to access the nested nodes with some extra scraping logic:
rating_element = item_element.select_one(".rating")
rating_stars = rating_element.select_one(".rating__stars")["aria-label"]
rating_reviews = rating_element.select_one(".rating__caption").text
Extend what you learned here to extract the desired data from each item:
# scrape the image URL
image_element = item_element.select_one("img")
image_url = "https:" + image_element["src"]

# scrape the brand name
brand_element = item_element.select_one(".product-item__vendor")
brand_name = brand_element.text

# scrape the title
title_element = item_element.select_one(".product-item__title")
title = title_element.text

# scrape the price
price_element = item_element.select_one(".price")
price = price_element.text.replace("Sale price", "").strip()

# scrape the rating info
rating_element = item_element.select_one(".rating")
rating_stars = rating_element.select_one(".rating__stars")["aria-label"]
rating_reviews = rating_element.select_one(".rating__caption").text

# scrape the stock information
stock_info_element = item_element.select_one(".product-item__inventory")
stock_info = stock_info_element.text
Create a new item object with the scraped data and add it to items:
# create a new item object
item_data = {
    "image_url": image_url,
    "brand_name": brand_name,
    "title": title,
    "price": price,
    "rating_stars": rating_stars,
    "rating_reviews": rating_reviews,
    "stock_info": stock_info
}
# append the new item to the list
items.append(item_data)
Step 10: Store the scraped data
The items list contains all scraped items from the target page. It only remains to pass it to the Actor dataset through the push_data() method:
await Actor.push_data(items)
You'll now be able to retrieve the scraped data via API. Also, you'll be able export it in various formats directly on the Apify dashboard.
Step 11: Put it all together
Here's the final code of the Python Actor to scrape a website:
from bs4 import BeautifulSoup
from httpx import AsyncClient
from apify import Actor

async def main() -> None:
    async with Actor:
        # target page to scrape data from
        url = "https://warehouse-theme-metal.myshopify.com/collections/headphones"

        try:
            # make a GET request to the target URL
            async with AsyncClient() as client:
                response = await client.get(url)

             # parse the HTML document
            soup = BeautifulSoup(response.text, "html.parser")

            # select all product elements on the page
            item_elements = soup.select(".product-item")

            # where to store the scraped data
            items = []

            # iterate over each item HTML element
            # and apply the scraping logic
            for item_element in item_elements:
                # scrape the image URL
                image_element = item_element.select_one("img")
                image_url = "https:" + image_element["src"]

                # scrape the brand name
                brand_element = item_element.select_one(".product-item__vendor")
                brand_name = brand_element.text

                # scrape the title
                title_element = item_element.select_one(".product-item__title")
                title = title_element.text

                # scrape the price
                price_element = item_element.select_one(".price")
                price = price_element.text.replace("Sale price", "").strip()

                # scrape the rating info
                rating_element = item_element.select_one(".rating")
                rating_stars = rating_element.select_one(".rating__stars")["aria-label"]
                rating_reviews = rating_element.select_one(".rating__caption").text

                # scrape the stock information
                stock_info_element = item_element.select_one(".product-item__inventory")
                stock_info = stock_info_element.text

                # create a new item object
                item_data = {
                    "image_url": image_url,
                    "brand_name": brand_name,
                    "title": title,
                    "price": price,
                    "rating_stars": rating_stars,
                    "rating_reviews": rating_reviews,
                    "stock_info": stock_info
                }
                # append the new item to the list
                items.append(item_data)

              # store the scraped data in the Actor dataset
              await Actor.push_data(items)
        except Exception:
            Actor.log.exception(f"Cannot extract data from {url}.")
Step 12: Deploy to Apify
Before deploying your Actor to Apify, make sure to update the actor.json file, the Actor configuration file. This currently involves some input arguments and output specifications. You don't need any of those, so override it with the following simpler definition:
{
  "actorSpecification": 1,
  "name": "website-scraper",
  "title": "Python Scraper",
  "description": "Scraping data using HTTPX and Beautiful Soup",
  "version": "1.0",
  "meta": {
    "templateId": "python-beautifulsoup"
  },
  "dockerfile": "./Dockerfile"
}
Deploy your script to Apify with just a single command:
apify push
Log into your Apify account, and access the My Actors page. You'll now see a new Actor:
Click on it, and execute your Actor by clicking the "Start" button:
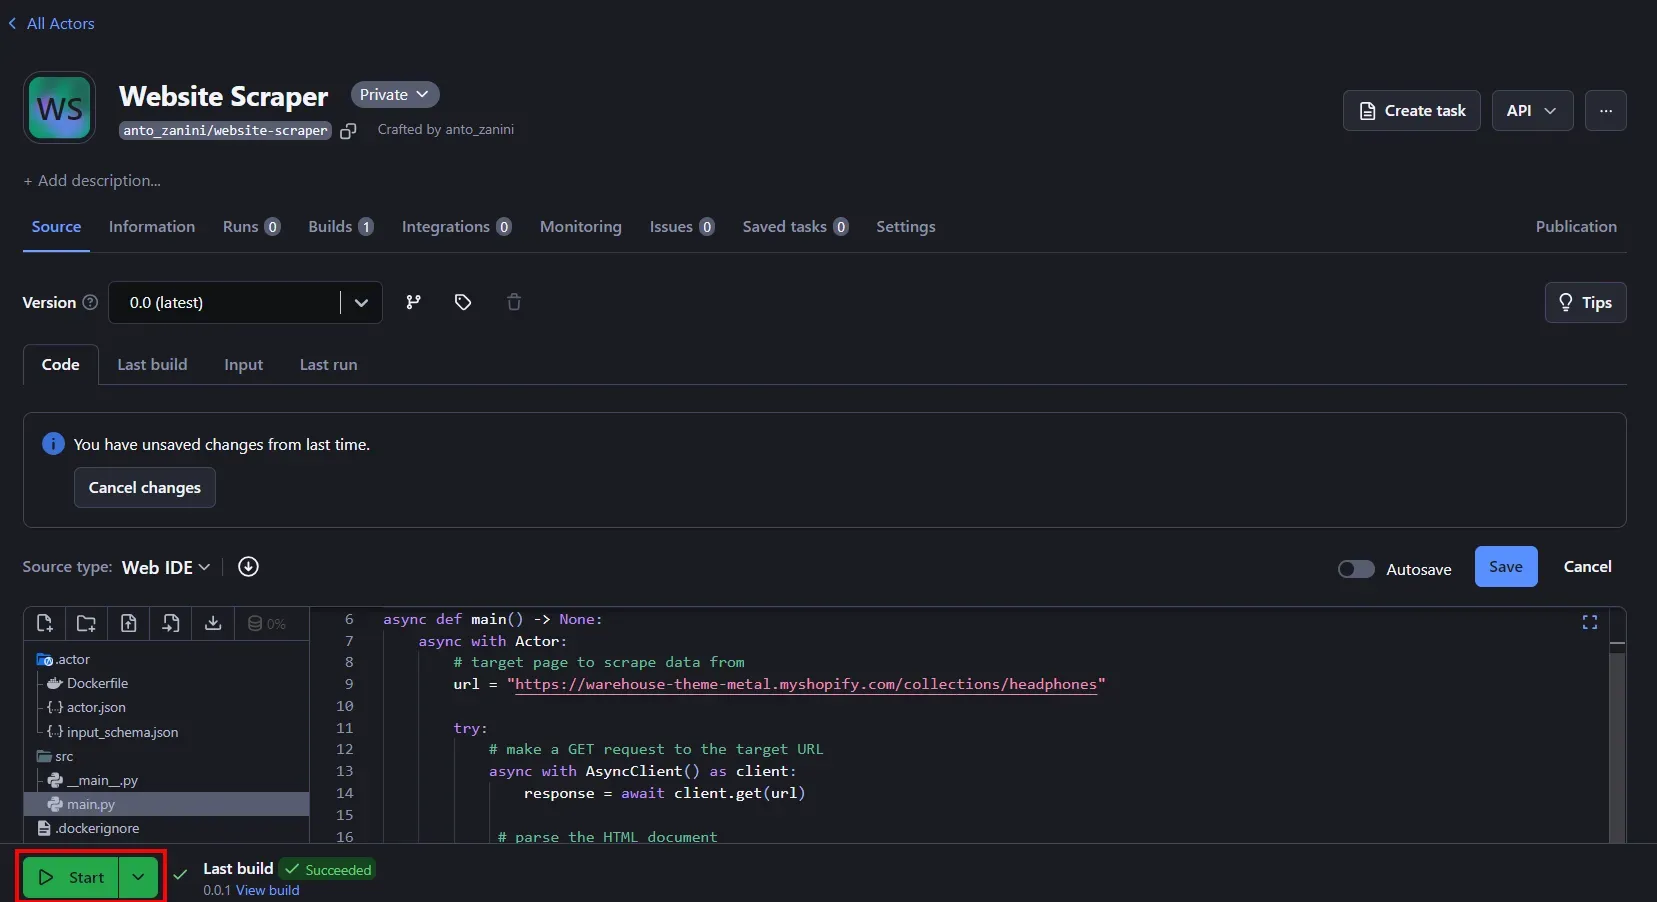
Note that you can edit the code of your Actor directly in the web IDE provided by Apify. Wait for the script execution to finish. In the "Storage" tab, you can now export the retrieved data in the format you prefer:
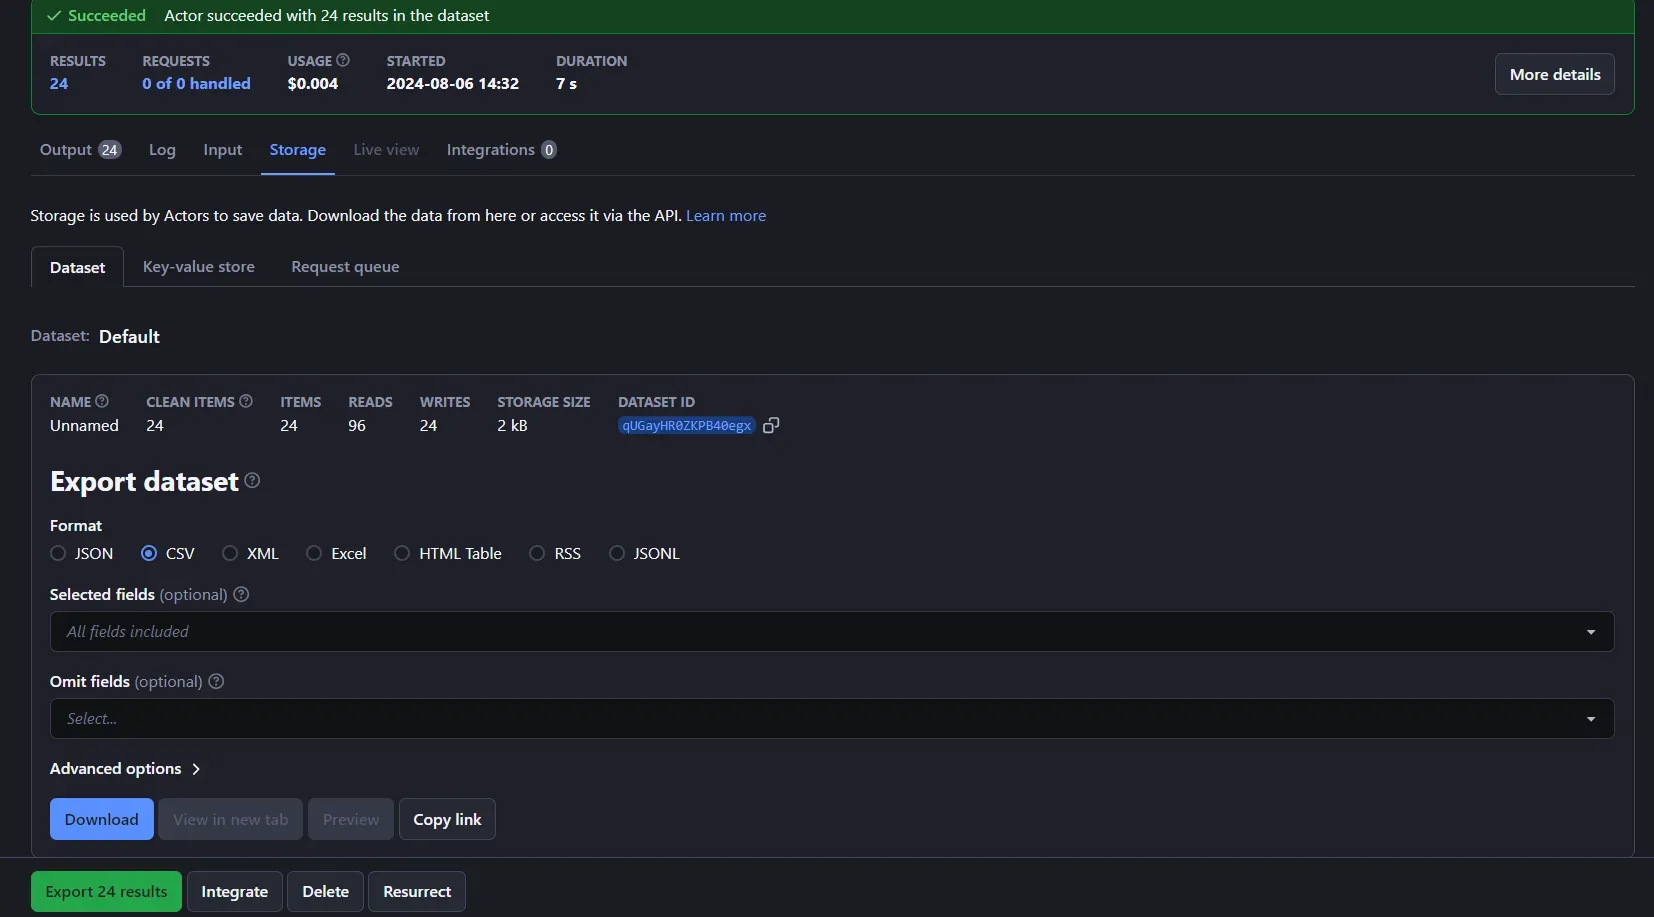
Export it to CSV and open the file in Excel. That's what you'll see:
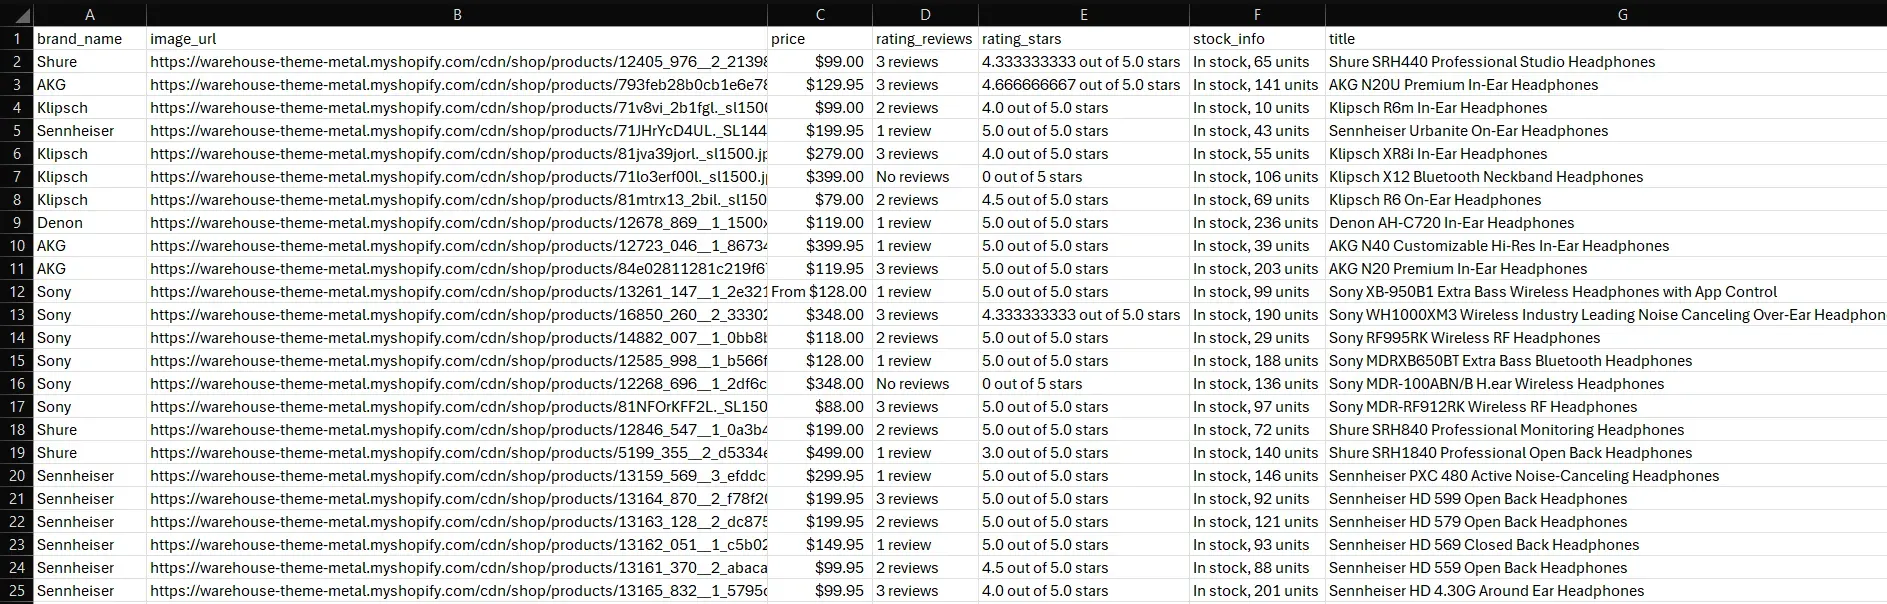
Et voilà! That is exactly the item information contained on the target page.
Next steps
This tutorial section has covered the fundamentals of how to scrape data from a website. Consider these advanced techniques to improve your script:
- Crawling: Retrieve all items of a given category by scraping data from all pagination. For more guidance, check out our guide on how to do web crawling in Python.
- URL parametrization: Customize your Actor so that it accepts the URL of the page to scrape as an input parameter.
- Proxy management: Integrate proxies into your Actor to avoid blocks and IP bans. Discover more in the official documentation.
Scraping websites without code
You just learned how to scrape a website with a Python script. While that's a great approach, it comes with some drawbacks, such as the need to keep the code up-to-date. Apify knows that struggle, which is why it comes with a store with thousands of ready-made scrapers. Currently, there are over 2,000 Actors available targeting various websites.
For example, assume you're interested in retrieving data from TripAdvisor. Typically, you would need to build a custom scraping script for that. With Apify, you can simply use an existing Actor, eliminating the need for custom development.
Visit Apify Store and search for the "tripadvisor" keyword:
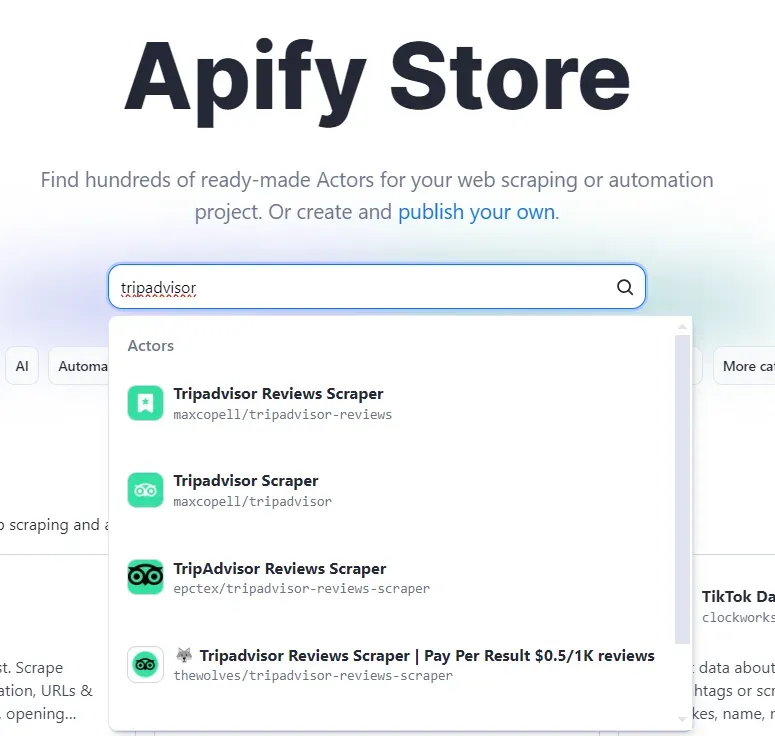
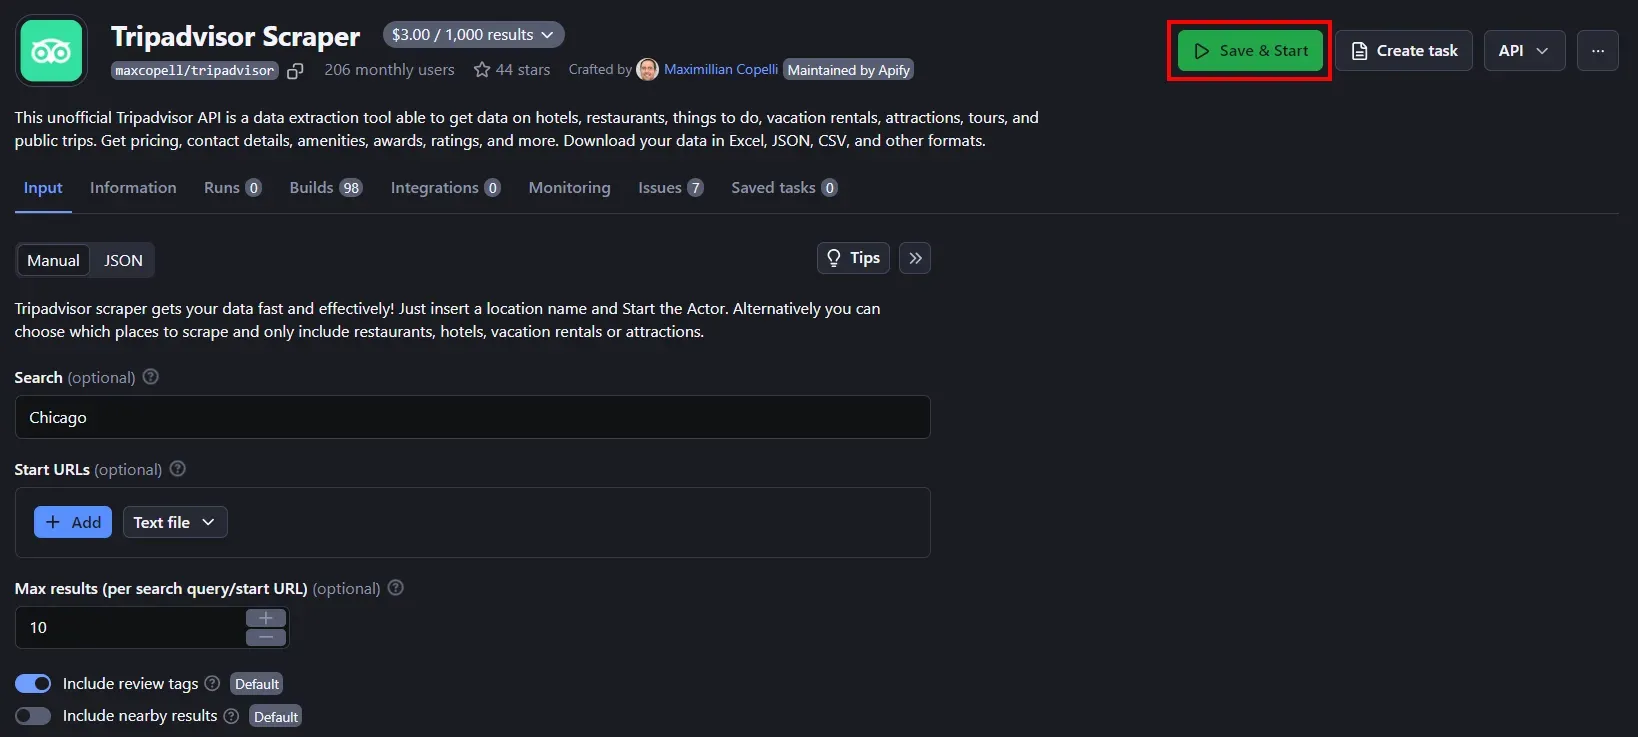
Select the "Tripadvisor Scraper" option, and on the Actor public page, click the "Try for free" button:
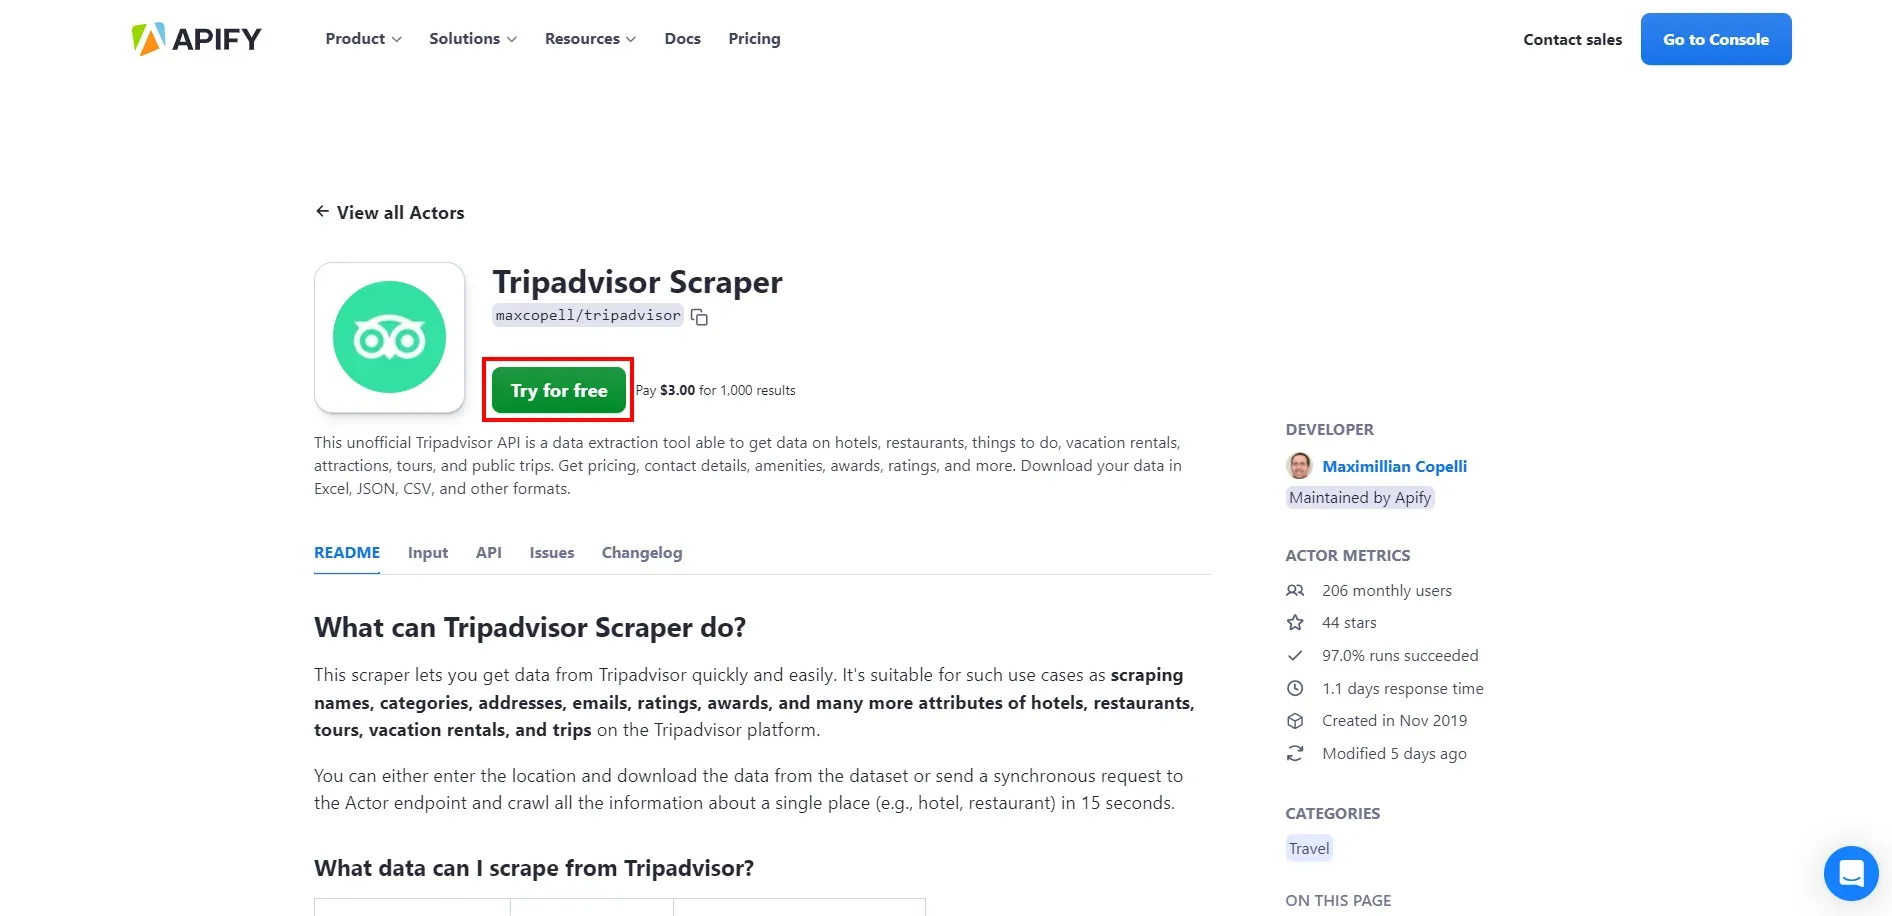
The Actor will be added to the dashboard of your personal account. Configure the Actor as desired and click "Save & Start" button to launch it:
A few seconds later, you'll see the following data:
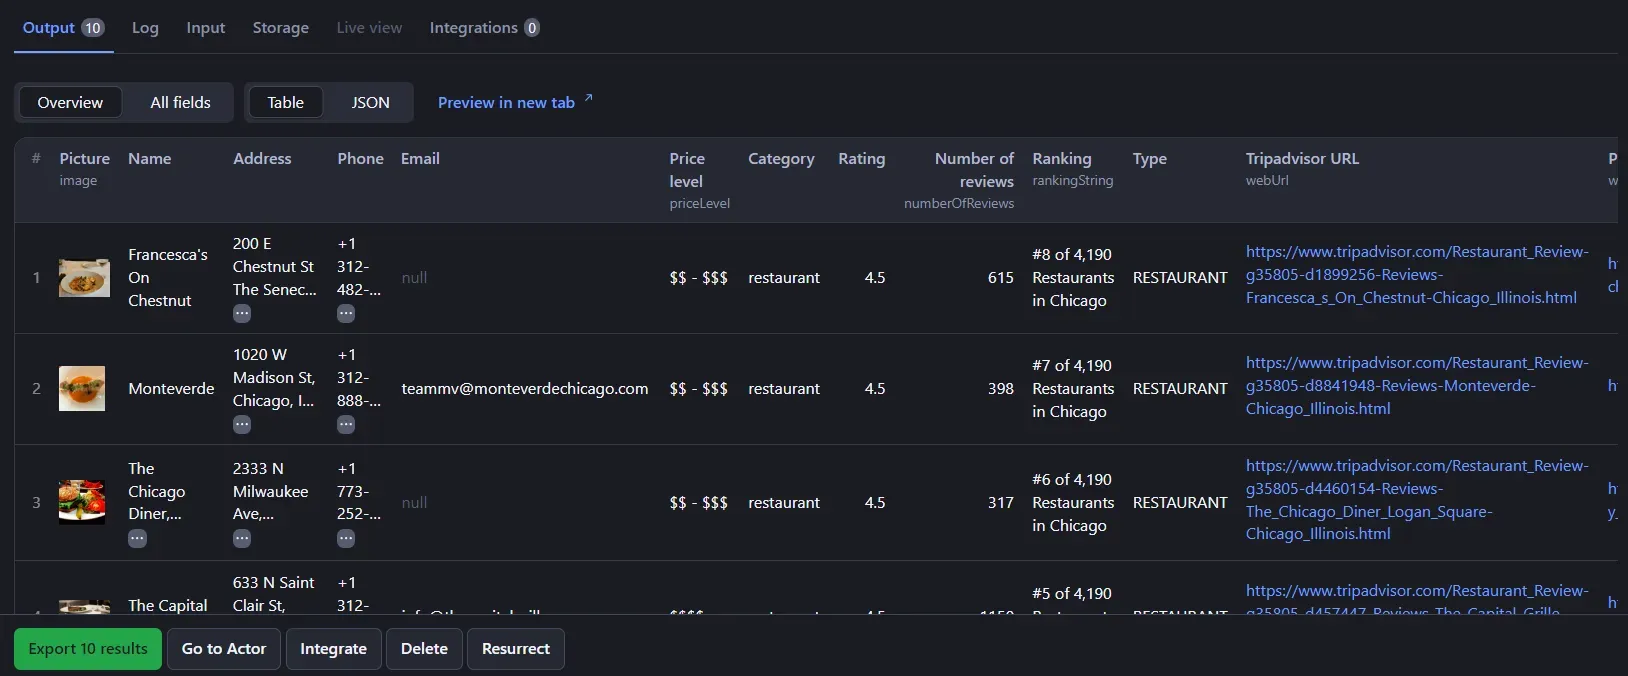
Wonderful! You just scraped data from Tripadvisor without a single line of code.
Thanks to Apify, you no longer need to be a developer to perform web scraping. However, if you're a developer, you can create useful Actors and monetize them to earn extra income.
Web scraping use cases
Web scraping is used in tons of industries as it can cover different use cases, including:
- Price monitoring: Track competitor prices to adjust your own pricing strategy in real time or monitor prices to find great deals.
- Market research: Gather data on consumer trends from social network sites for informed business decisions and sentiment analysis.
- Lead generation: Extract contact information from social media and platforms like LinkedIn for sales and marketing campaigns. This can be a crucial part of your sales enablement framework and help streamline lead generation.
- Real estate listings: Aggregate property listings from various websites for comparison or analysis.
- SEO analysis: Scrape keyword rankings, backlinks, and other SEO metrics to optimize your website's performance or track competitors.
- Job listings: Automatically retrieve job postings from multiple websites to simplify the process of finding your new job.
- News aggregation: Collect news articles from various sources for a curated newsfeed.
- Academic research: Generate large datasets from online sources for data-driven studies and analyses.
Is web scraping legal?
Yes, as long as you target public data and comply with the site's Privacy Policy and Terms and Conditions, web scraping is 100% legal. To ensure ethical scraping, make also sure to respect the rules for automated crawlers defined in the site's robots.txt file.
In general, web scraping shouldn't be confused with hacking or DDoS attacks. Retrieving public information from a site using an automated script can't be considered data stealing or a malicious action. Refer to our detailed guide for a comprehensive understanding of web scraping legality.
Deploy your scraping code to the cloud
Headless browsers, infrastructure scaling, sophisticated blocking.
Meet Apify - the full-stack web scraping and browser automation platform that makes it all easy.
Frequently asked questions
Let's answer some interesting questions on how to scrape a website.
How do I scrape a webpage?
To scrape a website, you need to:
- Retrieve the page content using an HTTP client or a browser automation tool
- Parse the HTML of the page
- Select the HTML nodes of interest and extract data from them
- Export the scraped data to a human-readable format, such as CSV or JSON
Is web scraping always free?
Yes, web scraping is free when it only involves launching a local script. At the same time, you may incur additional costs for server maintenance, deployment, and proxy integration. These extra services are required for high-volume scraping or when targeting complex sites.
Can ChatGPT do web scraping?
No, ChatGPT can't directly perform web scraping but can support you during the process of building a scraping script. It can suggest tools, provide code, and help you understand how to scrape a website. Learn more in our guide on how to use ChatGPT for web scraping.
What is the difference between web crawling and web scraping?
Web crawling is the process of following links to discover new pages, while web scraping is about extracting data from web pages. Web crawling relies on web scraping to extract the URLs from the links on a page. Web scraping uses web crawling to discover all pages to scrape. See the web crawling vs web scraping comparison.
What does it take to scrape a website?
To scrape a website, analyze if it's static or dynamic, choose appropriate tools, and write a script to fetch and parse HTML. This guide showed you how to connect to a site, extract data, and store it with Python and an Apify Actor without a single line of code.