

You’ll learn step-by-step how to create an AI agent - specifically, an Instagram analysis agent - using the CrewAI Python framework and Apify and integrate it with LLMs and web scrapers. You’ll learn how to configure tools, define prompts, make your agent public on the Apify platform, and monetize it.
The key components required are:
- Good prompts to guide the agent.
- A powerful set of tools to interact with the external world.
- A strong LLM to process and connect everything together.
- An agentic framework to handle situations where the LLM doesn't behave as expected.
- A platform to run the agent and make the solution publicly available and scalable.
What are AI agents on Apify?
AI agents are goal-oriented systems capable of making independent decisions. They interact with their environment using predefined tools and workflows to automate complex tasks.
On Apify, an AI agent is built as an Actor. These are serverless cloud programs used for web scraping, data processing, and AI deployment.
Originally, Apify was built to run scrapers in the cloud, interact with the web, and achieve predefined goals. Over time, we realized that LLMs could also follow predefined workflows. Instead of writing rigid scripts, we could dynamically define goals and equip the agent with the right tools. This is essentially how AI agents work.
Why use Apify for AI agents?
Apify provides solutions for any problem a developer might face when building an AI agent:
- Serverless execution – No infrastructure headaches.
- Stateful execution – Agents can have memory.
- Monetization options – Easily charge for usage with developer-specified events.
- Extensive tool ecosystem – Thousands of pre-existing tools (Actors) available.
- Scalability and reliability – Built for production use.
- Pre-integrated tools – Ready-to-use web scraping and automation capabilities.
In parallel, managing your storage effectively is essential for maintaining system performance while developing AI agents. This is particularly important when working on data-intensive tasks, like building and deploying AI agents, which can quickly consume significant system resources.
How to build an AI agent on Apify (step-by-step guide)
1. Define the use case
In this tutorial, we’ll build a social media analysis agent that analyzes Instagram posts based on user queries. The agent will use the Instagram Scraper Actor to extract data.
Example use case:
- Input: "Analyze the last 5 posts from @openai and @googledeepmind and summarize AI trends."
- Output: Trend analysis based on post content.
2. Define input and output
The input could be a simple URL for website content analysis, a JSON config, or a textual query from the user. The agent’s output can be either a textual response or in a structured format - both of these formats can be easily stored on the Apify platform.
Example input:
- User query (e.g., "Analyze @openai and @googledeepmind posts for AI trends")
- OpenAI model selection
Example output:
- Textual response with insights
- Data stored in an Apify Dataset
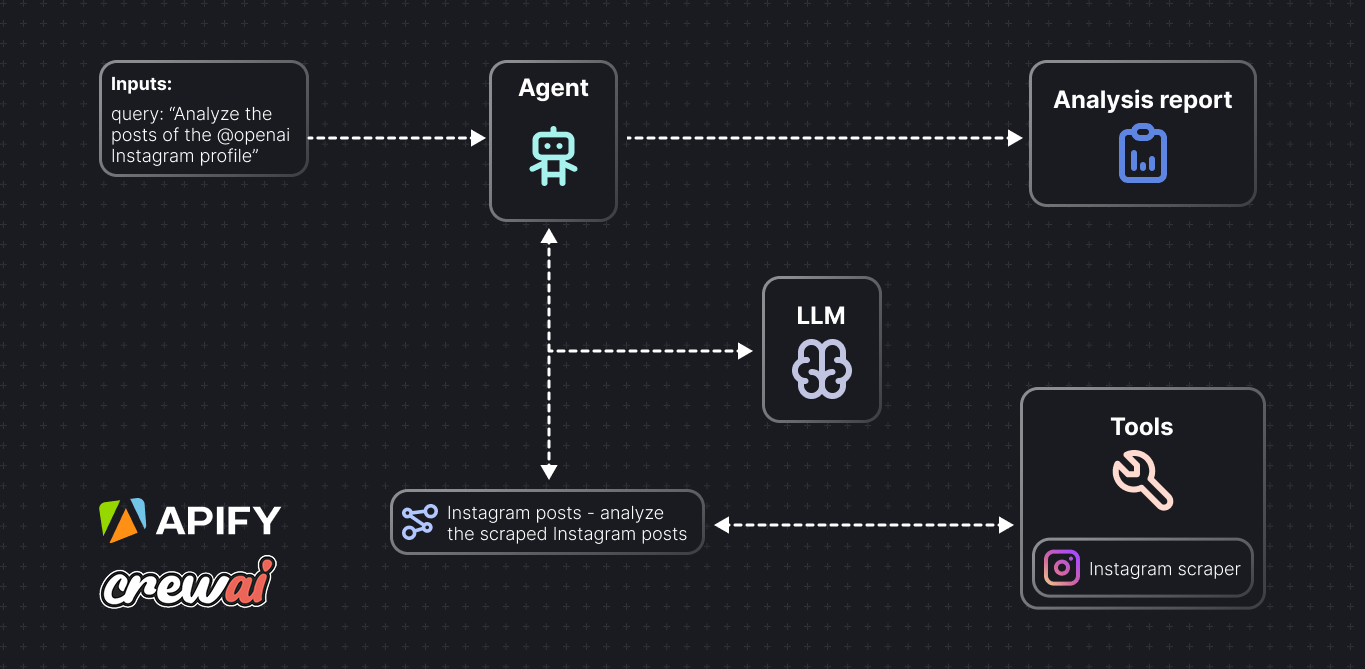
How the Instagram analysis agent works:
The agent takes a user query, runs Instagram analysis, and provides a helpful response to accomplish the task.
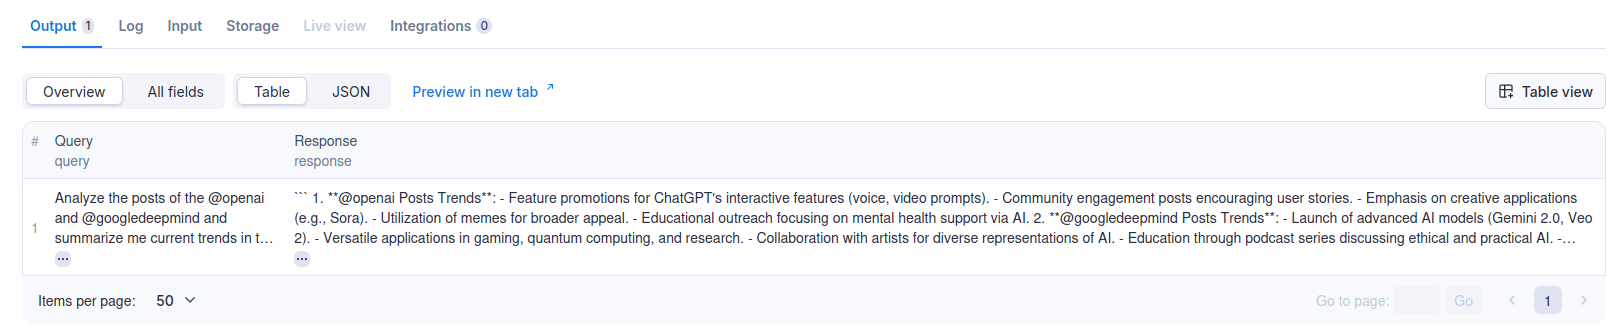
User query:
Analyze the last 5 posts of @openai and @googledeepmind and summarize me current trends in the AI.
Agent’s response:
1. **@openai Posts Trends**:
   - Feature promotions for ChatGPT's interactive features (voice, video prompts).
   - Community engagement posts encouraging user stories.
   - Emphasis on creative applications (e.g., Sora).
   - Utilization of memes for broader appeal.
   - Educational outreach focusing on mental health support via AI.

2. **@googledeepmind Posts Trends**:
   - Launch of advanced AI models (Gemini 2.0, Veo 2).
   - Versatile applications in gaming, quantum computing, and research.
   - Collaboration with artists for diverse representations of AI.
   - Education through podcast series discussing ethical and practical AI.
   - Visualizing AI to enhance public understanding and accessibility.

**Current Trends in AI**:
- Interactivity and personalization of AI tools.
- Creative integration into workflows.
- Diverse applications across various fields.
- Community engagement and collaboration.
- Education on AI implications and responsible usage.
3. Define and integrate the agent
We’ll use the CrewAI framework to define our agent and integrate it with Apify.
CrewAI simplifies defining agents, tasks, and tools, making it ideal for this use case. Apify provides a Python CrewAI template that we’ll use as a starting point.
The template includes Actor definition, monetization helper functions, and an Instagram scraping tool using the Instagram Scraper Actor.
In addition to CrewAI, Apify supports other frameworks for building AI agents, including LangGraph, LangGraph.js, LlamaIndex, PydanticAI, Smolagents, Mastra, and the BeeAI framework. You can explore these options and their templates in the Apify templates section.
4. Create an Apify Actor
Install the Apify CLI:
npm -g install apify-cli
Create a new Actor from the CrewAI template:
apify create agent-actor -t python-crewai
The template's file structure includes:
.actor/– Contains the Actor definition:.actor/actor.json– Actor definition.actor/input_schema.json– Input schema.actor/dataset_schema.json– Dataset output schema.actor/pay_per_event.json– Monetization configuration
src/– Source code:main.py– Actor execution, agent, tools, and task definition
5. Define input and output schema
This input schema lets the user define the task for the agent using the query field and specify which model to use using modelName.
Update .actor/input_schema.json to define the Actor's inputs (see input schema documentation for more details).
{
  "title": "CrewAI Agent Python",
  "type": "object",
  "schemaVersion": 1,
  "properties": {
    "query": {
      "title": "Query",
      "type": "string",
      "description": "Query for the agent.",
      "editor": "textfield",
      "prefill": "Analyze the last 5 posts from @openai and @googledeepmind and summarize AI trends."
    },
    "modelName": {
      "title": "OpenAI model",
      "type": "string",
      "description": "The OpenAI model to use. Currently supported models are gpt-4.1 and gpt-4.1-mini.",
      "enum": [
        "gpt-4.1",
        "gpt-4.1-mini"
      ],
      "default": "gpt-4.1-mini",
      "prefill": "gpt-4.1-mini"
    }
  },
  "required": ["query"]
}
After the Actor finishes its execution, it will display the query and response fields from the dataset in an overview table.
Define the output schema in .actor/dataset_schema.json (see dataset schema documentation for more details):
{
  "actorSpecification": 1,
  "views": {
    "overview": {
      "title": "Overview",
      "transformation": {
        "fields": ["query", "response"]
      },
      "display": {
        "component": "table",
        "properties": {
          "query": {
            "label": "Query",
            "format": "text"
          },
          "response": {
            "label": "Response",
            "format": "text"
          }
        }
      }
    }
  }
}
6. Choose the tools
We decided that the social media analysis agent will use the Instagram post scraper tool to get the post and analyze it.
This tool is already implemented in this template using Instagram Scraper and the Apify CrewAI Actors integration.
That is defined in src/main.py:
from crewai_tools import ApifyActorsTool

# Create a toolkit for the agent
# containing the Instagram scraper tool
tools = [ApifyActorsTool('apify/instagram-scraper')]
7. Implement the agent
Now that the required tool is defined, we can start implementing the agent.
We need to first handle the Actor input, create an actual agent with a given role, then assign the agent a task based on the user query, put the agent into a one-man crew and finally execute the crew to perform the task.
The agent is defined in src/main.py.
First, we need to handle Actor input:
actor_input = await Actor.get_input()

query = actor_input.get('query')
model_name = actor_input.get('modelName', 'gpt-4o-mini')
if not query:
    msg = 'Missing "query" attribute in input!'
    raise ValueError(msg)
Define the agent with the tools we created:
agent = Agent(
    role='Social Media Analytics Expert',
    goal='Analyze and provide insights about social media profiles and content.',
    backstory='I am an expert social media analyst specializing in Instagram analysis. I help users understand social media data and extract meaningful insights from profiles and posts.',
    tools=tools,
    verbose=True,
    llm=model_name,
)
Create a task from the user query and a crew - a collaborative group of agents working together to achieve a set of tasks:
task = Task(
    description=query,
    expected_output='A helpful response to the user query.',
    agent=agent,
)

crew = Crew(agents=[agent], tasks=[task])
actor-start and task-completed events, not on token usage.Execute the crew, handle the response, and save the response to the Apify Dataset:
crew_output = crew.kickoff()
raw_response = crew_output.raw

# Log total token usage
Actor.log.info('Total tokens used by the model: %s', crew_output.token_usage.total_tokens)

await Actor.push_data(
    {
        'query': query,
        'response': raw_response,
    }
)
Actor.log.info('Pushed the data into the dataset!')
8. Run the Actor locally
Now test the agent locally using the apify run command with the specified Actor input and environment variables set before pushing the Actor to the Apify platform.
OPENAI_API_KEY="your-openai-api-key" apify run --input '{"query": "Analyze the posts of the last 2 posts from @openai and summarize me current trends in the AI.", "modelName": "gpt-4o-mini"}'
9. Push to Apify
The next step is to deploy the agent Actor to the Apify platform - the Actor is not public after pushing: it needs to be explicitly published.
From the agent-actor directory:
apify push
In the Actor detail page (Source > Code), set the OPENAI_API_KEY environment variable as a secret and rebuild the Actor. See the guide on setting environment variables for detailed instructions.

10. Test the agent
Run the agent with this sample query:
Analyze the last 5 posts of the @openai and @googledeepmind and summarize me current trends in the AI.
Result stored in an Apify dataset:
The agent may fail to call the tool, or the scraper itself may fail to scrape Instagram. In that case, be sure to check the Actor run logs or runs triggered on your Apify account to see if the Instagram scraper was started and finished successfully. You can do that here.
We’ve shown you how to build an AI agent and deploy it to the Apify platform. But there’s more you can do. You can also make money from the agents you publish on Apify Store. That’s what we’ll go through now.
How to monetize your AI agent
Apify’s pay-per-event (PPE) pricing model allows you to charge users based on specific events triggered by your agent (e.g., Actor start, task completed, token usage, …) through the API or SDKs (JS/Python).
Unlike traditional platform usage billing (e.g., compute units or storage), PPE lets you define custom events that align with your Actor, giving you more control over the monetization.
1. Define what the agent will charge for
With PPE, you define the event that the user will be charged for and set its price. For example:
- Actor start: Charge when the Actor begins running, based on resources like memory.
- Task completion: Charge when the agent finishes analyzing Instagram posts.
- Custom events: Charge for specific actions, like calling an external API or processing a certain number of posts.
Users pay for these events. The flexibility of PPE is ideal for Actors like AI agents where the output matters, not the runtime.
Here’s a more specific example. The event below marks the completion of a task - in this case, a summary of website content:
{
  "task-completed": {
      "eventTitle": "Task completed",
      "eventDescription": "Flat fee for each completed task.",
      "eventPriceUsd": 0.4
  }
}
2. Charge for events in code
Once the event is defined, you can charge for the event in your code:
# Charging for 5 tasks completed (total price will be 0.4 * 5 = 2$)
await Actor.charge('task-completed', count=5)
When the Actor.charge() function is called, the user running the Actor will be charged for the specified event.
3. Enable PPE in the Actor settings
Choose the pay-per-event monetization model in the Actor's monetization settings (follow the pay-per-event pricing model documentation) and define the events from the pay_per_event.json file if you want to charge on a per task completed basis.
Feel free to define custom events based on your needs. Example:
{
    "actor-start": {
        "eventTitle": "Actor start",
        "eventDescription": "Flat fee for starting an Actor run.",
        "eventPriceUsd": 0.1
    },
    "task-completed": {
        "eventTitle": "Price for completing the task",
        "eventDescription": "Flat fee for completing the task.",
        "eventPriceUsd": 0.4
    }
}
To charge for the Actor start:
# Charge for Actor start
await Actor.charge('actor-start')

# Handle input
actor_input = await Actor.get_input()
To charge for the task completed after the response is generated:
crew_output = crew.kickoff()
raw_response = crew_output.raw

# Log total token usage
Actor.log.info('Total tokens used by the model: %s', crew_output.token_usage.total_tokens)

# Charge for task completion
await Actor.charge("task-completed")
4. Publish the agent
Now that you’ve set the pricing, you’re ready to publish your Actor. Here’s a helpful checklist before you do that:
- Update README with usage instructions (you can follow the Actor README documentation).
- Validate
input_schema.json(input schema documentation) anddataset_schema.json(dataset schema documentation). - Verify if the
OPENAI_API_KEYenvironment variable is set. - Check the monetization settings on the Actor publication page.
- Test the Actor thoroughly.
- Make the Actor public.
Once published, don’t forget to maintain your Actor and check for issues.

Ready to build your AI agent?
With Apify and CrewAI, you have everything you need to turn your ideas into powerful, scalable solutions - no server management required!
Here are a few pointers to get you started on creating your first agent:
- Start with the CrewAI template: Jump straight into action with the Python CrewAI template. It's pre-configured with the essentials—like Instagram scraping and monetization helpers—so you can focus on crafting your agent's unique abilities. Run
apify create agent-actor -t python-crewaiand start experimenting today! - Try other AI templates: Not feeling the CrewAI vibe? Explore a variety of AI-focused templates on the Apify templates page. From LangGraph to LlamaIndex setups, there's a starting point for every vision.
- Explore existing AI agents: Need inspiration or a ready-made solution? Check out the AI Agents collection on Apify Store. Test drive some LangGraph-based agents, see how others have tackled real-world problems, and adapt their approaches to your own projects.
- Publish and profit: Once your agent is ready, push it to the Apify platform with
apify pushand enable monetization. Turn your hard work into a revenue stream. Whether it's for personal projects or a side hustle, Apify makes it easy to share and earn.
AI agents on Apify
For inspiration, check out these AI agents available on Apify Store:
- Market Expansion Agent - analyzes Google Maps & social media data to map competitors, find market gaps, and suggest 1-3 optimal locations for your new business.
- Influencer Discovery Agent - finds and evaluates TikTok influencers that match your specific criteria.
- Competitive Intelligence Agent - generates competitive intelligence reports by analyzing Google Maps and social media data.
- Local Lead Generation Agent - finds local leads by scraping Instagram profiles based on search queries.
- Comments Analyzer Agent - helps you understand how audiences react to social media posts by analyzing comments for sentiment, and flags potentially harmful content.
More about AI agents
- AI agent workflow - building an agent to query Apify datasets - Learn how to extract insights from datasets using simple natural language queries without deep SQL knowledge or external data exports.
- AI agent orchestration with OpenAI Agents SDK - Learn to build an effective multiagent system with AI agent orchestration.
- 11 AI agent use cases (on Apify) - 10 practical applications for AI agents, plus one meta-use case that hints at the future of agentic systems.
- Agentic commerce and the AI economy stack: Learn more about infrastructure for autonomous payments.
- How to build and deploy MCP servers in minutes with a TypeScript template - Transform any stdio MCP server into a scalable, cloud-hosted service.
- Best MCP servers for developers - 7 of the best servers to automate repetitive tasks, improve development workflow, and increase productivity.
- The state of MCP - The latest developments in Model Context Protocol and solutions to key industry challenges.
- How to use MCP with Apify Actors - Learn how to expose over 5,000 Apify Actors to AI agents like Claude and LangGraph, and configure MCP clients and servers.
- 10 best AI agent frameworks - 5 paid platforms and 5 open-source options for building AI agents.
- What are AI agents? - The Apify platform is turning the potential of AI agents into practical solutions.
- AI agent architecture in 1,000 words - A comprehensive overview of AI agents' core components and architectural types.
- 7 real-world AI agent examples in 2025 you need to know - From goal-based assistants to learning-driven systems, these agents are powering everything from self-driving cars to advanced web automation.
- LLM agents: all you need to know in 2025 - LLM agents are changing how we approach AI by enabling interaction with external sources and reasoning through complex tasks.
- 7 types of AI agents you should know about - What defines an AI agent? We go through the agent spectrum, from simple reflexive systems to adaptive multi-agent networks.