In this guide, you’ll learn how to use Scrapy step-by-step, from setting up basic spiders to scrape single pages to creating more advanced spiders like CrawlSpider and SitemapSpider for larger, more complex projects.
Scrapy is an open-source web scraping framework for Python, built for high performance and scalability. It can be seen as a more powerful alternative to BeautifulSoup, especially for projects that require complex scraping, customization, and handling large-scale data extraction that would be difficult to manage with BeautifulSoup.
What sets Scrapy apart is its use of specialized spiders that can handle different types of scraping tasks, middleware to extend its capabilities and the ease of exporting data into various formats.
Run your Scrapy spiders on Apify
Run, monitor, schedule, and scale your spiders in the cloud.
Prerequisites and how to set up Scrapy
Before you can start using Scrapy, there are a few things you’ll need to ensure that you have installed on your computer. Here’s a step-by-step guide to help you get started.
First, you need to have Python and pip.
-
Python: You need to have Python 3.6+ installed on your machine. You can check if Python is installed by running:
python --versionIf you don't have Python installed, download it from the official website.
-
pip: Make sure you have
pipinstalled, as this will help you install Scrapy. You can check this by running:pip --version
After that, you need a folder for your project. Create a directory where you want your Scrapy project to live.
mkdir scrapy-project
cd scrapy-project
Now, you want to set up a virtual environment. While this step is optional, it’s highly recommended because using a virtual environment keeps your project’s dependencies well organized and isolated from other projects.
-
For MacOS/Linux:
-
Run the following command to create a virtual environment:
python3 -m venv venv -
Activate the virtual environment:
source venv/bin/activate
-
-
For Windows:
-
Run the following command to create a virtual environment:
python -m venv venv -
Activate the virtual environment:
venv\\Scripts\\activate
-
With your virtual environment activated, install Scrapy by running:
pip install scrapy
Now, to create a new Scrapy project, use the following command:
scrapy startproject scrapy_demo
This will create a folder called scrapy_demo with all the necessary files and structure for your Scrapy project.
And finally, once your project is initialized, navigate into the project folder:
cd scrapy_demo
To ensure everything is working, run:
scrapy
You should see Scrapy’s help menu appear, which means you're all set to start scraping with Scrapy.
Web scraping with Scrapy
One of the key features of Scrapy is the ability to create different types of spiders. Spiders are the backbone of Scrapy and are responsible for parsing websites and extracting data. That's why our first step will be to create a Spider.
1. Creating a Spider
Now that we have a Scrapy project set up, we can create a spider to scrape data from a website, for example, HackerNews. To create a new spider, use the terminal window in your project directory to run the following command:
scrapy genspider hackernews news.ycombinator.com
This command will create a Basic Spider, which is the simplest type of spider and is used for extracting data from a single page or a small set of pages.
You can check the newly created spider by opening the hackernews_spider.py file in the spiders directory of your project. There you’ll see a basic template for a Scrapy Spider.
# spiders/hackernews.py

from scrapy import Spider

class HackernewsSpider(Spider):
    name = 'hackernews'
    allowed_domains = ['news.ycombinator.com']
    start_urls = ['<https://news.ycombinator.com>']

    def parse(self, response):
        pass
Before we move on, let’s quickly break down what we’re seeing:
nameattribute is the name of the Spider.allowed_domainsattribute is a list of domains that the Spider is allowed to scrape.start_urlsattribute is a list of URLs that the Spider should start scraping fromparsemethod is the method that Scrapy calls to handle the response from each URL in thestart_urlslist.
Cool, now for the fun part. Let's find the elements we want to scrape and then add some code to the parse method to scrape the data we want.
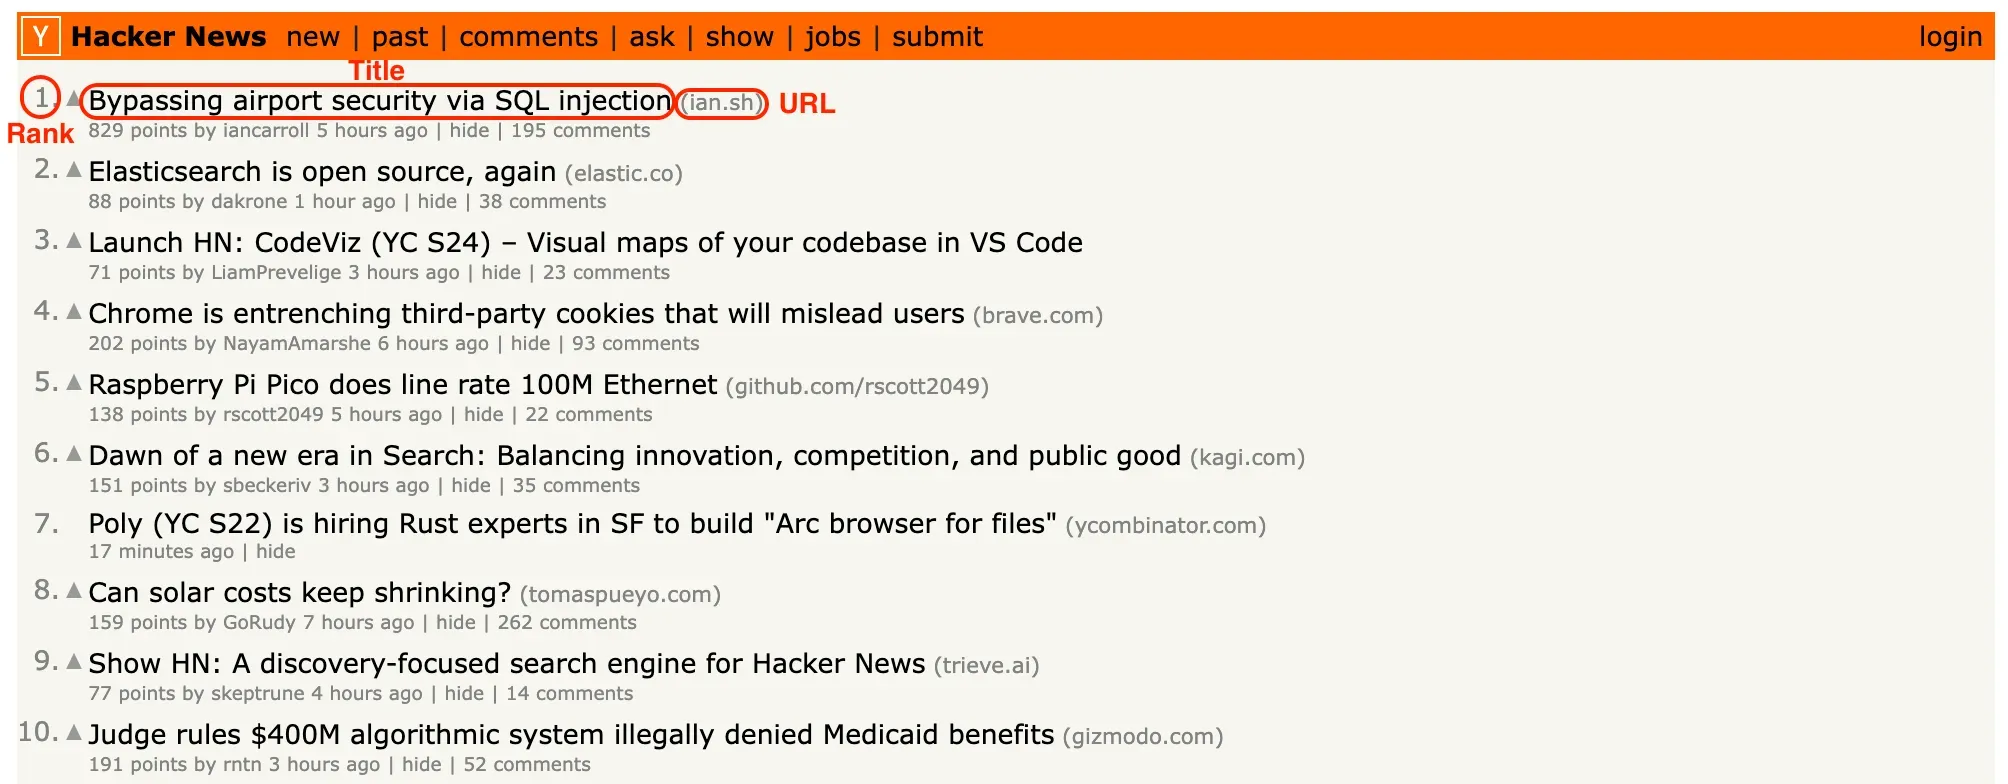
2. Finding elements you want to scrape
We’ll be scraping HackerNews, and our goal is to extract the rank, title, and URL of each post on the first page. I’ll assume you’re already familiar with using Developer Tools to find the CSS selectors for these elements, so I won’t cover that in this guide. If you need help with DevTools, you can check out the “Starting with browser DevTools" tutorial.
3. Scraping data from a page
With the right selectors ready, you can accomplish the task in just a few lines of code within the parse function.
# spiders/hackernews.py

from scrapy import Spider

class HackernewsSpider(Spider):
    name = 'hackernews'
    allowed_domains = ['news.ycombinator.com']
    start_urls = ['<https://news.ycombinator.com>']

    def parse(self, response):
        articles = response.css('tr.athing')
        for article in articles:
            yield {
                'URL': article.css('.titleline a::attr(href)').get(),
                'title': article.css('.titleline a::text').get(),
                'rank': article.css('.rank::text').get().replace('.', ''),
            }
In this code, we use the css method to extract data from the response. We select all the articles on the page using the CSS selector tr.athing, and then extract the title, URL, and rank for each article using more specific selectors. Finally, we use the yield keyword to return a Python dictionary with the scraped data. You can use the command below to run the spider:
scrapy crawl hackernews
By default, the data is printed in the console, but you can also export it to formats like JSON or CSV, which we'll cover later in the article.
4. Extracting data from multiple pages
So far, we've scraped data from a single page using a basic Spider. While we could write code to navigate through the remaining pages and scrape all the articles on HackerNews with the basic Spider, Scrapy provides a more efficient option: the CrawlSpider. Let's go ahead and create a new CrawlSpider.
scrapy genspider -t crawl hackernews_crawl <https://news.ycombinator.com>
This command generates a new spider called hackernews_crawl in the same spiders directory where the basic spider was located.
Essentially, a CrawlSpider is more advanced type of spider that is used for extracting data from multiple pages or entire websites. CrawlSpider automatically follows links and extracts data from each page it visits. After running the command, you will have a spider template similar to the one below:
import scrapy
from scrapy.linkextractors import LinkExtractor
from scrapy.spiders import CrawlSpider, Rule

class HackernewsCrawlSpider(CrawlSpider):
    name = "hackernews_crawl"
    allowed_domains = ["news.ycombinator.com"]
    start_urls = ["<https://news.ycombinator.com>"]

    rules = (Rule(LinkExtractor(allow=r"Items/"), callback="parse_item", follow=True),)

    def parse_item(self, response):
        item = {}
        #item["domain_id"] = response.xpath('//input[@id="sid"]/@value').get()
        #item["name"] = response.xpath('//div[@id="name"]').get()
        #item["description"] = response.xpath('//div[@id="description"]').get()
        return item
Our goal now is to extract the same data from each article we scraped before: URL, title, and rank. This time, though, we’ll set up rules for the scraper to follow as it navigates through the website. For example, we'll define a rule to tell the scraper how to find the right links to move through the pages of HackerNews.
Here’s what the final code will look like:
# spiders/hackernews_crawl.py

from scrapy.spiders import CrawlSpider, Rule
from scrapy.linkextractors import LinkExtractor

class HackernewsCrawlSpider(CrawlSpider):
    name = 'hackernews_crawl'
    allowed_domains = ['news.ycombinator.com']
    start_urls = ['<https://news.ycombinator.com/news>']

    custom_settings = {
        'DOWNLOAD_DELAY': 1  # Add a 1-second delay between requests
    }

    # Define a rule that should be followed by the link extractor.
    # In this case, Scrapy will follow all the links with the "morelink" class
    # And call the "parse_article" function on every crawled page
    rules = (
        Rule(
            LinkExtractor(allow=[r'news\\\\.ycombinator\\\\.com/news$']),
            callback='parse_article',
        ),
        Rule(
            LinkExtractor(restrict_css='.morelink'),
            callback='parse_article',
            follow=True,
        ),
    )

    # When using the CrawlSpider we cannot use a parse function called "parse".
    # Otherwise, it will override the default function.
    # So, just rename it to something else, for example, "parse_article"
    def parse_article(self, response):
        for article in response.css('tr.athing'):
            yield {
                'URL': article.css('.titleline a::attr(href)').get(),
                'title': article.css('.titleline a::text').get(),
                'rank': article.css('.rank::text').get().replace('.', ''),
            }
You may notice that some parts of this code were already generated by the CrawlSpider, while other parts are very similar to what we did when writing the basic Spider.
The first thing that stands out is the custom_settings attribute. We added this to introduce a 1-second delay between requests. Since we’re now sending multiple requests to scrape different pages, this delay helps avoid overwhelming the website with too many requests at once.
Next, we set up a set of rules in the rules attribute to guide the scraper:
    rules = (
        Rule(
            LinkExtractor(allow=[r'news\\\\.ycombinator\\\\.com/news$']),
            callback='parse_article',
        ),
        Rule(
            LinkExtractor(restrict_css='.morelink'),
            callback='parse_article',
            follow=True,
        ),
    )
Each rule is created using the Rule class, which takes two key arguments: a LinkExtractor to define which links to follow, and a callback function to handle the response. In this case, we have two rules:
• First rule: This uses a LinkExtractor with the allow parameter to target URLs ending with “news.ycombinator.com/news.” This catches the first page of Hacker News articles. The callback function parse_article is called to process the response.
• Second rule: This uses LinkExtractor with the restrict_css parameter, targeting links with the class morelink (the “More” button). We again use parse_article as the callback and set follow=True, so the scraper follows these links to the next page.
Finally, we define the parse_article function, which takes the response object from each page and processes it:
    def parse_article(self, response):
        for article in response.css('tr.athing'):
            yield {
                'URL': article.css('.titleline a::attr(href)').get(),
                'title': article.css('.titleline a::text').get(),
                'rank': article.css('.rank::text').get().replace('.', ''),
            }
Here, yield is used instead of return to enable Scrapy to gradually return scraped data as you go.
We also named the function parse_article instead of the default parse. This is important because CrawlSpider uses parse for its own internal handling, and overwriting it could cause issues. By giving it a different name like parse_article, we avoid that problem and keep our code working smoothly.
5. Exporting scraped data
As we saw in the first spider, Scrapy’s automatically prints data to the console. But you can also export the data to formats like JSON, CSV, or XML by specifying the format when you run the scraper. For example, to save the data as a JSON file, you would run:
scrapy crawl hackernews -o hackernews.json
This will save the scraped data to a file called hackernews.json in your project’s root directory. You can easily export to other formats by changing the file extension (e.g., -o hackernews.csv for CSV format).
6. Extending Scrapy with Middlewares 🔗
Middlewares in Scrapy allow us to add extra functionality to our scraping process. Scrapy comes with several built-in middlewares ready to use, but we can also create custom ones to handle tasks like modifying request headers, logging, or managing exceptions. Let’s look at some commonly used Scrapy middlewares:
- UserAgentMiddleware:
This middleware helps set a custom User-Agent header for each request, which can prevent websites from detecting and blocking scraping bots. To use it, add the following to your settings.py file:
# settings.py

DOWNLOADER_MIDDLEWARES = {
    'scrapy.downloadermiddlewares.useragent.UserAgentMiddleware': 500,
}
Here, we set the priority to 500 to ensure it runs before other middlewares. By default, this middleware randomly assigns a User-Agent string, but you can customize it by setting the USER_AGENT option in your settings.
- RetryMiddleware:
This middleware retries requests that fail due to specific HTTP status codes (e.g., 500, 503, etc.) or when an exception is raised. To use it with its default settings, add it to your settings.py:
# settings.py

DOWNLOADER_MIDDLEWARES = {
    'scrapy.downloadermiddlewares.retry.RetryMiddleware': 550,
}
You can also tweak the retry settings using RETRY_TIMES and RETRY_HTTP_CODES.
- HttpProxyMiddleware:
This middleware lets you route requests through proxies, which helps you avoid detection or bypass IP rate limits. To enable it, add the following to your settings:
# settings.py

DOWNLOADER_MIDDLEWARES = {
    'scrapy.downloadermiddlewares.httpproxy.HttpProxyMiddleware': 110,
    'myproject.middlewares.ProxyMiddleware': 100,
}

PROXY_POOL_ENABLED = True
This setup enables HttpProxyMiddleware and a custom ProxyMiddleware to randomly select proxies from a pool you provide.
These are just a few examples of how middleware can enhance Scrapy’s functionality. The best part is that you can write custom middleware to add even more features tailored to your specific needs.
☁️ Deploying Scrapy spiders to the cloud
Next, we’ll learn how to deploy Scrapy Spiders to the cloud using Apify. This allows us to configure them to run on a schedule and access many other useful features of the Apify platform.
To demonstrate, we’ll use the Apify SDK for Python and Apify CLI. Part of the CLI is a feature for wrapping Scrapy projects into Apify Actors (see the docs). Actors are serverless applications that can be run, scheduled, and monitored on the Apify platform. We're going to use it to run our CrawlSpider Hacker News scraper. Let's get started.
Installing the Apify CLI
To start working with the Apify CLI, we need to install it first. There are two ways to do this: via the Homebrew package manager on macOS or Linux or via the Node.js package manager (NPM).
Via homebrew
On macOS (or Linux), you can install the Apify CLI via the Homebrew package manager.
brew install apify/tap/apify-cli
Via NPM
Install or upgrade the Apify CLI by running:
npm -g install apify-cliActorizing the Scrapy project
Once you have the Apify CLI installed on your computer, simply go to the directory with your Scrapy project (hackernews_scraper/ in our case), and run the following command in the terminal:
apify initThen, go ahead and specify the Scrapy BOT_NAME, the path to the spiders' directory, and pick one of the spiders you want to Actorize.
$ apify init
Info: The current directory looks like a Scrapy project. Using automatic project wrapping.
? Enter the Scrapy BOT_NAME (see settings.py): hackernews_scraper
? What folder are the Scrapy spider modules stored in? (see SPIDER_MODULES in settings.py): hackernews_scraper.spiders
? Pick the Scrapy spider you want to wrap: HackernewsCrawlSpider (/.../hackernews_scraper/spiders/hackernews_crawl.py)
Info: Downloading the latest Scrapy wrapper template...
Info: Wrapping the Scrapy project...
Success: The Scrapy project has been wrapped successfully.
This command will create a new folder named .actor/, where the Actor metadata is stored, and Python files __main__.py and main.py to your project. You can check them and update their content if you need to, but make sure you know what you're doing. Also, a new file with Python requirements has been added requirements_apify.txt, make sure to install them.
pip install -r requirements_apify.txtThis will install Apify Python SDK and other dependencies that are necessary for running the Apify Actor.
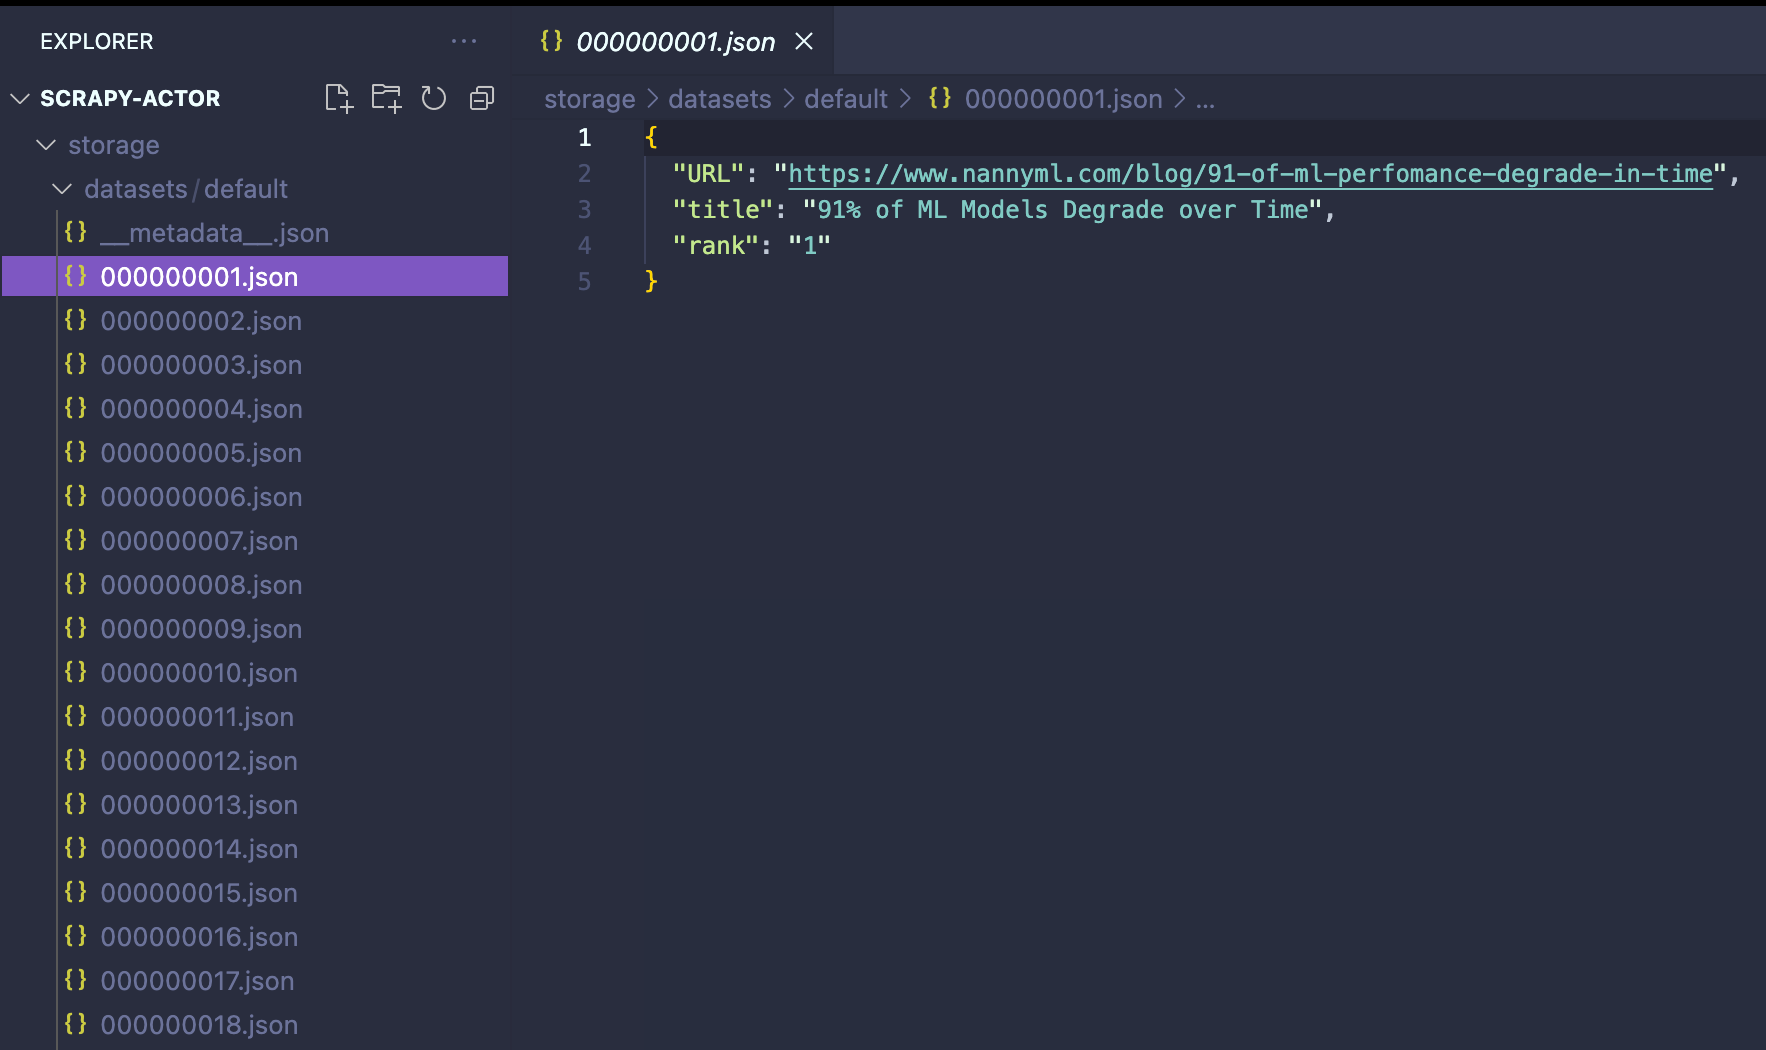
Running the Actor locally
Great! Now we're ready to run our Scrapy Actor. To do so, let’s type the command apify run in our terminal. After a few seconds, the storage/datasets will be populated with the scraped data from Hacker News.
Deploying the Actor to Apify
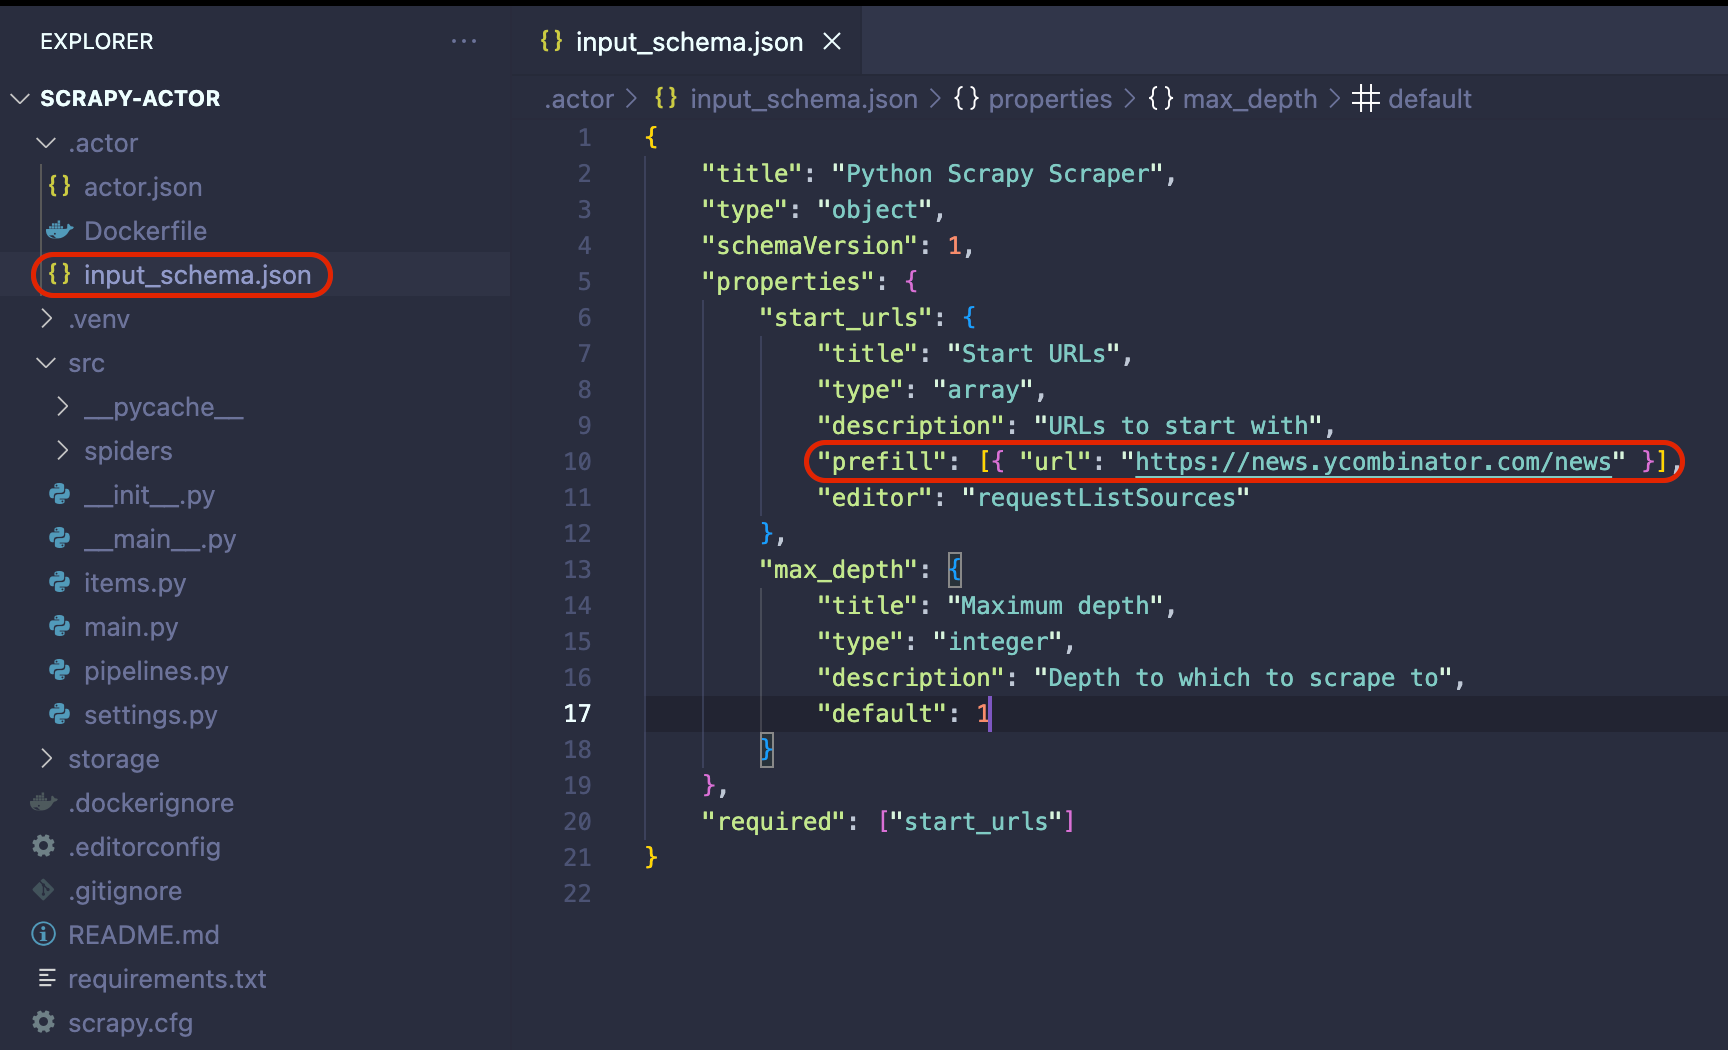
Before deploying the Actor to Apify, we need to make one final adjustment. Go to .actor/input_schema.json and change the prefill URL to https://news.ycombinator.com/news. This change is important when running the scraper on the Apify platform.
Now that we know that our Actor is working as expected, it is time to deploy it to the Apify platform. You will need to sign up for a free Apify account to follow along.
Once you have an Apify account, run the command apify login in the terminal. You will be prompted to provide your Apify API Token. Which you can find in Apify Console under Settings → Integrations.
The final step is to run the apify push command. This will start an Actor build, and after a few seconds, you should be able to see your newly created Actor in Apify Console under Actors → My actors.
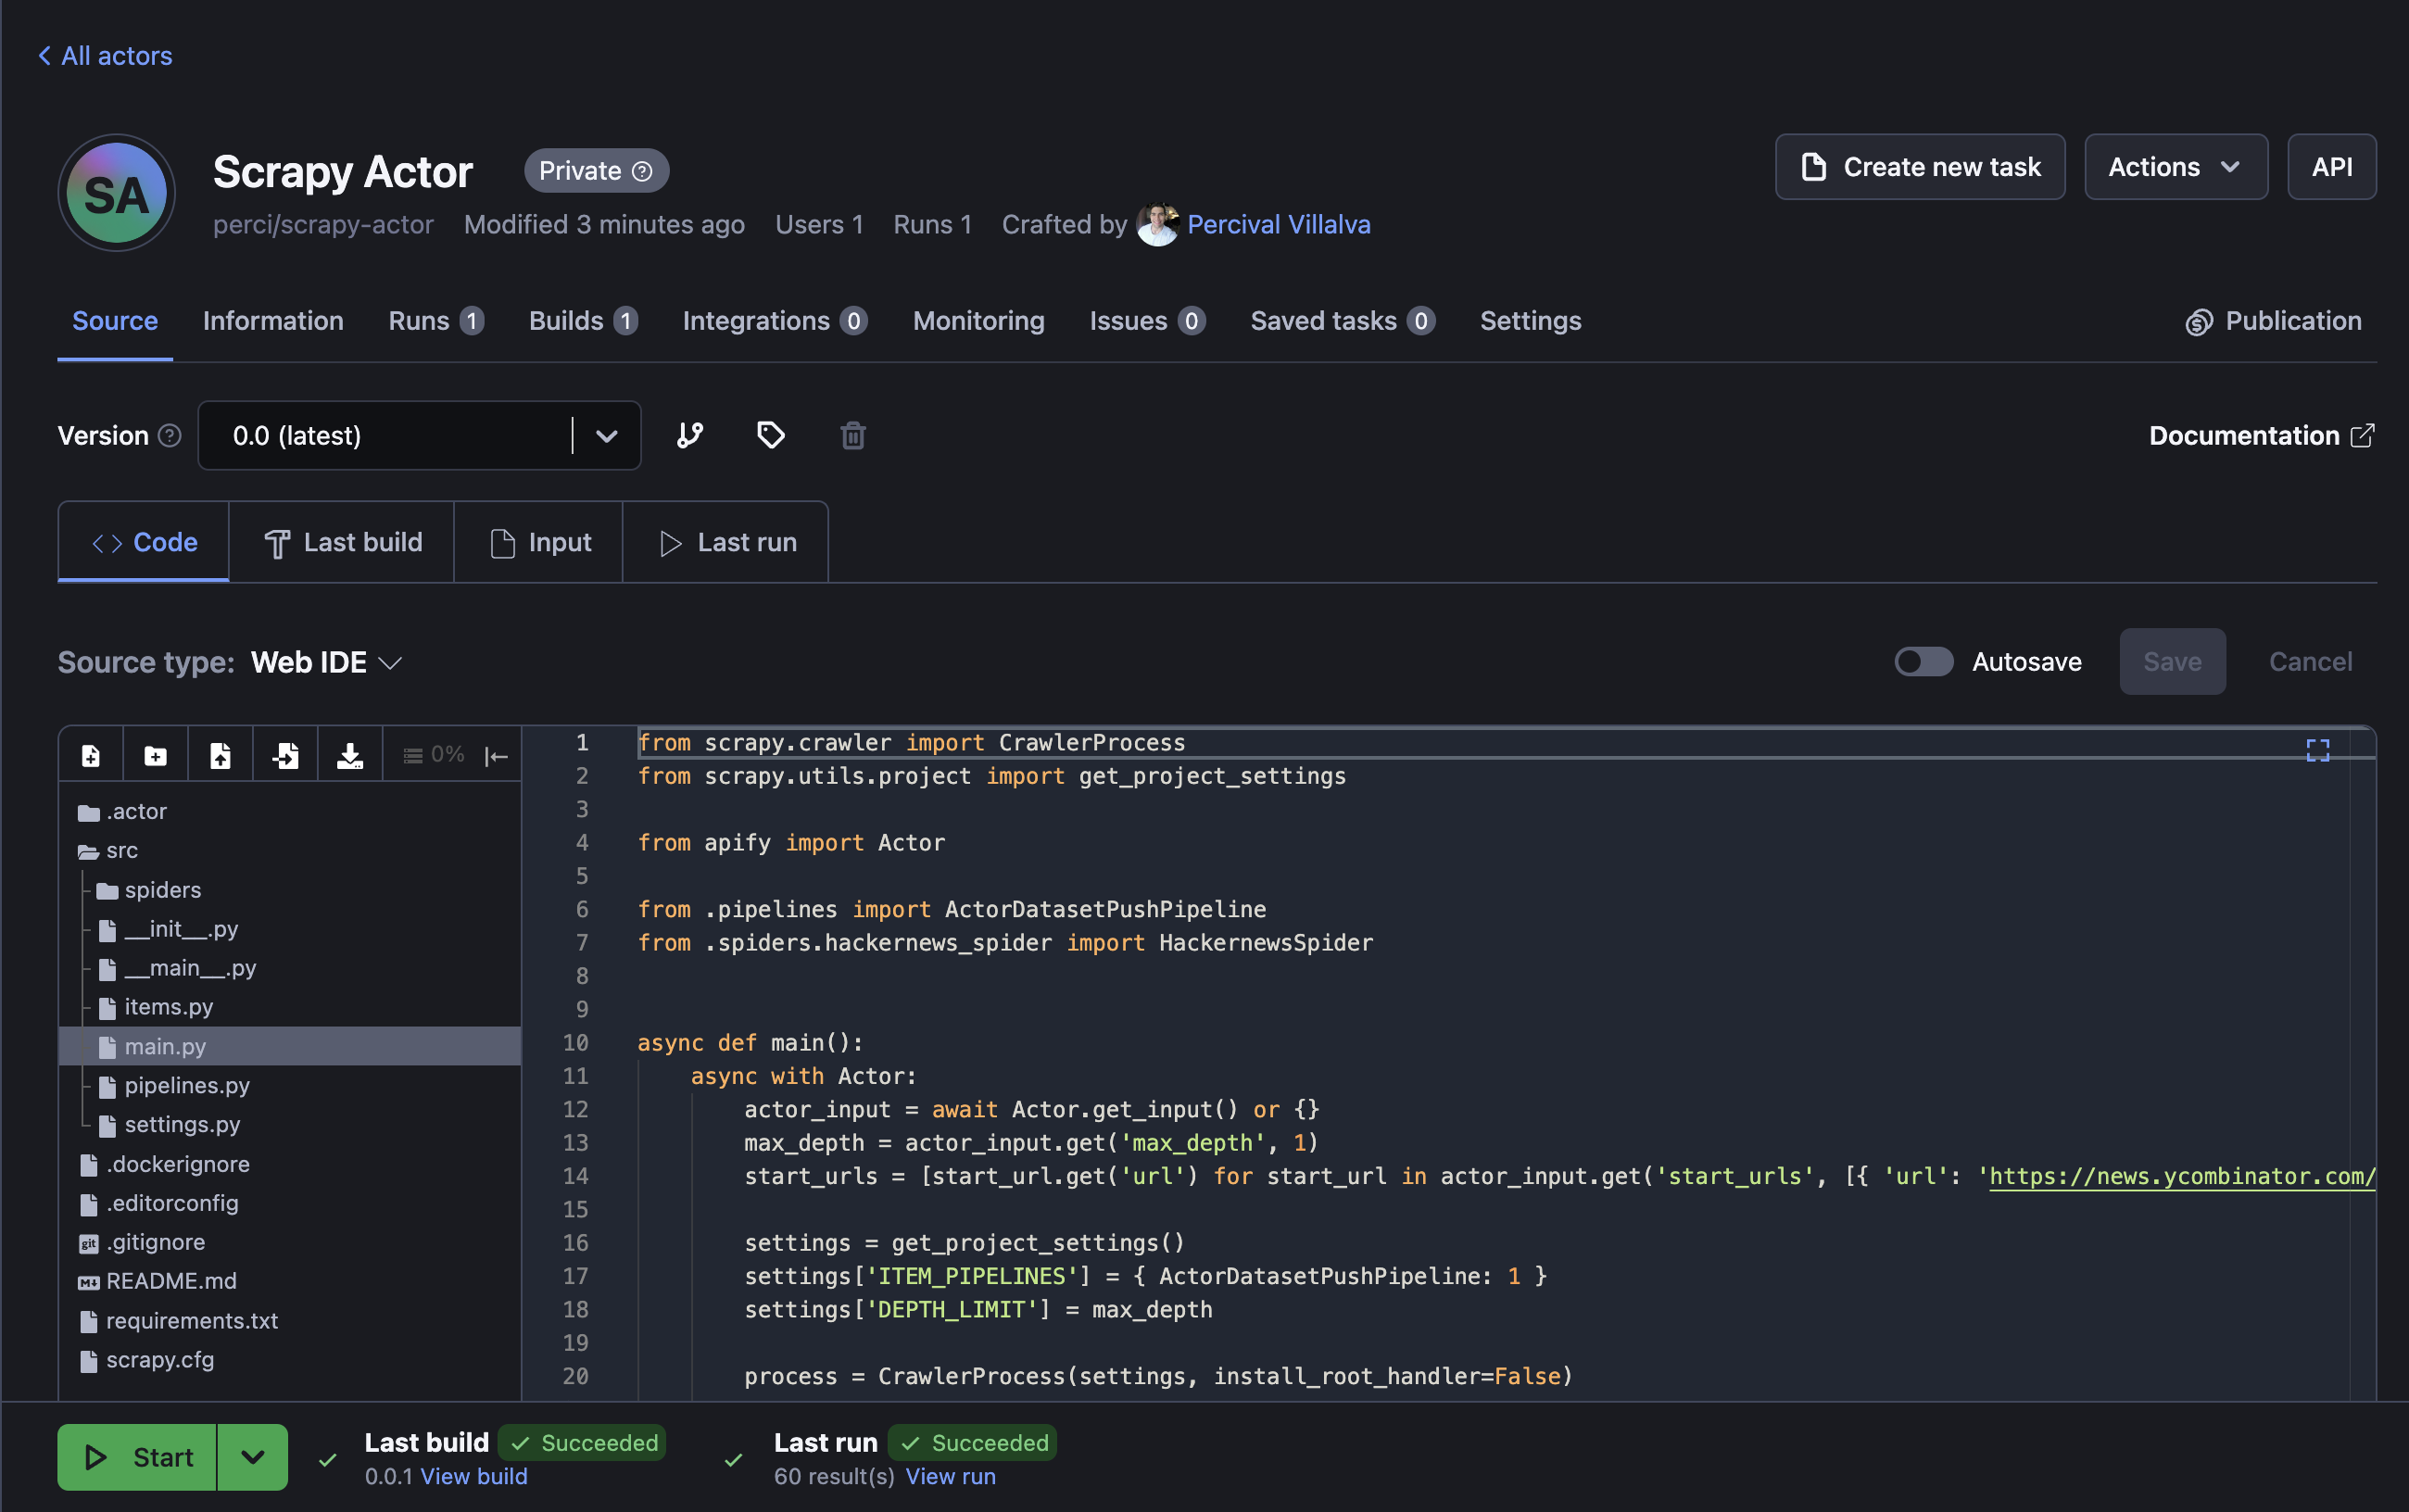
Perfect! Your scraper is ready to run on the Apify platform. To begin, click the Start button. Once the run is finished, you can preview and download your data in multiple formats in the Storage tab.
Deploy your scraping code to the cloud
Headless browsers, infrastructure scaling, sophisticated blocking.
Meet Apify - the full-stack web scraping and browser automation platform that makes it all easy.
Conclusion
Scrapy is a flexible and powerful web scraping framework, with features like middlewares that allow you to modify requests, handle retries, and use proxies. Its different spider types, such as the basic Spider and CrawlSpider, make it easy to adapt to various scraping tasks, whether you’re working with a single page or crawling an entire site.
Unlike BeautifulSoup, which mainly focuses on parsing, Scrapy is a complete framework that manages both data extraction and large-scale project handling. Its ability to scale, manage multiple requests, and export data in formats like JSON and CSV makes it perfect for more complex projects.
However, one limitation of Scrapy is that it doesn’t handle dynamic websites that rely on JavaScript. You can work around this by using Scrapy with Playwright to scrape dynamic content. For more details, check out this guide: Scrapy Playwright tutorial.