Modifying scraped data with Scrapy pipelines
If you want to modify scraped data before it's saved by Scrapy spiders, you need Scrapy pipelines. These are data processing extensions that you can use to enhance, validate, and store scraped data in a database.
In this tutorial, we’re going to show you how to use them by creating a simple Scrapy project for extracting book data from the website books.toscrape.com and storing it in a database. We'll write a Spider for extracting the data from the website, then write two Item Pipelines – one for data cleaning and one for storing them in the database.
Requirements
Since Scrapy is a Python framework, we’ll need a Python interpreter to be installed on our machine. We'll also need the Python package manager pip for installing 3rd party packages. For a database, we’re gonna go with PostgreSQL, a very popular open-source relation database. We’ll run the PostgreSQL database in one of the easiest ways: by using a Docker. So make sure you’ve installed Python, pip, and Docker on your machine. You can do it by running the following command.
python --version && \
pip --version && \
docker --version
Python 3.11.6
pip 23.2.1 from /home/vdusek/.local/lib/python3.11/site-packages/pip (python 3.11)
Docker version 24.0.6, build ed223bc
We're going to use these versions in this blog post.
Use pip to install Scrapy and Psycopg libraries and Psycopg as a Python database driver for PostgreSQL. With these, we'll be able to connect to the PostgreSQL database from Python and run SQL queries inside that. We’re gonna use the binary installation of the Psycopg. Basically, that means you don’t have to install its requirements manually. (Check these docs for more information.)
pip install scrapy psycopg[binary]
Make sure that the packages were successfully installed by running the following command, which also prints their versions.
python -c "import scrapy; print(scrapy.__version__)" && \
python -c "import psycopg; print(psycopg.__version__)"
2.11.0
3.1.10We're going to use these versions of packages in this blog post.
Starting the Scrapy project
Once we have all the requirements installed, we can create a Scrapy project by running the following command. Since we're going to scrape book data, we can call our project books_scraper.
scrapy startproject books_scraper
The generated project boilerplate should have the following structure. We’ll use the tree util for printing the nested file structure.
tree books_scraper/
books_scraper/
├── books_scraper/
│   ├── spiders/
│   │   └── __init__.py
│   ├── __init__.py
│   ├── items.py
│   ├── middlewares.py
│   ├── pipelines.py
│   └── settings.py
└── scrapy.cfg

3 directories, 7 files
Expected file structure.
Preparation of the data model
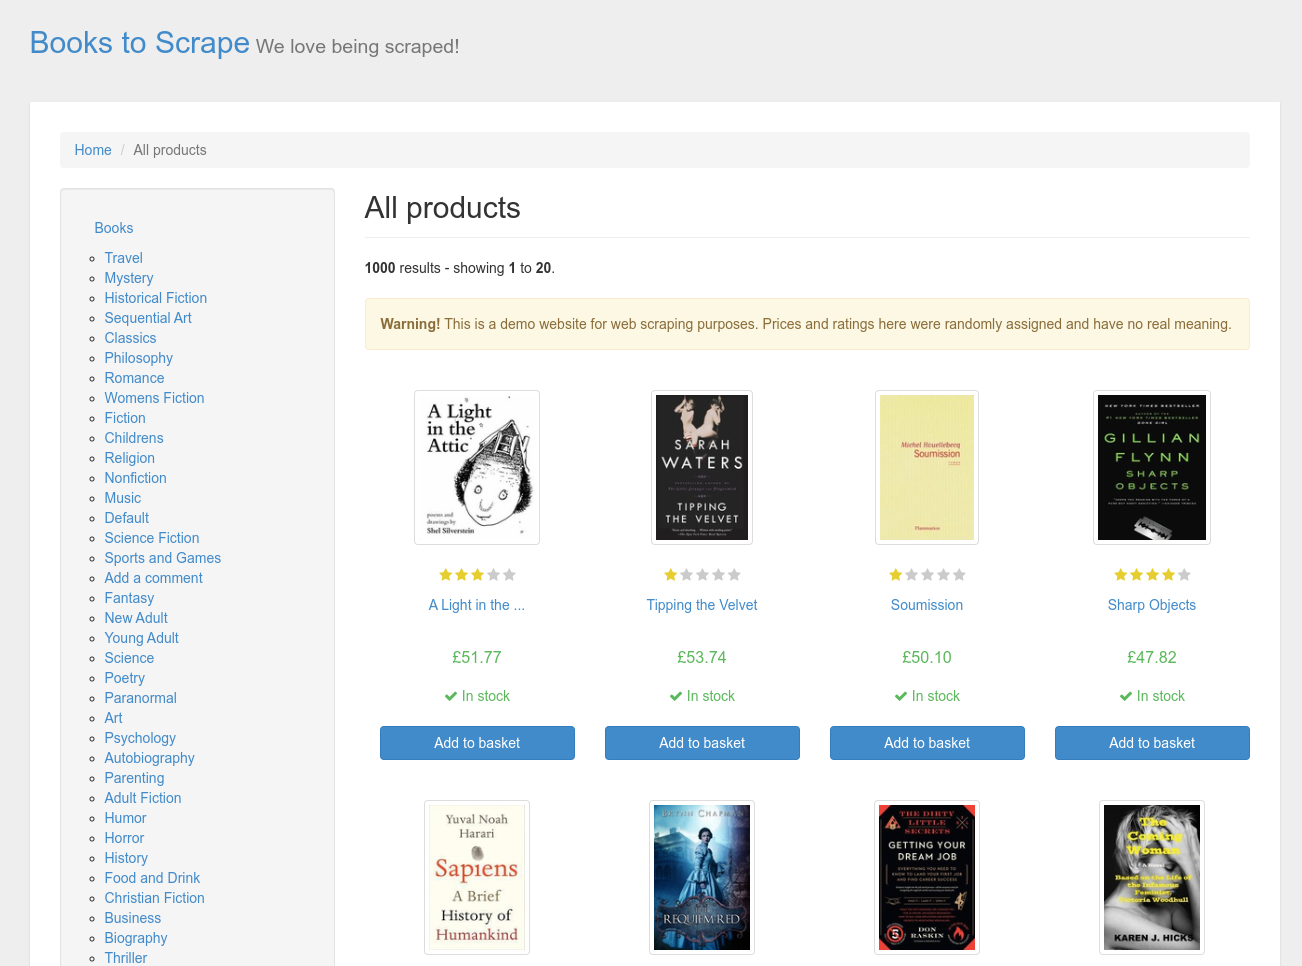
If we go to the website we want to scrape (we can see that on the main page), we’ve got a list of all the books. There are book titles, ratings, prices, and stock availability. This is the information we want to scrape in this tutorial.
First, let’s create a model for the book. We'll use Scrapy Item for that. Scrapy items have the same interface as dictionaries. However, they provide some additional features. Let’s open a books_scraper/items.py file, remove its default content, and create a BookItem.
import scrapy

class BookItem(scrapy.Item):
    title = scrapy.Field()
    rating = scrapy.Field()
    price = scrapy.Field()
    in_stock = scrapy.Field()
Writing a spider for extracting book data
Now, let’s create a spider for the book data extraction. We want to scrape the data from all the books. They're paginated in 20 pieces per page. And there are 50 pages. So we'd like to go through all the pages and scrape all of them one by one.
A Scrapy Spider can yield an extracted item or a request. If the spider returns the extracted item, the Scrapy processing pipeline continues with the Item Pipelines. Otherwise, if the spider returns a request, the processing pipeline is terminated, and the request is handed over to the Scheduler, which will schedule it for later.
Let’s create a file books_scraper/spiders/book.py and start with the spider skeleton.
from typing import Generator
from scrapy import Spider, Request
from scrapy.responsetypes import Response
from ..items import BookItem

class BookSpider(Spider):
    name = 'book_spider'
    start_urls = ['http://books.toscrape.com/']

    def parse(self, response: Response) -> Generator[BookItem | Request, None, None]:
        self.logger.info(f'BookSpider is parsing {response}...')
        # ...
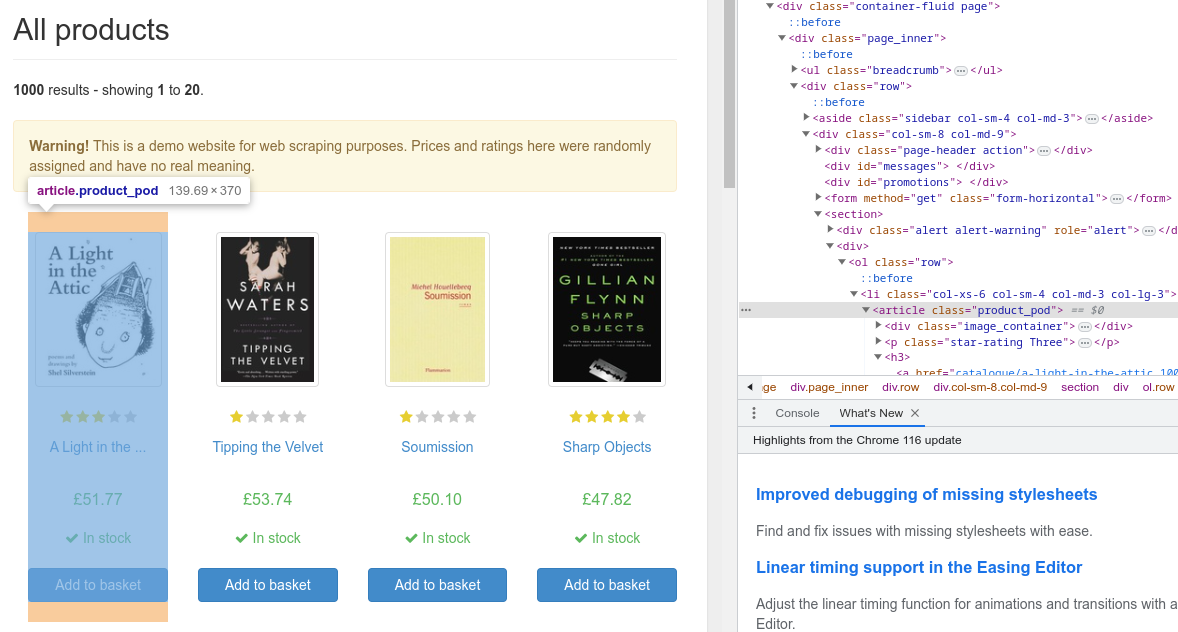
Let’s use developer tools in the browser (in the case of Google Chrome, you can use the keyboard shortcut CTRL + SHIFT + J) to inspect the HTML page and find out how we can target the info from the code. Scrapy’s Response class provides methods for navigation on the HTML page. We’re gonna target certain HTML elements using CSS selectors in the Response.class() method. To get the book data, let’s inspect the article element with the class product_pod.
def parse(self, response: Response) -> Generator[BookItem | Request, None, None]:
        self.logger.info(f'BookSpider is parsing {response}...')
        articles = response.css('article.product_pod')

        for article in articles:
            yield BookItem(
                title=article.css('h3 > a::attr(title)').get().strip(),
                price=article.css('.price_color::text').get().strip(),
                rating=article.css('.star-rating::attr(class)').get().strip(),
                in_stock=article.css('.instock.availability::text').getall()[1].strip(),
            )
        # ...
Now, let’s inspect the next button to find out how to get the URL and create a Request object for the next pages.
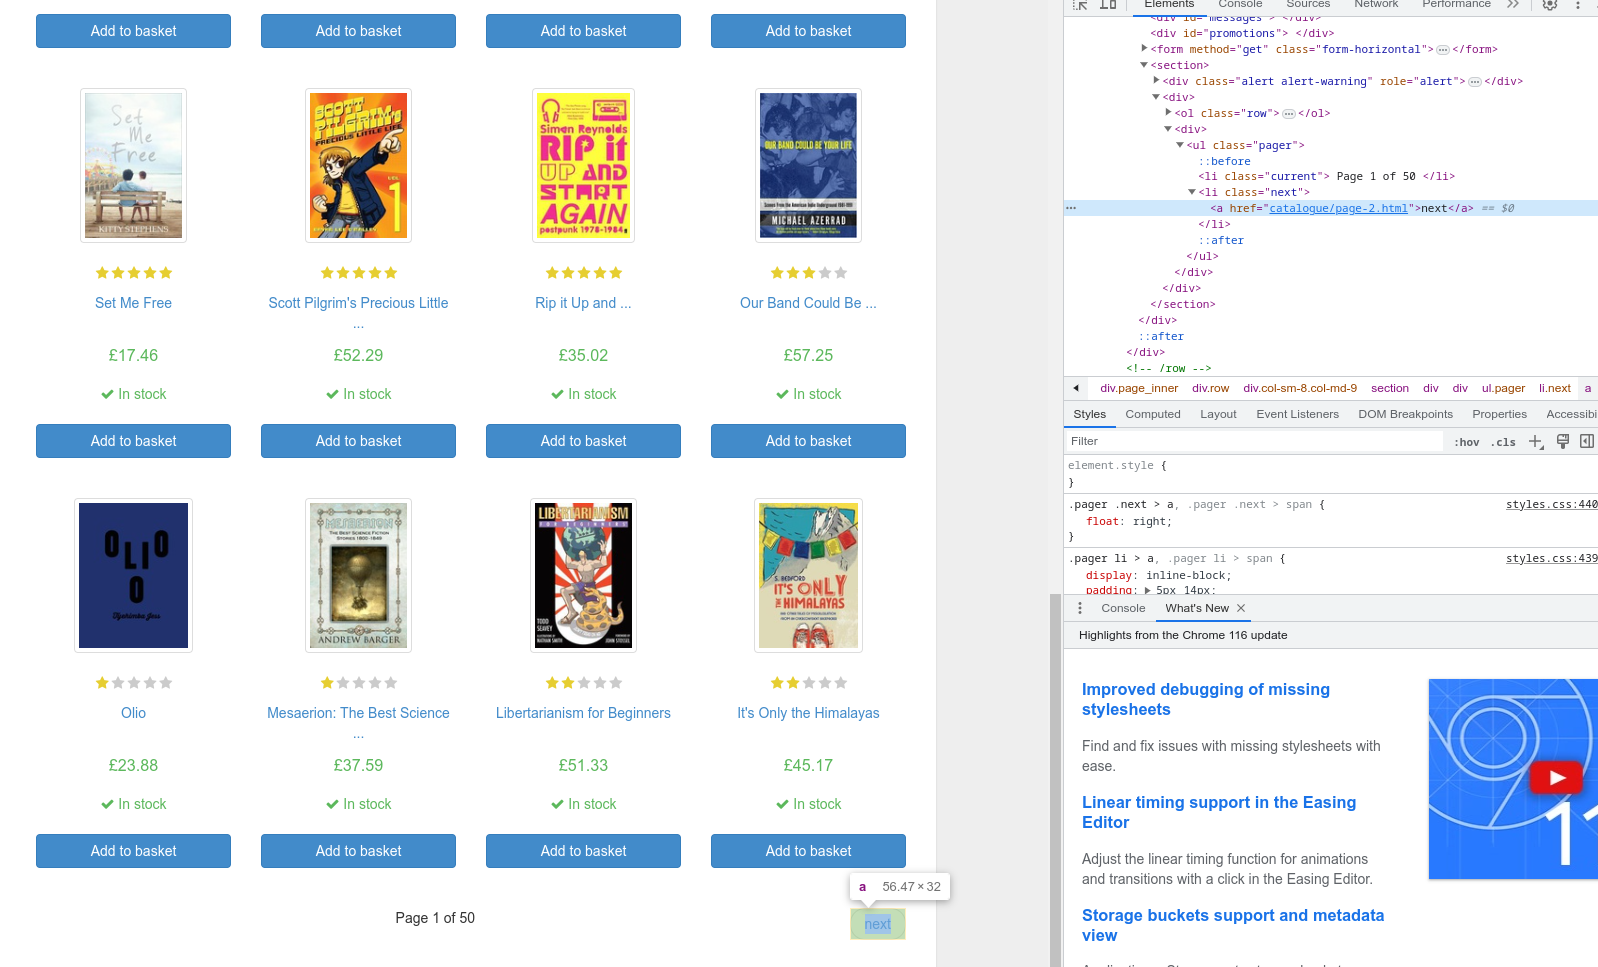
This is the complete Spider code. It should scrape all the books through all the pages.
from typing import Generator
from scrapy import Spider, Request
from scrapy.responsetypes import Response
from ..items import BookItem

class BookSpider(Spider):
    name = "book_spider"

    def parse(self, response: Response) -> Generator[BookItem | Request, None, None]:
        self.logger.info(f"BookSpider is parsing {response}...")
        articles = response.css("article.product_pod")

        for article in articles:
            yield BookItem(
                title=article.css("h3 > a::attr(title)").get().strip(),
                price=article.css(".price_color::text").get().strip(),
                rating=article.css(".star-rating::attr(class)").get().strip(),
                in_stock=article.css(".instock.availability::text").getall()[1].strip(),
            )

        next_page_link = response.css("li.next a::attr(href)").extract_first()
        if next_page_link:
            yield response.follow(next_page_link)
Creating a pipeline for data cleaning
Okay, now we want to create a pipeline for data cleaning and processing. The spider just extracts data from the HTML page as strings and provides them as it is. However, we'd like to do some further processing and convert the data into suitable data types. The title will remain represented as a string. We’ll convert the price into a float, rating into an integer, and in-stock availability into a boolean value.
Since we’re going to have more pipelines in our project, let’s create a pipelines/ directory and books_scraper/pipelines/cleaning.py file for our Cleaning Pipeline.
from scrapy import Spider
from ..items import BookItem

class CleaningPipeline:

    def process_item(self, item: BookItem, spider: Spider) -> BookItem:
        number_map = {
            'one': 1,
            'two': 2,
            'three': 3,
            'four': 4,
            'five': 5,
        }
        return BookItem(
            title=item['title'],
            price=float(item['price'].replace('£', '')),
            rating=number_map[item['rating'].split(' ')[1].lower()],
            in_stock=True if item['in_stock'].lower() == 'in stock' else False,
        )
Preparing the database
Now would be the right time to prepare a database so that we can have a place for storing the scraped data. As we mentioned earlier, we’re gonna use the PostgreSQL database, and we'll run it as a Docker container. We'll use the official image with the latest stable version - postgres:16.
docker run \
    --detach \
    --name postgres \
    --publish 5432:5432 \
    --env POSTGRES_USER=postgres \
    --env POSTGRES_PASSWORD=postgres \
    --env POSTGRES_DB=postgres \
    postgres:16
We'll need to prepare a database table for storing the scraped data. To do that, let’s execute the psql command line tool inside the container in the interactive mode. Using that, we can connect to our postgres database.
docker exec \
    --interactive \
    --tty \
    postgres \
    psql --host localhost --port 5432 --username postgres --dbname postgres
Let’s list the current tables; there shouldn’t be any.
\dt
Create a table books with the following structure for our scraped data.
CREATE TABLE books (
    id SERIAL PRIMARY KEY,
    title VARCHAR(255) NOT NULL,
    rating INTEGER NOT NULL,
    price NUMERIC(10,2) NOT NULL,
    in_stock BOOLEAN NOT NULL
);
Pipeline for storing the data
One of the last steps should be a pipeline for storing the data in the database. Let’s create a file books_scraper/pipelines/storing.py where we'll implement it. We’re gonna use a psycopg library for the creation of the database connection and execution of the SQL query, inserting the data. We'll connect to the DB in the pipeline constructor, and in the process_item method, we shall use this connection to execute the insertion query.
import re
import psycopg
from scrapy import Spider
from ..items import BookItem

class StoringPipeline:

    def __init__(self) -> None:
        self.conn = psycopg.connect("host='localhost' dbname='postgres' user='postgres' password='postgres' port=5432")

    def process_item(self, item: BookItem, spider: Spider) -> BookItem:
        title_escaped = re.sub(r"'", r"''", item['title'])
        with self.conn.cursor() as cursor:
            query = 'INSERT INTO books (title, price, rating, in_stock) ' \\
                    f"VALUES ('{title_escaped}', {item['price']}, {item['rating']}, {item['in_stock']});"
            cursor.execute(query)
            self.conn.commit()
        return item
Project settings
As a last step, we need to let Scrapy know about our spider and pipelines. This should be done via books_scraper/settings.py file. Pipelines have priorities that indicate in which order they’ll be executed. We'd like the Cleaning Pipeline to be executed before the Storing Pipeline. We can also specify the bot name. The other settings can be left with the default values. (Explore the Scrapy docs for more information.)
BOT_NAME = 'books_scraper'

SPIDER_MODULES = ['books_scraper.spiders']
NEWSPIDER_MODULE = 'books_scraper.spiders'

# Obey robots.txt rules
ROBOTSTXT_OBEY = True

# Set settings whose default value is deprecated to a future-proof value
REQUEST_FINGERPRINTER_IMPLEMENTATION = '2.7'
TWISTED_REACTOR = 'twisted.internet.asyncioreactor.AsyncioSelectorReactor'
FEED_EXPORT_ENCODING = 'utf-8'

ITEM_PIPELINES = {
    'books_scraper.pipelines.cleaning.CleaningPipeline': 100,
    'books_scraper.pipelines.storing.StoringPipeline': 200,
}
In the books_scraper/scrapy.cfg we can specify other configuration options. In our case, we'll just fill the path to the settings file and leave the project name as it is.
[settings]
default = books_scraper.settings

[deploy]
project = books_scraper
Executing the Scrapy spider
Finally, we can try to execute our Spider and get the book data. We’ll do that using the scrapy CLI tool. Let’s use the crawl subcommand followed by the name of the Spider and log level.
scrapy crawl book_spider --loglevel INFO
In the log, you can find the Scrapy settings, including our custom pipelines.
...

2023-09-20 16:43:57 [scrapy.middleware] INFO: Enabled item pipelines:
['books_scraper.pipelines.cleaning.CleaningPipeline',
 'books_scraper.pipelines.storing.StoringPipeline']

...
The spider should go page by page, extracting the book data.
2023-09-20 16:43:58 [book_spider] INFO: BookSpider is parsing <200 http://books.toscrape.com/>...
2023-09-20 16:43:58 [book_spider] INFO: BookSpider is parsing <200 http://books.toscrape.com/catalogue/page-2.html>...
2023-09-20 16:43:58 [book_spider] INFO: BookSpider is parsing <200 http://books.toscrape.com/catalogue/page-3.html>...

...

2023-09-20 16:44:12 [book_spider] INFO: BookSpider is parsing <200 http://books.toscrape.com/catalogue/page-48.html>...
2023-09-20 16:44:12 [book_spider] INFO: BookSpider is parsing <200 http://books.toscrape.com/catalogue/page-49.html>...
2023-09-20 16:44:12 [book_spider] INFO: BookSpider is parsing <200 http://books.toscrape.com/catalogue/page-50.html>...
2023-09-20 16:44:12 [scrapy.core.engine] INFO: Closing spider (finished)
2023-09-20 16:44:12 [scrapy.statscollectors] INFO: Dumping Scrapy stats:
{'downloader/request_bytes': 15110,
 'downloader/request_count': 51,
 'downloader/request_method_count/GET': 51,
 'downloader/response_bytes': 2552973,
 'downloader/response_count': 51,
 'downloader/response_status_count/200': 50,
 'downloader/response_status_count/404': 1,
  ...

2023-09-20 16:44:12 [scrapy.core.engine] INFO: Spider closed (finished)
At the end of the log, we can see scraping statistics, such as how many requests were made, how many bytes were transmitted, and stuff like that. Let’s connect to our database and check that the data was successfully inserted.
docker exec \
	--interactive \
	--tty \
	postgres \
	psql --host localhost --port 5432 --username postgres --dbname postgres
Just select all the rows from the table books.
SELECT * FROM books;
You should see something like this:
id |           title           | rating | price | in_stock
---+---------------------------+--------+-------+----------
 1 | A Light in the Attic      |      3 | 51.77 | t
 2 | Tipping the Velvet        |      1 | 53.74 | t
 3 | Soumission                |      1 | 50.10 | t

...
If everything went smoothly, there should be 1,000 rows in the table.
Executing a Scrapy project on the Apify platform
If you want reliable cloud infrastructure for your Scrapy project and would like to run, monitor, schedule, and scale your spiders in the cloud, then you need Apify.
Apify is a cloud-based platform that helps you build reliable web scrapers fast and automate anything you can do manually in a web browser through serverless cloud programs called Actors.
In a recent update, Apify introduced support for running Scrapy projects on the cloud. Just follow this straightforward process to get started:
First, make sure your Scrapy project is prepared and the Apify CLI is installed. Then, execute the following command to initiate the wrapping process and transform your Scrapy project into an Apify Actor:
apify init
This command essentially "actorizes" your Scrapy project, enhancing it with additional files, including requirements_apify.txt containing extra Python requirements. Before executing the Actor, ensure these requirements are installed.
pip install -r requirements_apify.txt
These two steps convert your Scrapy project into a fully-fledged Actor within the Apify ecosystem. With this conversion completed, you gain the ability to interact with your Scrapy project using the Apify CLI. For instance, you can execute the project with the following command:
apify run
You can also push the project to Apify Console, where you can run or schedule your runs in the Apify cloud.
apify push
To customize and refine it more, navigate to the .actor/actor.json file and modify it to update the metadata associated with your Actor.
We welcome any feedback on the wrapping tool! Just email us at python@apify.com.