Selenium is one of the most popular software testing frameworks, often used for scraping web data. Initially designed for cross-browser end-to-end tests, Selenium is a powerful open-source browser automation platform that supports Python, Java, C#, Ruby, JavaScript, and Kotlin.
The Selenium framework offers several ways to interact with websites, such as clicking buttons, filling in forms, scrolling pages, taking screenshots, and executing JavaScript code. That means Selenium can be used to scrape dynamically loaded content, which is often necessary for most modern websites.
For this reason, we'll show you how to use Selenium for web scraping in Python, the most popular language for extracting data from the web.
Setting up Selenium for Python
To follow this tutorial, you’ll need to have the following installed:
- Python 3.8 or later
- Selenium package (
pip install selenium) - Chrome web browser
- The Chrome driver that matches your Chrome browser version
Create and activate a virtual environment
Creating a virtual environment is optional but recommended to keep your project’s dependencies isolated. To set one up, navigate to your project directory and run the appropriate command for your operating system:
MacOS
python3 -m venv venv
source venv/bin/activate
Windows
python -m venv venv
venv\Scripts\activate
Install Selenium
pip install seleniumImport necessary modules
You'll have to import the necessary packages for your Selenium script. For this tutorial, you'll need:
from selenium import webdriver
from selenium.webdriver.common.by import By
from selenium.webdriver.common.keys import Keys
from selenium.webdriver.support import expected_conditions as ec
from selenium.webdriver.support.ui import WebDriverWait
How to scrape a website with Selenium in Python
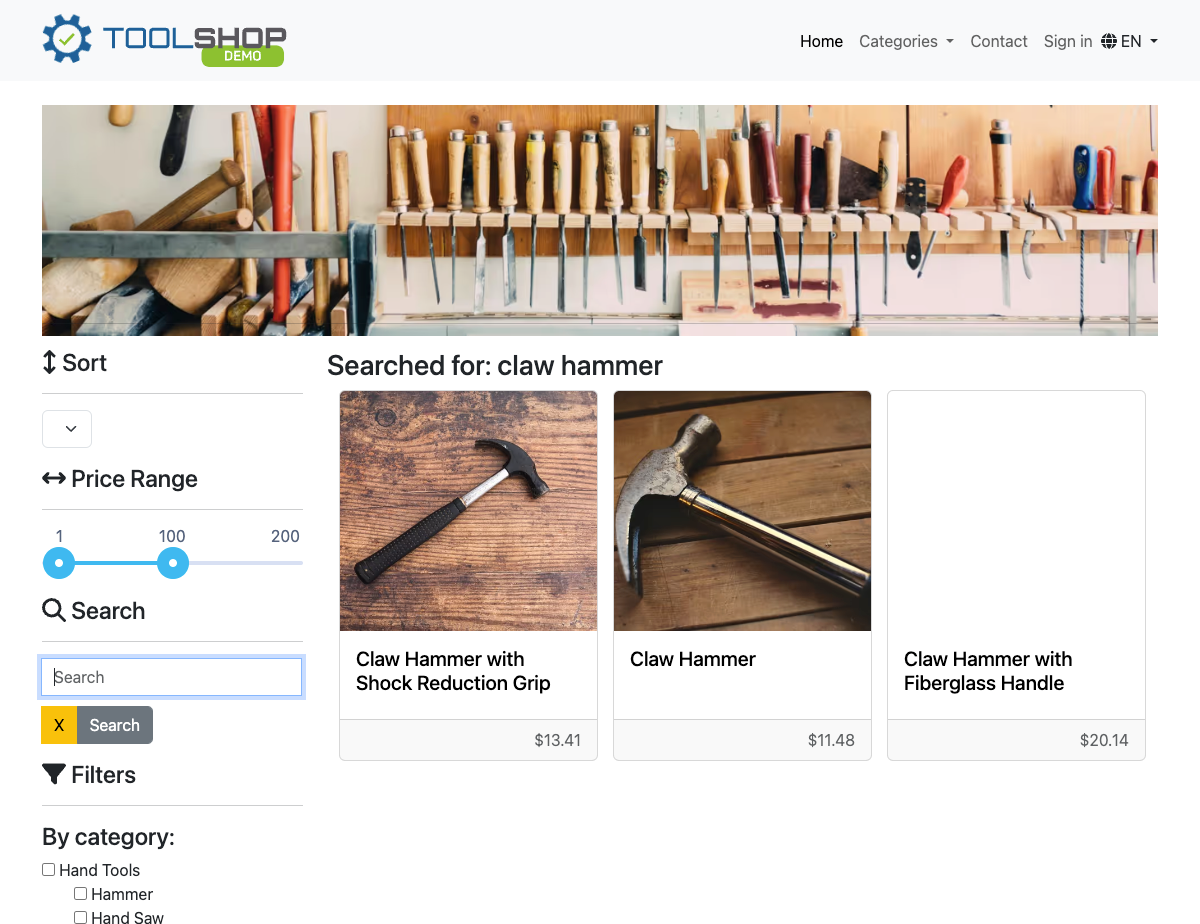
Our target website for this tutorial will be the Practice Software Testing Toolshop demo application, but the same methods can be applied to other websites.
1. Launching the browser and navigating to the website
Launch the browser with the webdriver module and navigate to the website you want to scrape. In this case, we'll use Chrome as the browser and navigate to the target website:
driver = webdriver.Chrome()
driver.get('https://practicesoftwaretesting.com/')
2. Switching to headless mode
When scraping dynamically loaded content, you need a headless browser so you can render the entire page you want to crawl. To switch to headless Chrome, you need to instantiate an Options object and set add_argument to --headless=new.
options = webdriver.ChromeOptions()
options.add_argument('--headless=new')
driver = webdriver.Chrome(options=options)
driver.get('https://practicesoftwaretesting.com/')
3. Locating and interacting with elements
Now that you've navigated to the website, you'll need to locate elements on the page and interact with them. For example, you might want to search for a product in the e-shop.
nav_home = driver.find_element(By.CSS_SELECTOR, '[data-test="nav-home"]')
print(nav_home.text)

# Output:
# Home
With Selenium WebDriver, you can use find_element to select a single element, as we did in the example above, or find_elements to select multiple elements. To illustrate this, let’s now select all the navbar items by finding all elements with the class nav-item:
nav_items = driver.find_elements(By.CLASS_NAME, 'nav-item')
nav_items_names = [nav_item.text for nav_item in nav_items]
print(nav_items_names)

# Output:
# ['Home', 'Categories', 'Contact', 'Sign in']
4. Waiting for elements to load
Sometimes, the content on the web page is dynamically loaded after the initial page load. In such cases, you can wait for the required element to load using the WebDriverWait function.
In the example below, we wait 10 seconds for the product elements with the class card to load.
products = WebDriverWait(driver, 10).until(EC.visibility_of_all_elements_located((By.CLASS_NAME, 'card')))Once the elements are loaded, we can loop through the results and scrape their contents using the element.text method.
product_names = [product.find_element(By.CLASS_NAME, 'card-title').text for product in products]
print(product_names)

# Output:
'''
['Combination Pliers', 'Pliers', 'Bolt Cutters', 'Long Nose Pliers', 'Slip Joint Pliers', 'Claw Hammer with Shock Reduction Grip', 'Hammer', 'Claw Hammer', 'Thor Hammer']
'''
5. Taking a screenshot
If you need to screenshot the website at any point, you can do that in your script using the save_screenshot() function.
driver.save_screenshot('screenshot.png')
6. Executing JavaScript code
To execute JavaScript code, use the execute_script() method. For example, if you want to scroll to the bottom of the page to take a screenshot:
driver.execute_script('window.scrollTo(0, document.body.scrollHeight);')You can use WebDriverWait to wait for the browser to scroll down before taking the screenshot.
WebDriverWait(driver, 10).until(lambda d: d.execute_script('return document.readyState') == 'complete')
driver.save_screenshot('screenshot.png')
7. Exporting results to CSV
Up until this point, we have been printing the scraped data to the console, but that’s not ideal for real-world projects. Instead, we'll often want to export this data to a file, like a CSV, for easier analysis and sharing. Here’s how we can do that:
import csv

# Open a CSV file to write the results
with open('search_results.csv', mode='w', newline='') as file:
    writer = csv.writer(file)
    writer.writerow(['URL', 'Name', 'Price'])  # Write the header

    # Loop through search results and write each one to the CSV
    for search_result in search_results:
        product = {
            'url': search_result.get_attribute('href'),
            'name': search_result.find_element(By.CSS_SELECTOR, '.card-title').text,
            'price': search_result.find_element(By.CSS_SELECTOR, 'span[data-test="product-price"]').text,
        }
        writer.writerow([product['url'], product['name'], product['price']])  # Write data rows
Continuing from where we left off, we start by importing Python’s built-in csv module, which allows us to open (or create) a CSV file named search_results.csv.
First, we write a header row with “URL,” “Name,” and “Price” to label the columns. Then, as we loop through each product in the search results, we extract its URL, name, and price, and write this data as a new row in the CSV file.
8. Closing the browser
When we’re done, it's good practice to end the browser session with the driver.quit() method. Note that the quit method is different from the close method. close() only closes the current window, but the WebDriver session will remain active, so use quit() to close all browser windows and end the WebDriver session.
Final code for scraping with Selenium
Now, let’s put everything we’ve learned into a final script. We’ll search the store for the keyword “claw hammer” and save each product’s details, including the product URL, name, and price to a CSV file. Finally, the script will take a screenshot of the page. Give it a try yourself first, and then compare your result with the solution below:
import csv
from selenium import webdriver
from selenium.webdriver.common.by import By
from selenium.webdriver.common.keys import Keys
from selenium.webdriver.support import expected_conditions as EC
from selenium.webdriver.support.ui import WebDriverWait

options = webdriver.ChromeOptions()
options.add_argument('--headless=new')

driver = webdriver.Chrome(options=options)
try:
    driver.get('https://practicesoftwaretesting.com/')

    # Wait until the search box is present and interactable
    search_box = WebDriverWait(driver, 10).until(
        EC.element_to_be_clickable((By.ID, 'search-query'))
    )
    search_box.send_keys('claw hammer')
    search_box.send_keys(Keys.ENTER)

    # Wait until search results are loaded
    search_completed = WebDriverWait(driver, 10).until(
        EC.presence_of_all_elements_located((By.CSS_SELECTOR, 'div[data-test="search_completed"]'))
    )

    search_results = driver.find_elements(By.CSS_SELECTOR, 'a.card')

    # Open a CSV file to write the results
    with open('search_results.csv', mode='w', newline='') as file:
        writer = csv.writer(file)
        # Write the header
        writer.writerow(['URL', 'Name', 'Price'])

        # Write the search results
        for search_result in search_results:
            product = {
                'url': search_result.get_attribute('href'),
                'name': search_result.find_element(By.CSS_SELECTOR, '.card-title').text,
                'price': search_result.find_element(By.CSS_SELECTOR, 'span[data-test="product-price"]').text,
            }
            writer.writerow([product['url'], product['name'], product['price']])

    # Take a screenshot of the final page
    driver.save_screenshot('search_results.png')
finally:
    # Ensure the driver quits properly
    driver.quit()
Expected output - CSV file with product details

Expected output - Screenshot
Using proxies with Selenium
Before we wrap up, we need to say something about using a proxy with Selenium. There's good news and bad news. I'll start with the bad: Selenium can't do proxy authentication out of the box. The good news? You can solve this drawback with the Selenium Wire package.
Installing Selenium Wire
To use Selenium Wire, you first need to install it. Run the following command in your terminal:
pip install selenium-wireSetting up a proxy with Selenium Wire
After installing Selenium Wire, configuring a proxy is straightforward. You can specify your proxy details in the seleniumwire_options when initializing the WebDriver. Here's an example configuration:
from seleniumwire import webdriver  # Import from seleniumwire

# Define seleniumwire_options
seleniumwire_options = {
    'proxy': {
        'http': 'http://myproxy:port',
        'https': 'http://myproxy:port',
        'no_proxy': 'localhost,127.0.0.1'  # Exclude localhost and 127.0.0.1 from proxying
    }
}

# Initialize the WebDriver with seleniumwire_options
driver = webdriver.Chrome(seleniumwire_options=seleniumwire_options)
This setup directs all HTTP and HTTPS traffic through the proxy server specified by http and https keys, respectively.
Handling proxy authentication
If your proxy requires authentication, you can include the credentials directly in the proxy URL:
seleniumwire_options = {
    'proxy': {
        'http': 'http://username:password@myproxy:port',
        'https': 'http://username:password@myproxy:port',
    }
}
For more sophisticated authentication mechanisms or additional proxy configurations, refer to the Selenium Wire documentation.
Scaling Selenium for web scraping
One of the most straightforward ways to scale Selenium is by distributing the scraping workload across multiple machines. This can be achieved using frameworks like Selenium Grid or with a cloud platform like Apify.
- Selenium Grid: This tool allows you to run multiple instances of Selenium WebDriver across different machines to enable parallel execution of scraping tasks. You can set up a hub that distributes the tasks to various nodes, each running its instance of WebDriver.
- Cloud-based solutions: Using cloud infrastructure, such as AWS, Google Cloud, Azure, or Apify can also help scale your scraping operations, as they provide scalable storage solutions, resource allocation, parallel processing, and auto-scaling.
Scale Selenium with the Apify cloud platform
Headless browsers, infrastructure scaling, sophisticated blocking.
Meet the full-stack platform that makes it all easy.
Conclusion
We’ve shown you how to use Selenium with Python to scrape a demo website, but you can use what you've learned here to scrape data from any site you like. As we've demonstrated, Selenium is a solid choice when you need to interact with web pages and extract data from dynamic websites.
Frequently asked questions about Selenium
Is Selenium good for web scraping?
Selenium is commonly used for scraping due to its ability to control headless browsers, render JavaScript on a page, and scrape dynamic websites. However, because it was designed for testing, using it to scrape large amounts of data is slow and inefficient compared to other alternatives, such as Crawlee, Scrapy, and Playwright.
Is Selenium better than Beautiful Soup?
Beautiful Soup is easier to learn than Selenium and is a great choice for scraping static content. Extracting HTML and XML elements from a web page requires only a few lines of code, making it ideal for tackling simple scraping tasks with speed. However, to scrape JavaScript-rendered pages, you need Selenium.
Should I use Selenium or Scrapy?
Selenium beats Scrapy for cross-language support and efficiency in scraping dynamic content (though scraping dynamic content is possible with Scrapy via plugins). But if it is a Python web crawling framework you want, Scrapy is more powerful.
Is Selenium better than Playwright for web scraping?
While Selenium has a larger and more established community and vast resources due to its longer history, Playwright is generally considered to have better performance than Selenium owing to its more modern architecture.