This guide will help you build web scrapers with PHP. By the end, you'll have a working scraper and the skills to customize it. Even if you're new to PHP, this process is surprisingly straightforward!
Is PHP good for web scraping?
Yes, PHP is a great option for web scraping. PHP is easy to use and has specialized libraries, such as Simple HTML DOM, for data extraction from websites. However, be aware that PHP may have limitations in performance and handling JavaScript-rendered websites compared to alternatives like Python.
Prerequisites
To start your first PHP web scraping project, set up a PHP environment and some basic tools. Here's what you need to get going:
1. Setup a PHP environment
If you're using PHP for the first time, you'll need to install it. You can download it directly from the official PHP website or choose a local development environment like XAMPP or MAMP. These packages include PHP and other necessary components, making the setup easy.
2. Download Simple HTML DOM library
In this guide, we'll use Simple HTML DOM for web scraping. Download it and place it in your project directory to get started.
Why choose Simple HTML DOM?
This library is user-friendly and effective for web scraping. It simplifies parsing and navigating HTML content, to pinpoint the information you need easily.
Its key features include:
- Finding elements by various selectors (tags, classes, IDs, etc.)
- Extracting text, links, and attributes from HTML elements
- Modifying HTML content
- Handling poorly formatted HTML
Simple HTML DOM is well-suited for beginners due to its intuitive syntax. You won't need a deep understanding of complex DOM manipulation concepts, making it a great starting point for anyone just getting into web scraping.
See this document for more information about Simple HTML DOM.
How to scrape a website with PHP?
To start building, we'll scrape a post from the Apify Blog for our example.
Step 1: Setting the stage
- Project folder: Create a new folder for your scraper project.
- Simple HTML DOM: As mentioned in the prerequisites section, add the downloaded Simple HTML DOM library to your project folder.
- Scraper file: Create a new PHP file (e.g., scraper.php) in your project folder. This is where you'll write your scraping code.
Step 2: Import the library
The Simple HTML DOM library is often downloaded as an archived file (e.g., a ZIP file). Extract the contents of this archive into your project folder. To use the library, include the simple_html_dom.php file located inside the extracted folder in your PHP script like this:
<?php
require_once('simplehtmldom_1_9_1/simple_html_dom.php');
?>
Step 3: Fetch the HTML
Choose the page you want to scrape and set up your code like this:
// Set target resource
$target_url = "https://blog.apify.com/web-scraping-2024/";
// Get the HTML content from the target website
$html = file_get_html($target_url);
The [file_get_html](https://simplehtmldom.sourceforge.io/docs/1.9/api/file_get_html/) from the Simple HTML Dom hands the HTML content of your $target_url into the $html variable.
Step 4: Get title and content data
Now, you have the HTML content stored in the $html variable. Next, you'll need to filter this content to extract the data you want.
Use your browser's Inspect tool to examine the HTML structure (tags, classes, etc.) of the data you want to scrape. Here, we'll target the content within the post-content class and the main <h1> tag containing the blog post title.
$postContent = $html->find('div.post-content', 0);
$title = $html->find('h1', 0);
Now we have the blog post's main content in the $postContent variable and the title in $title. However, there's likely more information we want to extract, like the subheading.
Visit Simple HTML DOM to learn more about how the find function works in the library.
Step 5: Prepare the info section
Before moving on, let's create an info section to display the purpose of our scraping and the URL of the webpage we're working with. We'll do this by creating a new <div> element and adding the necessary data. This will give us a grouped information set to preview or save later.
Simple HTML DOM provides some handy methods to handle this. Let's first take a look at the code and then discuss how it works:
// Create a new info section
$infoSection = $html->createElement('div');
$disclaimer = $html->createElement('h1');
$pageUrl = $html->createElement('h1');

// Update inner texts of the created new elements
$disclaimer->innertext = "Note: This content was scraped for demonstration purposes.";
$pageUrl->innertext = "Target page URL: " . $target_url;

// Append disclaimer and page URL to the infoSection div
$infoSection->appendChild($disclaimer);
$infoSection->appendChild($pageUrl);
Take a look at the code above. We can divide it into three parts. The first part focuses on creating elements:
$infoSection = $html->createElement('div');
Simple HTML DOM provides the createElement method to create new elements. Here, we've created three different elements using this method. To learn more about how this works, check out this resource.
Now we've created three elements: the infoSection <div>, the disclaimer, and the pageUrl <h1>. We then updated the content of the <h1> tags using Simple HTML DOM's innertext method:
$pageUrl->innertext = "Target page URL: " . $target_url;
By setting the innertext property, we can override an element's HTML content. Here, we've updated the text within the disclaimer and pageUrl <h1> tags. Visit here to learn more.
Finally, we've appended these updated <h1> tags to the previously created infoSection <div>. Take a look at the code:
$infoSection->appendChild($pageUrl);
Learn more about how the node appending process works here.
Step 6: Get the subheading - Extract DOM siblings

In the image above, you'll notice that the subheading is the next DOM sibling of the title. Simple HTML DOM lets you find sibling elements by using: [next_sibling](https://simplehtmldom.sourceforge.io/docs/1.9/api/simple_html_dom_node/next_sibling/)
$subheading = $title->next_sibling();
Now, we can easily extract the next sibling of a node we already know. Not only this, but Simple HTML DOM also allows you to extract the parent and children of a given node.
Step 7: Modify titles and display the info section
In this step, we'll preview the text from the title and subheading, along with the info section data we created previously. First, let's update the HTML of the titles to distinguish them clearly. Check out the code below:
$title->innertext = "Title: " . $title->plaintext;
$subheading ->innertext = "<h1>Subheading : " . $subheading->plaintext . "</h1>";
As we have seen, the innertext property allows us to update the title and subheading text. Notice the plaintext method ($title->plaintext), which extracts the raw text content from an element. I've also changed the subheading tag to a <h1> for better formatting.
Next, we'll append the updated title and subheading to the infoSection <div> we created in step 5 and then display the entire infoSection using PHP's [echo](https://www.w3schools.com/php/func_string_echo.asp) function:
// Append title and subheading to the infoSection div
$infoSection->appendChild($title);
$infoSection->appendChild($subheading);

// Display the infosection
echo $infoSection;
This will output the raw HTML of the infoSection <div>, rendered in your browser. You'll see the disclaimer, target page URL, title, and subheading, along with the 'Title:' and 'Subheading:' prefixes. The subheading will appear as a <h1> heading. Check the image below for an example:

If you're new to PHP, remember that you'll need a running PHP server to preview the results. For further setup instructions, see this XAMPP guide.
Step 8: Extract images
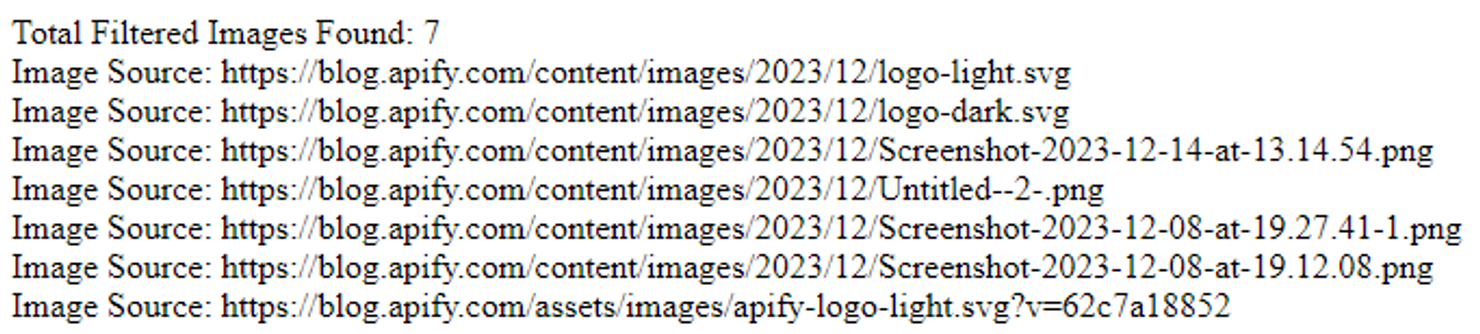
This Apify blog post contains several images. In this step, we'll extract and count the images, then filter and print only the ones whose source URLs begin with https://blog.apify.com. We'll begin by finding and counting all of the images:
// Find all the images
$images = $html->find('img');

// Count the images
$imageCount = count($images);

echo "Total Images Found: " . $imageCount . "<br>";
If you execute this, you should see the result 'Total Images Found: 17'. Now, let's refine our code to extract only the image URLs, that begin with https://blog.apify.com. Below is the updated code snippet:
// Find images whose 'src' attribute starts with 'https://blog.apify.com'
$images = $html->find('img[src*=https://blog.apify.com]');

// Count the filtered images
$imageCount = count($images);

echo "Total Images with Matching Source: " . $imageCount . "<br>";

// Iterate and preview the sources of all the filtered images
foreach ($images as $image) {
    $src = $image->src;
    echo "Image Source: " . $src . "<br>";
}
This updated code first filters images based on their 'src' attribute, specifically selecting those starting with 'https://blog.apify.com'. To filter, use the following line:
$images = $html->find('img[src*=https://blog.apify.com]');
It then prints the total filtered image count and iterates through the list, printing the source URLs of each matching image by accessing its src attribute ($image->src). Simple HTML DOM not only lets you access attributes like src, but also allows you to modify them. To learn more about this, check out this resource.
However, the final output of this section should look similar to this:
Step 9: Prepare post content
Now that we've extracted the images, title, and subheading of the blog post, let's move on to scraping the post content.
First, remove unwanted elements like images and videos from the $postContent. We've cleaned up the preview of the main text content for better display later. After inspecting the blog post, we identified and removed unnecessary elements. Here's the resulting code snippet:
// Find and remove the first <p> element within $postContent
$firstParagraph = $postContent->find('p', 0);
if ($firstParagraph) { // Check if it was found
  $firstParagraph->outertext = '';
}

// Find and remove the 4th figure element within $postContent
$ytVideo = $postContent->find('figure', 3);
if ($ytVideo) { // Check if it was found
  $ytVideo->outertext = '';
}

// Remove unwanted divs using class name
$moreDivsToRemove = $postContent->find('div.kg-callout-card-blue');
foreach ($moreDivsToRemove as $div) {
  $div->outertext = '';
}

// Find and remove all the images
$images = $postContent->find('img');
foreach ($images as $image) {
  $image->outertext = '';
}

// Find and remove all the figCaptions
$figCaptions = $postContent->find('figcaption');
foreach ($figCaptions as $figCaption) {
  $figCaption->outertext = '';
}
You can use this snippet or inspect the blog yourself to find any other elements you may want to remove.
As you can see in the code snippet above, setting an element's outertext to an empty string ('') effectively removes it. Always check if an element exists before attempting to remove it, just like the example does with if ($firstParagraph) {}.
It's also important to note the filtering method used to remove unnecessary divs:
$divsToRemove = $postContent->find('div.kg-callout-card-blue');
This line specifically targets <div> elements with the class 'kg-callout-card-blue'. The code then iterates through the found elements and removes them.
Step 10: Output the scraped content
Now we have all the prepared data - image count, image source URLs, and extracted post content - it's time to display these results.
Let's see the complete code below, demonstrating how to display and save our results to a separate file using the save() method:
<?php
require_once('simplehtmldom_1_9_1/simple_html_dom.php');

// Target resource from the Apify website
$target_url = "https://blog.apify.com/web-scraping-2024/";
$html = file_get_html($target_url);

// Find by Tags, Classes, and Siblings
$postContent = $html->find('div.post-content', 0);
$title = $html->find('h1', 0);
$subheading = $title->next_sibling();

// Create a new info section
$infoSection = $html->createElement('div');
$disclaimer = $html->createElement('h1');
$pageUrl = $html->createElement('h1');

// Update inner texts of the created new elements
$disclaimer->innertext = "Note: This content was scraped for demonstration purposes.";
$pageUrl->innertext = "Target page URL: " . $target_url;

// Append disclaimer and page URL to the infoSection div
$infoSection->appendChild($disclaimer);
$infoSection->appendChild($pageUrl);

// Modify HTML
$title->innertext = "Title: " . $title->plaintext;
$subheading ->innertext = "<h1>Subheading : " . $subheading->plaintext . "</h1>";

// Append title and subheading to the infoSection div
$infoSection->appendChild($title);
$infoSection->appendChild($subheading);

// Display the info Section
echo $infoSection;

// Find images whose 'src' attribute starts with 'https://blog.apify.com'
$images = $html->find('img[src*=https://blog.apify.com]');

// Count the filtered images
$imageCount = count($images);

echo "Total Filtered Images Found: " . $imageCount . "<br>";

// Iterate and preview the sources of all the filtered images
foreach ($images as $image) {
  $src = $image->src;
  echo "Image Source: " . $src . "<br>";
}

// Find and remove the first <p> element within $postContent
$firstParagraph = $postContent->find('p', 0);
if ($firstParagraph) { // Check if it was found
  $firstParagraph->outertext = '';
}

// Find and remove the 4th figure element within $postContent
$ytVideo = $postContent->find('figure', 3);
if ($ytVideo) { // Check if it was found
  $ytVideo->outertext = '';
}

// Remove unwanted divs using class name
$moreDivsToRemove = $postContent->find('div.kg-callout-card-blue');
foreach ($moreDivsToRemove as $div) {
  $div->outertext = '';
}

// Remove images
$images = $postContent->find('img');
foreach ($images as $image) {
  $image->outertext = '';
}

// Remove figCaptions
$figCaptions = $postContent->find('figcaption');
foreach ($figCaptions as $figCaption) {
  $figCaption->outertext = '';
}

// Output modified HTML
echo $postContent->save('cleaned_content.html');
?>
This displays the results of all our filtering and modifications. We've successfully extracted the core text content of the blog post, removed unwanted elements and images, and used the save method to store the cleaned HTML content in the "cleaned_content.html" file. Below, take a look at a browser preview of this scraped HTML file:

Beyond the basics:
This demo has covered the fundamentals of web scraping. Consider these challenges to improve your skills:
- Try to clone an element: recreate an element using this method:
[outertext](https://simplehtmldom.sourceforge.io/docs/1.9/api/simple_html_dom_node/outertext/) - Data storage: Learn how to store extracted information (titles, image URLs, text) in a structured format like JSON or a database.
- Complex websites: Practice scraping with dynamic content or those that require navigating multiple pages.
Advantages of web scraping with PHP
PHP is a powerful toolkit for web scraping. Here's why:
- Ease of integration: PHP works smoothly with databases and servers, ideal for backend data handling.
- Large community: Tap into a wide array of community-generated resources and libraries like Simple HTML DOM and Gottue for web scraping.
- Scheduled scraping: PHP scripts can be easily set up to run at scheduled intervals with cron jobs, facilitating regular data collection.
- Cost efficiency: PHP is open source and widely supported by hosting services, reducing the cost of deploying web scraping solutions.
Disadvantages of web scraping with PHP
Like any tool, PHP web scraping has limitations. Here's what you should keep in mind:
- Performance issues: For large-scale scraping projects, PHP's performance might not be as fast as languages like Java or C++.
- Complexity in handling JavaScript: PHP doesn't handle JavaScript-rendered content well by itself. It requires additional tools or approaches.
- Server load: Continuously running scraping tasks can put significant load on servers, potentially leading to performance degradation.
- Maintenance overhead: Web scrapers can require frequent updates due to changes in the target website’s structure or content.
So, should you use PHP for web scraping?
PHP has its strengths so it's worth considering for web scraping, but it probably isn't the best tool for complex, JavaScript-rendered pages. If you're dealing with that kind of scraping, use Python or JavaScript.
If you want to get started with Python, check out how to scrape JavaScript-rendered web pages with Selenium.