The job market is constantly evolving, making it essential to stay updated on new opportunities. However, manually tracking job listings across multiple sites can be time-consuming. So why not automate it?
In this guide, you'll learn how to build a LinkedIn job scraper in Python. While we’ll focus on LinkedIn, the same techniques can be applied to job sites like Indeed and others.
We'll guide you through every step - from setting up your project to deploying your automated scraper on the Apify platform!
- If you want a quicker, easier method, skip to the Use Apify's ready-made LinkedIn Jobs Scraper section or check out LinkedIn Jobs Scraper on Apify Store
Guide for scraping LinkedIn jobs with Python
Learn how to build a LinkedIn job scraper in Python with a step-by-step guide. In this tutorial, we’ll automatically retrieve job postings from the LinkedIn search page:
This section will walk you through the process of job scraping via the following steps:
- Prerequisites and project setup
- Analyze LinkedIn jobs structure
- Connect to the target API endpoint
- Extract job data
- Handle pagination
- Save data to CSV
- Complete code
- Deploy to Apify
1. Prerequisites and project setup
To follow along with this tutorial, make sure that you meet the following prerequisites:
- A basic understanding of how the web works
- Familiarity with the DOM, HTML, and CSS selectors
- Knowledge of AJAX and RESTful APIs
Since Python is the primary language for this LinkedIn scraping guide, you'll also need:
- Python 3+ installed on your local machine.
- A Python IDE, such as Visual Studio Code with the Python extension or PyCharm
- Basic knowledge of Python and asynchronous programming
To set up your Python project, start by creating a new folder and initializing a virtual environment inside it:
mkdir linkedin-scraper
cd linkedin-scraper
python -m venv venv
To activate the virtual environment on Windows, run:
venv\\Scripts\\activate
Equivalently, on Linux/macOS, execute:
source venv/bin/activate
In an activated virtual environment, install the required libraries for LinkedIn jobs scraping:
pip install httpx beautifulsoup4 lxml
These dependencies include:
httpx: A fast, modern HTTP client for making web requestsbeautifulsoup4: A library for parsing HTML and extracting data from HTML documentslxml: The underlying HTML parsing engine used by Beautiful Soup
Now, open your project in your IDE and create a scraper.py file to implement the scraping logic.
2. Analyze LinkedIn jobs structure
If you visit the LinkedIn Jobs Search page in your browser while being logged out, you might encounter this login wall page:

To bypass that, visit the LinkedIn homepage and click on the "Jobs" button:
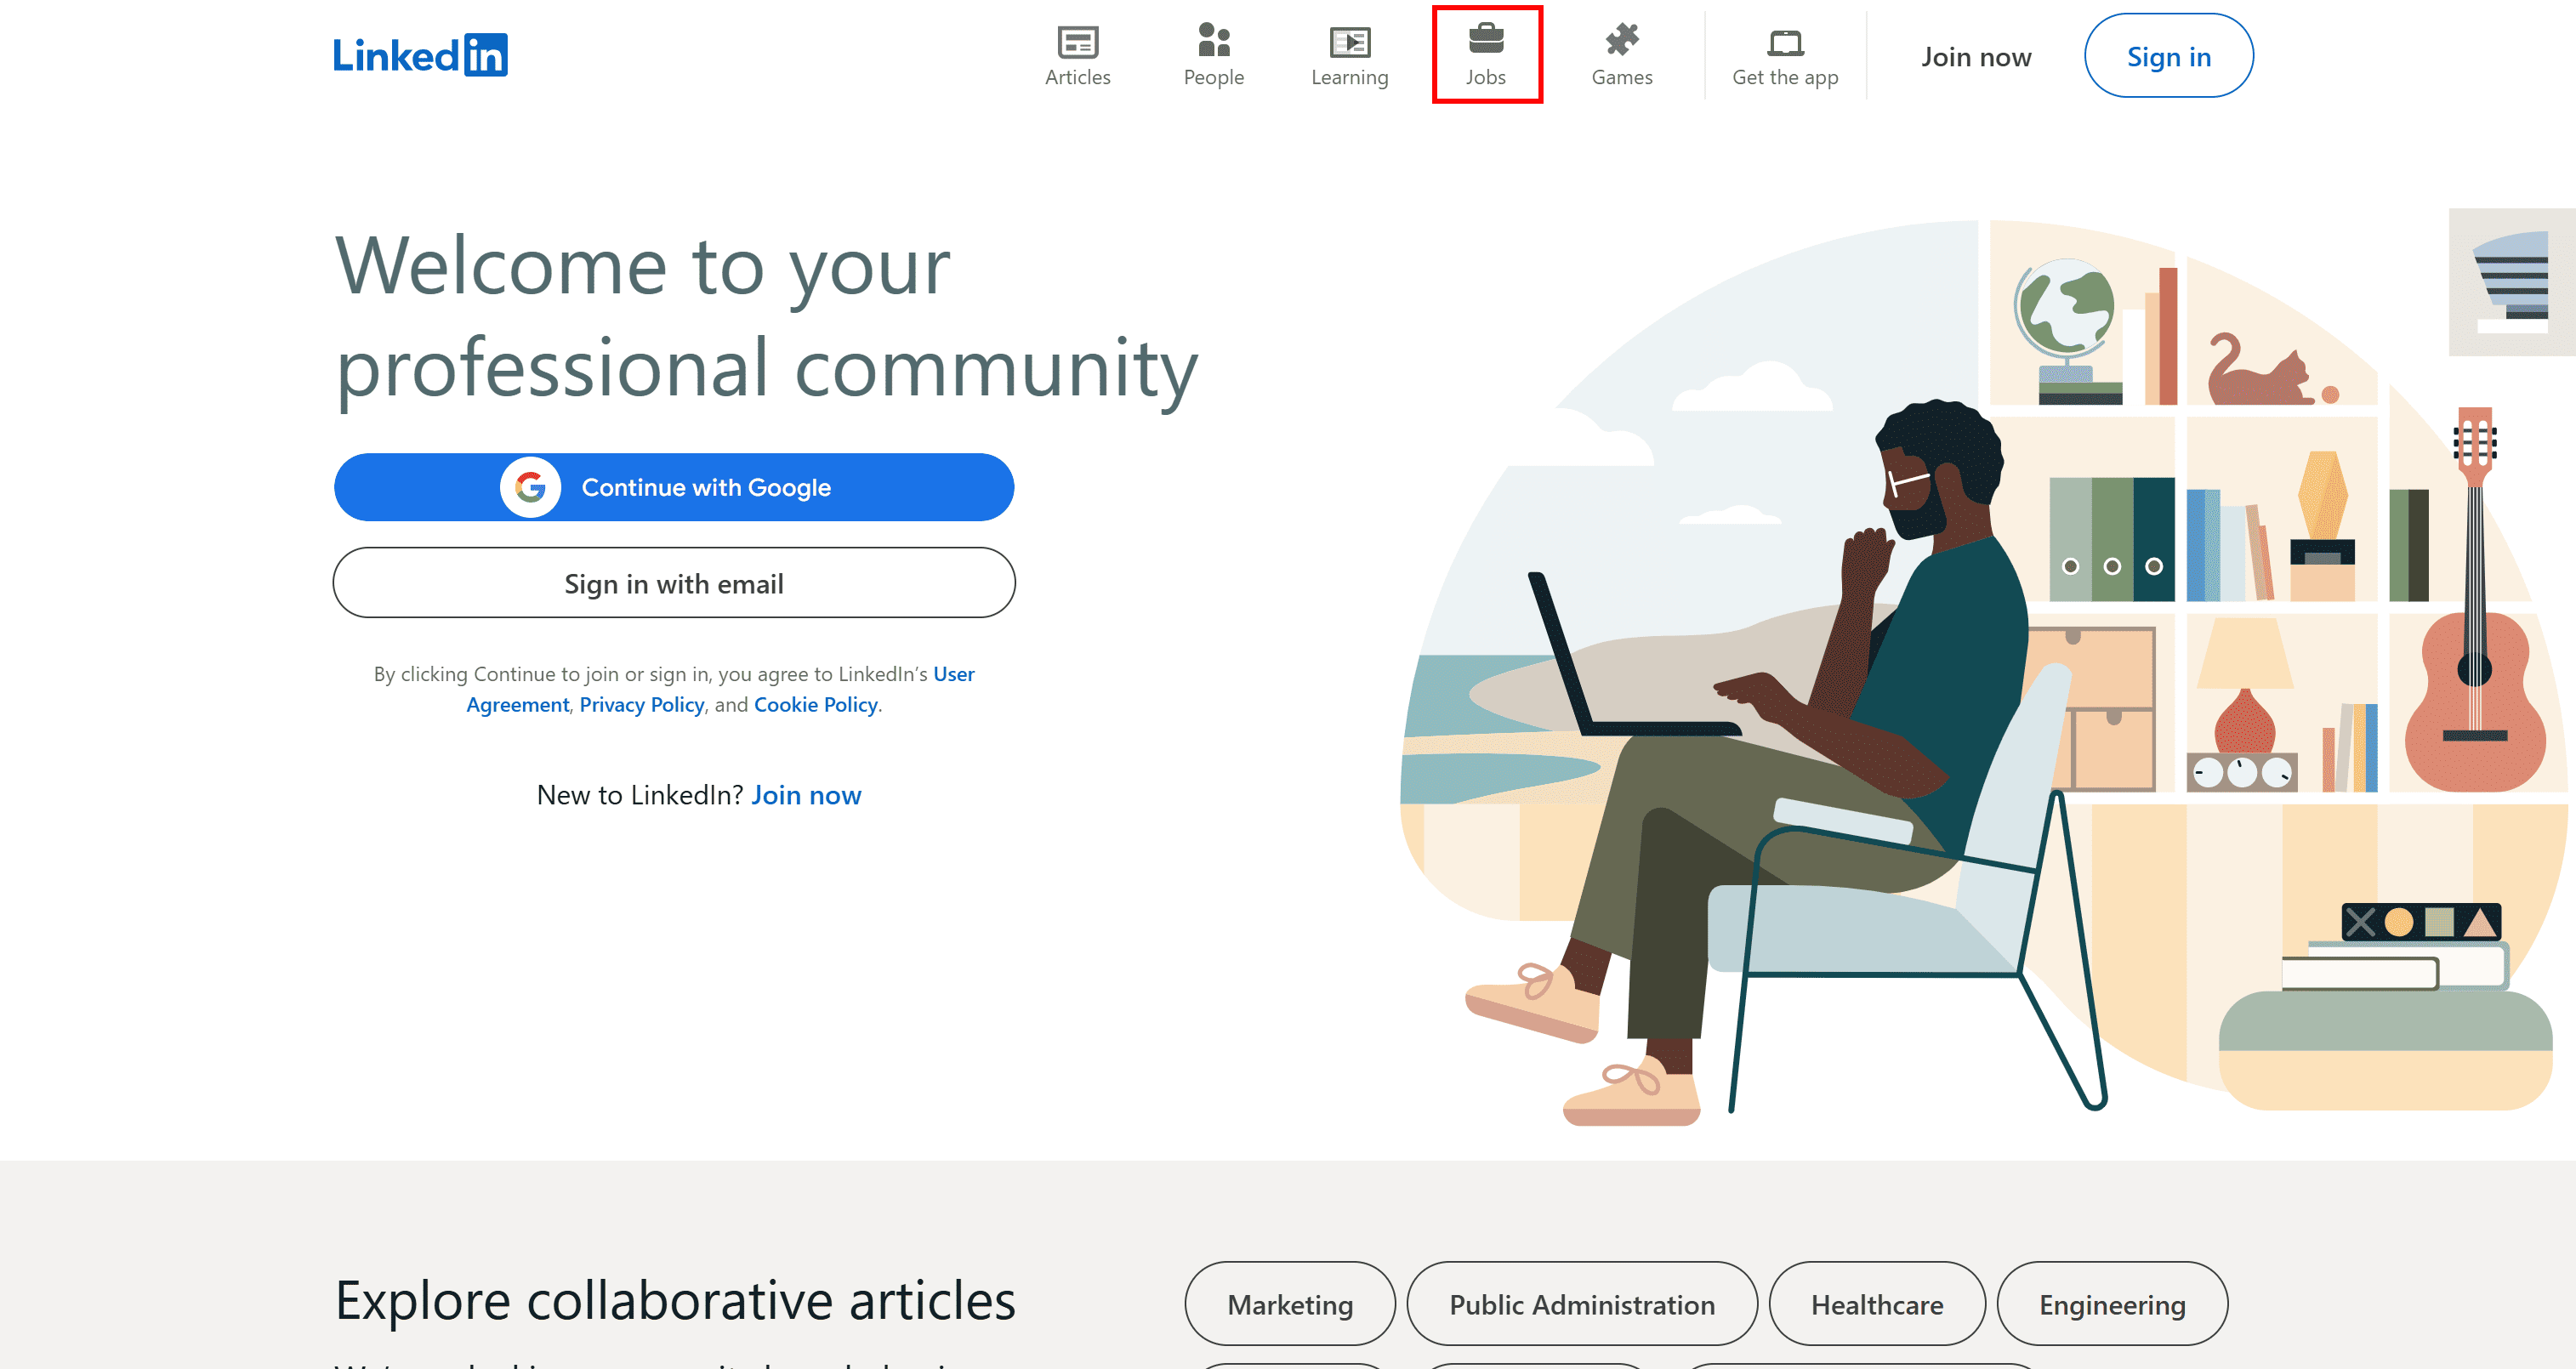
This time, you’ll see the correct job search page:
The difference? The first page has this URL:
https://www.linkedin.com/jobs/search
Whereas the second page has the URL below:
https://www.linkedin.com/jobs/search?trk=guest_homepage-basic_guest_nav_menu_jobs&position=1&pageNum=0
The extra query parameters signal to LinkedIn that you are a legitimate visitor, allowing access to the job search results.
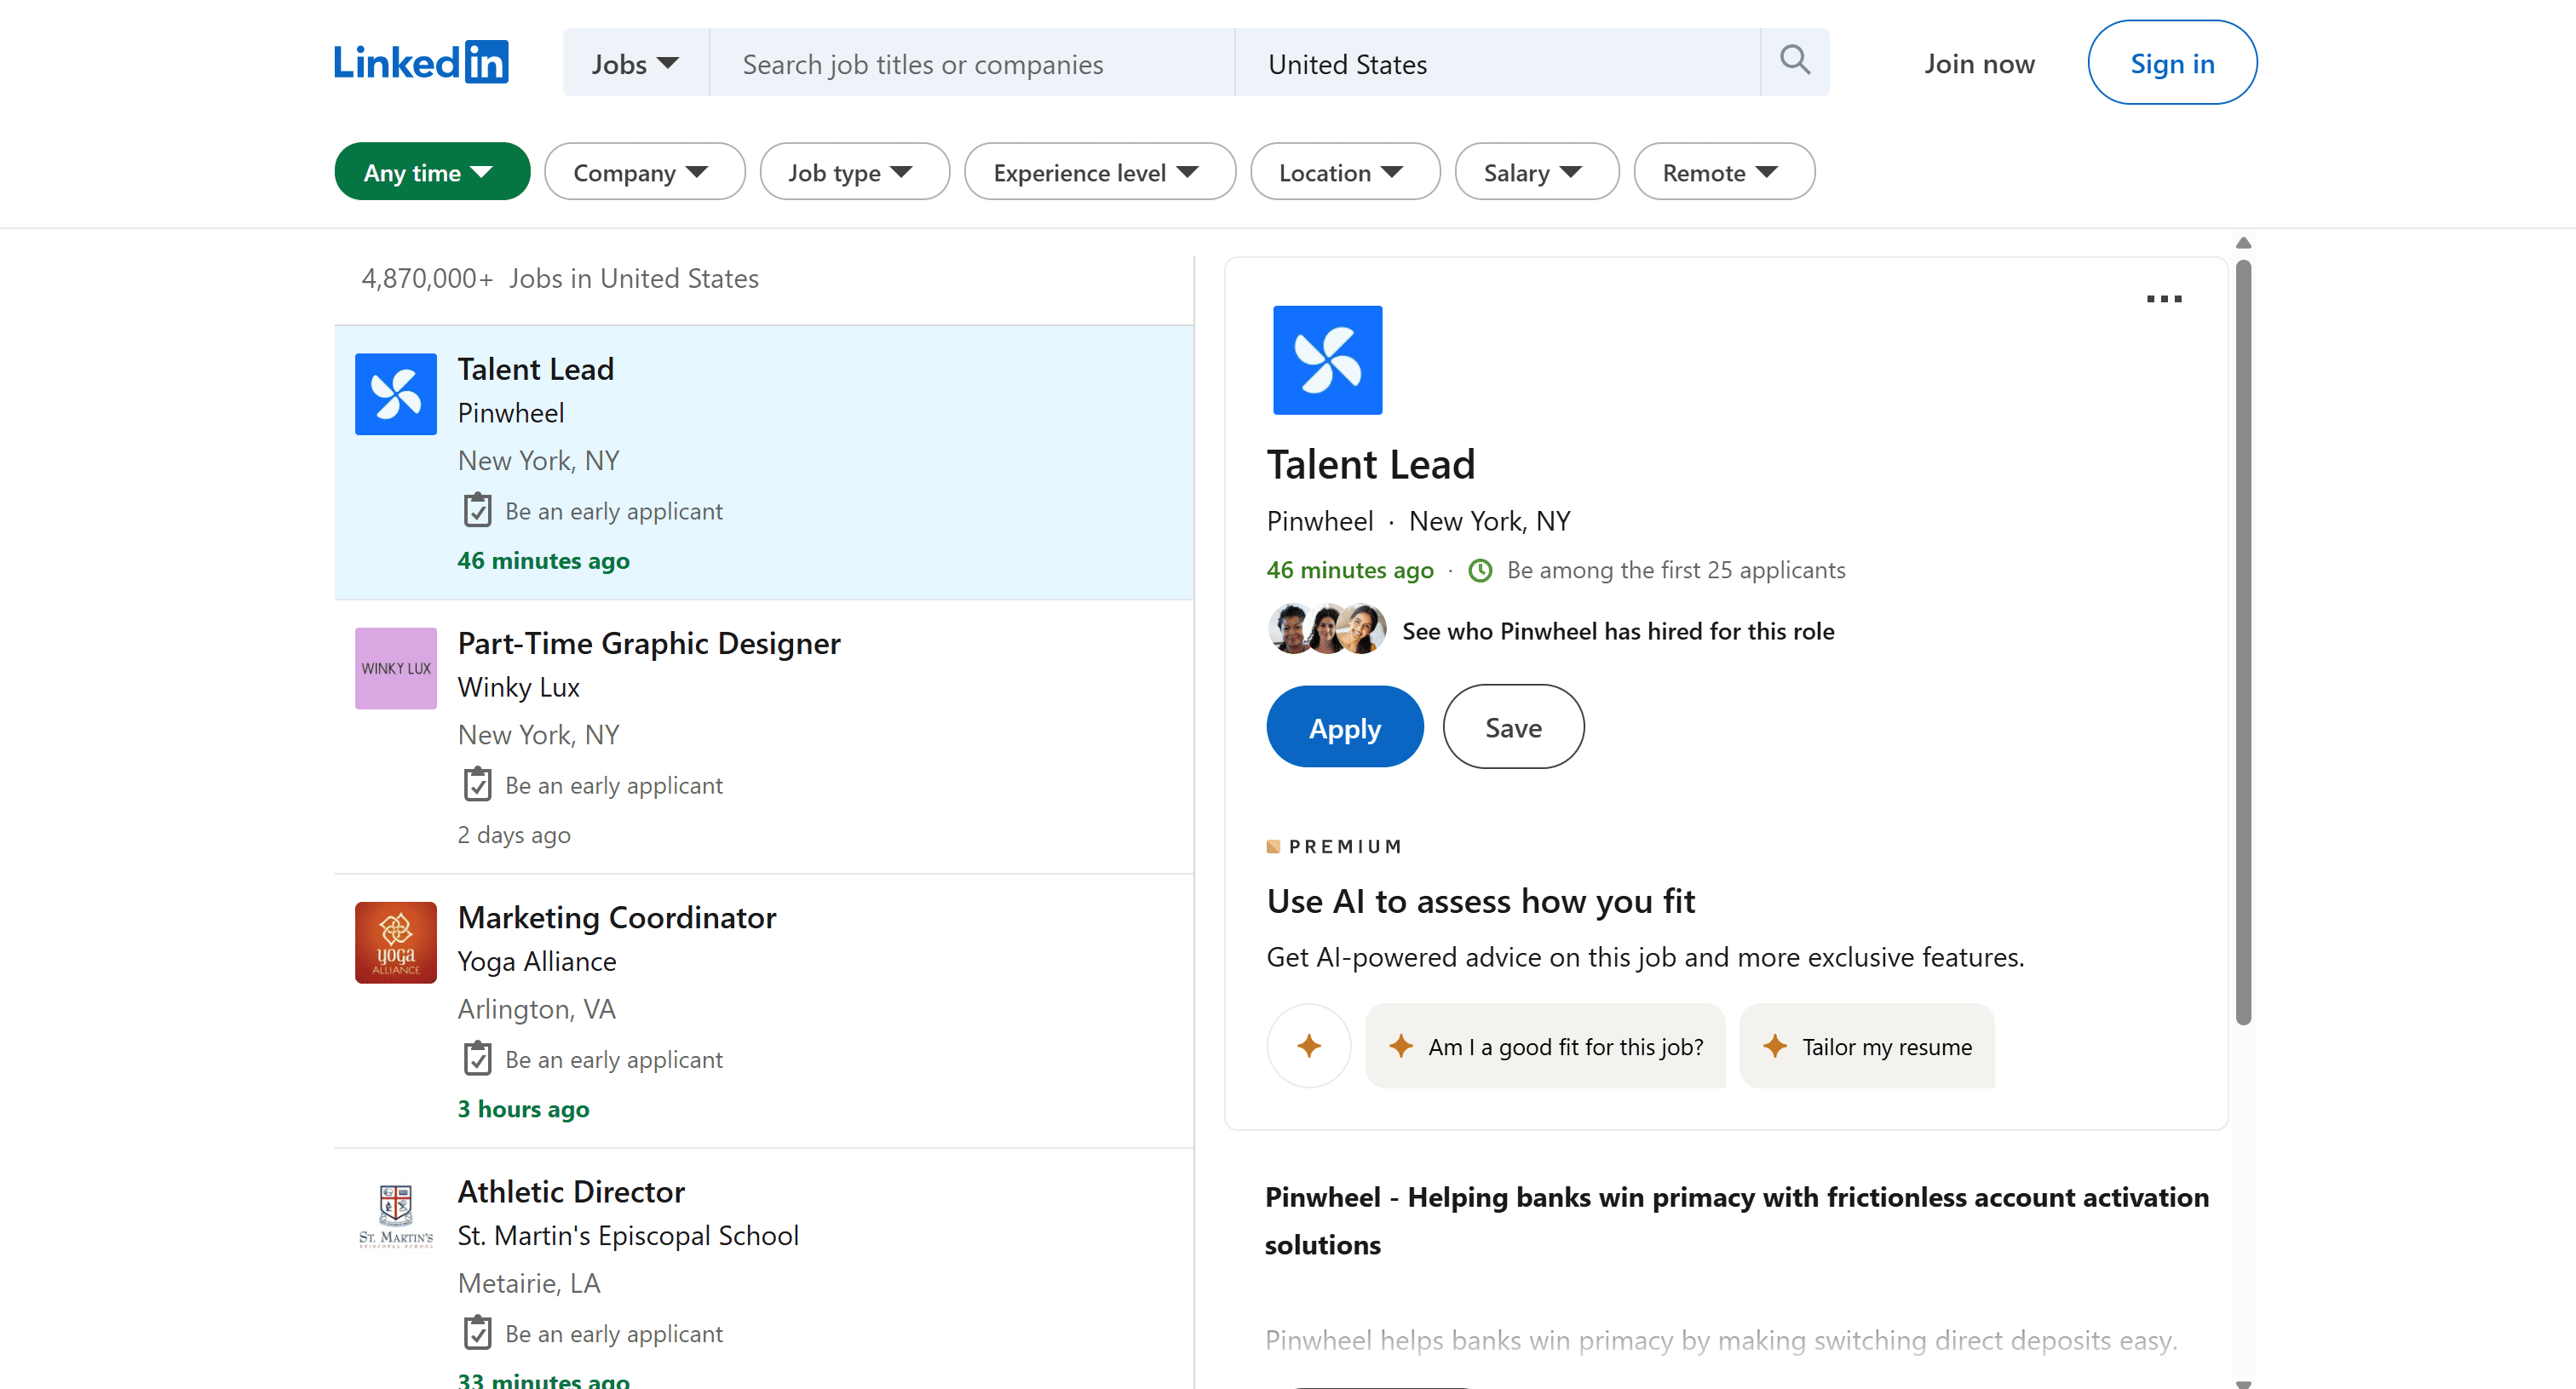
Now, try searching for a specific job title like "AI Engineer" in the United States:

The URL of the page will become:
https://www.linkedin.com/jobs/search?keywords=AI%20Engineer&location=United%20States&trk=public_jobs_jobs-search-bar_search-submit&position=1&pageNum=0
You might be tempted to scrape this page directly, but there’s a smarter approach!
Right-click on the page and select the “Inspect” option. In the DevTools window, reach the “Network” tab and enable the “Fetch/XHR” filter. Now, scroll down the page to trigger the loading of more job listings.
You'll notice that LinkedIn sends an AJAX request to fetch more job postings:
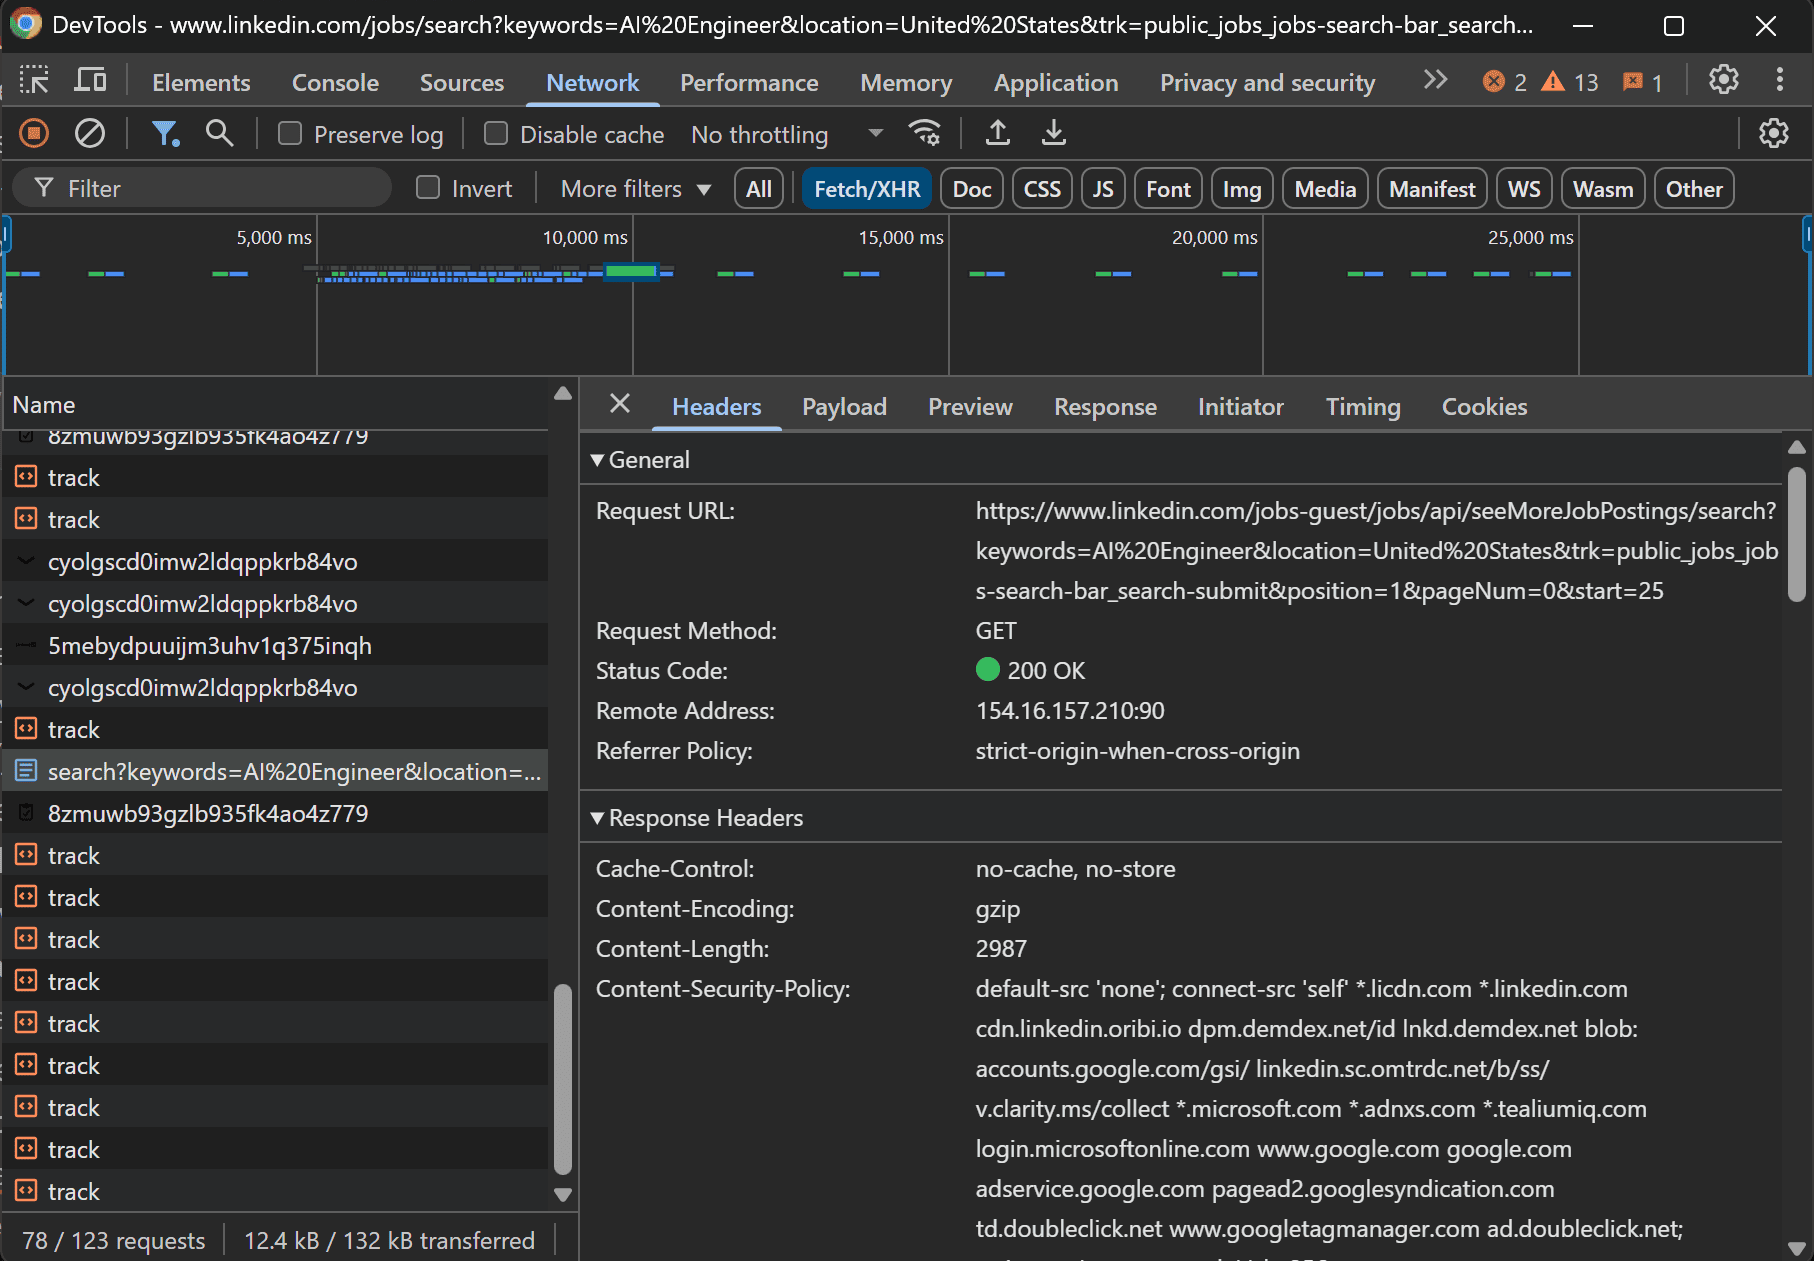
Specifically, the page calls the GET /jobs-guest/jobs/api/seeMoreJobPostings/search endpoint with some parameters:
https://www.linkedin.com/jobs-guest/jobs/api/seeMoreJobPostings/search?keywords=AI%20Engineer&location=United%20States&trk=public_jobs_jobs-search-bar_search-submit&position=1&pageNum=0&start=25
The above endpoint follows this structured format:
https://www.linkedin.com/jobs-guest/jobs/api/seeMoreJobPostings/search?keywords=><keyword>&location=<location>&trk=public_jobs_jobs-search-bar_search-submit&position=1&pageNum=0&start=<start>
Where:
<keyword>is the job title you are searching for (e.g., "AI Engineer").<location>is the location for the job search (e.g., "United States").<start>controls pagination (e.g.,0starts from the first job,10skips the first 10 jobs and fetches the next set, etc.)
If you inspect the API response, you'll see it returns raw HTML with job listings:
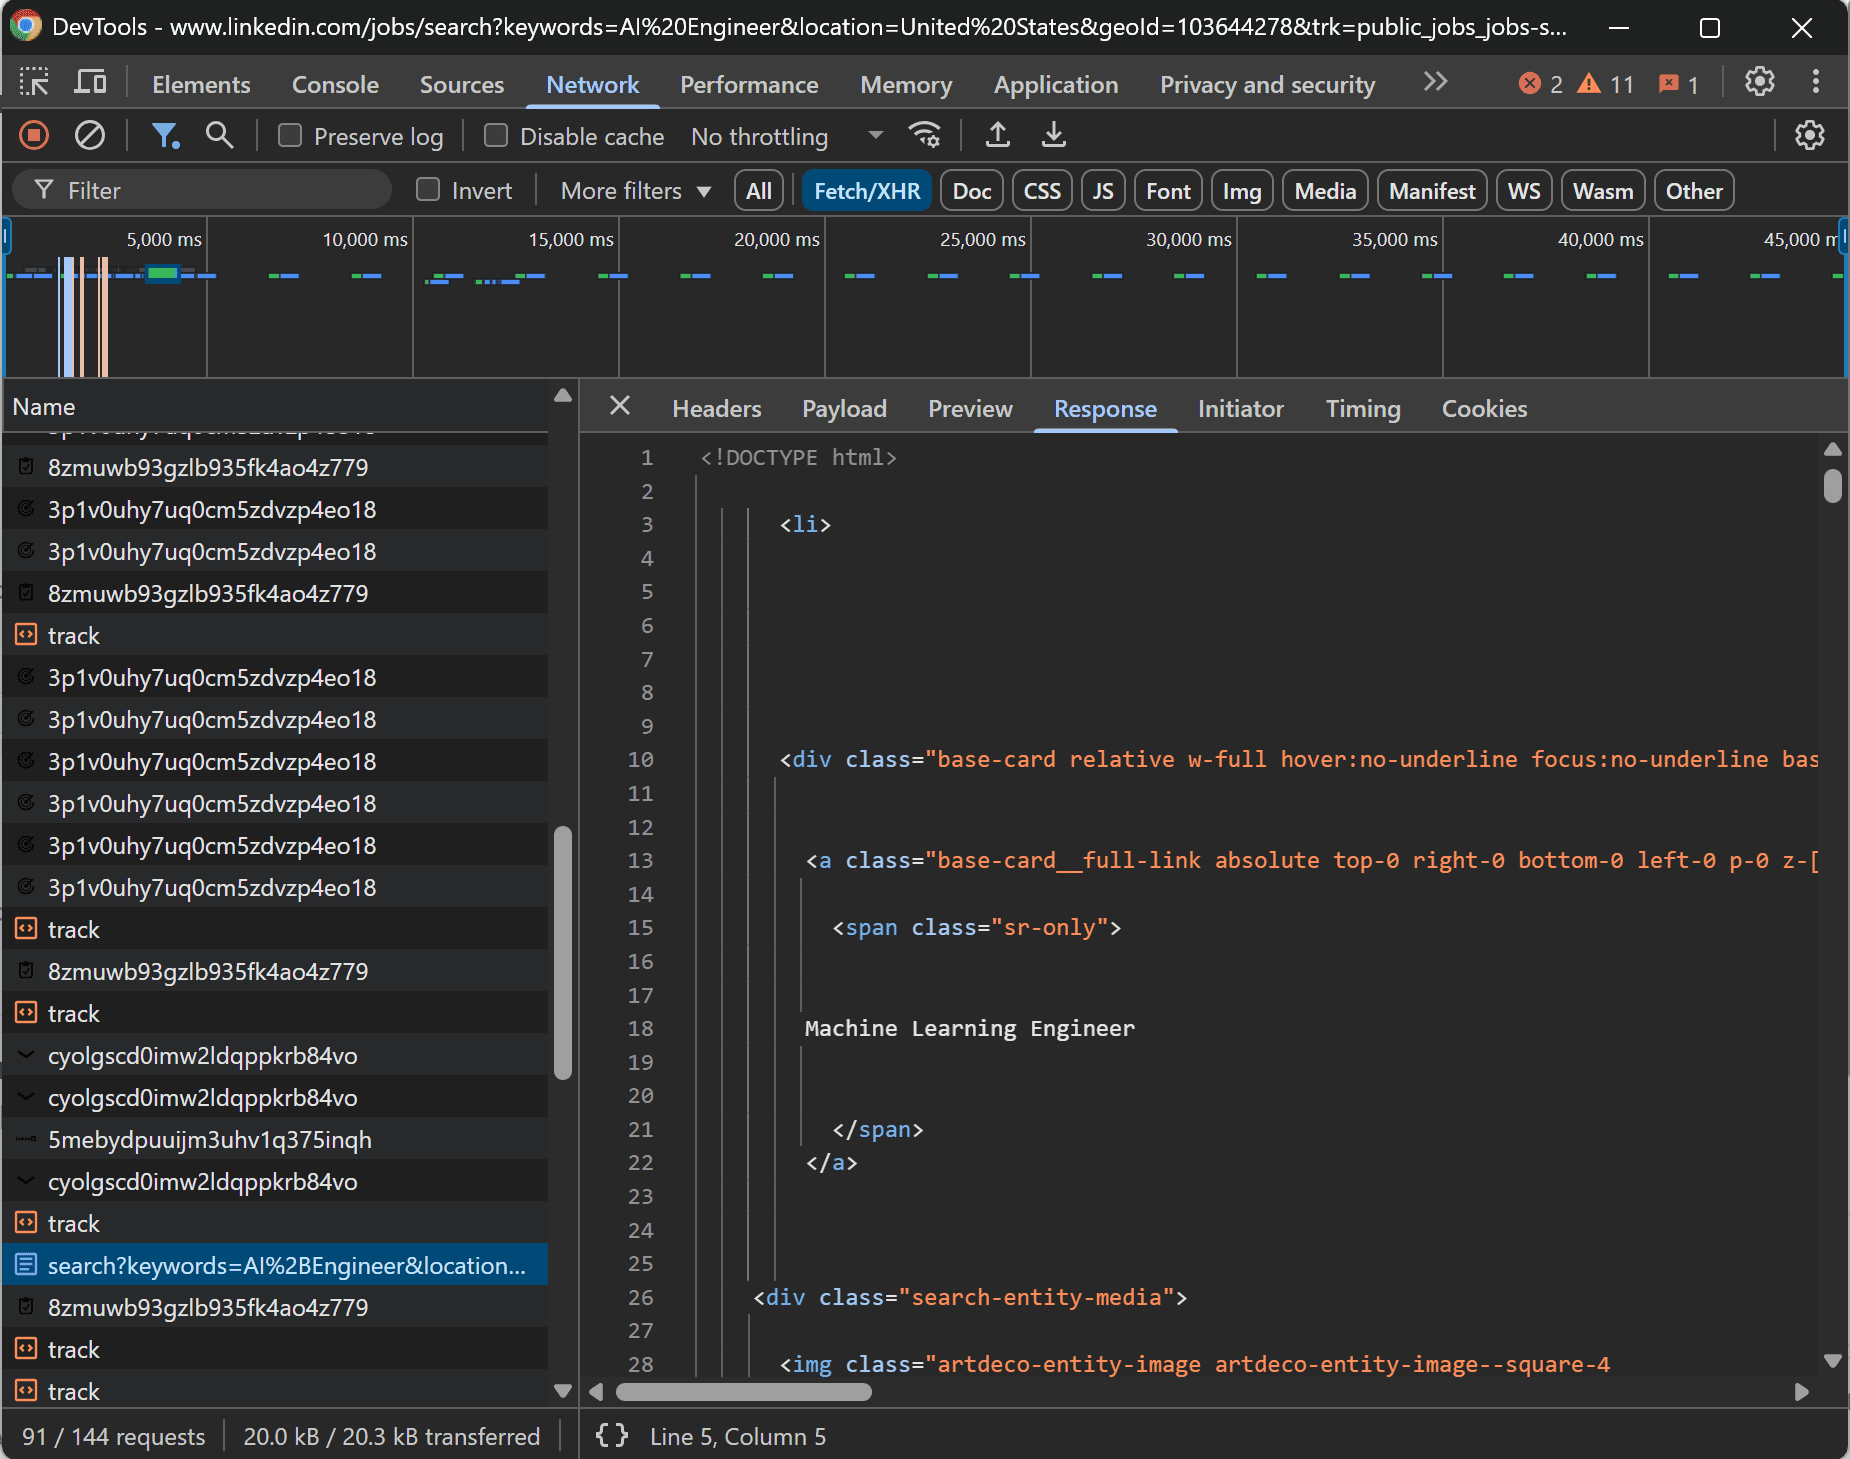
As you can tell, the response consists of <li> elements containing job postings. Essentially, that API can be targeted for web scraping, a technique known as “API scraping.”
If you copy and paste the API URL into your browser, you'll see the raw HTML response:
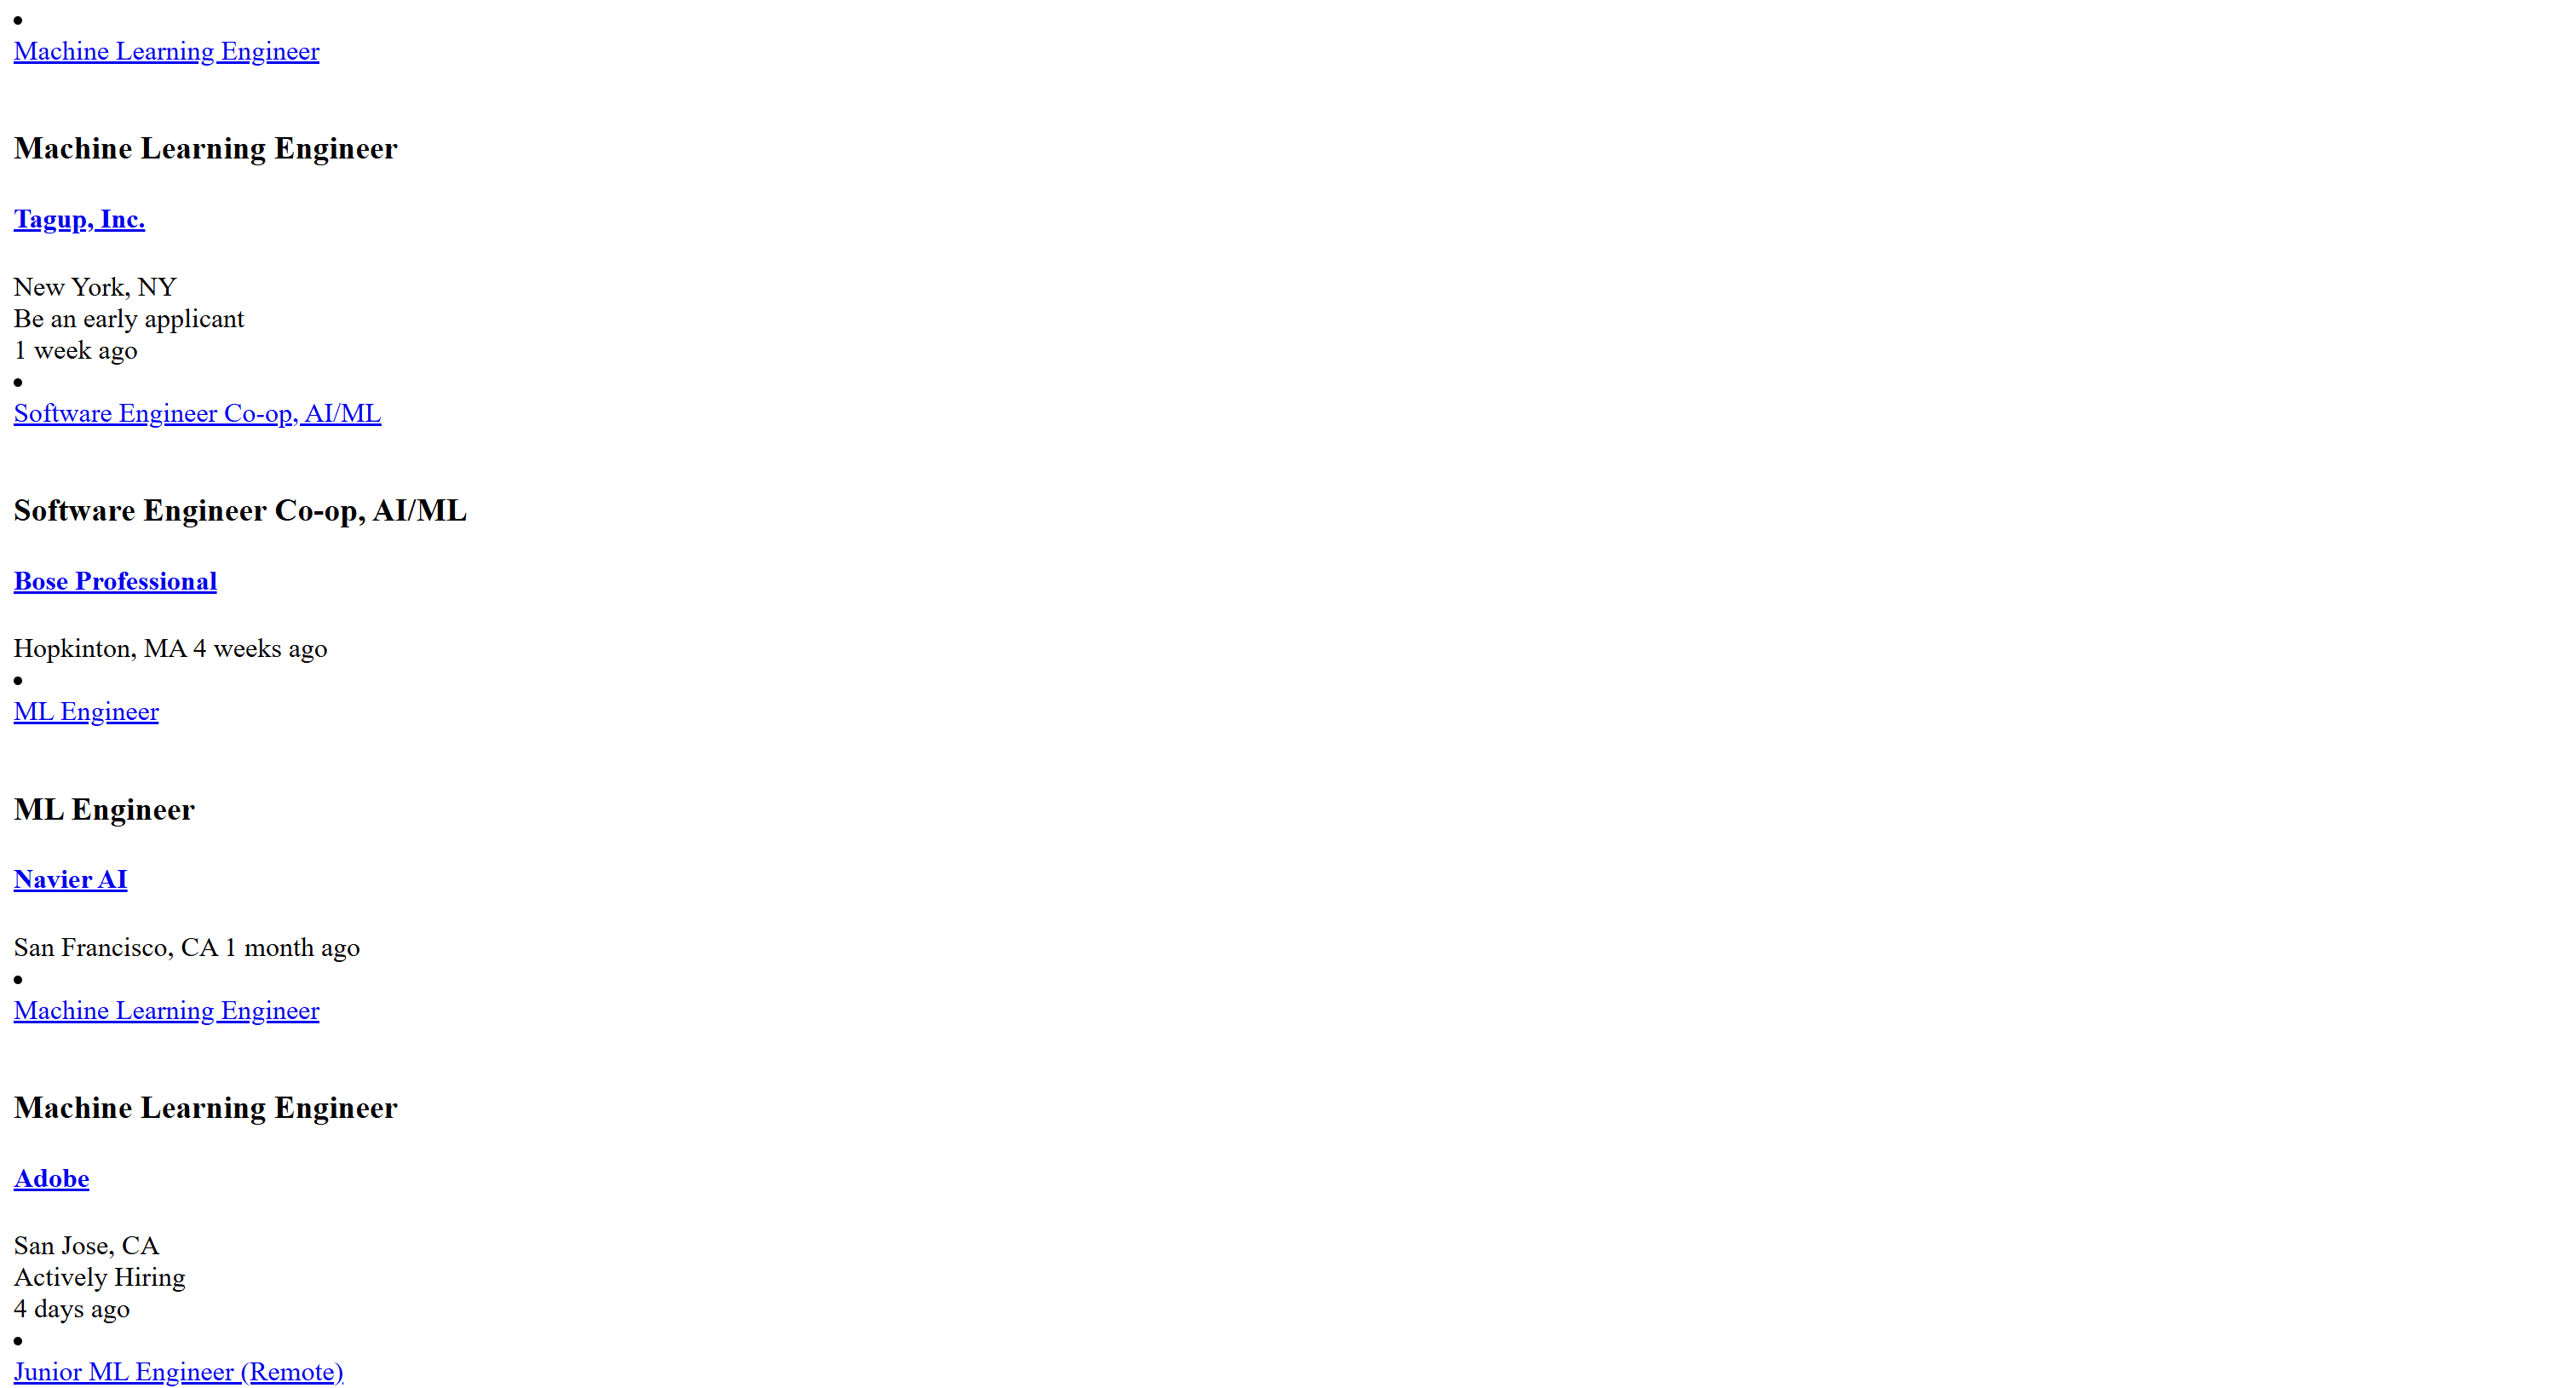
Each job posting contains:
- The job title
- The URL to the specific LinkedIn job page
- The job location
- The posting date
By targeting this API instead of scraping the entire webpage, you can extract job listings more efficiently.
3. Connect to the target API endpoint
To scrape LinkedIn job listings, you'll first need to make an HTTP request to the target search API/page. First, import HTTPX in your Python script:
from httpx import AsyncClient
Then, remember that the AJAX request made by the page in the browser contains multiple headers. If you don’t include them in your script, LinkedIn may block your request since it won’t appear to be coming from a browser. To avoid blocks, replicate the GET request headers when making the request with HTTPX:
url = "https://www.linkedin.com/jobs-guest/jobs/api/seeMoreJobPostings/search"
params = {
    "keywords": "AI Engineer",
    "location": "United States",
    "trk": "public_jobs_jobs-search-bar_search-submit",
    "start": "0"
}
headers = {
    "accept": "*/*",
    "accept-language": "en-US,en;q=0.9",
    "priority": "u=1, i",
    "sec-ch-ua": '"Chromium";v="134", "Not:A-Brand";v="24", "Google Chrome";v="134"',
    "sec-ch-ua-mobile": "?0",
    "sec-ch-ua-platform": '"Windows"',
    "sec-fetch-dest": "empty",
    "sec-fetch-mode": "cors",
    "sec-fetch-site": "same-origin"
}
async with httpx.AsyncClient() as client:
    response = await client.get(url, headers=headers, params=params)
Note that <start>has been set to 0 to get the job posting elements from the start.
Instead of using the API, you could directly target the LinkedIn job search page:
url = "https://www.linkedin.com/jobs/search?keywords=AI%20Engineer&location=United%20States&trk=public_jobs_jobs-search-bar_search-submit&position=1&pageNum=0"
# same code as above...
As mentioned earlier, the API returns only the essential job listings in raw HTML—making data parsing much easier. Instead, the full job search page contains many additional elements. Also, targeting the search webpage makes it harder to scrape job listings across multiple pages. In this case, the API approach is recommended.
Right now, your scraper will contain:
import asyncio
import httpx

async def main() -> None:
    url = "https://www.linkedin.com/jobs-guest/jobs/api/seeMoreJobPostings/search"
    params = {
        "keywords": "AI Engineer",
        "location": "United States",
        "trk": "public_jobs_jobs-search-bar_search-submit",
        "start": "0"
    }
    headers = {
        "accept": "*/*",
        "accept-language": "en-US,en;q=0.9",
        "priority": "u=1, i",
        "sec-ch-ua": '"Chromium";v="134", "Not:A-Brand";v="24", "Google Chrome";v="134"',
        "sec-ch-ua-mobile": "?0",
        "sec-ch-ua-platform": '"Windows"',
        "sec-fetch-dest": "empty",
        "sec-fetch-mode": "cors",
        "sec-fetch-site": "same-origin"
    }
    async with httpx.AsyncClient() as client:
        # Perform a GET HTTP request to the target API
        response = await client.get(url, headers=headers, params=params)
        # Print the HTML response
        print(response.content)

# Run the async function
asyncio.run(main())
If you execute the script, you’ll get raw HTML similar to the content below:
<li>
<div class="base-card relative w-full hover:no-underline focus:no-underline base-card--link base-search-card base-search-card--link job-search-card"
data-entity-urn="urn:li:jobPosting:4172359372"
data-impression-id="jobs-search-result-0"
data-reference-id="UwAVpEJKGozQZChiRkVAqA=="
data-tracking-id="IqYOsCsaz16pk9P++5/Qlg=="
data-column="1" data-row="26">
<a class="base-card__full-link absolute top-0 right-0 bottom-0 left-0 p-0 z-[2]"
href="https://www.linkedin.com/jobs/view/machine-learning-engineer-at-tagup-inc-4172359372?position=1&pageNum=2&refId=UwAVpEJKGozQZChiRkVAqA%3D%3D&trackingId=IqYOsCsaz16pk9P%2B%2B5%2FQlg%3D%3D"
data-tracking-control-name="public_jobs_jserp-result_search-card"
data-tracking-client-ingraph
data-tracking-will-navigate>
<span class="sr-only">Machine Learning Engineer</span>
</a>
<div class="search-entity-media">
<img class="artdeco-entity-image artdeco-entity-image--square-4"
data-delayed-url="https://media.licdn.com/dms/image/v2/D4E0BAQGukdIwLnnfsA/company-logo_100_100/company-logo_100_100/0/1737909623270/tagup_logo?e=2147483647&v=beta&t=r41szu5-PE_bSt4ehtf5wHPFSpw5kF58dLqbw-WClE4"
data-ghost-classes="artdeco-entity-image--ghost"
data-ghost-url="https://static.licdn.com/aero-v1/sc/h/6puxblwmhnodu6fjircz4dn4h"
alt>
</div>
<div class="base-search-card__info">
<h3 class="base-search-card__title">Machine Learning Engineer</h3>
<h4 class="base-search-card__subtitle">
<a class="hidden-nested-link"
data-tracking-client-ingraph
data-tracking-control-name="public_jobs_jserp-result_job-search-card-subtitle"
data-tracking-will-navigate
href="https://www.linkedin.com/company/tagup?trk=public_jobs_jserp-result_job-search-card-subtitle">
Tagup, Inc.
</a>
</h4>
<div class="base-search-card__metadata">
<span class="job-search-card__location">New York, NY</span>
<div class="job-posting-benefits text-sm">
<icon class="job-posting-benefits__icon"
data-delayed-url="https://static.licdn.com/aero-v1/sc/h/8zmuwb93gzlb935fk4ao4z779"
data-svg-class-name="job-posting-benefits__icon-svg"></icon>
<span class="job-posting-benefits__text">Be an early applicant</span>
</div>
<time class="job-search-card__listdate" datetime="2025-03-03">1 week ago</time>
</div>
</div>
</div>
</li>
<li>
<!-- omitted for brevity... -->
</li>
<!-- other <li> elements... -->
That is the raw HTML structure of a job listing returned by the LinkedIn jobs search API.
4. Extract job data
Now that you have raw HTML, feed it to Beautiful Soup for parsing it with lxml. First, import Beautiful Soup:
from bs4 import BeautifulSoup
Then, pass the raw HTML to the BeautifulSoup constructor:
html = soup = BeautifulSoup(response.content, "lxml")
To define the HTML parsing logic, you must get familiar with the structure of the HTML snippet returned by the API. Copy the API URL into your browser and visit it. Next, inspect the resulting HTML with DevTools:
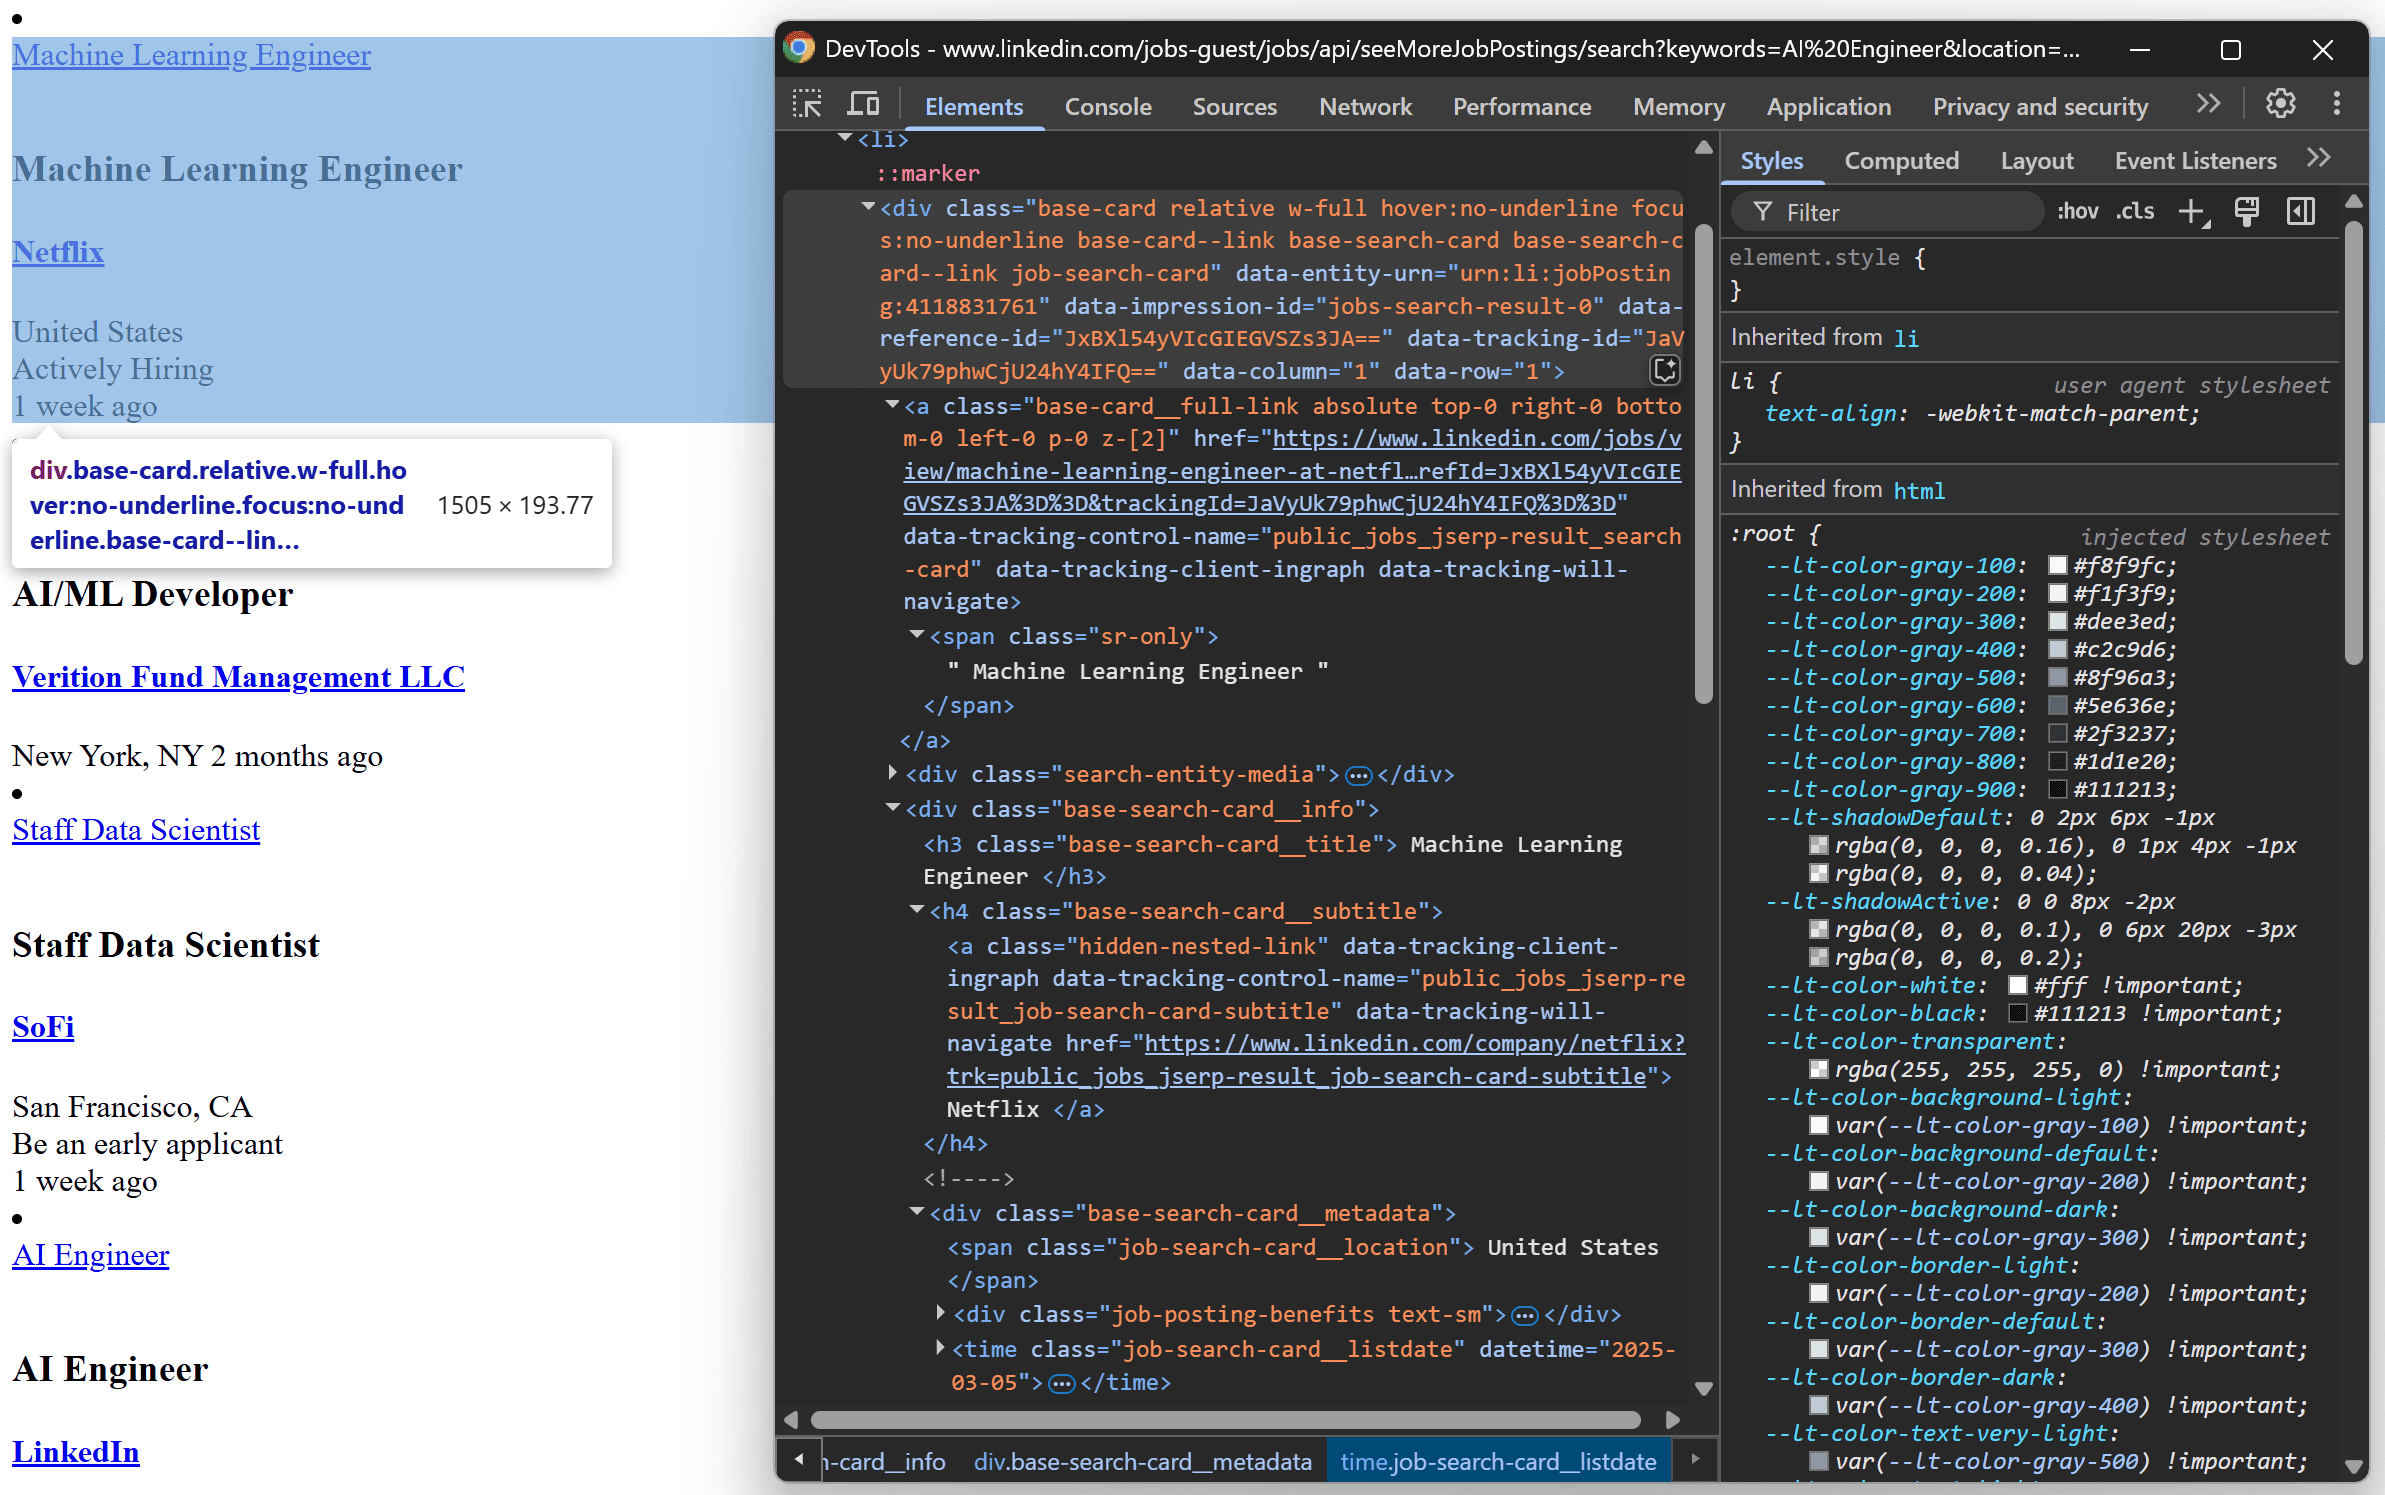
Here, you can see that each <li> contains:
- The job post URL in an
a[data-tracking-control-name="public_jobs_jserp-result_search-card"]element - The job title in an
h3.base-search-card__titleHTML element - The company name in an
h4.base-search-card__subtitlenode - The publication date in a
job-search-card__listdateelement
To scrape LinkedIn job postings, you first need a structure to store the scraped data. Since the page contains multiple job listings, an array is ideal:
job_postings = []
First, select all <li> elements and prepare to iterate over them:
job_li_elements = soup.select("li")

for job_li_element in job_li_elements:
    # Scraping logic...
select() from Beautiful Soup returns all HTML elements that match the specified CSS selector.
Next, scrape data from each <li> element by selecting the elements identified earlier and the content of interest from them:
link_element = job_li_element.select_one("a[data-tracking-control-name=\\"public_jobs_jserp-result_search-card\\"]")
link = link_element["href"] if link_element else None

title_element = job_li_element.select_one("h3.base-search-card__title")
title = title_element.text.strip() if title_element else None

company_element = job_li_element.select_one("h4.base-search-card__subtitle")
company = company_element.text.strip() if company_element else None

publication_date_element = job_li_element.select_one("time.job-search-card__listdate")
publication_date = publication_date_element["datetime"] if publication_date_element else None
select_one() works similarly to select(), but it returns only the first element that matches the specified CSS selector. The text attribute retrieves the text content within the HTML element, while square bracket syntax is used to access HTML attributes. The strip() method is used to remove any extra spaces from the text content.
If you're not familiar with the syntax above, read our guide on web scraping with Beautiful Soup.
Keep in mind that not all LinkedIn job posting HTML elements contain the same data. For this reason, some HTML elements you're looking for in the code may not be part of the <li> element. In that case, select_one() will return None. To prevent errors, you can use this syntax:
<variable> = <operation> if <html_element> else None
This ensures that <operation> is performed only if <html_element> is not None. Otherwise, it assigns <variable> to None.
Finally, use the scraped data to populate a new job posting object and add it to the list:
job_posting = {
    "url": link,
    "title": title,
    "company": company,
    "publication_date": publication_date
}
job_postings.append(job_posting)
At the end of this step, job_postings will contain something like:
[
  {'url': 'https://www.linkedin.com/jobs/view/machine-learning-engineer-at-netflix-4118831761?position=1&pageNum=0&refId=Kd5%2F7JLKUdxzWL%2FdaPidwA%3D%3D&trackingId=4iC4PH5kiqfIRN%2B0D9s64Q%3D%3D', 'title': 'Machine Learning Engineer', 'company': 'Netflix', 'publication_date': '2025-03-05'},
  # omitted for brevity...
  {'url': 'https://www.linkedin.com/jobs/view/machine-learning-engineer-at-tagup-inc-4172355933?position=10&pageNum=0&refId=Kd5%2F7JLKUdxzWL%2FdaPidwA%3D%3D&trackingId=lff%2BDfyg%2B0C3z9cQAFDxIg%3D%3D', 'title': 'Machine Learning Engineer', 'company': 'Tagup, Inc.', 'publication_date': '2025-03-03'}
]
5. Handle pagination
Don't forget that the LinkedIn job search endpoint has a start parameter that allows you to handle pagination. By default, the API returns 10 job postings at a time. So, you can access the second page by setting start to 10, the third page by setting it to 20, and so on.
To implement pagination, you can write a simple for loop as shown below:
# url = ...
# params = ...
# headers = ...

# The number of pagination pages to scrape
pages = 3
# Iterate over each pagination page
for page in range(pages):
    async with httpx.AsyncClient() as client:
        # Set the right pagination argument
        params["start"] = str(page * 10)
        response = await client.get(url, headers=headers, params=params)
The argument pages is set to 3, meaning the script will scrape 3 pages of job postings.
Note that to make the data storing logic work, you must move job_postings outside of the for loop:
job_postings = []
# for loop...
This way, job_postings will store data across all pages, rather than being reset for each page.
6. Save data to CSV
You now have the scraped LinkedIn job postings in a Python array. To make the data easier to share and analyze, export it to a CSV file. Note that you don’t need any new dependencies for this task, as the Python Standard Library provides everything you need.
First, import csv from the Python Standard Library:
import csv
Then, use it to export job_postings to a file called job_postings.csv as follows:
with open("job_postings.csv", mode="w", newline="", encoding="utf-8") as file:
    # Initialize the CSV writer
    writer = csv.DictWriter(file, fieldnames=["url", "title", "company", "publication_date"])
    # Write the CSV header
    writer.writeheader()
    # Populate the CSV with the data in the dictionary array
    writer.writerows(job_postings)
writerows() from csv.DictWriter will populate the output file with your scraped data.
7. Complete code
This is the final code of your Python LinkedIn jobs scaper:
import asyncio
import httpx
from bs4 import BeautifulSoup
import csv

async def main() -> None:
    url = "https://www.linkedin.com/jobs-guest/jobs/api/seeMoreJobPostings/search"
    params = {
        "keywords": "AI Engineer",
        "location": "United States",
        "trk": "public_jobs_jobs-search-bar_search-submit",
        "start": "0"
    }
    headers = {
        "accept": "*/*",
        "accept-language": "en-US,en;q=0.9",
        "priority": "u=1, i",
        "sec-ch-ua": '"Chromium";v="134", "Not:A-Brand";v="24", "Google Chrome";v="134"',
        "sec-ch-ua-mobile": "?0",
        "sec-ch-ua-platform": '"Windows"',
        "sec-fetch-dest": "empty",
        "sec-fetch-mode": "cors",
        "sec-fetch-site": "same-origin",
    }

    # Where to store the scraped data
    job_postings = []

    # The number of pagination pages to scrape
    pages = 3
    # Iterate over each pagination page
    for page in range(pages):
        async with httpx.AsyncClient() as client:
            # Set the right pagination argument
            params["start"] = str(page * 10)

            # Perform a GET HTTP request to the target API
            response = await client.get(url, headers=headers, params=params)

        # Parse the HTML content returned by API
        soup = BeautifulSoup(response.content, "lxml")

        # Select all <li> job posting elements
        job_li_elements = soup.select("li")

        # Iterate over them and scrape data from each of them
        for job_li_element in job_li_elements:
            # Scraping logic
            link_element = job_li_element.select_one("a[data-tracking-control-name=\\"public_jobs_jserp-result_search-card\\"]")
            link = link_element["href"] if link_element else None

            title_element = job_li_element.select_one("h3.base-search-card__title")
            title = title_element.text.strip() if title_element else None

            company_element = job_li_element.select_one("h4.base-search-card__subtitle")
            company = company_element.text.strip() if company_element else None

            publication_date_element = job_li_element.select_one("time.job-search-card__listdate")
            publication_date = publication_date_element["datetime"] if publication_date_element else None

            # Populate a new job posting with the scraped data
            job_posting = {
                "url": link,
                "title": title,
                "company": company,
                "publication_date": publication_date
            }
            # Append it to the list
            job_postings.append(job_posting)

    # Export the scraped data to CSV
    with open("job_postings.csv", mode="w", newline="", encoding="utf-8") as file:
        # Initialize the CSV writer
        writer = csv.DictWriter(file, fieldnames=["url", "title", "company", "publication_date"])
        # Write the CSV header
        writer.writeheader()
        # Populate the CSV with the data in the dictionary array
        writer.writerows(job_postings)

# Run the async function
asyncio.run(main())
Execute the script with the following command:
python scraper.py
At the end of the execution, a job_postings.csv file will appear in your project directory. Open it, and you will see something like this:

Great! Your LinkedIn scraping script is working like a charm.
8. Deploy to Apify
Suppose you want to deploy your LinkedIn job scraper to Apify to execute it in the cloud. The prerequisites for using Apify are:
- An Apify account
- A basic understanding of how Apify works
To initialize a new LinkedIn web scraping project on Apify:
- Log in
- Reach the Console
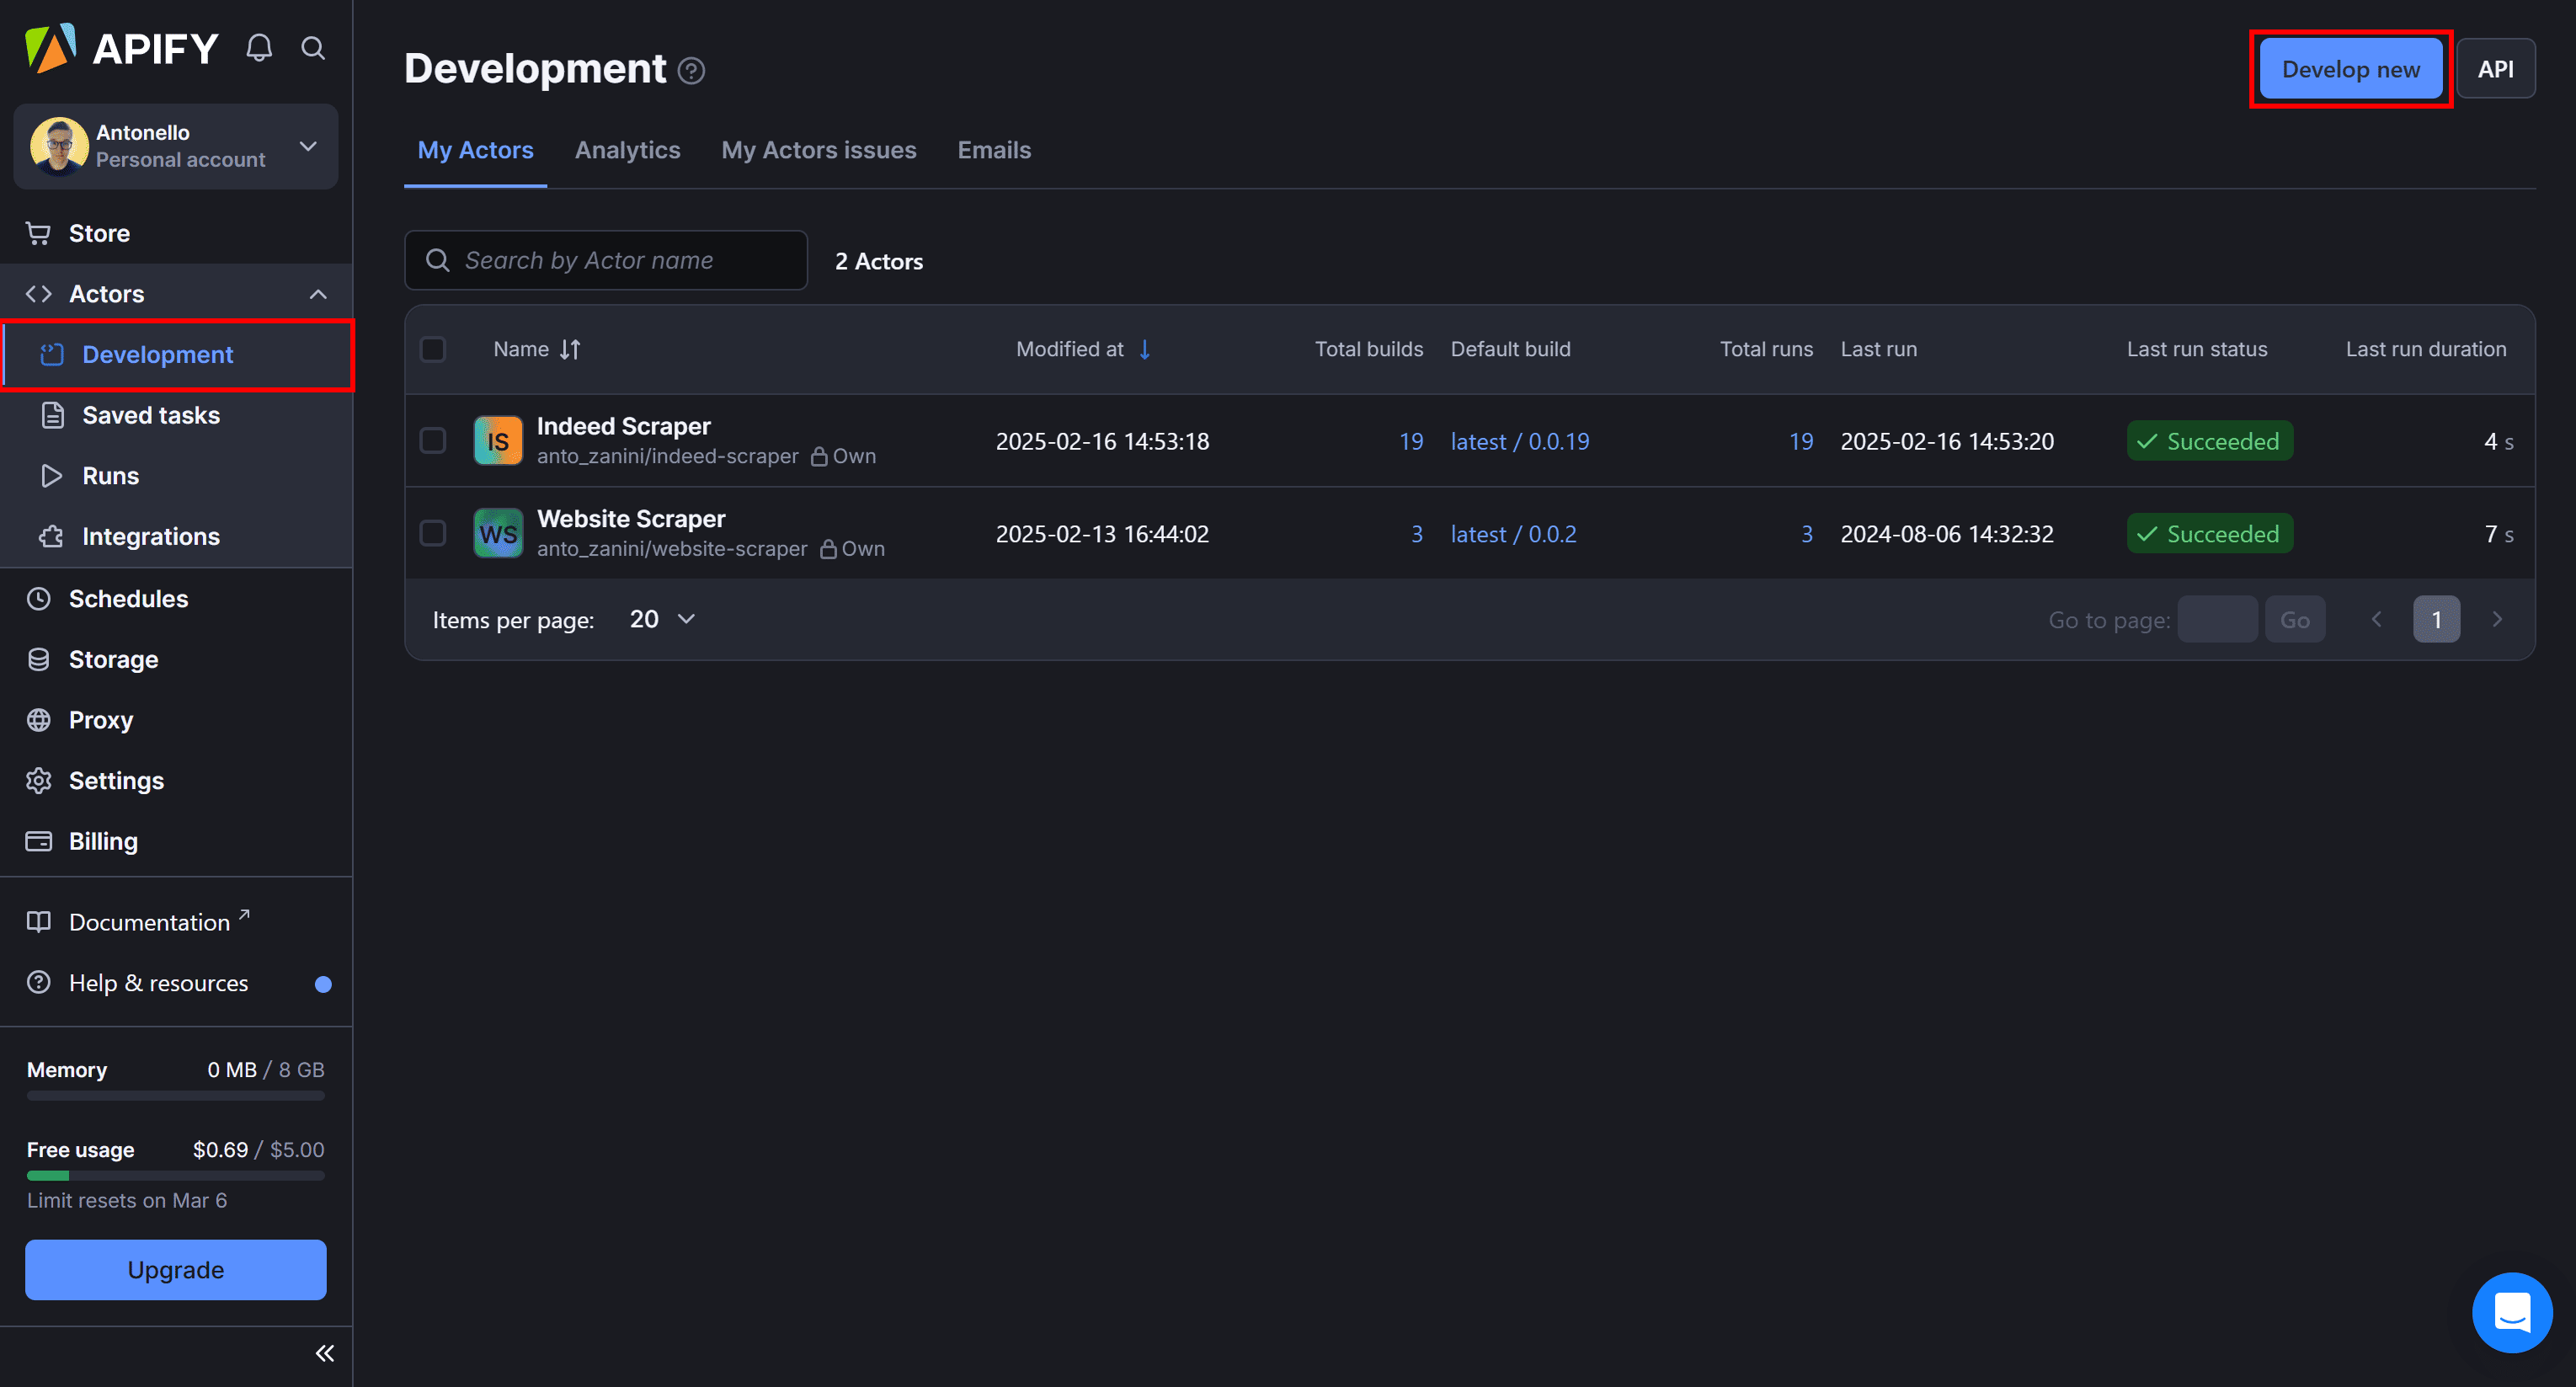
Under the "Actors" dropdown, select "Development," and press the “Develop new” button:
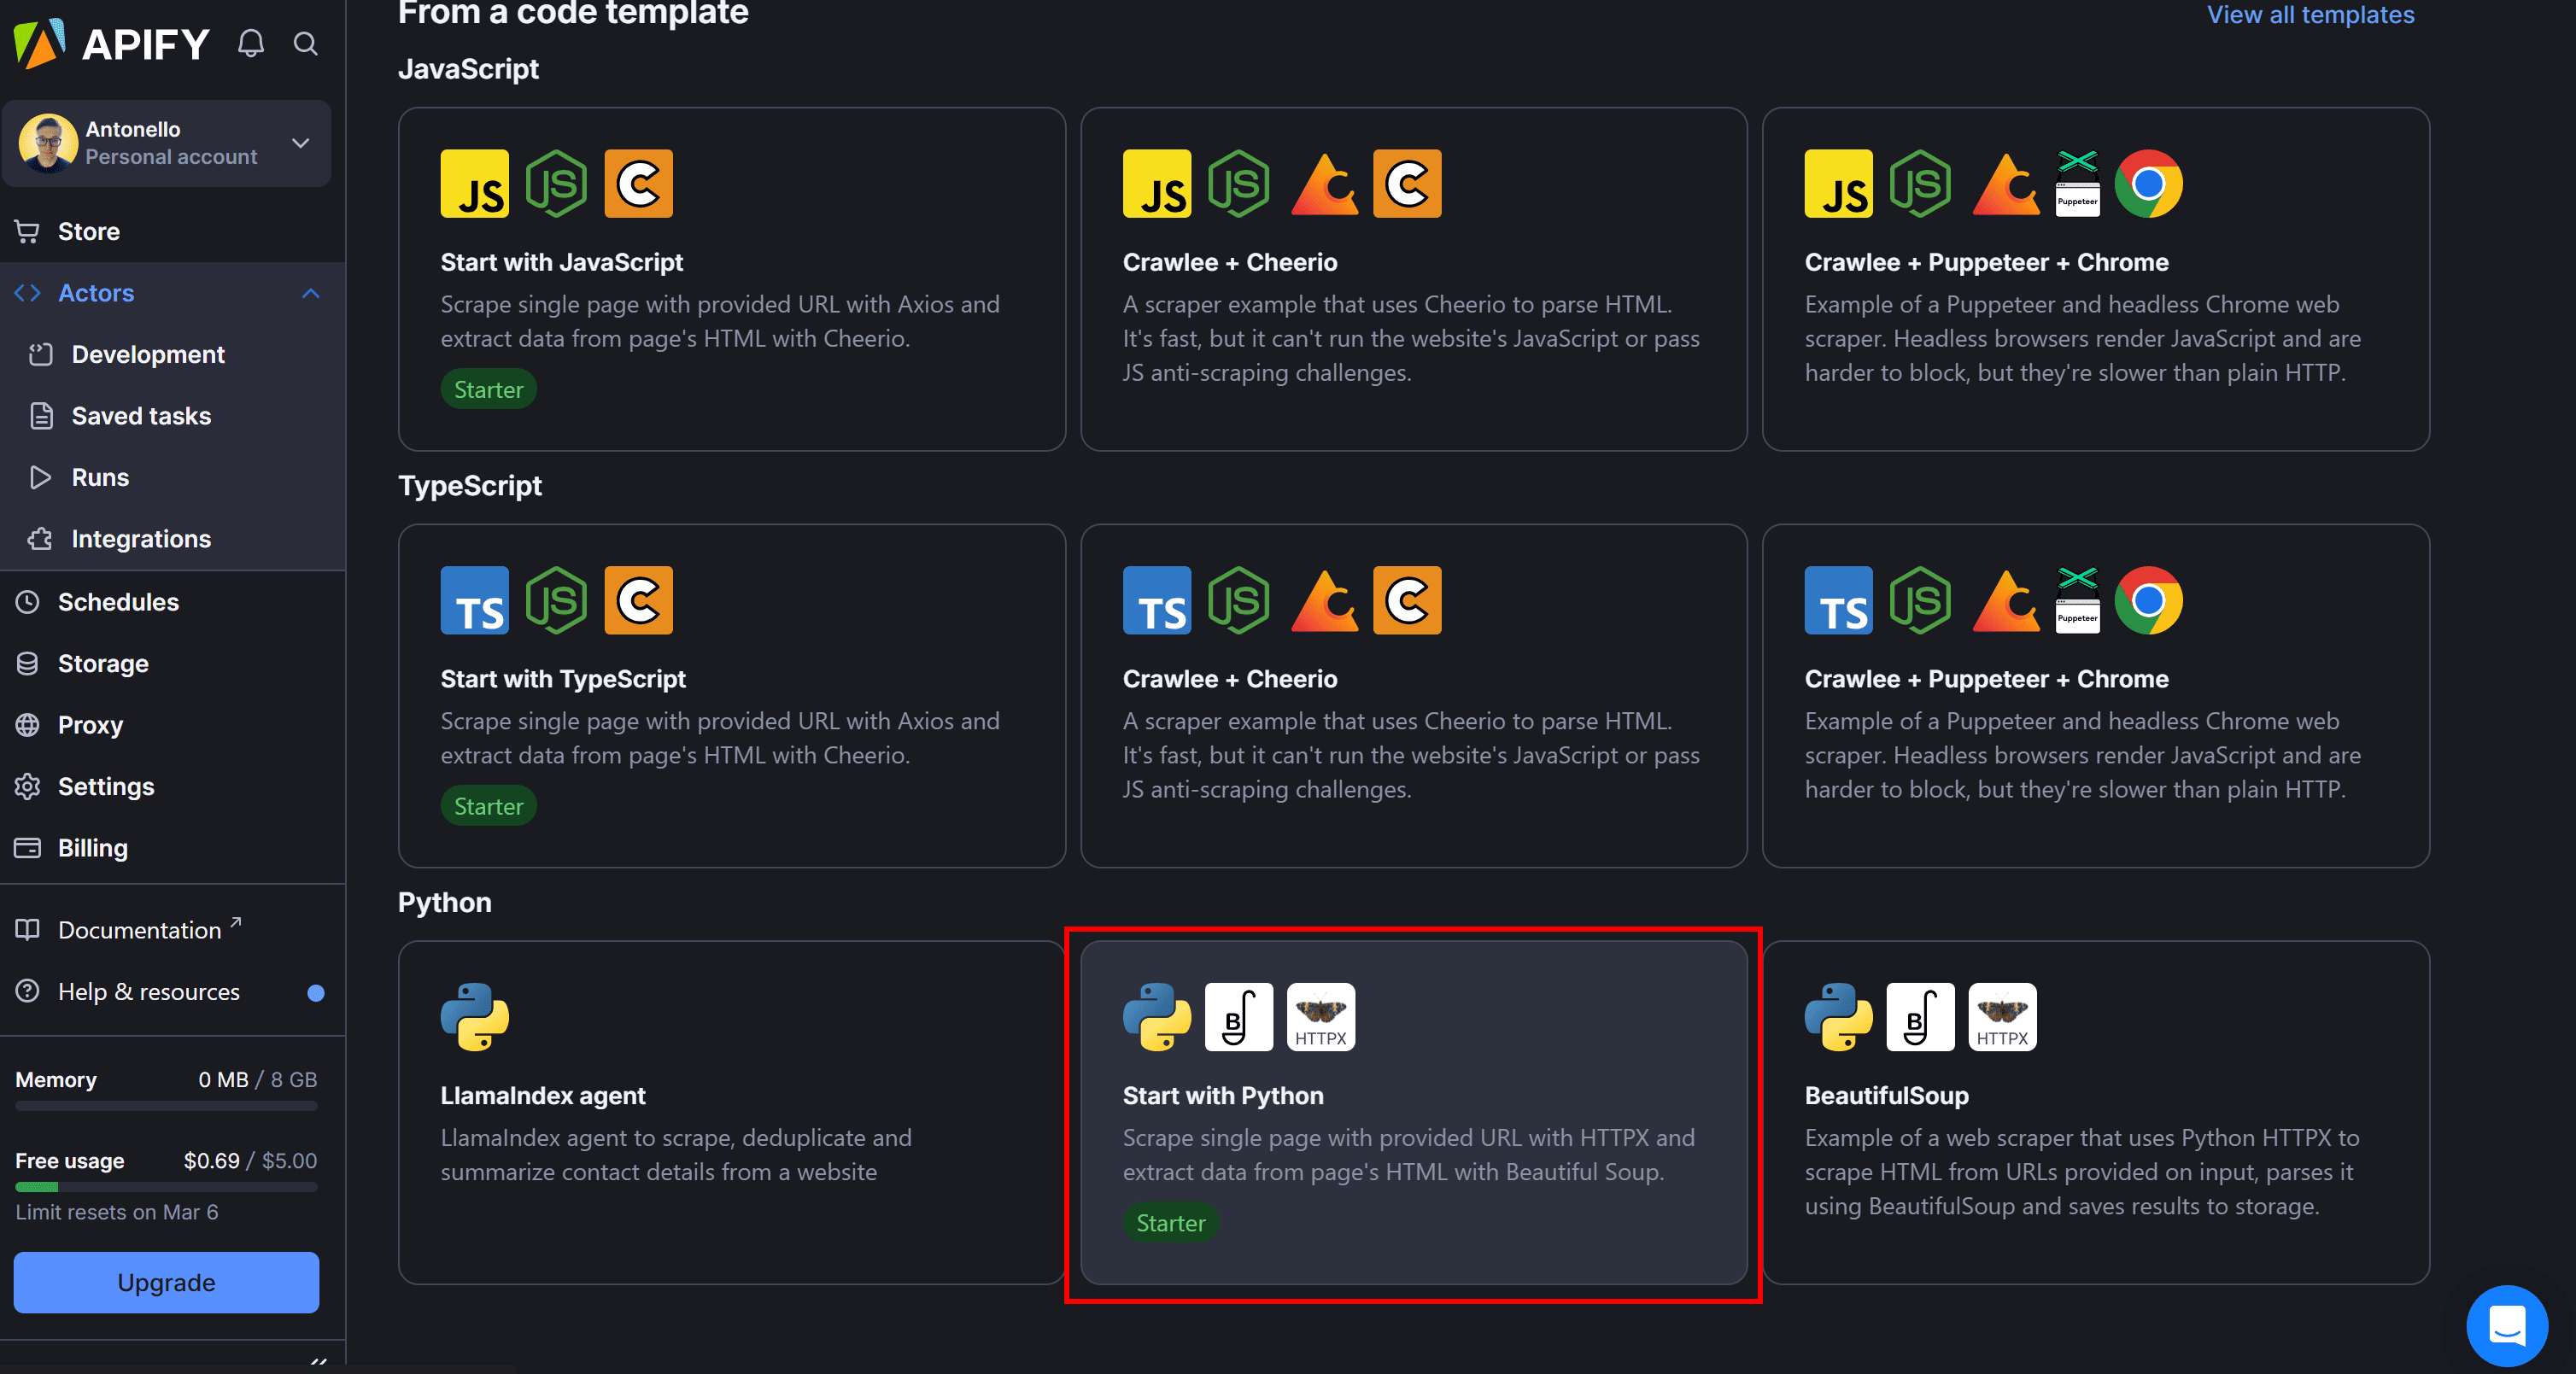
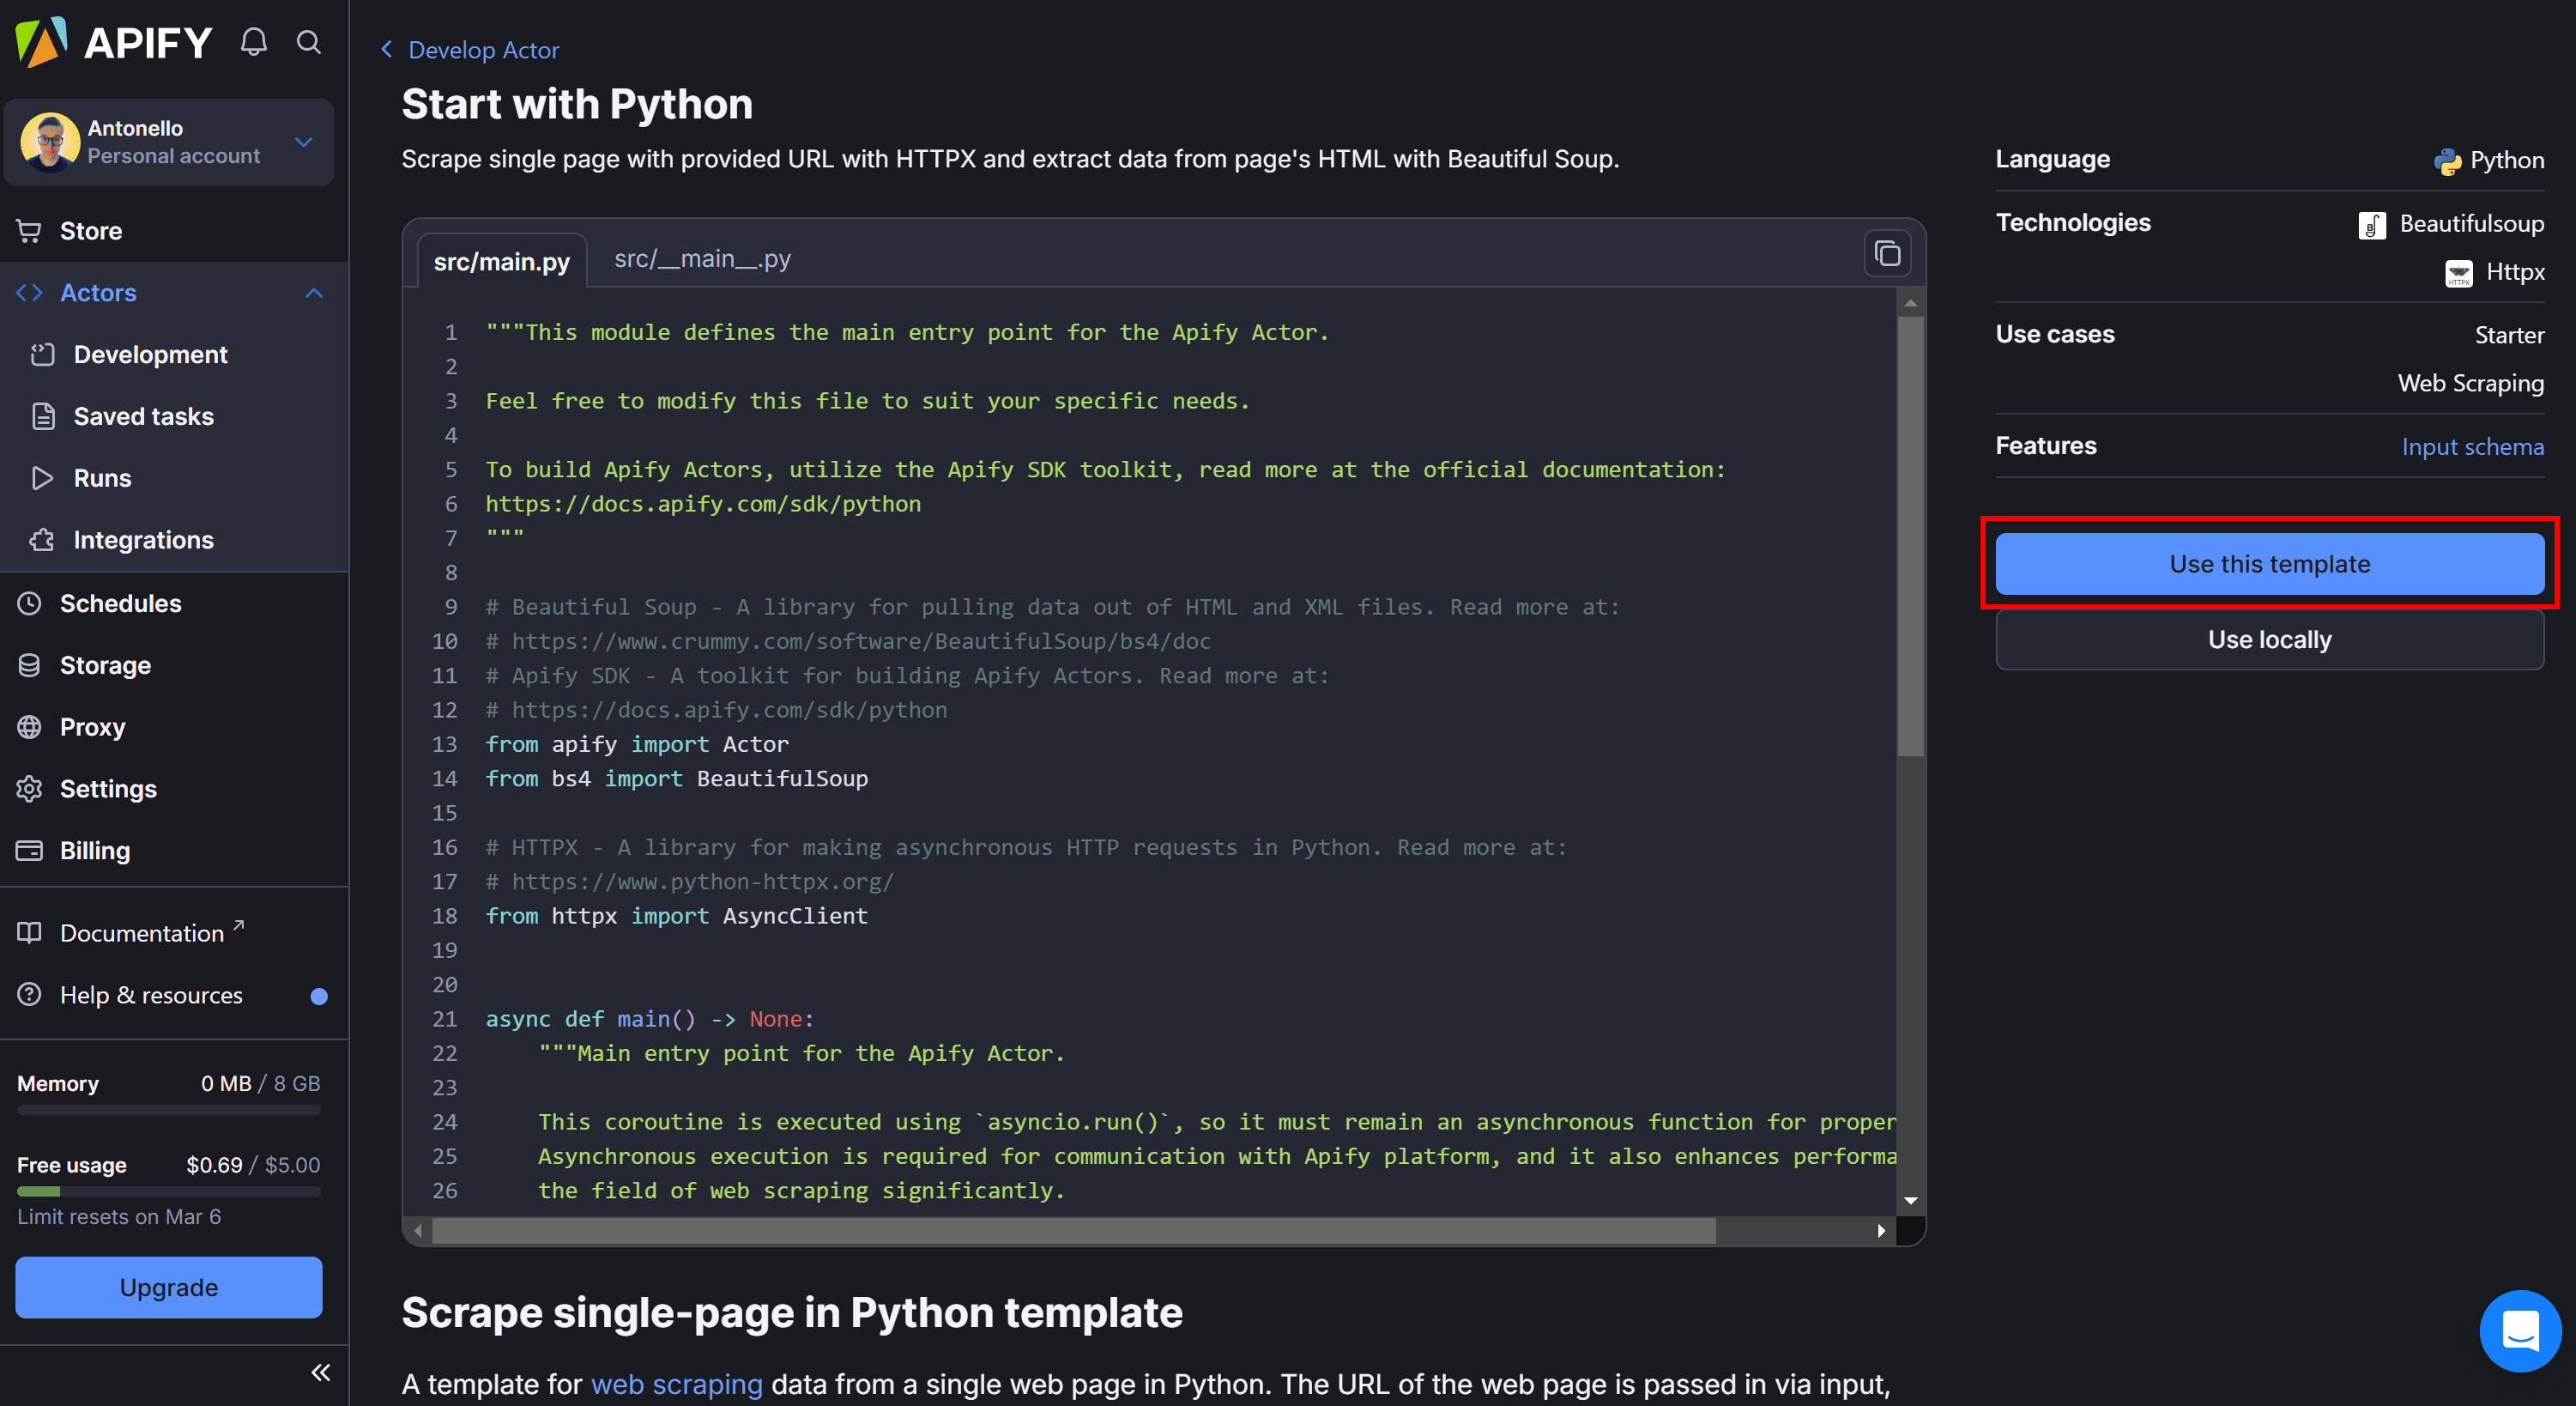
Next, select one of the many Apify templates. In this case, choose the "Start with Python" template, which sets up a Python Actor using HTTPX and Beautiful Soup:
Review the starter project code and click "Use this template" to fork it:
You will be redirected to an online IDE:
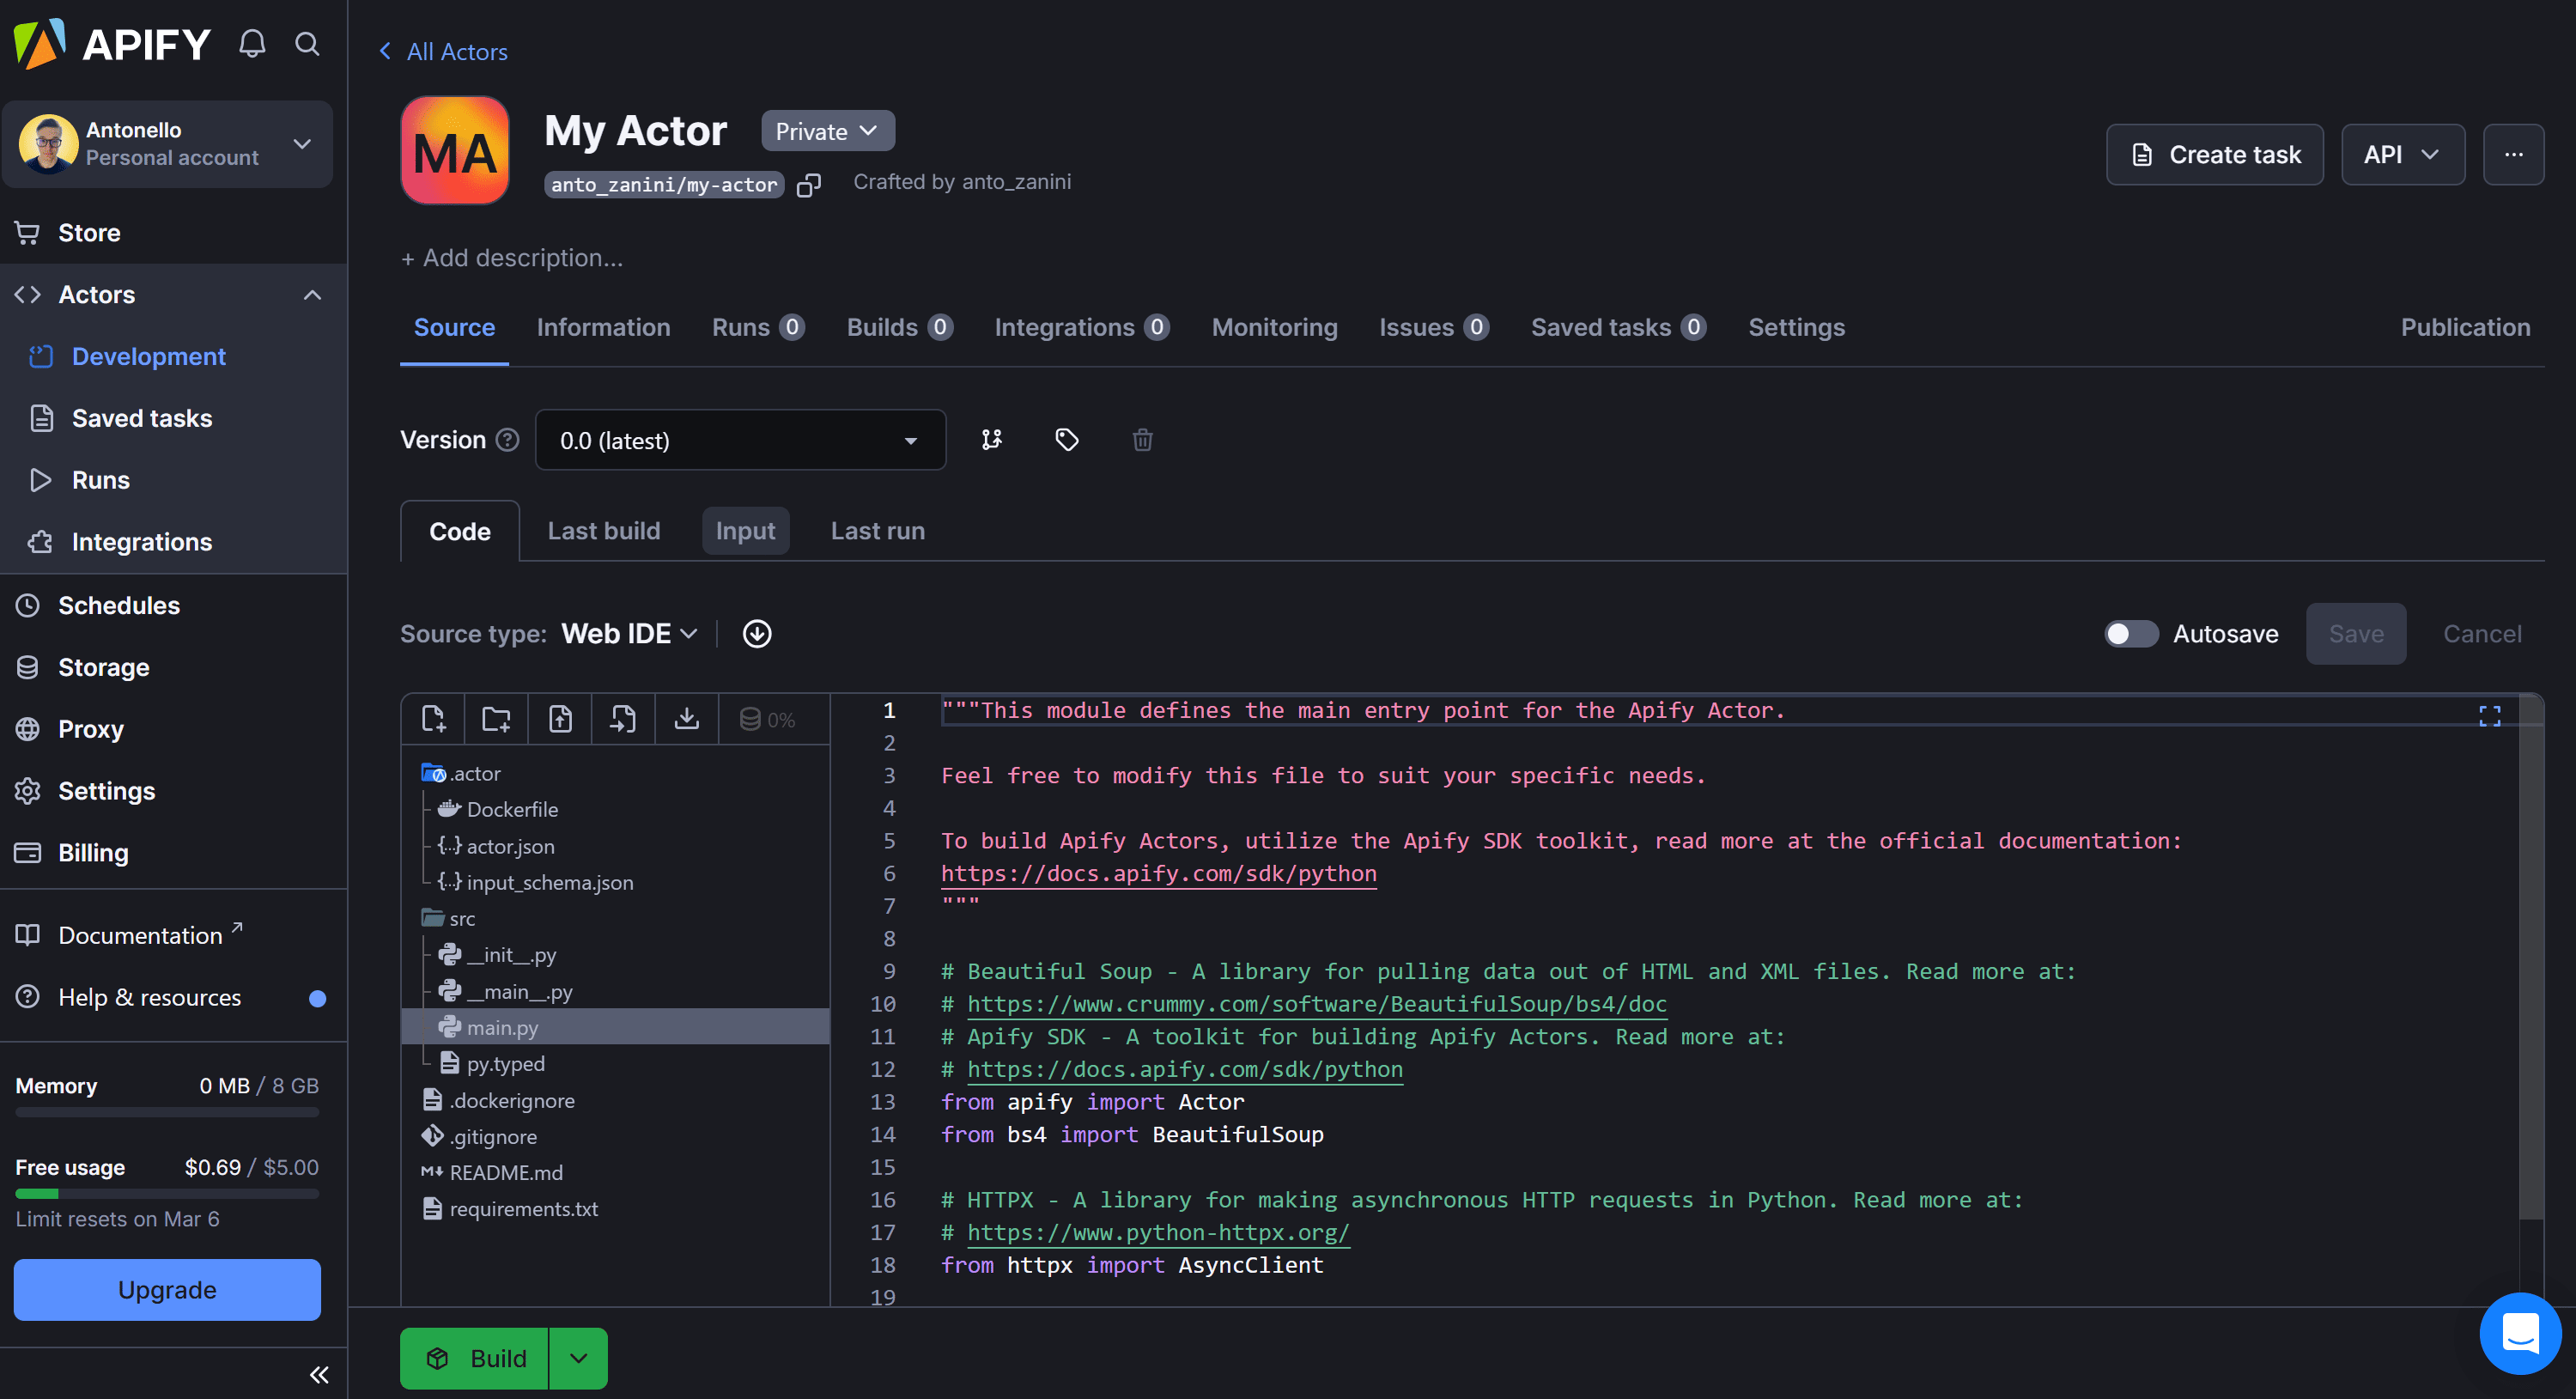
Here you can customize your Actor, writing your LinkedIn scraping logic directly in the cloud.
Now, instead of hardcoding the LinkedIn job search API parameters directly in the code, it's better to configure your code so it can read them from the Apify input configuration. This way, you can programmatically adapt your scraping script to work with different job searches.
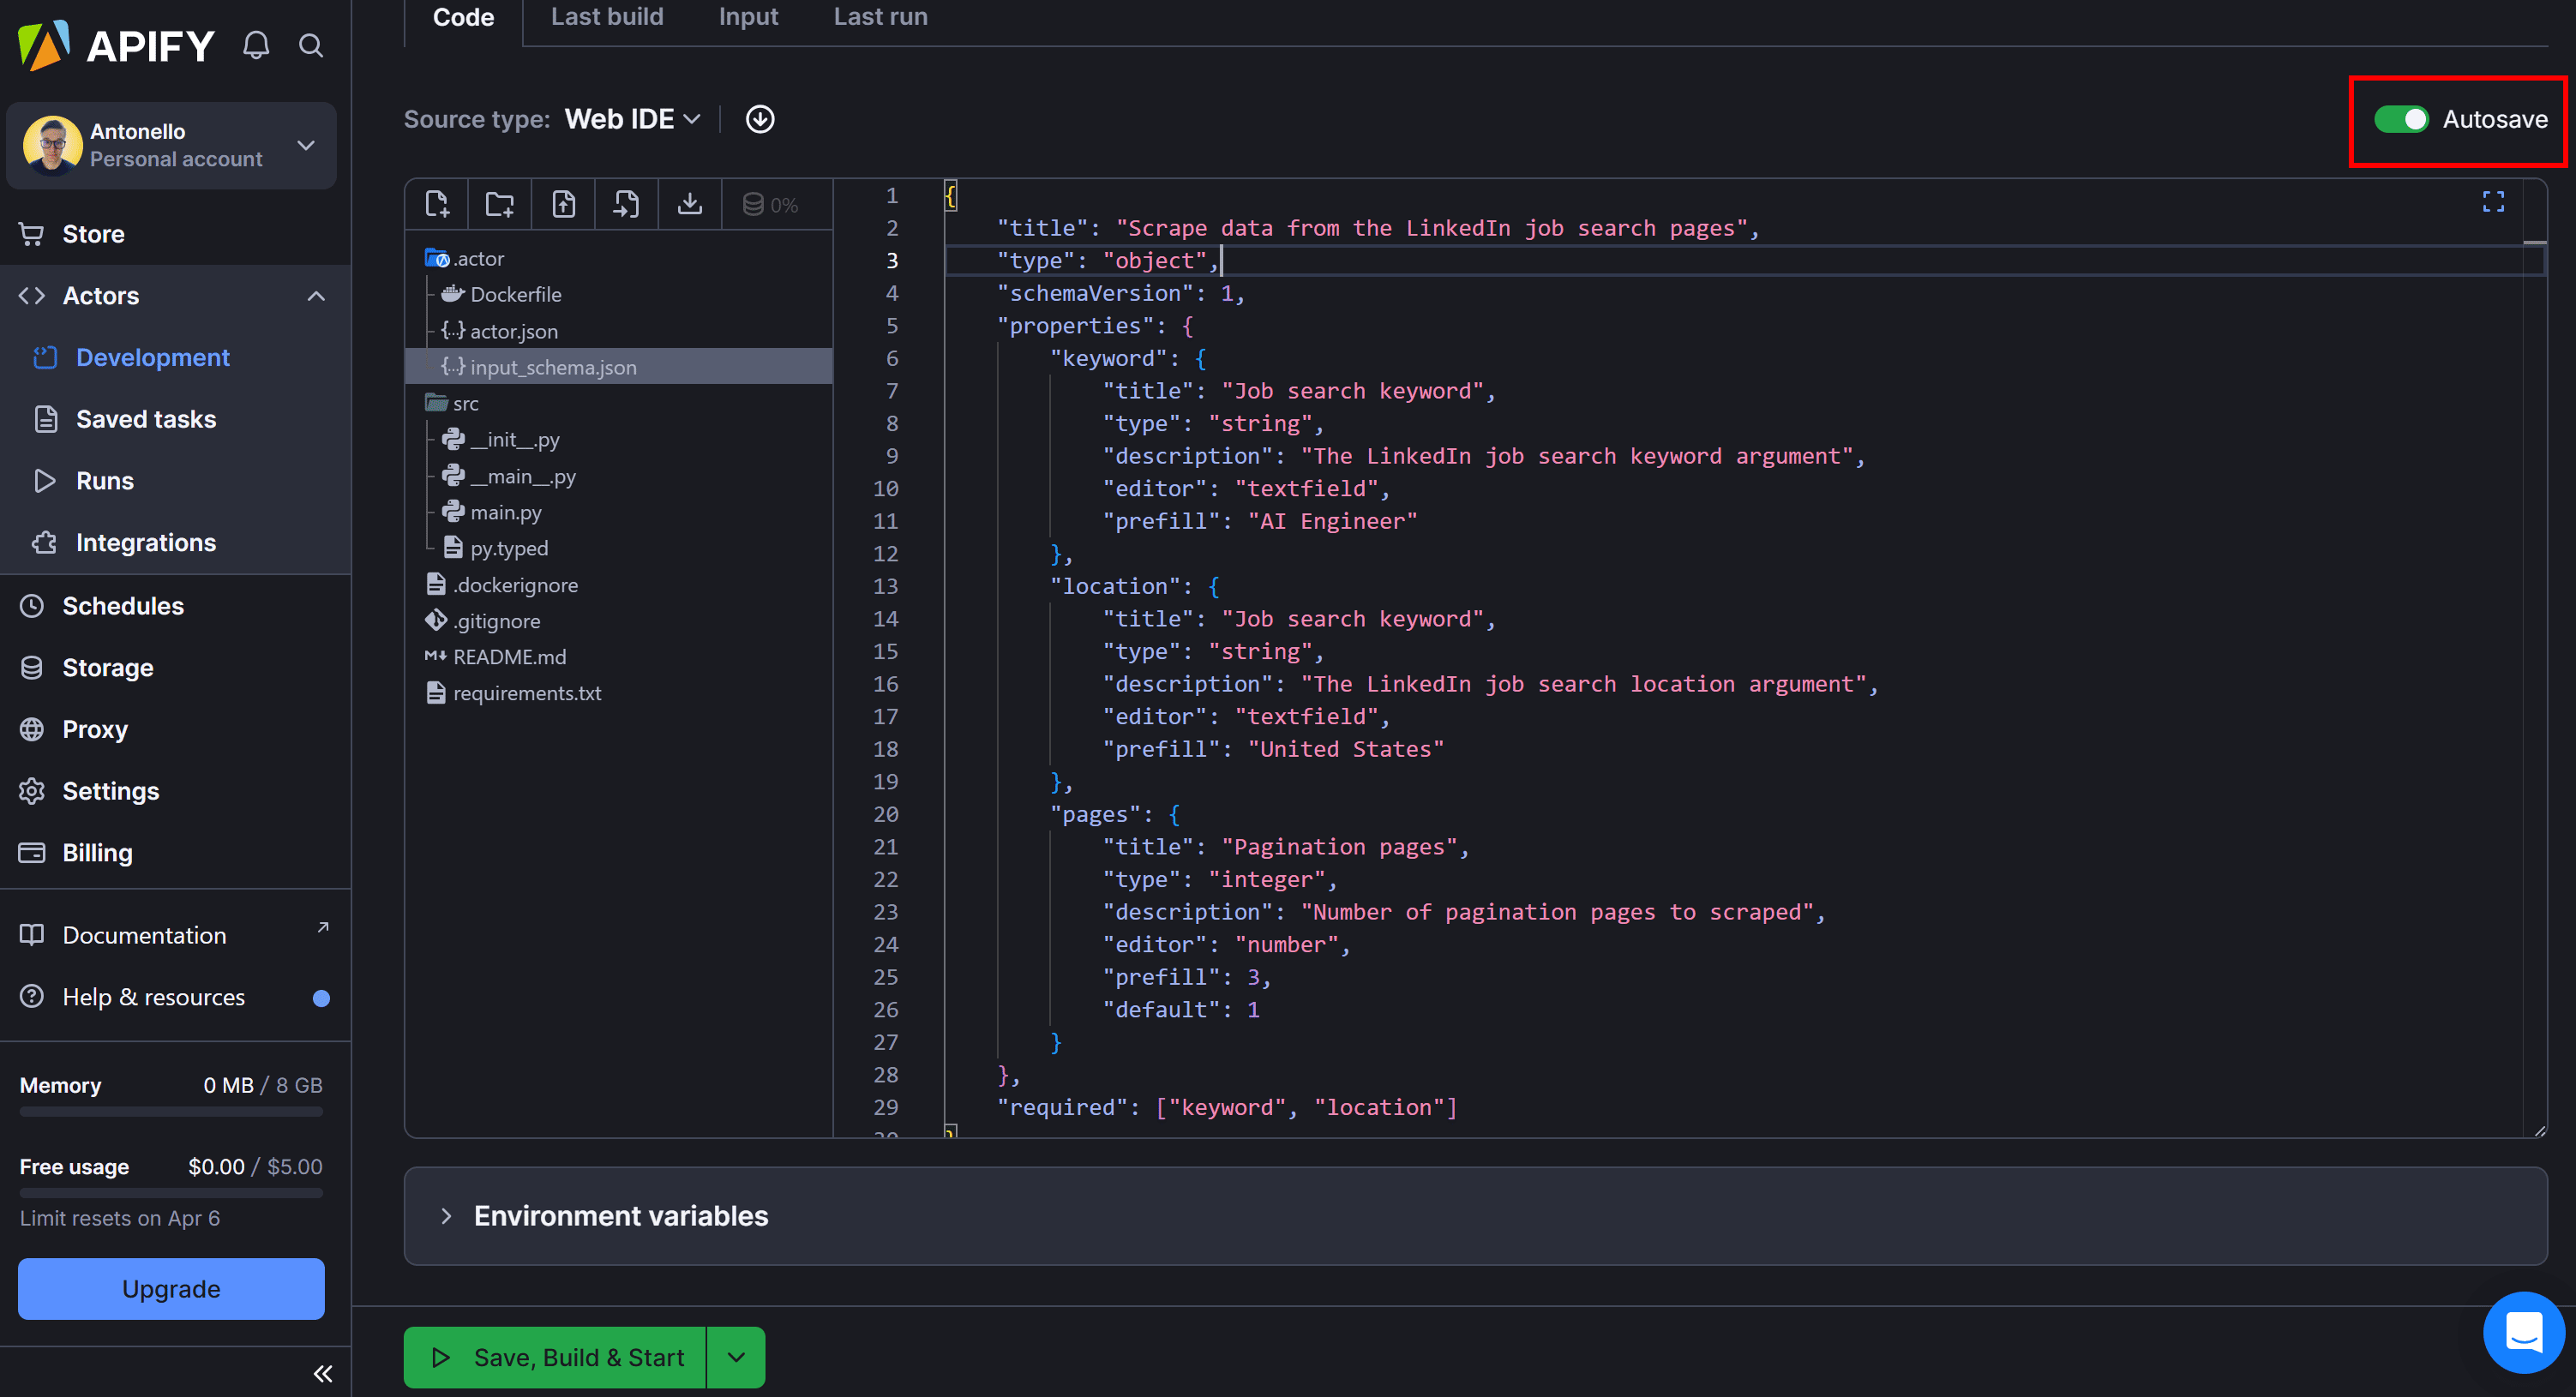
To make your Apify actor configurable, open input_schema.json in the Web IDE and write this JSON content:
{
    "title": "Scrape data from the LinkedIn job search pages",
    "type": "object",
    "schemaVersion": 1,
    "properties": {
        "keyword": {
            "title": "Job search keyword",
            "type": "string",
            "description": "The LinkedIn job search keyword argument",
            "editor": "textfield",
            "prefill": "AI Engineer"
        },
        "location": {
            "title": "Job search keyword",
            "type": "string",
            "description": "The LinkedIn job search location argument",
            "editor": "textfield",
            "prefill": "United States"
        },
        "pages": {
            "title": "Pagination pages",
            "type": "integer",
            "description": "Number of pagination pages to scraped",
            "editor": "number",
            "prefill": 3,
            "default": 1
        }
    },
    "required": ["keyword", "location"]
}
This defines the following three arguments:
keyword: The job search keyword (e.g., "AI Engineer").location: The job search location (e.g., "United States").pages: The number of pagination pages to scrape (e.g.,3).
Make sure to enable the autosave feature:
In main.py, you can read those arguments to populate the params object and the pages variable as shown below:
actor_input = await Actor.get_input()

# ...
params = {
    "keywords": actor_input.get("keyword"),
    "location": actor_input.get("location"),
    "trk": "public_jobs_jobs-search-bar_search-submit",
    "start": "0"
}

# ...

pages = actor_input.get("pages")
Actor.get_input() loads the input you can then access by name with actor_input.get().
Put it all together and you’ll get the following Apify actor code:
from apify import Actor
import httpx
from bs4 import BeautifulSoup

async def main() -> None:
    async with Actor:
        # Access the Apify input data
        actor_input = await Actor.get_input()
        url = "https://www.linkedin.com/jobs-guest/jobs/api/seeMoreJobPostings/search"
        params = {
            "keywords": actor_input.get("keyword"),
            "location": actor_input.get("location"),
            "trk": "public_jobs_jobs-search-bar_search-submit",
            "start": "0"
        }
        headers = {
            "accept": "*/*",
            "accept-language": "en-US,en;q=0.9",
            "priority": "u=1, i",
            "sec-ch-ua": '"Chromium";v="134", "Not:A-Brand";v="24", "Google Chrome";v="134"',
            "sec-ch-ua-mobile": "?0",
            "sec-ch-ua-platform": '"Windows"',
            "sec-fetch-dest": "empty",
            "sec-fetch-mode": "cors",
            "sec-fetch-site": "same-origin",
        }

        # The number of pagination pages to scrape
        pages = actor_input.get("pages")

        # Iterate over each pagination page
        for page in range(pages):
            async with httpx.AsyncClient() as client:
                # Set the right pagination argument
                params["start"] = str(page * 10)

                # Perform a GET HTTP request to the target API
                response = await client.get(url, headers=headers, params=params)

            # Parse the HTML content returned by API
            soup = BeautifulSoup(response.content, "lxml")

            # Select all <li> job posting elements
            job_li_elements = soup.select("li")

            # Iterate over them and scrape data from each of them
            for job_li_element in job_li_elements:
                # Scraping logic
                link_element = job_li_element.select_one("a[data-tracking-control-name=\\"public_jobs_jserp-result_search-card\\"]")
                link = link_element["href"] if link_element else None
                title_element = job_li_element.select_one("h3.base-search-card__title")
                title = title_element.text.strip() if title_element else None
                company_element = job_li_element.select_one("h4.base-search-card__subtitle")
                company = company_element.text.strip() if company_element else None
                publication_date_element = job_li_element.select_one("time.job-search-card__listdate")
                publication_date = publication_date_element["datetime"] if publication_date_element else None

                # Populate a new job posting with the scraped data
                job_posting = {
                    "url": link,
                    "title": title,
                    "company": company,
                    "publication_date": publication_date
                }

                # Register the scraped data to Apify
                await Actor.push_data(job_posting)
Note that the CSV export logic is no longer needed because it's handled by the push_data() method:
await Actor.push_data(job_postings)
This allows you to retrieve the scraped data via the API or export it in multiple formats supported by the Apify dashboard.
Now, click the “Save & Build” button:

Visit the “Input” tab and fill out the input manually as shown below:
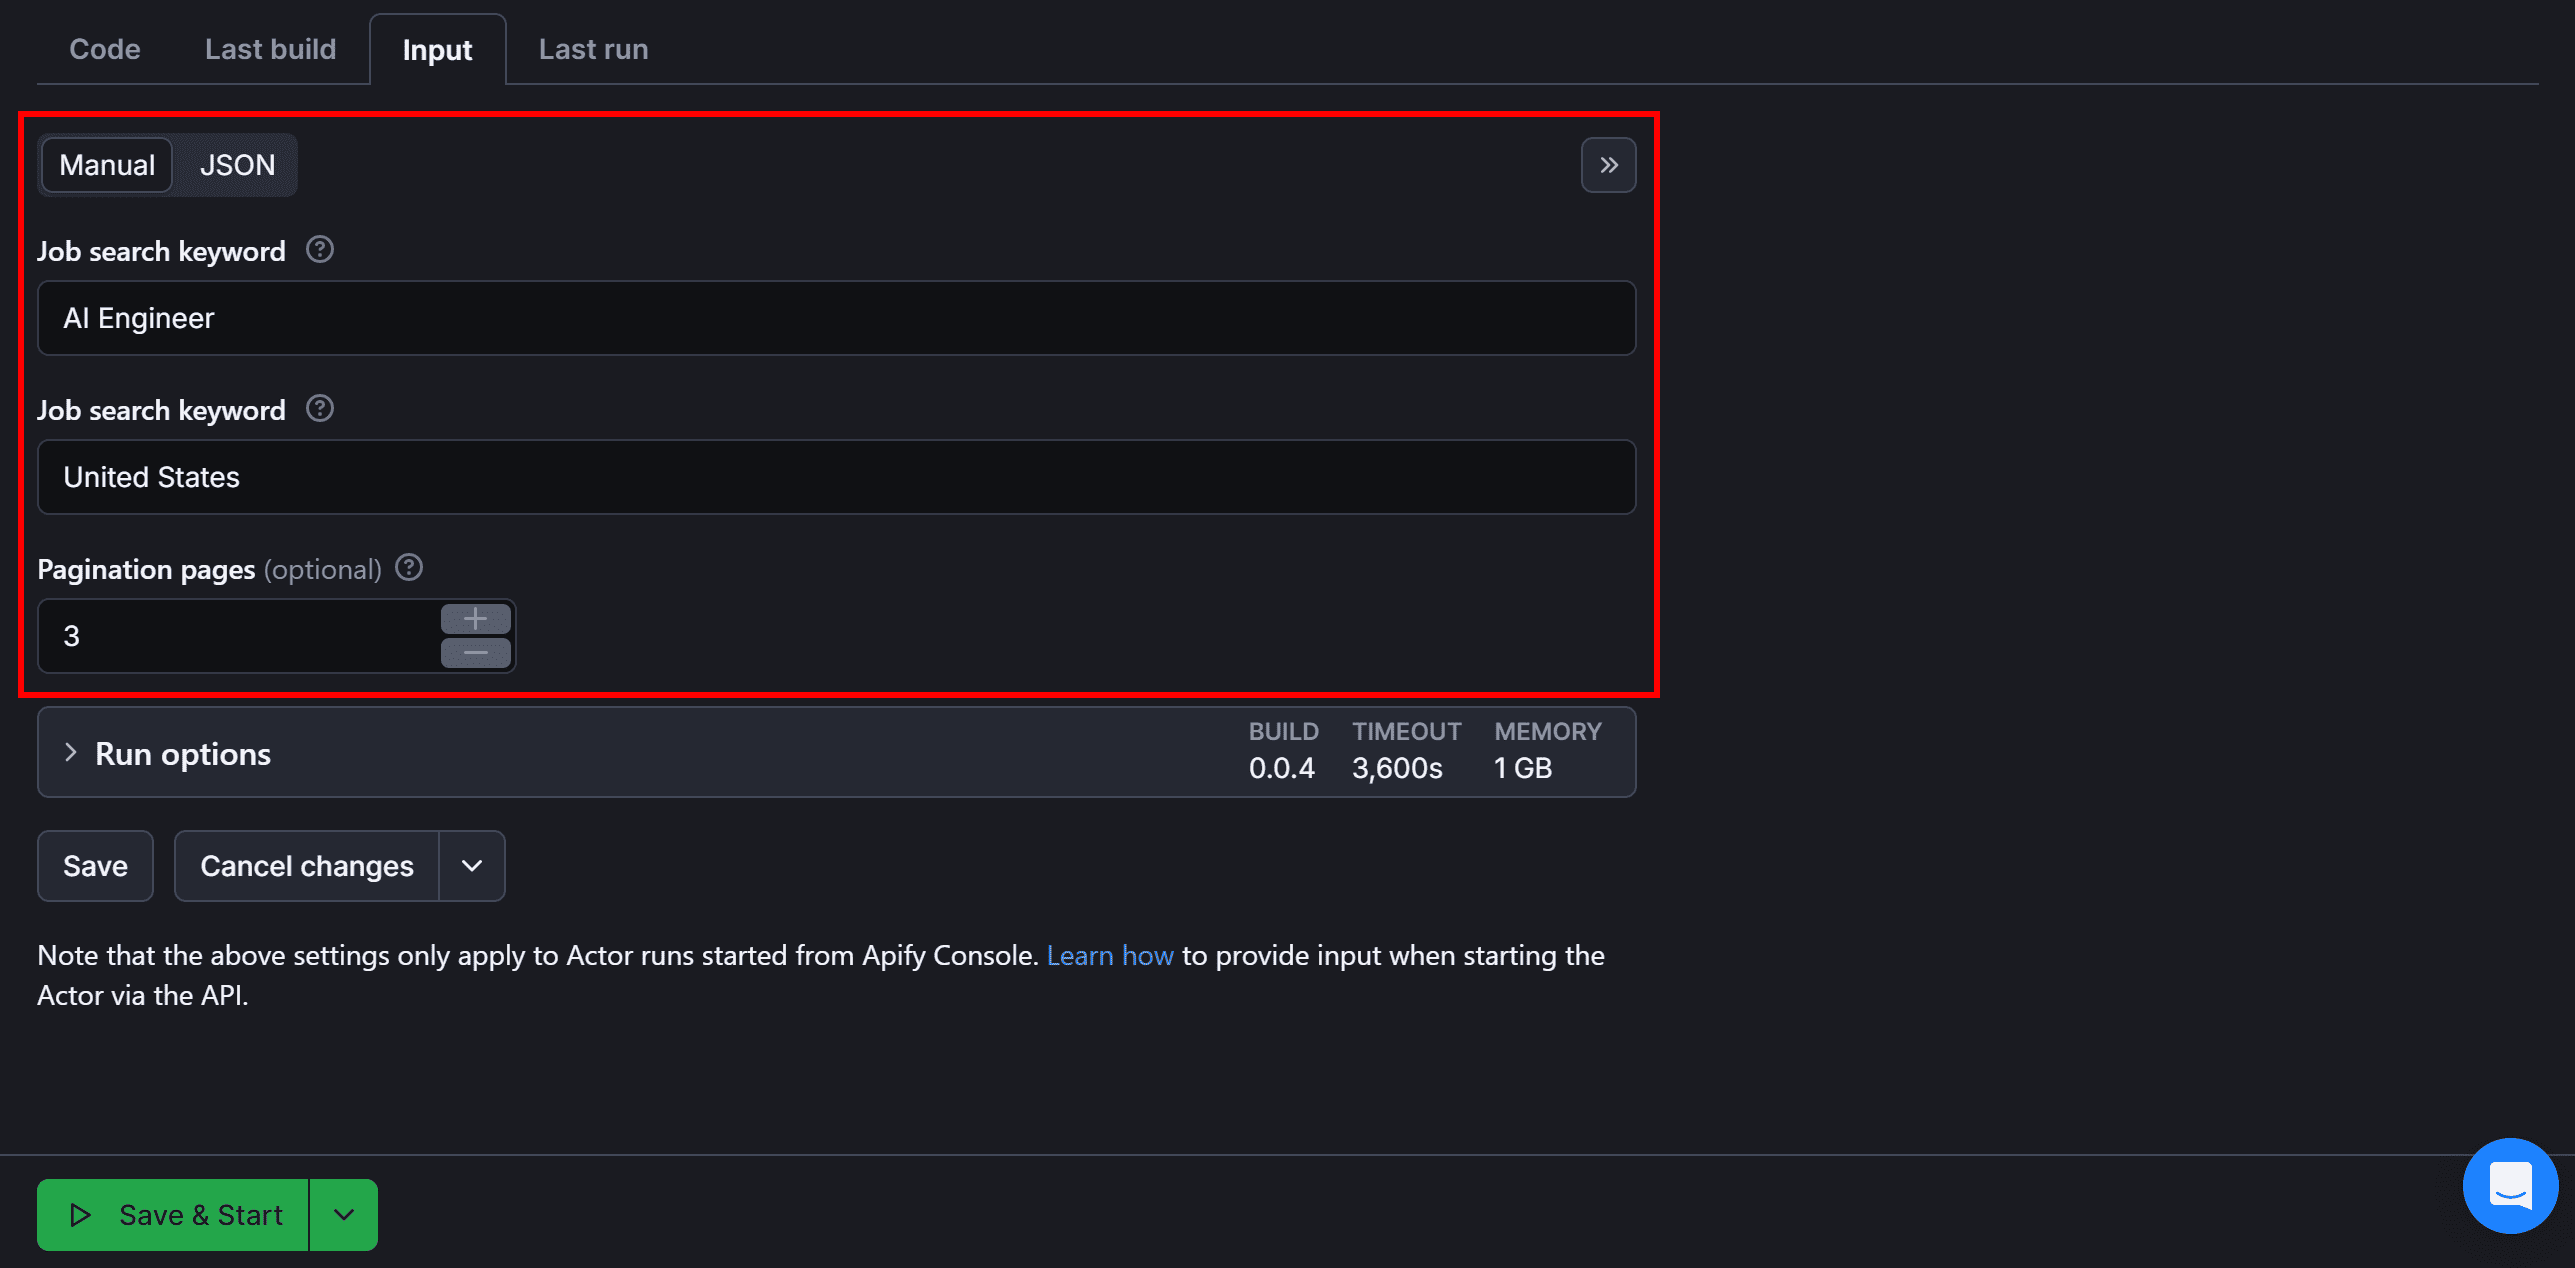
Press “Save & Start” to launch the LinkedIn scraper. The result will look like this:
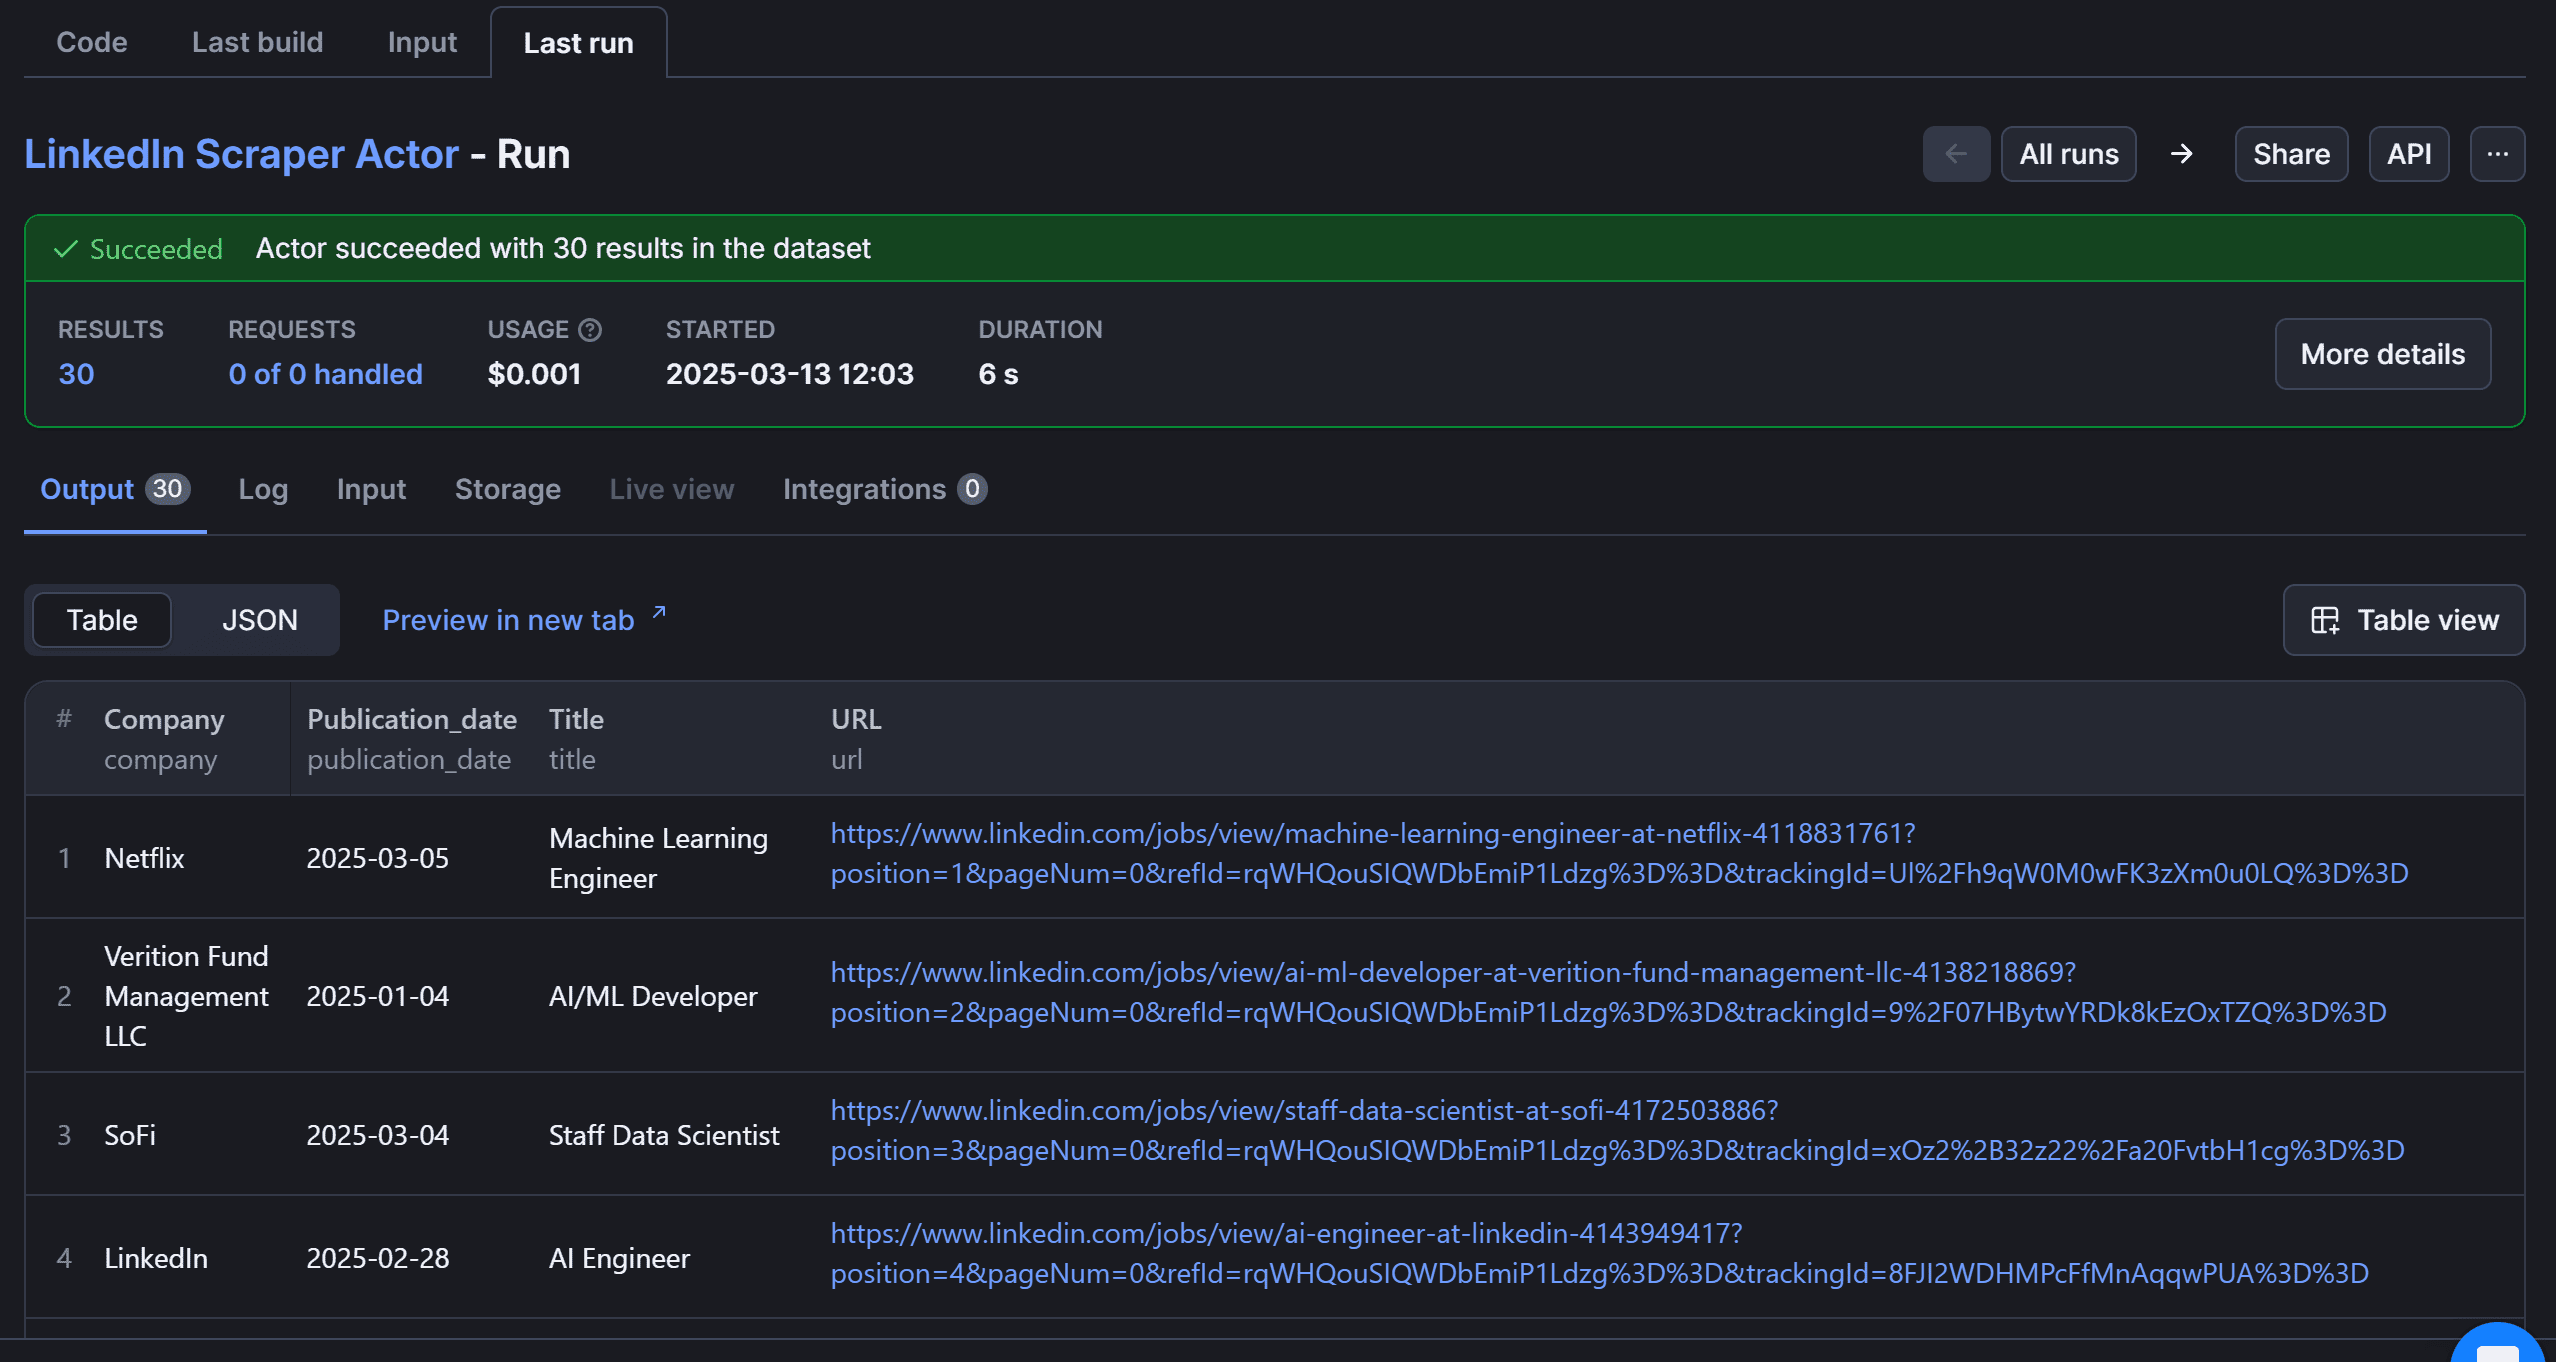
Move to the “Storage” card:
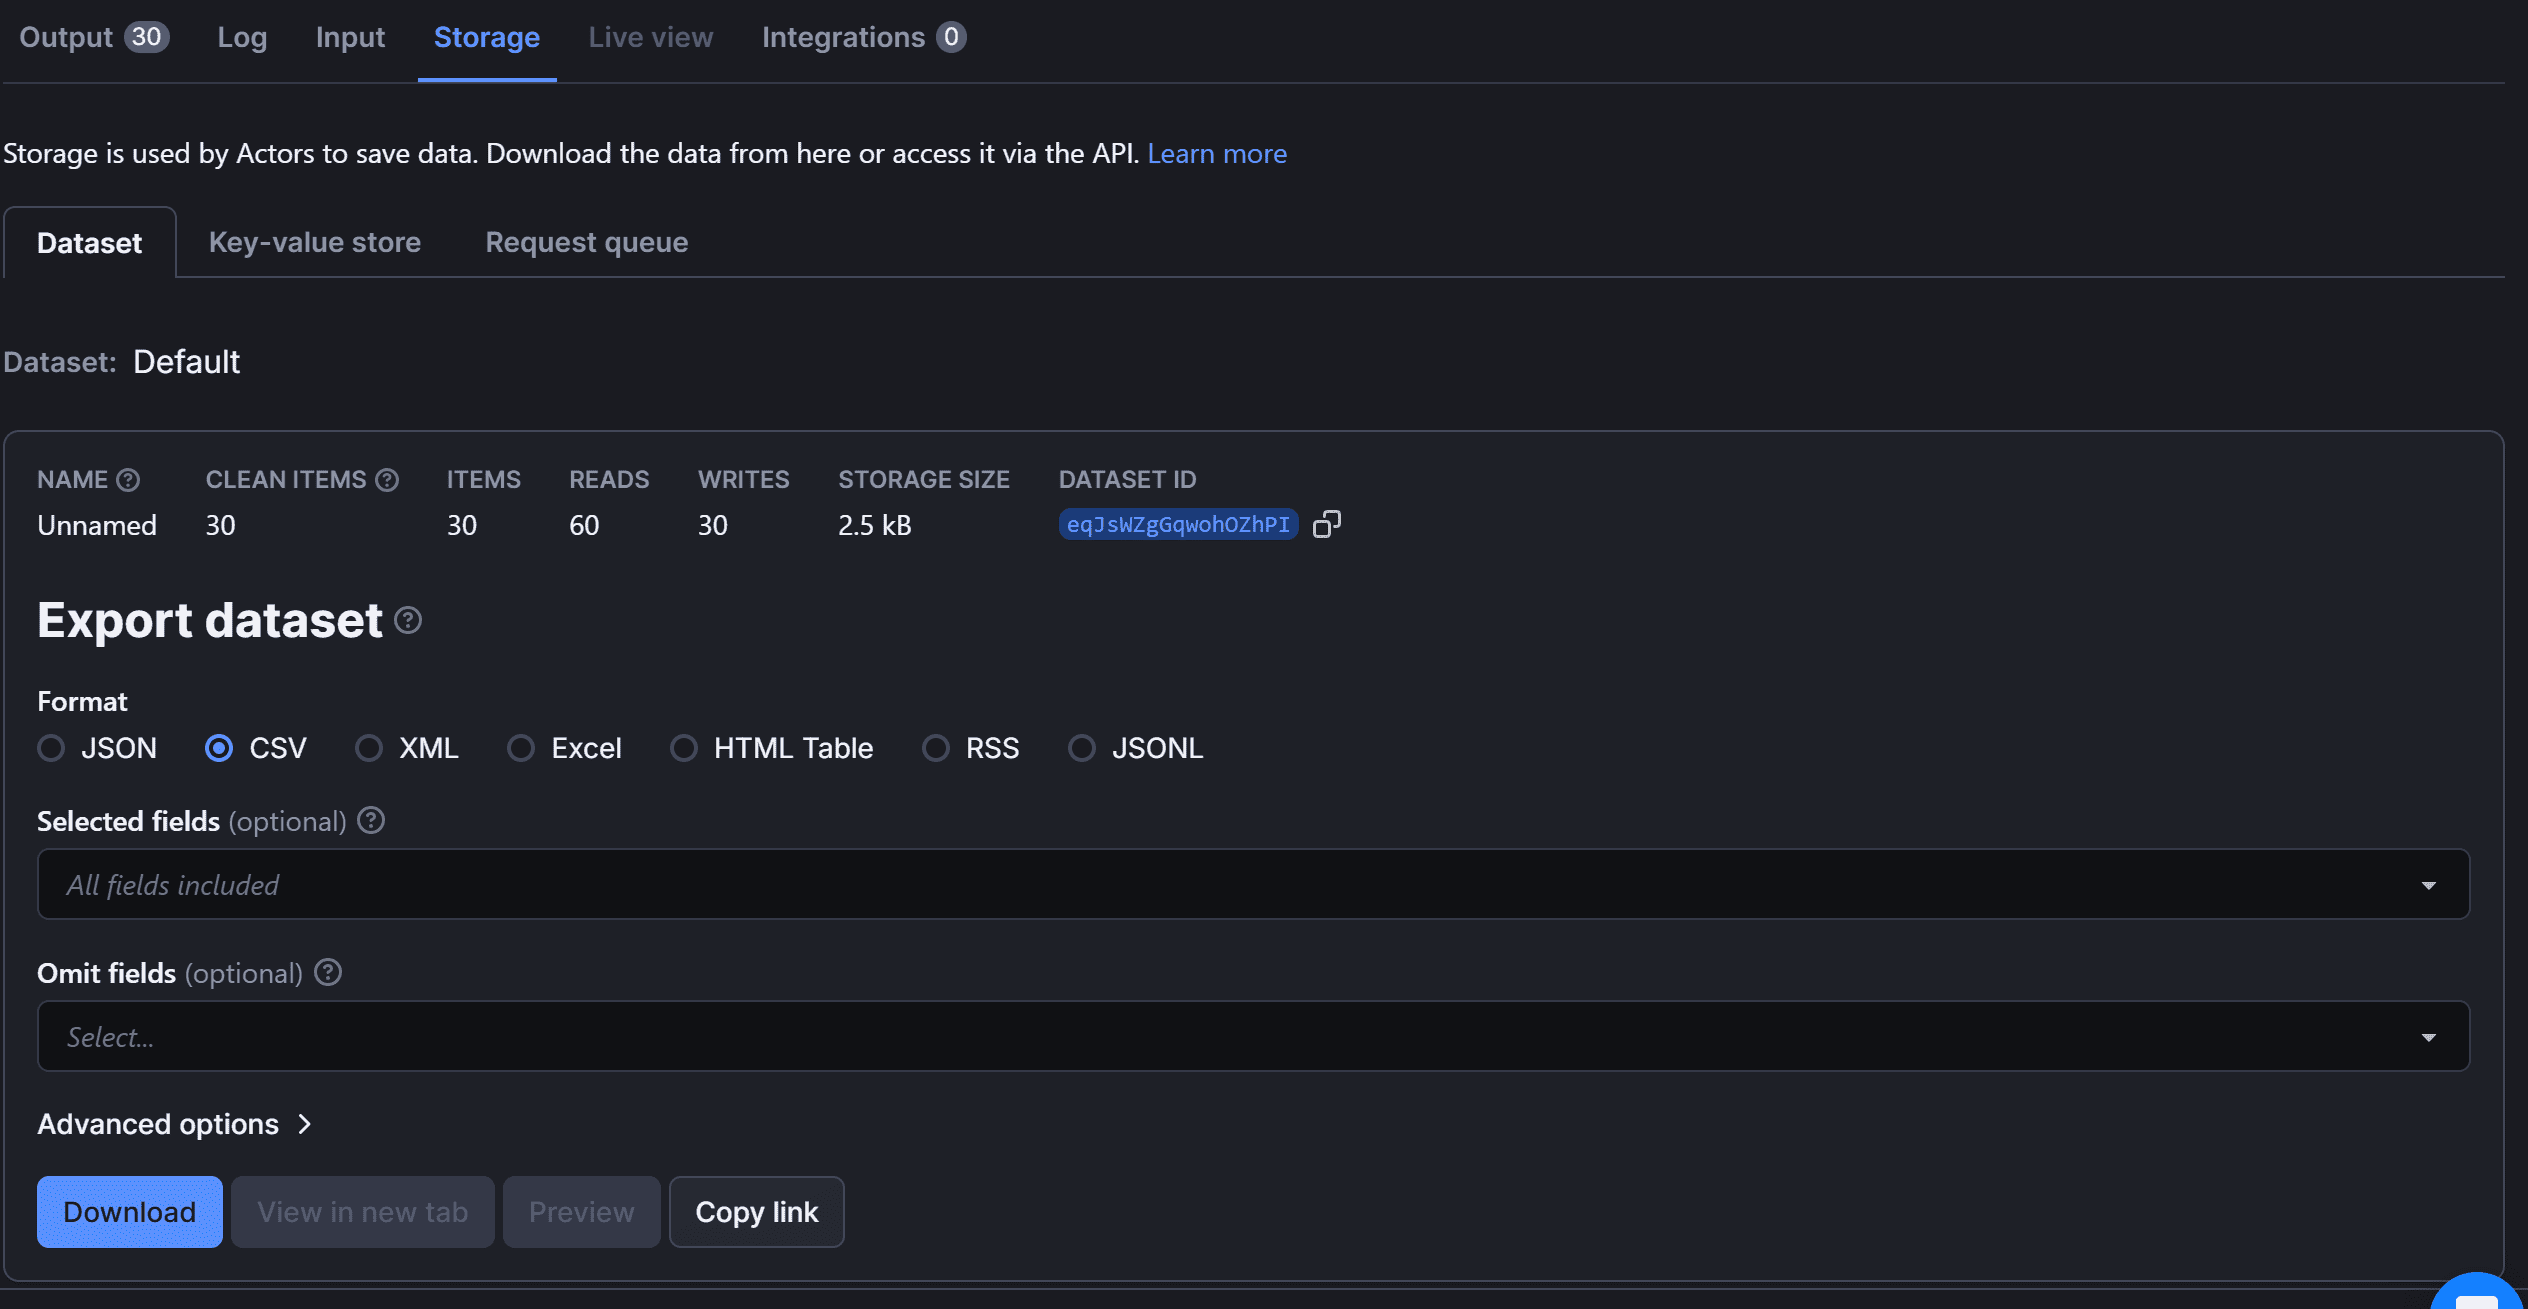
Here, you can export the data in multiple formats, including JSON, CSV, XML, Excel, HTML Table, RSS, and JSONL.
Et voilà! You’ve successfully performed LinkedIn jobs web scraping on Apify.
Next steps
This tutorial has covered the basics of web scraping on LinkedIn. To elevate your script and make it more powerful, consider implementing these advanced techniques:
- Automated interaction: Use Python web browser automation to mimic real user behavior, reducing the likelihood of your script getting blocked.
- Specific job data scraping: Navigate to individual job posting pages using their URLs to extract more detailed data beyond what's available on the main job listing page.
- Proxy management: Integrate proxies into your actor to avoid IP bans and blocks. Discover more in the official documentation.
Use Apify’s ready-made LinkedIn Jobs Scraper
Scraping jobs from LinkedIn may not be as simple as we’ve shown in this article. As long as you stick to basic methods like in this tutorial, everything is a breeze. However, if you aim to retrieve data at scale, you'll have to deal with anti-scraping measures like IP bans, browser fingerprinting, CAPTCHAs, and more.
The easiest way to overcome these obstacles is by using a pre-built LinkedIn scraper that handles everything for you. Some benefits of this approach include:
- No coding required: Start scraping instantly.
- Block bypass: Avoid IP bans and CAPTCHAs automatically.
- API access: Easily integrate scraped data into your applications.
- Scalability: Handle large volumes of job listings effortlessly.
- Regular updates: Stay compliant with LinkedIn’s latest changes.
- Reliable data extraction: Minimize errors and inconsistencies.
Apify offers over 4,000 Actors for various websites, including nearly 200 specifically for LinkedIn.
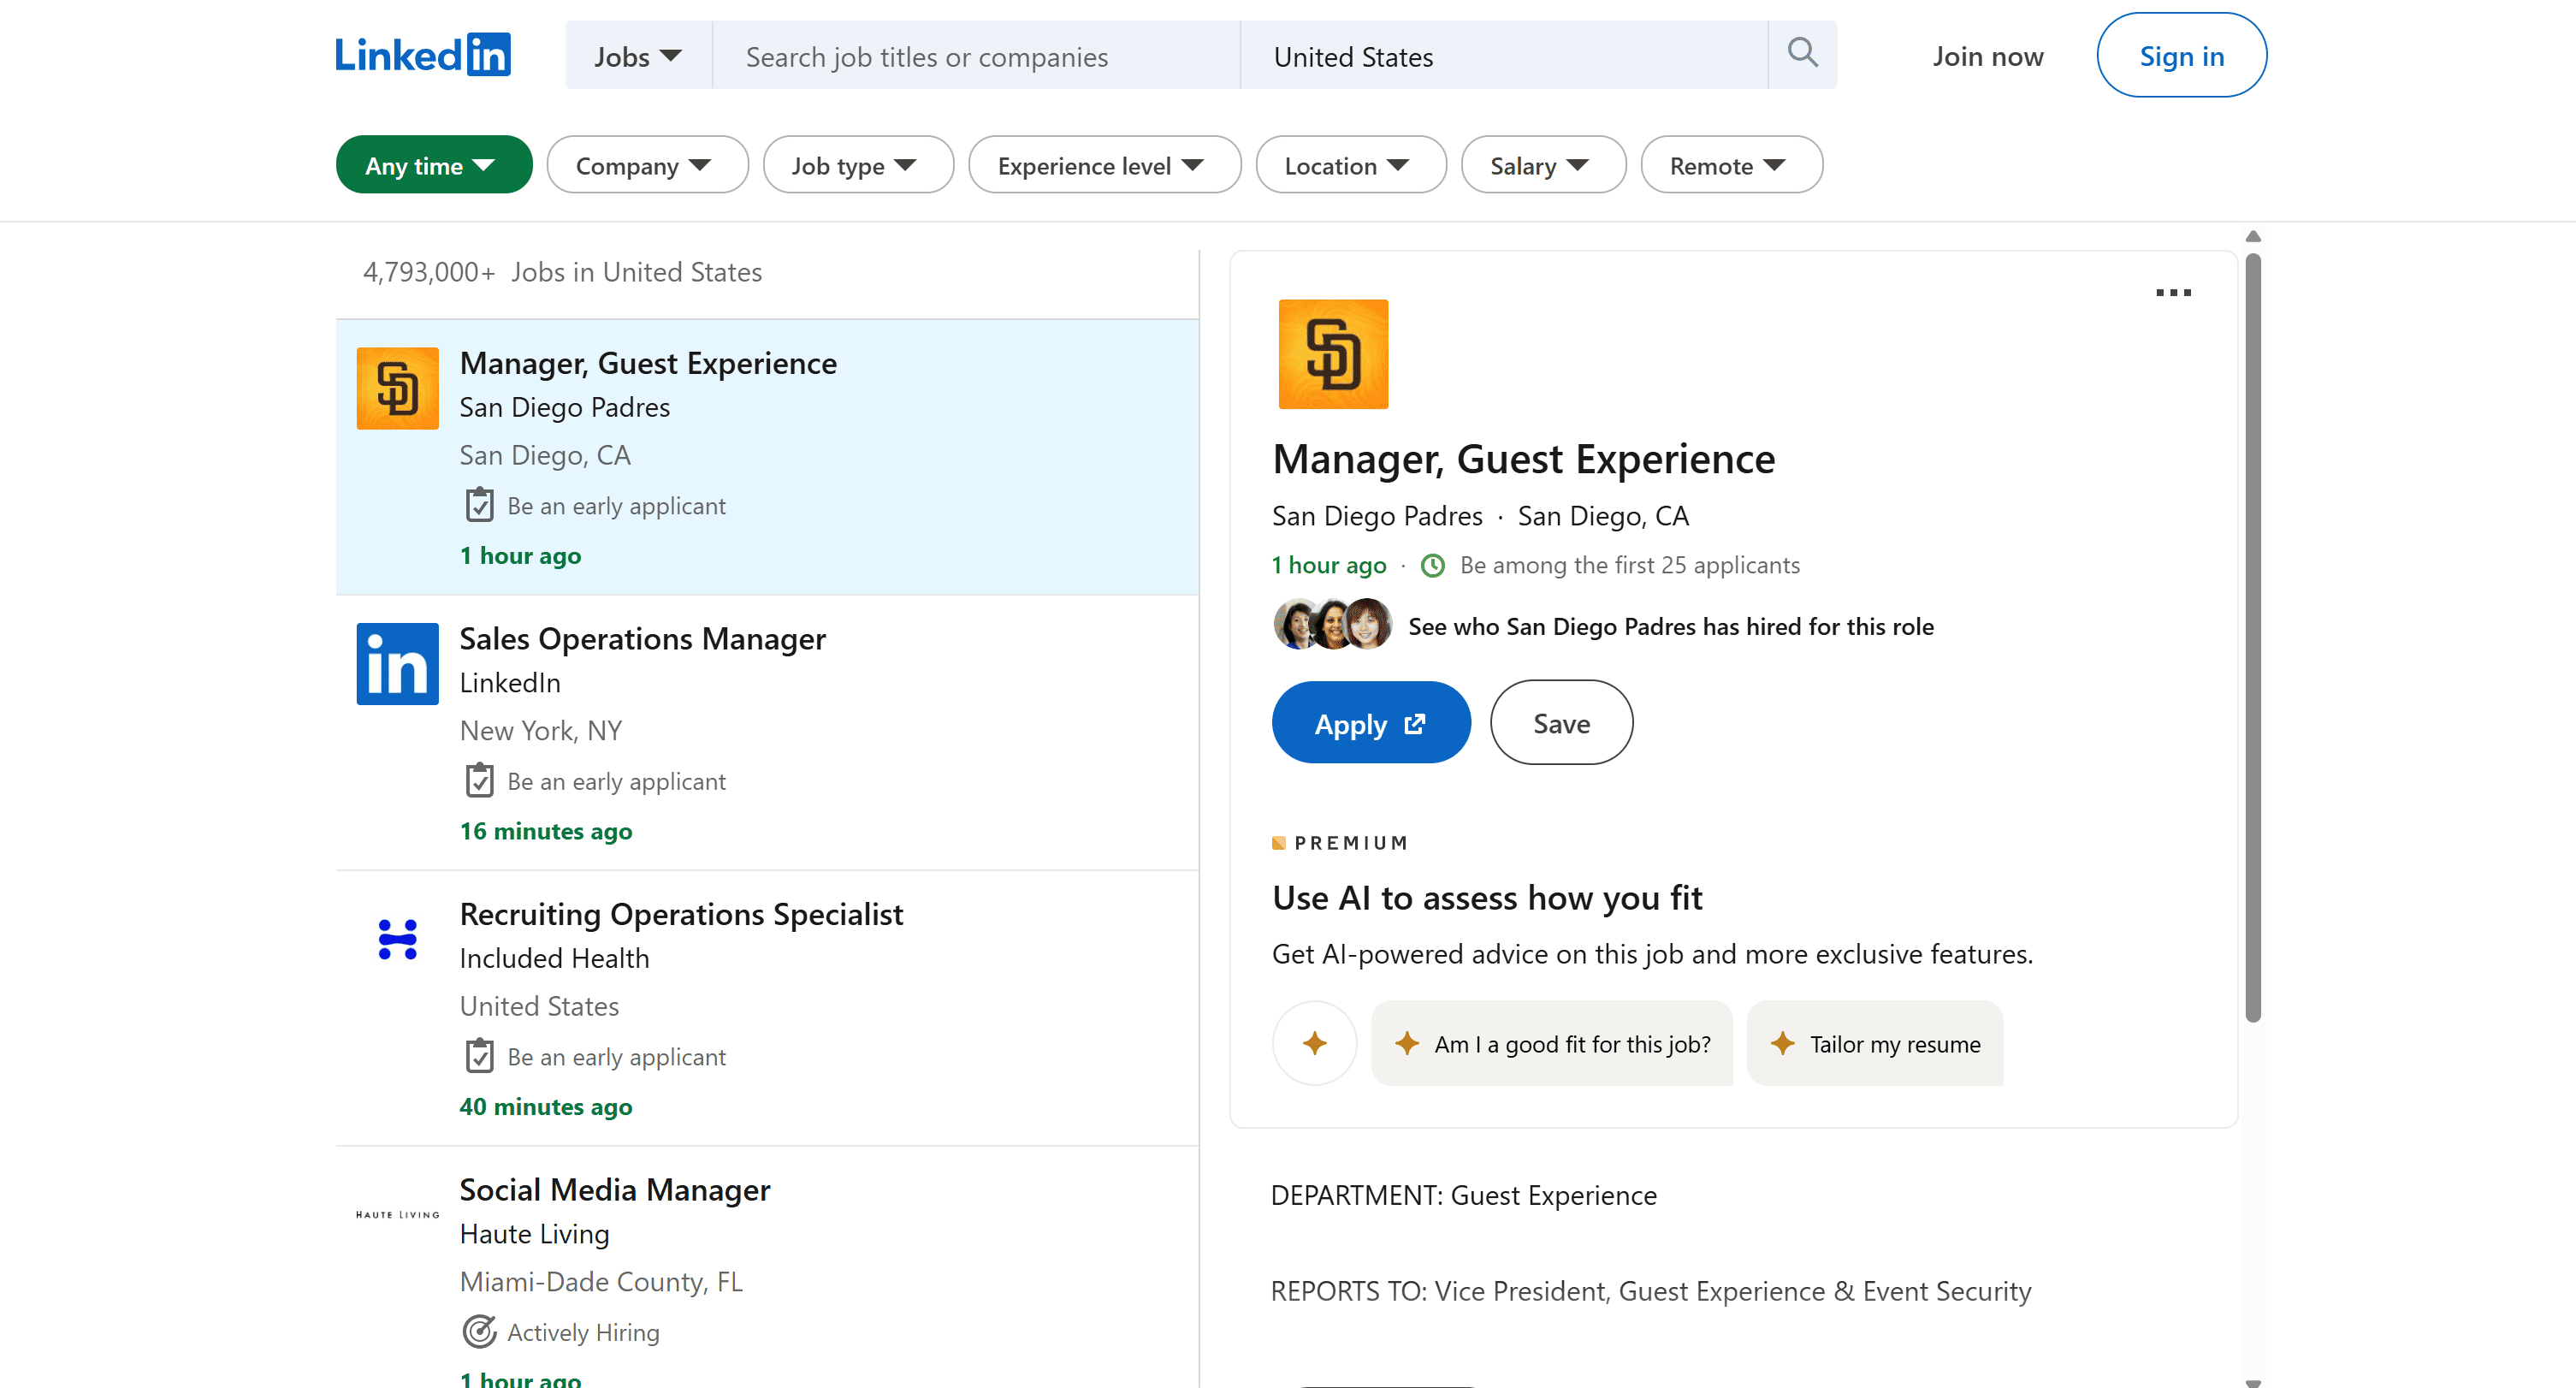
If you're interested in scraping LinkedIn job postings without building a scraper yourself, simply visit Apify Store and search for the "linkedin" keyword:
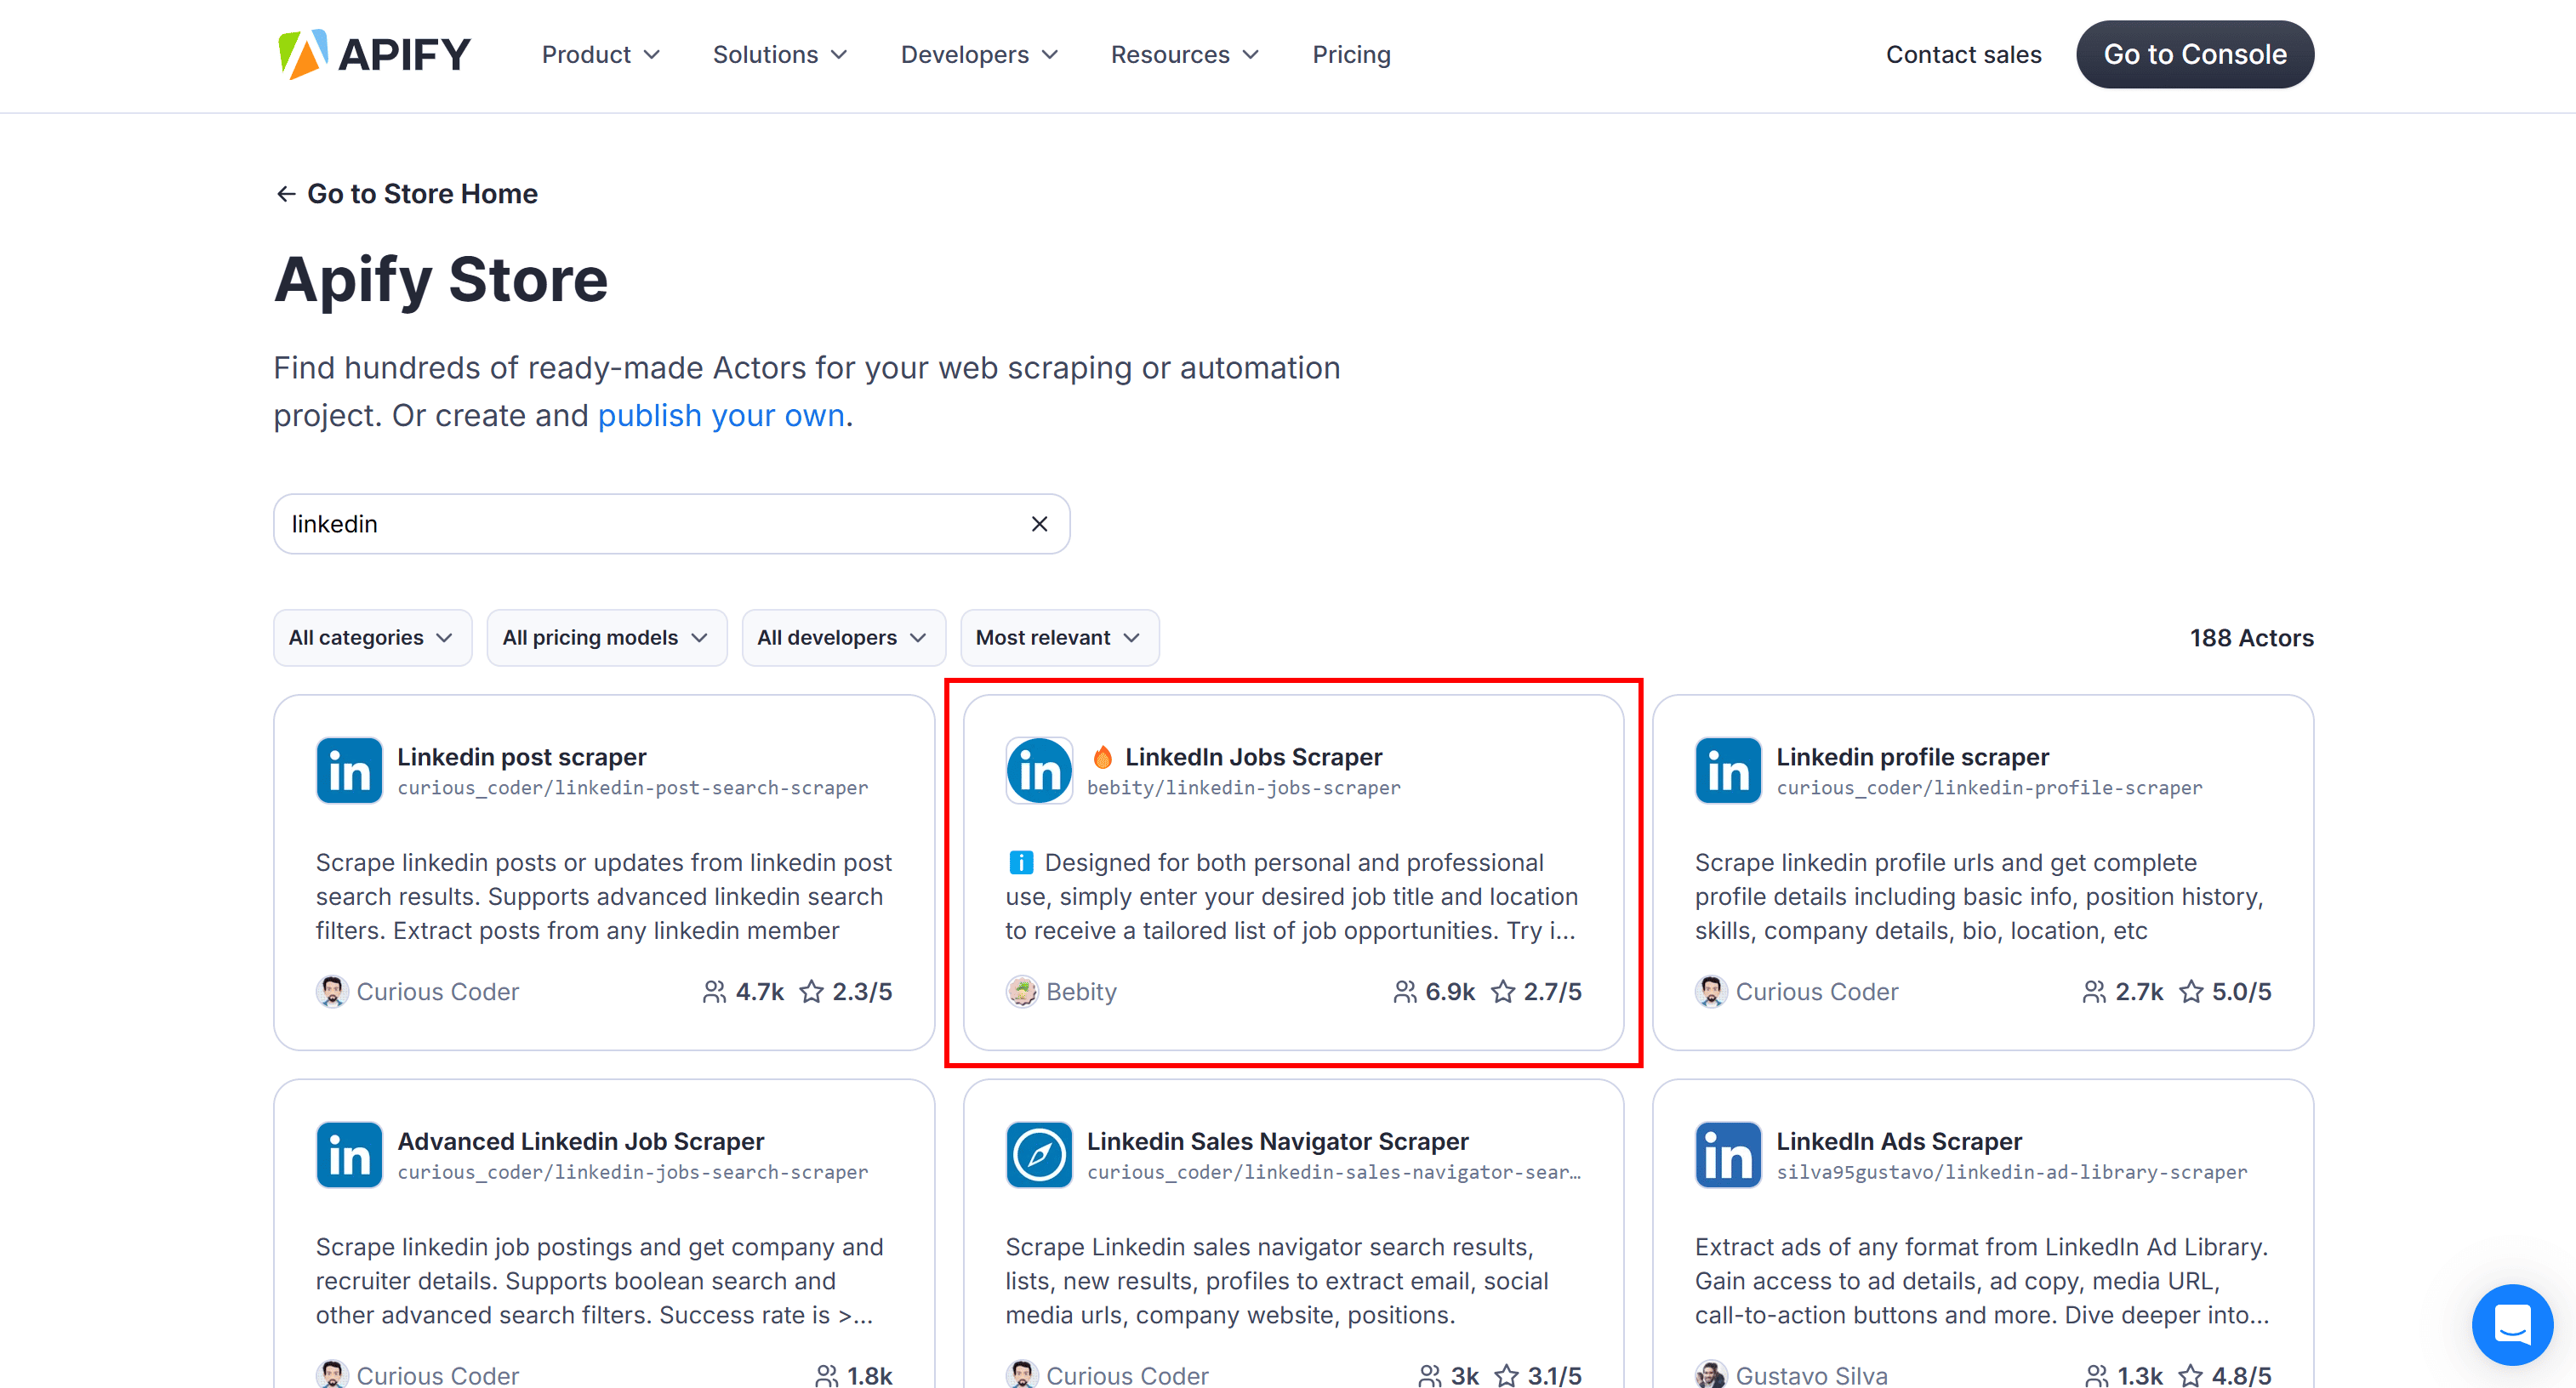
Selecting the “LinkedIn Jobs Scraper” Actor
Select the "🔥 LinkedIn Jobs Scraper" Actor, then click "Try for free" on its public page:

The Actor will be added to your personal Apify dashboard. Configure it as needed, then click "Start" to rent the Actor:
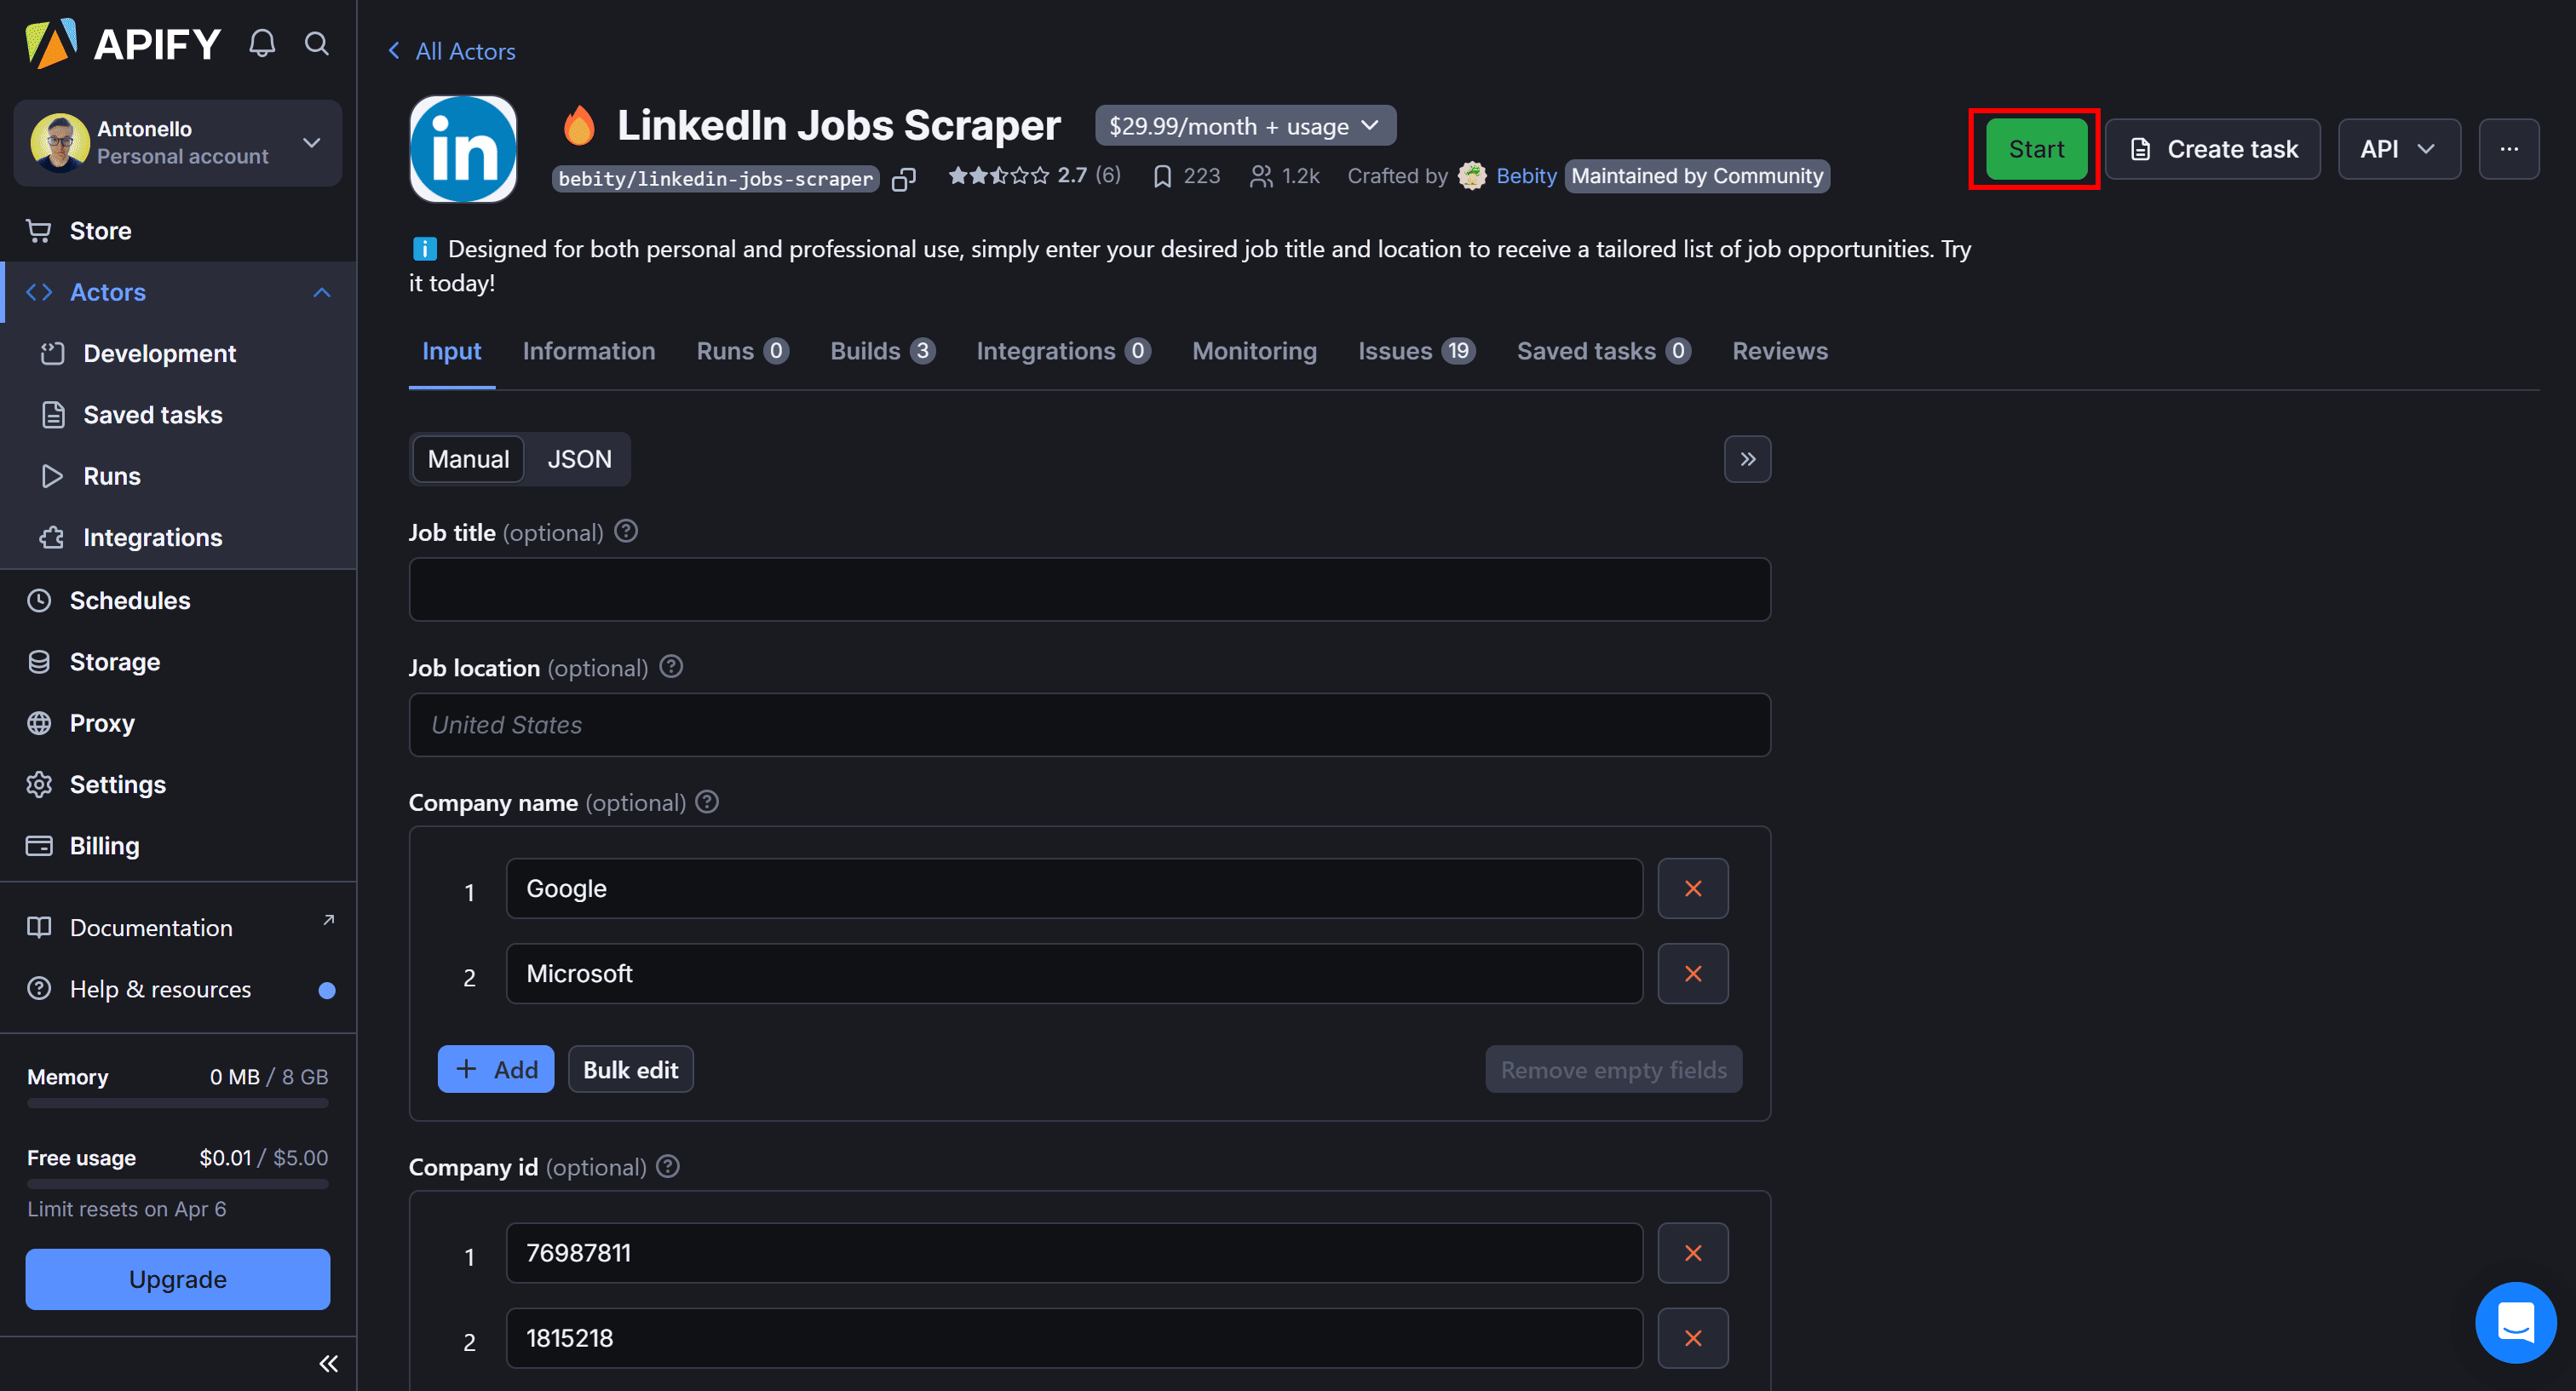
Press “Start” again, wait for the Actor to finish, and enjoy your LinkedIn job data:

And that’s it! You’ve successfully scraped job data from LinkedIn with just a few clicks.
Why scrape LinkedIn jobs?
Having access to fresh LinkedIn job data through web scraping is valuable for multiple use cases:
- Job market analysis: Identify industry trends and hiring patterns.
- Salary trend monitoring: Compare salaries across roles and locations.
- Competitor analysis: Track hiring activity and job openings from rival companies.
- Skill demand insights: Analyze which skills are most sought after in various industries.
- Geographic workforce trends: Monitor job availability and demand across different regions.
In particular, extracted LinkedIn data points include job titles, company names, locations, salary estimates, posting dates, and more. This information benefits recruiters, job seekers, HR professionals, market analysts, business strategists, and many other professionals. It empowers individuals to make informed career decisions and find their dream jobs. For example, LinkedIn data supports data-driven decisions in hiring and workforce planning.
In short, by automating LinkedIn job data collection, you can uncover hiring trends, compare salaries across industries, and enhance job recommendation systems.
Conclusion
In this tutorial, you used Beautiful Soup and HTTPX to build a LinkedIn web scraper to automate the retrieval of job postings. In particular, you extracted job data from LinkedIn and deployed the scraper on Apify.
This project showed how Apify enables efficient, scalable job scraping while reducing development time. You can explore other templates and SDKs to expand your web scraping and automation capabilities.
As demonstrated in the blog post, using a pre-made LinkedIn Actor is the recommended approach to streamline job data retrieval.
Frequently asked questions
Can you scrape LinkedIn jobs?
Yes, you can scrape LinkedIn jobs using a simple Python scraping script by leveraging LinkedIn's API or parsing its HTML pages. For ethical scraping and avoiding bans, make sure to comply with LinkedIn’s terms of service and respect its robots.txt file.
Is it legal to scrape LinkedIn jobs?
Yes, it is legal to scrape LinkedIn jobs as long as you do not scrape sensitive data behind login walls. To avoid legal issues and potential violations of LinkedIn's terms, it's recommended to perform scraping without logging into your account.
How to scrape LinkedIn jobs?
To scrape LinkedIn jobs, you can use the GET /jobs-guest/jobs/api/seeMoreJobPostings/search API to fetch job listings. From the returned HTML, you can then extract job results.