Using Python for downloading images
Downloading images with Python has plenty of applications, including data acquisition for scientific analysis and training machine learning models like image recognition and object detection.
This comprehensive guide explores various methods for downloading and saving images from URLs using Python libraries like shutil, OpenCV, matplotlib, and PIL. You’ll also learn how asynchronous image downloads save time and optimize performance when handling thousands of images.

What you'll need to start saving images with Python
Before you start, make sure you have all the following requirements worked out:
- Python installed: Download the latest version from the official Python website. For this blog post, we’re using Python 3.12.2.
- Code editor: Choose a code editor, such as Visual Studio Code, PyCharm, or Jupyter Notebook.
Save an image with write()
- Using the
requests.get()function, you can send an HTTP GET request to a URL and retrieve the response. - Next, open a file in binary mode ('wb') using the
open()function. This mode is crucial for binary files such as images, as it ensures the data is written exactly as received, preserving its integrity. - Finally, use the
write()method of the open file object to write the retrieved content to the file.
Let's install the requests library in your Python environment. Run the following command in your terminal:
pip install requests==2.31.0Even though the image URL points to a PNG image, the following code allows you to save the downloaded image in other formats like JPG or JPEG during the saving process. You'll need to specify the desired format when executing the code.
import os
import requests

def download_image(image_url, file_dir):
    response = requests.get(image_url)

    if response.status_code == 200:
        directory = os.path.dirname(file_dir)
        if not os.path.exists(directory):
            os.makedirs(directory)

        with open(file_dir, "wb") as fp:
            fp.write(response.content)
        print("Image downloaded successfully.")
    else:
        print(f"Failed to download the image. Status code: {response.status_code}")

if __name__ == "__main__":
    image_url = "https://assets.stickpng.com/images/630f85bed5353300f4bd328c.png"
    file_dir = "myimage/download.jpg"
    download_image(image_url, file_dir)
Here’s the output:
What if the provided URL doesn't contain a .png or .jpg extension? No worries! You can still download the image and save it to your local system. You can choose from various formats like PNG, JPG, or JPEG. Additionally, you can specify the desired width and height for resizing.
import requests
import os

def download_image(image_url, file_dir):
    response = requests.get(image_url)

    if response.status_code == 200:
        directory = os.path.dirname(file_dir)
        if not os.path.exists(directory):
            os.makedirs(directory)

        with open(file_dir, "wb") as fp:
            fp.write(response.content)
        print("Image downloaded successfully.")
    else:
        print(f"Failed to download the image. Status code: {response.status_code}")

if __name__ == "__main__":
    image_url = "https://images.unsplash.com/photo-1689182339141-ce4448e34bd7"
    # image_url = "https://images.unsplash.com/photo-1689182339141-ce4448e34bd7?w=2000"
    # image_url = "https://images.unsplash.com/photo-1689182339141-ce4448e34bd7?h=300"

    file_dir = "myimage/download.jpeg"
    download_image(image_url, file_dir)
Here’s the output:

Save an image with shutil
The shutil module offers several high-level operations on files and collections of files. Let's use the requests library to download an image and the shutil module to save it locally in binary mode efficiently. Shutil is a part of the Python standard libraries, so we don't need to explicitly install it.
The stream=True parameter enables efficient handling of large files by reading and writing the content in chunks. This means the entire response content is not downloaded and loaded into memory at once. Instead, it is divided into smaller, non-overlapping "chunks," which is more memory-efficient.
Setting response.raw.decode_content to True ensures the response content is automatically decoded, saving the image correctly. This is crucial when dealing with binary data like images or compressed files.
import requests
import shutil
import os

def download_image(image_url, file_dir):

    response = requests.get(image_url, stream=True)

    if response.status_code == 200:
        directory = os.path.dirname(file_dir)
        if not os.path.exists(directory):
            os.makedirs(directory)

        with open(file_dir, "wb") as fp:
            response.raw.decode_content = True
            shutil.copyfileobj(response.raw, fp)
        print(f"Image downloaded and saved at {file_dir}")
    else:
        raise Exception(f"Failed to download image. Status code: {response.status_code}")


if __name__ == "__main__":
    image_url = "https://images.unsplash.com/photo-1689182339141-ce4448e34bd7?w=2000"
    file_dir = "myImage/download.jpg"

    download_image(image_url, file_dir)
Here’s the output:

Note that if you set stream to True when making a request, Requests can't release the connection back to the pool unless you consume all the data or call Response.close(). This can lead to inefficiency with connections. While using stream=True, you should make a request within a with statement to ensure it's always closed. Here's the updated code:
import requests
import shutil
import os

def download_image(image_url, file_dir):
    with requests.get(image_url, stream=True) as response:
        if response.status_code == 200:
            directory = os.path.dirname(file_dir)
            if not os.path.exists(directory):
                os.makedirs(directory)

            with open(file_dir, "wb") as fp:
                response.raw.decode_content = True
                shutil.copyfileobj(response.raw, fp)
            print(f"Image downloaded and saved at {file_dir}")
        else:
            print(f"Failed to download image. Status code: {response.status_code}")

if __name__ == "__main__":
    image_url = "https://images.unsplash.com/photo-1689182339141-ce4448e34bd7?w=2000"
    file_dir = "myimage/download.jpg"

    download_image(image_url, file_dir)
Save an image with PIL
The Python Imaging Library (PIL), also known as Pillow, is a free and open-source library for manipulating and processing images. It supports various image file formats, including PNG, JPEG, PPM, GIF, TIFF, and BMP. With Pillow, you can perform various operations on images, such as cropping, resizing, adding text, rotating, and converting to grayscale.
Let's install the Pillow library using the following command:
pip install pillow==10.1.0We'll use the requests library to download an image, and then Pillow to save and display it. Run the following code to display the image on the screen. The show() method from Pillow is used for this purpose.
from PIL import Image
import requests
from io import BytesIO

def download_image(image_url):
    response = requests.get(image_url)
    if response.status_code == 200:
        # Use BytesIO to convert raw content to a bytes-like object
        image_data = BytesIO(response.content)

        image = Image.open(image_data)
        image.show()
    else:
        print(f"Failed to download image. Status code: {response.status_code}")

if __name__ == "__main__":
    image_url = "https://images.unsplash.com/photo-1689182339141-ce4448e34bd7?w=2000"
    download_image(image_url)
io.BytesIO acts as an in-memory buffer, essentially creating a temporary file-like object to hold the downloaded image data. This allows the Image.open() to process the data as if it were a real image file, even though it never needs to be saved to disk.
You can save the processed image to a physical file using the save() method.
from PIL import Image
import requests
from io import BytesIO
import os

def download_image(url, file_dir):
    response = requests.get(url)

    if response.status_code == 200:
        directory = os.path.dirname(file_dir)
        if not os.path.exists(directory):
            os.makedirs(directory)

        image_data = BytesIO(response.content)
        image = Image.open(image_data)

        image.save(file_dir)
        image.show()
        print(f"Image saved successfully at {file_dir}")
    else:
        print(f"Failed to download image. Status code: {response.status_code}")

if __name__ == "__main__":
    image_url = "https://images.unsplash.com/photo-1689182339141-ce4448e34bd7?w=2000"
    file_dir = "myimage/download.jpg"

    download_image(image_url, file_dir)
Save an image with urllib
urllib in Python provides a simple and powerful way to interact with URLs and access resources over the internet. It is a package that contains several modules for working with URLs:
- urllib.request for opening and reading URLs.
- urllib.error containing the exceptions raised by urllib.request.
- urllib.parse for parsing URLs.
- urllib.robotparser for parsing robots.txt files.
To download files from URLs and save them locally, use the urllib.request.urlretrieve function. Pass the URL of the file you want to download and the local filename where you want to save the downloaded file.
Urllib is a part of the Python standard libraries, so we don't need to explicitly install it.
import urllib.request
import os

def download_image(image_url, file_dir):
    try:
        directory = os.path.dirname(file_dir)
        if not os.path.exists(directory):
            os.makedirs(directory)
        urllib.request.urlretrieve(image_url, file_dir)
        print("Image saved successfully.")
    except urllib.error.URLError as e:
        print(f"Error: {e}")


if __name__ == "__main__":
    image_url = "https://images.unsplash.com/photo-1561037404-61cd46aa615b?h=500"
    file_dir = "myimage/download.png"
    download_image(image_url, file_dir)
Here’s the output:

Save an image with wget
Wget hasn't been actively maintained since 2015, but it is still frequently used to download files from the web. Wget allows you to download files from the internet via FTP, HTTP, or HTTPS, including web pages, PDFs, and XML sitemaps.
While it may still function for basic downloads, you're probably better off using an alternative method listed here to save images with Python.
import wget
import os

def download_image(url, save_path):
    try:
        wget.download(url, out=save_path)
        print("\\nImage downloaded successfully!")
    except Exception as e:
        print(f"Error downloading image: {e}")

if __name__ == "__main__":
    image_url = "<https://images.unsplash.com/photo-1561037404-61cd46aa615b?h=200>"
    filepath = "myimage/download.jpg"

    download_image(image_url, filepath)
Here’s the result:

Save an image with OpenCV
OpenCV is a powerful library primarily used for computer vision tasks like image processing. Here, we'll use the Python OpenCV library to decode and display the image. We'll also use NumPy to convert the downloaded data (a byte array) into a NumPy array, which OpenCV can better understand for image processing.
Let's install the OpenCV and NumPy using the following command:
pip install numpy==1.25.2
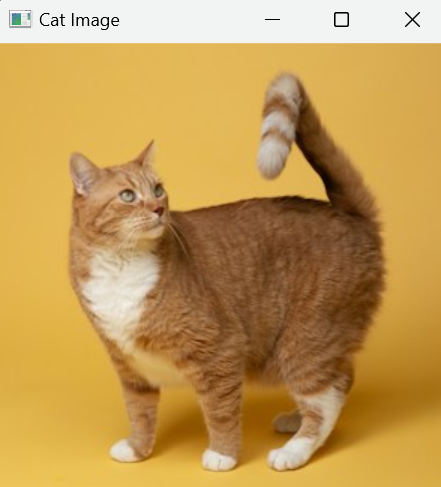
pip install opencv-python==4.9.0.80Let's take a look at the process step by step:
np.frombuffer(response.content, np.uint8): Converts the downloaded byte array to an 8-bit unsigned NumPy array (suitable for image data).cv2.imdecode(image_array, cv2.IMREAD_COLOR): Decodes the NumPy array into a color image object using OpenCV.cv2.imwrite(save_path, image): Saves the decoded image to the specified path.cv2.imshow('Cat Image', image): Displays the image in a window.cv2.waitKey(0): Waits for a key press before closing the window.cv2.destroyAllWindows(): Closes all OpenCV windows for proper resource management.
Here’s the code:
import cv2
import requests
import numpy as np
import os

def downloadSaveImage(url, fileDir):
    # Download the image from the URL
    response = requests.get(url)

    # Convert the content to a NumPy array
    imageArray = np.frombuffer(response.content, np.uint8)

    # Decode the NumPy array into an image
    image = cv2.imdecode(imageArray, cv2.IMREAD_COLOR)

    directory = os.path.dirname(fileDir)
    if not os.path.exists(directory):
        os.makedirs(directory)

    # Save the image
    cv2.imwrite(fileDir, image)

    # Display the image
    cv2.imshow("Cat Image", image)
    cv2.waitKey(0)
    cv2.destroyAllWindows()


if __name__ == "__main__":
    url = "https://images.unsplash.com/photo-1596854407944-bf87f6fdd49e?h=400"
    fileDir = "myimage/opencv-image.png"
    downloadSaveImage(url, fileDir)
The output is this:
Assuming you’ve already downloaded an image onto your computer, you can load it using the imread() function provided by OpenCV. Here are some second parameters you can pass to the function:
- cv2.IMREAD_COLOR (or 1): Loads the image in color (default)
- cv2.IMREAD_GRAYSCALE (or 0): Loads the image in grayscale
import cv2

image_cv2 = cv2.imread(r"myimage/opencv-image.png")
cv2.imshow("Cat Image", image_cv2)
cv2.waitKey(0)
cv2.destroyAllWindows()
Save an image with matplotlib
Matplotlib is a powerful library for generating static, animated, and interactive visualizations in Python. For our specific task of downloading and saving images, Matplotlib plays key roles:
- Image loading:
mpimg.imreadfrom Matplotlib efficiently reads the raw image data from the downloaded response. - Image saving:
plt.imsavesaves the loaded image data to a specified file path. - Image display (optional): For visual confirmation, you can use
plt.imshowand[plt.show](<http://plt.show>)to display the image within a Matplotlib window temporarily.
Let's install the Matplotlib library with the following command:
pip install matplotlib==3.7.3
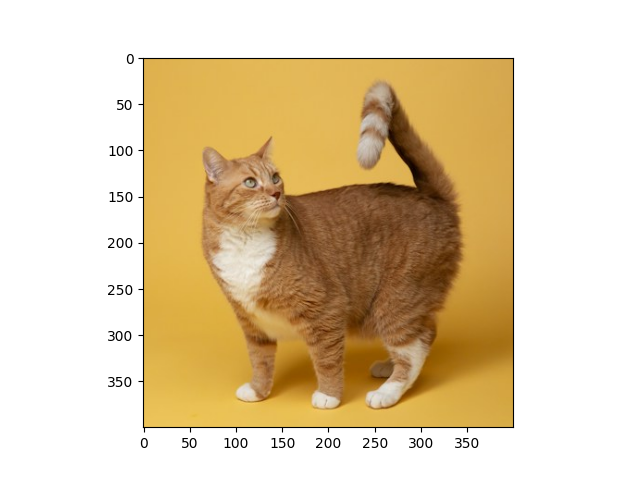
First, we’ll send a GET request to the URL to retrieve the image content. The response object (response.raw ) will then be used to read the raw image data using mpimg.imread. Following that, the image data will be saved to the specified save_path using plt.imsave.
To display the image data temporarily within the Matplotlib window, use plt.imshow(). Finally, use plt.show() to make the Matplotlib window visible.
import requests
import matplotlib.pyplot as plt
import matplotlib.image as mpimg

def download_save_image(url, save_path):
    response = requests.get(url, stream=True)
    if response.status_code == 200:

        # Read the image from the response content
        img = mpimg.imread(response.raw, format="jpeg")

        # Save the image
        plt.imsave(save_path, img)

        # Display the image
        plt.imshow(img)
        plt.show()
        print("Image downloaded successfully.")
    else:
        print("Failed to download the image.")

if __name__ == "__main__":
    url = "<https://images.unsplash.com/photo-1596854407944-bf87f6fdd49e?h=400>"
    save_path = "myimage/cat.png"
    download_save_image(url, save_path)
The output is:
Assuming you have an image already downloaded on your computer, you can read it using the imread function and display it using plt.show. Here's how:
import matplotlib.pyplot as plt
import matplotlib.image as mpimg

imag = mpimg.imread("myimage/cat.png")
plt.imshow(img)
plt.show()
Downloading images asynchronously
Asynchronous downloading allows you to run multiple tasks concurrently without needing to wait for each one to complete before starting the next. However, it requires more complex implementation compared to synchronous approaches.
Install the aiohttp and aiofiles libraries using the below commands:
pip install aiohttp==3.9.3
pip install aiofiles==23.2.1
In the following code, the download_all asynchronous function schedules multiple download coroutines concurrently using asyncio.gather.
import aiohttp
import asyncio
import aiofiles
import time

async def download(url, filename):
    print(f"Downloading {url}")
    async with aiohttp.ClientSession() as session:
        async with session.get(url) as response:
            async with aiofiles.open(filename, 'wb') as f:
                await f.write(await response.read())
    print(f"\\nDownload completed for {url}.")

async def download_all(urls):
    tasks = []
    for i, url in enumerate(urls):
        tasks.append(download(url, f"image_async_{i}.jpg"))
    await asyncio.gather(*tasks)

urls = [
    "<https://images.unsplash.com/photo-1683009427513-28e163402d16?h200>",
    "<https://images.unsplash.com/photo-1682687220305-ce8a9ab237b1?h=205>",
    "<https://images.unsplash.com/photo-1706612527282-1e7004678ab1?h=210>",
    "<https://images.unsplash.com/photo-1706271625297-cb3c47286e37?h=215>",
    "<https://images.unsplash.com/photo-1701405790155-e0591d01590a?h=220>"

]

start_time = time.time()
asyncio.run(download_all(urls))
end_time = time.time()
print(f"\\nAsynchronous download took {end_time - start_time} seconds.")
Time taken by asynchronous download:

Time taken by synchronous download:

Next steps: using async/await in Python
We've discussed various methods of downloading and saving images from URLs using Python. Each method has its pros and cons, so choose the one that best suits your project's needs. The Requests module has emerged as a popular and reliable choice for downloading content in Python, even gaining recommendations from the urllib documentation as a high-level HTTP client interface.
Next steps? Explore asynchronous methods for downloading and saving images, as they can be more efficient. This tutorial on Python asyncio provides a good starting point for learning how to write concurrent code in Python using the async/await syntax.