


If you're looking to crawl and scrape content, you need to find a good crawler capable of working under different protocols like HTTP, HTTPS, FTP, and FTPS. Today, you’ll learn how to install Wget and all you need to do while web scraping. Read more and enjoy!
Talking about web scraping, get to know Apify - a full-stack web scraping and automation platform, where you can publish and monetize your scrapers.
Meet Wget: one of the best open-source and non-interactive command line utilities
This means you can use it anywhere, from a script, a cron job, or a terminal. So, you can crawl for content regardless of the context you're on. But that's not all. Wget also has support for proxies. This is particularly useful when you're keen on crawling content without fear of getting blocked.
For example, some websites can flag you as a bot and eventually block your requests, causing your downloads to fail continually.
If you route your requests through a proxy server, your IP address will be rotated automatically. Therefore, every request that you send would have a different IP address. This makes it hard for the website to detect a bot, thus creating anonymity within the web, which lets you scrape and crawl for content easily.
And, with Wget, you're able to execute your requests via a configured proxy server, letting you freely crawl for content.
In addition to that, Wget comes with many benefits:
- If your request gets interrupted, it can be resumed.
- It lets you operate requests in the background
- You can use filename wild cards to help recursively mirror directories.
So, let's delve into the intricacies of Wget and discover how you can effectively run Wget with a Proxy.
Installing Wget
Wget can be installed in two ways:
- The official GNU channel
- Manually using package managers
I recommend using a package manager to install Wget as it allows you perform additional actions like removing or upgrading it easily.
If you're using Ubuntu/Debian
sudo apt-get install wget
If you're using CentOS or RHEL
yum install wget
If you're using MacOS and Homebrew
brew install wget
If you're using Windows and Chocolatey
choco install wget
To verify your installation, run the command:
wget --version
This should display the output:

Now, let's take a look at what you can do with Wget to better understand its functionality.
Using Wget
Downloading a file
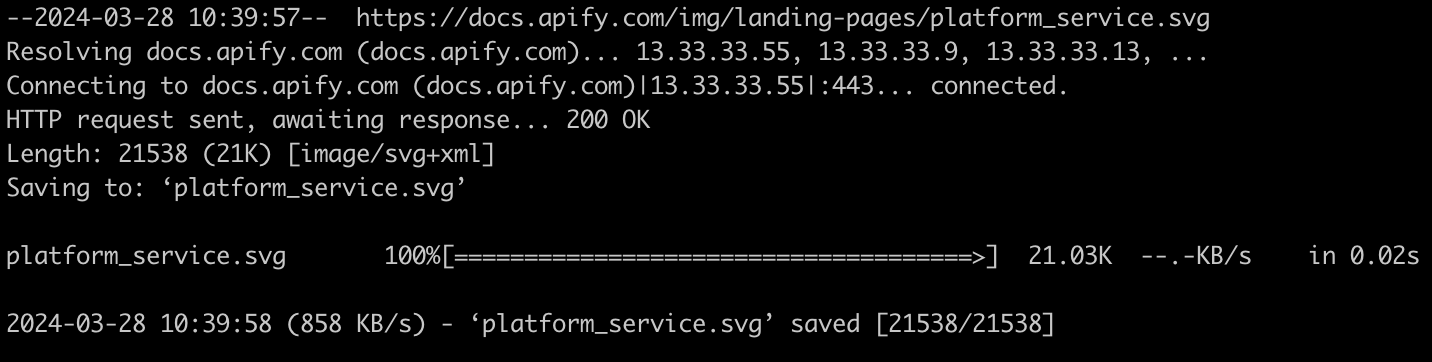
To get started, let's download a file using Wget. In fact, let's download a simple SVG file that's available here.
To do so, run the command:
wget <<url>>
Replace <> with the file url as follows:
wget [https://docs.apify.com/img/landing-pages/platform_service.svg](https://docs.apify.com/img/landing-pages/platform_service.svg)
You should see your file being downloaded:
To verify the download, let's list the contents in the directory using ls.

As you can see, the file is saved on the directory.
Download files to a defined directory
Initially, I downloaded the file on to the default working directory that my terminal was launched on. However, this is not the case in real-world use cases. You'd want to have a defined directory where all your downloads go. This can be easily accomplished using Wget.
All you have to do is use the flag - -P and provide your download path. So, if we were to specify a path to the file we downloaded earlier, it would look something like this:
wget <\> -P <\
After replacing the placeholders, the command should look like this:
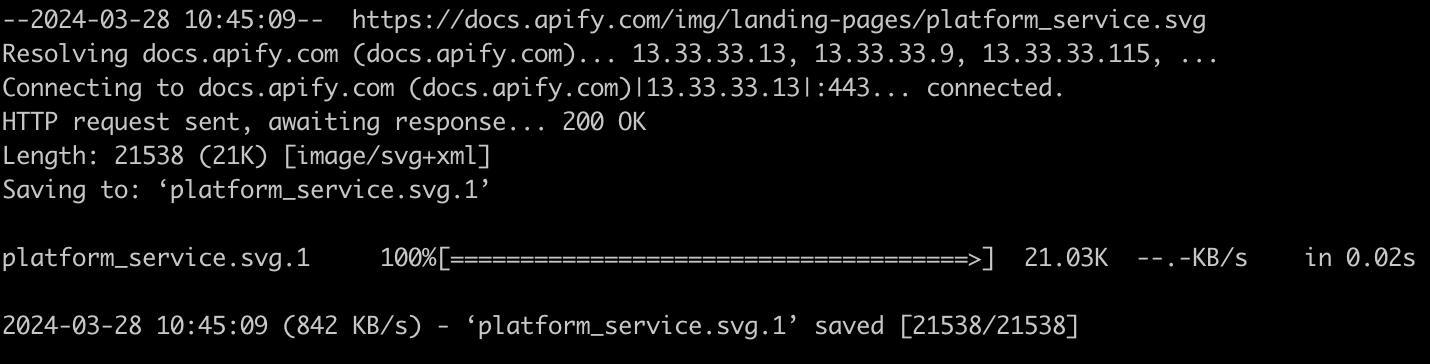
wget [https://docs.apify.com/img/landing-pages/platform_service.svg](https://docs.apify.com/img/landing-pages/platform_service.svg) -P /Users/lakinduhewawasam/Desktop/downloads
After execution, you should see the output:

If you view the directory, you should see the file downloaded:

Rename file downloads
Next, you can even rename the file that you're downloading from the server. To do so, you'll have to use the flag - -O, and specify the new filename along with the file type.
So, your command will look like this:
wget <\> -O <\>
If we rename our example file, it would look like this:
wget [https://docs.apify.com/img/landing-pages/platform_service.svg](https://docs.apify.com/img/landing-pages/platform_service.svg) -O wgetdownload.svg
Once it's downloaded, you should see the output in your directory

Define user agents
You can define a user agent when you're executing a request. This helps the web server tailor content to the capabilities or preferences of the client device. To do so, you can use the flag - --user-agent and specify the agent you require.
This would look something like:
wget <\> --user-agent=<\>
Let's download the same file using Chrome as a user agent. You might consider doing this as websites often check the user agent to deliver content compatible with the user's browser. Chrome is one of the most popular and widely supported browsers, and is likely to receive content that's optimized for a good browsing experience.
So, to do this, run the following command:
wget [https://docs.apify.com/img/landing-pages/platform_service.svg](https://docs.apify.com/img/landing-pages/platform_service.svg) --user-agent=Chrome
If you've executed it successfully, you should see the output shown above.
Limit speeds of a download
Next, you can set up speed limiters when you're downloading files using wget. This is useful in cases where you don't want to exhaust the network resources on your server.
For this, you need to use the flag - --limit-rate and specify your download speed in Bytes Per Second. For example, if you wanted to limit the speed to 2 Megabytes per second, you'd have to limit the speed to 2,097,152 bytes per second. To convert your speed, check this out.
wget <\> --limit-rate=<\>
In this example, I'll download the sample file with 1 byte per second:
wget [https://docs.apify.com/img/landing-pages/platform_service.svg](https://docs.apify.com/img/landing-pages/platform_service.svg) --limit-rate=1
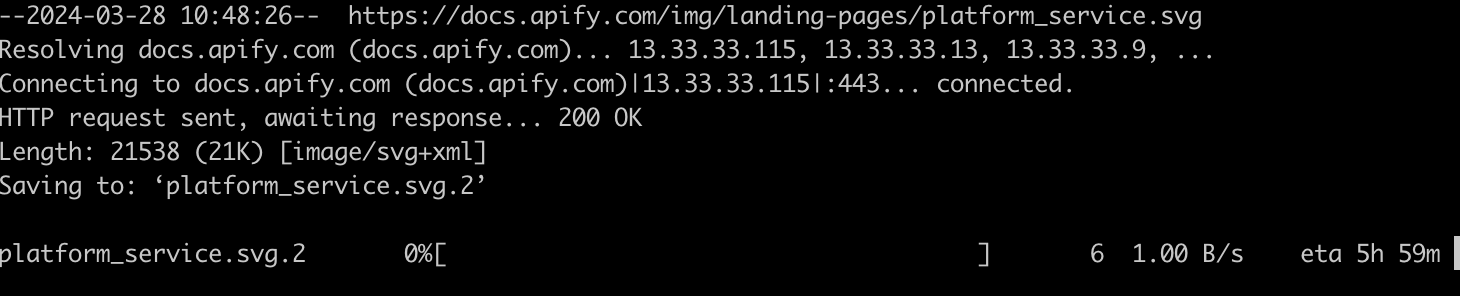
If you observe closely, you'll notice that the speed is at "1.00 B/s", showing that our speed is being limited.
Perform batch downloads
Next, you can batch your downloads using wget. For instance, if you have a list of URLs that you'd like to download, all you have to do is:
- Create a text file with each the URLs separated via a new line.
- Run wget using the flag - -i along with the file containing the list of URLs.
So, to showcase this, I've created a file with the following URLs:
// text.txt

https://docs.apify.com/img/landing-pages/platform_service.svg

https://docs.apify.com/img/landing-pages/platform_service.svg

https://docs.apify.com/img/landing-pages/platform_service.svg

https://docs.apify.com/img/landing-pages/platform_service.svg

https://docs.apify.com/img/landing-pages/platform_service.svg

https://docs.apify.com/img/landing-pages/platform_service.svg

https://docs.apify.com/img/landing-pages/platform_service.svg

https://docs.apify.com/img/landing-pages/platform_service.svg

https://docs.apify.com/img/landing-pages/platform_service.svg

https://docs.apify.com/img/landing-pages/platform_service.svg

https://docs.apify.com/img/landing-pages/platform_service.svg
Next, I'll batch this using this command:
wget -i <\>
So, my command will look like this:
wget -i text.txt
You should see this output:

If you inspect the directory of the downloaded files, you should see your files visible:

Downloading an entire website
You can do pretty advanced stuff with wget such as downloading an entire website. This lets you browse the site offline or maintain a backup.
This can be achieved using the command:
wget --mirror --convert-links --adjust-extension --page-requisites --no-parent <\>
This will do the following:
-mirror: This option turns on options suitable for mirroring websites, including recursion and time-stamping.-convert-links: After the download is complete, convert the links in the documents for local viewing.-adjust-extension: Adds suitable extensions to filenames (html or css) depending on their content-type.-page-requisites:Download all the files that are necessary to properly display a given HTML page. This includes things like inlined images, sounds, and referenced stylesheets.-no-parent: Do not follow links outside the directory you’re downloading.
Let's download the website - https://apify.com/. Execute:
wget --mirror --convert-links --adjust-extension --page-requisites --no-parent [https://apify.com](https://apify.com/)
Upon downloading, you should see the output:
You can update your command with the wait option as follows:
wget --wait=seconds[URL]
Automating downloads
Next, you can automate downloads as well. This involves scripting and scheduling the download command to run at specific intervals or times.
So, here's a basic guide for both Linux, macOS Windows systems.
Automating downloads: Linux/macOS
On a Linux or a macOS system, you can use cron, a time-based job scheduler, to automate downloads.
Step 1: Write a script
First, let's create a shell script by creating a file - download_website.sh. You can execute these scripts in your terminal and automate your downloads.
Open the newly created file and add the script:
#!/bin/bash
wget --mirror --convert-links --adjust-extension --page-requisites --no-parent [URL]
Next, make the script executable by running chmod +x download_website.sh in the terminal.
Step 2: Schedule with cron
Next, schedule your script using cron. To do so, open your crontab for editing by running crontab -e in the terminal.
Next, schedule your script to run at a specific time. To do that, add the line following the cron format.
0 3 * /path/to/download_website.sh
This will run the download every day at 3AM. Additionally, if you wish to create your own schedule, you can check out Crontab Guru.
Automating downloads: Windows
On Windows, you can use Task Scheduler to automate tasks.
Step 1: Create a batch file
First, create a batch file with your wget command. Update your file with the following code:
wget --mirror --convert-links --adjust-extension --page-requisites --no-parent [URL]
Next, save the file with a .bat extension - download_website.bat.
Step 2: Schedule with Task Scheduler
Next, use Task Scheduler to run your batch file at specific times. To do so, you'd have to first open your task scheduler, as shown below:

Next, Click "Create Basic Task…" and follow the wizard to set up your task, as shown below.

When prompted for the action, select "Start a Program" and browse to your batch file, as shown below:

Finally, complete the wizard with your preferred schedule.
This will trigger your script on a scheduled basis on Windows!
Using Wget with a proxy
Now that we have a basic idea on wget and how you can download files and websites with it, it's important to use Wget with a proxy since all of the operations that we just did may get blocked by certain websites.
For instance, most servers don't let you download their entire website as that can be extremely resource intensive on that server. So, they typically block these actions by looking out for bots. So, this is where your proxy server comes in.
Your proxy server can rotate your IP address whenever a request originates to ensure that the server can't identify you as a bot. This lets you crawl as you'd usually would without any restrictions.
How to configure a proxy with Wget?
To configure your proxy, all it takes is a few simple settings.
Head over to your wget initialization file. This is typically inside the directory - /usr/local/etc/wgetrc (global, for all users) or $HOME/.wgetrc (for a single user). Next, open the file and update it with these variables:
https_proxy = http\://[Proxy_Server]:[port]

http_proxy = http\://[Proxy_Server]:[port]

ftp_proxy = http\://[Proxy_Server]:[port]

use_proxy=on
With this configuration, you configure three proxies:
- HTTP
- HTTPS
- FTP
Additionally, the file does the following:
- https_proxy =
http\://[Proxy_Server]:[port]: This sets the proxy server for HTTPS connections. Despite the "https" in the variable name, the proxy server URL itself useshttp\://because this setting specifies the proxy server to be used, not the protocol of the data being requested. Replace[Proxy_Server]with the proxy server's hostname or IP address and[port]with the proxy server's port number. This setting is used when accessing websites securely over HTTPS. - httpproxy =
http\://[Proxy_Server]:[port]: Similar to httpsproxy, this sets the proxy server for HTTP connections. It's used when accessing websites over the non-secure HTTP protocol. The[Proxy_Server]and[port]placeholders should be replaced with your proxy's details. - ftp_proxy =
http\://[Proxy_Server]:[port]: This configures the proxy settings for FTP (File Transfer Protocol) connections. It's used when downloading or uploading files using FTP. Again, replace[Proxy_Server]and[port]with the appropriate values for your proxy server. - use_proxy=on: This option enables the use of a proxy server for the requests made by the application or utility. Setting it to 'on' activates the proxy settings provided by the other variables.
And that's pretty much it. After you've done this, your requests will be routed through your proxy server!
Using a proxy with authentication
If your proxy requires authentication, you'd have to pass in a username and a password. So, If your proxy server requires authentication, you need to include the username and password in the proxy configuration.
This can be done by embedding the credentials directly in the proxy URL. So, update your wget initialization file by adding credentials of your proxy server:
http_proxy=[http://username:password@Proxy_Server:port/](http://username:password@proxy_server:port/)

https_proxy=[https://username:password@Proxy_Server:port/](https://username:password@proxy_server:port/)

ftp_proxy=ftp://username:password@Proxy_Server:port/

use_proxy=on
Doing this means your requests will now be sent through an authorized proxy server.
Using proxy rotation
Sometimes, you might not only have one proxy server. Instead, you might have multiple proxy servers that you'd want wget to rotate off of.
This can be useful for web scraping, avoiding IP bans, or load balancing requests across multiple servers.
Here's how you can do this:
- Proxy list: Maintain a list of proxy servers.
- Selection script: Write a script to select a proxy from the list randomly or in a round-robin fashion.
- Set environment variable: The script then sets the
http_proxy,https_proxy, andftp_proxyenvironment variables to the selected proxy. - Run wget: Execute your wget command after setting the environment variable.
You can include this in a shell file to automate this:
#!/bin/bash

# List of proxies

proxies=("[http://proxy1:port](http://proxy1:port/)" "[http://proxy2:port](http://proxy2:port/)" "[http://proxy3:port](http://proxy3:port/)")

# Select a random proxy from the list

selected_proxy=${proxies[$RANDOM % ${#proxies[@]}]}

# Export the selected proxy as environment variable

export http_proxy=$selected_proxy

export https_proxy=$selected_proxy

# Run wget command

wget [Your wget command here]
Now, every time you execute the shell script, your proxy server will change randomly.
But wait, there's more!
Have you heard about wget2? Wget2 is the newest release of wget and it includes some massive improvements over the first release.
Some key improvements from wget to wget2 include:
Performance and Efficiency
- Multi-threading: wget2 introduces multi-threaded downloads, allowing multiple files (or multiple parts of a single file) to be downloaded simultaneously. This can significantly speed up the download process, especially for sites with rate limiting or when downloading large files from servers that support multiple connections.
- HTTP/2 support: wget2 supports HTTP/2, which can improve download efficiency and speed by reducing the latency involved in opening multiple connections and by compressing header data. wget is limited to HTTP/1.1.
Features
- Improved security: wget2 includes better default security settings, such as using stronger cryptographic primitives for HTTPS connections.
- More robust parsing: wget2 offers improved HTML and CSS parsing capabilities, which can enhance the accuracy of page requisites downloading (like images and stylesheets) when using the tool to recursively download or mirror websites.
- WARC output: wget2 supports writing downloaded content directly to WARC (Web ARChive) files, which is a standard format for archiving web content. This feature is particularly useful for tasks related to web preservation and archiving.
Compatibility and standards
- Protocol support: Besides HTTP/2, wget2 aims to offer more extensive protocol support and compliance with current web standards, making it more compatible with modern web technologies.
- Quota management: wget2 provides improved quota management, allowing users to specify maximum download limits more flexibly.
But what if wget isn't the right tool for me? Well, if wget is not right for you, consider using the next best alternative - curl.
Wrapping up
And that's pretty much it for this article. If you're looking to build automated download services that leverage proxies, wget is the way to go for you.
Plus, if you're looking at downloading sites, consider scraping them instead. It's way easier and less resource-intensive on the web server. Here's a simple guide to get you started.


