Whether we need to collect data from multiple sources, perform form testing, or automate mundane form submissions, learning how to submit forms with Playwright and JavaScript can help us automate these tasks.
Why automate forms?
Before we get into the technical details, let's consider a few scenarios where form automation can be beneficial:
Data collection
Imagine we need to gather data from various online marketplaces, including product details, prices, and more. The traditional manual approach is time-consuming and error-prone, requiring navigation to each product page and form filling. However, automation tools like Playwright enable us to automatically navigate these marketplaces, extract the necessary information, and populate a database, saving time and reducing errors.
Learn more about how to scrape the web with Playwright:
Form testing
When developing web applications, testing the functionality and behavior of forms is crucial. Manually testing each scenario can be repetitive and inefficient. By automating testing with form submissions, input validation testing, and error handling, we ensure the smooth operation of our applications.
Repetitive tasks
Many online services require filling in forms repeatedly, such as submitting support requests, job applications, or entering sweepstakes. Again, automating these repetitive tasks will save time and effort. This can be done for individuals, such as if you want to repeatedly enter your details, or at scale, for companies or web scraping projects.
By the end of this article, you will have a solid understanding of how to automate forms using Playwright. You can then apply the techniques we will learn here to your own projects. So, let’s get coding!
What you'll need to start automating forms
Before getting started, there are a few prerequisites you should have in place:
- Basic understanding of HTML forms and browser DevTools: It's helpful to have a fundamental understanding of HTML forms and their structure as well as being able to use your browser DevTools to inspect elements on a webpage.
- JavaScript knowledge: Since we'll be using JavaScript and Node.js as the programming language for our project, it's essential to have at least a basic understanding of concepts such as variables, functions, and asynchronous programming in JavaScript.
- Node.js installation: Ensure that Node.js is installed on your local machine. You can download and install the latest version of Node.js from the official Node.js website and use our guide on how to install it correctly. Node.js will allow us to run JavaScript code outside of the browser environment.
You don't need to have any experience with Playwright, but you might like to find out more about it before you start.
Setting up your form automation project
Create a new project directory
Choose a suitable location on your computer and create a new directory for your project. You can name it anything you like, for example form-automation-project. So, let’s open the terminal, navigate to the desired location, and use the following command to create the directory:
mkdir form-automation-project
Initialize a new Node.js project
Change into the newly created project directory and initialize a new Node.js project by running the following commands:
cd form-automation-project
npm init -y
This command generates a package.json file that will keep track of the project's dependencies and configuration.
Install Playwright
With the project initialized, we can now install the Playwright library. In your terminal or command prompt, run the following command:
npm install playwright
Update package.json to use module syntax
To enable the use of the JavaScript module syntax when building our project, add "type": "module" to your package.json file. This syntax allows us to take advantage of the ES module system, which provides a more standardized and modern approach to organizing and importing JavaScript code.
Launching the browser and navigating to the form
Now that our project is set up, we can begin automating the form by launching a browser instance and navigating to the target webpage containing the form.
Create a new JavaScript file: In the project directory, let’s create a new JavaScript file to hold the logic for our bot. You can name it bot.js or choose any other suitable name.
Import Playwright modules
Open the newly created bot.js file in your preferred code editor. At the top of the file, let’s import the necessary Playwright modules using the following code:
import { chromium } from 'playwright';
This imports the chromium module from Playwright, which allows us to automate Chromium-based browsers like Google Chrome.
Launch a browser instance
Below the import statement, add the following code to launch a new browser instance:
async function submitForm() => {
  const browser = await chromium.launch({ headless: false });
})();
This code uses an asynchronous function to launch a browser instance with Playwright's launch() method. The browser variable will hold the browser instance for further interactions. Note that we are also passing the parameter headless: false so we can see our bot in action.
Navigate to the target web page
To navigate to the web page containing the form, add the following code after launching the browser:
async function submitForm() => {
  const browser = await chromium.launch();
  const context = await browser.newContext();
  const page = await context.newPage();

  await page.goto('https://www.example.com/form'); // Replace with the actual URL of the form
};
In this code, we create a new context and a new page within that context. Then, we use the goto() method to navigate to the URL of the webpage containing the form. Make sure to replace 'https://www.example.com/form' with the actual URL of the form you want to automate.
Locating and filling form fields
Now that we have successfully navigated to the webpage containing the form, we can proceed to locate the form fields and fill them in with our desired values.
Locate form fields
To interact with form fields, we need to locate them on the web page. Inspect the HTML structure of the form to identify the attributes or selectors we can use to locate each field. Common attributes include name, id, and class. For example, let's assume we have an input field with the name attribute "firstName". We can locate it using Playwright's page.locator() method:
const firstNameField = page.locator('input[name="firstName"]');
For example, in our Google form example, we have to first inspect the input field we want to find the selectors that we can then use to target it:
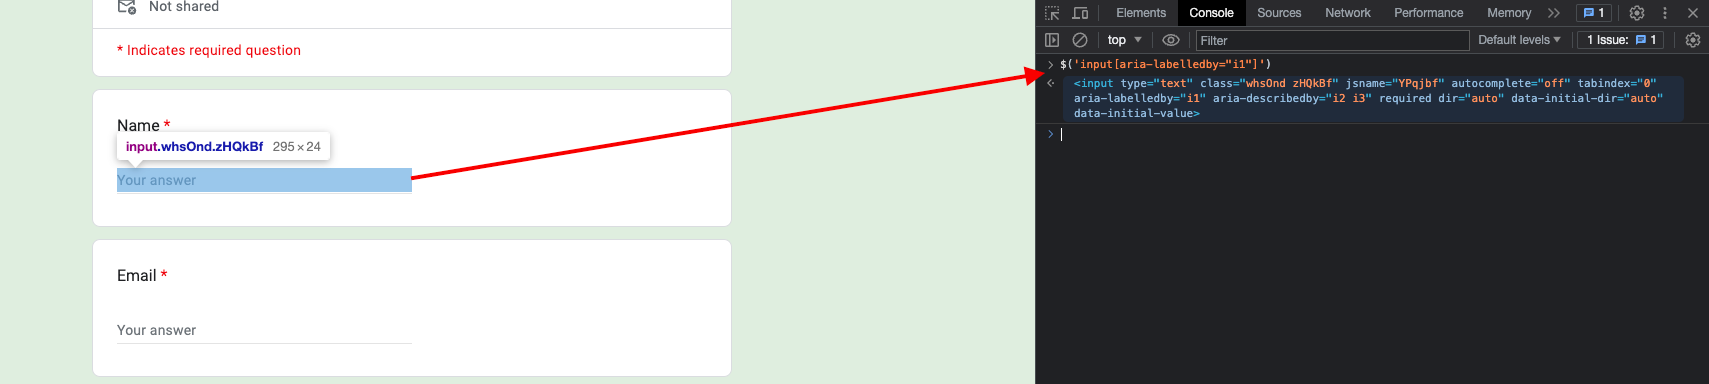
And now we can target it by using the following code:
const firstNameField = page.locator('input[aria-labelledby="i1"]')
Repeat this approach to target all the form fields you need to fill in. For example, these are the selectors for each of the fields present in our dummy Google form:
const firstNameField = page.locator('input[aria-labelledby="i1"]');
const emailField = page.locator('input[aria-labelledby="i5"]');
const addressField = page.locator('textarea[aria-labelledby="i9"]');
const phoneField = page.locator('input[aria-labelledby="i13"]');
const commentsField = page.locator('textarea[aria-labelledby="i17"]');
Fill form fields
Once we have located a form field, we can fill it with the desired value using Playwright's fill() method. Add the following code after locating the field:
await firstNameField.fill('John');
Replace 'John' with the value you want to fill in the field.
Handle different field types
Form fields can vary in type, such as text inputs, checkboxes, radio buttons, dropdown menus, and file upload fields. Use Playwright's appropriate methods to interact with each field type. For example, to check a checkbox, use the check() method:
const checkboxField = page.locator('input[name="acceptTerms"]');
await checkboxField.check();
Remember to adjust the code based on the specific field types and actions you want to perform.
For instance, let’s fill in the details for a fictitious “John” in our dummy form:
// Fill the form fields
await firstNameField.fill('John');
await emailField.fill('john@gmail.com');
await addressField.fill("John's Street");
await phoneField.fill('11111111');
await commentsField.fill('This form was submitted automatically.');
await checkboxField.check();
Submit the form
Once we have filled in all the necessary form fields, it’s time to submit our form using Playwright's submit() method. Locate the submit button and add the following code:
const submitButton = page.locator('button[type="submit"]');
await submitButton.click();
Close the browser
After we successfully submit our form it is important to explicitly tell Playwright to close the browser instance, otherwise, it would continue open even after the form is submitted.
// Close the browser
await browser.close();
Final code for automating the form
And here is what the final code for automating our dummy form looks like:
import { chromium } from 'playwright';

async function submitForm() {
    const browser = await chromium.launch({ headless: false });
    const context = await browser.newContext();
    const page = await context.newPage();

    await page.goto('https://forms.gle/7rhchFiZF2faMQxz7'); // Replace with the actual URL of the form

    await page.waitForSelector('div.lRwqcd > div', {
        state: 'visible',
    }); // Wait for form element to be visible on the page before proceeding

    // Select the form fields we want to target
    const firstNameField = page.locator('input[aria-labelledby="i1"]');
    const emailField = page.locator('input[aria-labelledby="i5"]');
    const addressField = page.locator('textarea[aria-labelledby="i9"]');
    const phoneField = page.locator('input[aria-labelledby="i13"]');
    const commentsField = page.locator('textarea[aria-labelledby="i17"]');
    const checkboxField = page.locator('div#i26');
    const submitButton = page.locator('div.lRwqcd > div');

    // Fill the form fields
    await firstNameField.fill('John');
    await emailField.fill('john@gmail.com');
    await addressField.fill("John's Street");
    await phoneField.fill('11111111');
    await commentsField.fill('This form was submitted automatically.');
    await checkboxField.check();

    // Submit the form
    await submitButton.click();

    // Close the browser
    await browser.close();
}

submitForm();
Note that in the final version of our bot, I added an extra line of code to explicitly wait for a specific element on the page to load before proceeding with the rest of the code.
await page.waitForSelector('div.lRwqcd > div', {
        state: 'visible',
    });
This step is not always necessary, but it is possible for the bot to attempt to "act" before the page is fully loaded. This can lead to an error due to the bot's inability to interact with the target element.
Automating multiple form submissions
In some cases, you may need to automate multiple form submissions, such as when you have a batch of data to process or want to simulate user interactions. Here's how you can automate multiple form submissions using Playwright:
Encapsulate form submission logic
To automate the submission of multiple forms, it is beneficial to encapsulate the form submission logic into a reusable function. We have already done this in the previous section, so we can continue using the form function we have created.
async function submitForm() {
  // Locate and fill form fields
  // Submit the form
}
Use a loop
Determine the number of times you want to submit the form and use a loop to automate the process. For example, if we want to submit the form five times, we can use a for loop as follows:
for (let i = 0; i < 5; i++) {
  await submitForm();
}
Adjust the loop conditions and the number of iterations based on your requirements.
Optional: add delays between submissions
In some cases, it may be necessary to introduce delays between form submissions to mimic user behavior or account for server response times. We can use Playwright's waitForTimeout method to add delays between submissions within the loop.
For example, we could add a 2-second delay right before we tell Playwright to close:
// Wait before closing the browser
await page.waitForTimeout(2000); // Wait for 2 seconds before the next submission

// Close the browser
await browser.close();
Adjust the delay duration as needed.
By encapsulating the form submission logic in a function and using a loop, we can automate as many form submissions as we want!
Error handling and debugging
When automating forms, it's essential to handle potential errors and have mechanisms in place for debugging. Here are some techniques we can use to do that:
Try-catch blocks
We can wrap our code inside try-catch blocks to catch and handle any errors that may occur during form automation. This allows us to gracefully handle exceptions and prevent our automation script from crashing.
try {
  // Form automation code
} catch (error) {
  console.error('An error occurred:', error);
}
By logging the error to the console or reporting it in some other way, you can quickly identify and diagnose issues.
Logging and debugging statements
Use console.log() statements strategically throughout the code to output useful information. These statements can help us track the execution flow, inspect variable values, and identify potential issues.
console.log('Filling in the first name field...');
// Your code for filling in the first name field
console.log('First name field filled successfully.');
By logging key steps or variables, you can gain insights into what's happening during the automation process.
Taking screenshots
Playwright allows us to take screenshots of the browser at any point during the automation process. Capture screenshots to visualize the state of the page and potentially identify issues or unexpected behavior.
await page.screenshot({ path: 'screenshot.png' });
Save the screenshot to a file for later examination.
Inspecting network traffic
Playwright provides tools for inspecting network traffic, which can be useful for debugging. We can intercept network requests, analyze responses, and verify data being sent and received.
page.on('response', (response) => {
  console.log('Received response:', response.url());
});
Use the page.on() method to listen for specific events related to network traffic.
Code including error handling and debugging
Now, let’s update our previous code to include the error handling and debugging techniques we discussed:
import { chromium } from 'playwright';

async function submitForm() {
    const browser = await chromium.launch({ headless: false });
    const context = await browser.newContext();
    const page = await context.newPage();

    await page.goto('https://forms.gle/7rhchFiZF2faMQxz7'); // Replace with the actual URL of the form

    await page.waitForSelector('div.lRwqcd > div', {
        state: 'visible',
    });

    try {
        // Select the form fields we want to target
        const firstNameField = page.locator('input[aria-labelledby="i1"]');
        const emailField = page.locator('input[aria-labelledby="i5"]');
        const addressField = page.locator('textarea[aria-labelledby="i9"]');
        const phoneField = page.locator('input[aria-labelledby="i13"]');
        const commentsField = page.locator('textarea[aria-labelledby="i17"]');
        const checkboxField = page.locator('div#i26');
        const submitButton = page.locator('div.lRwqcd > div');

        // Fill the form fields
        console.log('Filling in the first name field...');
        await firstNameField.fill('John');
        console.log('Filling in the email field...');
        await emailField.fill('john@gmail.com');
        console.log('Filling in the address field...');
        await addressField.fill("John's Street");
        console.log('Filling in the phone number field...');
        await phoneField.fill('11111111');
        console.log('Filling in the comments field...');
        await commentsField.fill('This form was submitted automatically.');
        console.log('Checking the box ✅...');
        await checkboxField.check();

        // Take screenshot of the completed form
        await page.screenshot({ path: 'screenshot.png' });

        // Submit the form
        await submitButton.click();

        // Wait before closing the browser
        await page.waitForTimeout(2000); // Wait for 2 seconds before the next submission

        // Close the browser
        await browser.close();
    } catch (error) {
        console.error('Oops, something went wrong:', error);
    }
}

for (let i = 0; i < 5; i++) {
    await submitForm();
}
Advanced techniques
In this section, we'll explore some advanced techniques for form automation with Playwright. These techniques can help us handle more complex scenarios and overcome common challenges.
Handling dynamic forms
Some forms may have fields that appear or disappear dynamically based on user interactions or other factors. We can handle such forms, by employing techniques like waiting for specific elements to appear or disappear using Playwright's waitForSelector() or waitForFunction() methods.
Working with CAPTCHAs and anti-bot measures
Websites often employ CAPTCHAs or other anti-bot measures to prevent automated interactions. Automating forms that include CAPTCHAs can be challenging. Consider using third-party services or libraries specifically designed to bypass CAPTCHAs or explore browser automation techniques like mouse movements or human-like delays to mimic user behavior.
Handling file uploads
If the form includes file upload fields, we can automate file uploads using Playwright's setInputFiles() method. Specify the path to the file we want to upload, and Playwright will handle the file selection process for us.
Navigating between pages
Sometimes, form automation may require navigating between multiple pages or steps. Use Playwright's page navigation methods like goto() or click() to move between pages and perform interactions on each page as needed.
Parallelization and performance optimization
To improve performance and reduce execution time, we can employ parallelization techniques. For example, we can use multiple browser contexts or instances of Playwright to run form automation in parallel, especially when dealing with a large number of forms or submitting forms with a time-consuming process.
Remember, advanced techniques depend on the specific requirements and challenges of the forms you're automating. It's essential to understand the unique aspects of each form and apply the appropriate techniques accordingly.
That's a wrap! Now you know how to automate forms with Playwright 🦾
In this tutorial, we explored how to automate forms using Playwright and JavaScript. We covered the essential steps to build a form-filling bot and provided explanations and code examples along the way. By now, you should have a solid understanding of automating forms using Playwright!
We also discussed the importance of form automation in various real-world scenarios, including data collection, form testing, and automating repetitive tasks. By automating form submissions, you can save time, reduce errors, and increase efficiency.
Now that you have learned how to automate forms using Playwright and JavaScript, feel free to apply these techniques to your own projects and explore further possibilities for automation.
And remember to always respect the terms of service and usage policies of the websites you are automating. Use form automation responsibly and ethically, ensuring that your actions comply with legal and ethical standards. In other words, take Uncle Ben's advice to heart: "With great power comes great responsibility" 🕷️