If you’re sending cold emails from a pre-built list, one bad bounce-rate week wrecks the sender reputation it took months to build. Most cold emailers find out the same way: a domain slips onto a deny list, and by Friday, they’re untangling DNS records instead of sending anything new.
This article covers four ways to verify emails in bulk, an honest comparison of the tools cold emailers actually use, and a walkthrough of a new option: verifying inline while you gather the data, without needing a second tool. If you’re starting with email scraping, the inline route changes the workflow. If your list is from any other source, a standalone verifier is still the right answer, and both routes are covered below.
By the end, you’ll know which method matches your situation, what to expect from the major tools, and how to set up a verified, deliverable list without bouncing your domain.
Why bulk email verification matters before you hit send
In 2025, Gmail and Microsoft both rolled out stricter enforcement on bulk email: as of November, Gmail ramps up rejections for senders who don’t meet authentication requirements, with permanent rejections for non-compliant traffic. Microsoft enforced the same set of authentication rules from May 2025, returning hard rejections to non-compliant senders.
Bounce rates aren’t specified as a single threshold in either policy, but they do feed directly into sender reputation. High bounce rates correlate with spam complaints, and Gmail’s published threshold is 0.3% spam complaints. The industry rule of thumb is that a domain with a high bounce rate drifts into the complaint-rate zone that triggers permanent rejection.
Verification tools predict bounces by checking three things:
- Syntax: Is the address formatted correctly?
- MX (mail exchange) records: does the domain actually have a mail server?
- SMTP (simple mail transfer protocol) handshake: does the inbox respond when the verifier knocks?
Each layer catches a different failure mode. Stacked together, they keep bounce rates inside the industry safety zone (below 2%) that protects sender reputation against deny-listing.
The point of running a verifier is to stop bad addresses from ever reaching the send. A scraped list will always have some, and verification is what keeps that number small enough that the rest of the workflow stays clean.
The four ways to verify emails in bulk
Email verification at scale comes down to four routes. Each fits a different starting point.
1. Bulk upload to a standalone verifier
The default for most readers. Pick a tool like ZeroBounce, Hunter, NeverBounce, EmailListVerify, or MillionVerifier. Upload a CSV, wait for the run, download the results, filter to deliverable, and re-import into your sending tool. The format works with any list source, which is its main argument. The tradeoff: each campaign means another vendor login, another export-import cycle, and a per-verification cost that adds up at volume.
2. API integration into a custom pipeline
For teams with engineering capacity, all five tools above offer APIs that can wire into a CRM, an outbound sequencer, or a custom enrichment script. Verification then happens as records are added, and the manual import-export step disappears.
3. DIY scripts
Python developers can build a basic verifier with dnspython for MX lookups and smtplib for SMTP handshakes. This route is free, but rate limits hit hard, false positives are higher than with commercial tools, and there’s no built-in disposable-domain list.
4. Inline verification at scrape time
Three Apify Actors that scrape emails from websites (Google Maps Scraper, Google Search Results Scraper, and Contact Details Scraper) now have a verifyLeadsEnrichmentEmails toggle that runs verification in the same Actor run that pulls the addresses. Each extracted email lands in the dataset tagged as ok, invalid, or disposable. One workflow, one bill, no CSV shuffle. On the starter plan, the bundled extract-and-verify cost works out to about $0.013 per result (decisive results only), which is competitive with what standalone verifiers charge for verification alone, with the scrape already included. The free plan runs the same workflow at a much higher per-result rate, so it’s best treated as a sample tier.
The comparison below covers cold-outreach pricing, accuracy claims, and where each tool fits in a scrape-to-send workflow.
| Tool | Per-verification cost | Billing model | Accuracy claim | Free tier | Fits inside an extraction pipeline |
|---|---|---|---|---|---|
| Apify (Google Maps Scraper) | $0.004/result on Starter (decisive results only); | Subscription plan plus pay-per-event usage | Not publicly stated | $5 platform usage | Yes |
| ZeroBounce | $0.0195 per credit at small tiers; lower at volume | Subscription plan or pre-paid credits | 99.6% | 100/month (business domain required) | No |
| Hunter | ~$0.014 (Starter plan) | Subscription with credit allocation | 98% (low-bounce phrasing) | 50 credits/month (100 verifications) | No |
| NeverBounce | $0.008 | Pay-as-you-go or monthly subscription | Not publicly stated | No free tier | No |
| EmailListVerify | ~$0.0081 (1k tier) | Pay-as-you-go or monthly subscription | 97% | 100 free verifications on signup | No |
| MillionVerifier | $0.00245 | Pre-paid credits | 99%+ | No free tier | No |
How to verify emails inline with Apify
The walkthrough below uses Google Maps Scraper as the worked example, since it’s the most-used of the three Actors for cold-outreach list building. Google Search Results Scraper and Contact Details Scraper ship the same toggle and follow the same pattern.
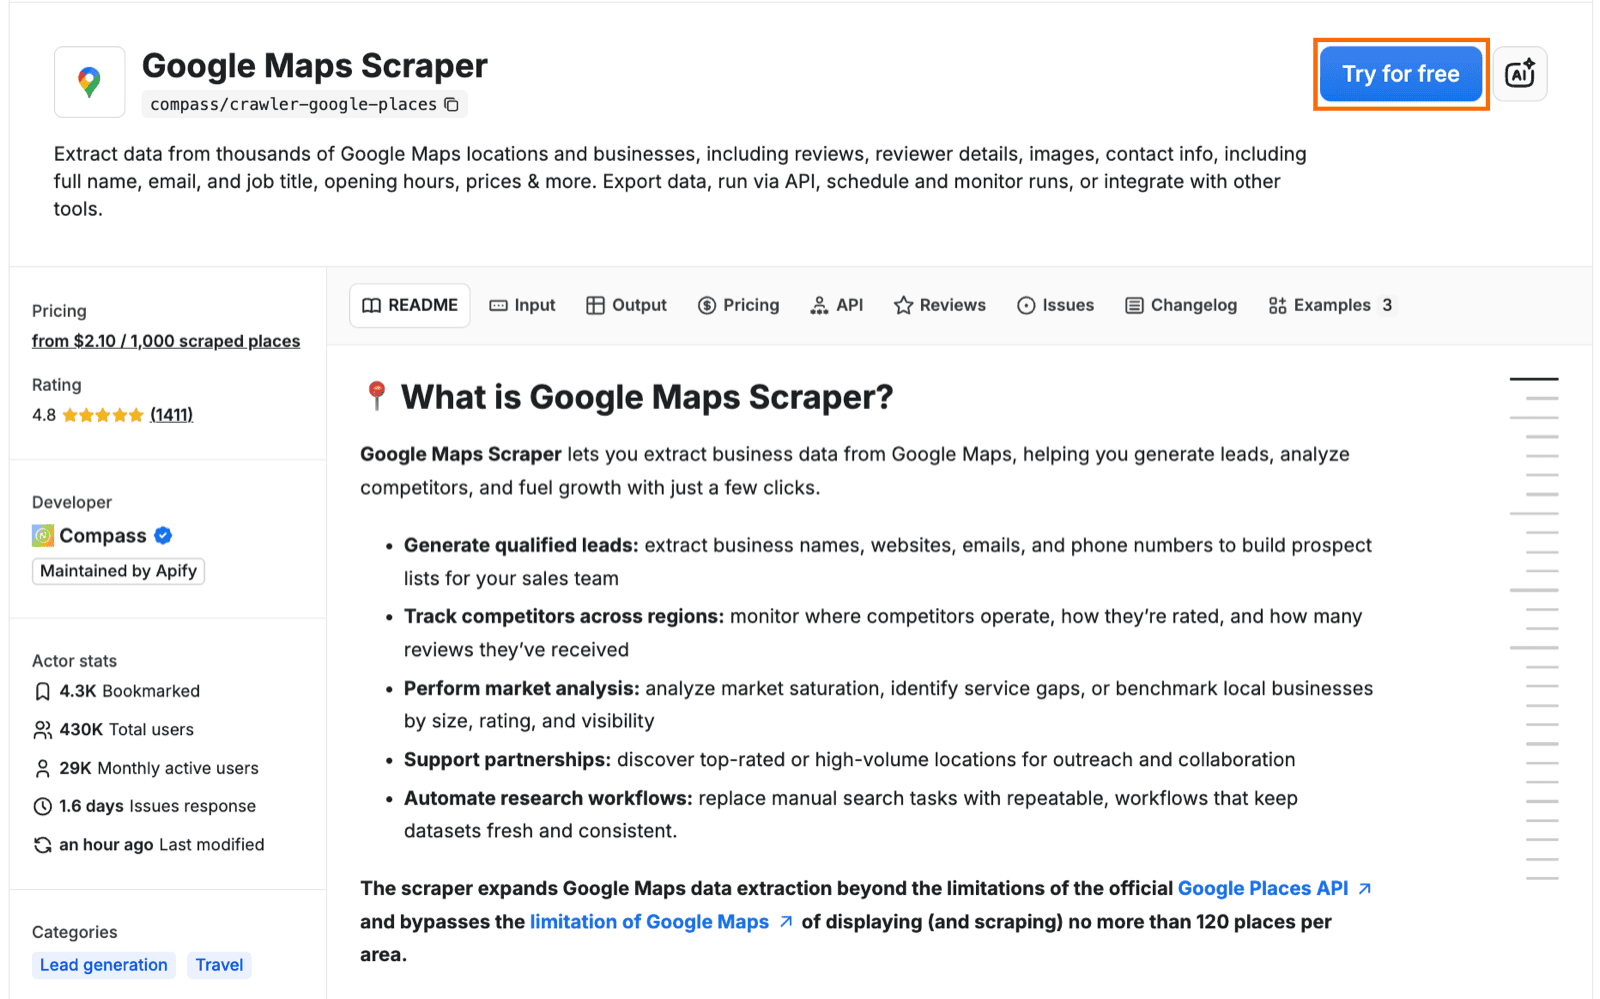
Step 1: Pick the Actor
Open Apify Store and locate Google Maps Scraper. Click into the Actor page and hit Try for free to open the Actor in Apify Console. If you don’t have an Apify account yet, signing up gives you $5 in free platform usage - enough to run a 20-25 result sample to confirm the workflow before scaling up on the Starter plan.
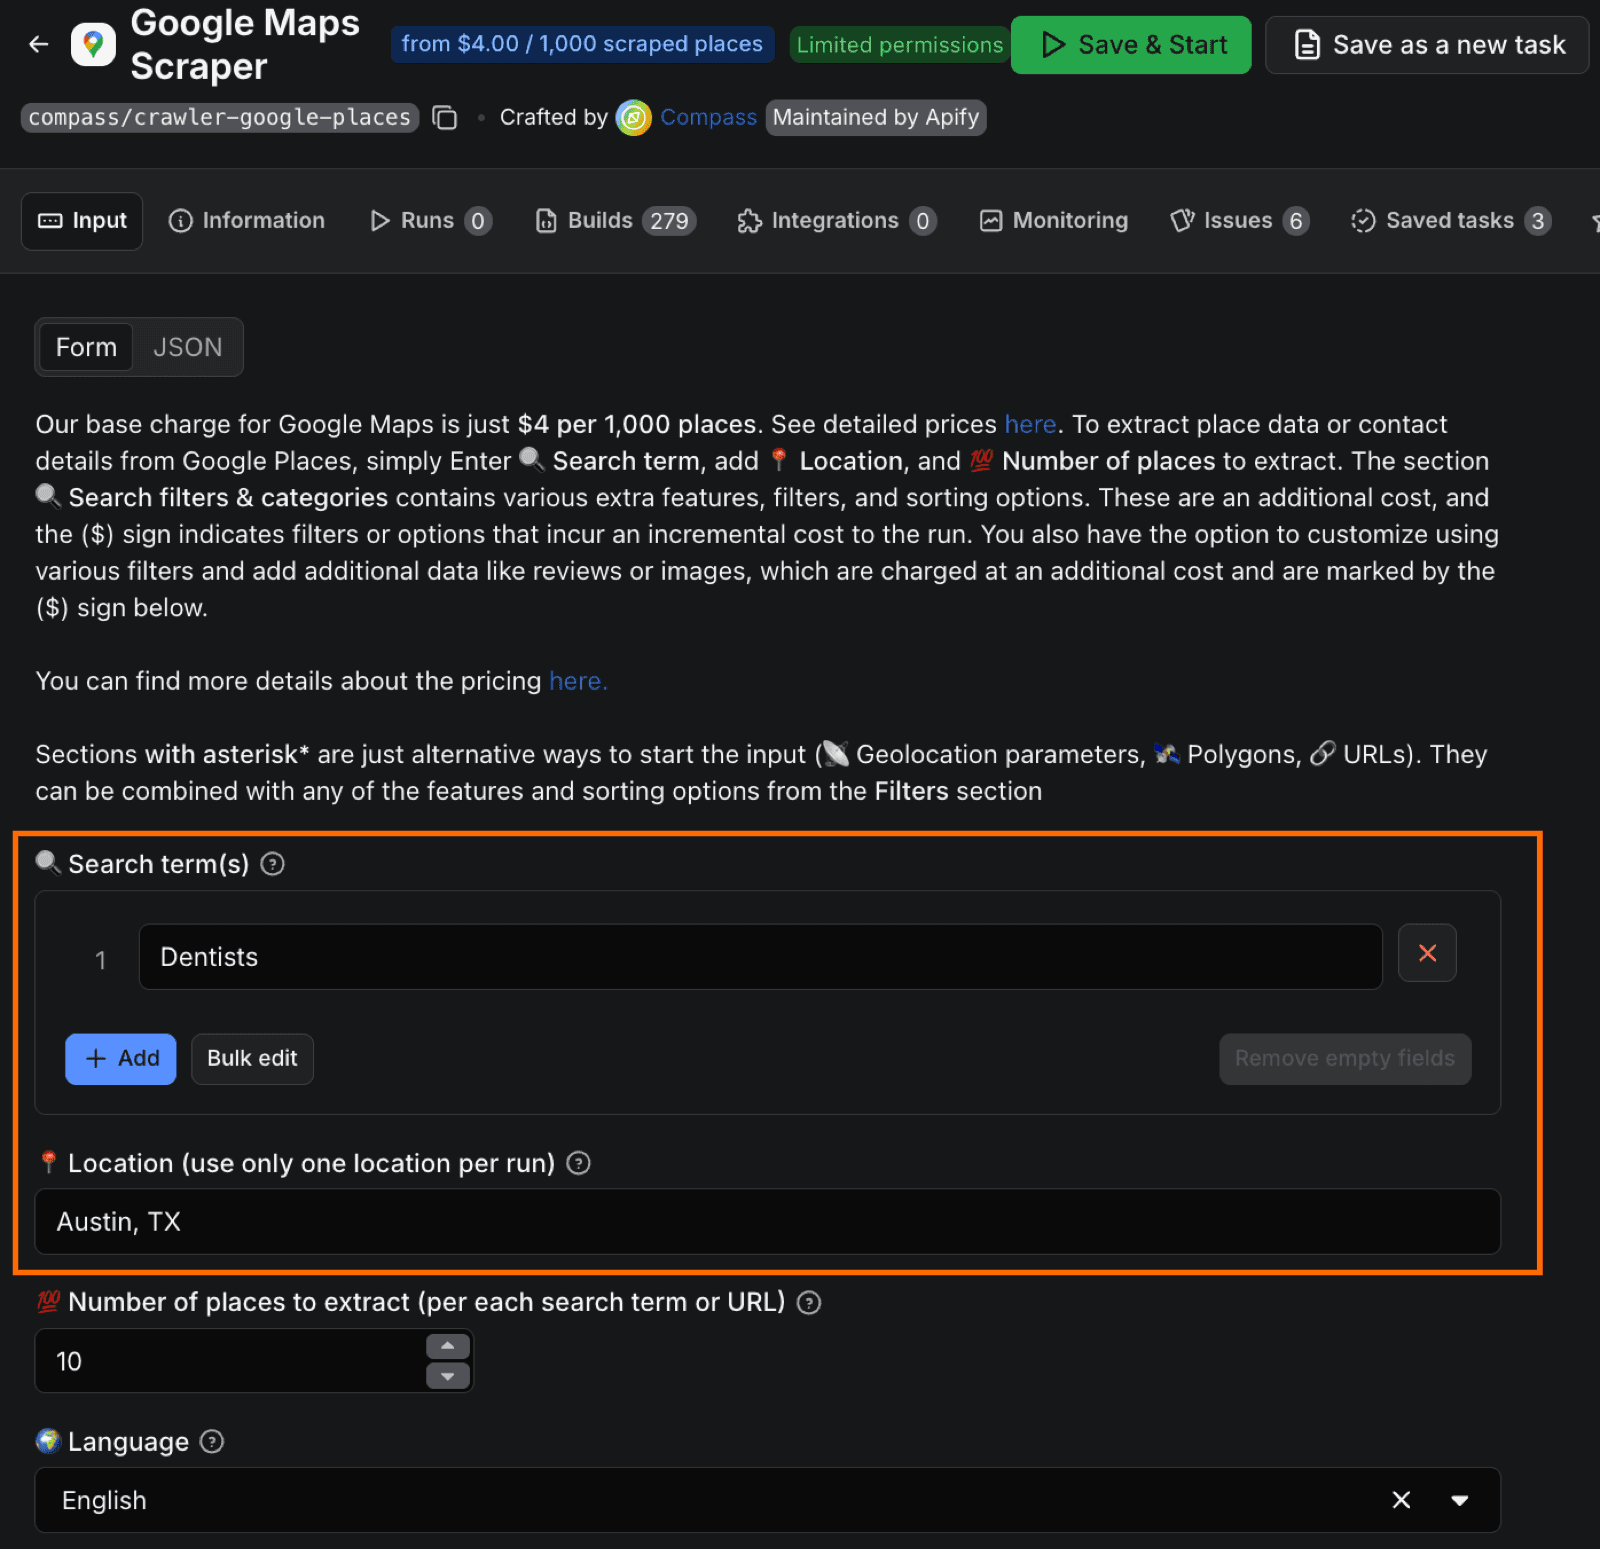
Step 2: Configure the Actor run
In the Actor’s input form, set the search query to the territory or vertical you’re targeting. The running example here is “dentists in Austin, TX”. Set a result limit and pick the language.
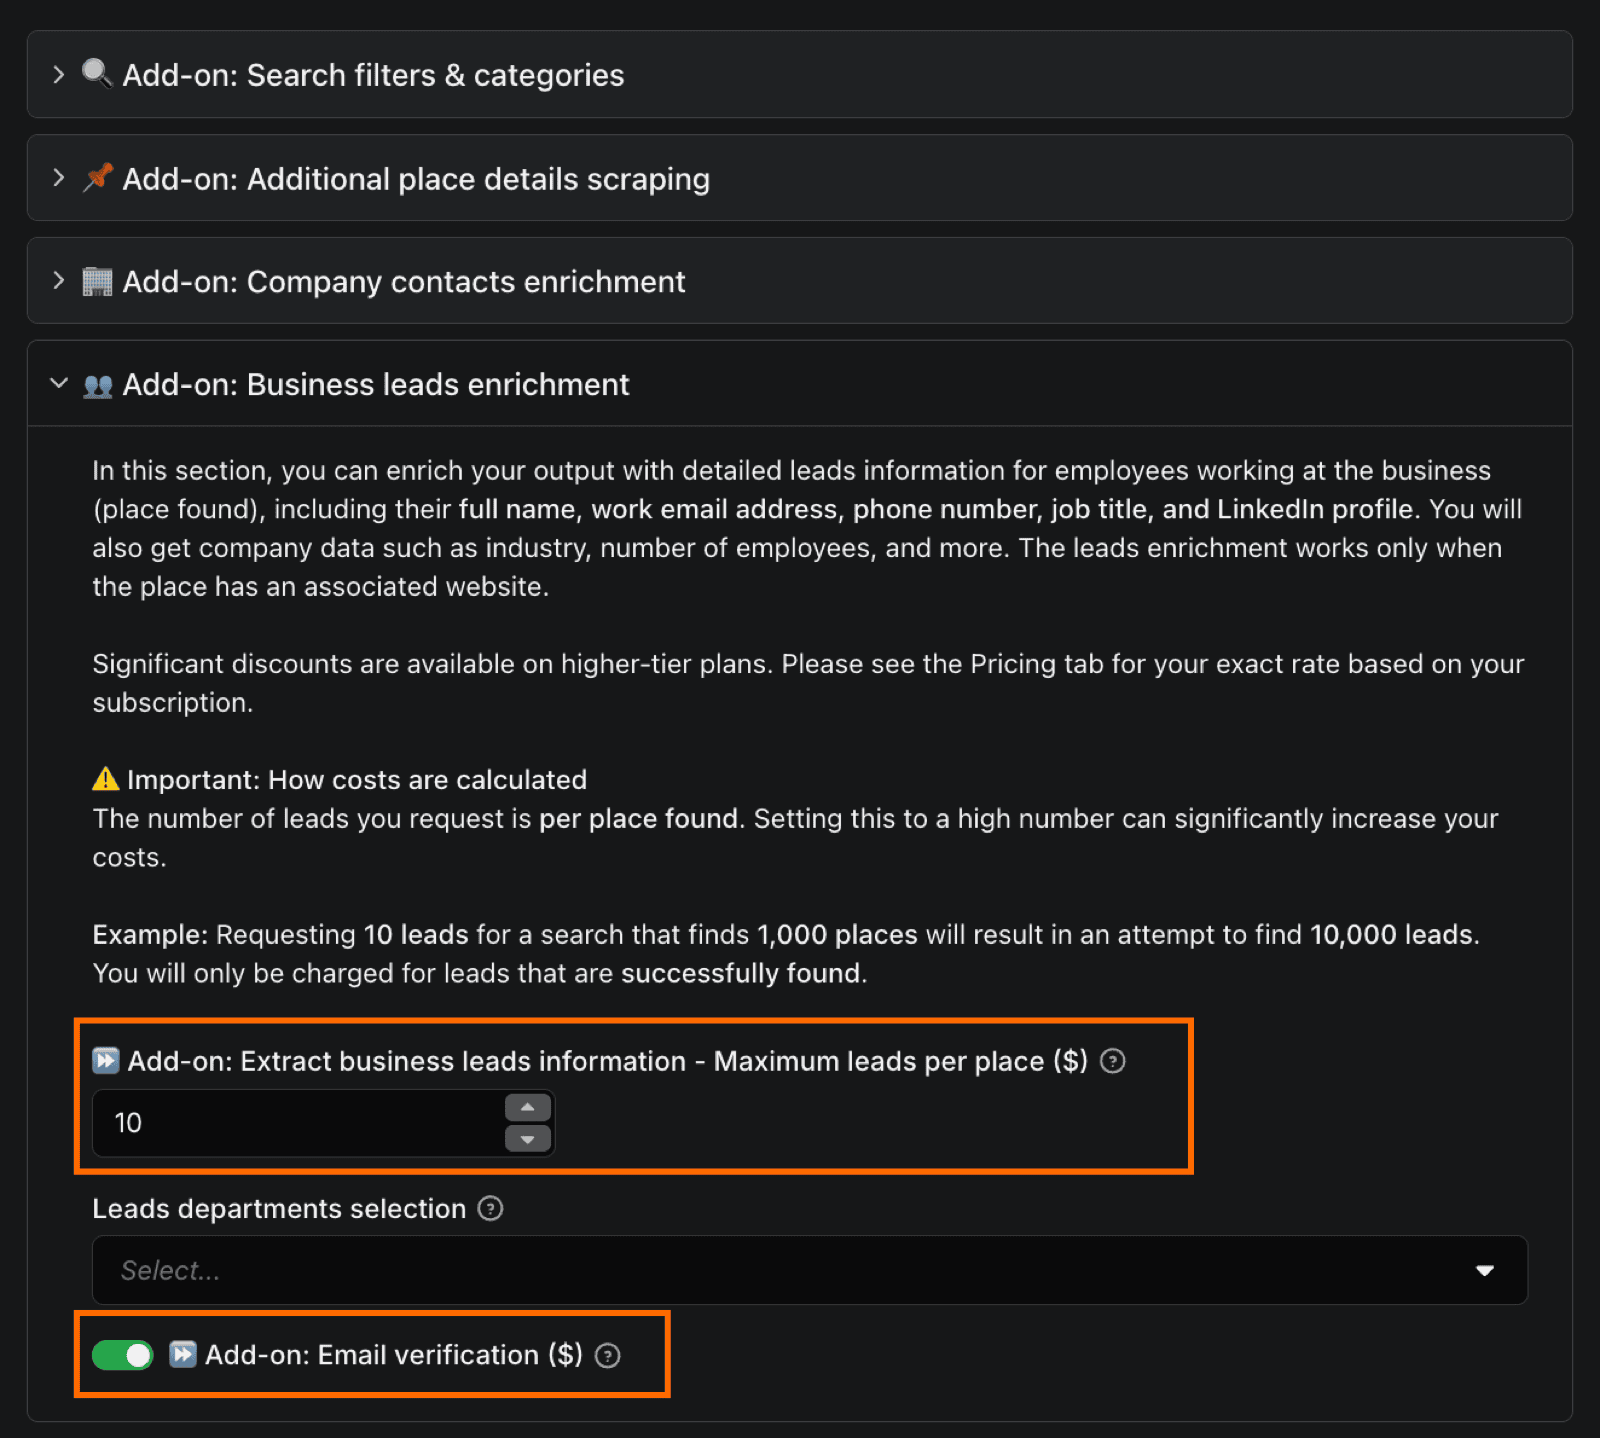
Step 3: Enable business leads enrichment and email verification
Scroll to the leads section and find the Extract business leads information add-on. Enable it, and set the maximum leads per place. This is the prerequisite for email verification: business leads enrichment pulls contact and company information (employee names, job titles, emails, phone numbers, LinkedIn profiles) from the scraped pages, and the verification toggle works on top of that data.
Find the Email verification toggle in the same section and enable it. The Actor now verifies every email it finds during enrichment and tags each result. Verification runs pay-per-event: only decisive results (ok, invalid, disposable) get billed. Grey-zone results (catch_all, unknown, and error) cost nothing.
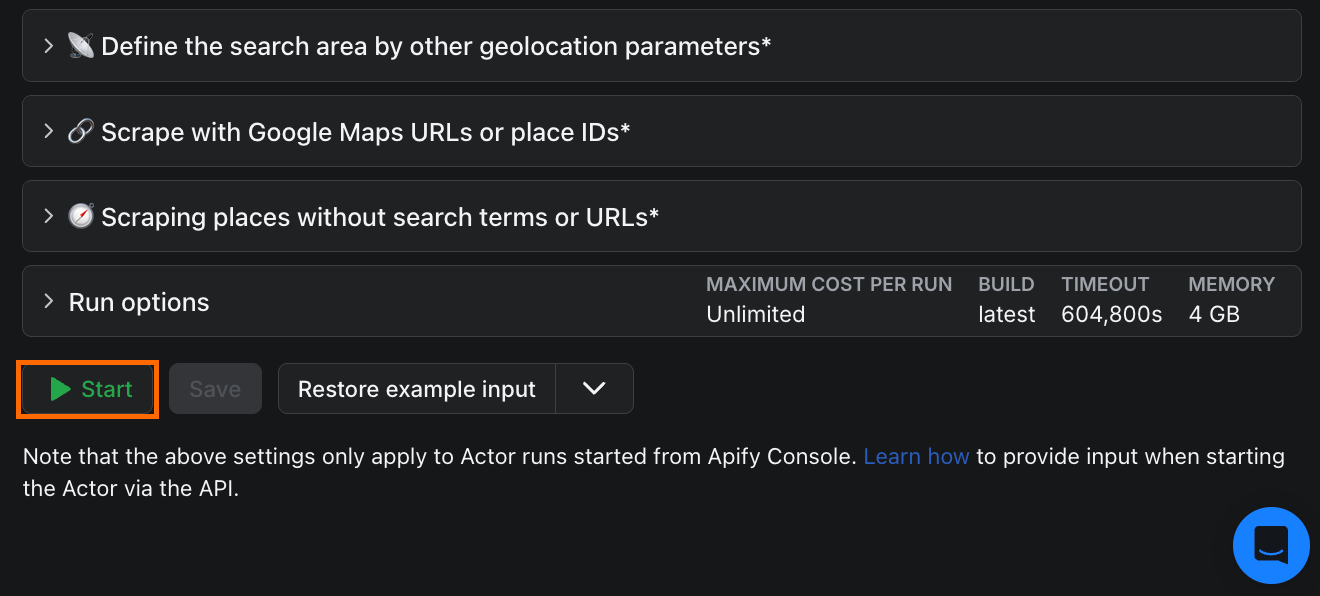
Step 4: Run the Actor
Click Start. A 500-row test run typically completes in 5 to 15 minutes, depending on Google Maps response times and how many of the scraped places expose contact information.
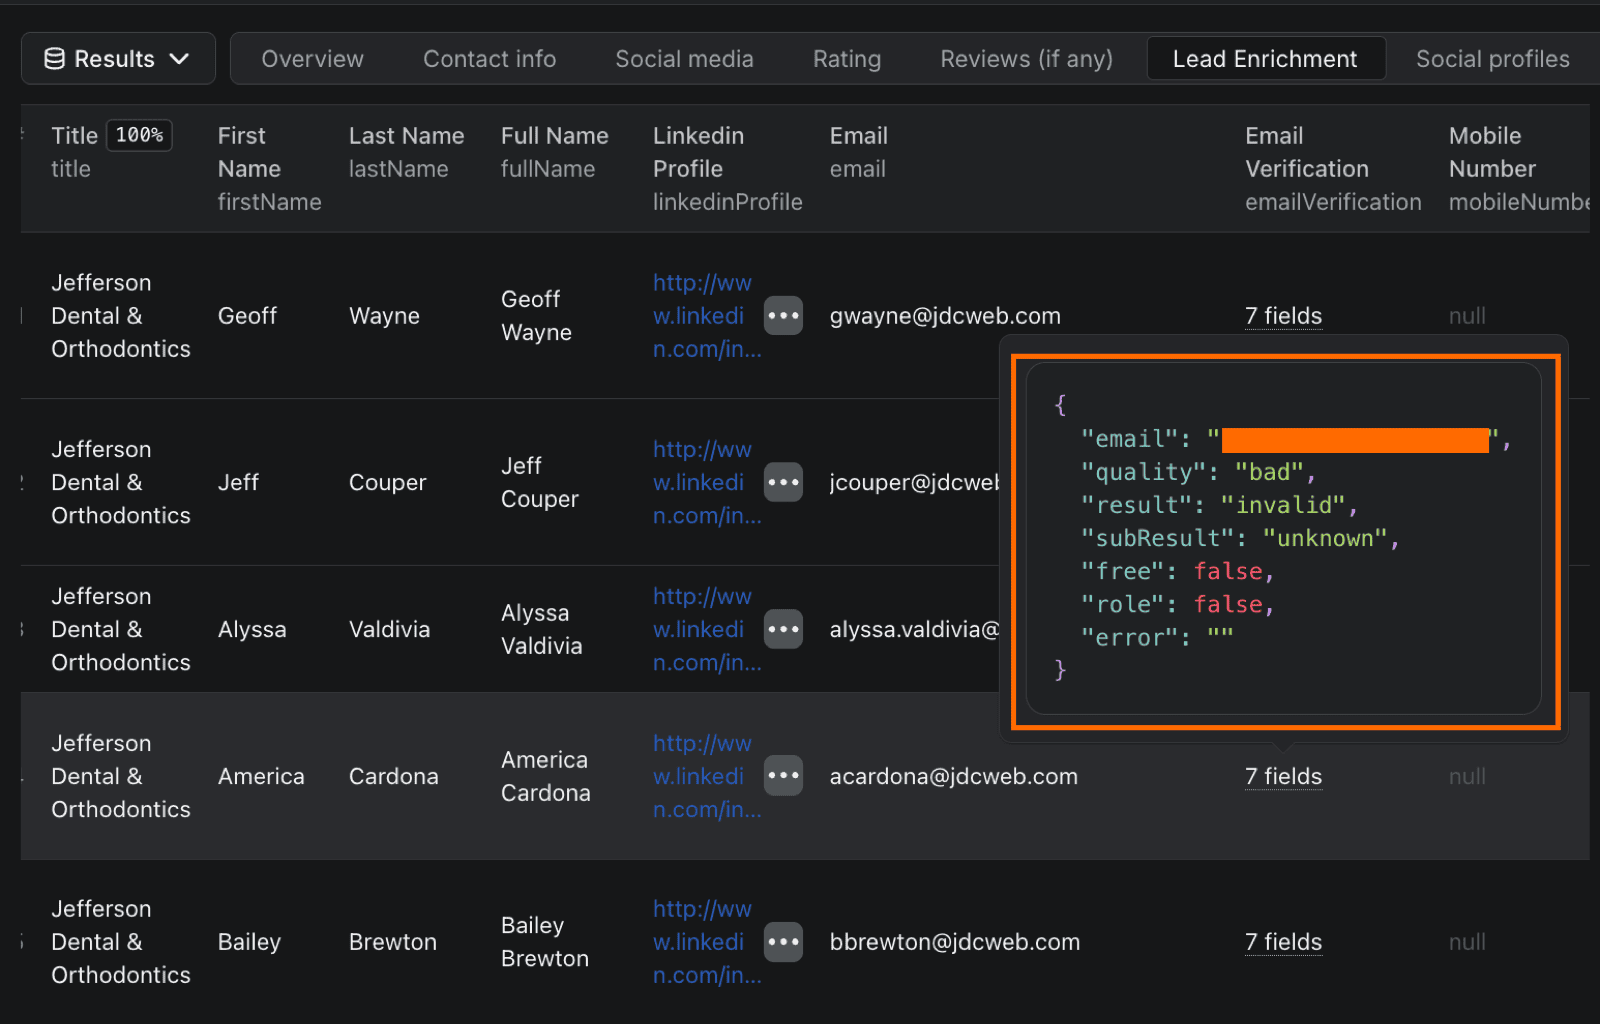
Step 5: Read the output
When the run finishes, click into the dataset. Each row contains the extracted business data plus an email verification field. Look for the three decisive tags:
ok- verified deliverableinvalid- verified bouncedisposable- verified throwaway domain
Pay attention to the disposable rows. These are the addresses hardest to spot manually, and they’re the ones most likely to slip into a sending list and drag down the bounce rate.
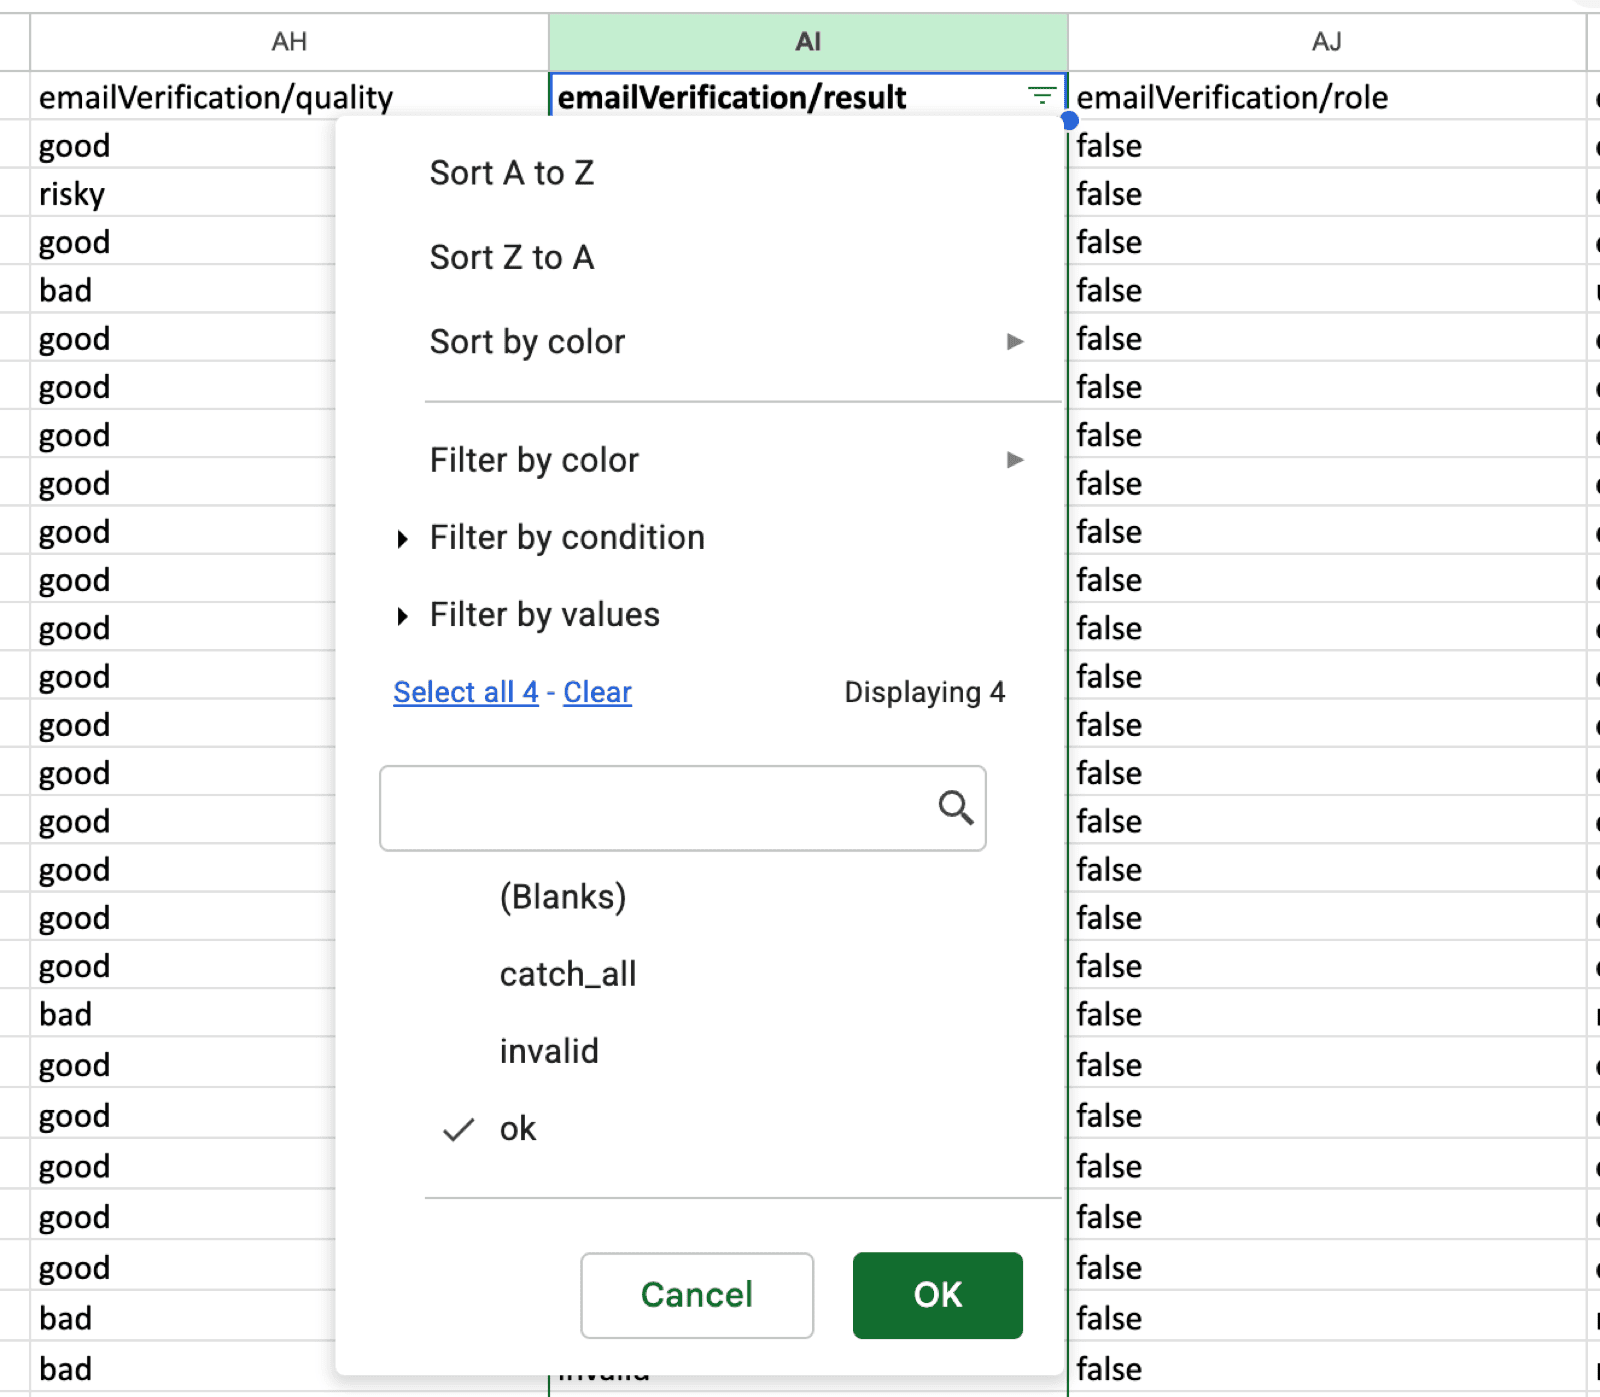
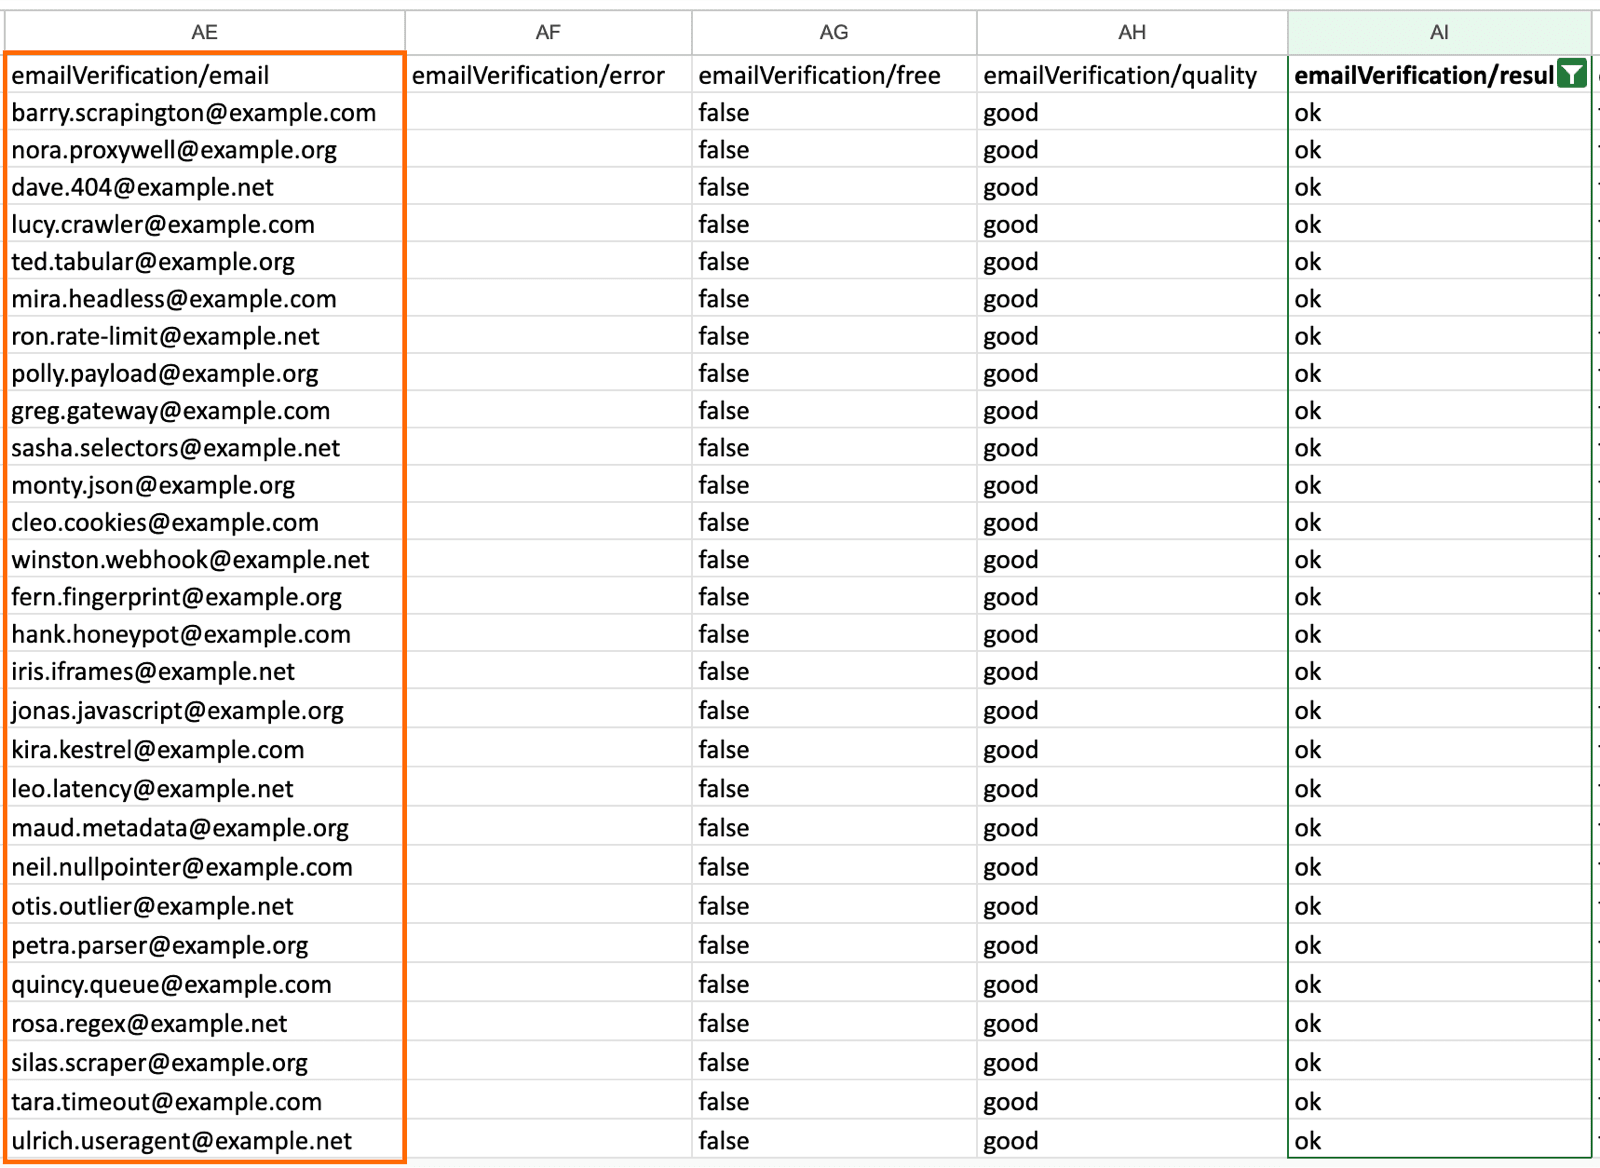
Step 6: Filter and export
Click Export in the dataset view, then choose CSV, Excel, or Google Sheets. Open the file in your spreadsheet tool of choice, and filter the emailVerification/result column to ok only. The result is a deliverable list ready to push into your cold email sequencer.
When to use a standalone verifier instead
The inline workflow only helps when you’re scraping contacts with Apify. Plenty of cold-outreach start somewhere else:
- CRM exports from past clients or trial signups
- Partner data drops
- LinkedIn Sales Navigator pulls
- Conference attendee lists
- Social pulls from Instagram or LinkedIn
- Lists bought or shared between teams
For any of these, a standalone verifier is still the right tool. The choice between vendors comes down to volume, integration needs, and price.
- ZeroBounce: Highest published accuracy claim (99.6%) and a broad integration set. Unknowns are free, which softens the credit-based pricing model at volume.
- Hunter: Good fit if Hunter is already in the stack for email finding. Verification is bundled into the Starter plan, and the per-verification price is steady at low volume.
- NeverBounce: Simpler bulk-upload flow than the API-first alternatives, with solid accuracy at its tier. Pull current pricing from the site before committing.
- EmailListVerify: Competitive per-credit pricing in the small-to-mid range). Pay-as-you-go option means no monthly commitment.
- MillionVerifier: Cheapest per credit at volume in the data captured: $0.00245 per verification.
For a one-off list, the free tiers are enough to test before paying. For weekly cold-outreach work at any volume, per-verification cost compounds quickly. The comparison table above is the place to start. The cheapest option in absolute terms depends on whether the workload is steady (subscription-friendly) or bursty (pay-as-you-go-friendly). For anyone already scraping their list with Apify, the bundled rate on Starter ($0.013/verified result) is cheaper than ZeroBounce’s per-credit pricing, and includes the scrape and enrichment that ZeroBounce doesn’t.
Conclusion
Four routes, one decision. Standalone bulk upload, API integration, DIY script, or inline verification at scrape time. The right one depends almost entirely on where the list came from.
If you’re looking to build a database of email contacts with an Apify Actor, the new verifyLeadsEnrichmentEmails toggle removes a step that used to take an export, a separate vendor, and a re-import. itrinity, a SaaS startup studio, built this kind of workflow on Apify and took their lead-gen operation from 10 emails a day to 400 a week, clawing back more than 40 hours of manual work along the way.
If your list is from any other source, ZeroBounce, Hunter, NeverBounce, EmailListVerify, and MillionVerifier all do the job. The honest tradeoff is one workflow versus two.
Try Google Maps Scraper for free and use the $5 in platform usage to extract and verify a sample list end-to-end. For the broader lead-gen workflow, the Apify lead-generation use case page maps the full pipeline from extraction to CRM.
FAQs
What is bulk email verification?
Bulk email verification checks a list of email addresses for deliverability before sending. A verification tool runs each address through a syntax check, an MX record lookup, and an SMTP handshake, then tags it as deliverable, undeliverable, or grey-zone (catch-all or disposable). The goal is to keep the bounce rate of an outbound campaign low enough that it doesn’t damage sender reputation.
How accurate is bulk email verification?
Published accuracy claims range from 97% to 99.6% across the major tools. Those figures are vendor-marketed, so the real-world number tends to be a percentage point or two lower. Accuracy dips on catch-all domains, which no verifier can resolve definitively.
API vs. bulk upload: which should I use?
Bulk upload is the right choice for one-off list cleaning and for lower-volume use. The CSV flow is fast to set up, and most vendors charge the same per-verification rate either way. The API is better for integrations: verification baked into a CRM, an outbound sequencer, or a scraping pipeline. If a list is generated on a schedule, the API removes the manual step. For most cold-outreach freelancers, bulk upload covers it.
What is MX record validation?
MX (mail exchange) records are DNS entries that tell the internet where to deliver email for a given domain. MX record validation confirms that a domain has a valid mail server set up. An email at a domain with no MX record can’t be delivered, so the check is the cheapest and fastest way to filter out dead addresses. It runs in milliseconds and catches a large share of obvious bounces before the more expensive SMTP handshake step.
How do you handle catch-all emails?
Catch-all domains accept any email at the domain. Verifiers tag these as catch_all because they can’t prove the specific address is real without sending mail. Treat catch-alls as low-confidence: send them in a separate segment at a slower rate, monitor bounce rates per segment, and drop the segment if it pushes the overall rate above 1.5%.
Can you verify emails in bulk for free?
Yes, partially. Most major verifiers offer 100 free verifications per month (ZeroBounce needs a business domain; Hunter and EmailListVerify don’t). Python with dnspython and smtplib is free in absolute terms, but comes with rate limits and false positives. Apify’s inline verification doesn’t have a dedicated free tier, but the $5 platform credit on signup covers about 25 decisive verifications during a scrape, which is enough to test the workflow end to end.