An ad intelligence agent maps how your competitors sell by tracking which ads stay live longest, how far they reach, what sits on the landing pages behind them, and which persuasion angles keep resurfacing. The Facebook Ad Library holds all of that information, but hands you none of it in a form you can rank or query.
This tutorial shows you how to build an agent with Apify, n8n, and Supabase that fetches active ads from the Facebook Ad Library along with the Shopify product pages behind them.
The system labels each ad by its persuasion angle, stores the dataset in Supabase, and layers a chat agent on top. You can then ask the agent which angles are winning, and even have it draft fresh ad copy grounded in strategies that are already proven to work.
Automate ad data extraction with Apify
Building and maintaining custom scrapers for Meta ads means dealing with constant proxy rotation, session drops, and browser automation quirks. Apify Actors solve this out of the box.
For this workflow, we are using the Actor, Facebook Ad Library Scraper. It operates entirely within Apify's $5 monthly free tier and extracts data the public UI hides or restricts, including bulk EU transparency metrics.
Point it at any Ad Library search URL to extract:
- Ad copy, headlines, and CTA text
- Image and video creative URLs
- Campaign start dates, active status, and runtime durations
- EU total reach and demographic disclosures
- Destination links and advertiser page details
How it fits into your stack:
- Run anywhere: Execute via REST API, the Apify console, or the n8n node we set up in Phase 2.
- Automate & Export: Schedule recurring runs and export cleanly to JSON, CSV, Excel, or XML.
- Streamline: Pipe data directly into your database or LLM workflows.
Summary of the workflow you're building
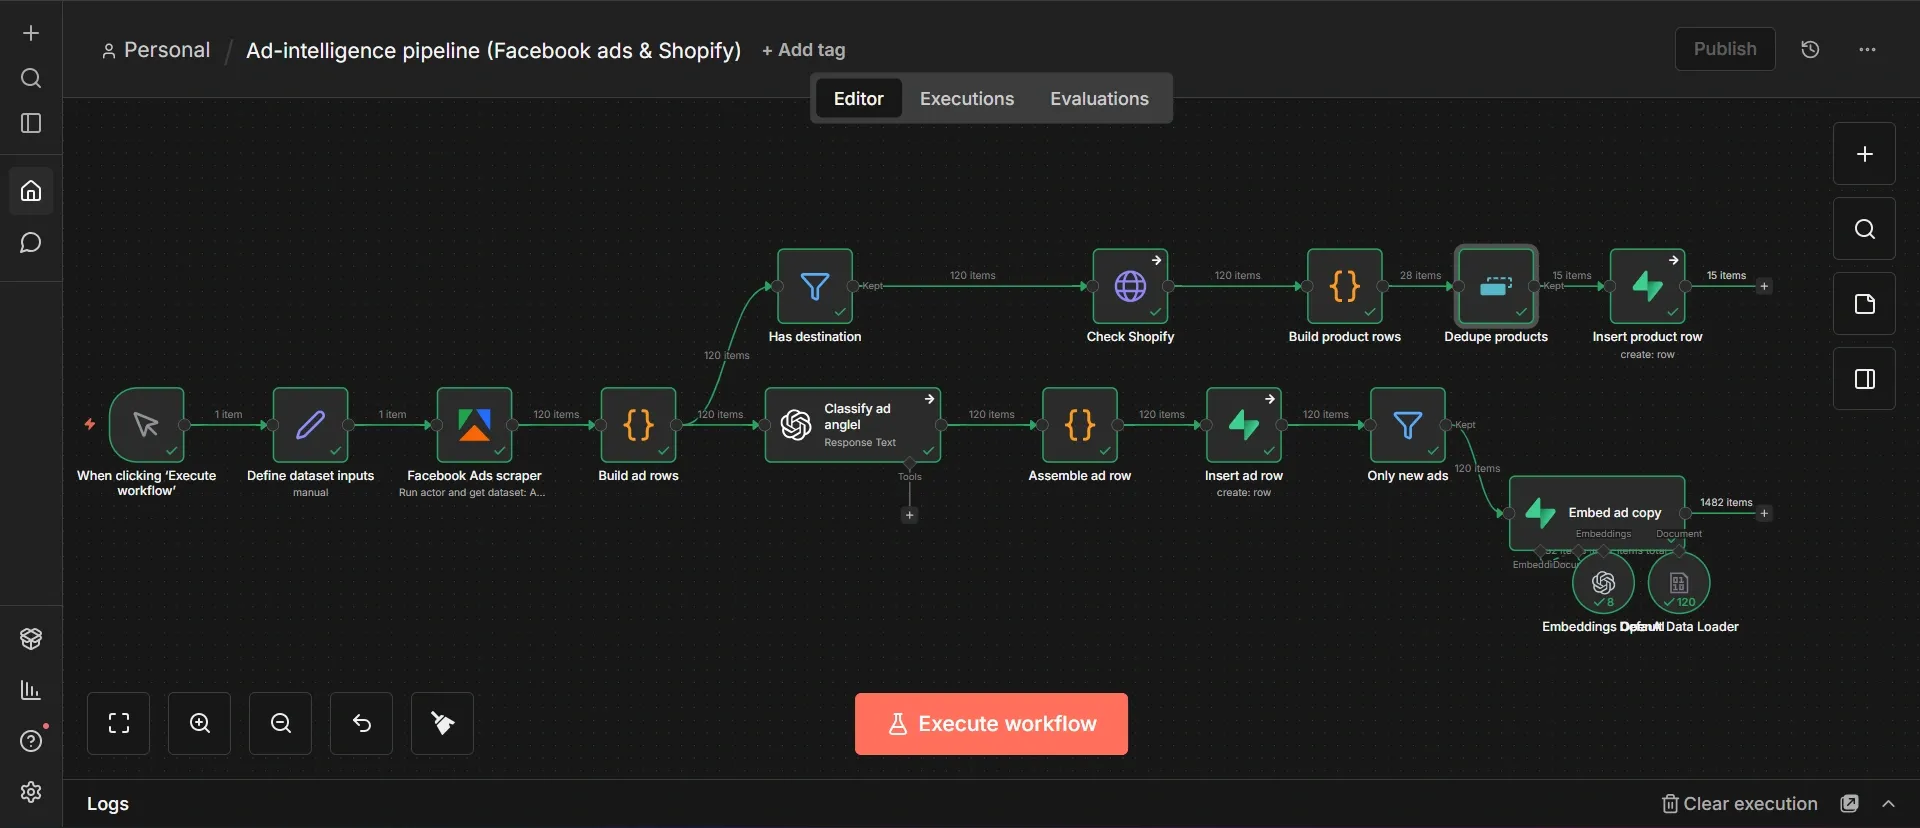
You’ll build two connected n8n workflows. The first scrapes live Facebook ads in your chosen niche with an Apify Actor, capturing their description, run duration, and reach (for ads running within the European Union (EU) only).
It then uses a Large Language Model (LLM) to label each ad's persuasion angle, matches the ad to its corresponding Shopify store and product, and stores the structured data in Supabase.
The second workflow is an interactive AI agent that ranks creative angles by how long they’ve been running and how many people in the EU they actually reached. The agent then builds on the winning ads to draft original copy backed by both numbers.
Instead of losing hours every week to competitor research and copywriting, you get it all done in one conversation using real market data.
Prerequisites
You'll need the following before you proceed with the build. Phase 1 walks through setting up each:
- An Apify account. The free $5 monthly credits cover the Actor runs in this build.
- An OpenAI platform account with a small credit balance.
- A Supabase account.
- Docker Desktop.
Phase 1: Set up your accounts and database
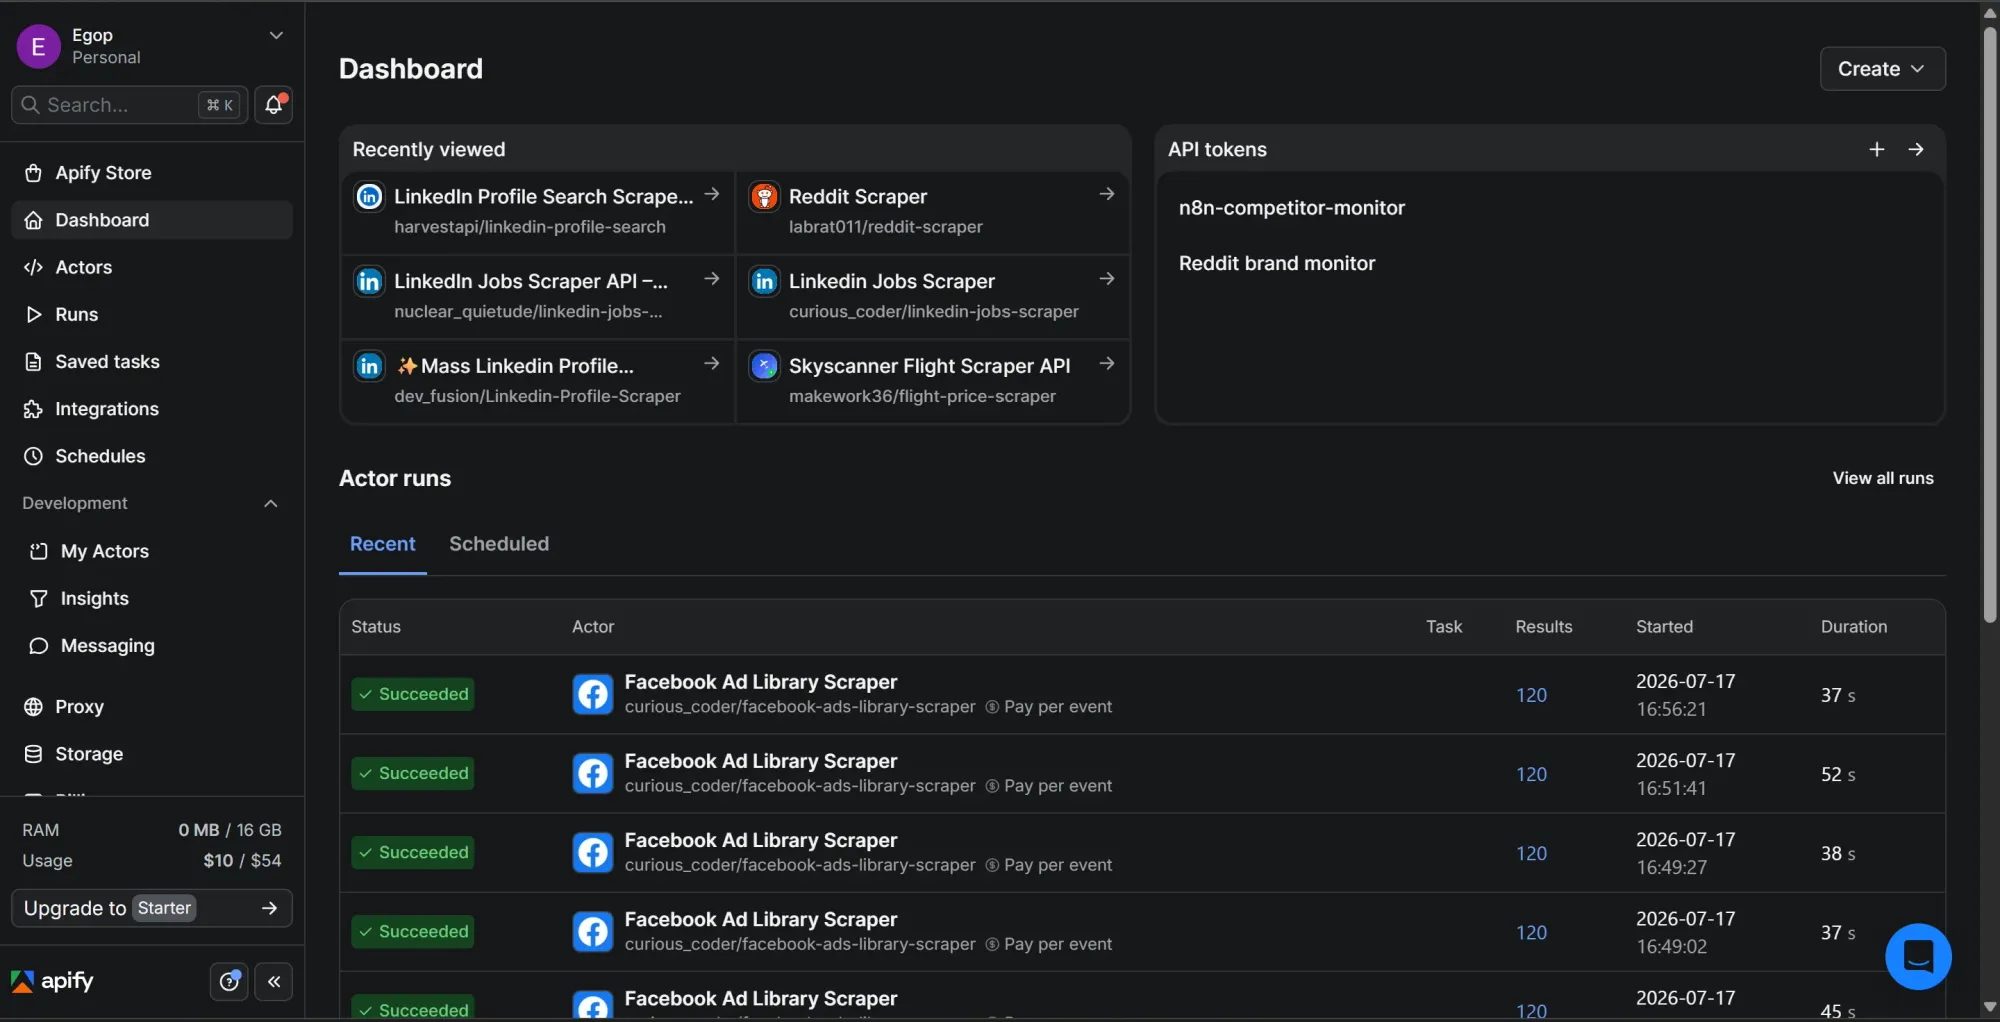
Step #1: Grab your Apify API token
- Sign up at https://apify.com/ if you don't have an account, then open Apify Console.
- In the left sidebar, click Settings and select the API & Integrations tab.
- Under Personal API tokens, copy your default token, or click Add new token to create one and name it.
- Paste it somewhere safe; you'll need it in Phase 3.
This token lets n8n run Facebook Ad Library Scraper on your behalf. Keep it private, and revoke or regenerate it from this same screen if it ever leaks.
Step #2: Create your OpenAI API key
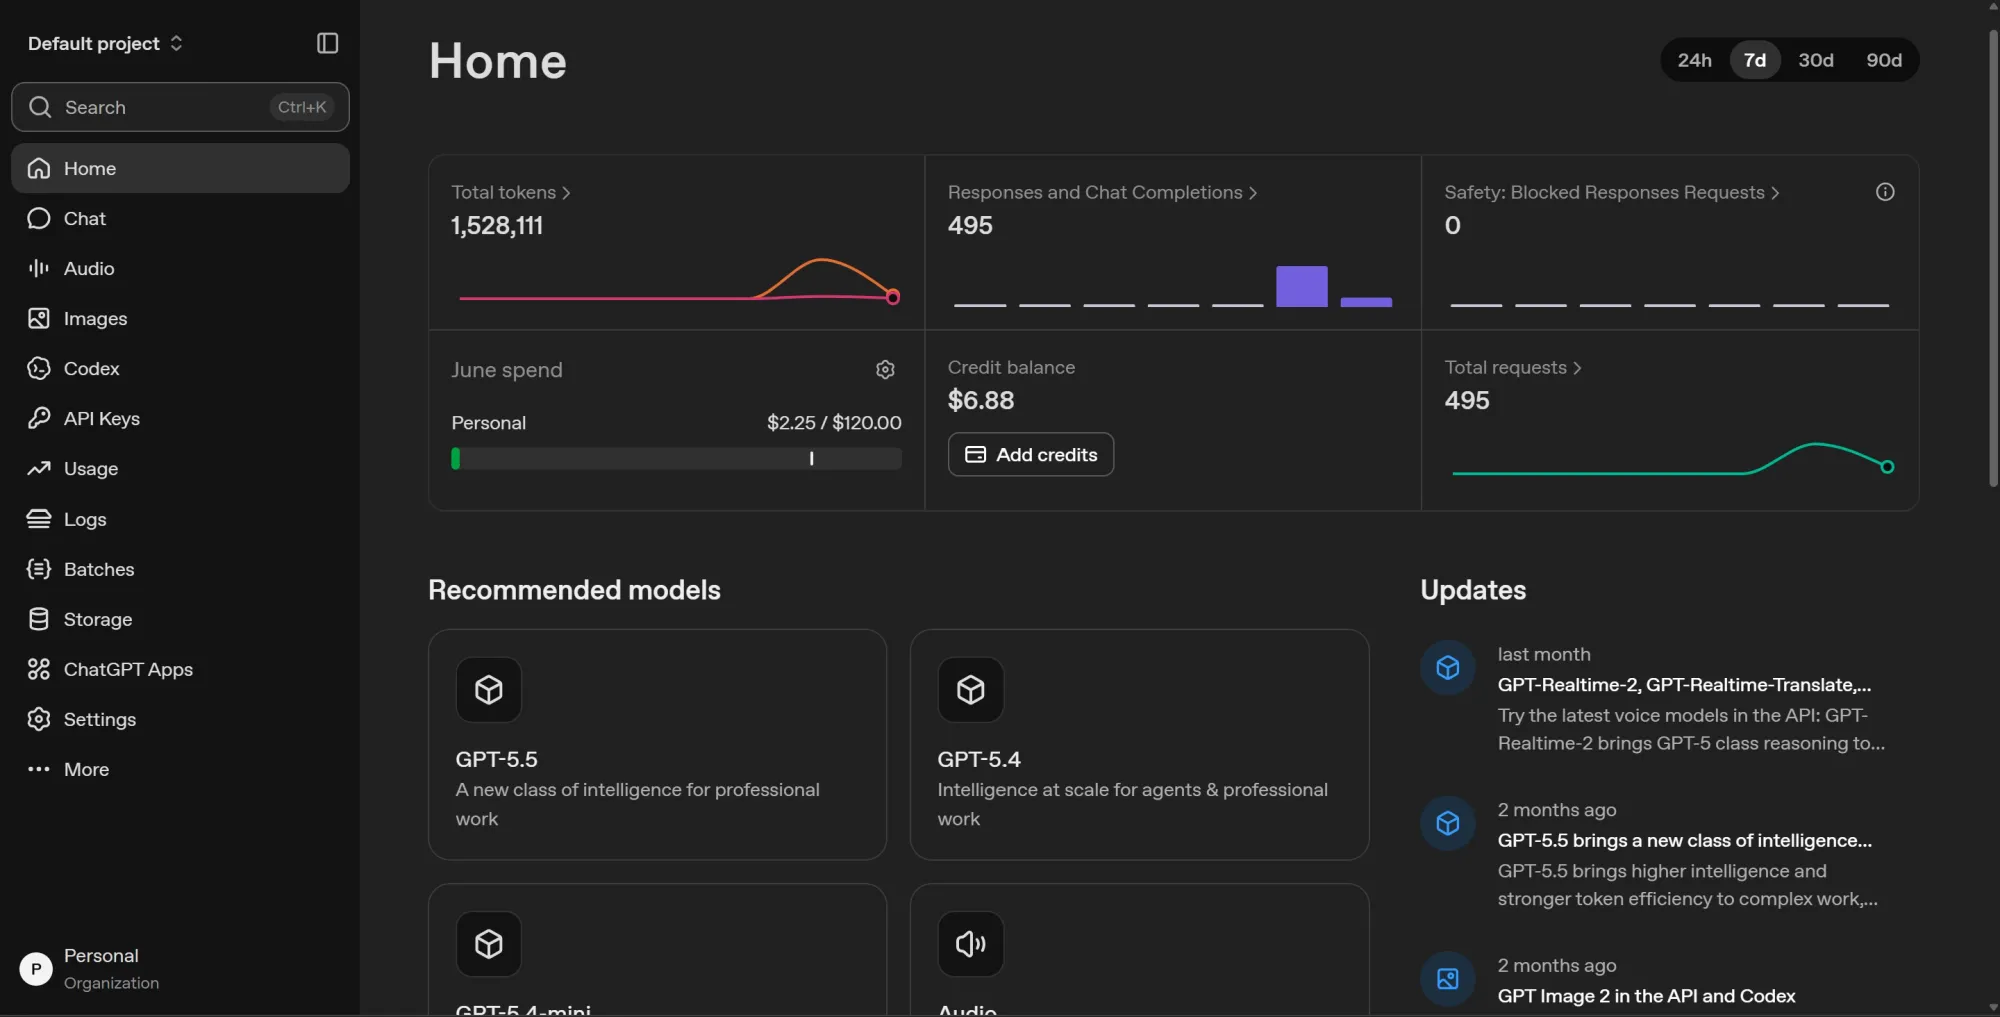
- Go to https://platform.openai.com/ and sign in or create an account.
- Open the API keys section from the left sidebar.
- Click Create new secret key, name it
ad-intelligence, leave permissions on All, and click Create secret key. - Copy the key and paste it somewhere safe.
- Open Billing under Settings, add a payment method, and buy a small amount of credit; $5 is plenty for testing.
You’ll need this API key to access the model that labels ad angles, generates embeddings, and powers the agent.
Step #3: Create the Supabase project and keys
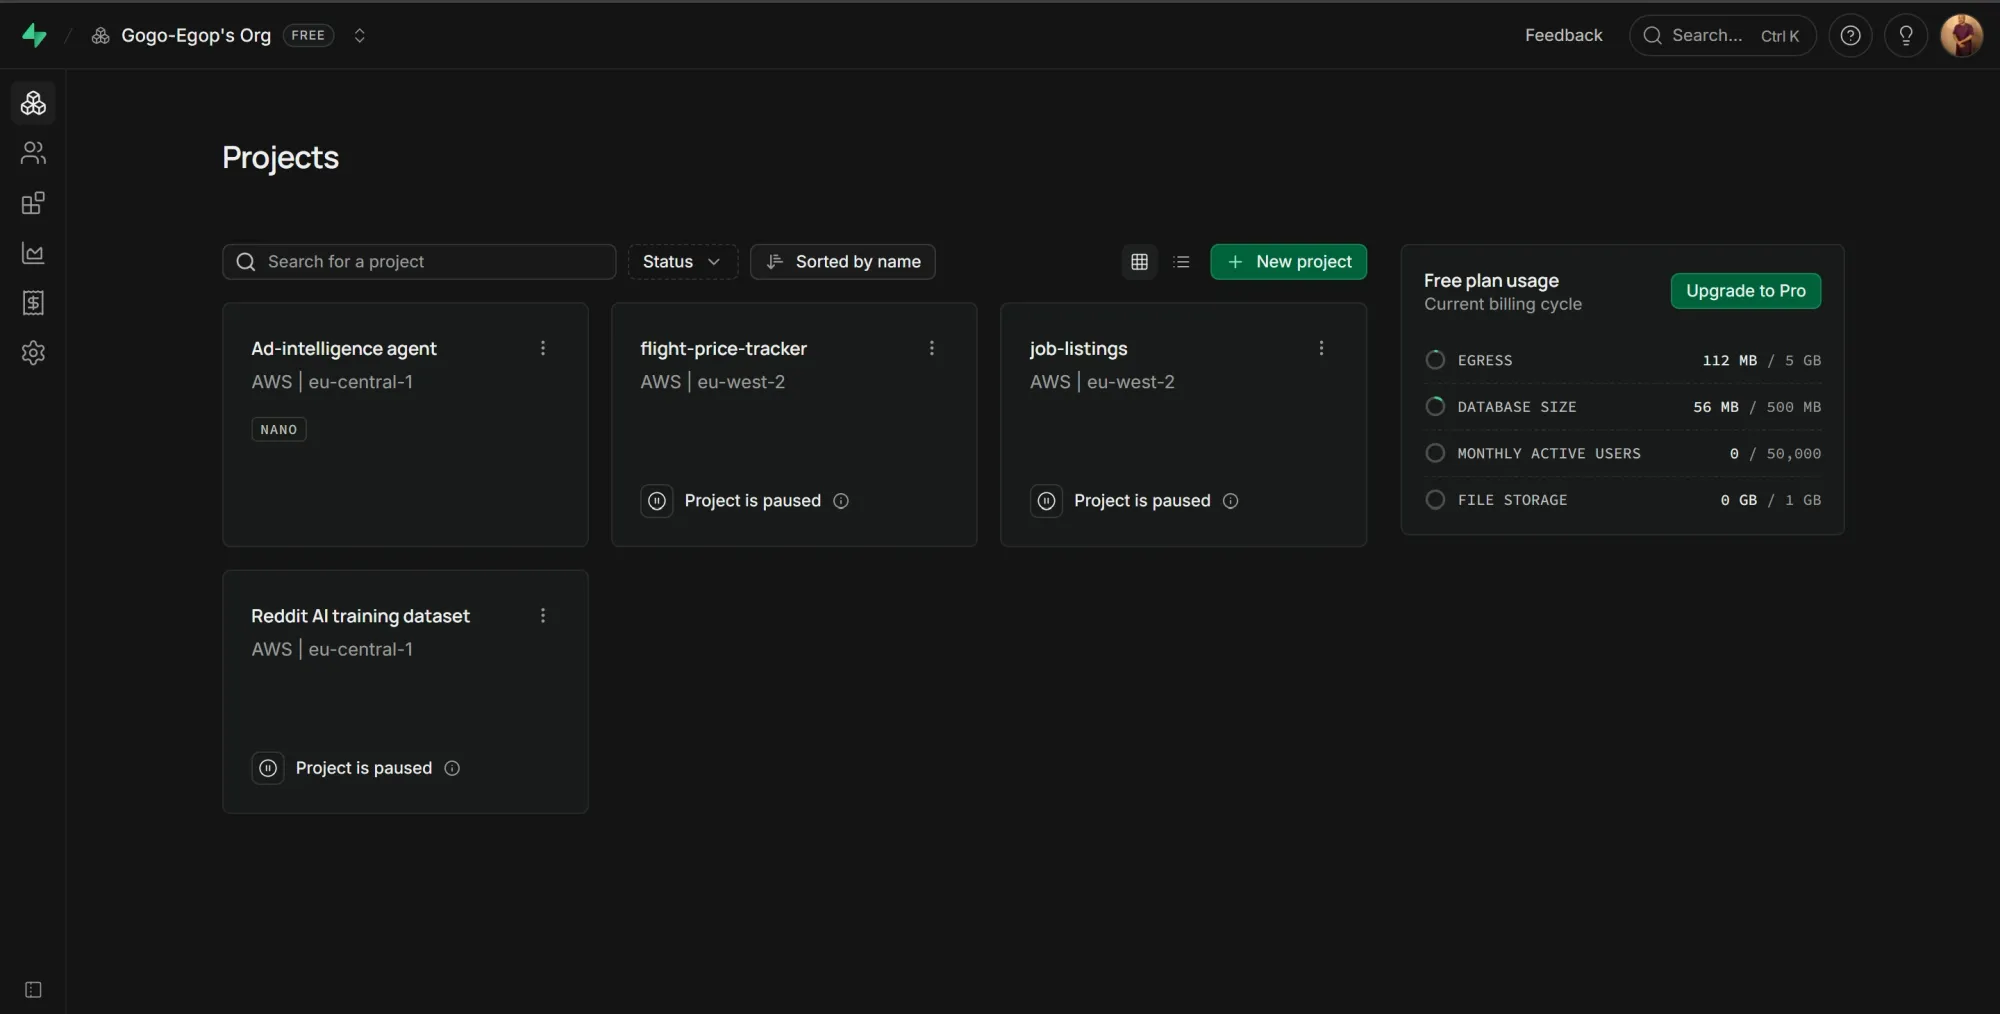
- Sign in at https://supabase.com/ and click New project.
- Create an organization, name the project
ad-intelligence, input a database password, choose the region nearest to you, then click Create new project. - In the left sidebar, click the gear to open Project Settings, then click Data API.
- On the Data API page, copy the Project URL.
- Under API keys, find the service_role key, click Reveal, and copy it.
- Paste both values somewhere safe. In older projects, they live together on a single API page.
The service_role key can write to your tables, which is what the pipeline needs. Keep it server-side inside n8n and never put it in client code, since it bypasses row-level security.
Step #4: Create the database tables
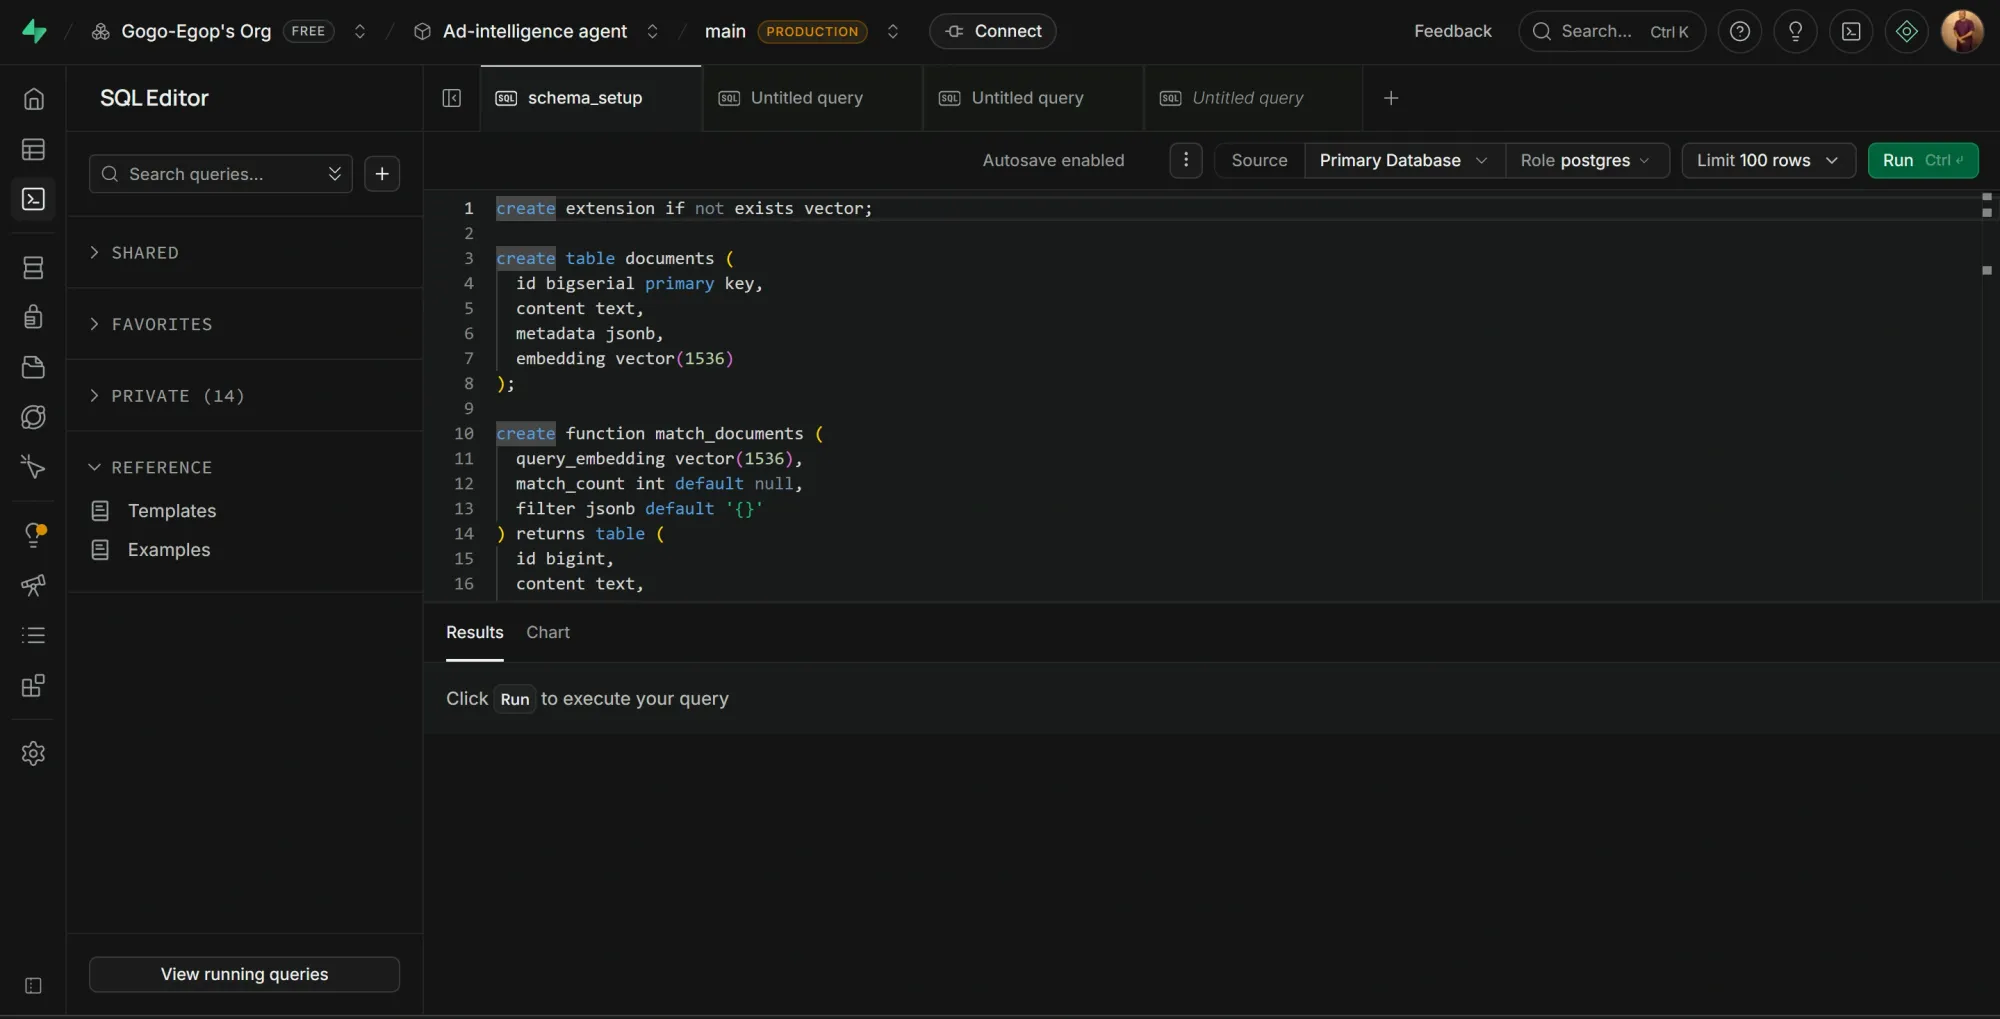
- In the left sidebar, click the SQL Editor icon, then click New query.
- Paste the first block below into the editor, then click Run.
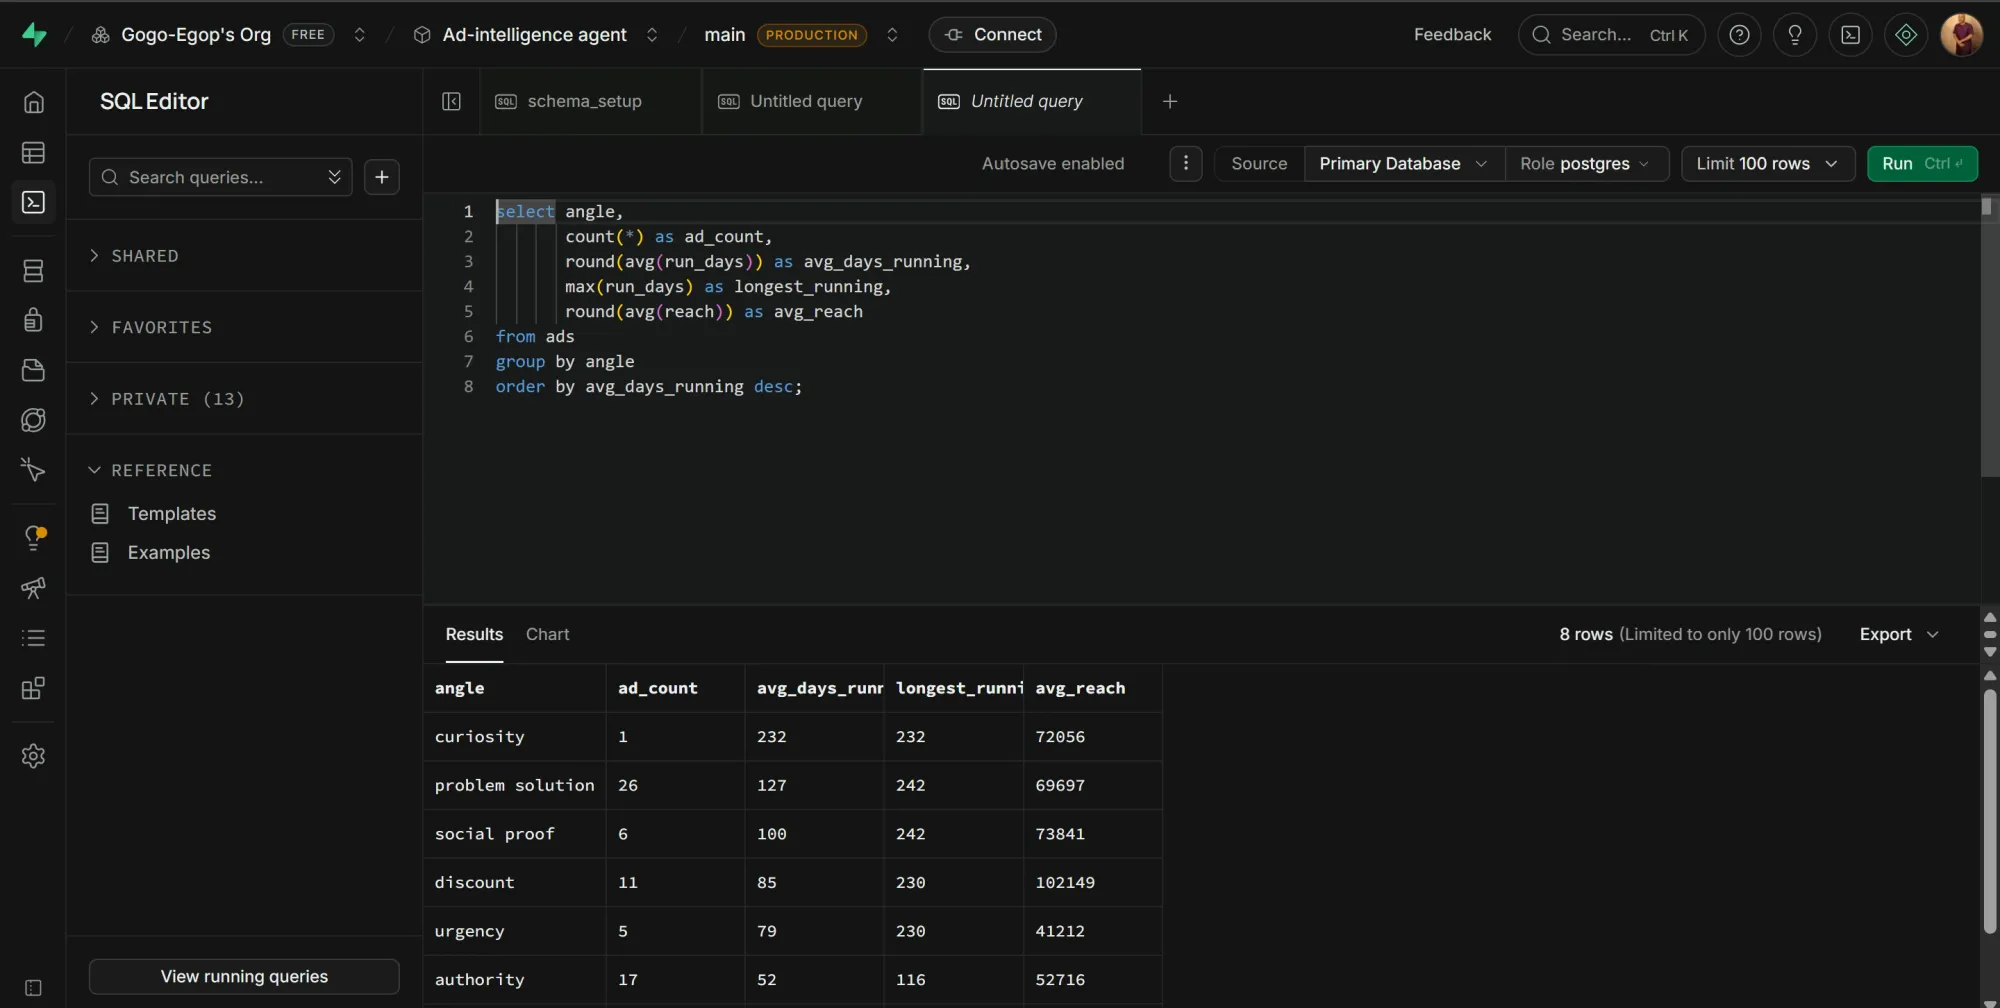
- You should see "Success. No rows returned," which confirms the extension, table, and function were created.
create extension if not exists vector;

create table documents (
  id bigserial primary key,
  content text,
  metadata jsonb,
  embedding vector(1536)
);

create function match_documents (
  query_embedding vector(1536),
  match_count int default null,
  filter jsonb default '{}'
) returns table (
  id bigint,
  content text,
  metadata jsonb,
  similarity float
)
language plpgsql
as $$
begin
  return query
  select
    documents.id,
    documents.content,
    documents.metadata,
    1 - (documents.embedding <=> query_embedding) as similarity
  from documents
  where documents.metadata @> filter
  order by documents.embedding <=> query_embedding
  limit match_count;
end;
$$;
- Open a new query tab, paste the second block, and click Run again to create the relational tables. You should see the same success message.
create table ads (
  ad_id text primary key,
  page_name text,
  page_id text,
  ad_text text,
  title text,
  cta_text text,
  creative_url text,
  destination_url text,
  domain text,
  display_format text,
  platforms text,
  angle text,
  is_active boolean,
  run_days int,
  reach bigint,
  started_at timestamptz,
  scraped_at timestamptz
);

create table products (
  product_id text primary key,
  ad_id text,
  domain text,
  title text,
  handle text,
  price numeric,
  product_url text,
  scraped_at timestamptz
);

create index on products (ad_id);
- Confirm the tables exist by opening the Table Editor in the left sidebar, where you’ll find
documents,ads, andproductslisted.
The tool's database consists of three tables: ads, products, and documents. The ads table is the core. It stores ad copy, angle labels, links, advertisers, and ranking signals (run_days and reach). The products table holds Shopify products linked by ad_id. An ad qualifies as a Shopify ad when a product row exists for it. Finally, the documents table holds ad-copy embeddings for retrieval. The schema deliberately duplicates the angle and ranking signals in the embedding metadata so the agent can easily rank retrieved results by historical performance evidence.
Phase 2: Set up n8n
Self-hosting n8n lets you build and run unlimited workflows for free, with full control over your data privacy. But if you don’t want to manage your own infrastructure, the n8n cloud tier works fine.
Step #1: Install Docker Desktop
- Download and install Docker Desktop for your operating system.
- Confirm it's running by opening your terminal and entering:
docker --version
- You should see a version number. If you see "command not found," Docker isn't in your PATH yet, so restart your terminal or reboot.
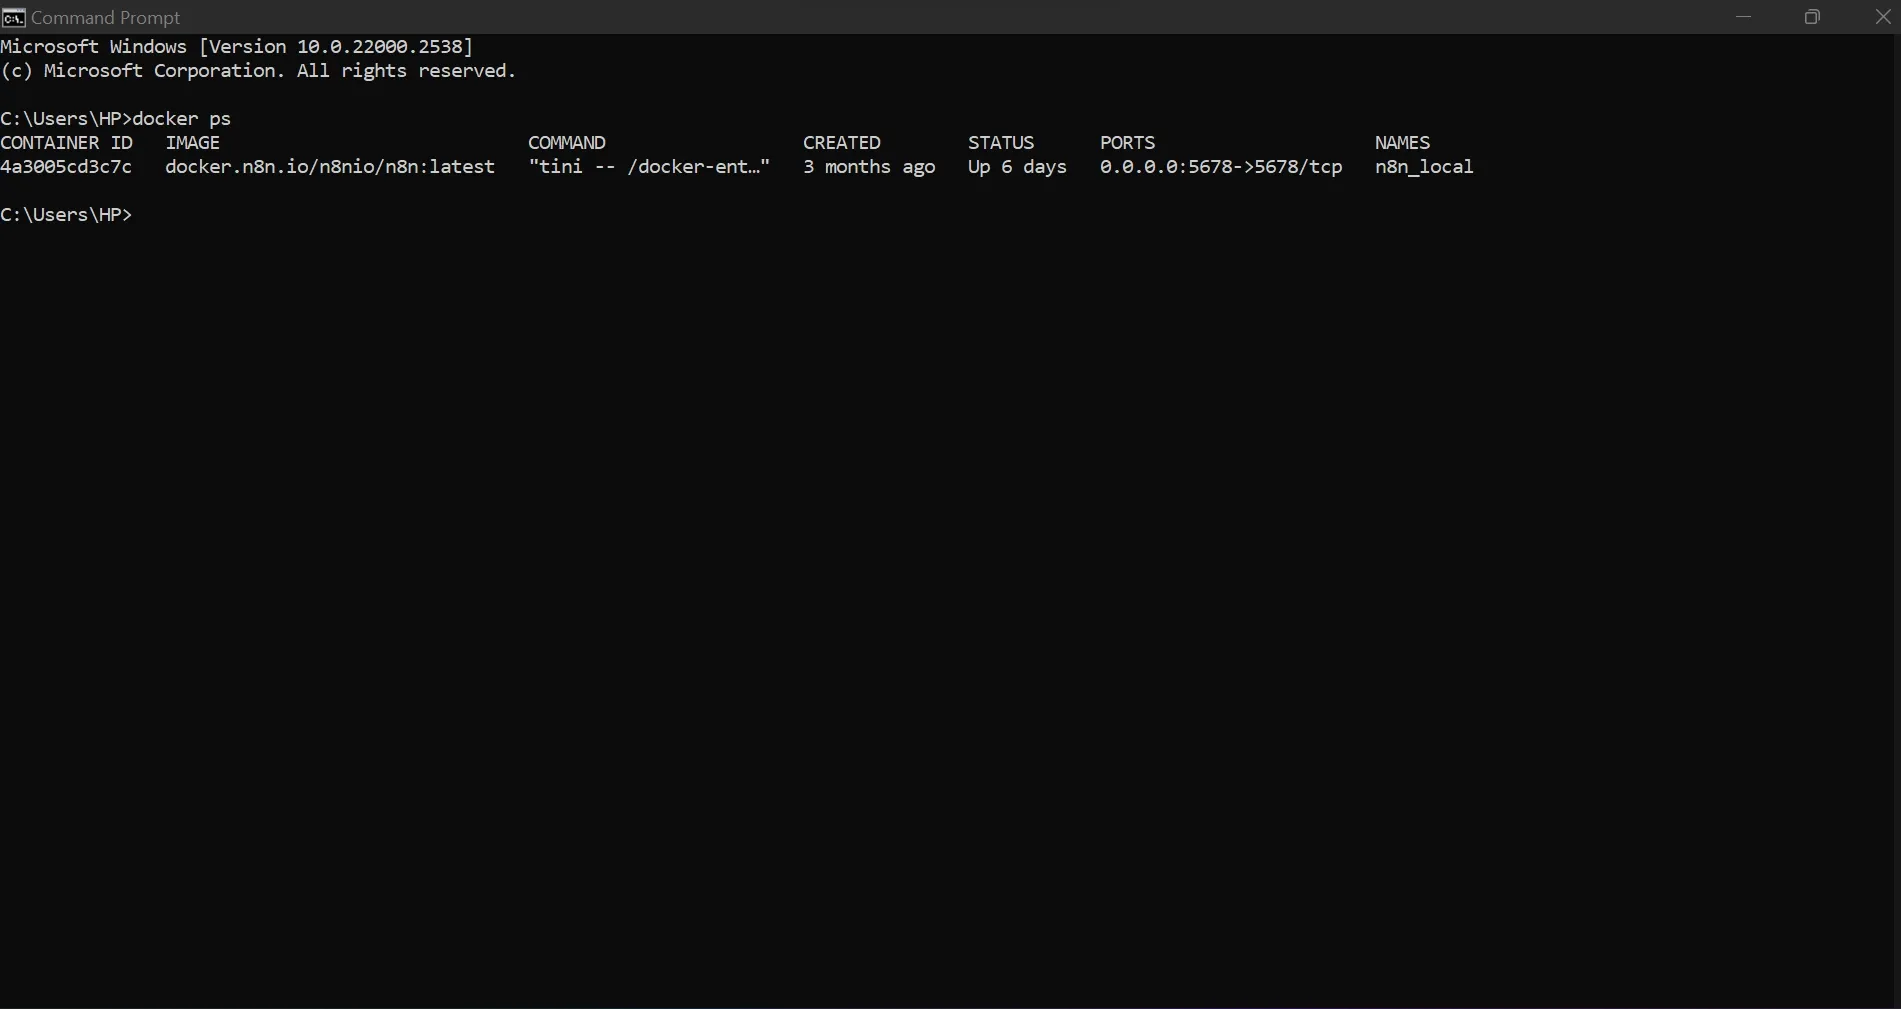
- Afterward, confirm the engine is running by typing:
docker ps
Step #2: Run n8n in Docker
- Open your terminal.
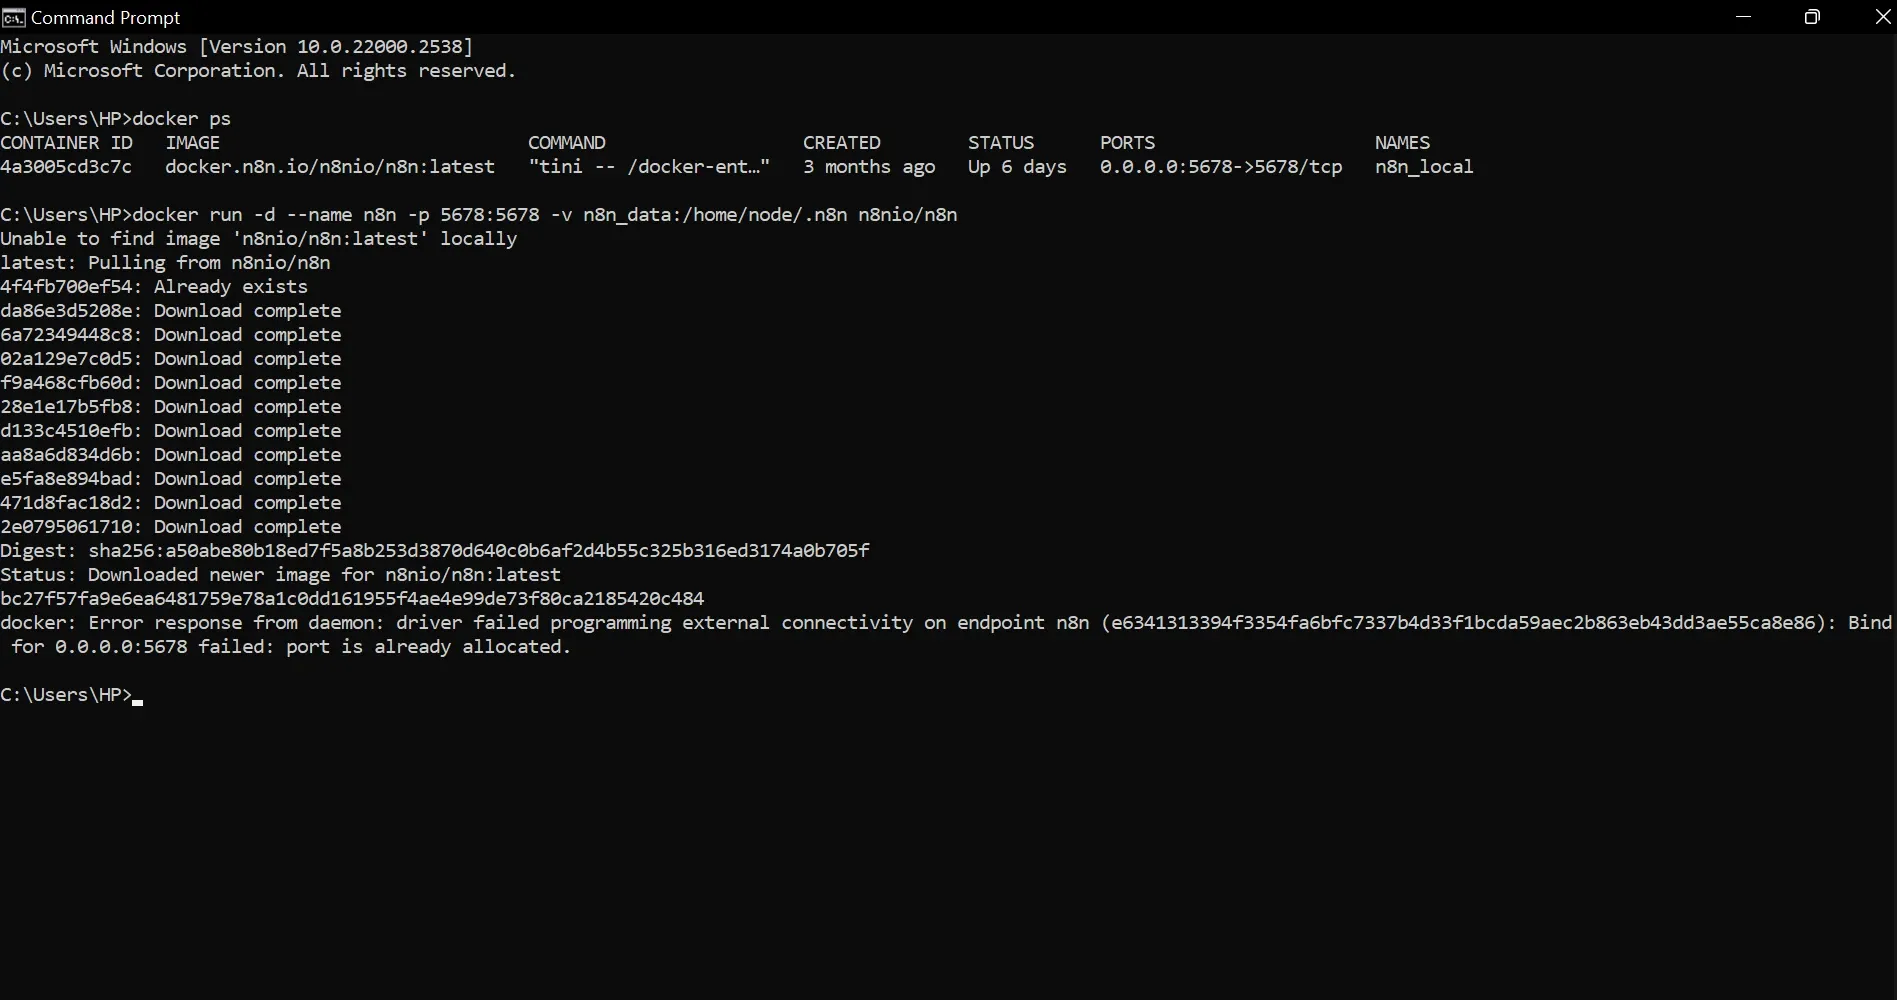
- Run the command below to pull and start n8n:
docker run -d --name n8n -p 5678:5678 -v n8n_data:/home/node/.n8n n8nio/n8n
- The first time you run this command, Docker will pause to pull the official n8n image from the internet. After downloading, it will assign and print your Container ID.
- Open a browser and go to
http://localhost:5678. - You'll see n8n's initial setup screen. Create an owner account with your email and a password.
Step #3: Install the Apify community node
n8n doesn't feature the Apify node natively. You’ll need to install it as an official community node before you can use it.
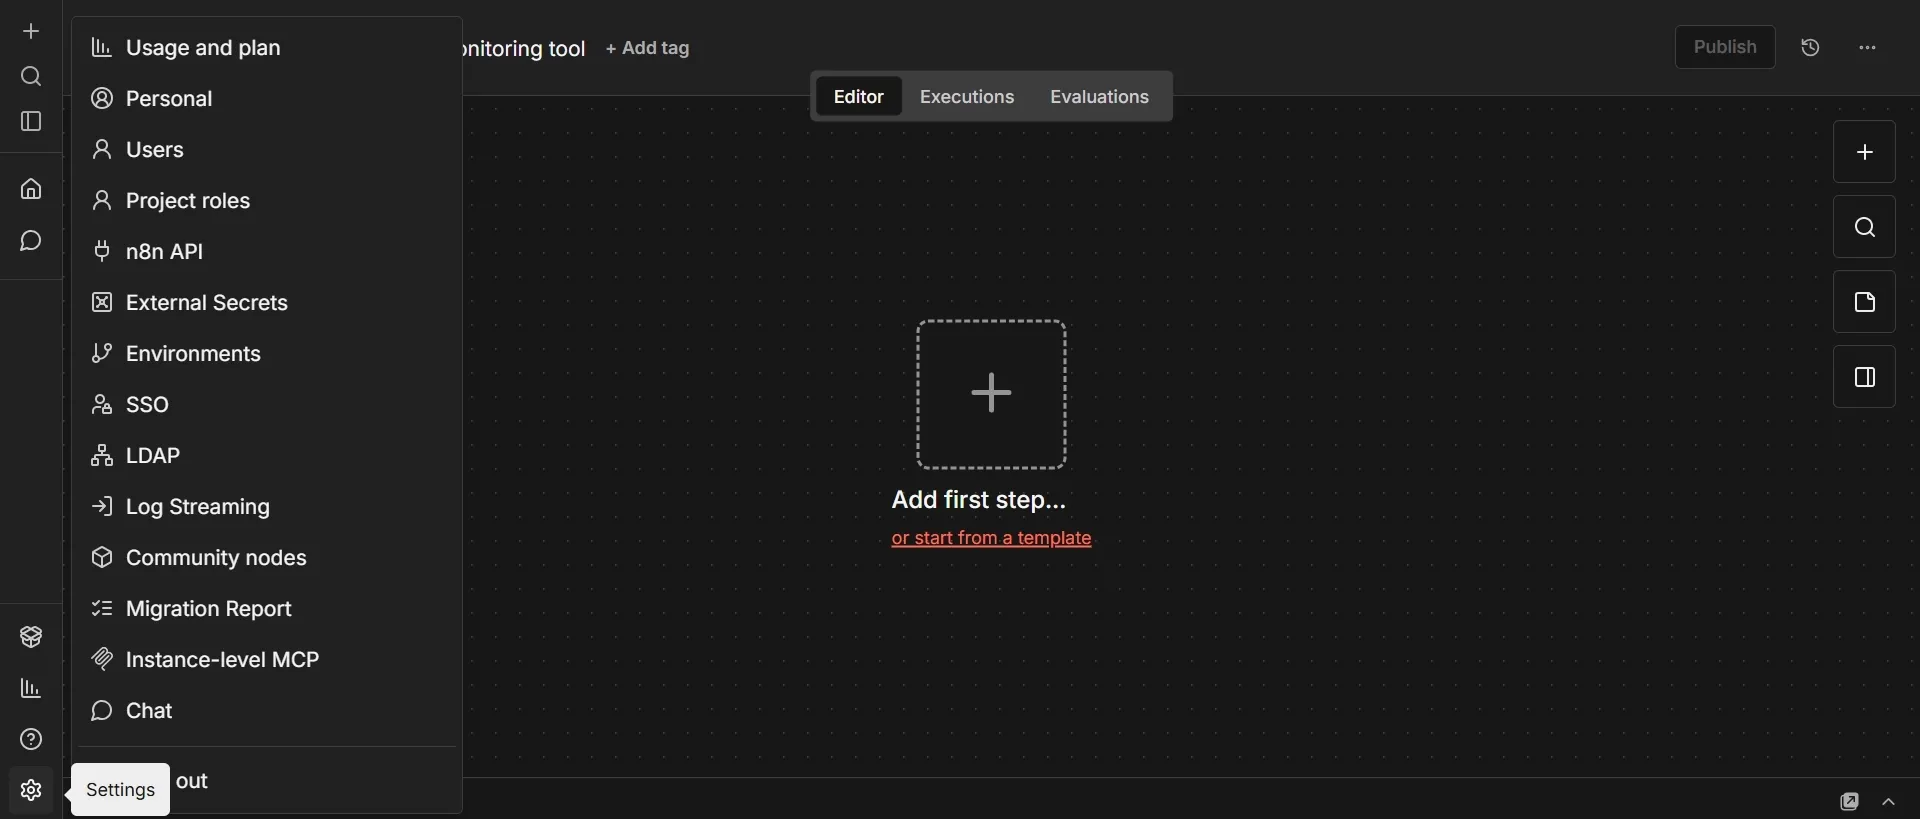
- In your n8n workspace, click Settings at the bottom of the left sidebar, then navigate to Community Nodes and click Install.
- In the npm package field, paste exactly this:
@apify/n8n-nodes-apify - Check the risk acknowledgment box and click Install.
Phase 3: Build the pipeline
The workflow splits into two branches, both of which read from the Build ad rows node. First, build the main branch to classify the angle, store the results in the database, and embed the ad copy for retrieval-augmented generation (RAG) purposes. After that, return to the Build ad rows node and start the Shopify branch from that same output to check destination links and store product data.
Step #1: Schedule Trigger node
- Create a new workflow by clicking Add workflow in the top left.
- On the empty canvas, click the large + in the center or the "Add first step" option.
- In the search panel, type
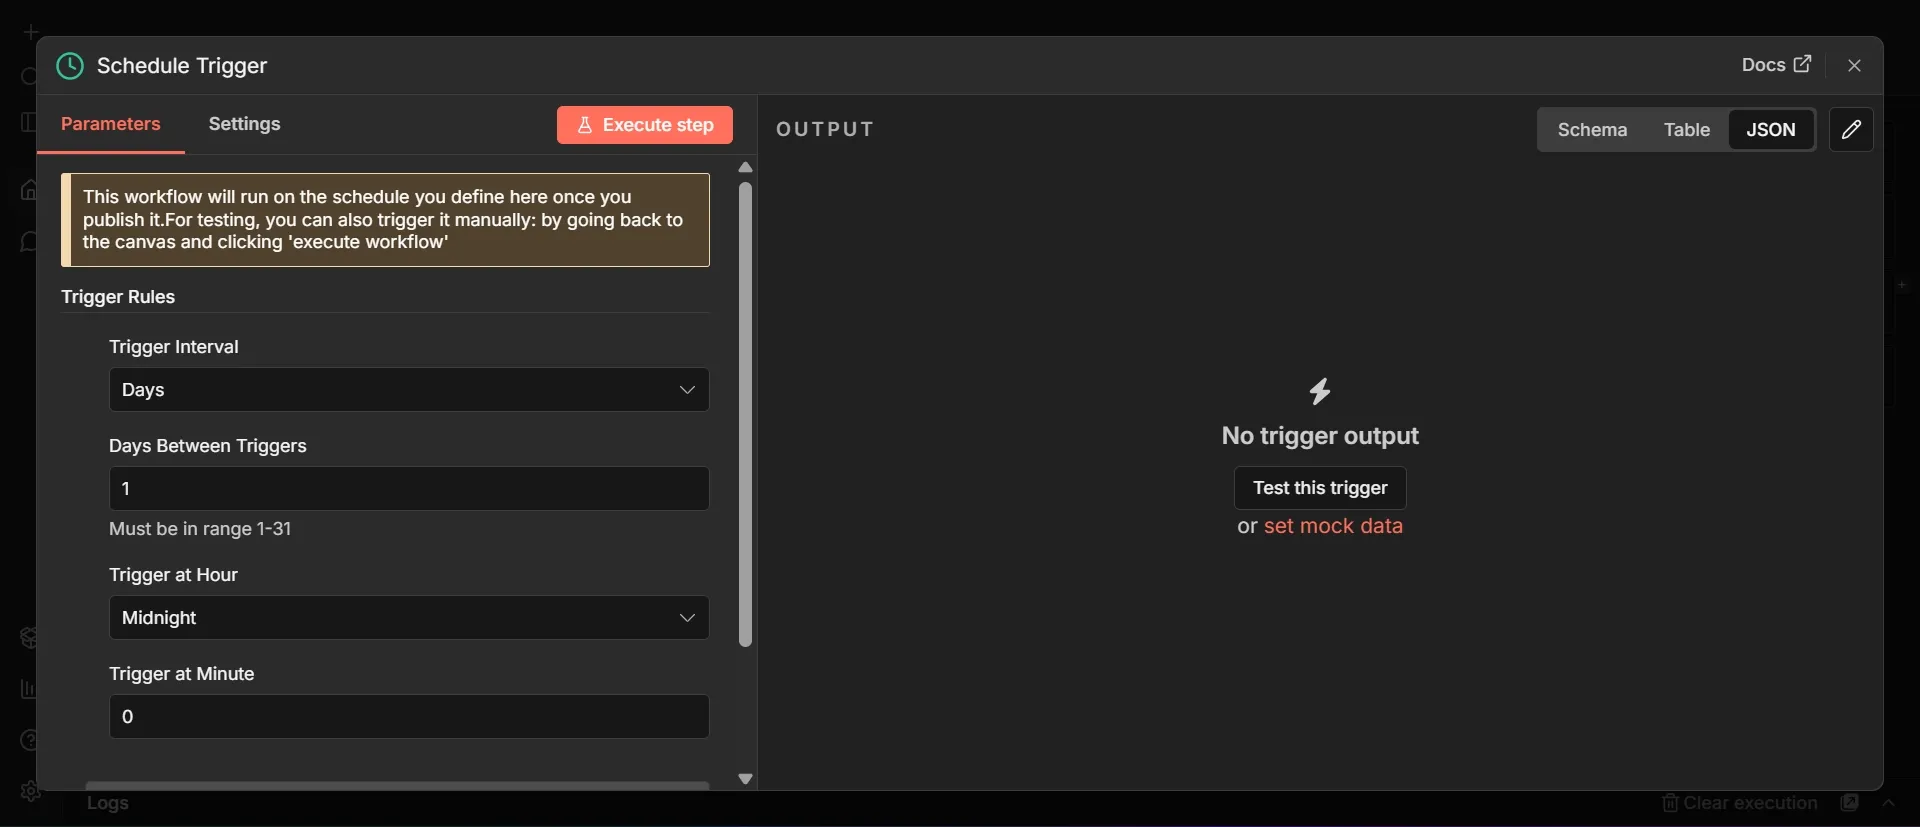
Schedule Triggerand select it to place it on the canvas. - Open it and set Trigger Interval to "Days", Days Between Triggers to
1, and a Trigger at Hour that suits you. - Click Save
Step #2: Define dataset inputs
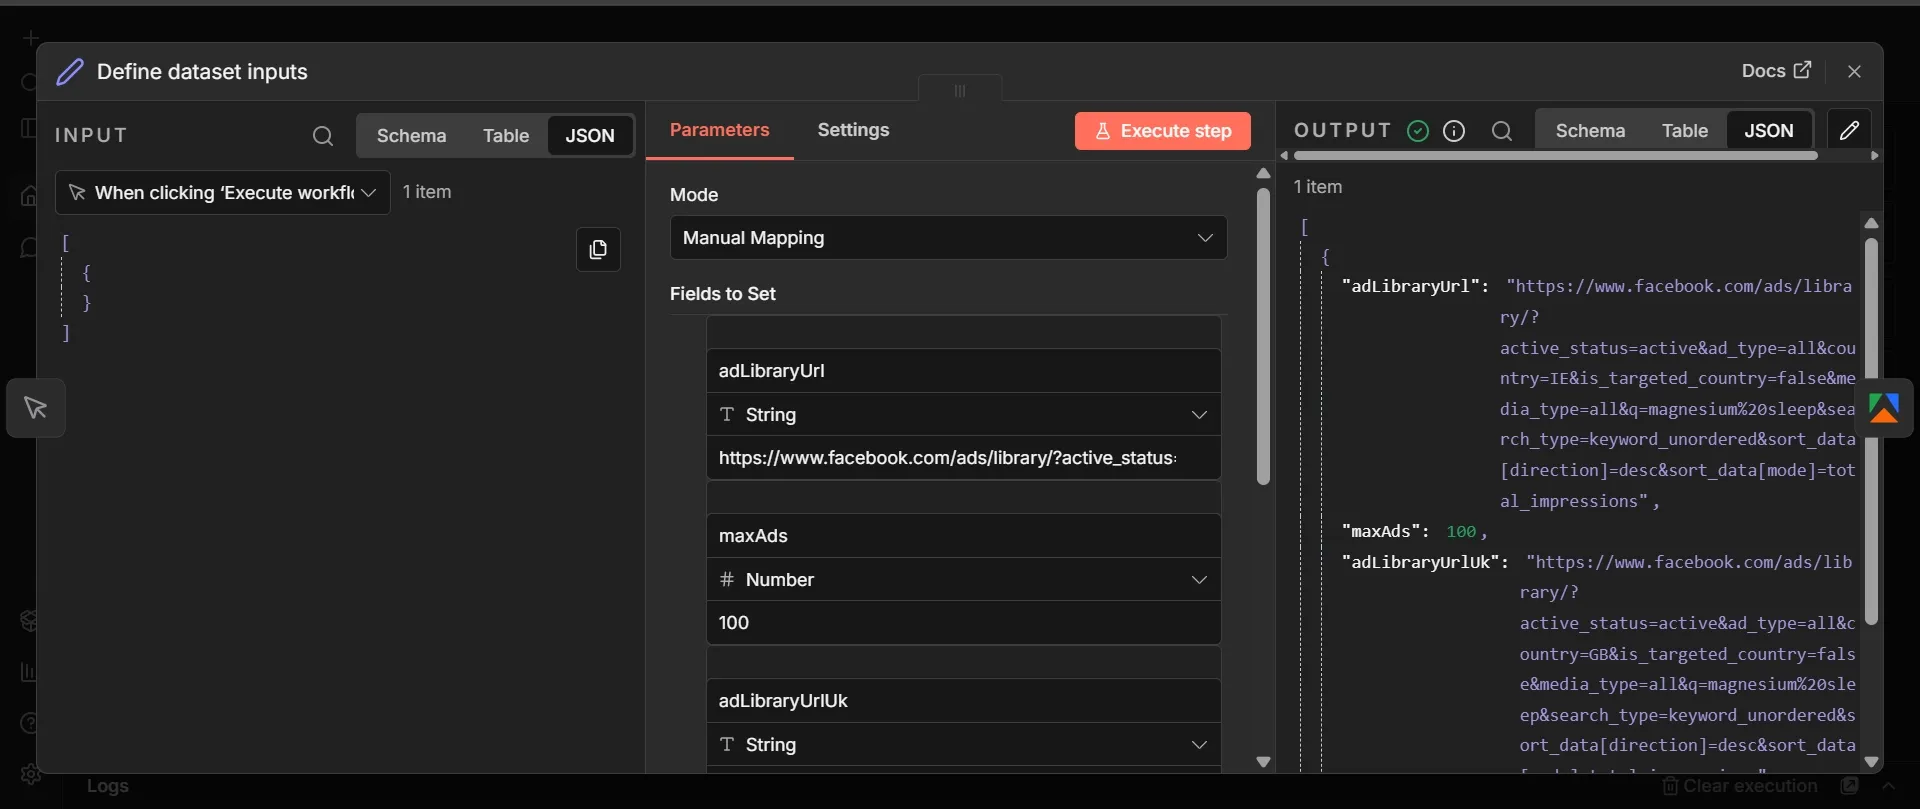
- Add an Edit Fields (Set) node after the Schedule Trigger (search "edit fields"), and rename it to "Define dataset inputs".
- Set Mode to "Manual Mapping".
- Open the Facebook Ad Library in a new tab to build your URL.
- Set the country dropdown to Ireland, and set the ad category to All ads.
- Type a niche keyword like “magnesium sleep” and press Enter.
- Copy the full URL from your browser's address bar. It should look like
https://www.facebook.com/ads/library/?active_status=active&ad_type=all&country=IE&is_targeted_country=false&media_type=all&q=magnesium%20sleep&search_type=keyword_unordered&sort_data[direction]=desc&sort_data[mode]=total_impressions. - Back in the node, click Add Field. Set Name to
adLibraryUrl, Type to "String", and paste your URL into Value. - Click Add Field again. Set Name to
maxAds, Type to "Number", and Value to100.
The choice of country in this build is vital to the quality of your results. Under the European Union Digital Services Act, Meta discloses the total reach for ads delivered within the EU, leaving the reach column blank for non-EU markets like the US. Ireland is the ideal target here because it provides complete EU reach data in an English-speaking market, so the ad copy feeds the angle classifier without any translation step.
Step #3: Facebook Ad Library Scraper (Apify) node
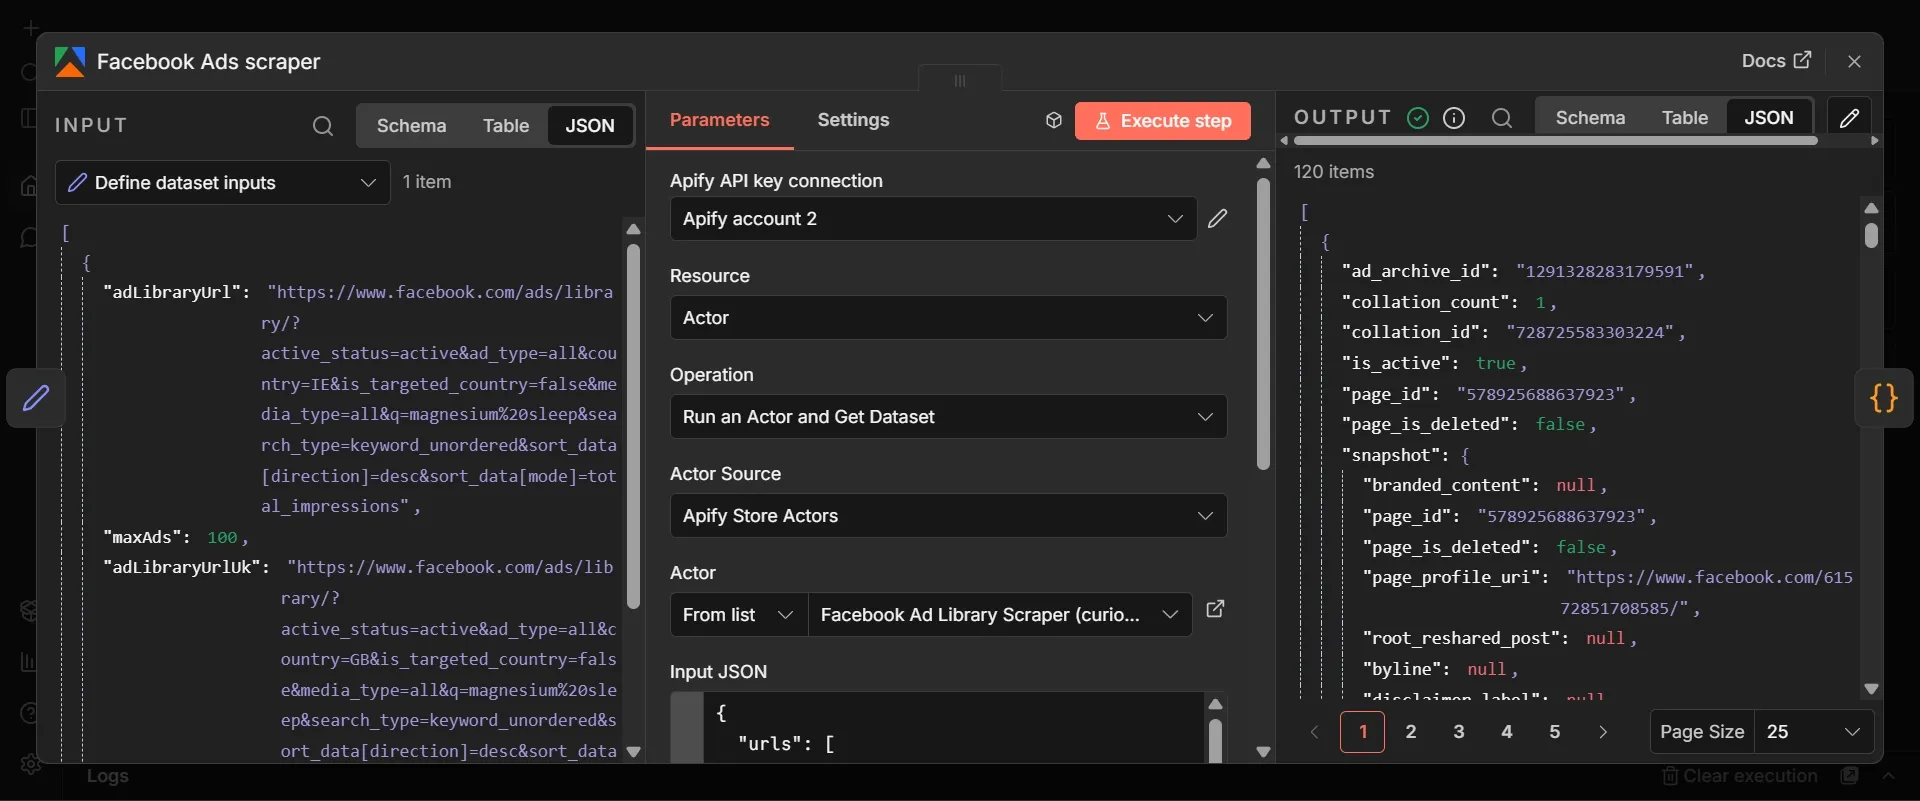
- Add the Apify node after Define dataset inputs (search "apify"), and select its Run an Actor and Get Dataset action. Rename it to "Facebook Ads scraper".
- Click the Credential to open the dropdown, then choose Create New Credential.
- Paste your Apify API token into the API Token field, click Save, and wait for the green "Connection tested successfully" banner.
- Set Resource to "Actor" and Operation to Run an Actor and Get Dataset.
- Click the Actor field, leave it on "From list", search "Facebook Ad Library Scraper", and select the one published by curious_coder (
curious_coder/facebook-ads-library-scraper). - Switch the Input JSON field to Expression mode, delete its contents, and paste the configuration below.
{
  "urls": [
    { "url": "{{ $json.adLibraryUrl }}" }
  ],
  "scrapeAdDetails": true,
  "limitPerSource": {{ $json.maxAds }}
}
- Scroll down to the node's options section (shown as Options or Additional Fields, depending on your n8n version) and click to add an option.
- Select Memory from the list.
- Set its value to
512MB.
The urls parameter takes your Ad Library search URL, limitPerSource caps how many ads one URL returns, and scrapeAdDetails fetches each ad's specific details after discovering them in the search feed. This detailed fetch is precisely why this Actor was chosen, as it captures Meta's EU transparency data and total reach figures. While this extra step makes the run slower than a listing-only scrape, trading execution time for that crucial second signal is essential. You don't need to set an activeStatus parameter because active_status=active is already embedded directly within your Ad Library URL.
Step #4: Code node for ad rows
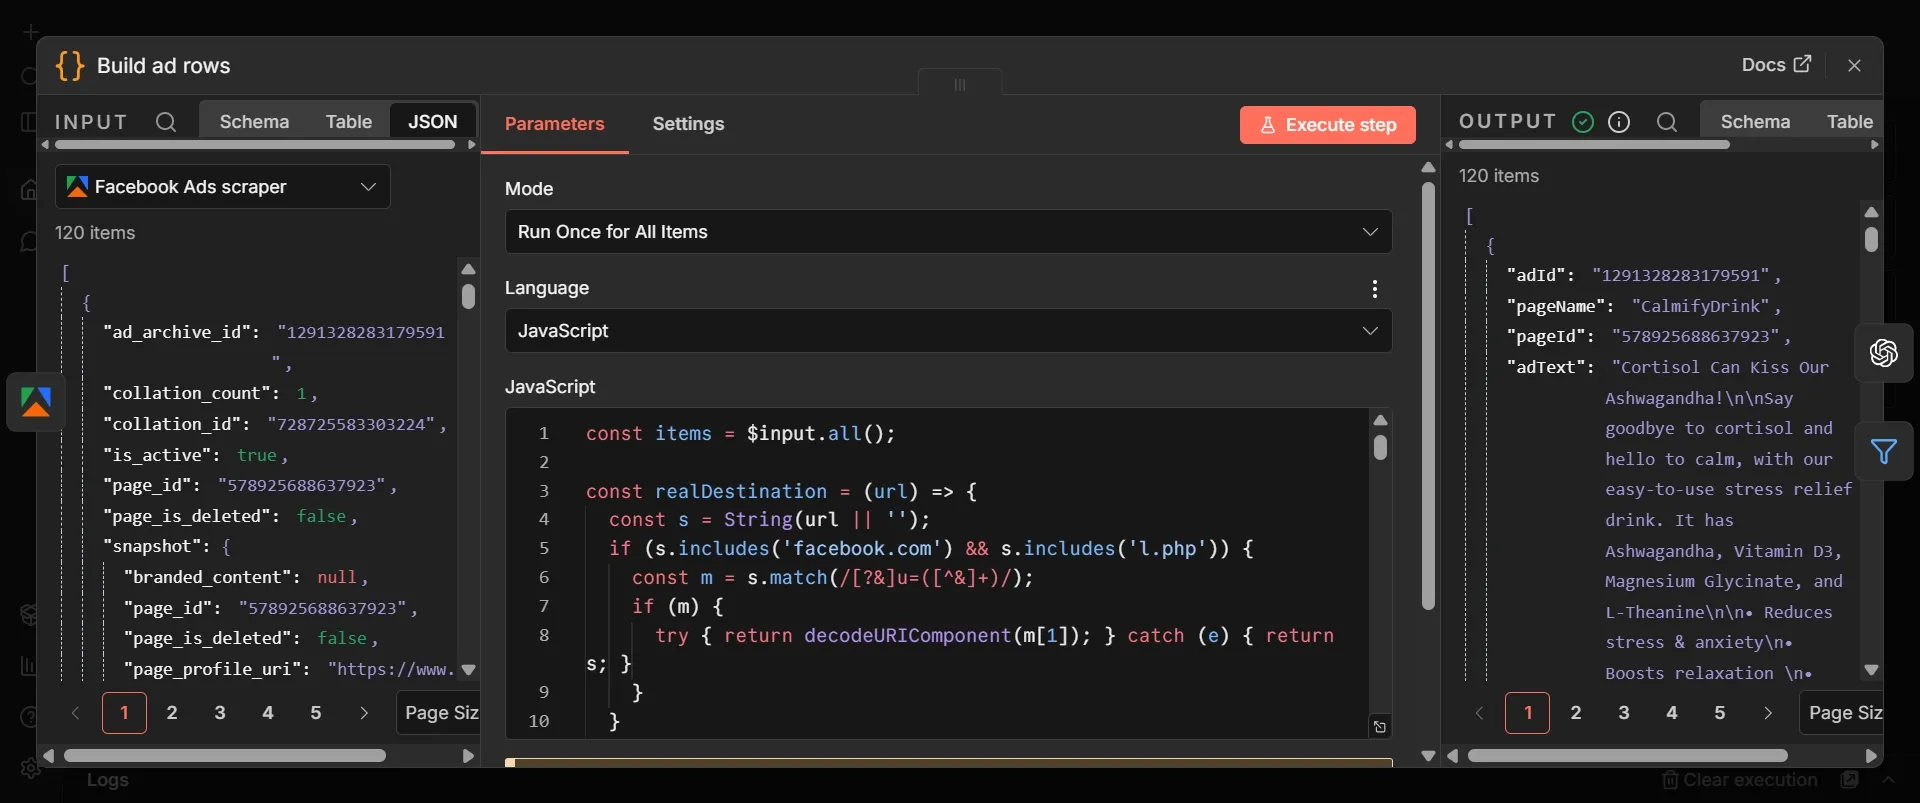
- Search for and add a Code node after the Facebook Ads scraper, then rename it to "Build ad rows".
- Set Mode to "Run Once for All Items" and Language to "JavaScript".
- Select everything in the code editor, delete it, and paste the code below:
const items = $input.all();

const realDestination = (url) => {
  const s = String(url || '');
  if (s.includes('facebook.com') && s.includes('l.php')) {
    const m = s.match(/[?&]u=([^&]+)/);
    if (m) {
      try { return decodeURIComponent(m[1]); } catch (e) { return s; }
    }
  }
  return s;
};

const hostOf = (url) => {
  const m = String(url || '').match(/^https?:\/\/([^/?#]+)/i);
  return m ? m[1].split(':')[0].replace(/^www\./, '').toLowerCase() : '';
};

return items
  .filter((item) => item.json && (item.json.adArchiveId || item.json.adArchiveID || item.json.ad_archive_id))
  .map((item) => {
    const ad = item.json;

    // Normalize the Actor's output so the rest of this node reads one set of field names
    ad.adArchiveId = ad.adArchiveId || ad.adArchiveID || ad.ad_archive_id;
    ad.pageName = ad.pageName || ad.page_name || '';
    ad.pageId = ad.pageId || ad.page_id || '';
    ad.startDate = ad.startDate ?? ad.start_date ?? null;
    ad.endDate = ad.endDate ?? ad.end_date ?? null;
    ad.isActive = ad.isActive ?? ad.is_active ?? false;
    ad.publisherPlatform = ad.publisherPlatform || ad.publisher_platform || [];

    const snap = ad.snapshot || {};
    snap.linkUrl = snap.linkUrl || snap.link_url || '';
    snap.title = snap.title || '';
    snap.ctaText = snap.ctaText || snap.cta_text || '';
    snap.displayFormat = snap.displayFormat || snap.display_format || '';
    snap.pageName = snap.pageName || snap.page_name || '';
    snap.pageId = snap.pageId || snap.page_id || '';
    if (snap.body && !snap.body.text && snap.body.markup && snap.body.markup.__html) {
      snap.body.text = snap.body.markup.__html.replace(/<[^>]*>/g, ' ').replace(/\s+/g, ' ').trim();
    }

    const cards = (Array.isArray(snap.cards) ? snap.cards : []).map((c) => ({
      ...c,
      body: c.body || c.body_text || c.bodyText || '',
      linkUrl: c.linkUrl || c.link_url,
      originalImageUrl: c.originalImageUrl || c.original_image_url,
      resizedImageUrl: c.resizedImageUrl || c.resized_image_url,
      videoHdUrl: c.videoHdUrl || c.video_hd_url,
      videoSdUrl: c.videoSdUrl || c.video_sd_url,
    }));
    const firstCard = cards[0] || {};

    // Ad copy. Dynamic ads leave a template in body.text, so fall back to card text.
    const bodyText = snap.body && snap.body.text ? snap.body.text : '';
    const cardText = cards.map((c) => c.body).filter(Boolean).join(' ');
    const adText = bodyText && !bodyText.includes('{{')
      ? bodyText
      : (cardText || bodyText || snap.title || '');

    const destinationUrl = realDestination(snap.linkUrl || firstCard.linkUrl || '');
    const domain = hostOf(destinationUrl);

    const creativeUrl =
      firstCard.originalImageUrl ||
      firstCard.resizedImageUrl ||
      firstCard.videoHdUrl ||
      firstCard.videoSdUrl ||
      '';

    const startMs = ad.startDate ? ad.startDate * 1000 : null;
    const endMs = ad.isActive ? Date.now() : (ad.endDate ? ad.endDate * 1000 : Date.now());
    const runDays = startMs ? Math.max(0, Math.round((endMs - startMs) / 86400000)) : null;

    // EU total reach comes from the detail fetch enabled by scrapeAdDetails
    const aaa = ad.aaa_info || ad.aaaInfo || {};
    const reachRaw = aaa.eu_total_reach ?? ad.reach_estimate ?? ad.reachEstimate ?? null;
    const reach = Number.isFinite(Number(reachRaw)) && Number(reachRaw) > 0 ? Number(reachRaw) : null;

    // Shopify probe: the specific product if the ad links to one, else the store's first product.
    let shopifyProbeUrl = '';
    if (domain) {
      const productMatch = destinationUrl.match(/\/products\/([^/?#]+)/i);
      shopifyProbeUrl = productMatch
        ? `https://${domain}/products/${productMatch[1]}.json`
        : `https://${domain}/products.json?limit=1`;
    }

    return {
      json: {
        adId: ad.adArchiveId,
        pageName: ad.pageName || snap.pageName || '',
        pageId: ad.pageId || snap.pageId || '',
        adText,
        title: snap.title || '',
        ctaText: snap.ctaText || '',
        creativeUrl,
        destinationUrl,
        domain,
        displayFormat: snap.displayFormat || '',
        platforms: Array.isArray(ad.publisherPlatform) ? ad.publisherPlatform.join(', ') : '',
        isActive: Boolean(ad.isActive),
        runDays,
        reach,
        startedAt: ad.startDateFormatted || ad.start_date_formatted || null,
        shopifyProbeUrl,
        scrapedAt: new Date().toISOString(),
      },
    };
  })
  .filter((row) => row.json.adText && row.json.adText.trim() !== '');
Your code node here flattens ads into clean rows. An adapter script standardizes the mixed camelCase and snake_case fields the Actor returns, so an Actor update falls back to the alternate field name instead of writing an empty column.
Link parsing here uses regex instead of JavaScript's URL class because some n8n sandboxes omit URL. The code unwraps Facebook's l.php redirects to find the true destination domain and constructs the Shopify probe URL for the next branch.
It calculates run_days from the start date against the end date or current time. With scrapeAdDetails active, the pipeline directly reads Meta's eu_total_reach from the aaa_info transparency block, relying on reach_estimate as a free fallback. Most EU ads return real reach, but if a figure is missing, the field stays null and ranking defaults to run duration.
Step #5: OpenAI node to classify the angle
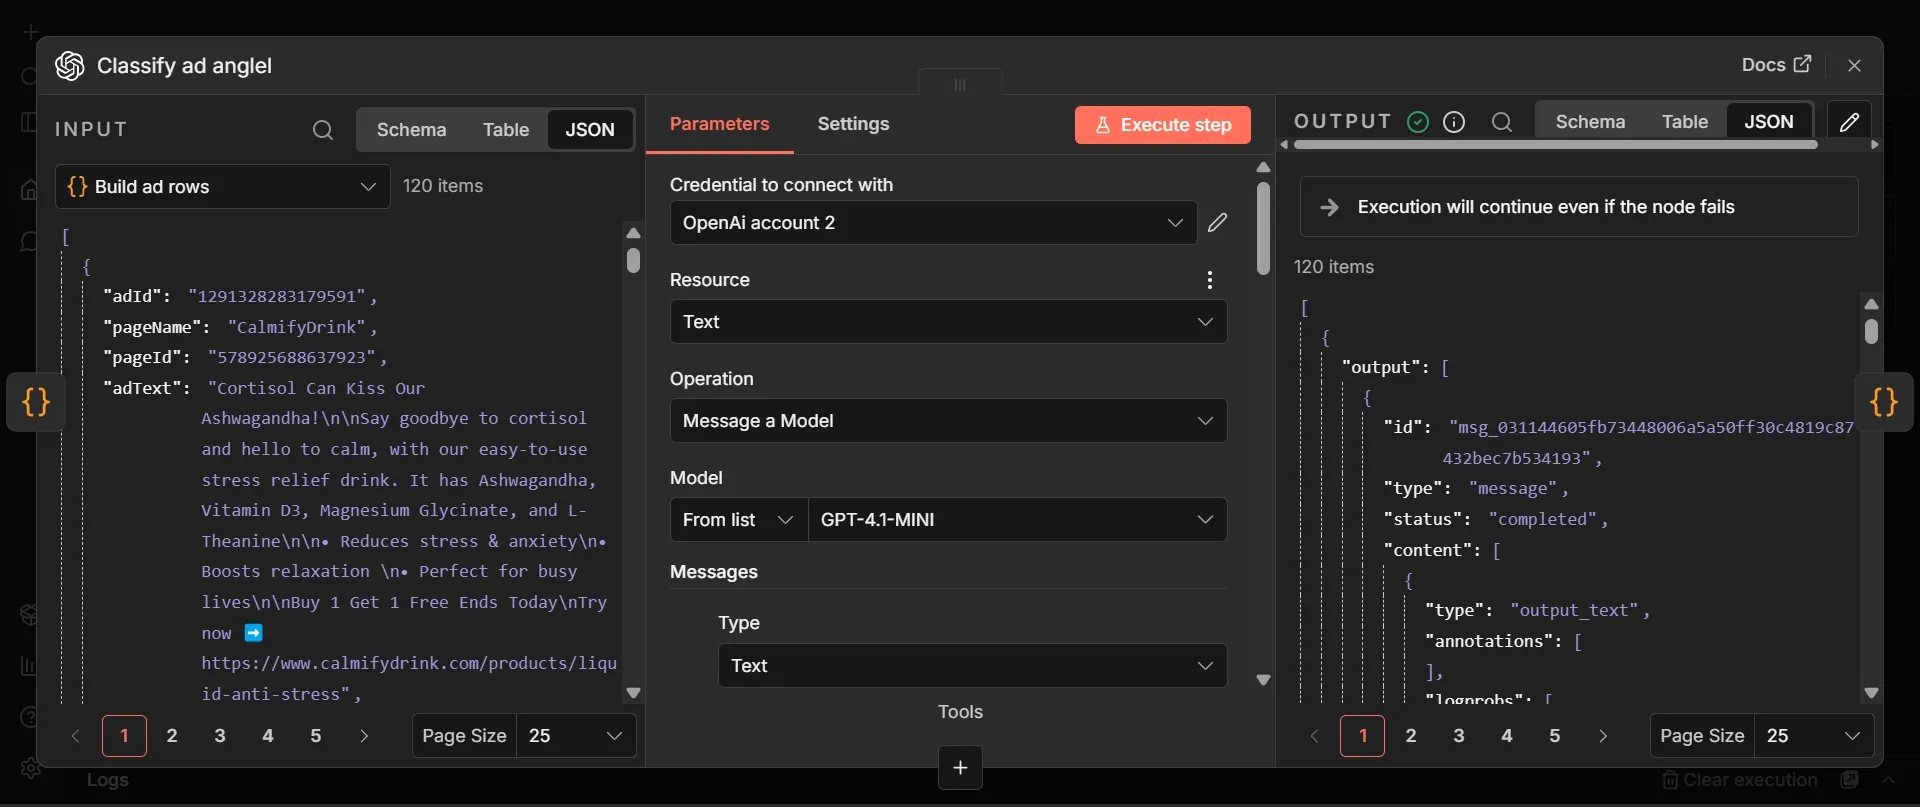
- Add the OpenAI node after Build ad rows, and select its Message a Model action. Rename it to "Classify ad angle".
- Click the Credential to open the dropdown, then choose Create New Credential.
- Paste your OpenAI key into the API Key field and click Save.
- Click the Model field and leave it on "From list".
- Type
gpt-4.1-miniand select it. It's a cheap, reliable choice for structured classification; "GPT-5.6 Luna" is the newest family equivalent if you prefer it. - Under Messages, click Add Message.
- Change the message's Role dropdown from "User" to "System", and paste the text below into its Prompt field.
You are labeling Facebook ads for a marketing intelligence dataset. You will be given the text of one ad. Classify the main persuasion angle it uses into exactly one category from this list: "urgency", "social proof", "founder story", "problem solution", "discount", "curiosity", "authority", "other". Judge only the ad text. Return a single JSON object with two keys: "angle" (one of the categories) and "reasoning" (a short phrase under 10 words). Return only the JSON object.
- Click Add Message again, leaving its Type set to "Text" and Role to "User".
- Switch its Prompt field to Expression mode and paste
{{ $('Build ad rows').item.json.adText }}. - Scroll down to Options, click Add Option, and choose Output Format.
- Set its Type to "JSON Schema (recommended)" and replace the placeholder in its Name field with
ad_angle. - Click into the Schema editor, select everything, delete the boilerplate example, and paste the schema below:
{
  "type": "object",
  "properties": {
    "angle": {
      "type": "string",
      "enum": ["urgency", "social proof", "founder story", "problem solution", "discount", "curiosity", "authority", "other"]
    },
    "reasoning": {
      "type": "string"
    }
  },
  "required": ["angle", "reasoning"],
  "additionalProperties": false
}
- Open the node's Settings tab.
- Switch Retry On Fail on.
- Set Max Tries to
3. - Set Wait Between Tries to
2000ms. - Set "On Error" to "Continue".
This node turns raw ad copy into a structured, comparable signal. Instead of a pile of text, every ad gets one angle label, which is what lets you rank angles, cluster similar creatives, and tell the agent what kind of message it's looking at.
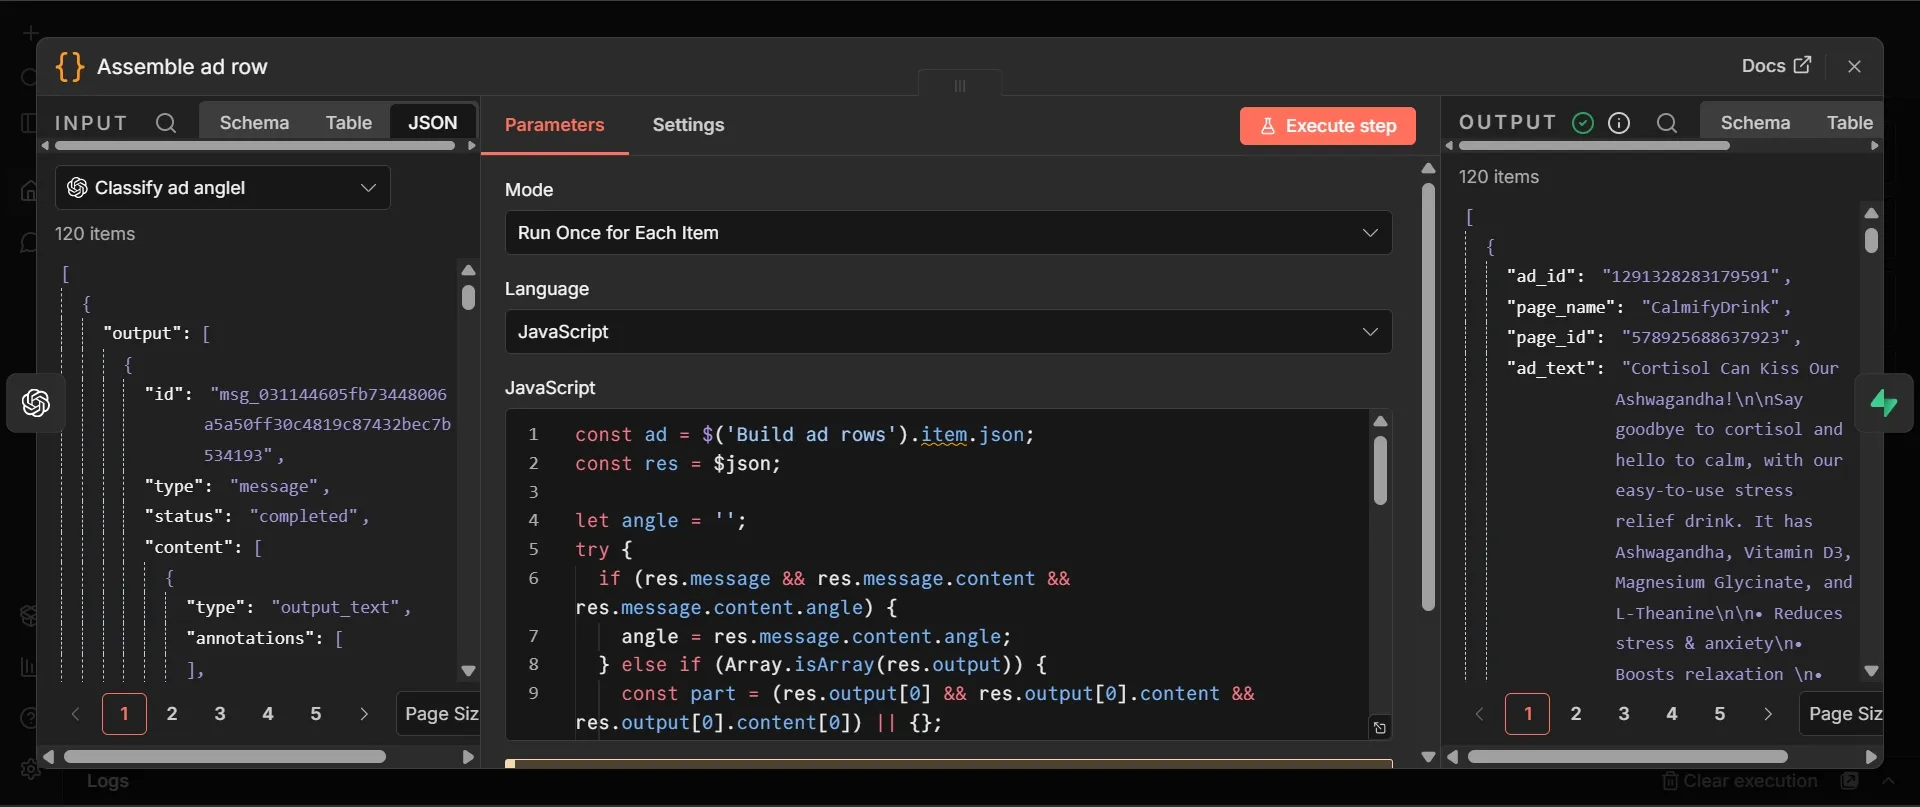
Step #6: Code node to assemble the row
- Add a Code node after Classify ad angle, and rename it to "Assemble ad row".
- Set Mode to "Run Once for Each Item" and Language to "JavaScript".
- Select everything in the editor, delete it, and paste the code below:
const ad = $('Build ad rows').item.json;
const res = $json;

let angle = '';
try {
  if (res.message && res.message.content && res.message.content.angle) {
    angle = res.message.content.angle;
  } else if (Array.isArray(res.output)) {
    const part = (res.output[0] && res.output[0].content && res.output[0].content[0]) || {};
    if (part.text && typeof part.text === 'object' && part.text.angle) {
      angle = part.text.angle;
    } else if (part.parsed && part.parsed.angle) {
      angle = part.parsed.angle;
    } else if (typeof part.text === 'string') {
      angle = JSON.parse(part.text).angle || '';
    }
  }
} catch (e) {
  angle = '';
}

return {
  json: {
    ad_id: ad.adId,
    page_name: ad.pageName,
    page_id: ad.pageId,
    ad_text: ad.adText,
    title: ad.title,
    cta_text: ad.ctaText,
    creative_url: ad.creativeUrl,
    destination_url: ad.destinationUrl,
    domain: ad.domain,
    display_format: ad.displayFormat,
    platforms: ad.platforms,
    angle,
    is_active: ad.isActive,
    run_days: ad.runDays,
    reach: ad.reach,
    started_at: ad.startedAt,
    scraped_at: ad.scrapedAt,
  },
};
The Assemble row node exists specifically to unlock auto-mapping in the next step. While a Supabase node can automatically map input keys to database table columns by name, it only works when the incoming item is formatted as a unified row. At this point in the pipeline, your data is still fragmented: the core ad fields remain in the Build ad rows node, and the angle label is in the classifier's output. This step merges those two sources into a single object.
Step #7: Create a row (Supabase) node for ads
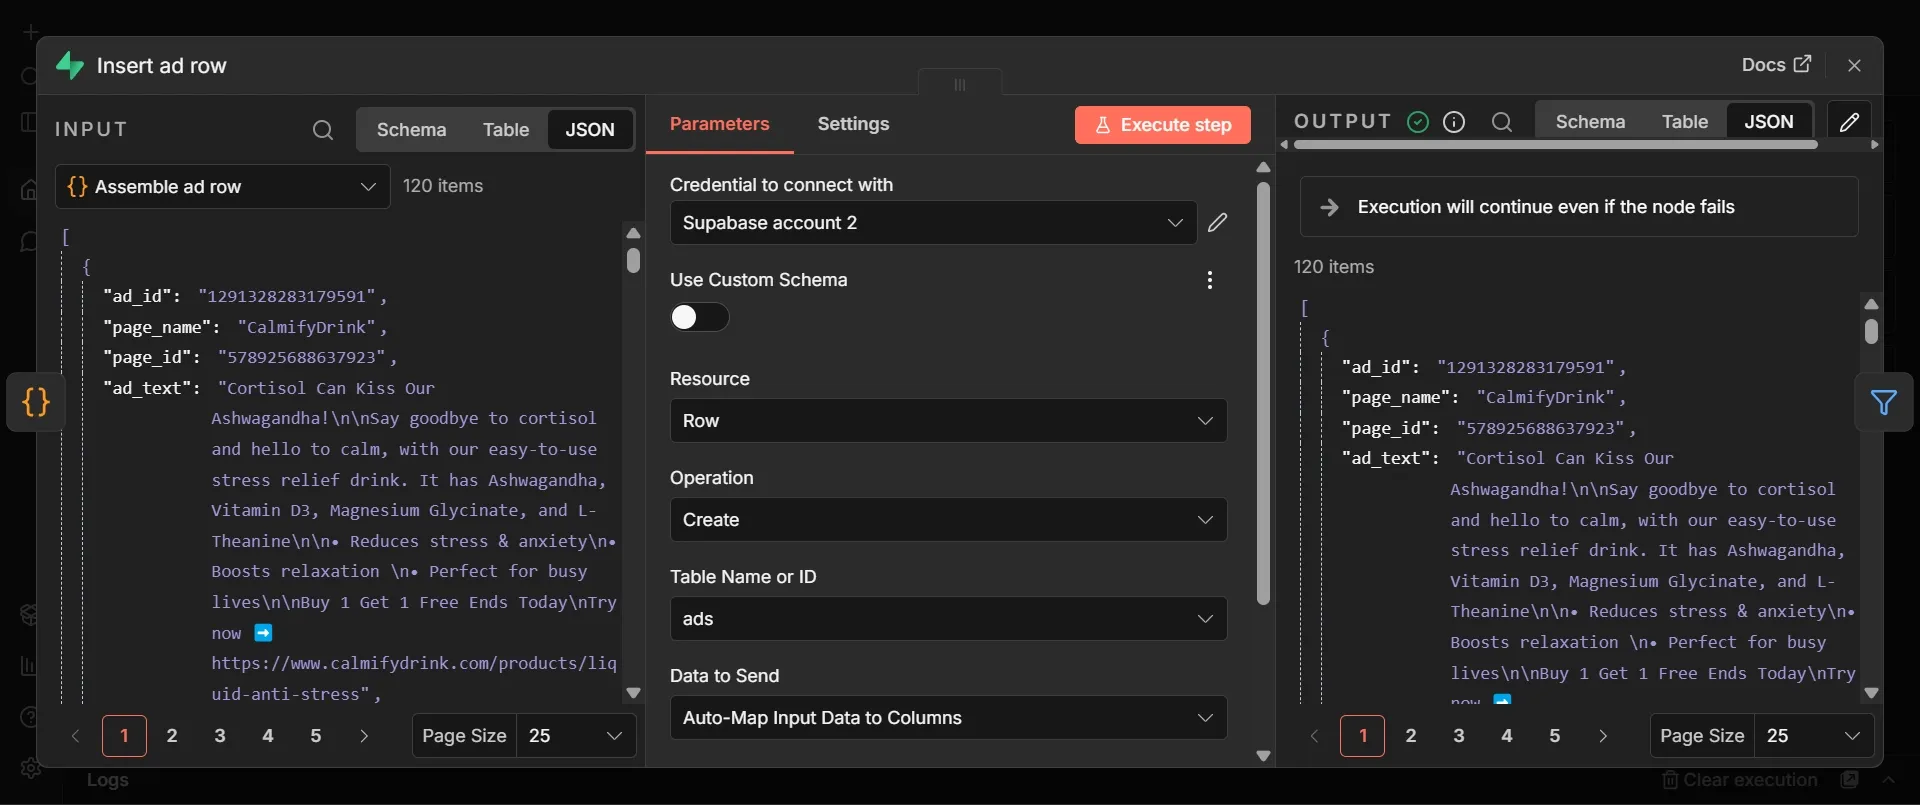
- Add a Supabase node after Assemble ad row (search "supabase"), and select its Create a row action. Rename it to "Insert ad row".
- Click the Credential to open the dropdown, then choose Create New Credential.
- Paste your Project URL into the Host field and your service_role key into the Service Role Secret field, then click Save.
- Note that the host is the bare project URL,
https://YOUR-REF.supabase.co, with no/rest/v1/path on the end. - Click the Table field, leave it on "From list", and select
ads. - Set Data to Send to "Auto-Map Input Data to Columns".
- Open the Settings tab and set On Error to Continue.
This node writes one row per ad by auto-mapping input keys to database columns. During re-runs, expect to see duplicate-key errors. This is simply how the pipeline recognizes that an ad is already stored, so it can safely skip it. Setting the node to Continue on error ensures these collisions are quietly ignored rather than breaking the workflow. If you want a clean test run without duplicate-key errors, wipe your tables first in the Supabase SQL Editor by running truncate table ads, products, documents; before triggering the pipeline again.
Step #8: Filter to new ads
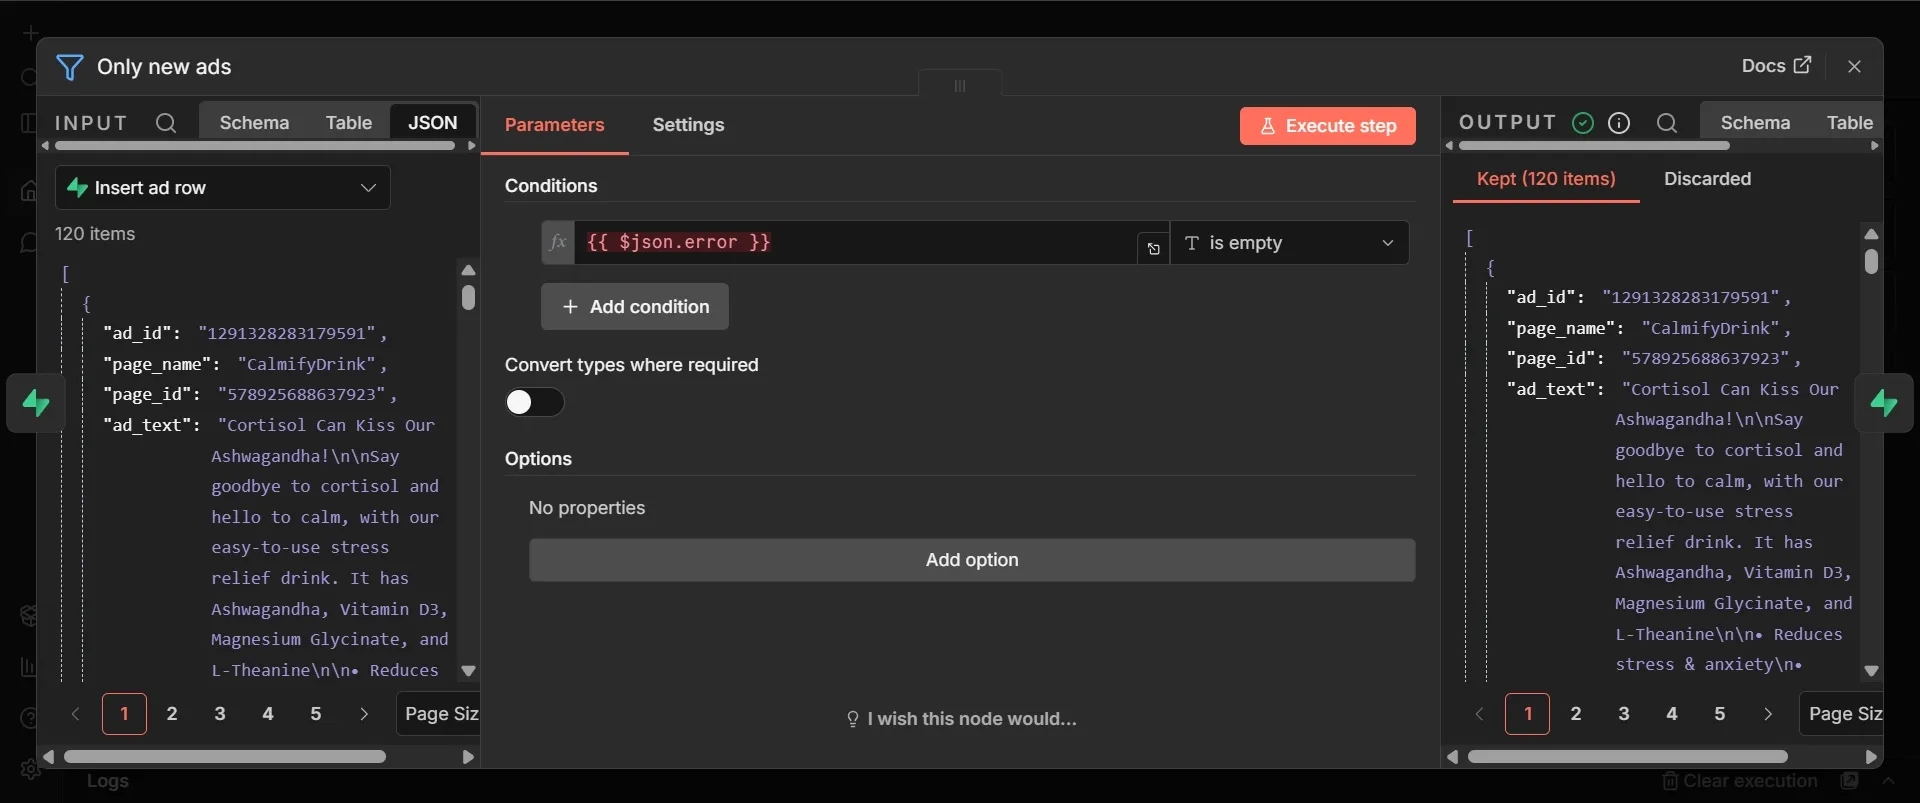
- On the Insert ad row node, click the + on its output dot.
- Search “filter” and select the filter operation. Rename it to "Only new ads".
- Under Conditions, switch the left Value field to Expression mode and type
{{ $json.error }}. - Set the data type dropdown between the two fields to "String", and the operation dropdown to is empty. The right field stays blank, since "is empty" needs no comparison value.
The filter node allows fresh ads to move to embedding, while ads already in the table stop here. Without it, every run would re-embed past ads, clogging the database with duplicates that’ll corrupt the agent’s retrieval.
Step #9: Supabase Vector Store node for ad copy
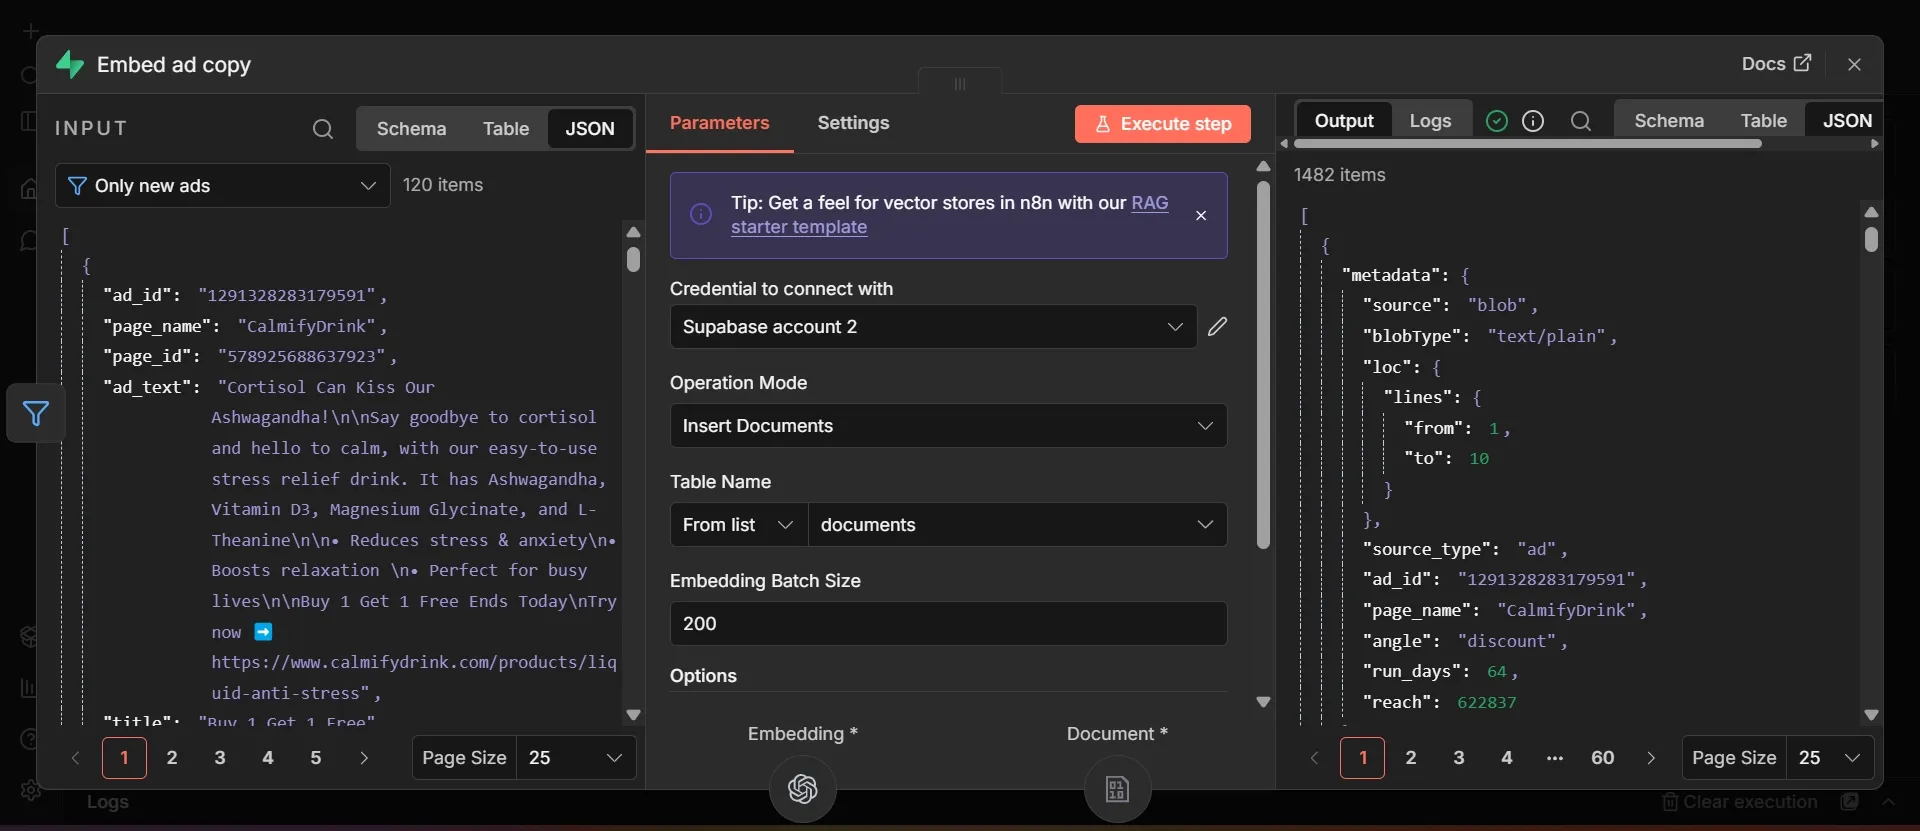
- Add the Supabase Vector Store node after Only new ads (search "supabase vector"), and select its Add documents to vector store action. Rename it to "Embed ad copy".
- Under Credential, select the Supabase credential you created in Step #7.
- Leave Table Name on "From list" and pick
documents. Seeing your table in that dropdown also confirms the credential works. - Leave Embedding Batch Size at its default of
200and skip Options.
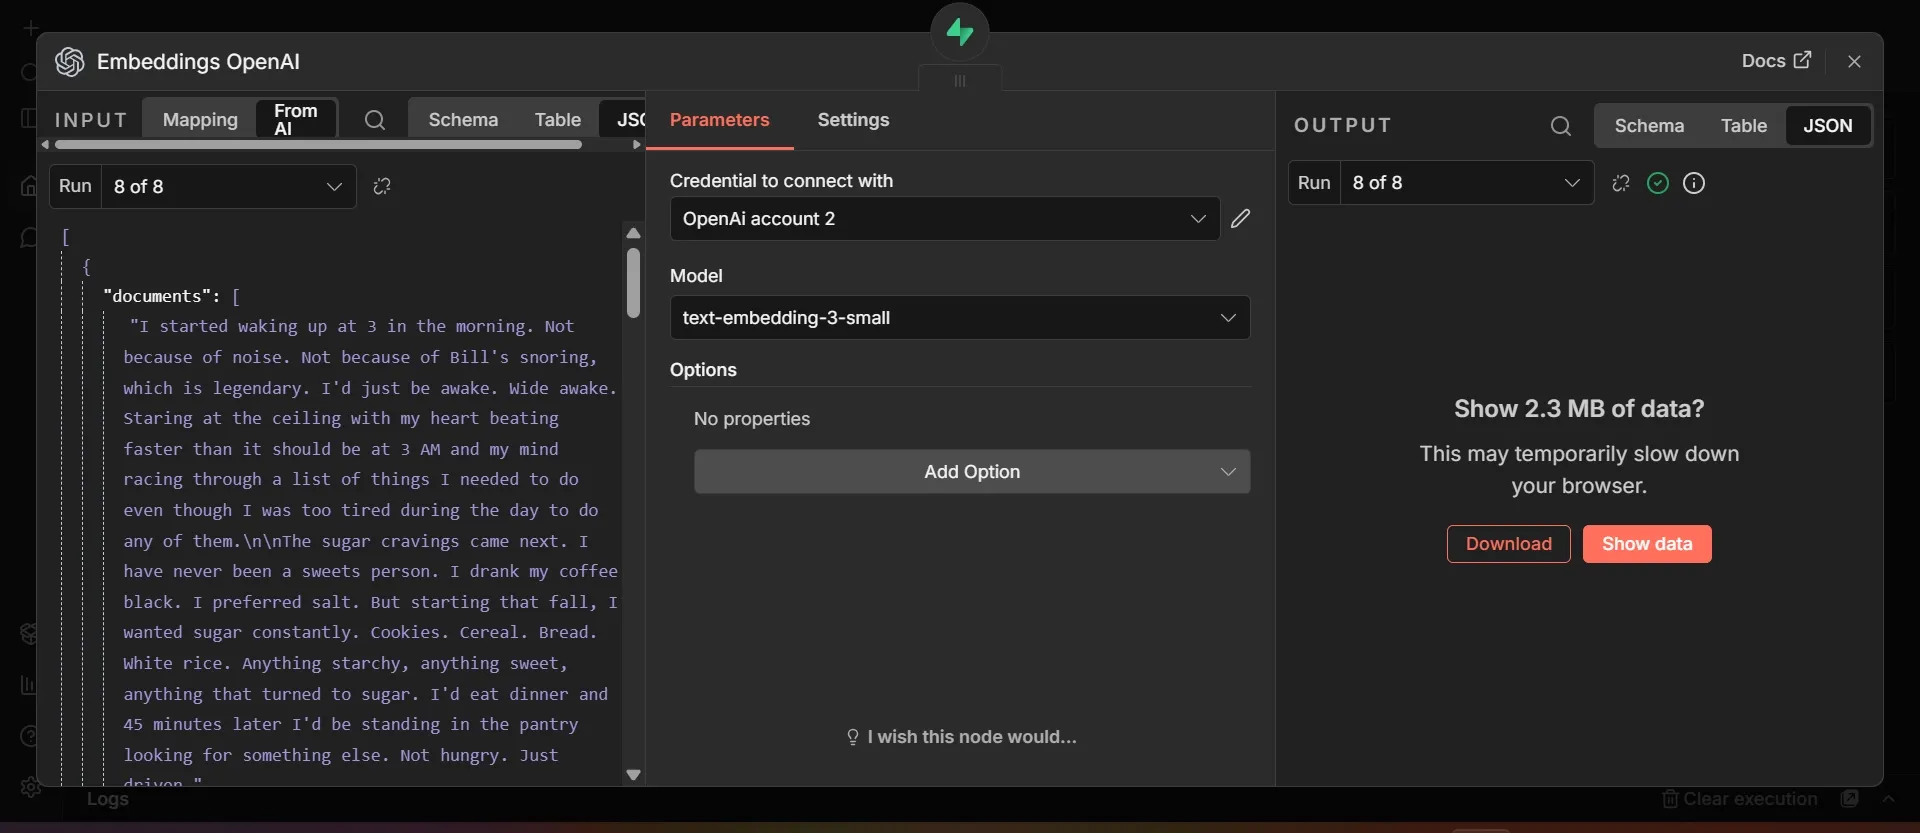
- Click the + under Embedding, search for "embeddings openai" and add it.
- Set its Model to
text-embedding-3-smalland pick your OpenAI credential.
- Click the + under Document and add Default Data Loader.
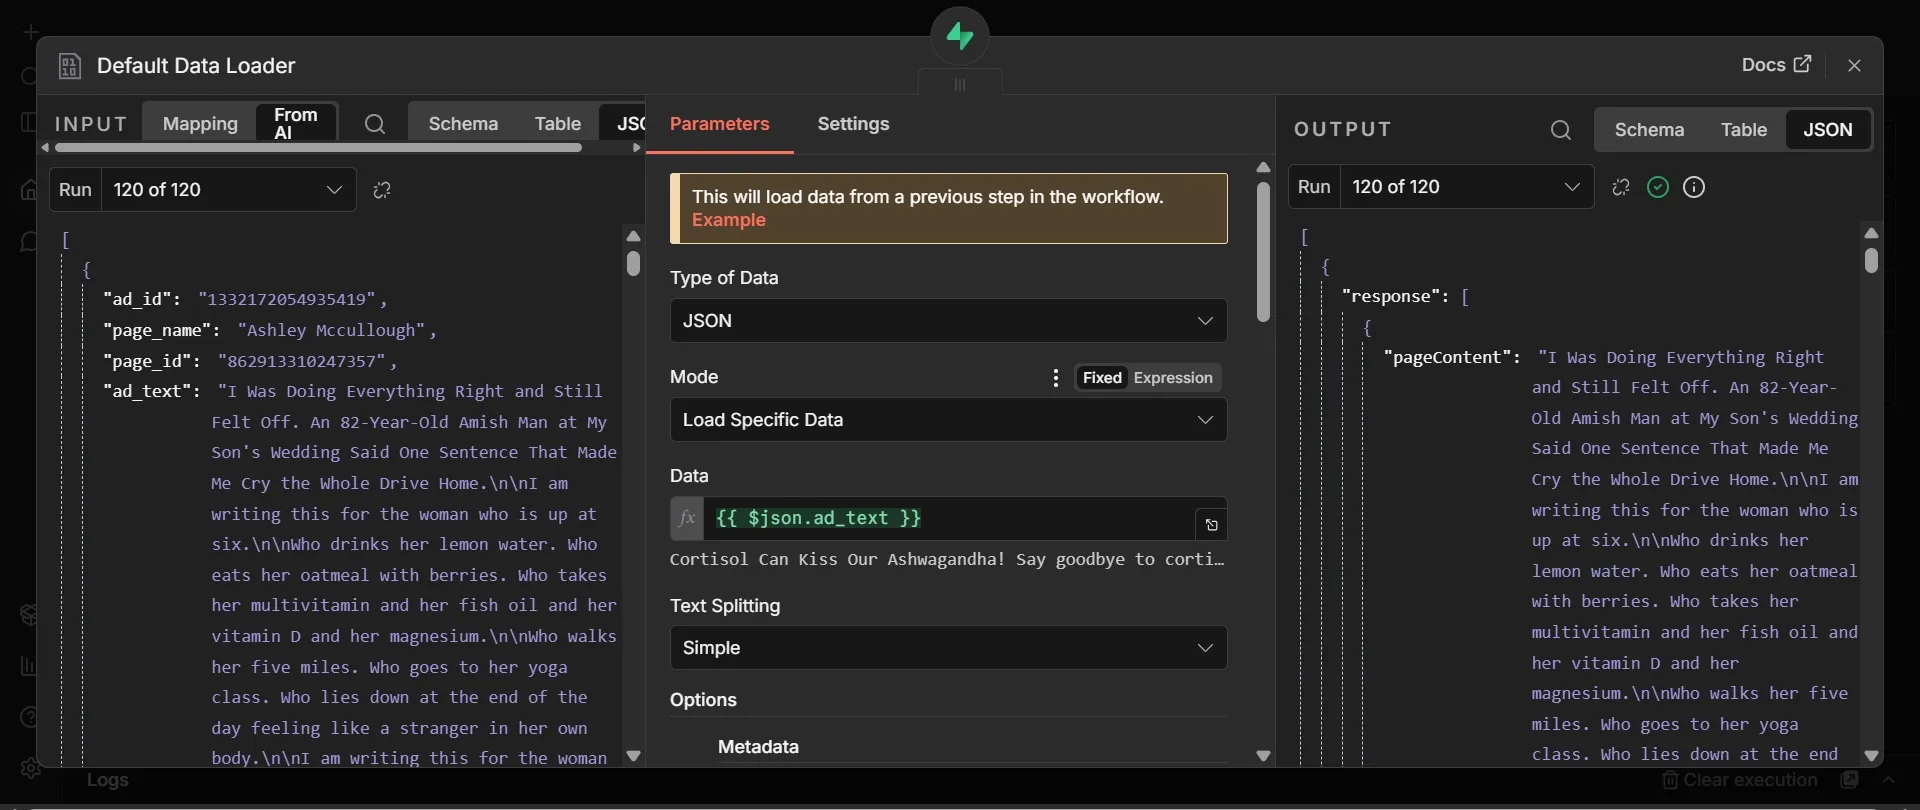
- Leave Type of Data on "JSON", then change the Mode dropdown from "Load All Input Data" to "Load Specific Data".
- Switch the Data field to Expression mode and paste
{{ $json.ad_text }}. - Leave Text Splitting on "Simple".
- Still inside the Default Data Loader, click Add Option and choose Metadata.
- Click Add Property six times and fill each Name and Value pair as follows, switching each value that starts with
{{to expression mode first.source_typeset toadad_idset to{{ $json.ad_id }}page_nameset to{{ $json.page_name }}angleset to{{ $json.angle }}run_daysset to{{ $json.run_days }}reachset to{{ $json.reach }}
This step embeds the ad copy for semantic search and bundles angle, run duration, and reach into the metadata as supporting proof.
documents, the schema uses that default table intentionally.Step #10: Filter to ads with a destination
- Hover over the "Build ad rows" node and click the + on its output dot a second time. A second connection line appears, which is the start of the Shopify branch.
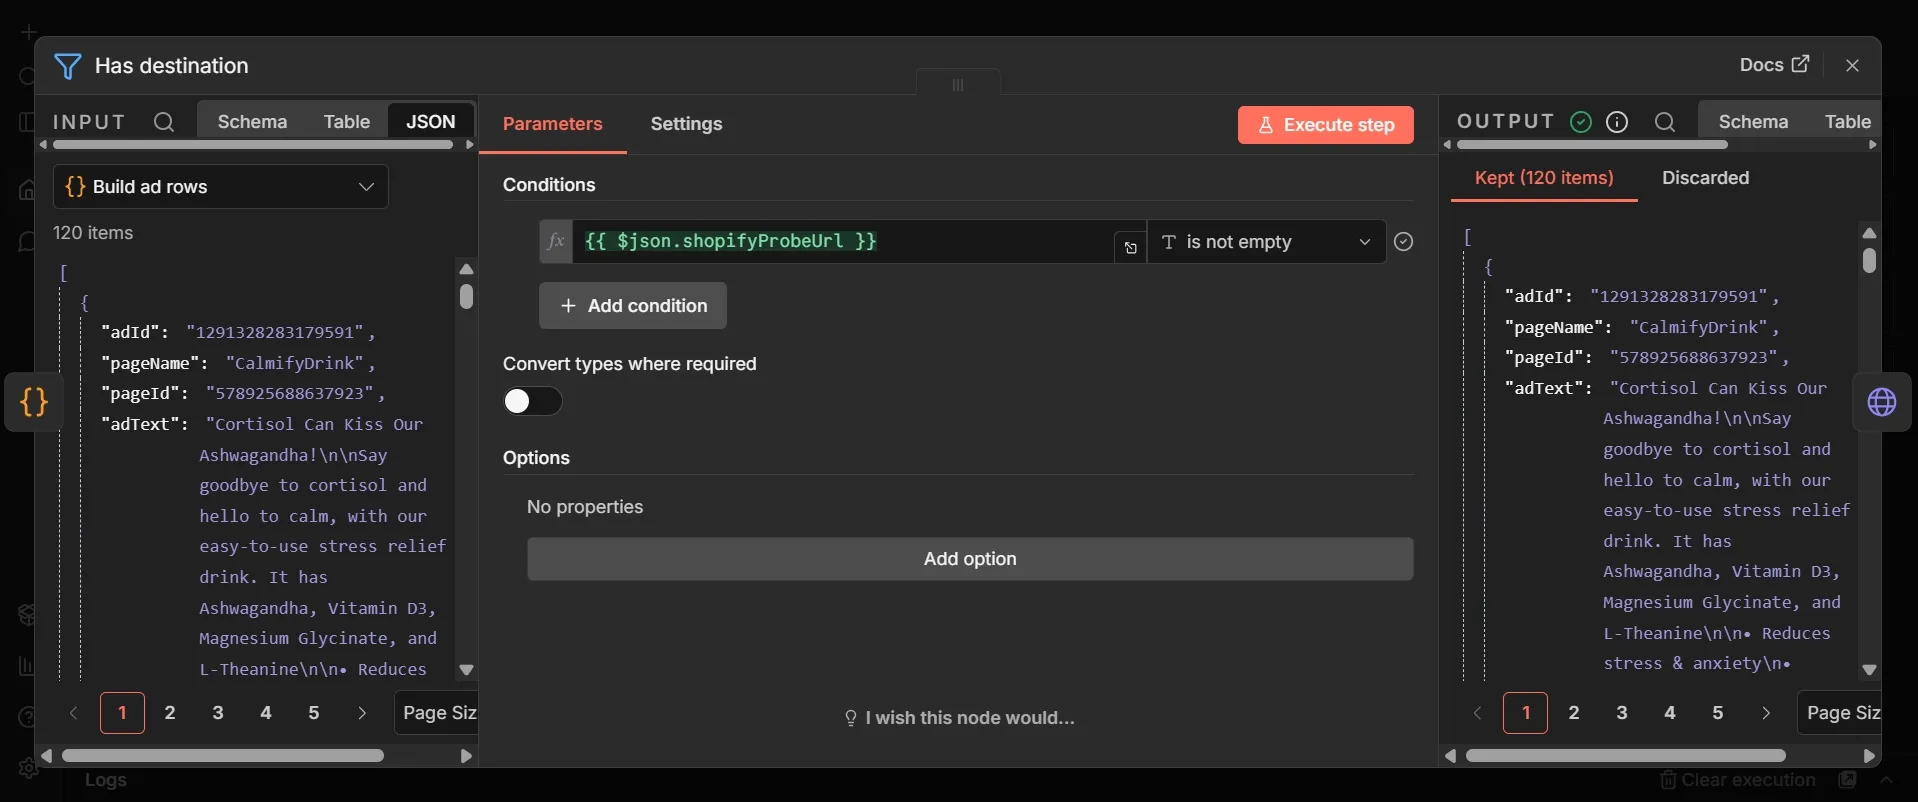
- Search "filter", select Filter, and rename it to "Has destination".
- Under Conditions, switch the left Value field to Expression mode and type
{{ $json.shopifyProbeUrl }}. - Set the data type dropdown to "String" and the operation dropdown to is not empty.
Only ads with a Shopify destination link can be matched to a store, so this step drops the rest before you waste any requests on them. Brand-awareness ads with no link simply stop here, though their copy and angle still reside in the ads table from the parallel branch.
Step #11: Check Shopify (HTTP Request) node
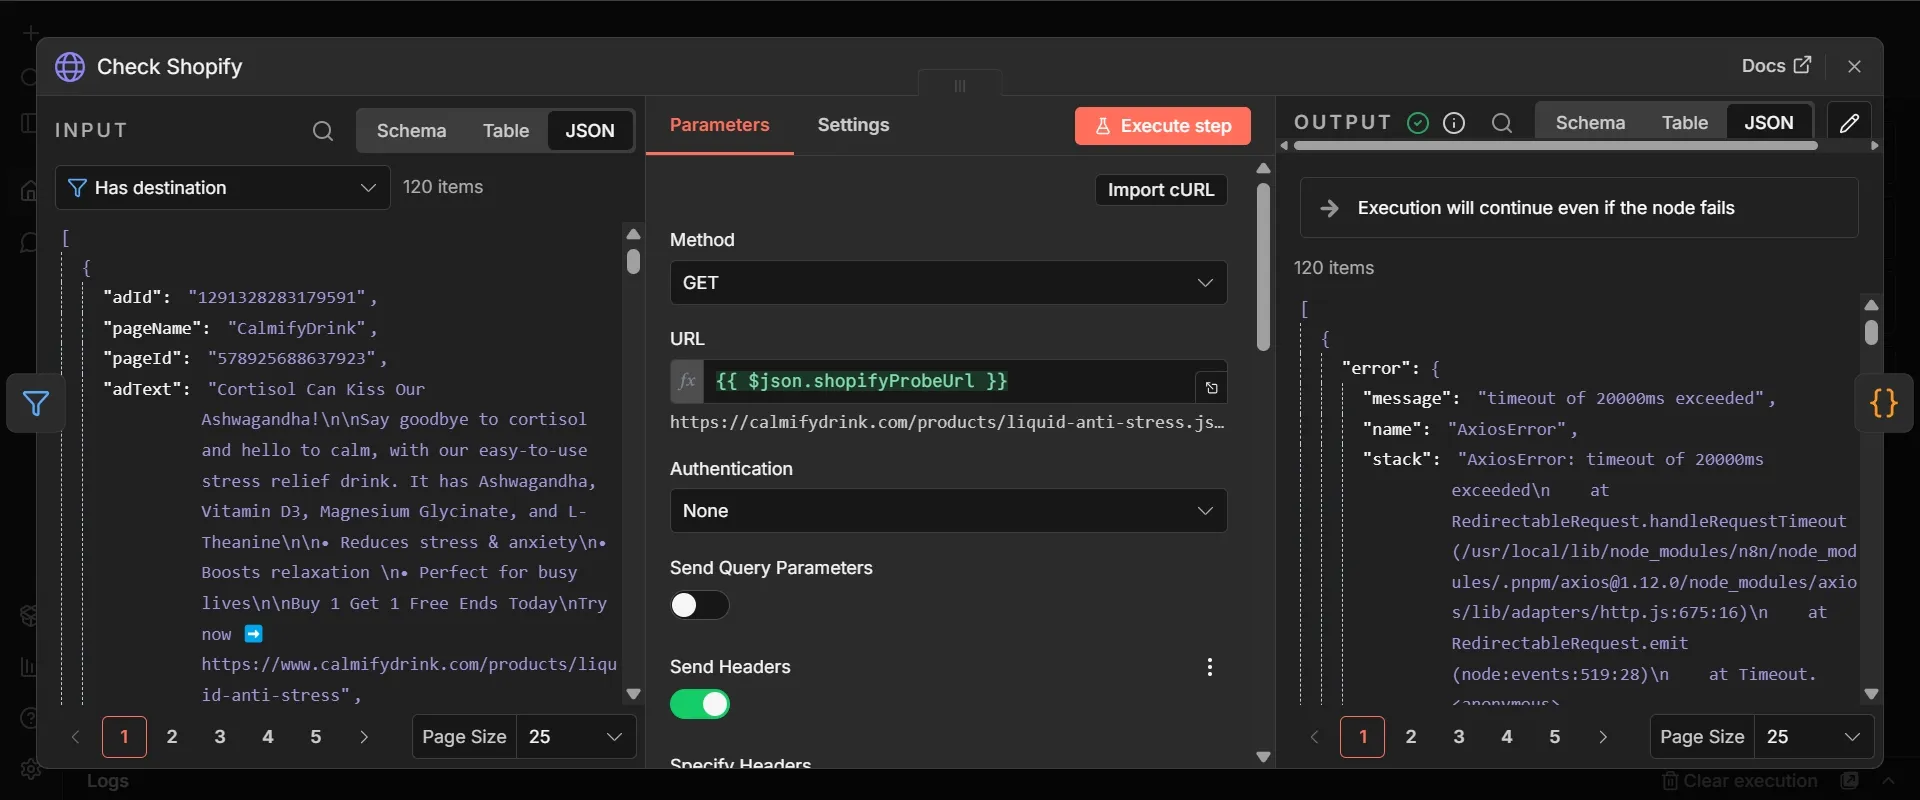
- Add an HTTP Request node after Has destination (search "http request"), and rename it to "Check Shopify".
- Set the Method dropdown to "GET".
- Switch the URL field to Expression mode and paste
{{ $json.shopifyProbeUrl }}. - Switch the Send Headers toggle to on, then click Add Parameter.
- Set the header Name to
User-Agent, and set its Value to a common browser string such asMozilla/5.0 (Windows NT 10.0; Win64; x64). - Scroll to Options and click Add Option, then choose Response.
- Set Response Format to "JSON".
- Click Add Option once more, choose Timeout, and set it to
10000, so dead domains fail within ten seconds instead of hanging the run. - Open the Settings tab and set On Error to "Continue".
This node queries each domain's products.json endpoint. Every Shopify store exposes data via products.json and per-product .json endpoints, so this call verifies the platform and fetches sample product data. Non-Shopify domains return errors or non-JSON payloads, which the next node drops.
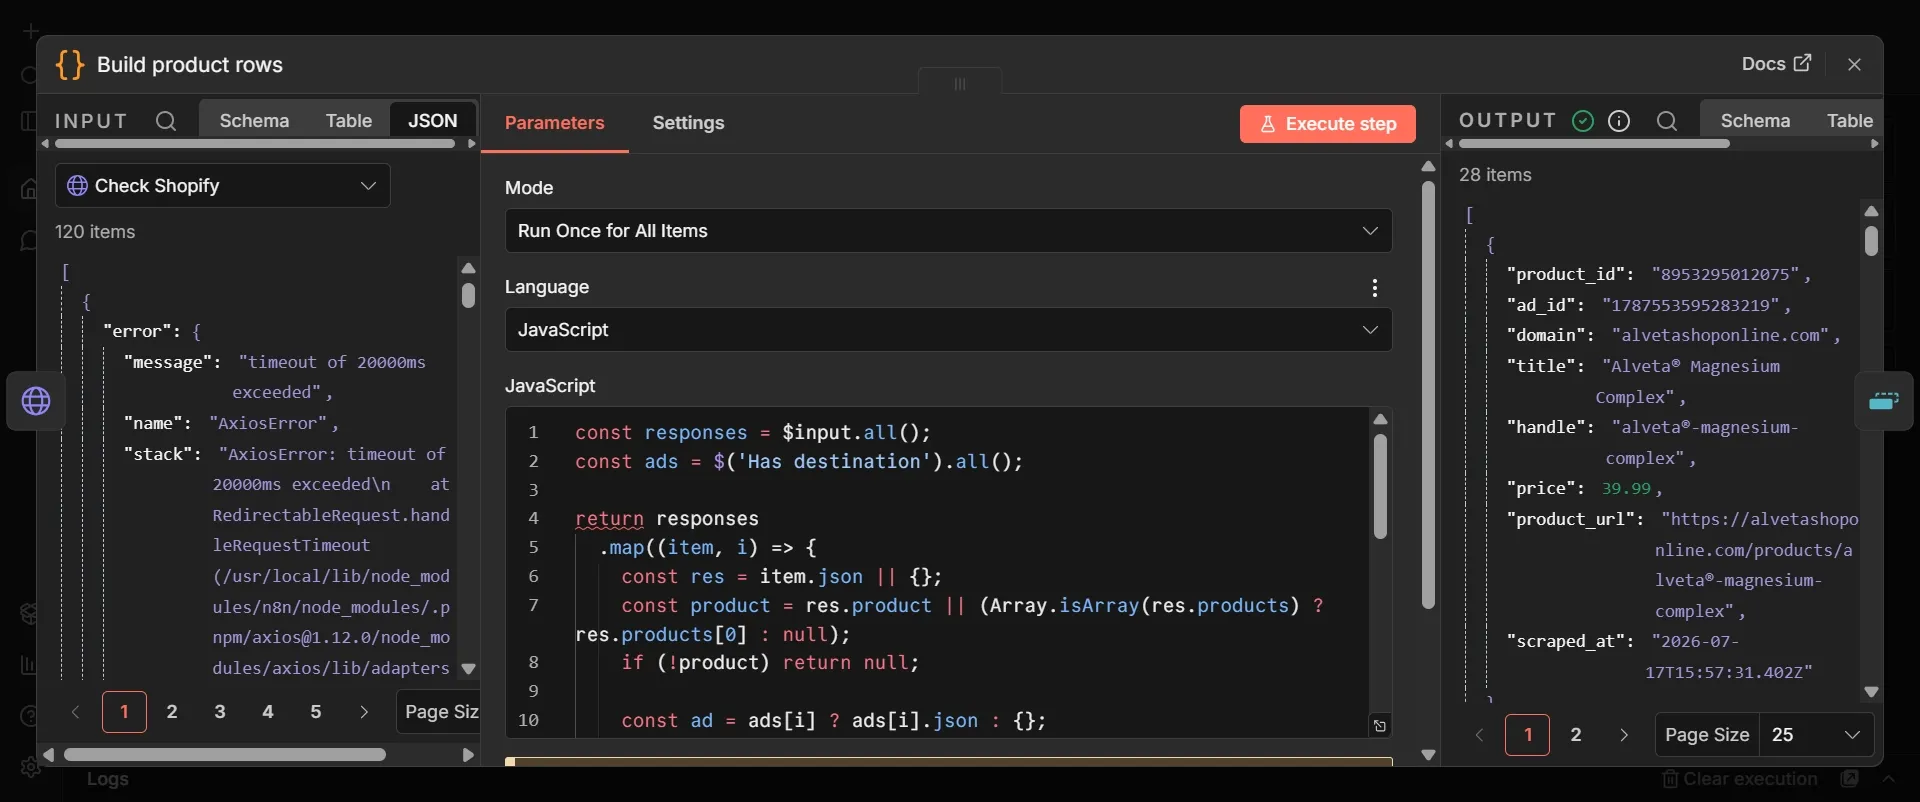
Step #12: Code node for product rows
- On the Check Shopify node, click the + on its output dot.
- Search
Codeand select the Code node. Rename it toBuild product rows. - Set Mode to "Run Once for All Items" and Language to "JavaScript".
- Select everything in the editor, delete it, and paste the code below.
const responses = $input.all();
const ads = $('Has destination').all();

return responses
  .map((item, i) => {
    const res = item.json || {};
    const product = res.product || (Array.isArray(res.products) ? res.products[0] : null);
    if (!product) return null;

    const ad = ads[i] ? ads[i].json : {};
    const variant = Array.isArray(product.variants) && product.variants[0] ? product.variants[0] : {};

    return {
      json: {
        product_id: String(product.id || ''),
        ad_id: ad.adId || '',
        domain: ad.domain || '',
        title: product.title || '',
        handle: product.handle || '',
        price: variant.price ? Number(variant.price) : null,
        product_url: ad.domain && product.handle ? `https://${ad.domain}/products/${product.handle}` : '',
        scraped_at: new Date().toISOString(),
      },
    };
  })
  .filter(Boolean)
Here, the node parses the HTTP response, handling both single-product objects and multi-product arrays to extract the title, handle, and first variant price. Because the HTTP Request node overwrites the incoming JSON, the code references the Has destination node by index to recover the original ad data. That works because the HTTP node preserves input-to-output item order, even on failed requests.
Step #13: Remove duplicate products
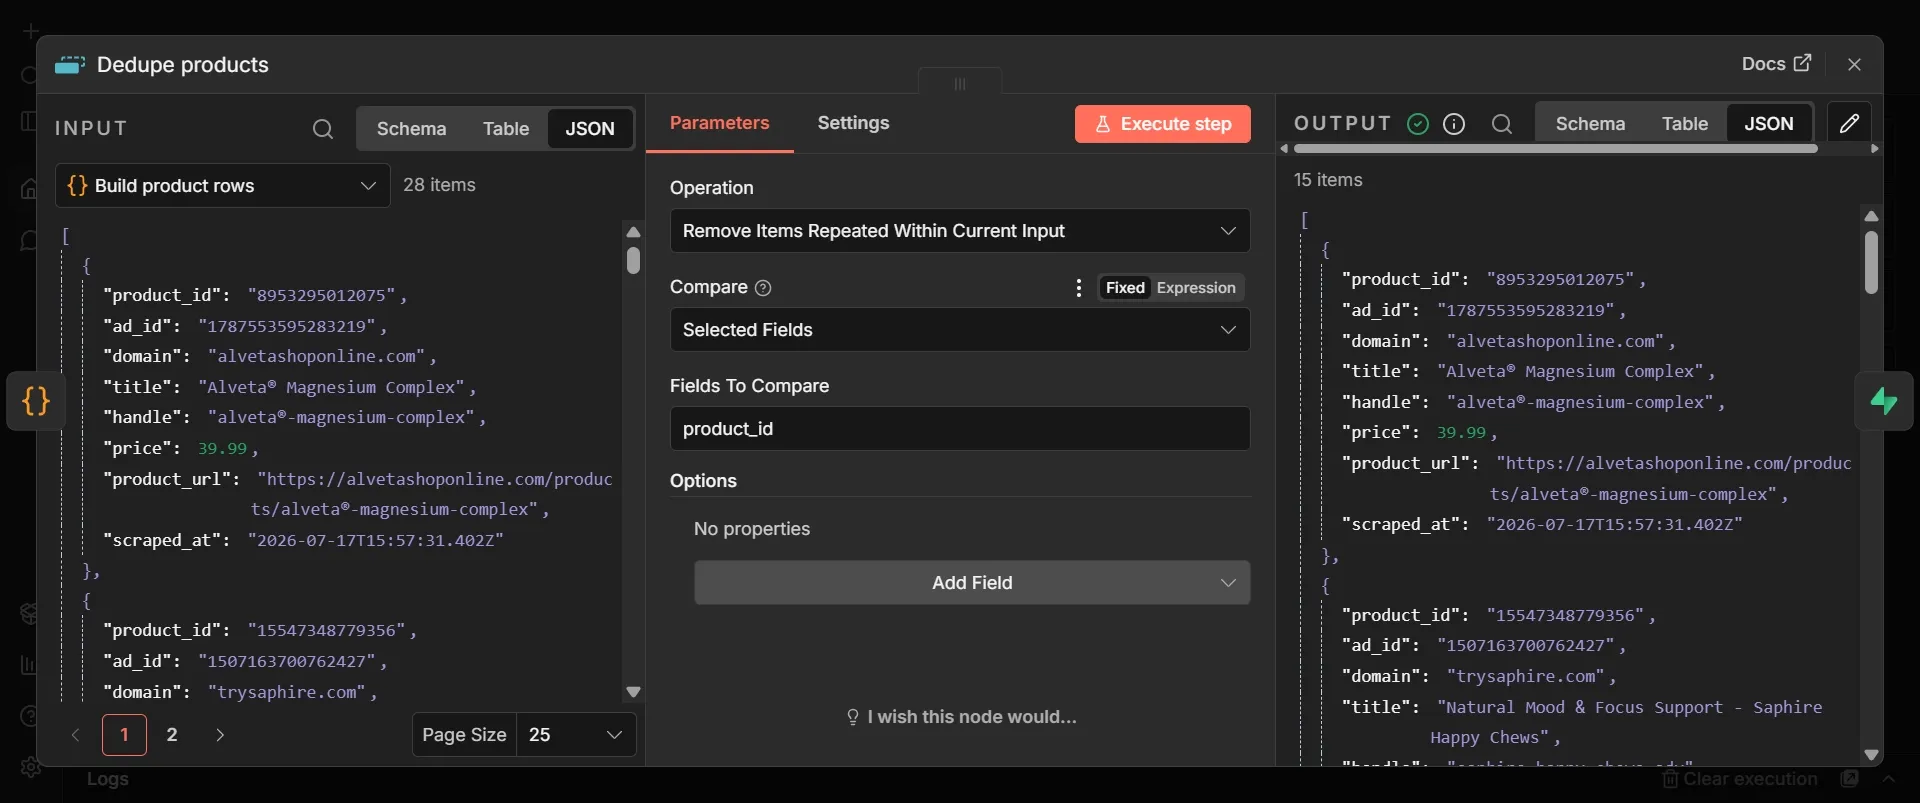
- Click the + on the right edge of Build product rows, type "remove duplicates" into the search panel, and select the Remove items repeated within current input action. Rename it to "Dedupe products".
- Set Compare to "Selected Fields" and enter
product_idin Fields To Compare. - Click Execute step and confirm the output collapses to one item per distinct product.
This node is a safeguard that prevents multiple ads from the same store from falling back to the same products.json item. A single batch of 100 responses might highlight a product with a specific product_id a dozen times. Without an explicit deduplication step, duplicate IDs will clash in the database during a batch insert. Deduplicating by product_id before the database node ensures each unique item is inserted and keeps the table clean.
Step #14: Create a row (Supabase) node for products
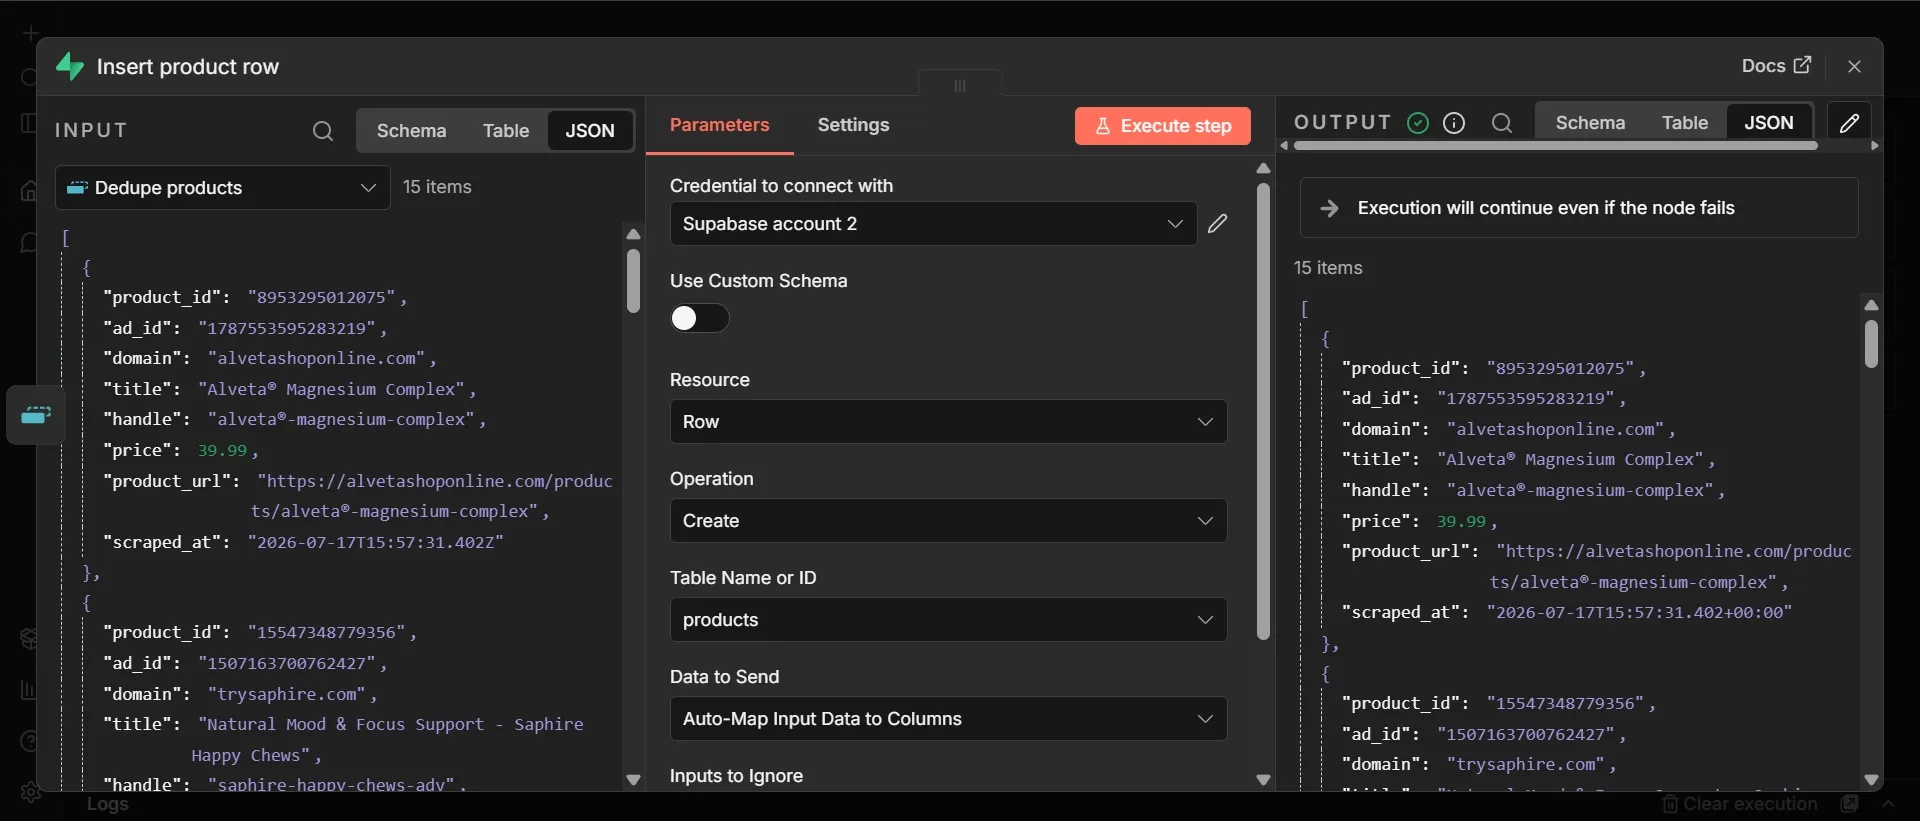
- On the Dedupe products node, click the + on its output dot.
- Search
Supabaseand select the Create a row operation. Rename it toInsert product row. - Click the Credential to open the dropdown, then select your existing Supabase credential.
- Click the Table field and select
productsfrom the list. - Set Data to Send to "Auto-Map Input Data to Columns". Build product rows already emits keys named exactly like the columns, so there's nothing to define.
- Open the Settings tab and set On Error to "Continue".
This node records the product associated with each ad. Just as with the Insert ad row node, a duplicate-key message during a re-run here is simply the skip mechanism in effect, not an error that requires fixing. If you also need to perform a clean test, truncate the tables first. With this in place, joining ads to products on ad_id reveals the full picture the tool was built to capture: the ad, its marketing angle, its signals, and the exact product it promotes.
Phase 4: Build the agent
This half turns the stored ads into a niche knowledge base you can talk to. It's a second workflow on the same n8n instance, built around an AI agent that uses the embedded ads as its memory.
Step #1: Add a chat trigger
- Save the original pipeline workflow with Cmd/Ctrl + S, then click Overview in the top-left corner to return to your workflow list and click Create Workflow.
- Click the new workflow's default name in the top bar and rename it to "Ad intelligence agent".
- On the blank canvas, click Add first step, search "chat", and select the trigger at the top of the results, marked with a lightning bolt.
- A Chat button appears at the bottom of the canvas.
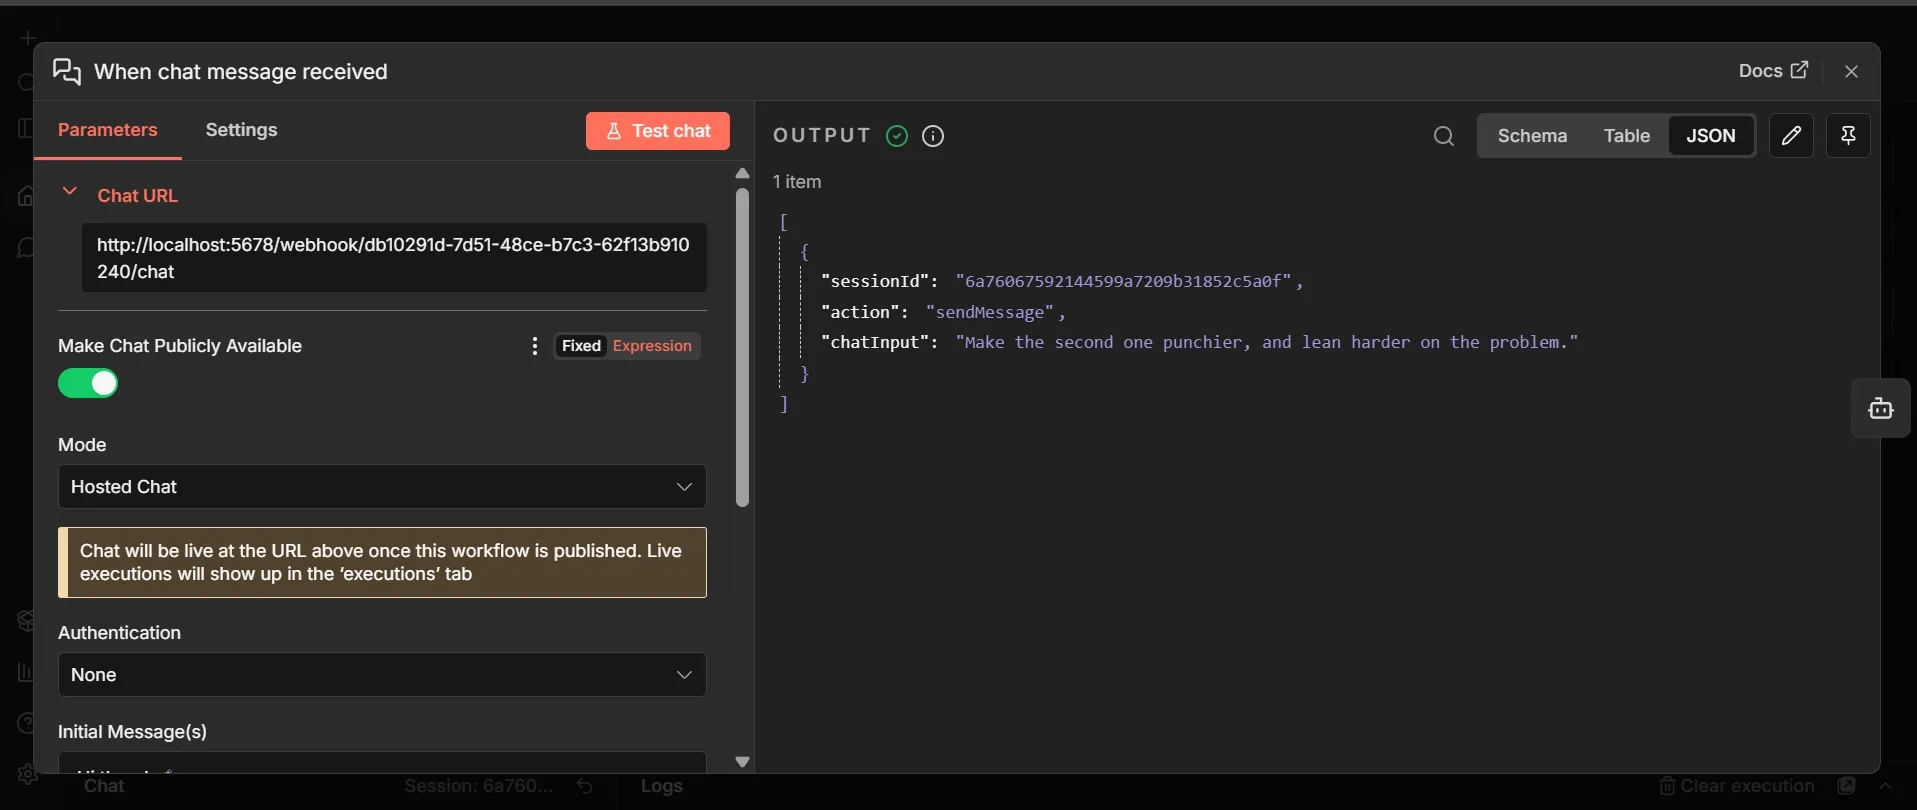
- Double-click the trigger to open it and switch the Make Chat Publicly Available toggle on.
- Note that the Chat URL it reveals goes live once you activate the workflow in Phase 5.
This trigger is the agent's front door, and it comes in two modes. The Chat button on the canvas opens a chat box inside the editor. Once you activate the workflow, n8n renders a standalone chat page at that URL. Anyone with the link can talk to the agent from their browser and get the same streamed answers.
Step #2: Add the AI Agent node
- On the chat trigger node, click the + on its output dot.
- Search
AI Agentand select the AI Agent node. - Leave the defaults alone.
- Scroll down to Options and click Add Option, then choose System Message.
- Paste the prompt below into the text box that appears.
You are an ad-intelligence assistant for a direct-to-consumer marketing team. You have a tool that searches a library of real Facebook ads, where each result includes the ad copy, the persuasion angle it uses, how many days it has been running, and its EU audience reach. Treat a long run as evidence the ad converts, since advertisers cut losers quickly.
You also have a leaderboard tool that returns the hard ranking of angles across the entire library by ad count, average days running, and average reach.
Reach is the second signal, and read the two together: a long run with high reach is the strongest evidence, a long run with very low reach is weak, and a short run with very high reach marks an aggressive new campaign worth watching even though duration alone would rank it last.
When asked what is working in a niche or for a topic, call the leaderboard first for the overall ranking, then search the library and summarize the winning angles with two or three short examples and their run_days and reach.
When asked to write or draft ad copy, first search for the closest high-evidence ads, then write fresh, original copy for the user's product modeled on the angles that are proven, never copying the source ads word for word.
Always name the angle you are using and cite the run_days and reach of the ads you drew from. If the library has nothing relevant, say so plainly.
This engineered prompt is what makes this an ad-intelligence agent rather than a generic chatbot. It tells the agent to read duration and reach together rather than leaning on either alone, keeps it to two clear jobs (reading the market and drafting from it), and makes it cite its evidence so its answers are verifiable.
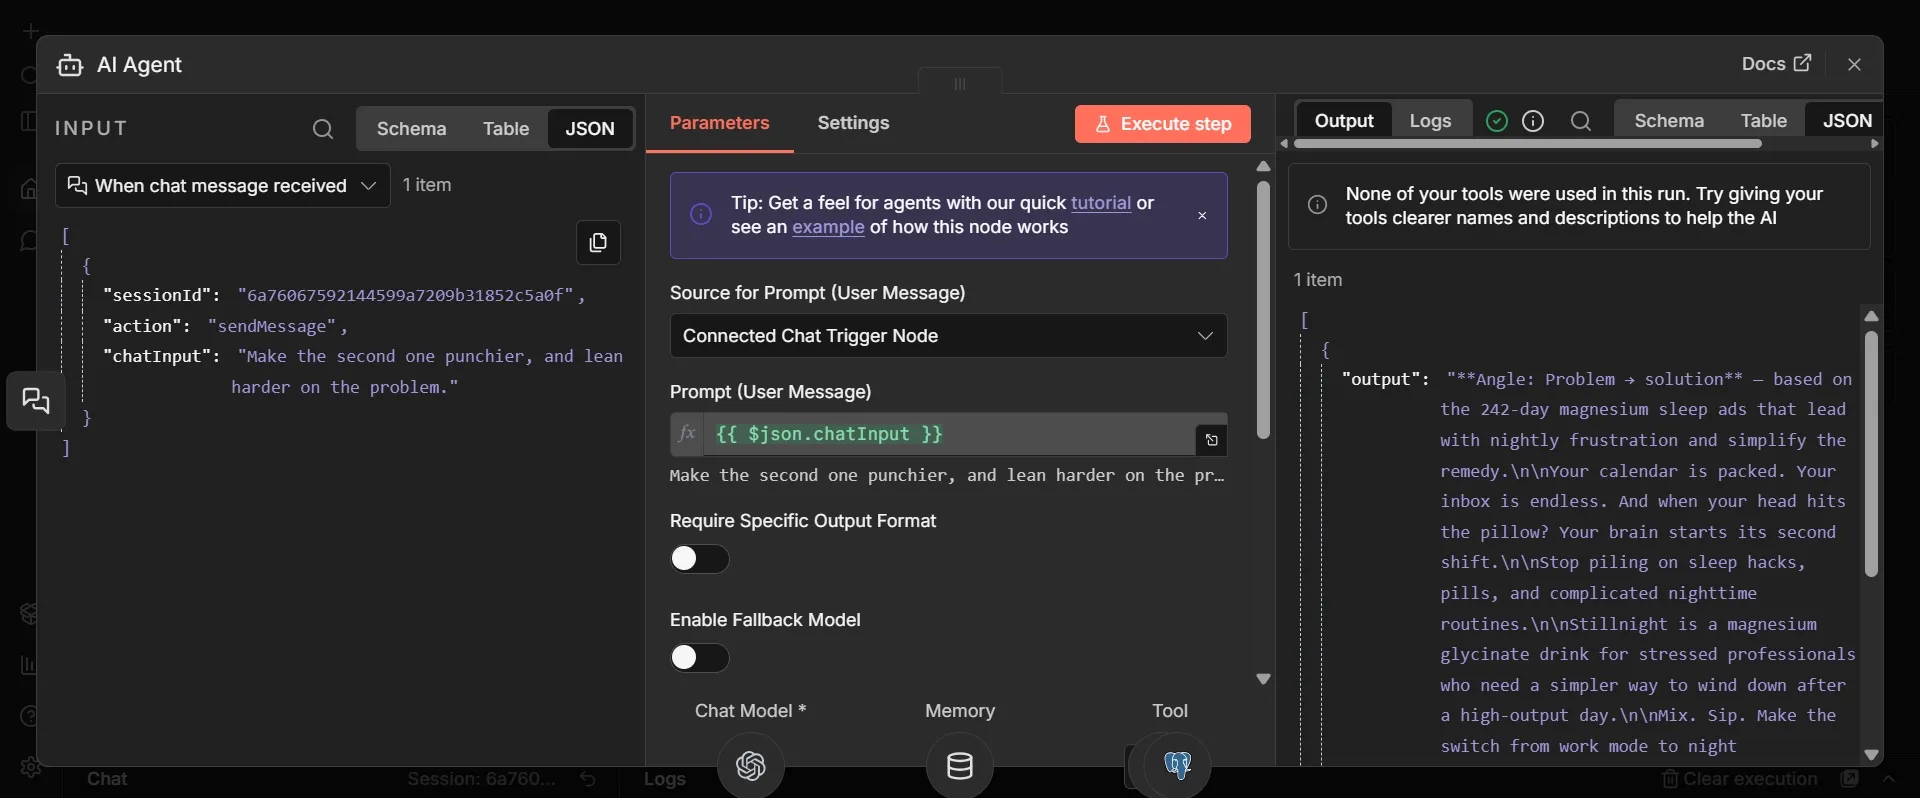
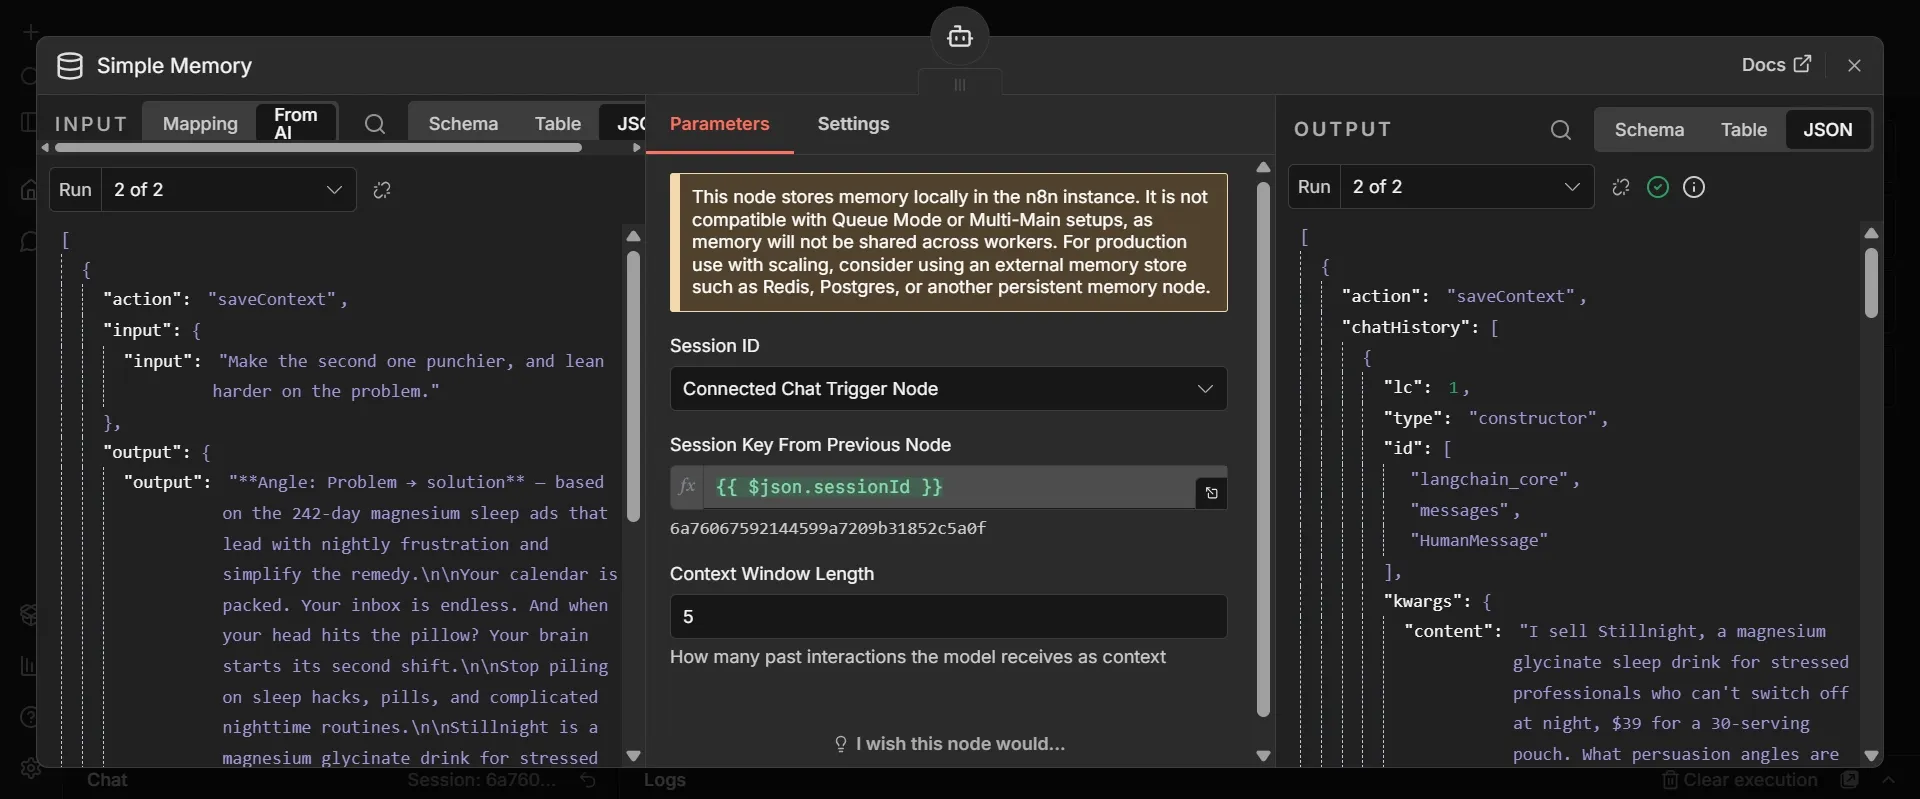
- Back on the canvas, click the + icon under the AI Agent's Memory connector, then add Simple Memory. Again, leave the defaults here as they are.
Memory stores context, making the chat feel more like a conversation. Without it, follow-up queries mean nothing to the agent.
Step #3: Attach the chat model
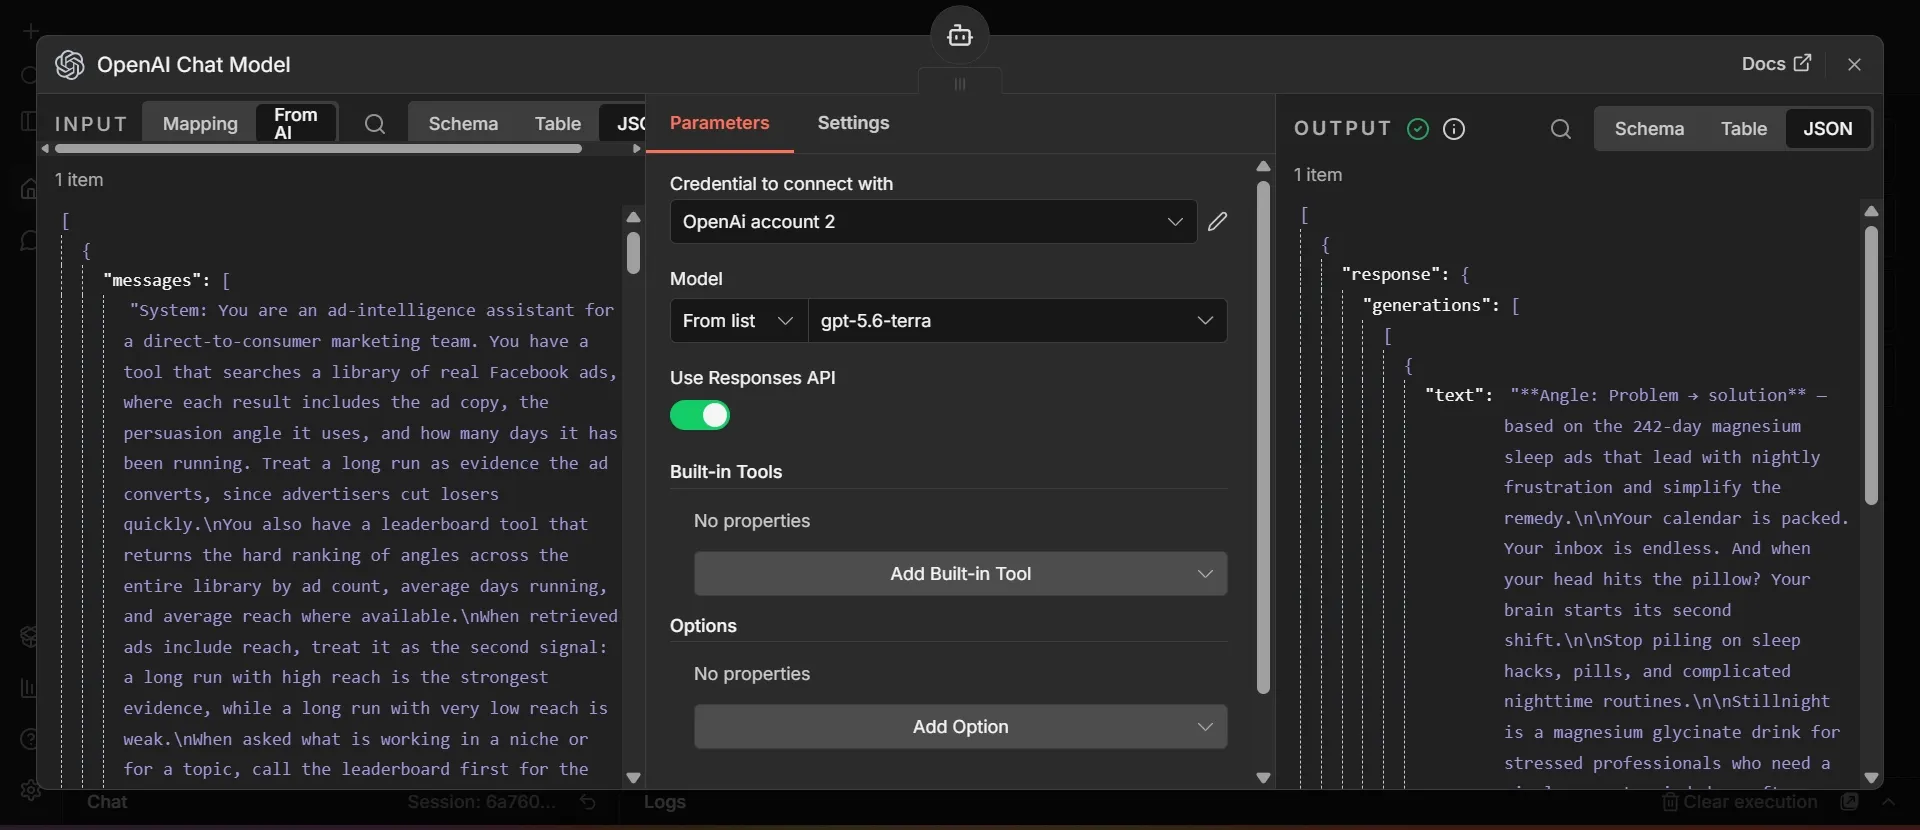
- Click the + under the AI Agent's Chat Model connector and add OpenAI Chat Model.
- Click the Credential to open the dropdown, then pick the OpenAI credential you created in Phase 3.
- Click the Model field and leave it on "From list".
- Type "terra" to filter the list and select "GPT-5.6 Terra".
The Terra model from OpenAI offers high quality at affordable pricing and is built for tool calling and complex workflows. You can switch to the Luna tier to reduce costs. Reuse your Phase 1 credentials to keep the entire architecture within a single provider account. If you prefer Claude for copywriting, replace this node with an Anthropic Chat Model using a Sonnet model and an API key from the Claude Console.
Step #4: Attach the ad library as a tool
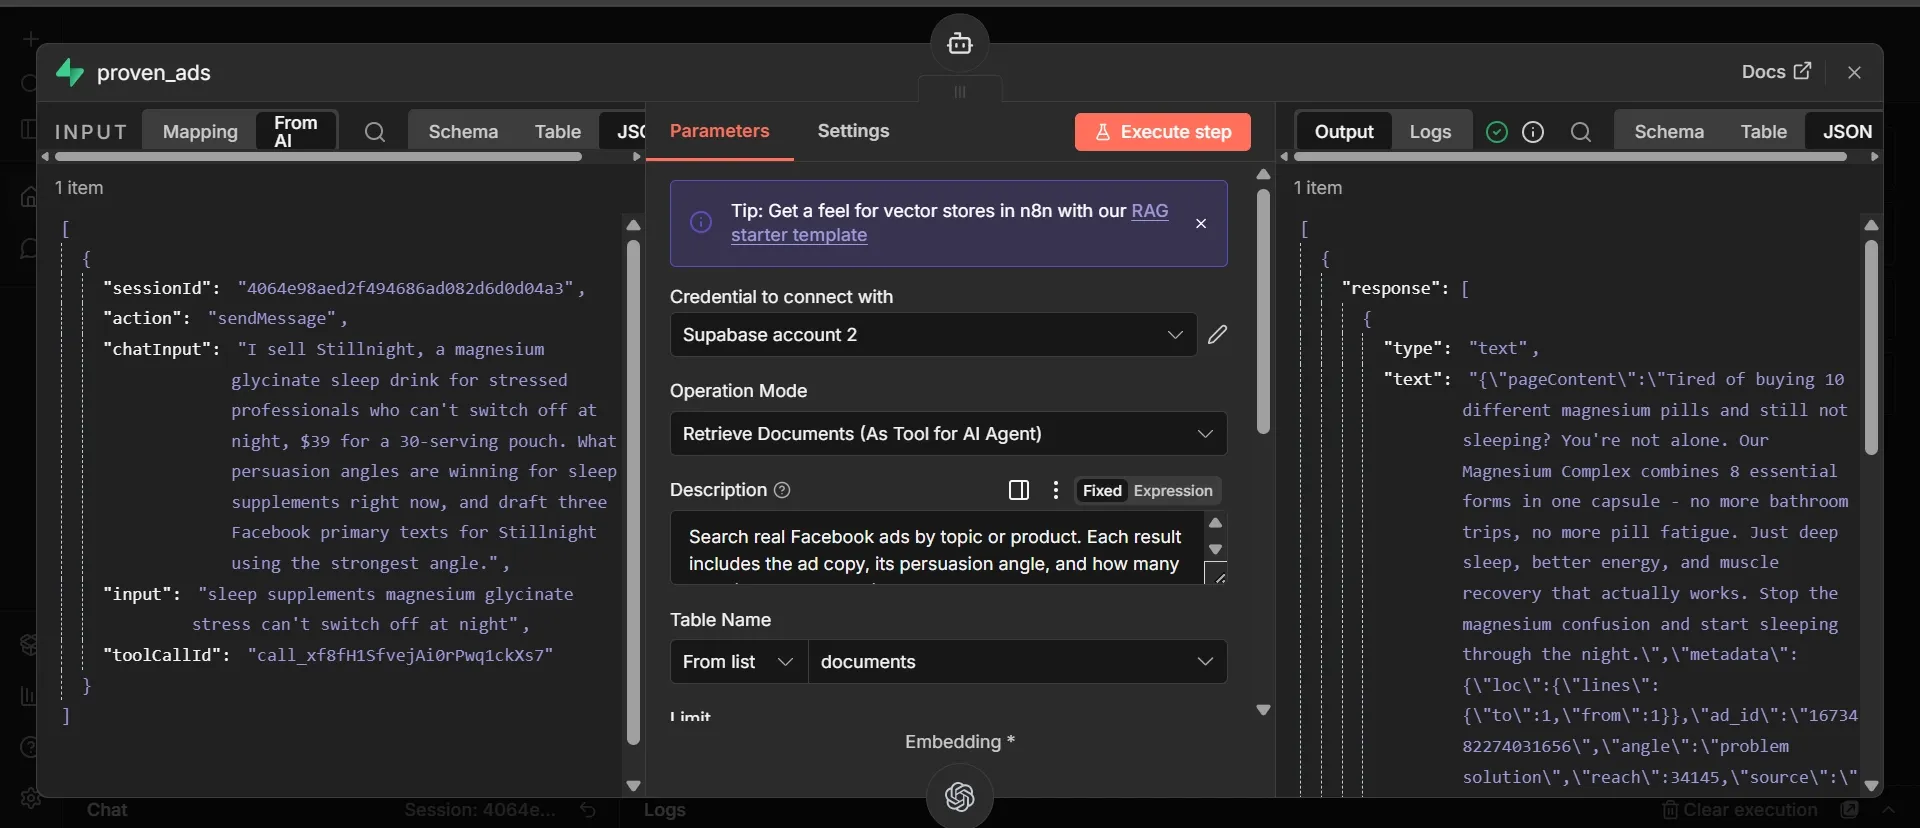
- Click the + under the AI Agent's Tool connector, search "supabase", select Supabase Vector Store, and pick the Retrieve documents for AI Agent as Tool action. Rename it to
proven_ads(letters and underscores only). - In its Description field, paste: "Search real Facebook ads by topic or product. Each result includes the ad copy, its persuasion angle, how many days it has been running, and its EU audience reach."
- Pick your Supabase credential and set Table Name to
documents. - Set the Query Name to
match_documents, the function from Phase 1 that runs the similarity search. If no Query Name field is visible, click Add Option, choose Query Name, and set it there. - If a Limit field is shown, raise it to
8, so the agent has enough ads to rank angles rather than judging a niche from four examples. - Click the + under its Embedding connector and add Embeddings OpenAI.
- Set the model to
text-embedding-3-smalland pick your OpenAI credential.
This is the agent's memory, attached directly as a tool. The description is what tells the agent when to reach for the library, and because you stored the angle, run duration, and reach in each embedding's metadata, every retrieved ad arrives with the proof the agent ranks and cites, with no intermediate model summarizing it. first.
Step #5: Attach the angle leaderboard as a second tool
- Click the + under the AI Agent's Tool connector again, search "postgres", and select Postgres Tool from the Other Tools section. Rename it to
angle_leaderboard. - Click the Credential to open the dropdown, then choose Create New Credential.
- In your Supabase project, click the green Connect button in the top bar.
- In the dialog that opens, select the Session pooler connection type.
- Click View parameters to see the values individually: a host that looks like
aws-0-us-east-1.pooler.supabase.com, port5432, databasepostgres, and a user ofpostgresfollowed by your project's reference ID. Copy each into the matching n8n field, and keep the user intact. - Set Password to the database password you chose when creating the project in Phase 1. This is not the service_role key. If you didn't save it, reset it from the Reset database password link shown right in the Connect dialog next to the password placeholder.
- Set SSL to "Require", then click Save and wait for the green connection test.
- Set Operation to "Execute Query" and paste the query below into the Query field.
select angle,
       count(*) as ad_count,
       round(avg(run_days)) as avg_days_running,
       max(run_days) as longest_running,
       round(avg(reach)) as avg_reach
from ads
group by angle
order by avg_days_running desc;
- Find the tool description setting, set it to "Set Manually", and paste: "Returns the hard ranking of persuasion angles across the entire ad library, with ad count, average days running, longest run, and average reach for each angle. Call this for any questions about what is working overall."
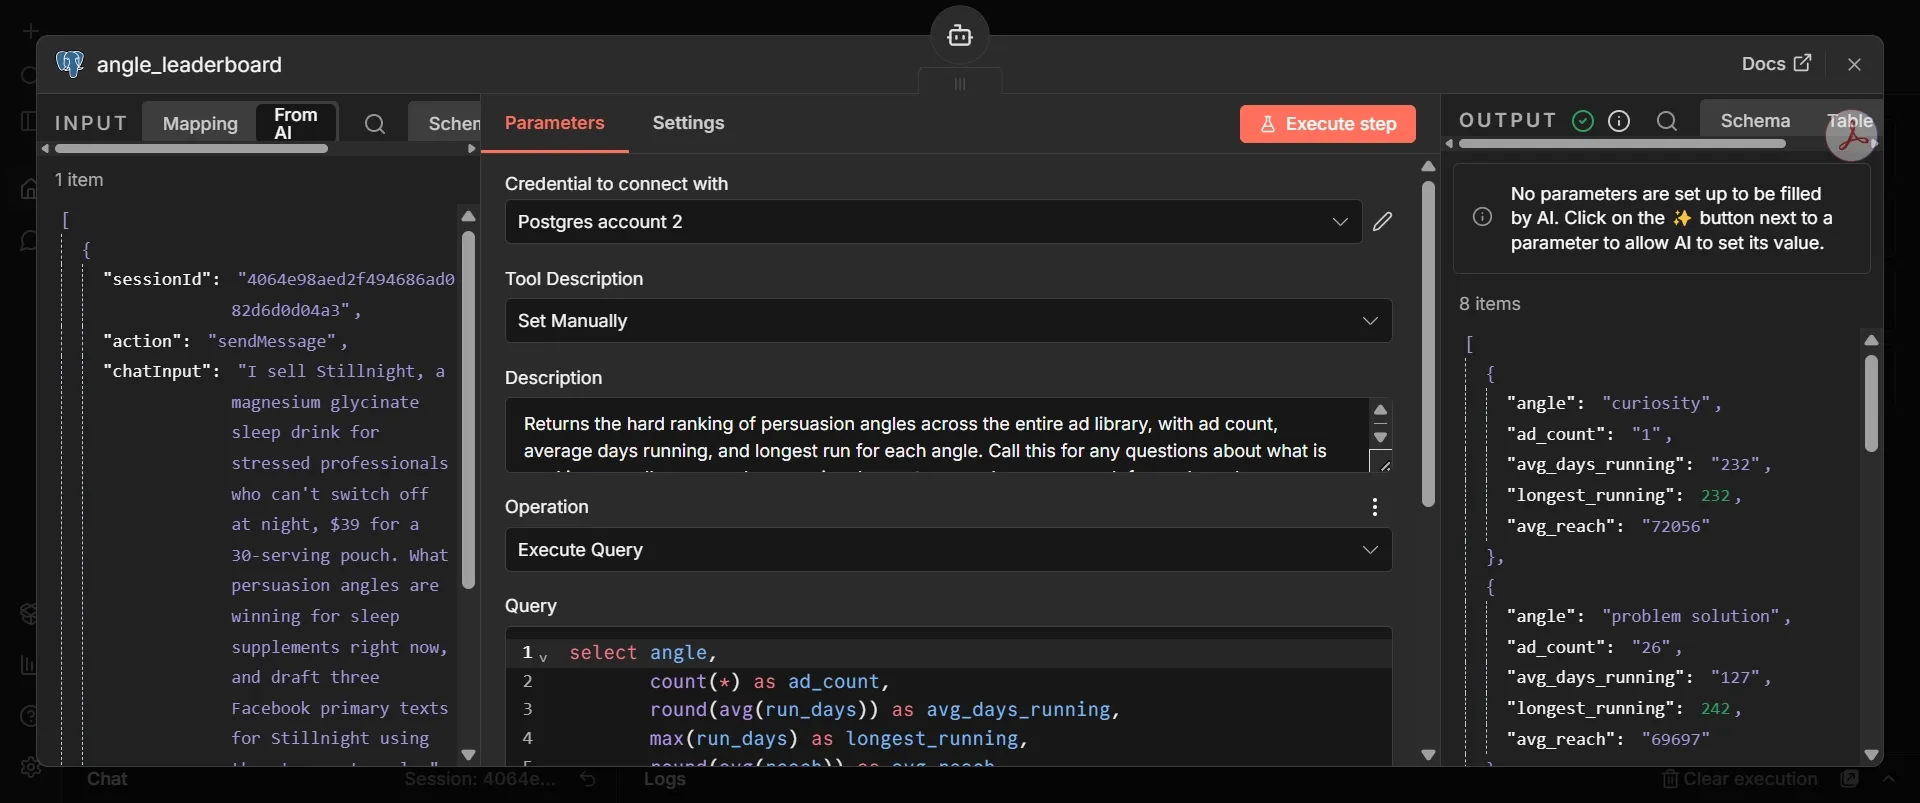
Semantic search finds relevant examples. This tool ranks them. With both attached, the agent leads with the leaderboard and backs it up with cited ads, and the numbers refresh on every scheduled run.
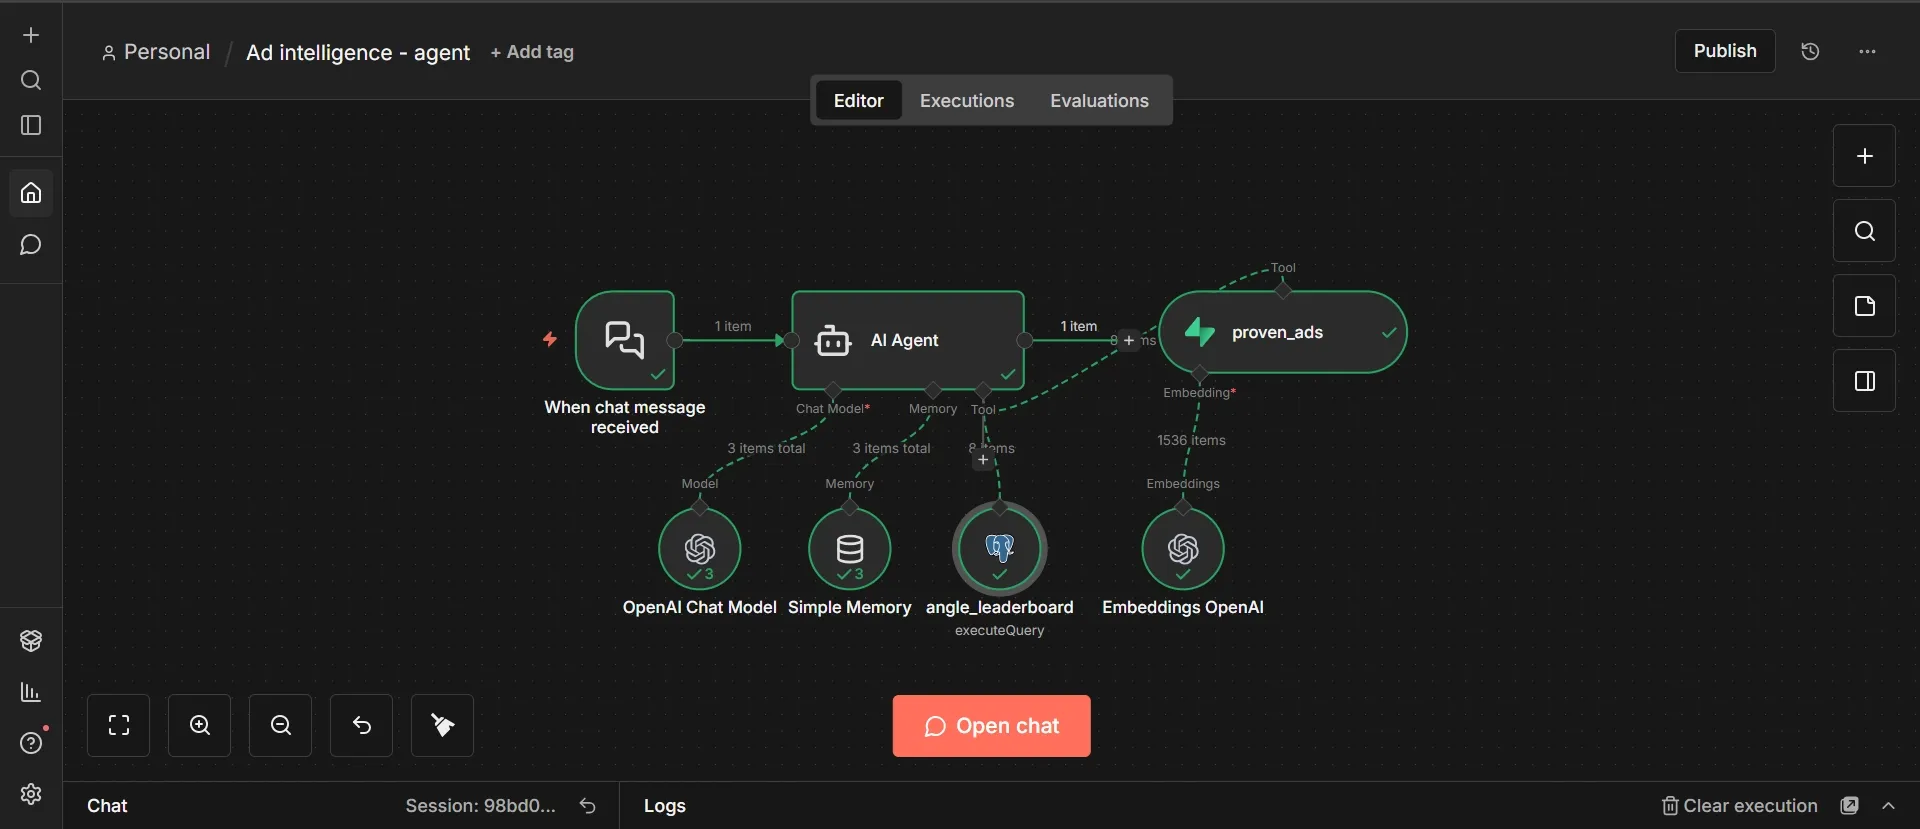
Phase 5: Test and publish
Step #1: Run the ingestion workflow
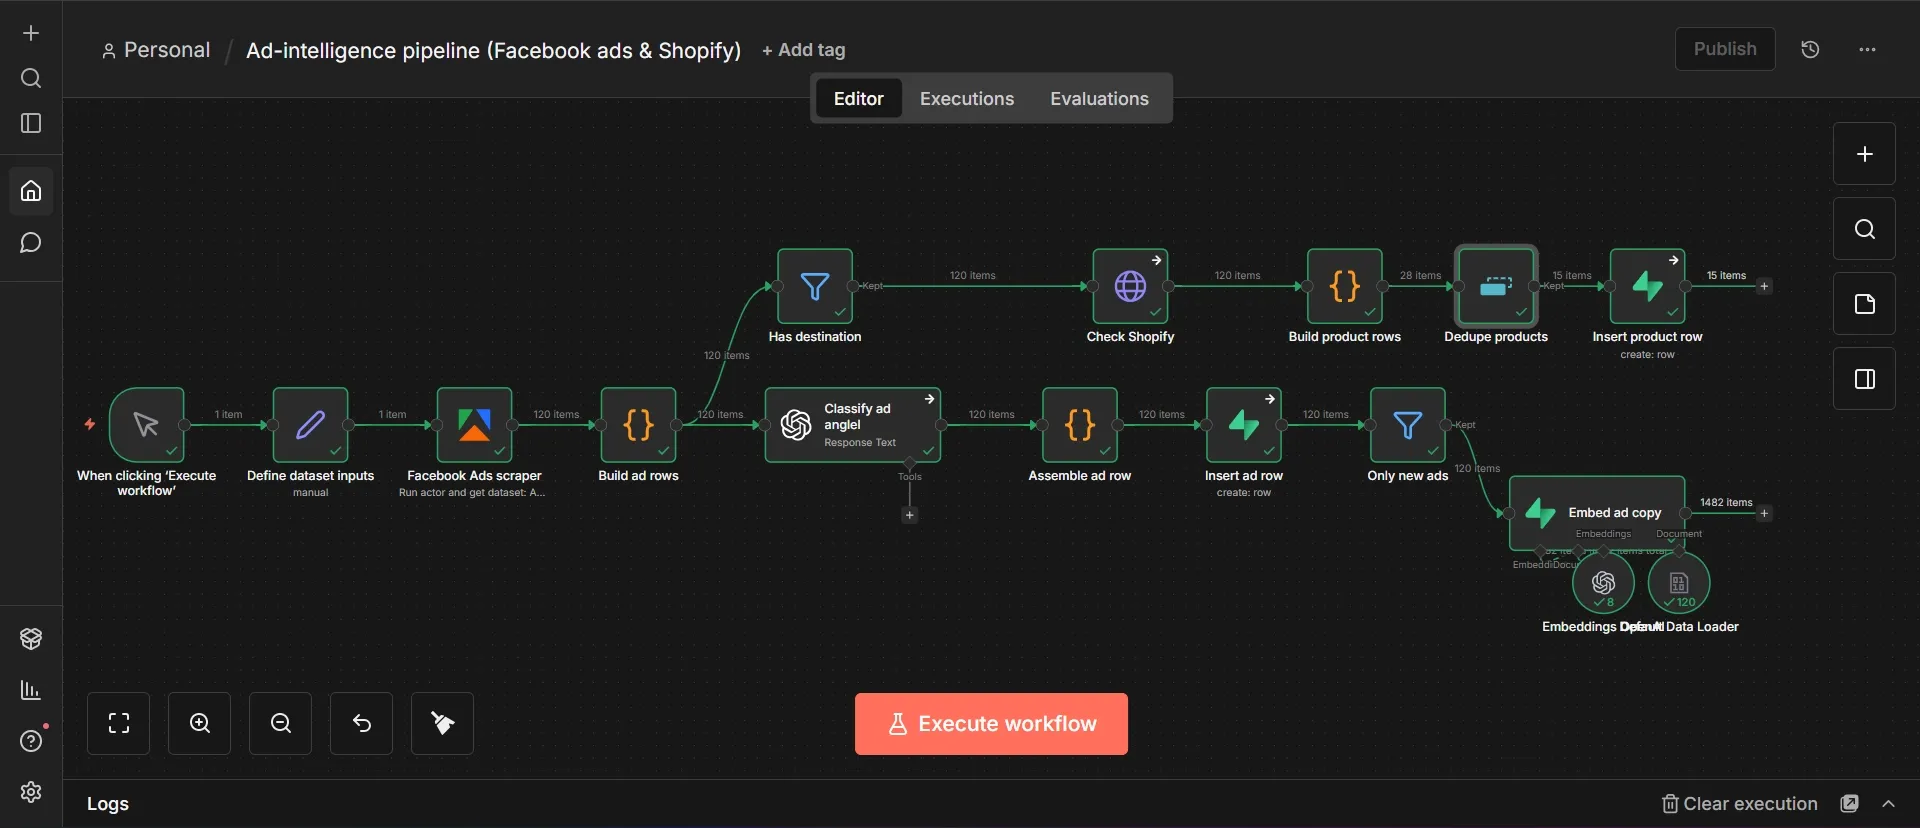
- Open the pipeline workflow and click the Execute Workflow button at the bottom center of the canvas.
- Watch the nodes light up and turn green in sequence.
- When the canvas settles, read the edges: every connection should be green with an item count, and every node should wear a green checkmark.
A green run that fills the tables means the path works end-to-end, from the Ad Library through to labeled, embedded ads with their reach figures and products attached.
Step #2: Check the tables
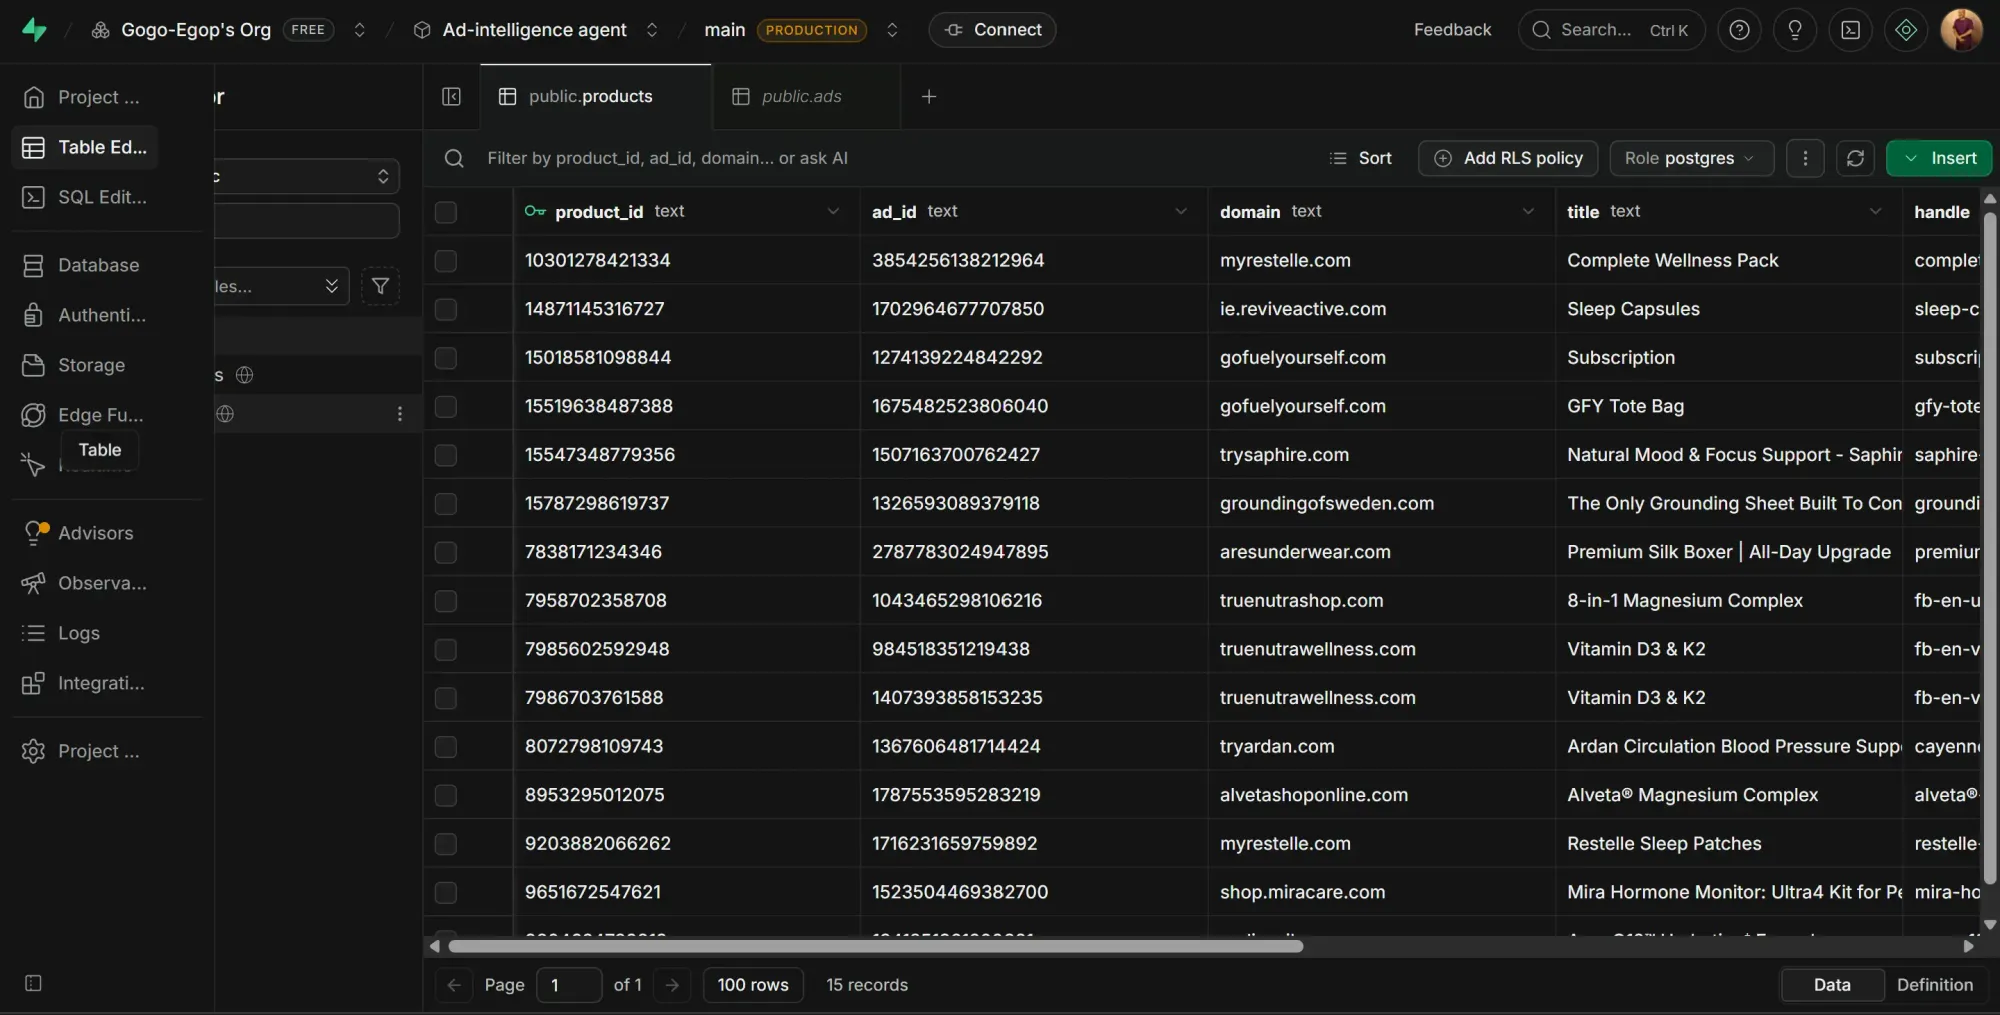
- In the Supabase left sidebar, click Table Editor and select
adsfrom the table list. You should see one row per ad, each with anangle, arun_days, areach, and its copy. - Select
products. You should see the Shopify products behind the ads that link to a store, each with apriceand anad_idthat matches a row inads. Expect far fewer rows here than inads: the table holds one row per distinct product, not per ad, and a niche sorted by impressions is often dominated by a few brands running many creative variants. - Select
documents. You should see rows tagged withsource_typeset toadin themetadatacolumn, and more rows than you have ads, since long ad copy splits into several chunks that each carry the same metadata.
Step #3: Rank the angles by the two signals
- Click SQL Editor in the Supabase sidebar, then click New query.
- Paste the query below and click Run.
select angle,
       count(*) as ad_count,
       round(avg(run_days)) as avg_days_running,
       max(run_days) as longest_running,
       round(avg(reach)) as avg_reach
from ads
group by angle
order by avg_days_running desc;
- For the per-advertiser view behind those averages, run one more:
select page_name, run_days, reach
from ads
order by reach desc
limit 10
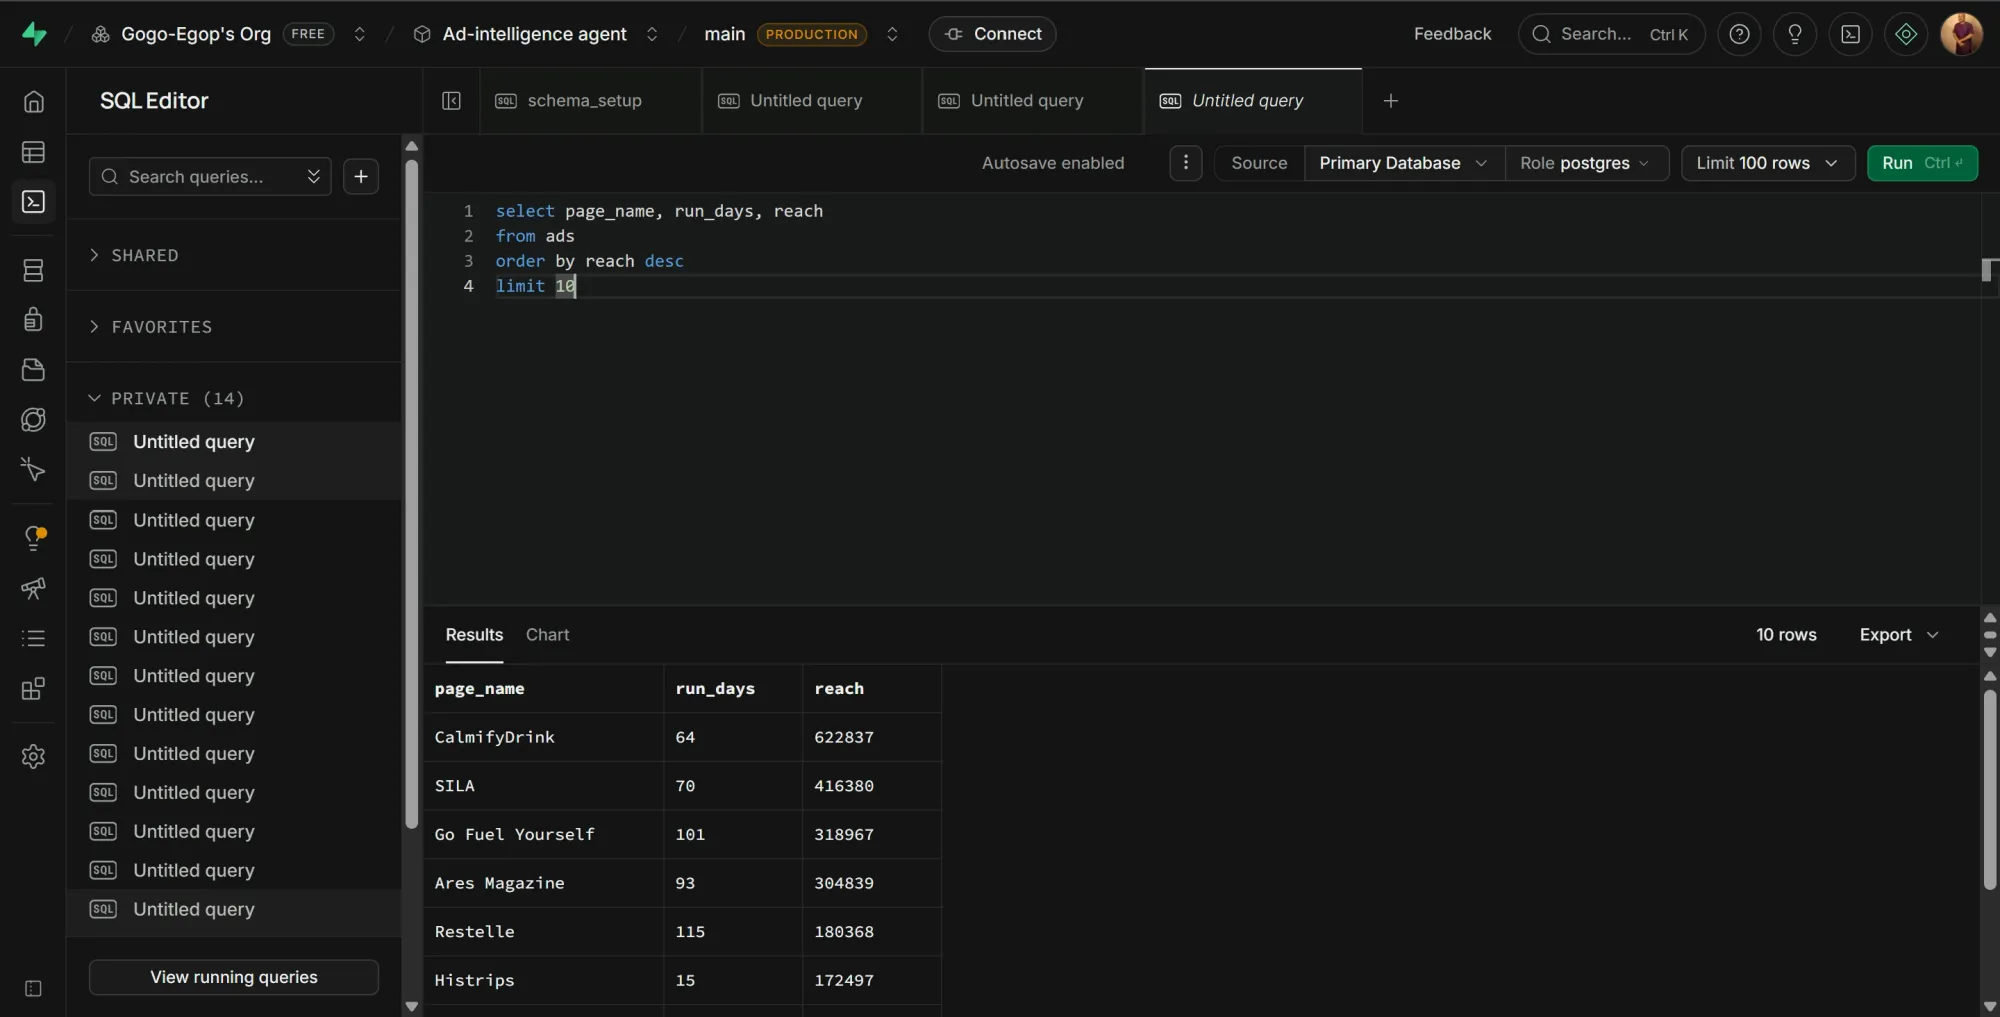
An ad that has run for months has survived the advertiser's own testing, which is the closest thing to a public profitability signal you'll get. The EU scraper setup has detail scraping turned on, so you’ll find substantial data in the avg_reach column.
The second query demonstrates the true power of tracking two separate signals. If you only track duration, you'll miss the brand-new ads that are spending massive amounts of money right now. If you only track reach, you'll miss the steady, long-running ads that have proven profitable over several months. You need both measurements because each one reveals a completely different type of success that the other metric is blind to.
Step #4: Ask the agent
- Open the agent workflow and click the Chat button at the bottom of the canvas.
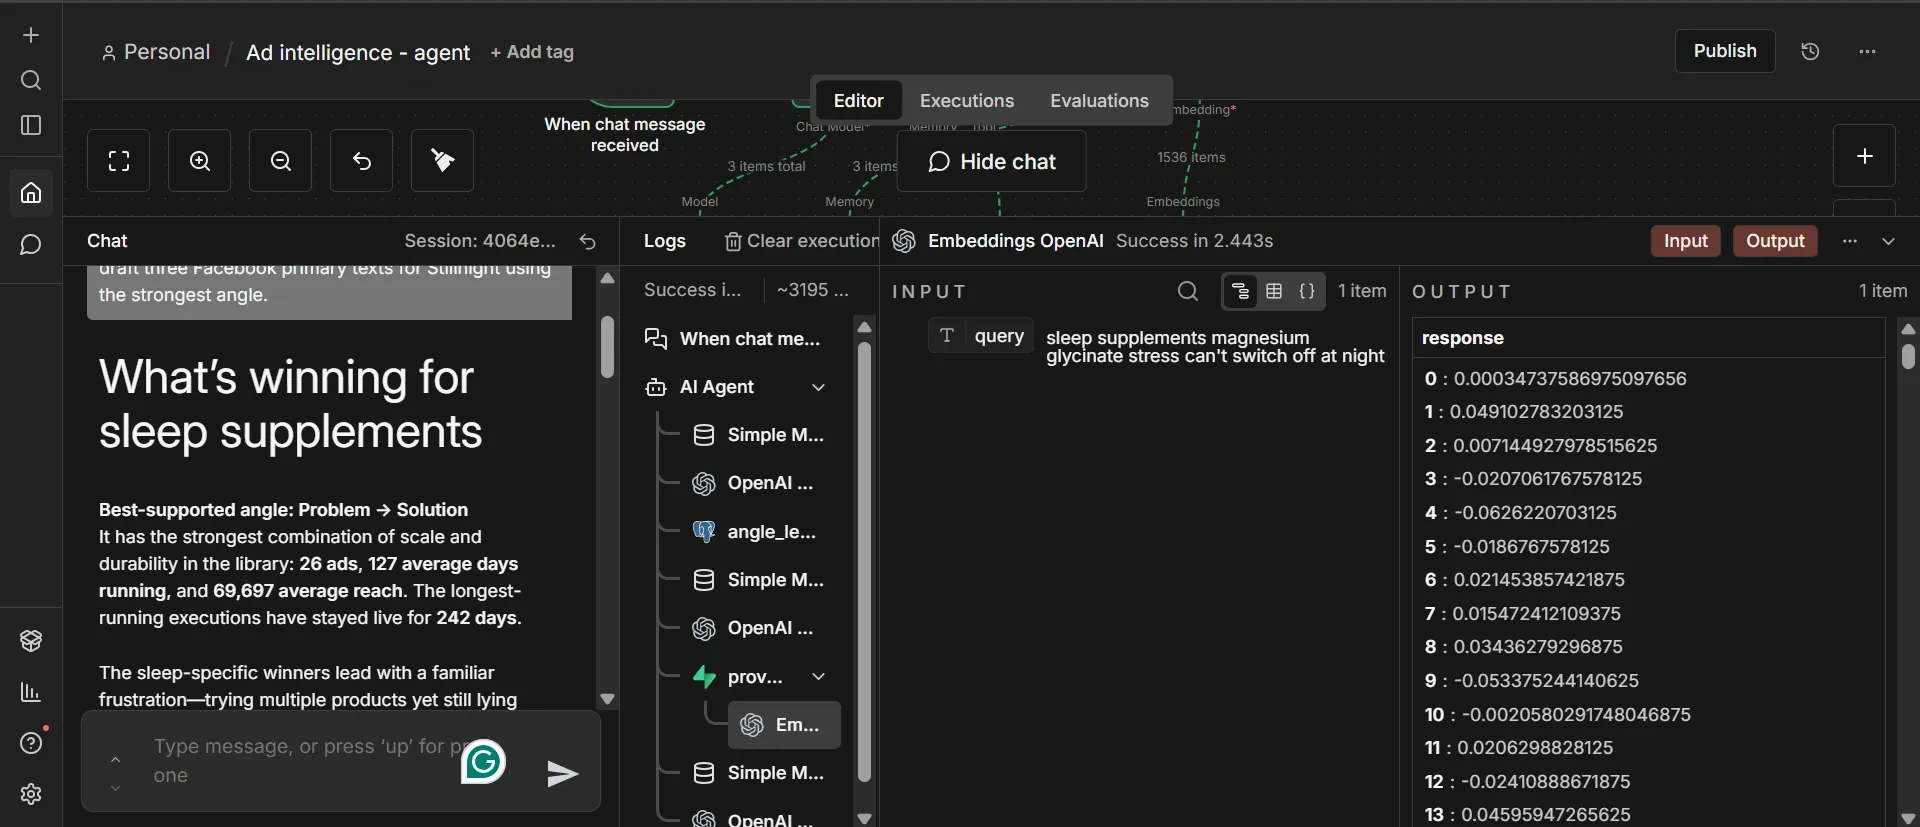
- Enter a real prompt, the kind a marketer would actually use with a product, an audience, and a price, something like this: "I sell Stillnight, a magnesium glycinate sleep drink for stressed professionals who can't switch off at night, $39 for a 30-serving pouch. What persuasion angles are winning for sleep supplements right now, and draft three Facebook primary texts for Stillnight using the strongest angle."
- While the agent reasons, watch the Logs pane that opens alongside the chat at the bottom of the canvas. Expand the AI Agent entry, and you should see angle_leaderboard fire before proven_ads.
- Then test the conversation itself with a follow-up: "Make the second one punchier, and lean harder on the problem." The agent should revise that specific draft, because Simple Memory is holding the thread.
The specificity of the prompt isn't just decoration. A product name and audience give the drafts something to personalize against; asking for the strongest angle forces the leaderboard call; the results after the follow-up prove that the memory node works.
Step #5: Share the agent
- Save the agent workflow.
- Flip the Inactive toggle in the top-right corner of the editor to Active.
- Open the chat trigger node and copy the Chat URL.
- Open that URL in a new browser tab to confirm the hosted chat page loads, then send the link to your team.
The public page displays the agent for direct use. There’s no separate hosting or cost; n8n serves the page itself. Consequently, the link only works where your n8n instance is live. If you’re running locally on Docker, it’s restricted to your machine. Once you switch to a live server, the link becomes available on the internet.
Step #6: Publish on a schedule
- Open the pipeline workflow.
- Press Cmd/Ctrl + S to save your completed workflow canvas.
- Click the Inactive toggle in the top-right corner of the screen to switch it to Active.
- Confirm the activation when prompted to set your scheduled pipeline live.
Summary
Your pipeline scrapes Meta ads, identifies marketing angles, matches Shopify products, and stores the embedded data in Supabase. Its AI agent uses that data to rank winning angles by ad longevity and reach, drafting fresh copy grounded in real market performance.
Because Meta hides spend data for commercial ads, run duration, and EU reach serve as your performance proxies. While neither metric is flawless (duration can overvalue old awareness campaigns, and EU reach ignores global spend), combining them offers the best odds of spotting balanced, effective winning angles.
Don't rely on guesswork for your creative strategy. Use the Facebook Ad Library Scraper on Apify to pull live competitor ads, EU reach metrics, and run-duration signals directly into your own AI workflows.
Get $5 free monthly credits when you sign up for Apify today
FAQs
Does the Facebook Ad Library show how much an advertiser spends on an ad?
Only for political and issue ads. For regular product ads, the Ad Library displays the visuals, copy, start date, and platforms, but hides spend and impression data. The only exception is the EU, where the Digital Services Act requires ads to disclose estimated reach.
Why is run duration a good proxy for ad performance?
Advertisers rarely keep paying for ads that fail to convert, making campaign duration the most useful public signal available since Meta hides commercial ad spend.
How can you tell if a website runs on Shopify?
A reliable shortcut is adding /products.json to the end of the store's domain name. Most standard Shopify stores automatically output structured product data at this endpoint. However, this method isn't foolproof, since stores on custom or headless storefronts and stores with the endpoint disabled won't respond to it.
How much does it cost to scrape 100 Facebook ads?
The Facebook Ad Library Scraper used in this tutorial charges $0.75 per 1,000 ads, so 100 ads cost about $0.08. Turning on scrape ad details for the EU reach data doesn't change the price. Apify's free plan credits cover this run several times over.