With the sheer volume of information available online, it's time-consuming to sift through multiple websites daily. Hence the need for a streamlined approach to information aggregation and distribution.
In this tutorial, you’ll learn how to build a web scraper that scrapes articles daily from 4 different platforms, displays the results in a Next.js application, and sends daily updates on the latest articles to subscribers' email addresses using Resend.com.
Prerequisites
You'll need the following knowledge and tools:
- Node.js installed on your machine
- An Apify free account
- A Resend.com account
- A basic understanding of TypeScript or JavaScript
How to build a news aggregator with Apify
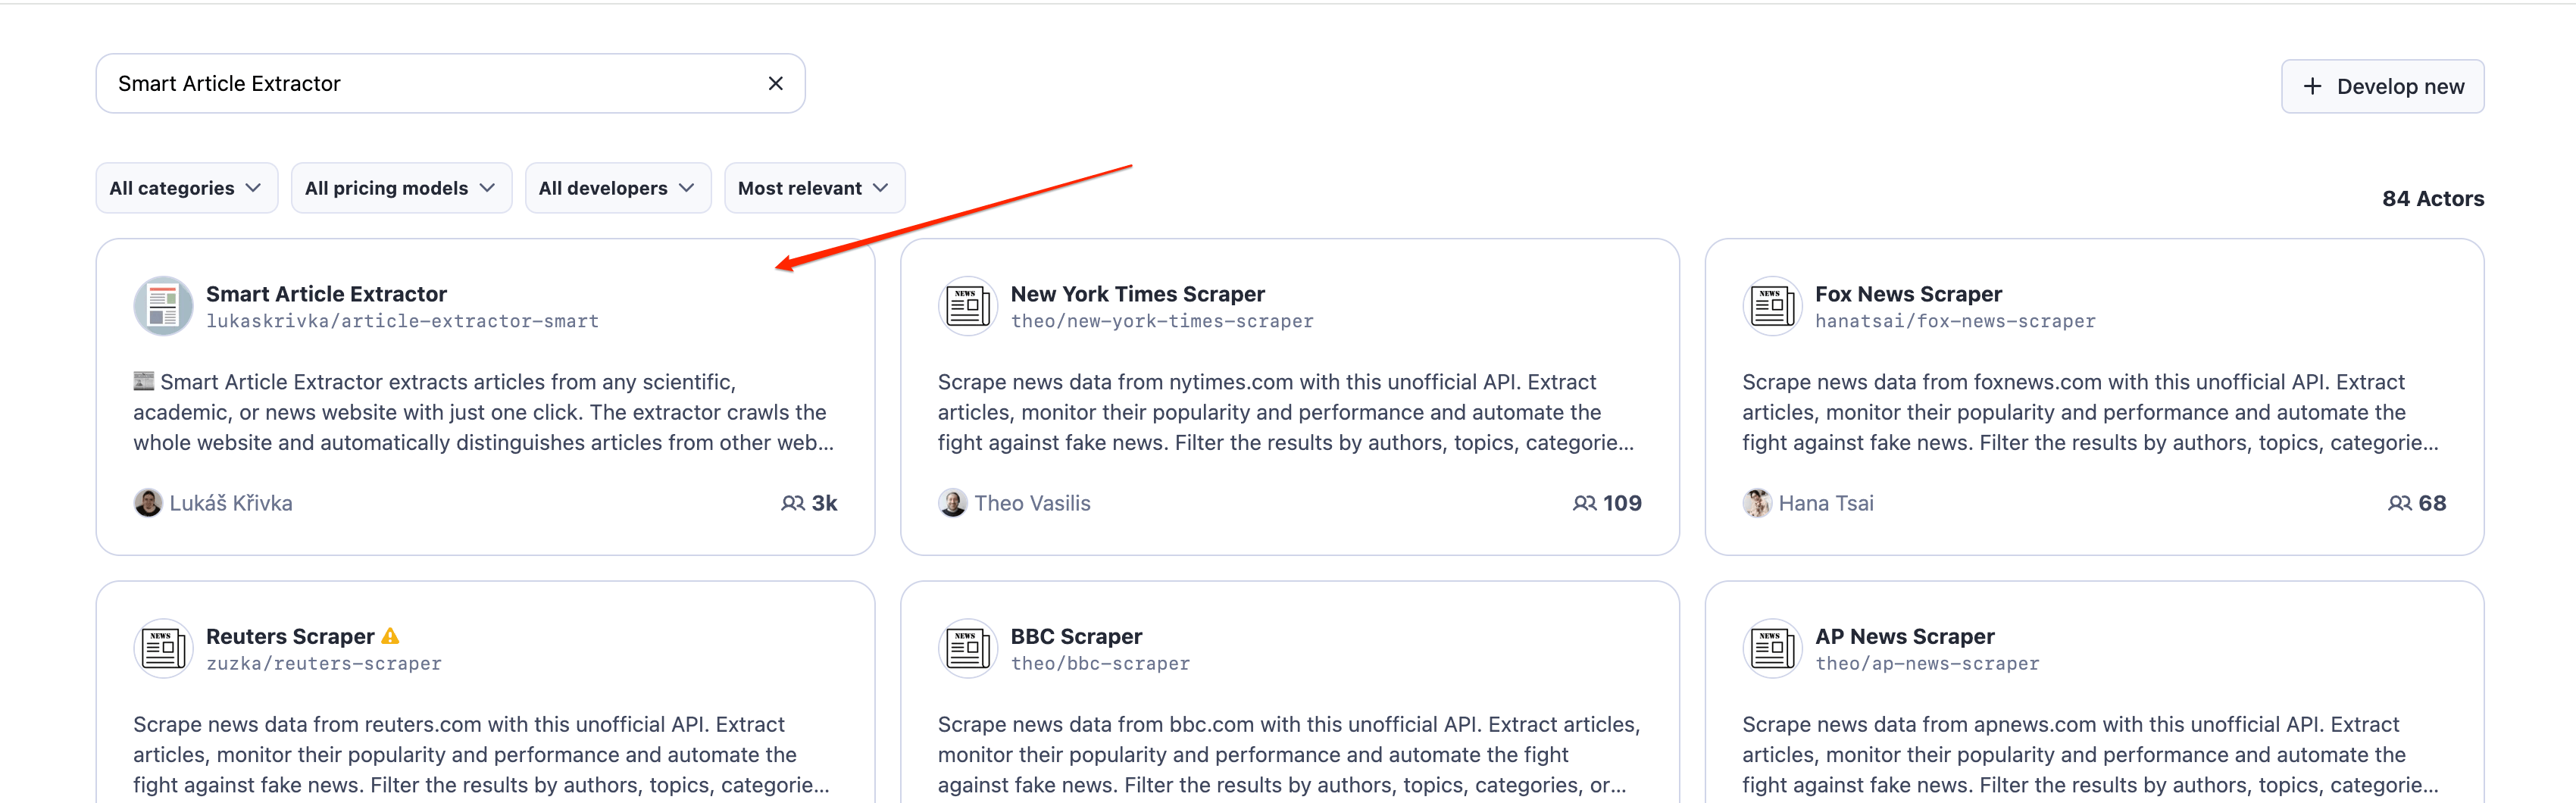
Step 1: Go to Smart Article Extractor on Apify Store
Once logged in to your Apify account, navigate to the Console → Store and search for “Smart Article Extractor.” This will show you the Actor you'll use for scraping news articles.
Step 2: Configure the Actor
On the input tabs, you can provide details on how you want the Actor to perform. Add the following URLs as websites you want to scrape in the Website/category URL section:
https://www.wired.com
https://techcrunch.com/
https://www.cnet.com/tech/
https://www.theverge.com/tech
Next, in the Article URLs section, Check Only inside domain articles .
In the What articles would you like to extract? section, Set the Only articles for last X days to 1. This will ensure that the extractor only scrapes data from 1 day ago.
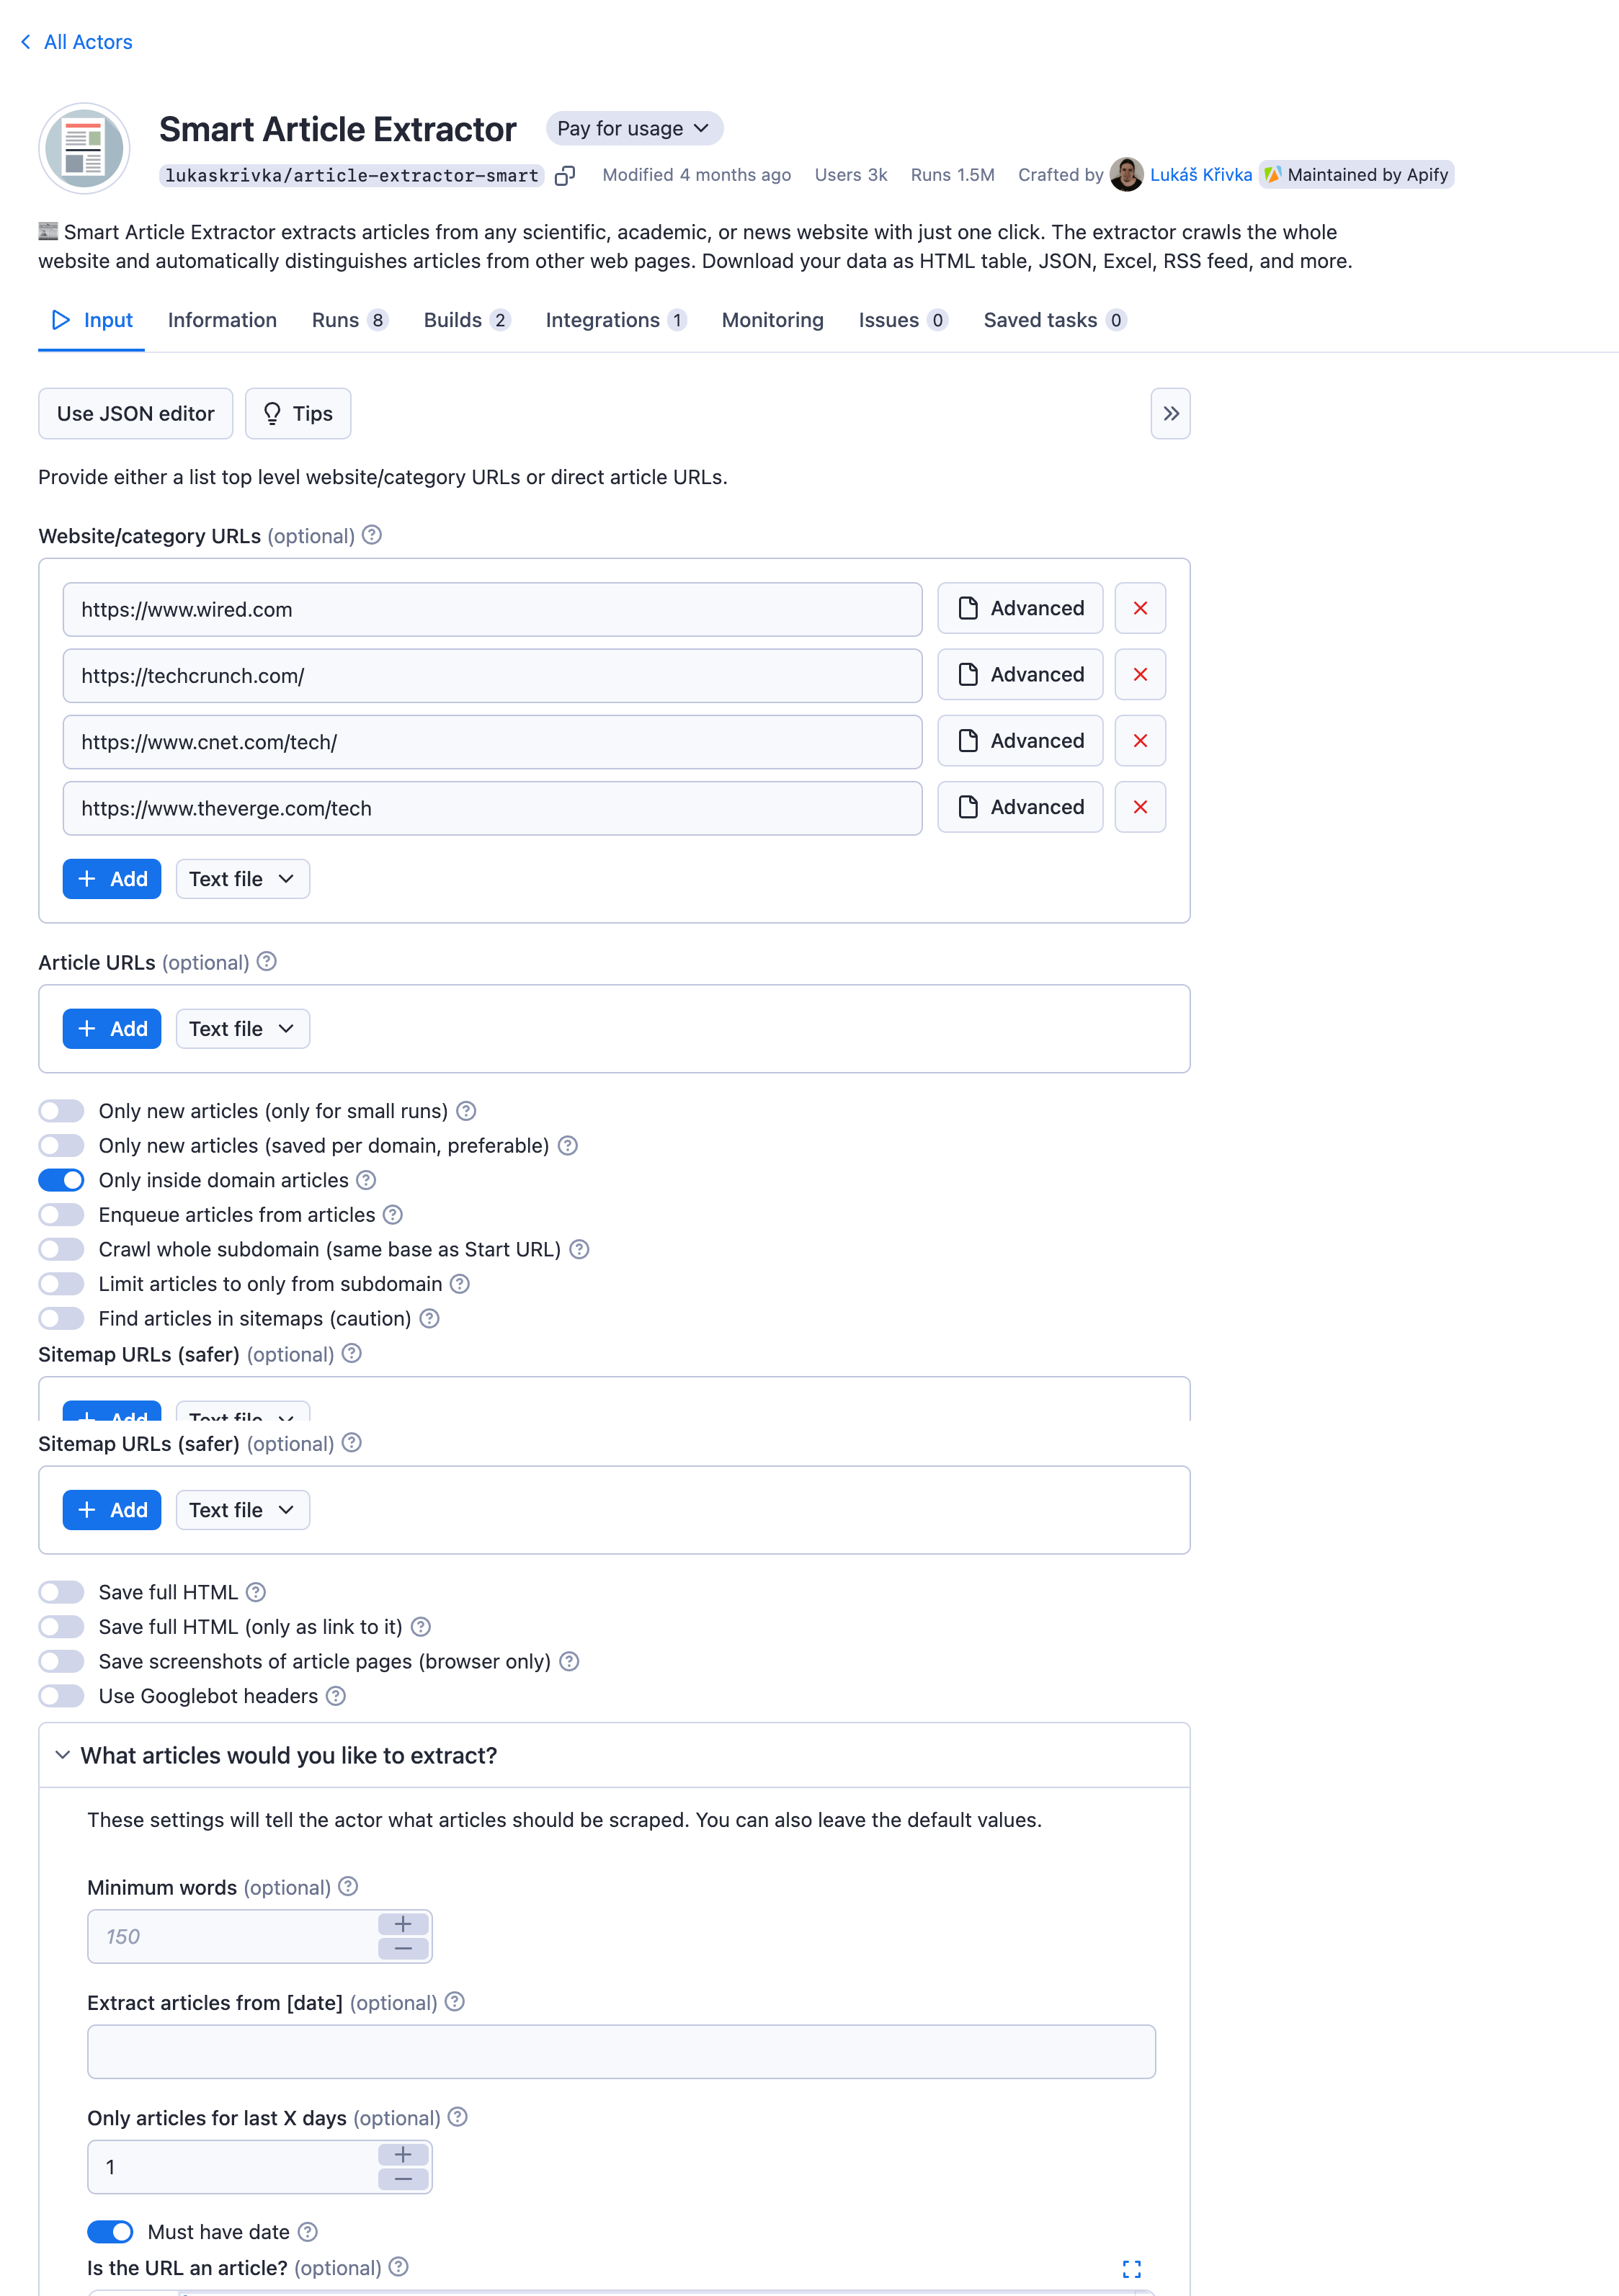
You can also customize the Actor settings further to suit your needs.
Step 3: Start extracting articles
Click on the Save & Start button to run the scraper to extract articles from the different websites.
After the Actor runs successfully, you'll find the data it extracted by that run and the details on how you want to display the data.
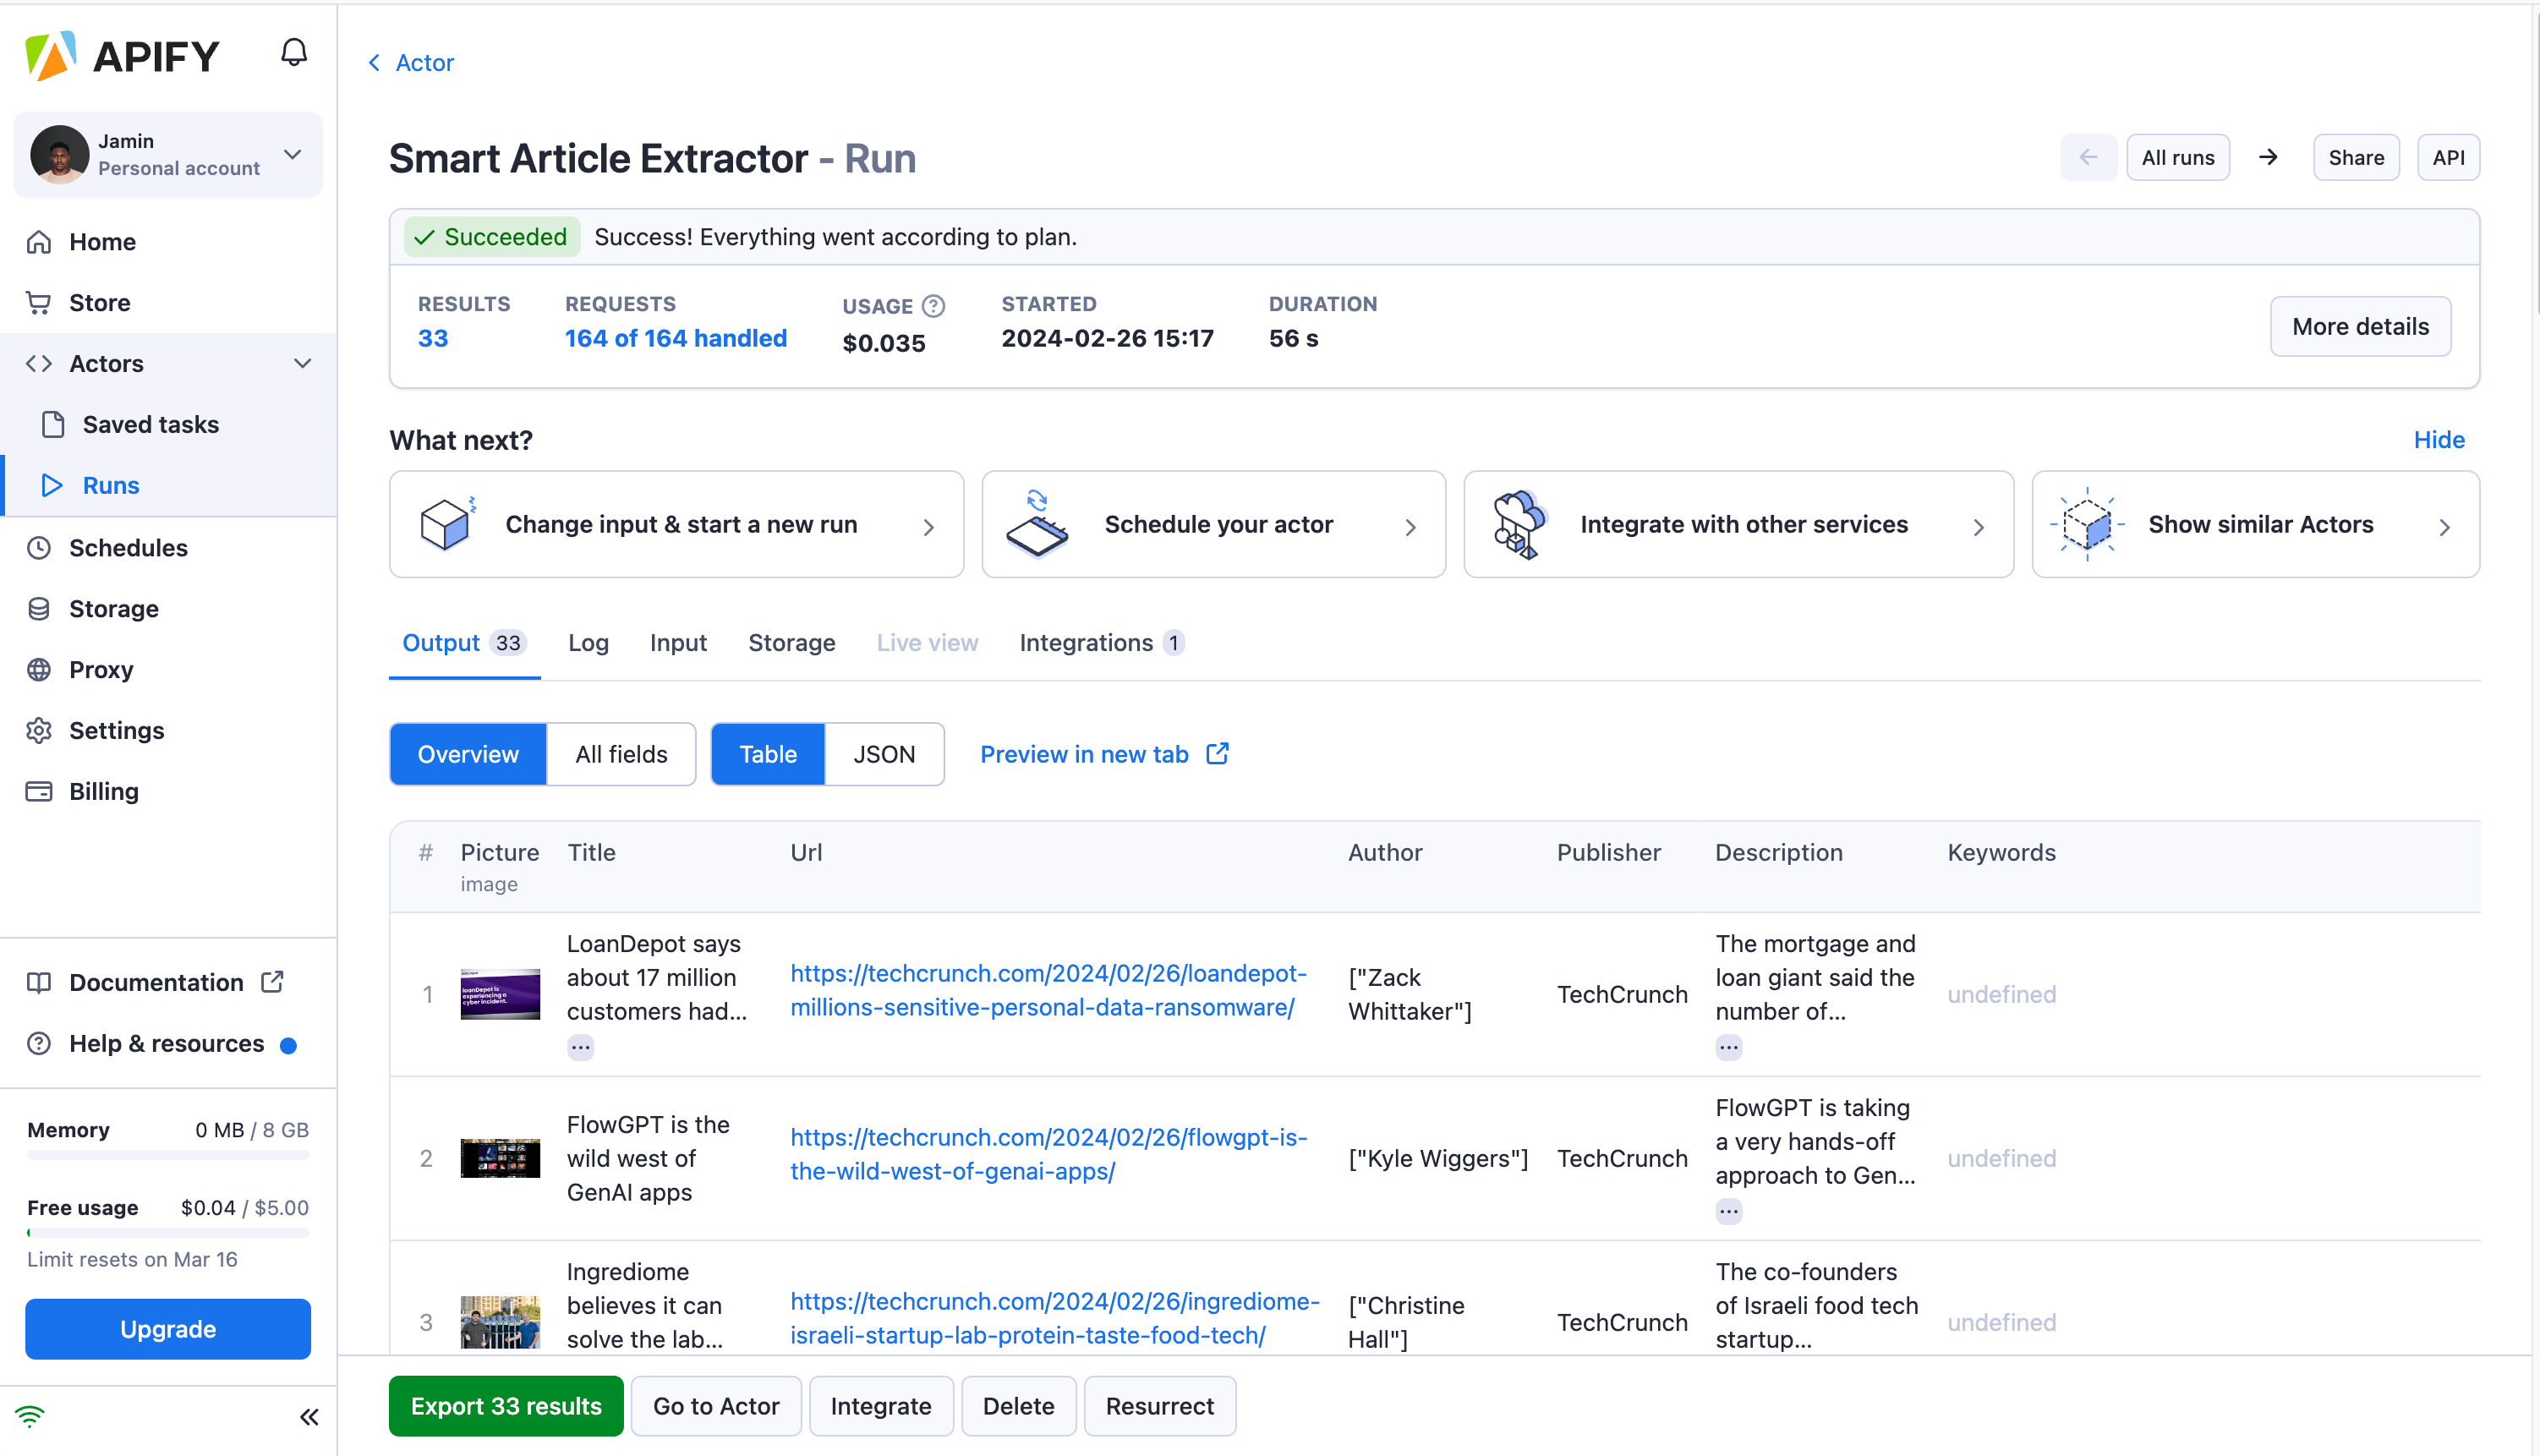
Congratulations🎉, you’ve just used an Actor on the Apify platform to scrape articles from different sources.
Step 4: Rename the dataset
In Apify Console, click on the Runs tab, where you'll find a list of all the successful runs of the Actors you've used. To view the dataset from a successful run, click on it and go to the Storage tab to show the dataset from that run.
By default, unnamed datasets on Apify are deleted after 7 days.
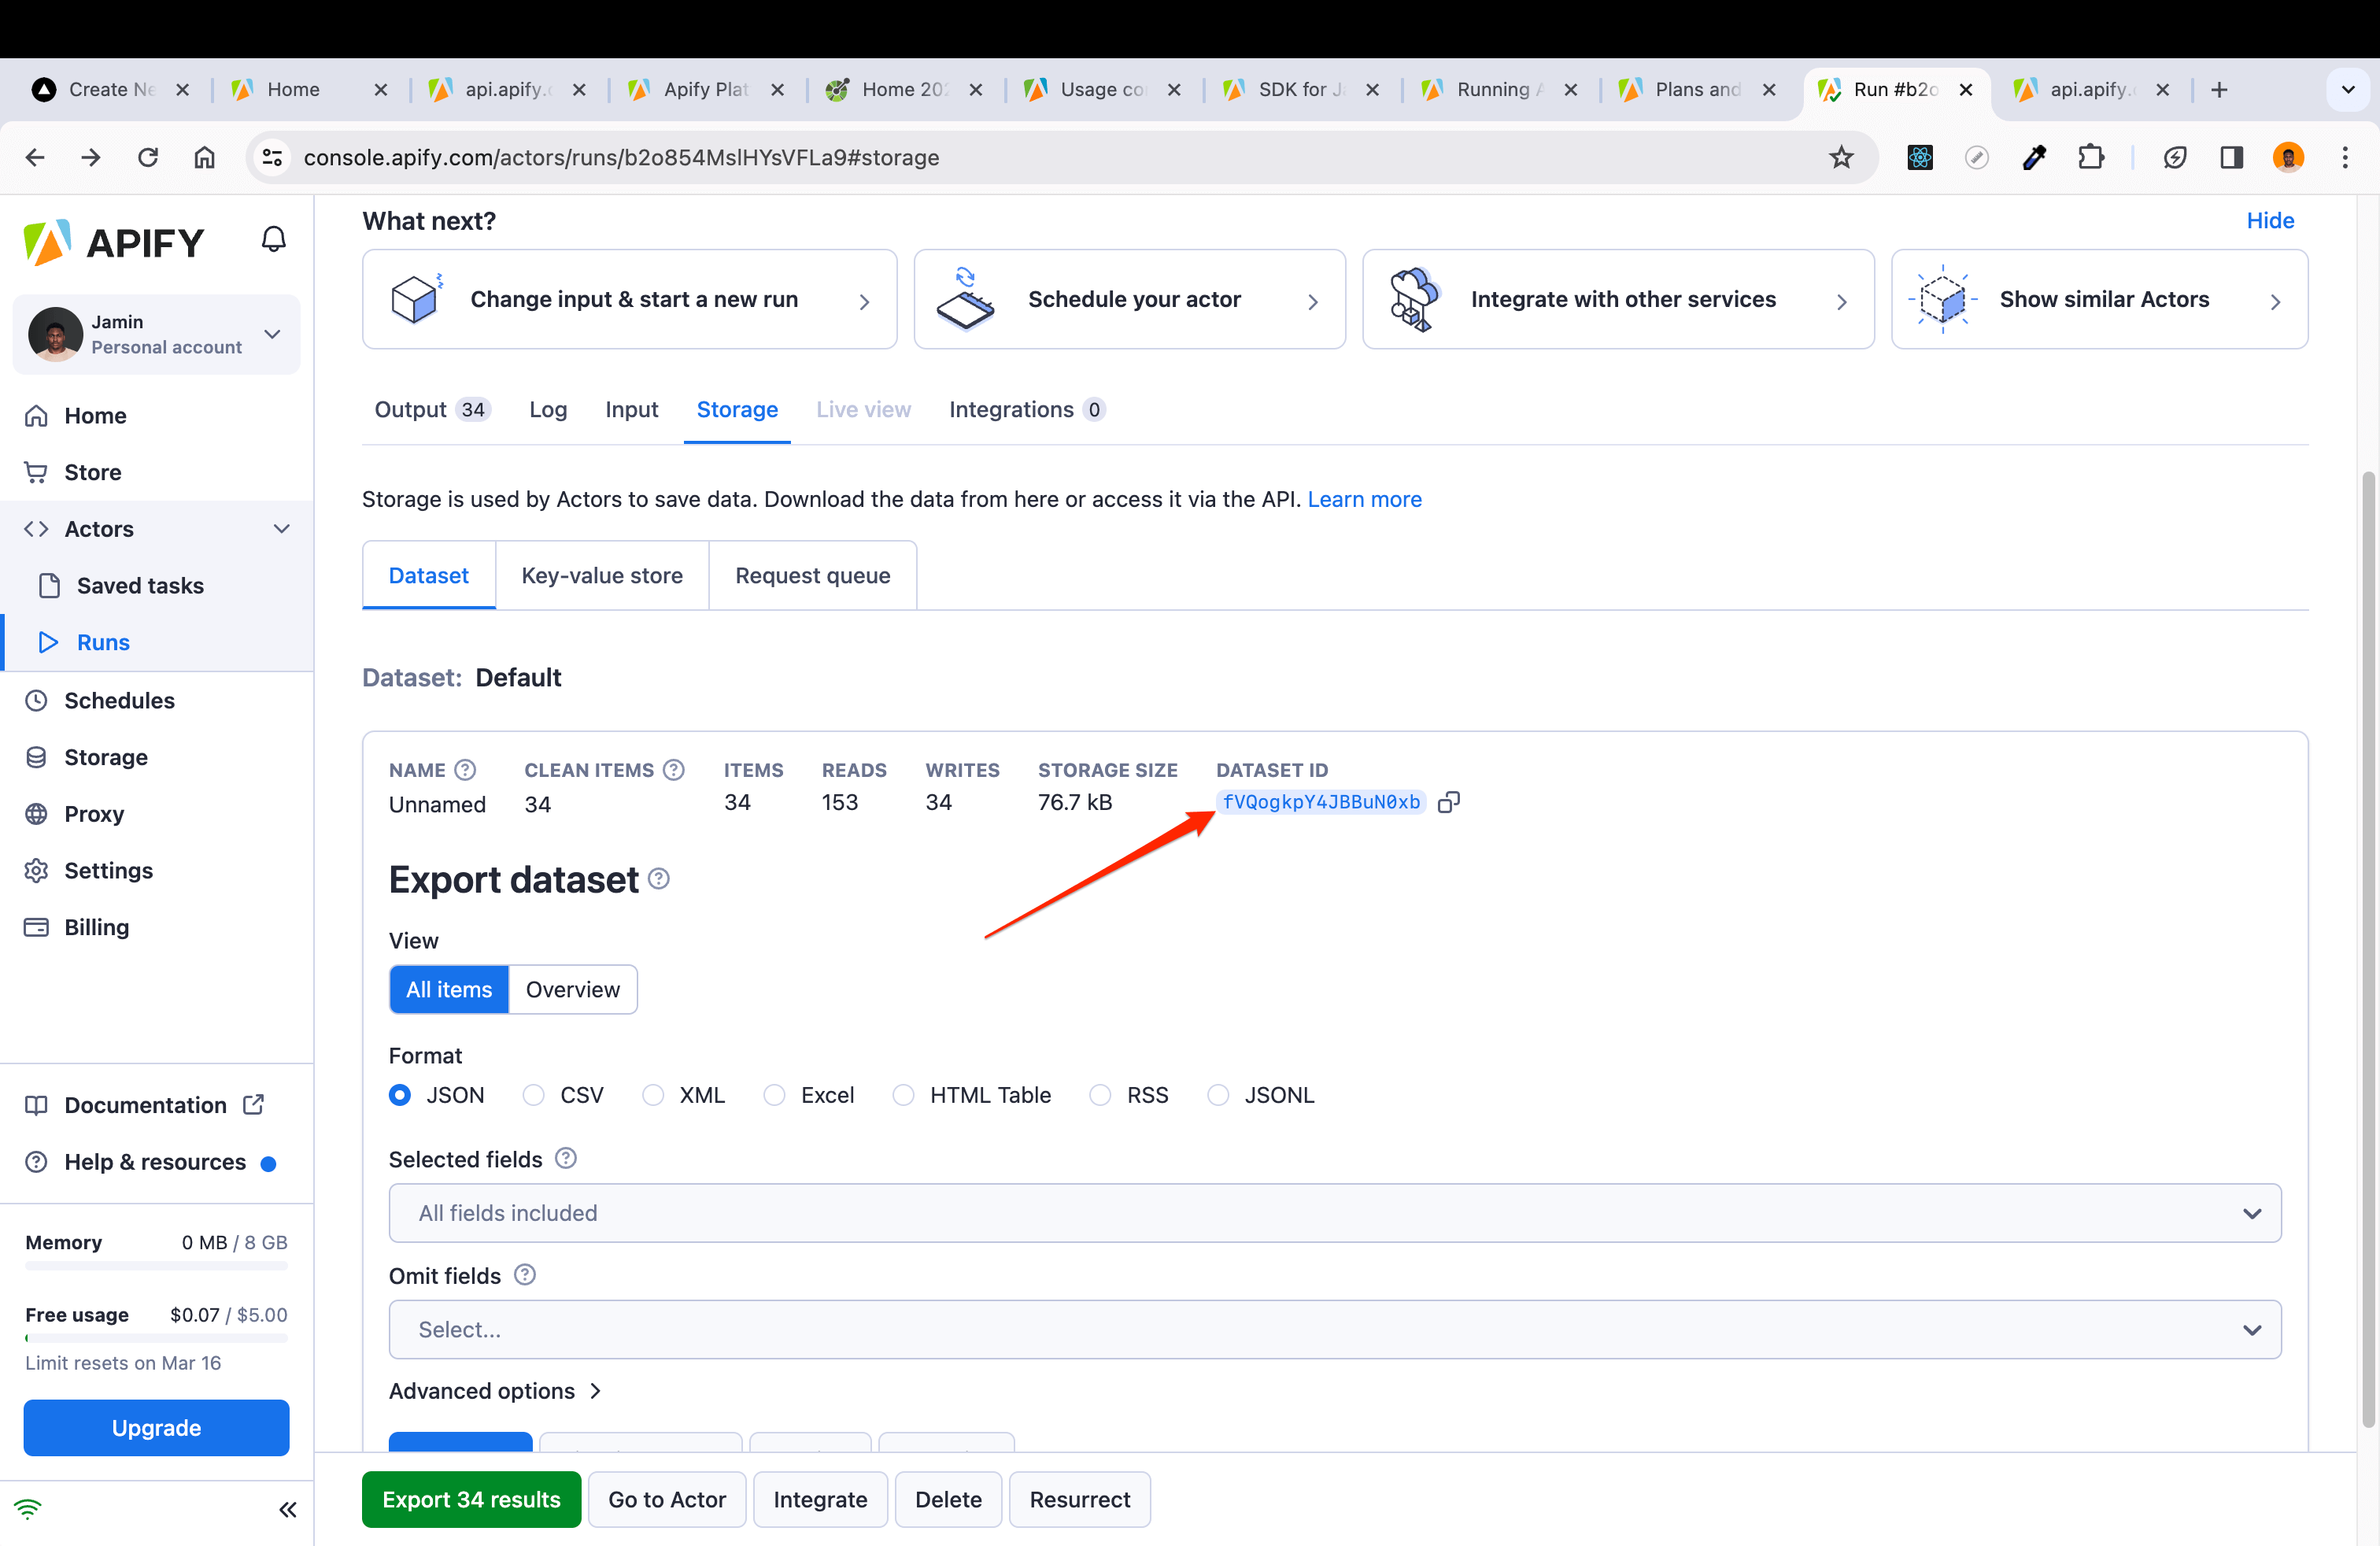
Click on the DATASET ID to open the dataset page, and click on the Action button to rename the dataset. Let's name it articles-datasets . Also, copy the dataset ID as you’ll need it for the next step to add more data to it.
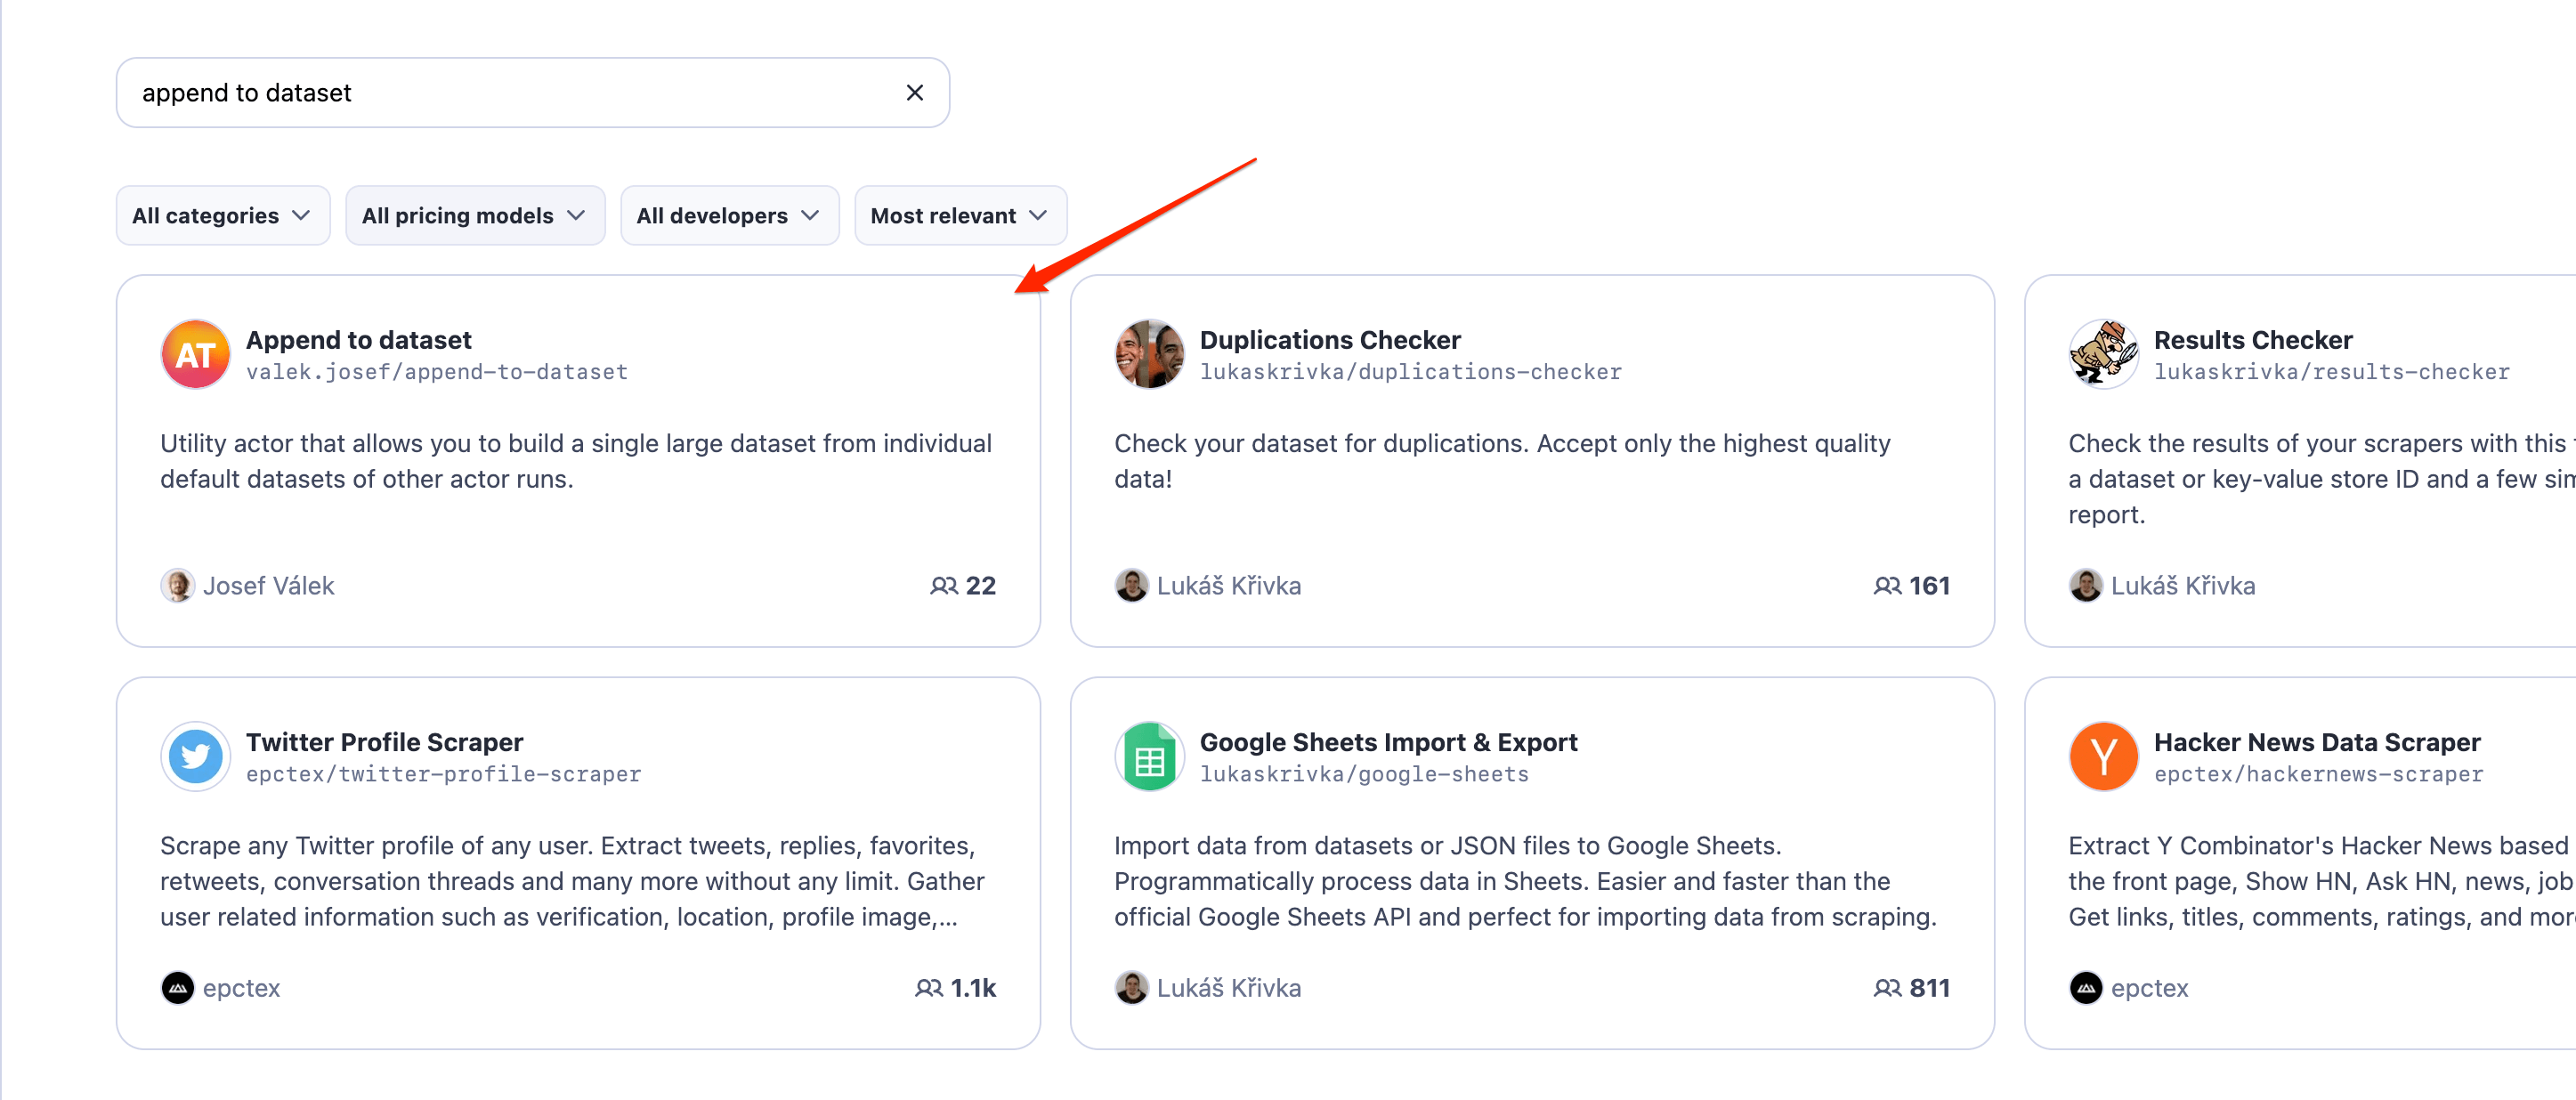
Step 5: Append data to the dataset
Whenever Smart Article Extractor runs, it creates a new dataset. To make sure that a newly created dataset is combined with that of a previous one, you can use the Append to Dataset Actor. This will let you set up a task to run whenever a Smart Article Extractor run is executed.
Go to Apify Store and search for “Append to Dataset”. This tool allows you to create a single large dataset from individual default datasets of other Actor runs.
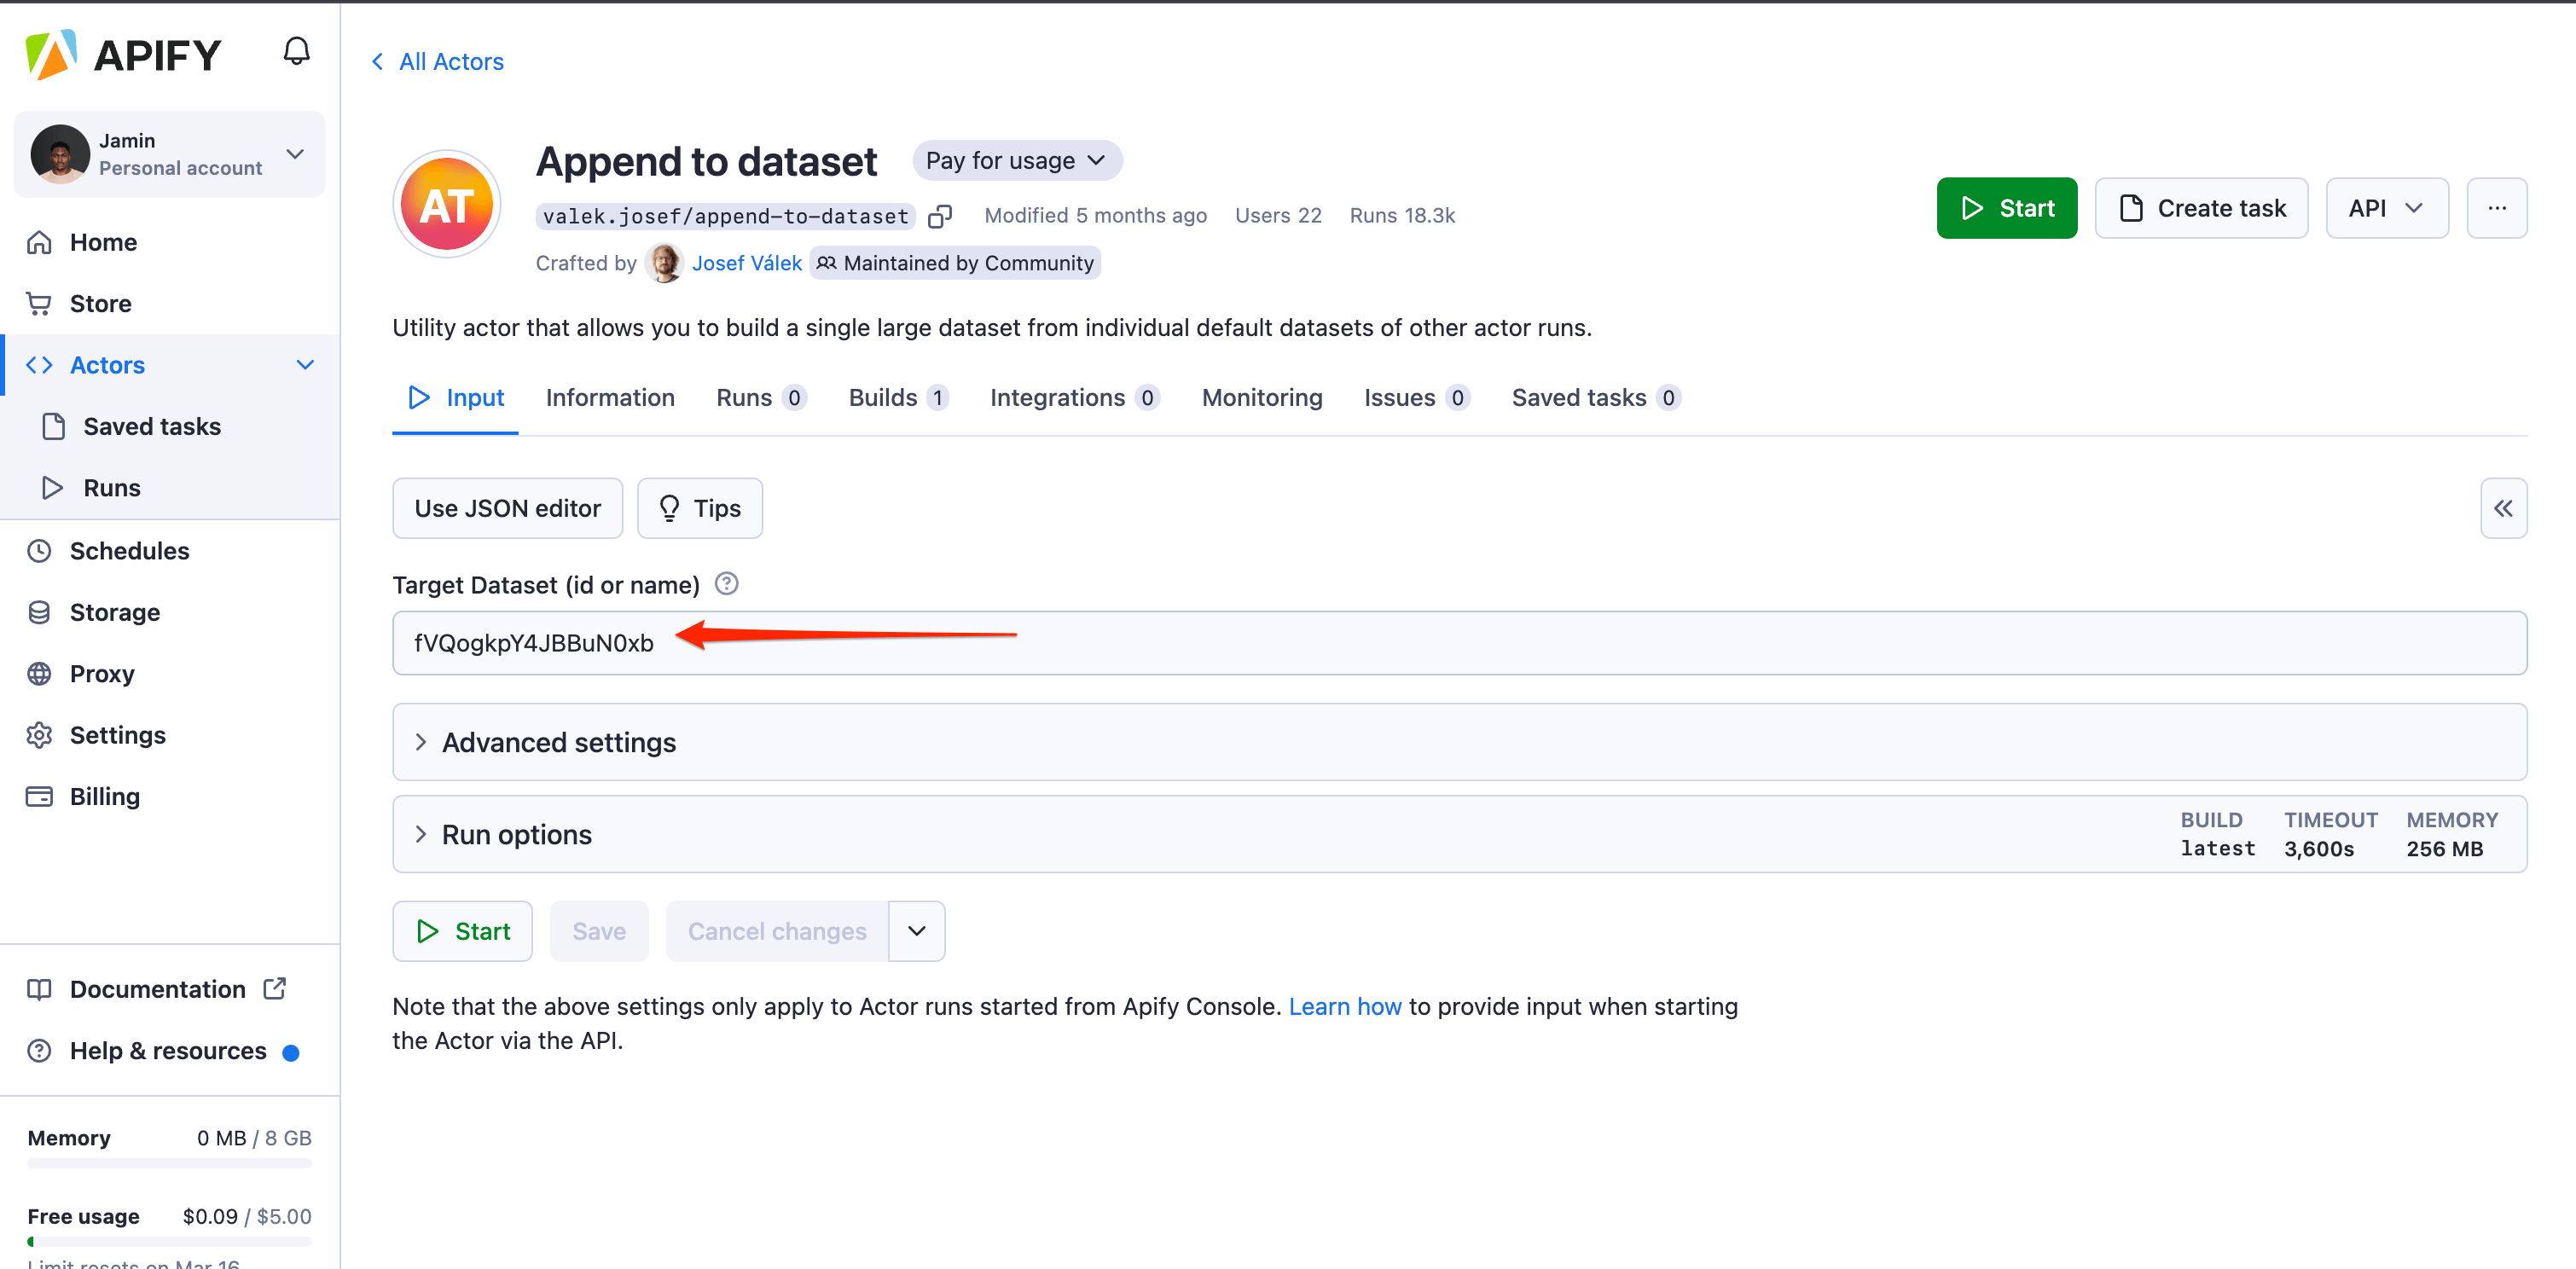
On the input tab of Append to Dataset, provide the dataset ID from the previous step as the Target Dataset and save.
Step 6: Create a task to run
Now to create a task that runs this Append to Dataset Actor, click on the Create task button at the top right.
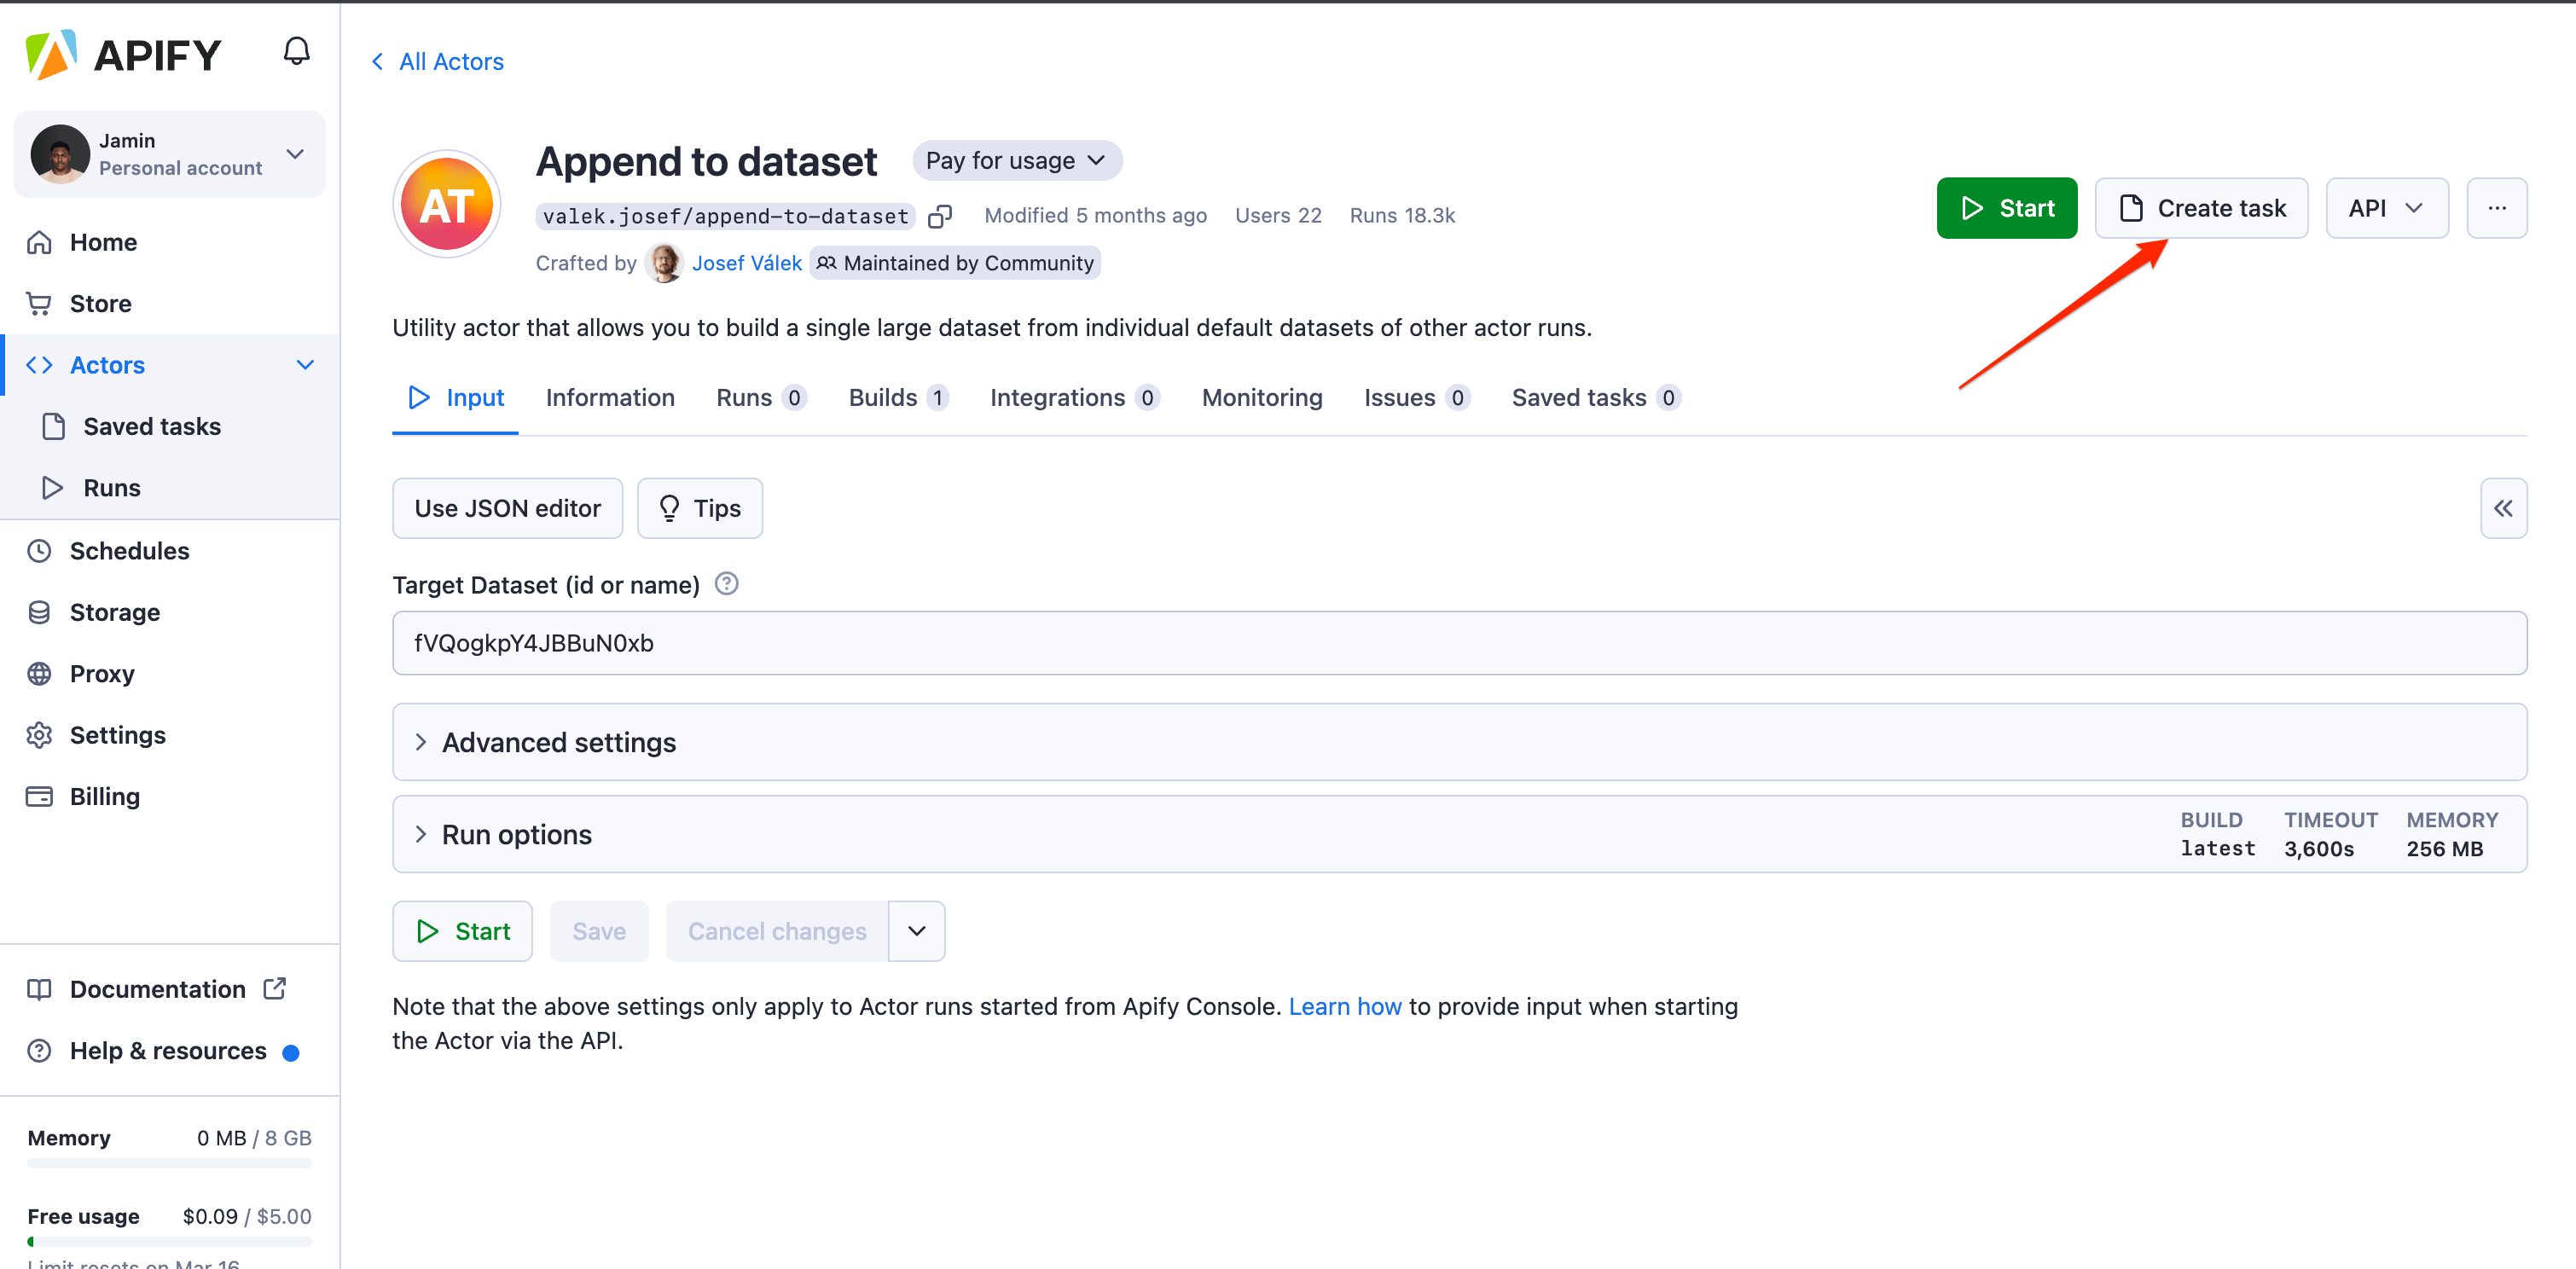
To run the created task whenever Smart Article Extractor runs successfully, you need to integrate the task with Smart Article Extractor via a webhook.
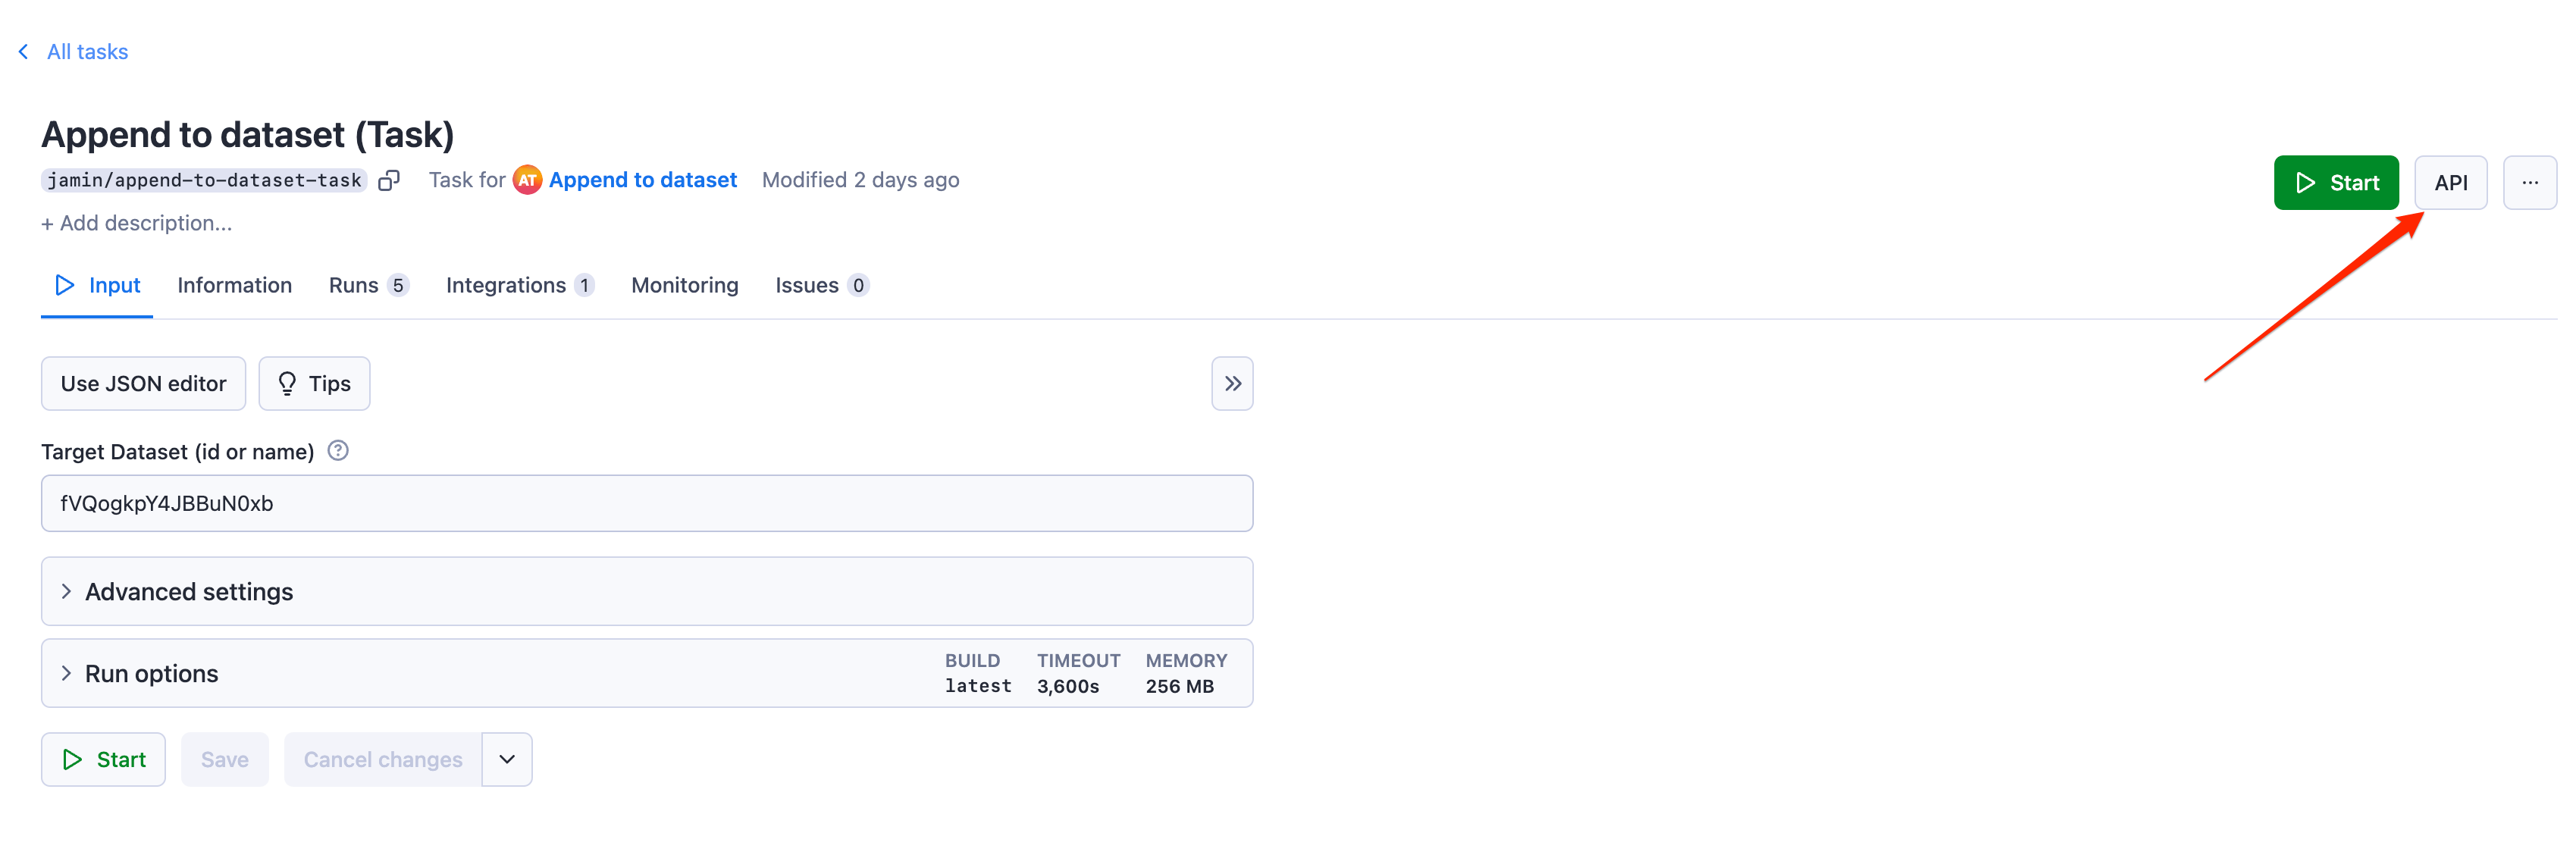
Step 7: Copy the API endpoint
On the Append to dataset (Task) page, click on the API button and copy the URL to run the task. This will open the API page and copy the API endpoint needed to run this task.
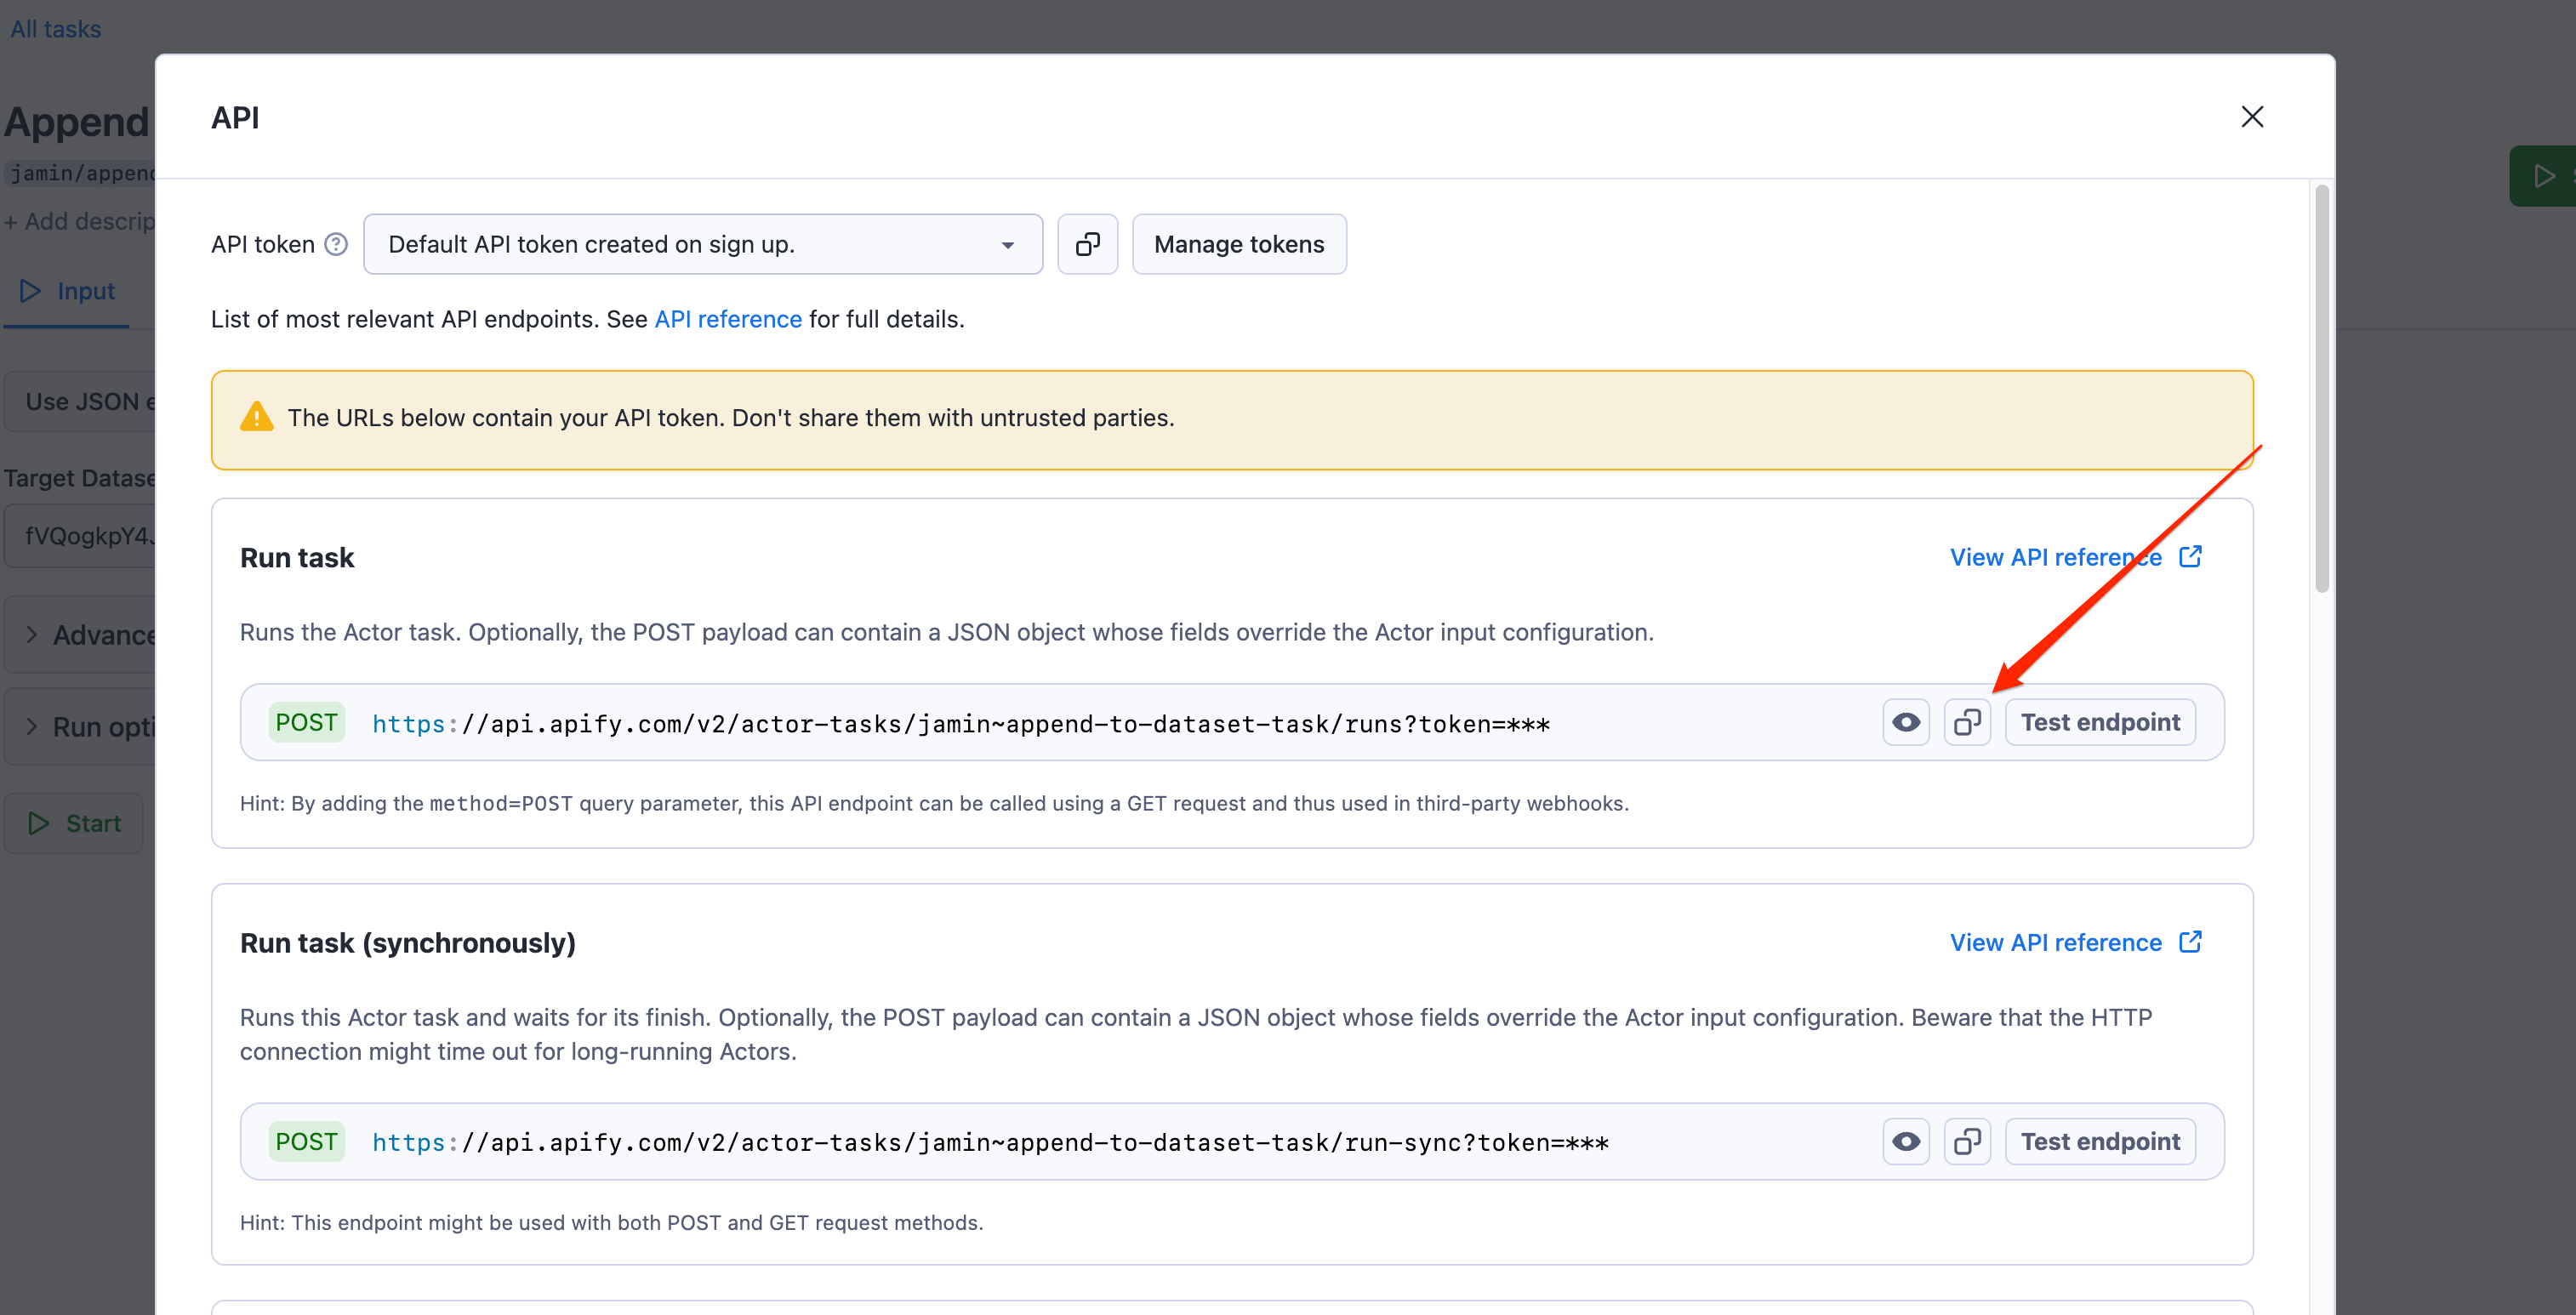
Step 8: Create an HTTP webhook integration
Next, go to Actors → Smart Article Extractor, and on the Integrations tab, create a new HTTP webhook integration and configure it to run whenever Smart Article Extractor has completed a successful run, using the URL you copied as the API endpoint.
This will run the Append to dataset (Task) whenever the Smart Article Extractor runs successfully.
Step 9: Schedule the Actor to run daily
One of the superpowers of the Apify platform is that you can schedule Actors to run at specific time intervals.
To schedule the article scraper to run daily, go to Actors → Smart article Extractor. Click on the three dots and choose Schedule Actor.
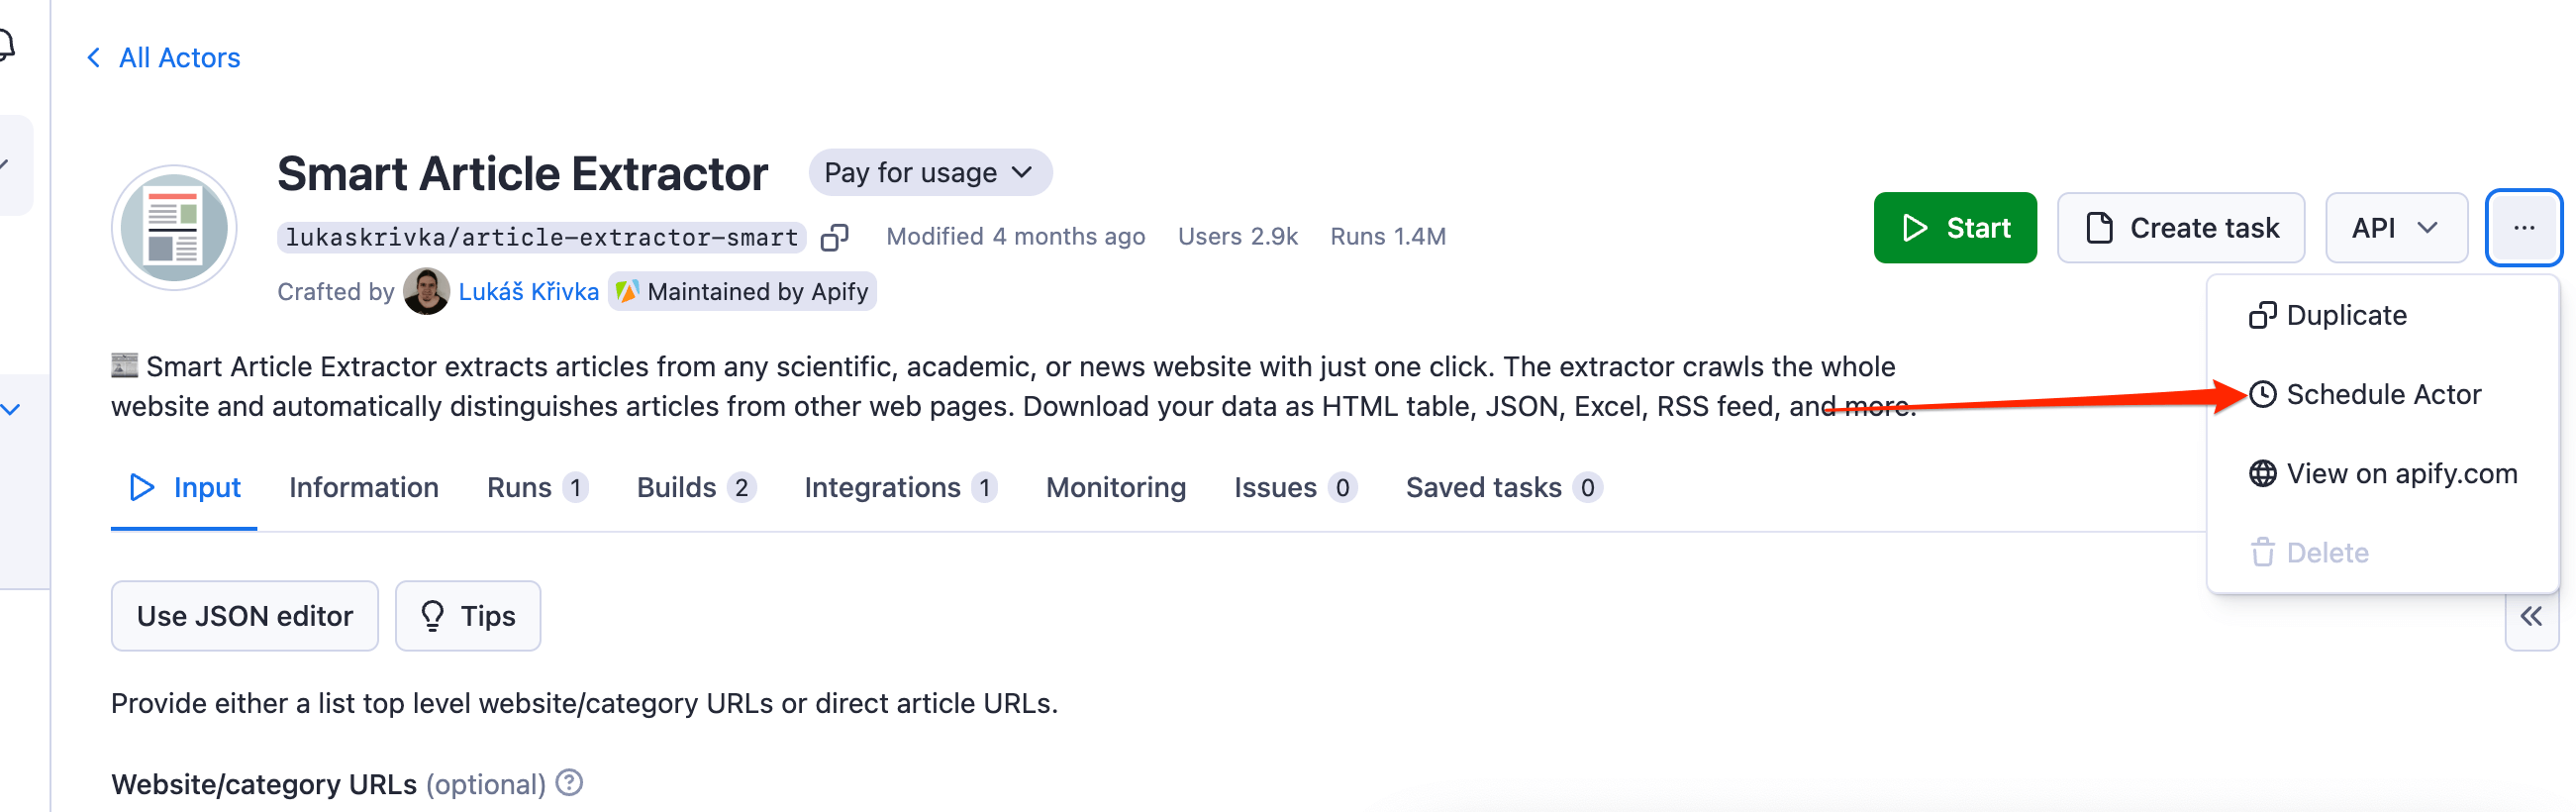
Set the Actor to run daily at the specific time of your choice.
With Smart Article Extractor scheduled, the Actor will run daily, and when the run succeeds, the Append to dataset task will copy the dataset from the new run to the previously existing dataset.
Setting up a Next.js application
Step 1: Install Next.js and required libraries
To initialize a new Next.js application, run the following command in your terminal:
npx create-next-app@14 news-aggregator
Install the libraries required to work with Next.js using this command:
npm i resend react-email @react-email/components apify-client
resend,react-email, and@react-email/componentswill be used for creating an email route to send the latest daily news updates to users.
- The
apify-clientlibrary will be used for communicating with the Apify platform from your Next.js application.
Step 2: Use the Apify client library in Next.js
To initialize the apify-client library in the root of your project, create a directory called lib and inside of this directory, create a new file called 'apifyClient.ts': lib/apifyClient.ts
import { ApifyClient } from "apify-client";
// Provide your APIFY_TOKEN to create a new Apify client instance
const client = new ApifyClient({
  token: process.env.APIFY_TOKEN,
});
export default client
The code above initializes the Apify client library using your APIFY_TOKEN . You can find your token in your Apify account → Settings → Intergrations.
Create a .env with content:
APIFY_TOKEN=YOUR_APIFY_TOKEN
DATASET_ID=YOUR_DATASET_ID
Step 3: Create a page that displays the data from Apify
To create the page to display the scraped data from Apify, you first need to create two components that will be used by this page.
In the root directory of your project, create a new folder called components and inside of this folder, create the following files with the content: components/Article/index.tsx
import Image from "next/image";

type Article = {
  image: string;
  title: string;
  description: string;
  url: string;
  date: string;
  loadedDomain: string;
};
export default function Article({
  image,
  title,
  description,
  url,
  date,
  loadedDomain,
}: Article) {
  return (
    <a href={url} target="_blank" className="article">
      <div>
        <Image src={image} alt={title} width={250} height={150} className="article-image" />
      </div>
      <div>
        <h2 className="article-title">{title}</h2>
        <p>
          <span>{new Date(date).toLocaleDateString()}</span> <span>{loadedDomain}</span>
        </p>
        <p className="article-description">{description}</p>
      </div>
    </a>
  );
}
The Article component above will serve as the component for displaying the fetched data from Apify: components/Form/index.tsx
"use client";

import { FormEvent, useState } from "react";

export default function SubscribeForm() {
  const [loading, setLoading] = useState("")
  const onSubmit = async (e: FormEvent<HTMLFormElement>) => {
    e.preventDefault();


    try {
      setLoading("Subscribing...")
      const formData = new FormData(e.currentTarget);
      const response = await fetch(`/api/subscribe`, {
        method: 'POST',
        body: JSON.stringify({
          email: formData.get('email'),
        }),
      });

      if (!response.ok) {
        setLoading("Subscription failed")
        throw new Error("Subscription failed");

      }

      const data = await response.json();
      setLoading("Subscription successful")
      console.log("Subscription successful:", data);
    } catch (error) {
      setLoading("Subscription failed")
      console.error("Subscription error:", error);
    }
  };

  return (
    <form className="form" onSubmit={onSubmit}>
      <input
        type="email"
        placeholder="Enter Email Address"
        name="email"
        className="form-input"
      />
      <button type="submit" className="form-button">
        {loading ? loading : "    Subscribe to News"}
      </button>
    </form>
  );
}
The Form component will enable visitors to easily subscribe to receive daily news from the news aggregator website. It sends a request to api/subscribe route, which you'll create shortly: components/EmailTemplate/index.tsx
import {
Section,
Row,
Column,
Img,
Container,
Heading,
Button,
Text,
} from "@react-email/components";
export default function EmailTemplate({
articles,
isNewUser = false,
}: {
articles: Article[];
isNewUser?: boolean;
}) {
return (
<Section>
<Container>
{isNewUser && (
<Text style={textStyle}>
Hi There, Thank you for signing up to the Tech news newsletter,
you'll find some of the latest gist below
</Text>
)}
{articles.map((article) => (
<a
key={article.title}
href={article.url}
target="_blank"
style={linkStyles}
>
<Row style={rowStyle}>
<Column>
<Img width={150} src={article.image} alt={article.title} />
</Column>
<Column>
<Heading style={headingStyle} as="h2">
{article.title}
</Heading>
<Text style={textStyle}>{article.loadedDomain}</Text>
</Column>
</Row>
</a>
))}
<Row align="center">
<Button href="http://localhost:3000/" style={btnStyle}>
Read all latest news
</Button>
</Row>
</Container>
</Section>
);
}
const linkStyles = {
textDecoration: "none",
color: "#2a2a2a",
};
const rowStyle = {
padding: "5px 0",
};
const headingStyle = {
fontSize: "16px",
padding: "10px",
margin: 0,
};
const textStyle = {
fontSize: "14px",
padding: "0 10px",
margin: 0,
};
const btnStyle = {
backgroundColor: "#7b00ff",
color: "#ffffff",
padding: "10px 20px",
borderRadius: "8px",
};
The EmailTemplate component will be used as the email template for sending emails to users for the subscription feature of the news aggregator.
Next, on the app directory, replace the contents of page.tsx with the following:
import Article from "../components/Article";
import styles from "./page.module.css";
import client from "../lib/apifyClient";
import SubscribeForm from "@/components/Form";


export default async function Home() {
  // Fetch scraped results from the Actor's dataset.
  const { items } = await client
    .dataset(process.env.DATASET_ID as string)
    .listItems({
      desc: true,
      limit: 20,
      fields: ["url", "title", "description", "image", "date", "loadedDomain"],
    });
    const itemList = items as Article[];

  return (
    <main className={styles.main}>
      <div className="container">
        <h1 className="heading">
          Bringing you the best news from the best Tech Blogs
        </h1>
        <SubscribeForm />
        <div className="article-list">
          {itemList.map((item, index) => (
            <Article
              key={index}
              image={item.image}
              title={item.title}
              url={item.url}
              date={item.date}
              loadedDomain={item.loadedDomain}
              description={item.description}
            />
          ))}
        </div>
      </div>
    </main>
  );
}
The code above:
- Fetches data from a dataset which the news data is stored in Apify using the
DATASET_ID.
- Loops through the data and displays a simple grid system using the
Articlecomponent.
- The page also renders the
SubscribeFormfor visitors to subscribe to the news aggregator.
To update the styling of the page, update the global.css file in the app directory:
* {
  box-sizing: border-box;
  padding: 0;
  margin: 0;
}


.container {
  max-width: 1024px;
  padding: 0 40px;
  margin: auto;
}

.heading {
  font-size: 40px;
  margin: 20px 0;
  text-align: center;
  margin: 20px 0;
}
.form {
  width: 100%;
  padding: 20px 0;
}
.form-input {
  width: 70%;
  padding: 10px;
  margin-right: 40px;
  border: 1px solid #2a2a2a;
  border-radius: 8px;
}
.form-button {
  background-color: #7b00ff;
  color: #ffffff;
  padding: 12px 20px;
  border: 1px solid #7b00ff;
  border-radius: 8px;
  cursor: pointer;
}
.article-list {
  grid-auto-columns: 1fr;
  display: grid;
  grid-template-rows: auto auto;
  gap: 20px;
  grid-template-columns: 1fr 1fr 1fr;
  width: 100%;
}

.article {
  color: #2a2a2a;
  text-decoration: none;
}
.article-image {
  width: auto;
  height: auto;
}
.article-title {
  margin: 10px 0;
}
.article-description {
  margin: 10px 0;
}
On your terminal, run the command to start the Next.js development server with npm run dev and open up http://localhost:3000 in a browser. You should have a page that looks like the one below
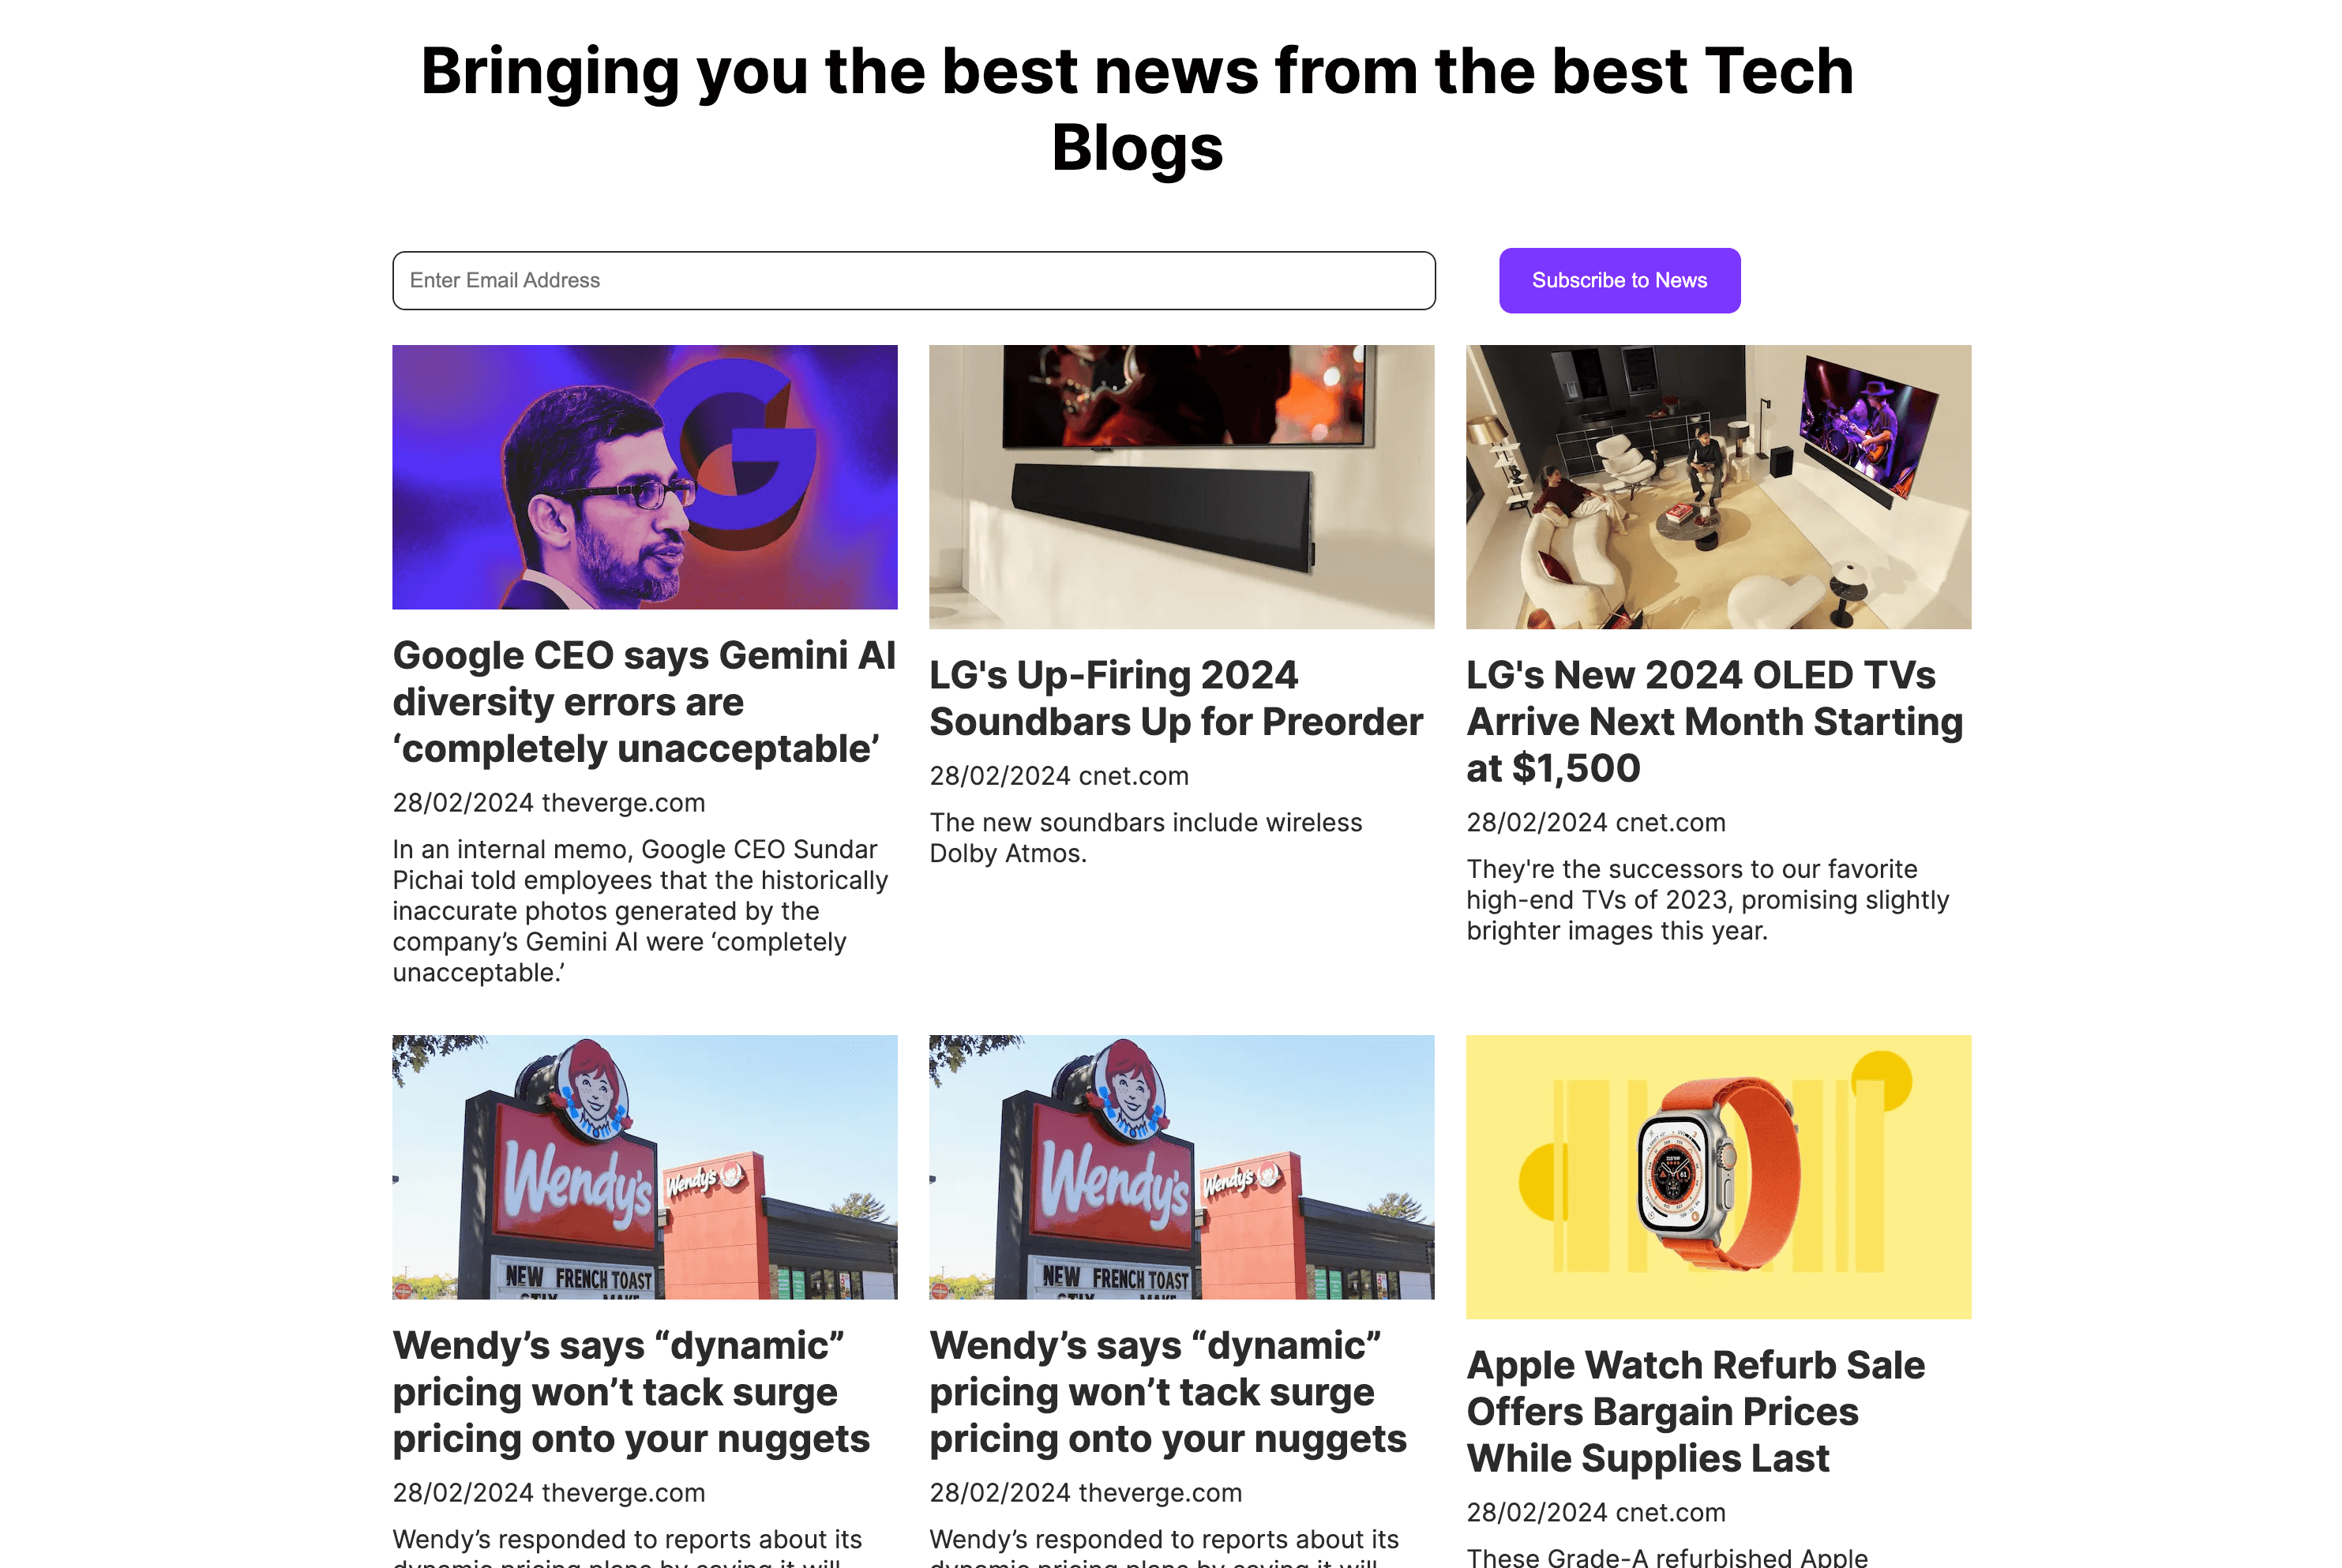
That’s it!, You’ve just used the Apify library to scrape news data from multiple sources and display that data in a Next.js application.
Creating the subscribe functionality
To create the subscribe to newsletter functionality using Resend, you need a Resend account.
Resend is an email API created for developers to send transactional emails. Head over to resend.com to create a free account, navigate to Overview → API Keys, and create a new API key for sending emails.
Next, retrieve an audience key from Overview → Audiences and save contacts to that audience. An Audience is a group of users subscribed to your emails on the from Resend.
Update the .env variables to be:
APIFY_TOKEN=YOUR_APIFY_TOKEN
DATASET_ID=YOUR_DATASET_ID
APIFY_TOKEN=YOUR_API_TOKEN
DATASET_ID=YOUR_DATASET
RESEND_API_KEY=RESEND_API_KEY
AUDIENCE_ID=YOUR_AUDIENCE_KEY
In the api folder, create a new directory called subscribe and inside of it, add route.ts with the content: api/subscribe/route.ts
import { NextResponse } from "next/server";
import { Resend } from "resend";
import EmailTemplate from "../../../components/EmailTemplate";
import client from "../../../lib/apifyClient";
// Constants
const resend = new Resend(process.env.RESEND_API_KEY);
const audienceId = process.env.AUDIENCE_ID as string;
export async function POST(request: Request) {
try {
// Extract email from request JSON
const { email } = await request.json();
// Fetch items
const { items } = await client
.dataset(process.env.DATASET_ID as string)
.listItems({
desc: true,
limit: 10,
fields: ["url", "title", "image", "loadedDomain"],
});
// Ensure items are defined and cast to Article[]
const itemList: Article[] = (items as Article[]) || [];
// Create contact
const contact = await resend.contacts.create({
email,
unsubscribed: false,
audienceId,
});
// Check if contact creation was successful
if (contact.data?.id) {
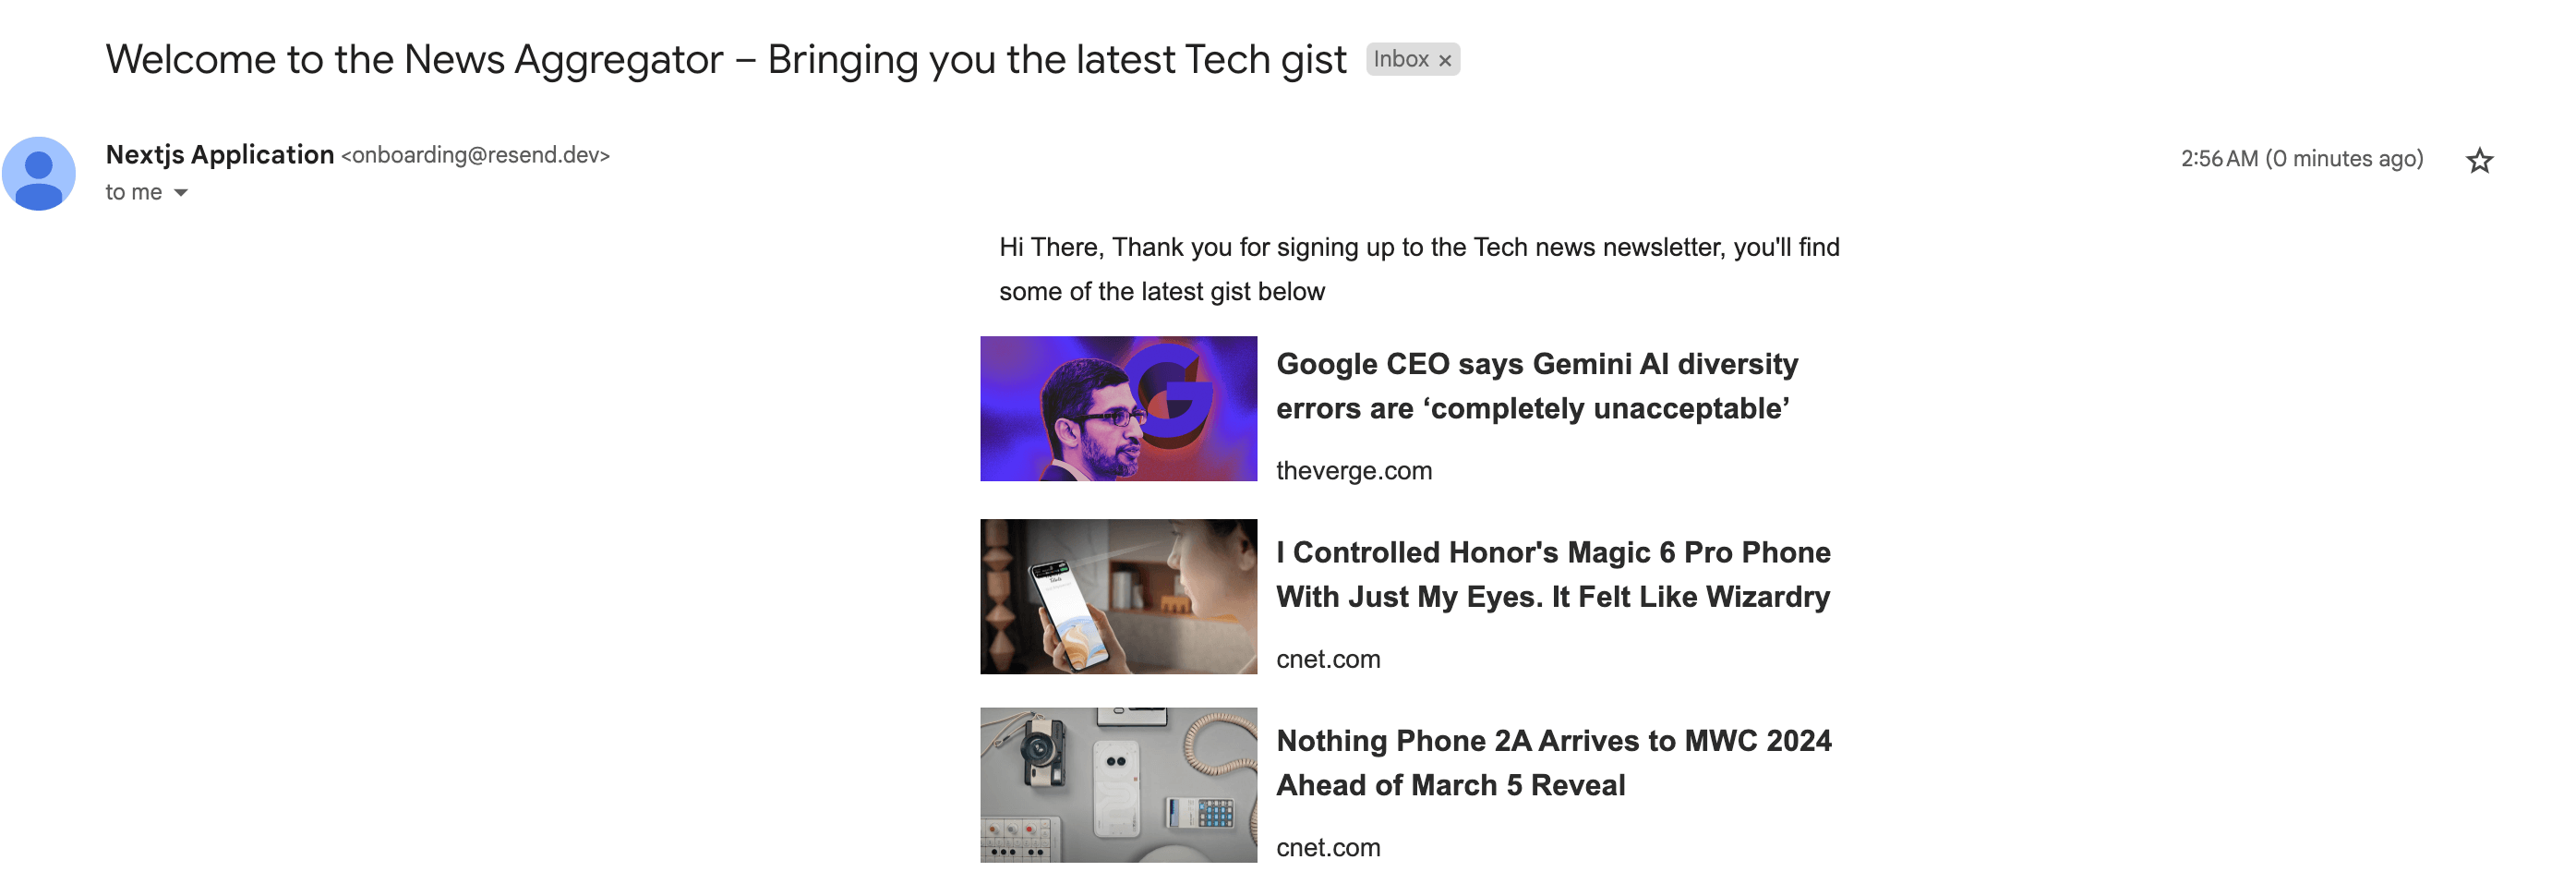
// Send welcome email
const welcomeEmail = await resend.emails.send({
from: "Next.js Application <onboarding@resend.dev>",
to: [email],
subject: "Welcome to the News Aggregator – Bringing you the latest Tech gist",
react: EmailTemplate({ articles: itemList, isNewUser: true }),
});
// Log success and return response
console.log(`Welcome email sent successfully to ${email}`);
return NextResponse.json(welcomeEmail);
}
} catch (error: any) {
// Log error and return error response
console.error(error);
return NextResponse.json(
{ message: "An unexpected error occurred, please try again" },
{ status: 500 }
);
}
}
The code above does the following:
- Extract the
emailaddress fromrequestJSON.
- Fetches the most recent scrapped news from Apify using the
apify-clientlibrary.
- Creates a new contact with the
emailaddress provided by the user to store in the audience list.
- When the new contact is created successfully, it sends a welcome email to the user with the latest news articles.
Create a newsletter API for sending the latest news to contacts
To send emails to your list of contacts whenever a recent news data is scraped from the Apify platform, you need to do two things.
- Create an API route in your Next.js Application that serves as the route for sending the emails.
- Integrate that API route to the
Append to datasettask on Apify so that whenever a new set of data is appended to the dataset, the API will retrieve the most recent news articles and send them to subscribed contacts.
Inside of the app/api/ directory, create a new directory called newsletter along with a file called route.ts using the content: app/api/newsletter/route.ts
import { NextResponse } from "next/server";
import { Resend } from "resend";
import EmailTemplate from "../../../components/EmailTemplate";
import client from "../../../lib/apifyClient";

const resend = new Resend(process.env.RESEND_API_KEY);
const audienceId = process.env.AUDIENCE_ID as string;

export async function POST(request: Request) {
  try {
    // Fetch items
    const { items } = await client
      .dataset(process.env.DATASET_ID as string)
      .listItems({
        desc: true,
        limit: 10,
        fields: ["url", "title", "image", "loadedDomain"],
      });

    // Ensure items are defined and cast to Article[]
    const itemList = items as Article[];

    // Fetch contacts
    const contacts = await resend.contacts.list({ audienceId });
    const contactList = contacts.data?.data?.map((contact) => ({
      from: "Next.js Application <onboarding@resend.dev>",
      to: [contact.email],
      subject: "Latest news update from the News Aggregator",
      react: EmailTemplate({ articles: itemList }),
    })) || [];

    // Send batch emails
    const batchedEmails = await resend.batch.send(contactList)

    console.log(batchedEmails)
    return NextResponse.json("Newsletter successfully sent");
  } catch (error) {
    console.error("Batch request failed:", error);
    return NextResponse.json(
      { message: "An unexpected error occurred, please try again" },
      { status: 500 }
    );
  }
}
The code above:
- Retrieves the most recent 10 articles.
- Fetches a contact list of subscribers from Resend.com using the
audienceId.
- Sends an email to the subscribed contact list using a
resend.batchmethod.
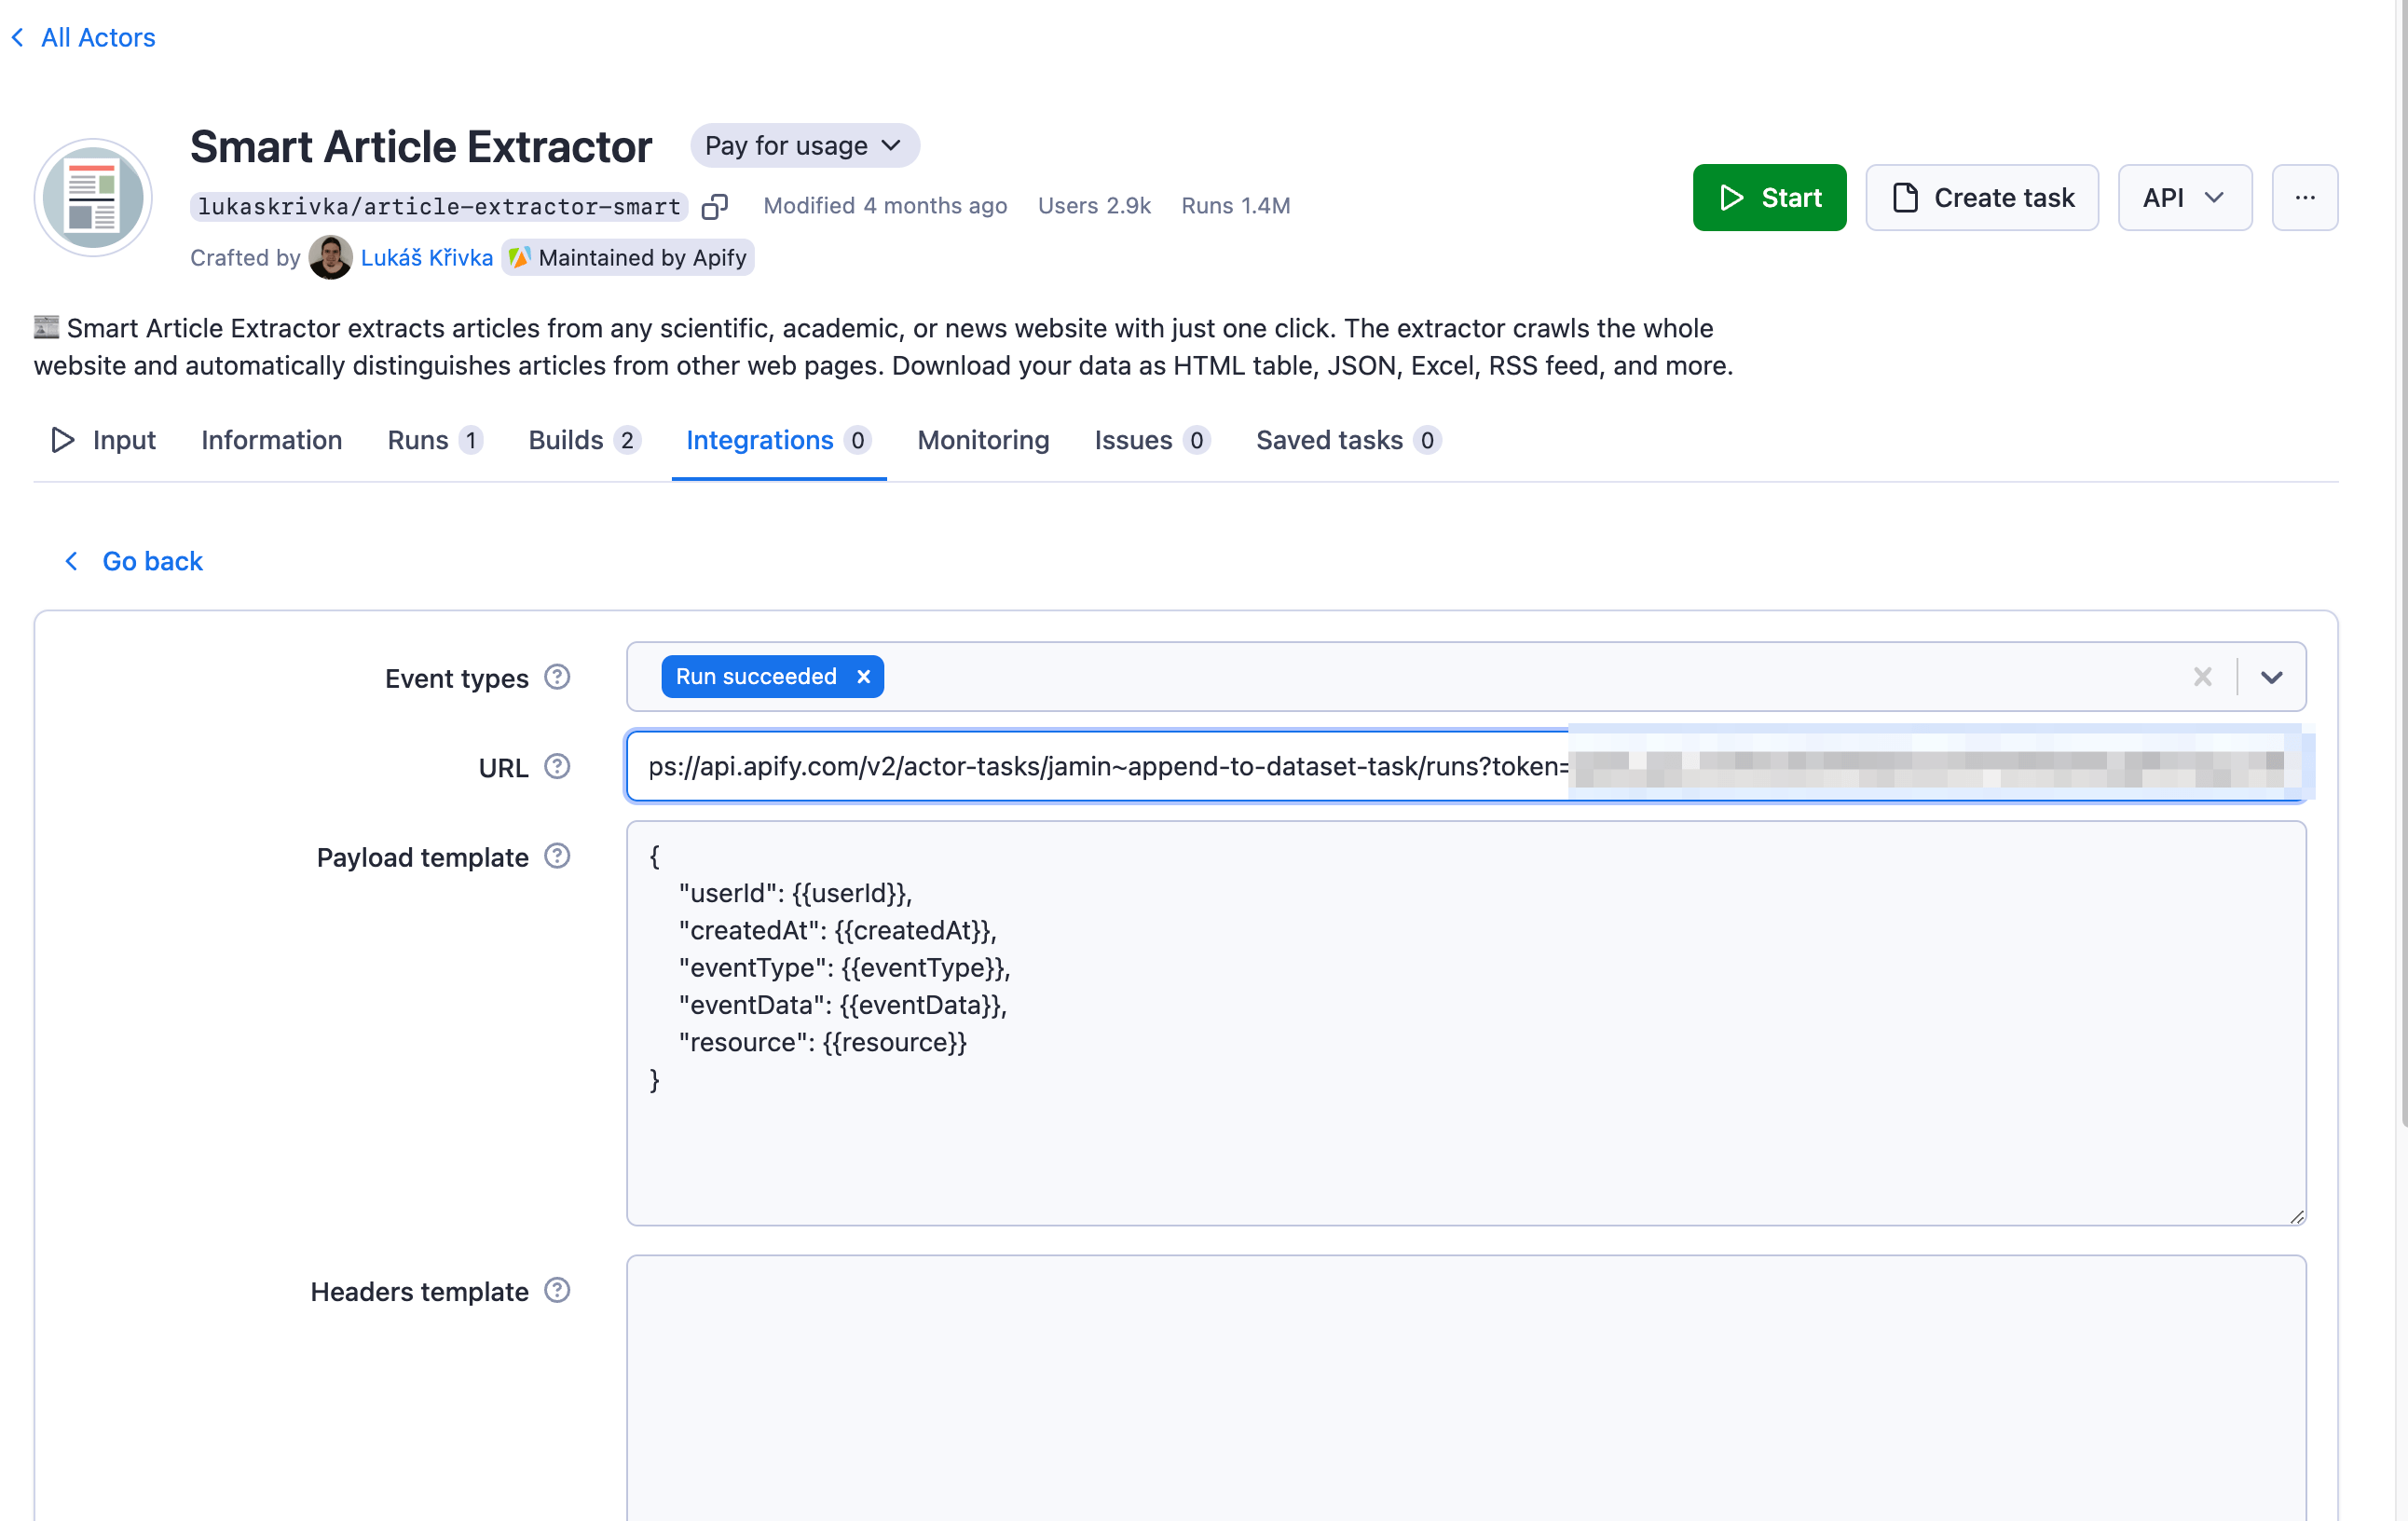
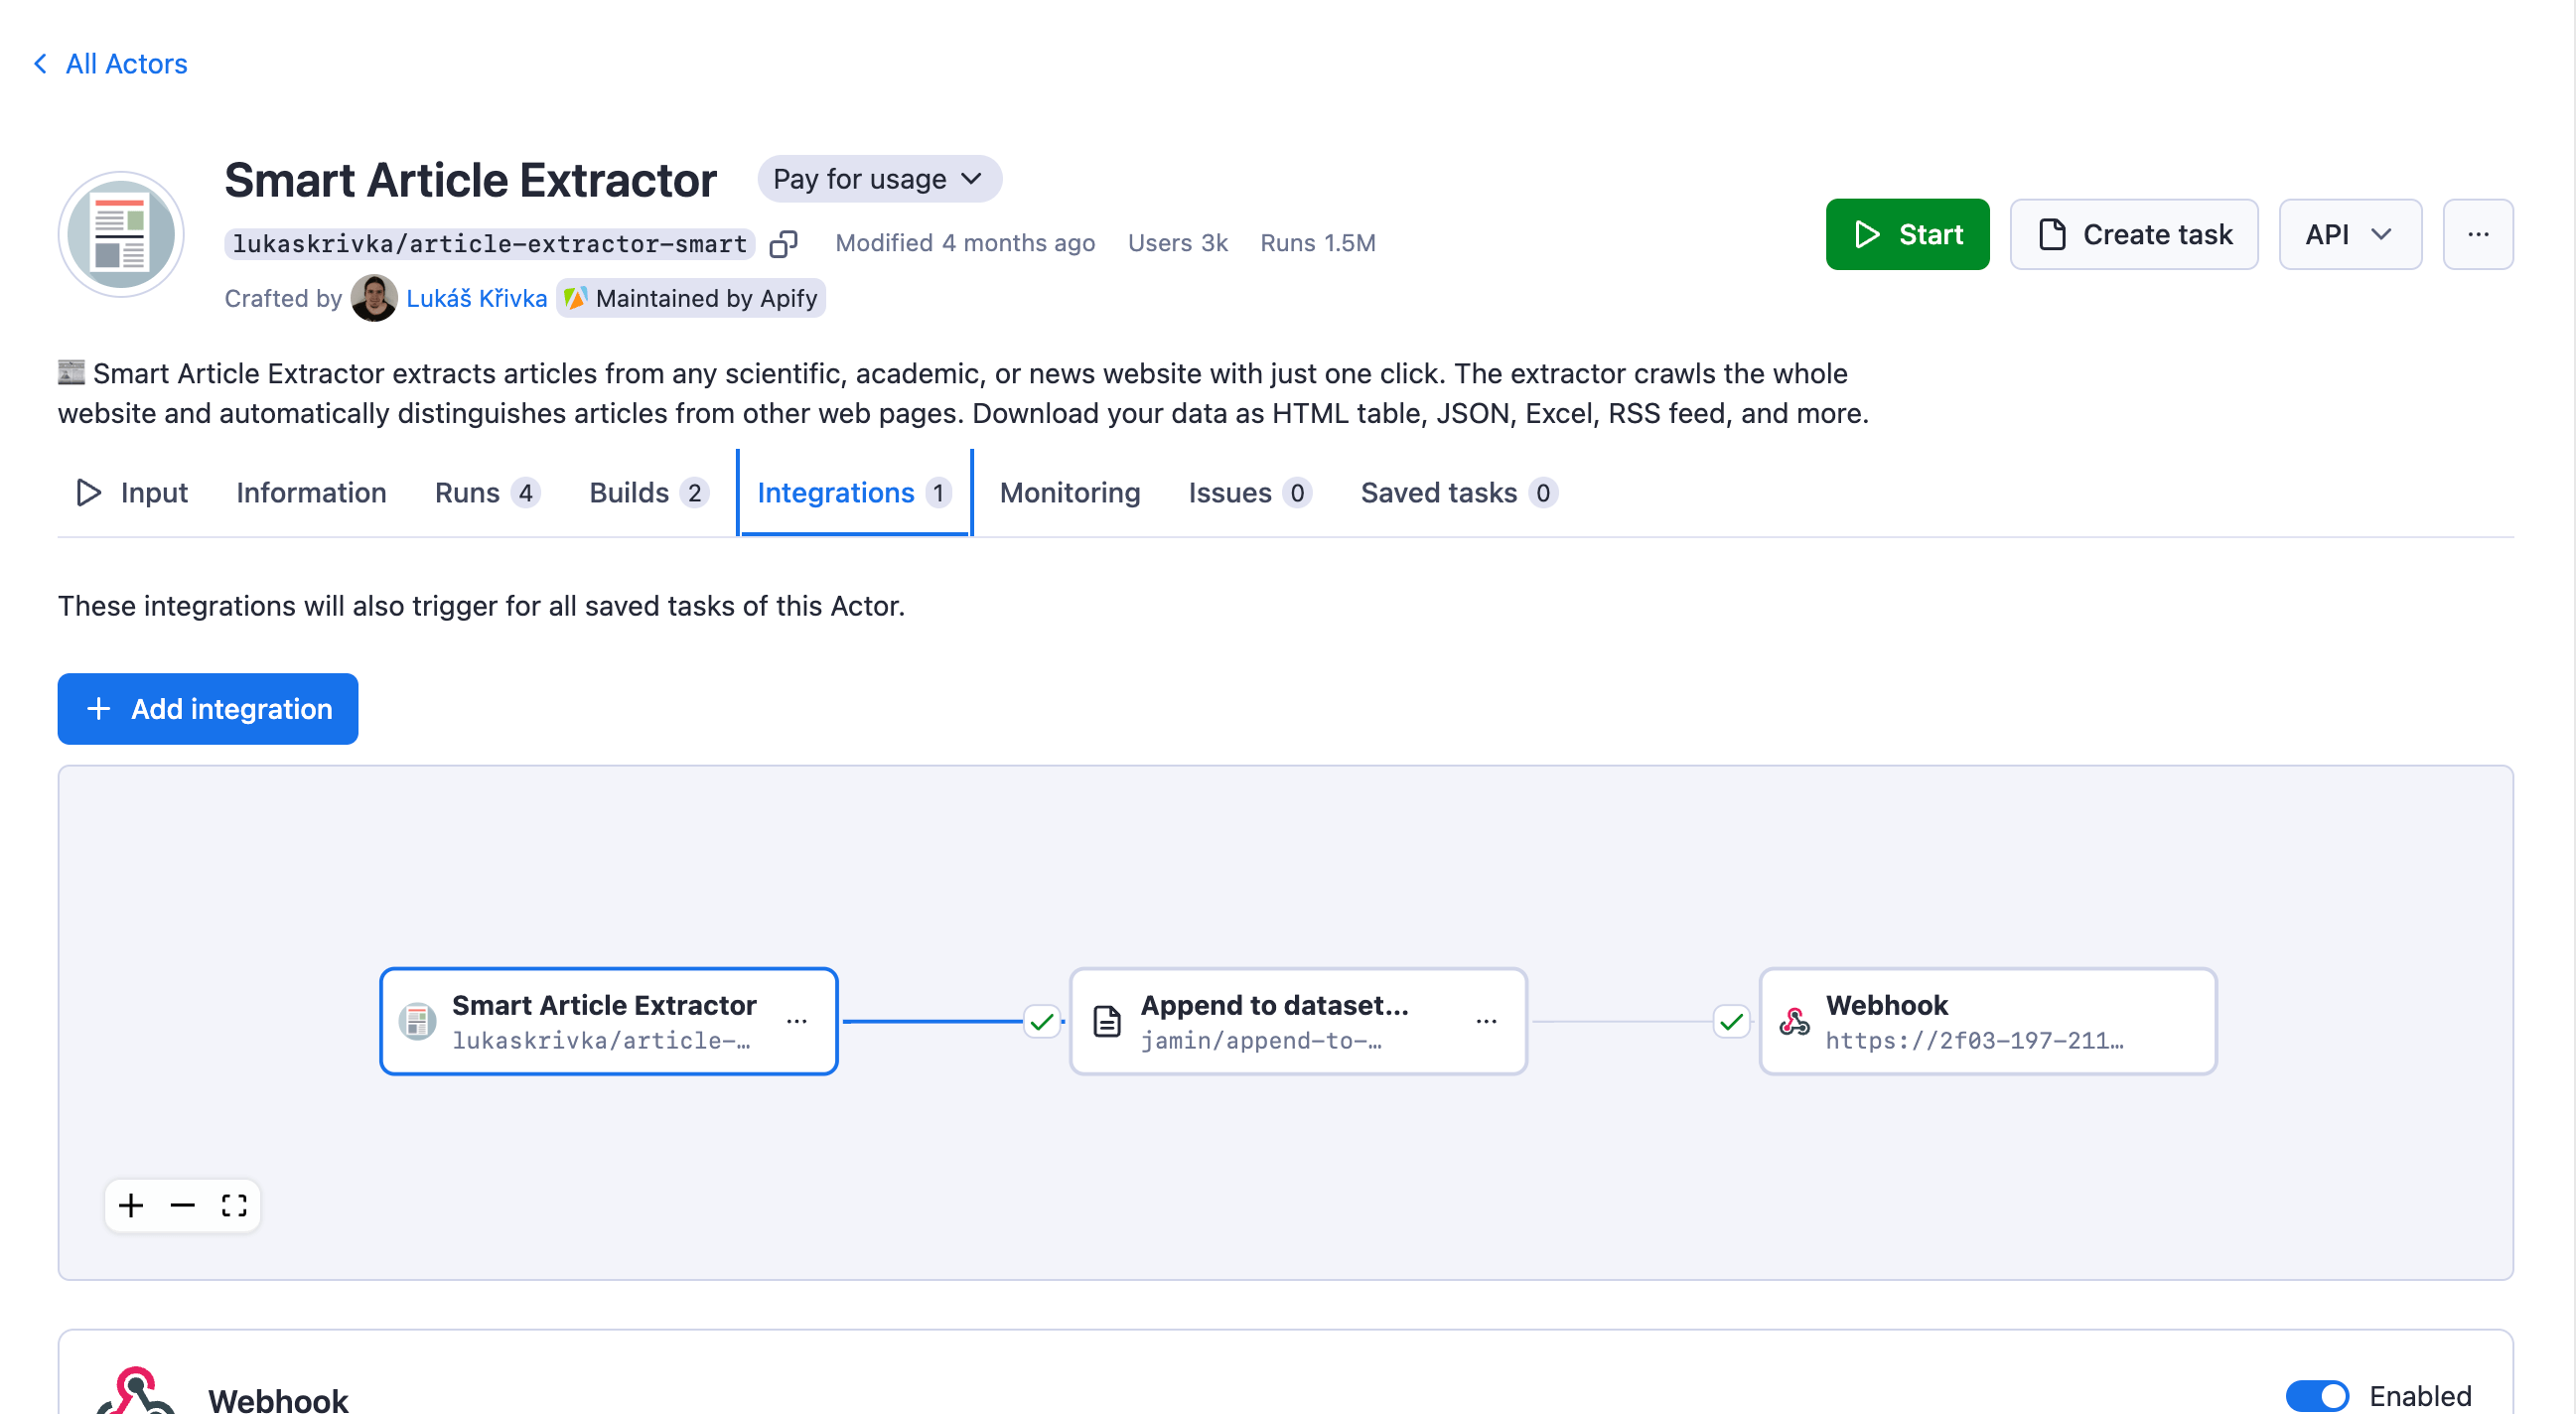
Connecting the newsletter API as a webhook to Apify
To make the API work as intended, you need to connect it to the Apify Actor that scrapes the data, preferably when the dataset changes, as this indicates new data has been scraped.
To do this, go to Apify Console and navigate to Saved tasks → Append to dataset (Task) → Integrations to add a new HTTP webhook. Click on the 'Configure' button to configure the webhook. Select the webhook event to be triggered when the task runs successfully and use the API URL (your_host/api/newsletter) as the URL for the webhook.
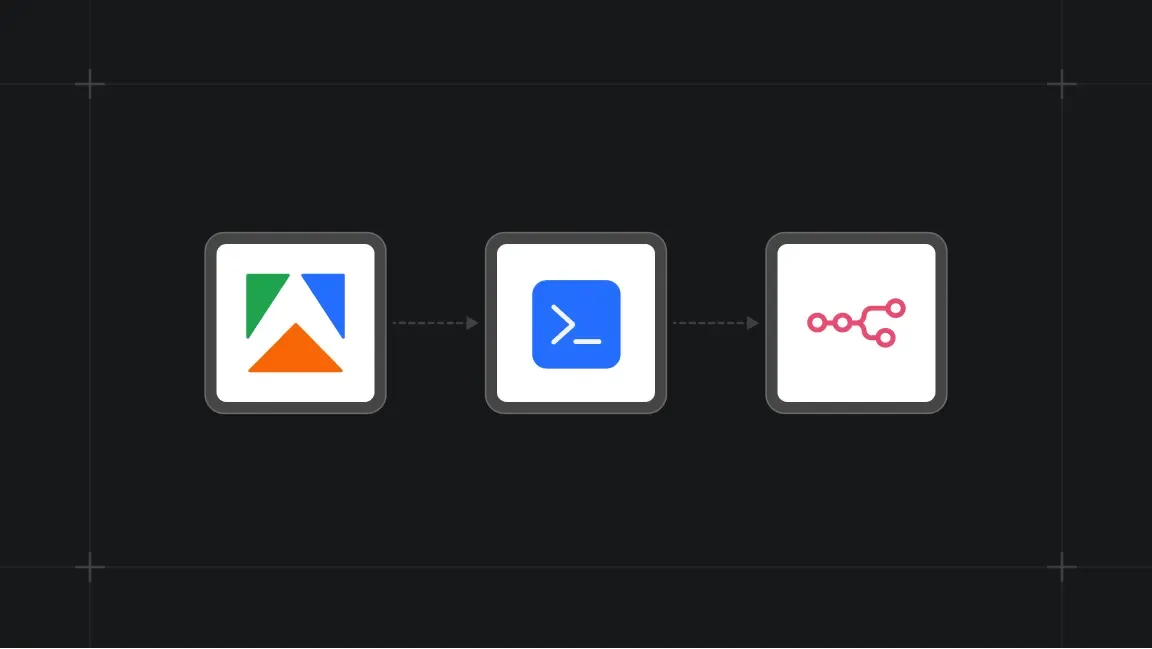
This tutorial used Ngrok to create a secure tunnel to expose the local development server ( http://localhost:3000) to the internet to test the webhook.
Recap and next steps
In this article, you've learned how to use Apify to build a news aggregator. Now you know how to:
- Use an Apify Actor to scrape data from multiple websites
- Schedule an Actor to run at daily intervals
- Create a task that runs based on a webhook
- Consume the dataset in a Next.js application
- Implement a subscription feature in a Next.js application and send emails to users using resend.com
- Create a custom webhook used by Apify when specific events happen.
To build this application further, you could consider the following steps:
- Consider proper error handling to deal with edge cases better.
- Consider adding pagination to the homepage to paginate the data displayed (the
apify-clientlibrary already has a structure for this). - Create more responsive email templates for sending emails to users.
- Explore Apify Store for more Actors that may suit your needs.