Each programming language has its own approach to web scraping, and Golang is no exception. In this tutorial, we’ll walk you through the key steps to building a web scraper in Go. We’ll go over the process and provide various code examples to help you get started with Colly, a popular Go library for building web scrapers and crawlers.
Prerequisites
Before you get started, make sure you've got the following:
- Install Golang on your machine (preferably the latest version). Head over to the official Golang website, download, and install the version that matches your system. Follow the specified installation instructions in the documentation. Verify the installation by running this command in your terminal:
go version
You should output the installed Golang version as follows:

- Good understanding of the Golang programming language.
With the prerequisites out of the way, let's proceed to set up a development environment which we'll be working from.
Set up the development environment
Now that you have installed Golang on your machine, let's set up a development workspace. We'll create a new directory for this project. To do that, in your terminal, type the following commands:
mkdir go-web-scraper
cd go-web-scraper
go mod init go-web-scraper
The go mod init will initialize a Golang module inside your project root folder—you should see a new go.mod file with the following content in your root folder:
module go-web-scraper

go 1.23.0
The version of Golang highlighted in the file will vary depending on the version you installed in your system.
Installing required packages
Golang is fast, has built-in concurrency support, and a ton of great technologies for handling different compute-heavy and resource-intensive tasks, including web scraping.
The two most popular libraries for web scraping in Golang include:
In this guide, we'll be using Colly to scrape Hacker News.
To install Colly, open your terminal and run the following command:
go get -u github.com/gocolly/colly/...
Great! Since you have set up the environment and installed Colly, we're ready to start building the web scraper.
Building a basic Golang scraper with Colly
Colly is a popular library that you can use to build different types of web crawlers and scrapers in Golang. It provides a feature-rich API that can handle a ton of scraping tasks, including distributed web scraping, HTML and XML parsing (as well as DOM manipulation), automatic cookie management, built-in HTTP request delays, and more.
Colly’s core entity is the Collector object that provides access to several useful event-driven methods that form the basis of the scraping process. The most common include:
- OnHTML: This method is commonly triggered after
OnResponsemethod, but only if the server returns a valid HTML document. With the HTML document, the scraper can then parse the content, extract elements using CSS selectors, and process structured data. - OnResponse: Colly executes this method after receiving a server response. This method is useful for handling raw response data, checking status codes, and extracting information from HTTP headers.
- OnError: To manage unexpected situations while running the scraper, we can use this method and define specific callbacks that will be executed when an error happens while making a request, parsing a page, or performing other actions related to scraping.
- OnRequest: Runs before any HTTP request is made. This method lets you modify request headers, log URLs, or cancel requests if needed.
Each of these functions accepts callbacks, which execute when the associated event occurs.
To start using Colly, you need to initialize the Collector object with the NewCollector() method as follows:
c := colly.NewCollector()
This creates the collector for your scraper, which you can then customize with various event triggers, callbacks, and configurations.
To build a basic Golang scraper with Colly, let’s start by creating a new file named app.go in your project's root directory. To do that, run your system-specific command on your terminal:
# Unix and Linux systems
touch app.go

# Windows systems
echo. > app.go
Now, inside the app.go file, create a simple “Hello, World!" program to verify that your Golang environment is set up correctly:
package main

import (
    "fmt"
)

func main() {
    fmt.Println("Hello, World!")
}
Go ahead and run the following command on your terminal to run the application.
go run app.go
Remember that the main() function serves as the entry point for Golang apps, and this is where you'll add your web scraping logic using Colly.
Using the browser developer tools to inspect the target website
Before you start scraping, it's crucial to understand the structure of the website you’re targeting. Each website has its unique HTML structure. Identifying the specific elements we want to extract data from is key to running an efficient and accurate scraper.
To do that, go ahead, and access the built-in developer tools to inspect Hacker News’ homepage HTML structure. Here's how to do it.
- Head over to Hacker News’ website on your browser and right-click anywhere on the webpage.
- Select the Inspect or Inspect Element from the context menu.
- This will open the Developer Tools panel, usually to the right or bottom of your browser window.
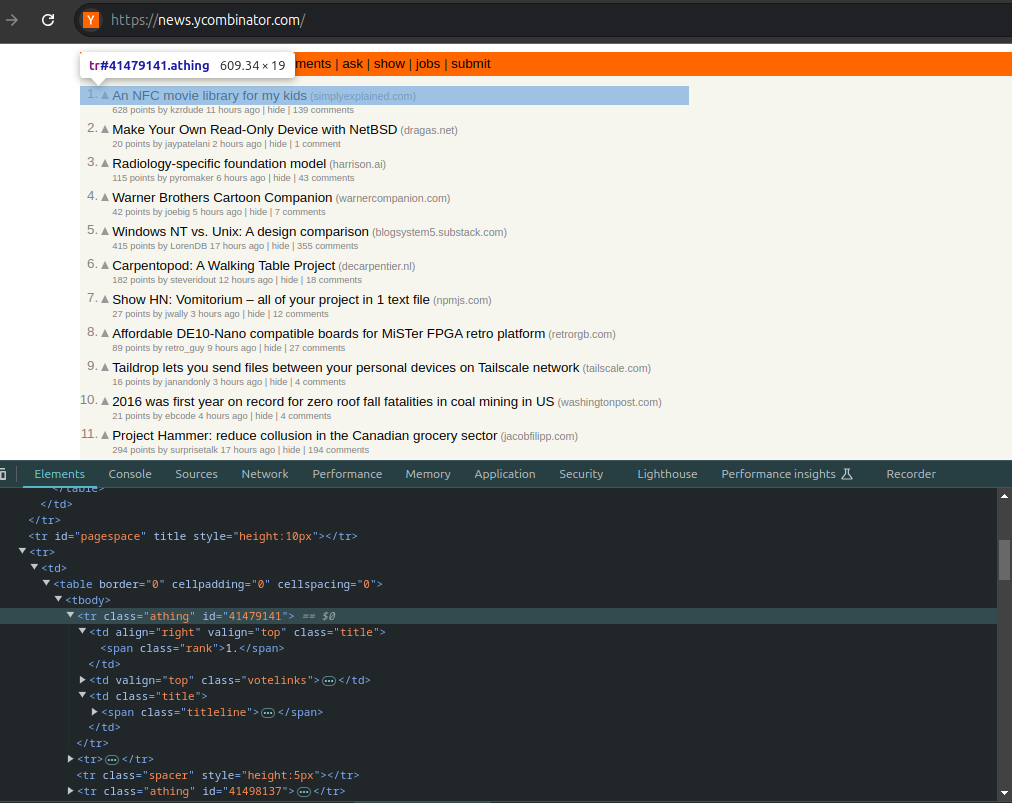
Once the developer tools window is open, you can hover over different parts of the webpage. As you do this, in the Elements Tab, the browser will highlight the corresponding elements in the HTML structure. Starting with this step before scraping is important since you can easily (even though it requires manual operation)identify which HTML elements correspond to the data you want to scrape.
To access the required data, you can use different CSS selectors (such as classes, IDs, etc.) together with DOM manipulation methods( a bit of JavaScript code) to log them on the Console tab.
Don't worry if you're not familiar with JavaScript—we'll take you through it step by step.
An important tip while building different scrapers—even if you're building a Golang web scraper, it's essential to be familiar with HTML, CSS, and JavaScript syntax, as it will help you properly write your scraper to target and extract the kind of data you want from different sites.
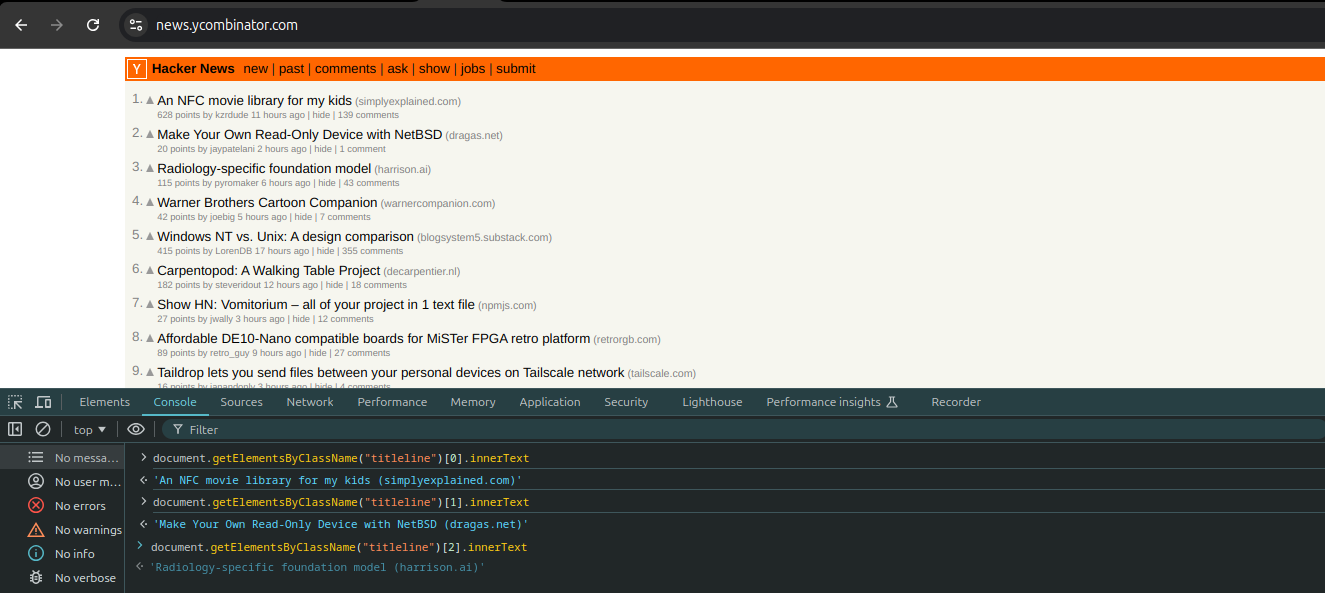
Let's try to grab the news titles and log them on the console. Going back to the image above, if we inspect the element further, you can see that the article titles are in a <tr> tag with the class .athing, wrapped in the <body> tag.
There are several methods we can use to log the titles, targeting various elements using different CSS selectors.
Since we’re testing on the browser, we can be a little specific, and target the article titles directly using their class names.
In our browser's console, type the following commands:
document.getElementsByClassName("titleline")[0].innerText
document.getElementsByClassName("titleline")[1].innerText
document.getElementsByClassName("titleline")[2].innerText
The document.getElementsByClassName() method targets all the elements with the class attribute selector that you specify, in this case, “timeline”.
Since this method returns an array of different items( different article titles) on the page, you can specify the index of the element you want to get the title of and add the innerText method to log the specific title.
Once you do that, you should see each of the three article titles. The output will look something like this:
This is the same process we'll use to build the Golang web scraper—we’ll specify which elements it will target to extract important data.
However, instead of doing it manually on the console, we'll automate the process by running the Golang Scraper script. This way, with an automated web scraping process, you can even broaden the scope of the kind of data you want or scale up to collect large amounts of data.
Scraping with Colly
Now that we understand the structure of the target website, let's automate the scraping process using Colly. We'll start by scraping the titles of posts on the Hacker News website.
Before we start scraping, let’s define a data structure to hold the scraped data. For this demo, let’s use a simple structure to store the title and URL of each post.
In the app.go file, copy, and paste the following code:
package main

import (
	 "fmt"
	"github.com/gocolly/colly/v2"
)

type Post struct {
	Title string
	URL   string
	Score string
	User  string
}
Next, you need to initialize a new Colly collector instance. Create a new main() method and define the collector as follows:
func main() {
	c := colly.NewCollector()
}
Colly uses Goquery under the hood, which means we can use CSS selectors to pinpoint exactly what we want to scrape. In this case, we're interested in the titles of posts, which are contained in span tags with the class titleline .
We'll use the OnHTML method to trigger the scraping event when a CSS selector matches the target element in the parsed HTML document. Then we'll extract the post titles.
For now, let's log out the titles on the terminal to test if the process works as expected.
c.OnRequest(func(r *colly.Request) {
		fmt.Println("Visiting", r.URL)
	})

c.OnHTML("span.titleline", func(e *colly.HTMLElement) {
	fmt.Println(e.Text)
})
Finally, to specify which website we should make HTTP requests to, we’ll call the Visit method. This allows Colly to perform HTTP GET requests to the target page and retrieve the HTML document. Colly then parses the HTML document and executes the callback functions that we specified inside the OnHTML method.
c.Visit("<https://news.ycombinator.com/>")
Now, add the OnError event method to handle errors that occur during the scraping process. This will enable the scraper to manage errors effectively and prevent the scraper from crashing mid-run.
c.OnError(func(r *colly.Response, err error) {
	fmt.Println("Error:", err)
})
You can customize the callback to trigger different operations if the scraper encounters issues while running. For instance, you can add a handler to manage retries. adjust network request intervals.
To run this script, simply type the following command in your terminal:
go run app.go
You should now see a list of post titles from the first page of the website.
And that's it! You've successfully scraped the post titles from Hacker News using Colly.
Extracting different HTML elements
Now that we have a good grasp of the logic behind a Colly scraper, let's scale it up and extract a bunch of data about the post.
You can modify the onHTML method to specify different HTML elements to scrape as follows:
c.OnHTML("tr.athing", func(h *colly.HTMLElement) {
		post := Post{}

		post.Title = h.ChildText("td.title > span.titleline > a")
		post.URL = h.ChildAttr("td.title > span.titleline > a", "href")


		subtext := h.DOM.Next()
		post.Score = strings.TrimSpace(subtext.Find("span.score").Text())
		post.User = strings.TrimSpace(subtext.Find("a.hnuser").Text())

		fmt.Printf("Title: %s\\nURL: %s\\nScore: %s\\nUser: %s\\n\\n", post.Title, post.URL, post.Score, post.User)
	})
The initial implementation only logged post titles. With this update, the scraper now targets the entire table row( Hacker News lists its post entries in tables) with the class tr.athing, extracting, and logging the post title, URL, score, and user for each entry on the page.
Advanced scraping techniques
Now that we've covered the basics, let's improve the scraper with a couple of additional scraping techniques.
Handling pagination
The current scraper implementation only handles a single page. Depending on the specific use cases and scenarios, you'll often need to scrape multiple pages.
How do you implement this functionality? Well, you first need to understand how the target website handles pagination—structuring large chunks of data to allow easy navigation.
Ideally, different websites manage this process (pagination) in various ways. Some use previous and next buttons, along with numbered page links. While others, implement infinite scrolling with a “load more data” button.
Hacker News keeps it simple; it handles pagination with a More link at the bottom of the page. This link has an anchor tag with a rel attribute set to next.

Now, knowing this, to scrape multiple pages with the Golang scraper, start by targeting the More link on the page using its class name CSS selector .morelink.
Next, add an OnHTML event method to manage how the scraper will navigate to the next page. Essentially, when the scraper finds the link, its callback should trigger, converting the page's relative URL into an absolute URL. This way, the scraper can proceed to visit and scrape the subsequent page.
c.OnHTML(".morelink", func(e *colly.HTMLElement) {
	nextPage := e.Request.AbsoluteURL(e.Attr("href"))
	c.Visit(nextPage)
})
When you run your scraper, you should see a continuous stream of posts in your terminal, pulled from multiple pages of Hacker News. Notice that the existing scraping function (the function that extracts post information) will automatically run on each new page the scraper visits—you don't need to modify it at all.
To ensure that the scraper is accurate and outputs consistent results, let’s implement a simple check to track visited pages. Go ahead and modify the pagination function as follows:
visitedURLs := make(map[string]bool)
c.OnHTML(".morelink", func(e *colly.HTMLElement) {
		nextPage := e.Request.AbsoluteURL(e.Attr("href"))
		if !visitedURLs[nextPage] {
			visitedURLs[nextPage] = true
			c.Visit(nextPage)
		}
	})
With this update, the scraper will maintain a map of visited URLs. When it encounters a morelink, it first converts the relative URL to an absolute URL. It then checks if this URL has been visited before. If not, it marks the URL as visited and proceeds to visit it. If the URL has already been visited, it skips it to avoid redundant requests.
Adding a User Agent
Many websites implement anti-bot measures to prevent content scraping, often by blocking requests with certain User Agent headers or other characteristics.
By default, Colly uses this User-Agent header in its request headers:
User-Agent: colly - <https://github.com/gocolly/colly>
To log this default User Agent in your terminal, update the OnRequest event as follows:
 c.OnRequest(func(r *colly.Request) {
		fmt.Println("Visiting", r.URL)
    fmt.Println("User-Agent:", r.Headers.Get("User-Agent"))
	})
This default User Agent provided by Colly might not be sufficient when scraping sophisticated sites, as it could trigger anti-bot measures.
A great workaround to this would be spoofing a real browser’s User Agent header. This will ensure that your scraper’s HTTP requests to the target websites appear as if they come from a legitimate user.
To do that, add this line of code immediately after initializing the collector to set a custom User Agent:
c.UserAgent = "Mozilla/5.0 (Windows NT 10.0; Win64; x64) AppleWebKit/537.36 (KHTML, like Gecko) Chrome/126.0.0.0 Safari/537.36"
Another great way to bypass anti-bot measures is to use rotating proxies. This technique helps prevent IP bans that can occur when the scraper exceeds request rate limits by distributing requests across multiple IP addresses.
Optimizing the Golang scraper
Now let’s explore several techniques to make your scraper faster and more efficient.
Parallel scraping for improved performance
To speed up your scraping process, you can enable parallel scraping using Colly’s Async method. This enables the scraper to scrape multiple pages simultaneously, significantly reducing the time needed to extract data from the target web pages.
To enable parallel scraping, set the Async option when initializing your collector:
c := colly.NewCollector(
    colly.Async(true),
)
After starting the scraping with the Visit method, use c.Wait() to block execution until all asynchronous requests are completed:
c.Wait()
This ensures that the scraper finishes collecting data before moving on to other tasks.
Limiting the number of parallel requests
While enabling parallel scraping can be very efficient, it’s important to control the number of concurrent requests to avoid overwhelming the target server or hitting HTTP request rate limits prematurely.
To achieve this, use the Limit method to set a maximum number of parallel requests. For example, you can limit to 5 concurrent requests:
c.Limit(&colly.LimitRule{DomainGlob: "*", Parallelism: 5})
In this configuration, DomainGlob: "*" applies the limit to all domains, while Parallelism: 5 restricts the scraper to a maximum of 5 simultaneous requests.
Here is the complete updated code:
package main

import (
	 "fmt"
	"strings"

	"github.com/gocolly/colly"
)

type Post struct {
    Title string
    URL   string
    Score string
    User  string
}

func main() {

	visitedURLs := make(map[string]bool)


	c := colly.NewCollector(
		colly.Async(true),
	)
	// add the user agent and rate limit rule
	c.UserAgent = "Mozilla/5.0 (Windows NT 10.0; Win64; x64) AppleWebKit/537.36 (KHTML, like Gecko) Chrome/126.0.0.0 Safari/537.36"
	c.Limit(&colly.LimitRule{DomainGlob: "*", Parallelism: 5})


	c.OnRequest(func(r *colly.Request) {
		fmt.Println("Visiting", r.URL)
		fmt.Println("User-Agent:", r.Headers.Get("User-Agent"))
	})


	c.OnHTML("tr.athing", func(h *colly.HTMLElement) {
		post := Post{}
		post.Title = h.ChildText("td.title > span.titleline > a")
		post.URL = h.ChildAttr("td.title > span.titleline > a", "href")


		subtext := h.DOM.Next()
		post.Score = strings.TrimSpace(subtext.Find("span.score").Text())
		post.User = strings.TrimSpace(subtext.Find("a.hnuser").Text())


		fmt.Printf("Title: %s\\nURL: %s\\nScore: %s\\nUser: %s\\n\\n", post.Title, post.URL, post.Score, post.User)


	})


	c.OnHTML(".morelink", func(e *colly.HTMLElement) {
		nextPage := e.Request.AbsoluteURL(e.Attr("href"))
		if !visitedURLs[nextPage] {
			visitedURLs[nextPage] = true
			c.Visit(nextPage)
		}
	})


	c.OnError(func(r *colly.Response, err error) {
		fmt.Println("Error:", err)
	})


	c.Visit("<https://news.ycombinator.com/>")


	c.Wait()
}
Now, since we are logging the results in the terminal, let’s go over the steps for persisting the scraped data.
Storing scraped data
Finally, after scraping data, you need to decide how to store it. There are several options, such as storing the data in CSV files, JSON files, or persisting it in a database.
For this demo, let’s go over the steps of how to store the scraped data in both CSV and JSON files.
Saving to a CSV file
To save the scraped data to a CSV file, we’ll use Go’s encoding/csv package. This method is straightforward and suitable for simpler use cases.
Now, to save the scraped data, we need to make a couple of changes to the scraper. For starters, go ahead, and import the following packages:
    "encoding/csv"
    "encoding/json"
    "os"
Inside the main function, initialize a slice to hold your scraped posts:
var posts []Post
Now, modify your scraping function to append each Post to the posts slice. To do that, add this line of code at the end of your scraping logic within the OnHTML callback:
posts = append(posts, post)
After calling c.Wait() to ensure all data is collected, call the following functions to save your data:
saveToCSV("results.csv", posts)
saveToJSON("results.json", posts)
Next, create the function to write the data to a CSV file.
func saveToCSV(filename string, posts []Post) error {
    file, err := os.Create(filename)
    if err != nil {
        return err
    }
    defer file.Close()

    writer := csv.NewWriter(file)
    defer writer.Flush()

    err = writer.Write([]string{"Title", "URL", "Score", "User"})
    if err != nil {
        return err
    }

    for _, post := range posts {
        err := writer.Write([]string{post.Title, post.URL, post.Score, post.User})
        if err != nil {
            return err
        }
    }

    return nil
}
In this function, we use the built-in os library to create a new CSV file and the encoding/csv package to handle data writing. We’ll use the Write method to write a header row and then write each Post from the posts slice to the file.
Saving to a JSON file
Lastly, let’s define the function of saving the data to a JSON file. For this, you'll need to define a new struct to manage JSON serialization:
type JSONPost struct {
    Title string `json:"title"`
    URL   string `json:"url"`
    Score string `json:"score"`
    User  string `json:"user"`
}

func saveToJSON(filename string, posts []Post) error {

    var jsonPosts []JSONPost
    for _, post := range posts {
        jsonPosts = append(jsonPosts, JSONPost{
            Title: post.Title,
            URL:   post.URL,
            Score: post.Score,
            User:  post.User,
        })
    }

    file, err := os.Create(filename)
    if err != nil {
        return err
    }
    defer file.Close()

    encoder := json.NewEncoder(file)
    encoder.SetIndent("", "  ")

    err = encoder.Encode(jsonPosts)
    if err != nil {
        return err
    }

    return nil
}
The saveToJSON function first creates the file using os.Create, then uses json.NewEncoder to encode the JSONPost slice into the file while indenting the post data for improved readability.
To test this out, go ahead, and run the scraper. After the process completes successfully, you should find two new files in the root directory of your project: results.csv and results.json with the scraped data.
For reference, you can find the complete code in this GitHub repository.
What’s next?
Awesome! You have now successfully built a Golang web scraper using Colly. We've covered a number of steps, from the basic setup to handling advanced use cases like data storage.
A key takeaway is that when using the Hacker News Scraper, you'll notice Golang’s advantage as a compiled language. Since it outputs machine code directly, it's faster and more efficient than interpreted languages like Python. This speed can be useful if you're building an asynchronous scraper to handle large datasets. Plus, Go's built-in goroutines make it easy to scale your scraping service while running other API tasks concurrently.
The downside of working with Golang, however, is getting accustomed to its syntax, especially if you’re used to dynamically typed languages. But with time, it's quite manageable. And again, unlike Python and JavaScript, Golang has a relatively smaller library eco-system for handling different tasks.
Deploy your scraping code to the cloud
Headless browsers, infrastructure scaling, sophisticated blocking.
Meet Apify - the full-stack web scraping and browser automation platform that makes it all easy.