When you create a new Actor in Apify Console, you can now pick GitHub, GitLab, or Bitbucket. Apify sets up the whole Git workflow for you: it creates the repository, pushes the Actor template code into it, and configures the build. From that moment, every push to the repo builds your Actor automatically. The same flow works in the Apify CLI through the apify create command.
Why connect Git?
With the source in a Git repository, your Actor gets the workflow you already use everywhere else:
- Version history. Every change is a commit you can review, compare, and roll back.
- Collaboration. You get branches, pull requests, and code reviews instead of editing one shared copy of the code.
- Automatic builds. Push a commit, and Apify builds a new version of your Actor.
What connecting Git used to take
If you wanted your Actor's source code in a Git repository, the flow in Apify Console was:
- Create the repository yourself on GitHub, GitLab, or Bitbucket.
- Add the Actor template code into it.
- In your Actor's Source tab, switch the source type to Git repository and paste the Git URL, with
#branch-namesyntax if you wanted a specific branch or folder. For a private repository, switch to the SSH form of the URL and add the Actor's deployment key to your repo.
The Apify CLI wasn't any better. The apify create command scaffolded the code locally, but connecting it to Git meant creating the repository, adding the origin manually, and then doing the Apify Console configuration above anyway (or wiring up GitHub Actions yourself).
Every step assumed you knew what a deployment key or a build trigger was. Miss one, and your pushes silently didn't build anything.
The new flow in Apify Console
Creating an Actor now walks you through four steps:
- What do you want to build? A web scraper, an AI agent, an API and data pipeline, or browser automation.
- Which language do you prefer? TypeScript, JavaScript, or Python.
- Here's your best match. Templates matched to your answers, so you start from working code instead of browsing a template gallery.
- Where do you want to host your code? This is the new part.
The first two questions each have a Not sure? option if you'd rather get help picking.
Choose Git, then GitHub, GitLab, or Bitbucket. You authorize the provider through OAuth, select the account or organization the repository should live under, and Apify does the rest: creates the repository, pushes the Actor template code, and configures the build. The new repository is private. You can make it public later in your provider's settings.
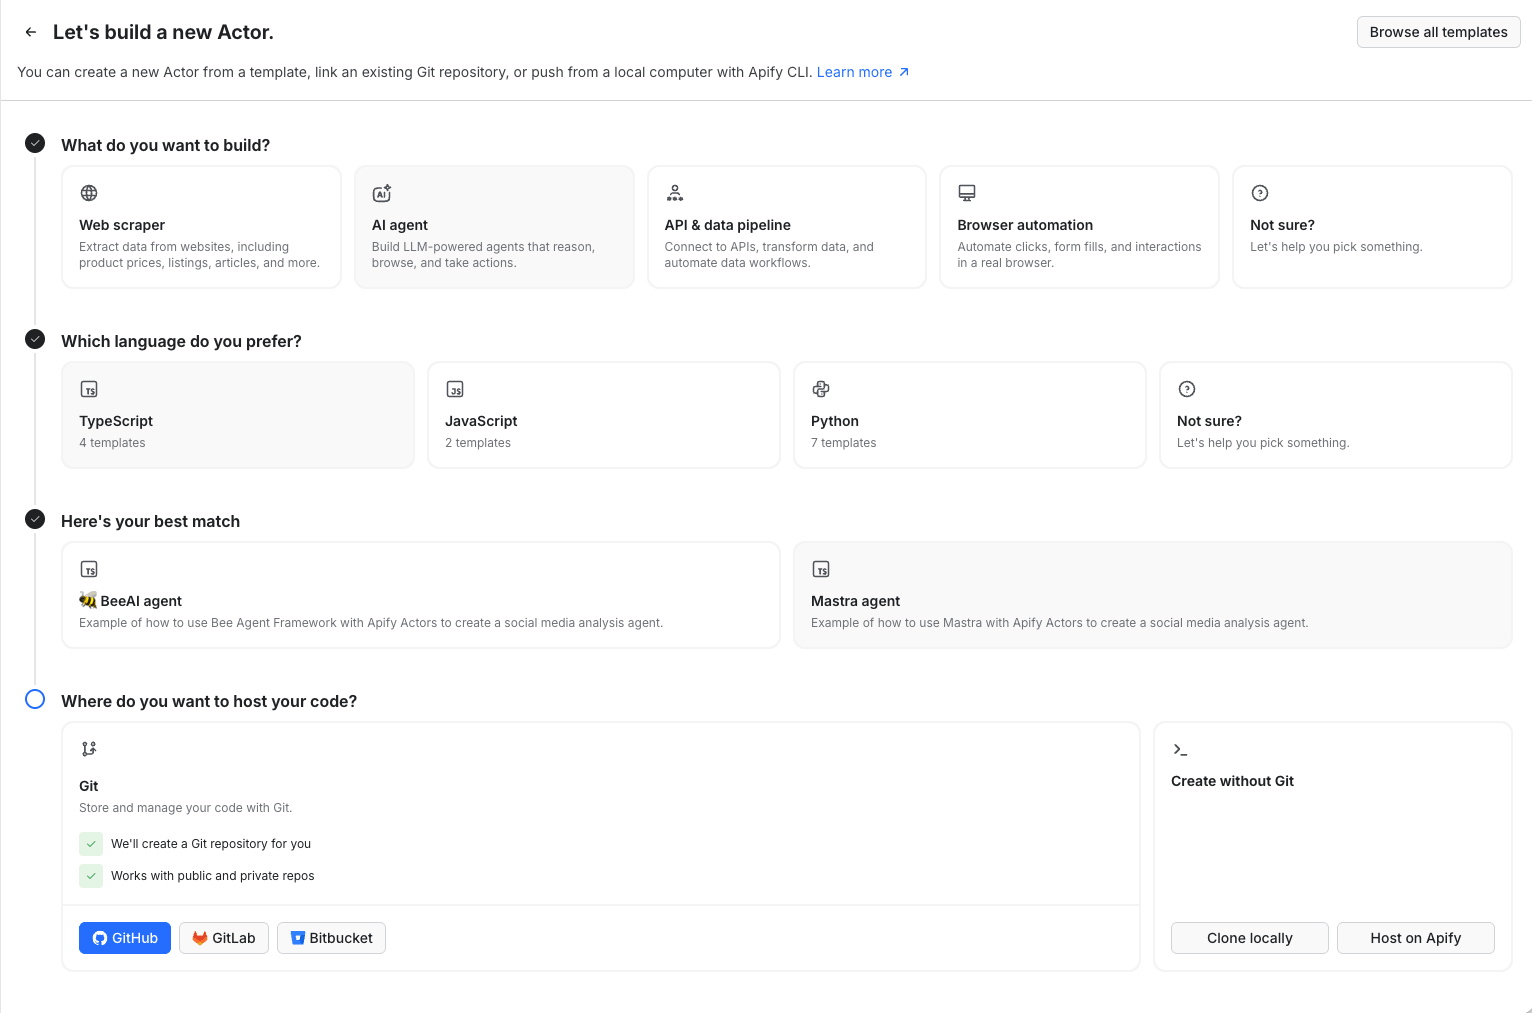
If you don't want Git, Create without Git is still there: Clone locally or Host on Apify.
The same flow in the Apify CLI
The apify create command now mirrors Apify Console. Instead of scaffolding a local folder and leaving the Git setup to you, it walks you through the same choices: template, then where the code lives. Pick a Git provider and you get the same result as in Apify Console: a repository created under your account with the Actor template code pushed and builds configured.
What this changes day to day
The build pipeline is configured for you from the first minute. You push a commit, Apify builds the Actor. Your code lives in your own repository from day one, with pull requests, reviews, continuous integration, and everything else you already do with Git.
The new feature is live for everyone, on every plan. Open https://actor.new, and see for yourself. Or get the latest version of the Apify CLI and run apify create in your terminal.