Hey, we're Apify. You can build, deploy, share, and monitor your scrapers on the Apify platform. Check us out.
Puppeteer is a Node.js library that can interact with headless and headful Chrome browsers. You can use Puppeteer to perform automation tasks such as automating file uploads and downloads, taking screenshots of websites, and generating PDFs.
There's even more you can do with Puppeteer, including adding proxies to your automation scripts.
In this article, you'll learn how to use proxies in Puppeteer, authenticate proxies, and avoid common pitfalls.
What is a proxy in Puppeteer?
A proxy acts as an intermediary between your Puppeteer scripts and the target website, hiding your IP address and displaying the proxy address to the website (the target website can still monitor your traffic through cookies).
The proxy allows you to make multiple requests to a website if there’s a need for it without being detected or blocked.
You can also be able to access websites that are limited to a particular region for the purpose of testing how websites are designed or behave in those regions.
In the next section, you will learn how to set up a proxy in your puppeteer script.
How to set up a proxy in Puppeteer
You need to have
Node.js and NPM installed on your computer.To set up a proxy in your project, create a folder and change your directory into the folder (the folder can be created on your desktop, in documents, or at your desired file location).
mkdir pptProxy && cd pptProxy
npm init -y
npm install puppeteer
The command above will create a folder called pptProxy; it will change your working directory into the folder, and the second command, npm init -y, will create a Node instance for your project.
This Node instance allows you to run any command related to Node using the npm package. The third command will install Puppeteer for your project.
Before you go further, you need to have a proxy.
You can get a proxy from any of the listed free proxy providers here, but we recommend using paid proxy services as a general rule.
Some proxies require no authentication, while others require authentication.
Within your puppeteer.launch function, introduce a flag --proxy-server, which tells your script to use a proxy.
const browser = await puppeteer.launch({
Replace the proxy with the IP address and port
    args: ['--proxy-server=your-proxy-IP:port']
  });
When your script is complete and set to run, all the requests on the target website will be made through the proxy server provided.
To verify your configuration, visit https://httpbin.org/ip before running the script.
Take note of your own IP address, run the script, and take a screenshot of the page.
Compare the output IP to see if it matches the proxy IP.
Example
import puppeteer from "puppeteer";

const browser = await puppeteer.launch({
    args: ["--proxy-server=your-proxy-IP:port"]
});
 const page = await browser.newPage()

 await page.goto('https://httpbin.org/ip');

screenshot code, full-page option
await page.screenshot({ path: 'apify.jpeg', fullPage: true });

// close the browser
await browser.close();
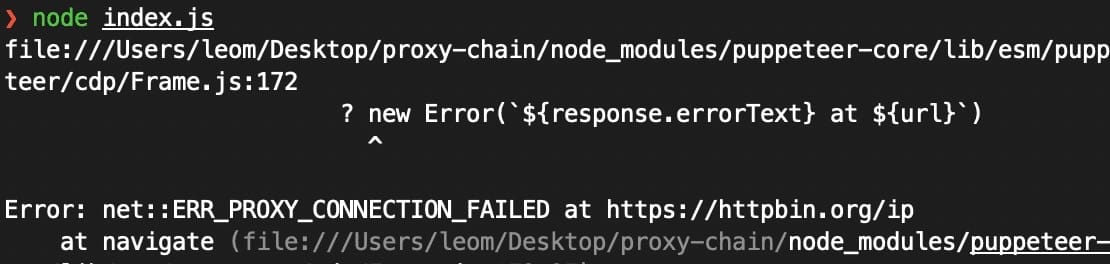
When using a proxy server, understand the protocol your proxy is using (either HTTP, HTTPS, or socks5). If you are not using the correct one, you might encounter failure such like the image below.
Premium proxy providers require you to authenticate your use of their servers; hence, a need for credentials arises. When you use a proxy requiring authentication in a non-headless browser (specifically Chrome), you'll be required to add credentials into a popup dialog that looks like this:

The problem with running in headless mode is that this dialog never exists, as there is no visible UI. This means that you must take another approach to authenticate your proxy.
Example
const browser = await puppeteer.launch({
    args: [`--proxy-server=https://myUsername:myPassword@my.proxy.com:8080`],
});
The above proxy configuration won't work because Chrome doesn't support passing the proxy credentials directly; they'll be ignored. You can solve that problem using a package we'll go into later.
The next section will guide you on how to authenticate a proxy in Puppeteer.
How to authenticate a proxy in Puppeteer
If you're using a proxy server that requires authentication, as stated earlier, you have to pass the login credentials separately, and Puppeteer has provided different ways to perform this operation. Let's go through them.
1. Using the authenticate() method on the puppet page object
The authenticate() method accepts the pair of credentials which will be used for basic HTTP authentication
import puppeteer from "puppeteer"

const proxy = 'https://your.proxy.com:7001';
const username = 'jimmy49';
const password = 'password123';

// Pass proxy URL into the --proxy-server arg
 const browser = await puppeteer.launch({
        args: [`--proxy-server=${proxy}`],
    });

 const page = await browser.newPage()

 Authenticate your proxy before visiting the target website
 await page.authenticate({ username, password });

 await page.goto('https://httpbin.org/ip');

//screenshot fullpage option
await page.screenshot({ path: 'apify.jpeg', fullPage: true });

Close the browser
await browser.close();
If you set your proxy URL correctly and ensure your login credentials are accurate, then your script will work accurately.
2. Using the proxy-chain NPM package
The proxy-chain package is an open-source package developed by and maintained by Apify, which provides a different approach with a feature that allows you to easily "anonymize" an authenticated proxy.
This can be done by passing your proxy URL with authentication details into the proxyChain.anonymizeProxy method, then using its return value within the --proxy-server argument when launching Puppeteer.
To use proxy-chain in your project, you need to install the library using npm install proxy-chain
import puppeteer from 'puppeteer';
import proxyChain from 'proxy-chain'

const proxy = 'http://my.proxy.com:3001';
const username = 'jimmy49';
const password = 'password123';

    const originalUrl = `http://${username}:${password}@${proxy}`;

    // Return anonymized version of original URL; it looks like <http://127.0.0.1:45678>
    const newUrl = await proxyChain.anonymizeProxy(originalUrl);

    const browser = await puppeteer.launch({
        args: [`--proxy-server=${newProxyUrl}`],
    });

    const page = await browser.newPage();

    await page.goto('https://httpbin.org/ip');

		//screenshot fullpage option
		await page.screenshot({ path: 'apify.jpeg', fullPage: true });

    await browser.close();

    // Close any pending connections
    await proxyChain.closeAnonymizedProxy(newProxyUrl, true);
An important thing to note when using this method is that after closing the browser, it is a good idea to use the closeAnonymizedProxy() method to forcibly close any pending connections that there may be.
This package performs both basic HTTP proxy forwarding, and HTTP CONNECT tunneling to support protocols such as HTTPS and FTP. It also supports many other features, so it is worth looking into it for other use cases.
3. Within ProxyConfigurationOptions in the Apify SDK
The Apify SDK is the most efficient way to write scalable automation and scraping software in Node.js using Puppeteer, Playwright, and Cheerio. If you aren't familiar with it, check out the documentation for either Javascript or Python.
Within the ProxyConfigurationOptions object in which you provide the Apify.createProxyConfiguration() method, there's an option named proxyUrls. This is simply an array of custom proxy URLs which will be rotated. Though it's an array, you can still pass only one proxy URL.
Pass your proxy URL with authentication details into the array, then pass the proxyConfiguration into the options of PuppeteerCrawler, and your proxy will be used by the crawler.
import { Actor } from 'apify';
import { PuppeteerCrawler } from 'crawlee';

await Actor.init();

const proxy = 'http://my.proxy.com:3001';
const username = 'jimmy49';
const password = 'password123';

    const requestList = await RequestList.open([{ url: '<https://google.com>' }]);

    // Pass authenticated proxy URL into proxyUrls
    const proxyConfiguration = await Actor.createProxyConfiguration({ proxyUrls: [`http://${username}:${password}@${proxy}`] });

    const crawler = new PuppeteerCrawler({
        requestList,
        requestQueue,
        // Pass proxyConfiguration into the crawler
        proxyConfiguration,
        async requestHandler({ page }){
            const title = await page.title();
            console.log(title);
        },
    });

await crawler.run();

await Actor.exit();
The advantage of using the Apify SDK for proxies over the first method is that multiple different custom proxies can be inputted, and their rotation will be automatically handled.
4. Setting the Proxy-Authorization header
If all else fails, setting the Proxy-Authorization header for each of your crawler's requests is an option. However, it does have its setbacks. This method only works with HTTP websites and not HTTPS websites.
Similarly to the first method, the proxy URL needs to be passed into the --proxy-server flag within args. The second step is to set an extra authentication header on the page object using the setExtraHTTPHeaders() method.
import puppeteer from "puppeteer"

const proxy = 'http://my.proxy.com:3001';
const username = 'jimmy49';
const password = 'password123';

    // Pass proxy URL into the --proxy-server arg
    const browser = await puppeteer.launch({
        args: [`--proxy-server=${proxy}`],
    });

    const page = await browser.newPage()

    // Pass in our base64 encoded username and password
    await page.setExtraHTTPHeaders({
    'Proxy-Authorization': 'Basic ' + Buffer.from(`${username}:${password}`).toString('base64'),
});

    await page.goto('https://www.google.com');

    await browser.close();
It's important to note that your authorization details must be base64-encoded. This can be done with the Buffer class in Node.js.
Once again, this method only works for HTTP websites, not HTTPS websites.
Using a rotating proxy in Puppeteer
Rotating proxies are the type of proxy server that changes IP address dynamically at a set interval for each website visit.
Rotating proxies provide dynamic flexibility. Their IP address changes over time, making it difficult for a website to detect the exact location from which visitors are coming.
It also allows you to access a website for a longer duration in case there's a restriction on the number of visits per day, as you have multiple IPs getting rotated.
You need to have access to a list of proxies that are reliable.
Create your Puppeteer script following the sample code.
import puppeteer from "puppeteer";

const proxyUrls = [
    'http://my.proxy.com:3001',
    'http://my.proxy.com:85',
    'http://my.proxy.com:8080'
];

    const randomProxyUrl = proxyUrls[Math.floor(Math.random() * proxyUrls.length)];

    const browser = await puppeteer.launch({
        args: [`--proxy-server=${randomProxyUrl}`]
    });

    const page = await browser.newPage();

    await page.goto('<https://httpbin.org/ip>');

		//screenshot code, fullpage option
		await page.screenshot({ path: 'apify.jpeg', fullPage: true });

    await browser.close();
The code above is an illustration of how to use rotating proxies with Puppeteer.
const randomProxyUrl = proxyUrls[Math.floor(Math.random() * proxyUrls.length)];
The line of code above selects a random proxy URL from the proxyUrls array. The Math.random() function generates a random number between 0 and 1, which is then multiplied by the length of the proxyUrls array.
After the calculation, when you run the code, a random proxy URL is used to perform the request.
If the proxies require authentication, use the authenticate() method to provide the credentials for the login.
Common pitfalls to avoid with Puppeteer proxy
When setting up a proxy for use with Puppeteer, you may encounter several issues:
- Invalid proxy URL: you might be using
httpto access a proxy that is meant to be accessed throughsocks5which will make your request not to go through. - Authentication issues: Some proxy providers require you to authenticate or validate your own IP address where you will be making these requests; otherwise, all your requests will fail. Also, be sure the proxy you use requires no authentication, and if it does, provide the appropriate credentials.
- Proxy server restrictions: You might be using a free proxy that has already been banned by the target website. The best solution is Apify Proxy, an HTTP proxy server endpoint that provides access to Apify’s large pool of proxies.
- Your hard-coded proxy rotation didn't work: If a single IP is being repeated, you can write code to limit an IP to a particular number of requests or use a loop to rotate the proxies available.
Best proxy for Puppeteer
The following are the best proxy providers that are used with Puppeteer:
1. Apify: Provides web scraping and automation solutions that include proxy services. Apify Proxy smartly rotates between datacenter and residential proxies to get the best performance while saving you money.
2. Oxylabs: Offers residential and data center proxies, and it can be used with Puppeteer.
3. Webshare: Provides a proxy service that allows users to test a limited number of proxies before purchase, and it can be used for Puppeteer tasks.
4. Storm Proxies: Offers a variety of proxy types, including residential and data center proxies that can be used for Puppeteer.
Conclusion
Puppeteer is used for performing various tasks such as automating file uploads/downloads, taking screenshots, and generating PDFs. Integrating proxies with Puppeteer increases its capabilities, helping you bypass geographical restrictions and preventing detection or getting blocked from multiple visits to targeted websites.
This article has shown you several ways to set up and authenticate proxies in Puppeteer, including Apify Proxy. Check it out.