Content
Introduction
Web scraping can be pretty challenging, especially when the website you're trying to scrape contains dynamic web pages, aka JavaScript-rendered pages.
Traditional scraping methods often fail to capture dynamically loaded content, which leaves a lot of valuable data out of reach.
Here's an example of what I'm talking about:
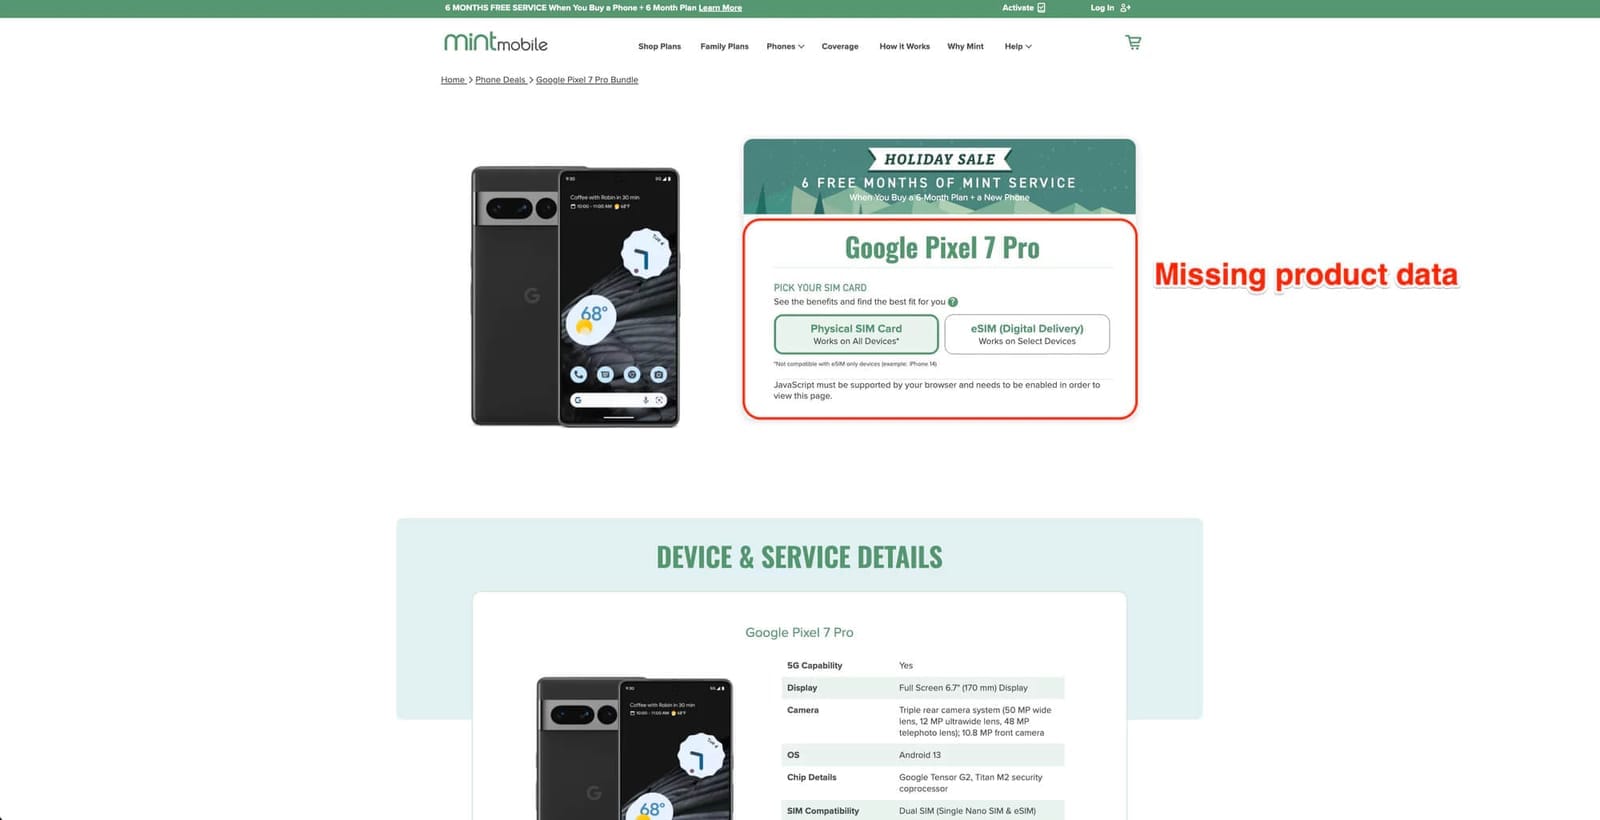
The purpose of this article is to guide you through effective methods to scrape JavaScript-rendered pages like this.
Understanding JavaScript-rendered web pages
"Static web pages are pre-rendered on the server and delivered as complete HTML files. Dynamic content is not initially present in the HTML source code and requires additional processing to be captured."
— Saurav Jain, Developer Community Manager
How to scrape dynamic websites with Python
Because JavaScript-rendered pages load content dynamically after the initial HTML has been retrieved, the source code you see when you inspect the page often doesn't contain the data you're trying to scrape. Instead, JavaScript executes in the browser to fetch and display content.
Static pages
Content is fully present in the initial HTML
JavaScript-rendered pages
Content is loaded or generated after the initial page load
Tools for scraping JavaScript-rendered pages
To scrape JavaScript-rendered pages, we need a tool that can execute JavaScript and interact with the page. Four popular Python options are:
- Selenium: A widely-used web automation tool that can control a real web browser (e.g., Chrome, Firefox) programmatically. Selenium is capable of executing JavaScript, rendering dynamic content, and interacting with web elements.
- Playwright: A modern, high-performance library for automating browsers. Playwright offers a Python API for controlling browsers like Chromium, Firefox, and WebKit.
- Scrapy Playwright: A library that combines Scrapy (a popular Python web scraping framework) with Playwright's browser interaction capabilities. Scrapy can't scrape JavaScript-rendered content on its own, so this combination remedies that limitation.
- Scrapy Splash: A combination of Scrapy and Splash (a lightweight browser rendering service). This approach offloads JavaScript rendering to a separate service, making Scrapy more efficient for large-scale scraping operations.
Selenium is the oldest and one of the most popular options for scraping dynamically loaded content, so we'll use that framework for this tutorial.
Scraping JavaScript-rendered web pages with Selenium
This step-by-step guide will walk you through the process of scraping data from a JavaScript-rendered web page using Selenium and Python.
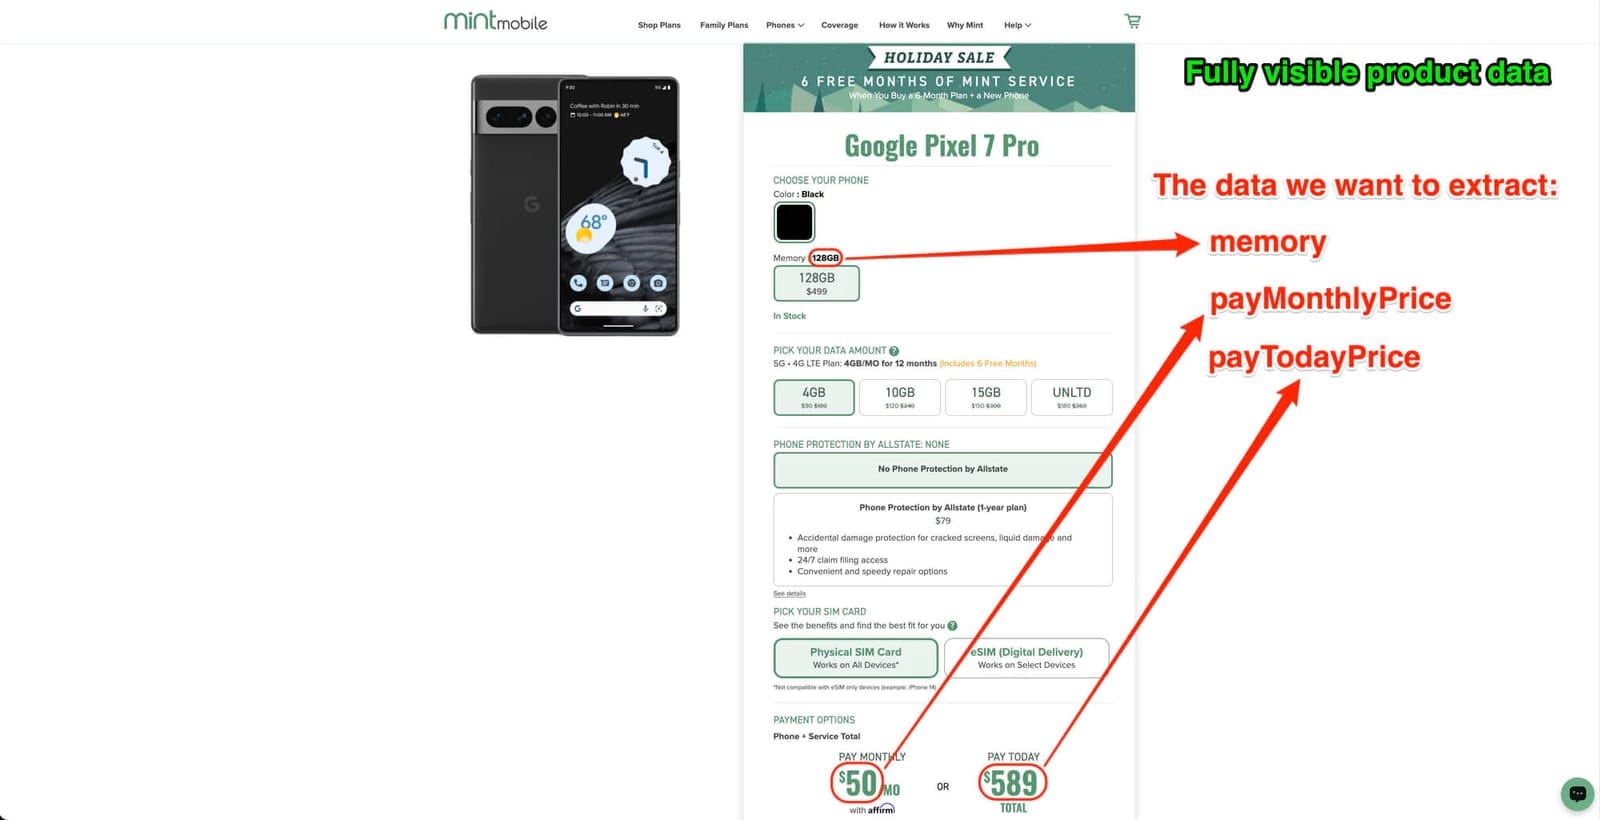
We'll use the Mint Mobile product page as an example.
Python 3.x installed on your system
Basic knowledge of Python and HTML
Step 1. Set up your environment
- a). Create a new directory for your project:
mkdir selenium_scraper
cd selenium_scraper
- b). Create a virtual environment:
python -m venv venv
source venv/bin/activate  # On Windows, use venv\\Scripts\\activate
- c). Install the required packages:
pip install selenium webdriver-managerOn macOS, you'll need to use
pip3 instead of pip and python3 instead of python when running commands.Step 2. Import required modules
Create a new file named main.py and add the following import statements:
from selenium import webdriver
from selenium.webdriver.common.by import By
from selenium.webdriver.chrome.options import Options
from selenium.webdriver.support.ui import WebDriverWait
from selenium.webdriver.support import expected_conditions as EC
from webdriver_manager.chrome import ChromeDriverManager
from selenium.webdriver.chrome.service import Service
import time
If you encounter issues with Chrome driver versions, the
webdriver_manager should handle this automatically. If problems persist, try updating Chrome to the latest version.Step 3. Create the SeleniumScraper class
Add the class definition and initialization method:
class SeleniumScraper:
    def __init__(self):
        chrome_options = Options()
        self.driver = webdriver.Chrome(service=Service(ChromeDriverManager().install()), options=chrome_options)

    def __enter__(self):
        return self

    def __exit__(self, exc_type, exc_val, exc_tb):
        self.driver.quit()
This sets up the Chrome WebDriver using webdriver_manager and allows use of the with statement for clean resource management.
Step 4. Start requests
Implement the website navigation and parsing trigger to navigate to the target URL:
    def start_requests(self):
        self.driver.get('https://www.mintmobile.com/product/google-pixel-7-pro-bundle/')
        self.parse()
Step 5. Find elements by class
Locate elements and extract their data using CSS selectors:
    def find_element_by_css(self, css_selector, attribute="text", child_index=None):
        element = WebDriverWait(self.driver, 10).until(EC.presence_of_element_located((By.CSS_SELECTOR, css_selector)))
        if attribute == "text":
            return element.text.replace('\\n', ' ').strip() if child_index is None else element.find_elements(By.CSS_SELECTOR, "*")[child_index].strip()
        return element.get_attribute(attribute)
This waits for elements to be present and then extracts their text or attributes as specified.
Step 6. Parse and extract the data
Define the data extraction and processing logic:
    def parse(self):
        time.sleep(5)

         data = {
            'name': self.find_element_by_css('h1[data-qa="device-name"]', 'text'),
            'memory': self.find_element_by_css('span[class^="simtype_selectedMemory__"]', 'text'),
            'pay_monthly_price': self.find_element_by_css('p[class^="paymentOptions_subtotalContent__"] > span:nth-child(1)', 'text'),
            'pay_today_price': self.find_element_by_css('p[class^="paymentOptions_subtotalContent__"] > span:nth-child(2) > span', 'text') + "/mo",
        }
        print(data)
This extracts specific data points from the web page.
In some web applications, especially those built with frameworks like React or Angular, class names may be dynamically generated. That is, they may change every time the page is loaded.
Dynamic class names, like the attribute
data-qa (short for 'data quality assurance') counteract this. These attributes are stable and don't change dynamically, which makes them reliable selectors for automation scripts.Step 7. Execute the web scraping script
Finally, add this code to make sure the scraper is properly initialized and executed when you run the script:
if __name__ == "__main__":
    with SeleniumScraper() as scraper:
        scraper.start_requests()
Complete script and output
from selenium import webdriver
from selenium.webdriver.common.by import By
from selenium.webdriver.chrome.options import Options
from selenium.webdriver.support.ui import WebDriverWait
from selenium.webdriver.support import expected_conditions as EC
from webdriver_manager.chrome import ChromeDriverManager
from selenium.webdriver.chrome.service import Service
import time

class SeleniumScraper:
    # Initialize the web driver for Chrome
    def __init__(self):
        chrome_options = Options()
        self.driver = webdriver.Chrome(service=Service(ChromeDriverManager().install()), options=chrome_options)

    # Allow use of 'with' statement for clean resource management
    def __enter__(self):
        return self

    # Ensure the web driver is closed after use
    def __exit__(self, exc_type, exc_val, exc_tb):
        self.driver.quit()

    # Start the web scraping process
    def start_requests(self):
        # Open the target webpage
        self.driver.get('https://www.mintmobile.com/product/google-pixel-7-pro-bundle/')
        self.parse()

    # Helper method to find elements and extract data
    def find_element_by_css(self, css_selector, attribute="text", child_index=None):
        # Wait for the element to be present before finding it
        element = WebDriverWait(self.driver, 10).until(EC.presence_of_element_located((By.CSS_SELECTOR, css_selector)))
        # Extract text or attribute based on parameters
        if attribute == "text":
            return element.text.replace('\n', ' ').strip() if child_index is None else element.find_elements(By.CSS_SELECTOR, "*")[child_index].strip()
        return element.get_attribute(attribute)

    # Parse the webpage to extract data
    def parse(self):
        # Wait a bit for all elements to fully load
        time.sleep(5)

        # Extract and print data from the page
        data = {
            'name': self.find_element_by_css('h1[data-qa="device-name"]', 'text'),
            'memory': self.find_element_by_css('span[class^="simtype_selectedMemory__"]', 'text'),
            'pay_monthly_price': self.find_element_by_css('p[class^="paymentOptions_subtotalContent__"] > span:nth-child(1)', 'text'),
            'pay_today_price': self.find_element_by_css('p[class^="paymentOptions_subtotalContent__"] > span:nth-child(2) > span', 'text') + "/mo",
        }
        print(data)

    # Close the web driver manually if needed
    def close_spider(self):
        self.driver.quit()

# Main execution
if __name__ == "__main__":
    # Use 'with' statement for automatic cleanup
    with SeleniumScraper() as scraper:
        scraper.start_requests()
The script will open a Chrome browser and navigate to the Mint Mobile product page:

It will then print a dictionary containing the scraped data:
- Product name
- Memory capacity
- Monthly payment price
- One-time payment price
{'name': 'Google Pixel 7 Pro', 'memory': '128GB', 'pay_monthly_price': '$989', 'pay_today_price': '$42/mo'}Recap: Why use Selenium?
This tutorial demonstrated how to use Selenium to scrape data from a JavaScript-rendered web page. The key advantages of the above approach are:
- The ability to interact with dynamic content
- Automatic handling of the Chrome driver installation
- Clean code structure using a class-based approach
But you don’t need to do all the heavy lifting.
Apify provides code templates for Python, including Selenium and Playwright. These templates save you development time.
What’s more, with these templates, you can turn your scraping scripts into Apify Actors to give you immediate access to scheduling, integrations, storage, proxies, and all the other features the Apify platform has to offer.