While it is common knowledge to enhance your social media links with an og:image tag, generating those can easily become a tedious task. Here is how we automated the og:image generation for our platform (using our platform) and saved ourselves hours of manual work.
What are OG images?
Open graph images are a customized preview of the website link you want to share. An open graph image usually consists of a title, details, a link, and a clickable image that leads to it. Not all web pages have those, but as the internet is visual-first, it has become customary for websites to generate an OG image whenever a user wants to share a link.
What are OG images for?
Essentially, OG images are used to display a preview of a shared link on social media. This little trick helps to encourage users to click on the link and browse through the content. In fact, seeing a link without an OG image these days may even look suspicious to the users, so they might be hesitant to click on it.
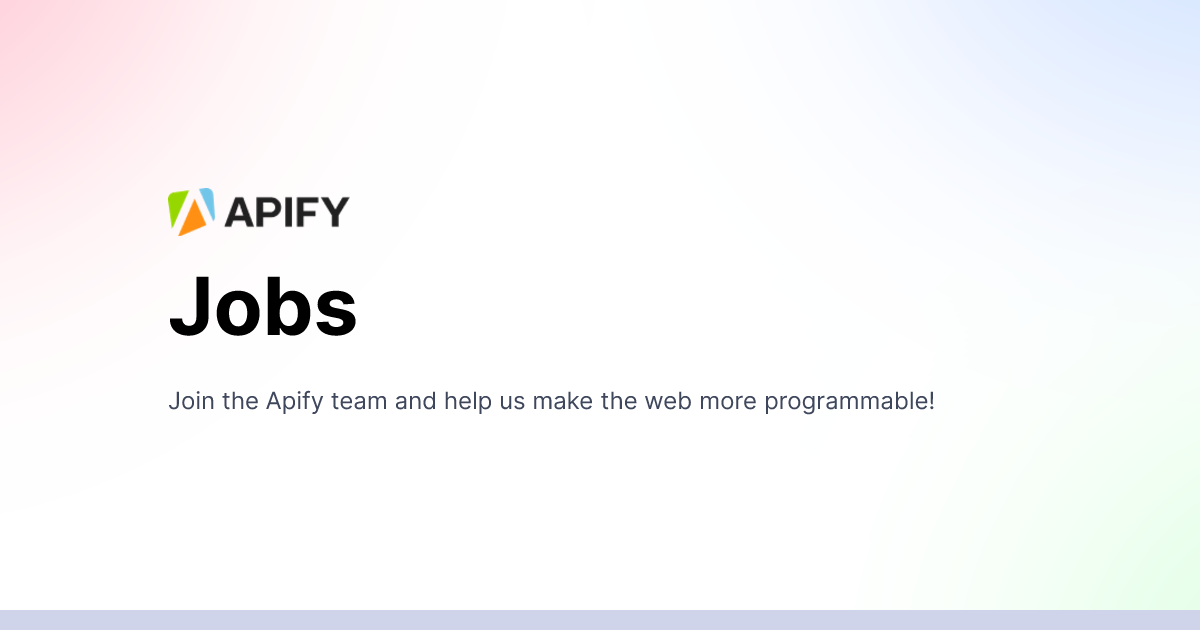
Here's one example of an OG image from the Apify website:
How many OG images does a website need?
The task of an OG image is to visually explain to the viewer what a particular page is about. This is why websites usually wouldn't use the same OG image for every link. Depending on the context, websites might use up to a dozen different OG image templates. For example, the image above is an OG image for our homepage, apify.com. However, for our career page, apify.com/jobs, we use a different, more fitting visual reference, such as the one below.
What happens if a website doesn't have an OG image?
Nothing too bad, the link will still work; the social media platform will simply generate a default OG image for it. You've probably seen a fair amount of shady-looking link previews on social media: a gray bar with some text. These OG graphics don't look inviting from a UX perspective and don't inspire confidence in the safety of the link you're about to visit. They are also easily skippable. So it's better not to rely on default OG images and instead make sure your website is equipped with OG graphics of its own.
Why generate OG images automatically?
Sometimes you have to deal with page content that is changing and expanding every day. How do you create, update and keep track of all OG images in that case? This is exactly our case in Apify, where we have to manage OGs for user-created content. In the Store part of our website, users can create their profiles and publish their tools called Actors. Both the profiles and the tools need an OG image. If we had to keep track of those and manually update profile and Actor OGs, we would be wasting time. So since the content of these public pages varies, we decided to find a way to dynamically create OG images for them to ensure that each page has a unique OG image.
Examples of OG use cases
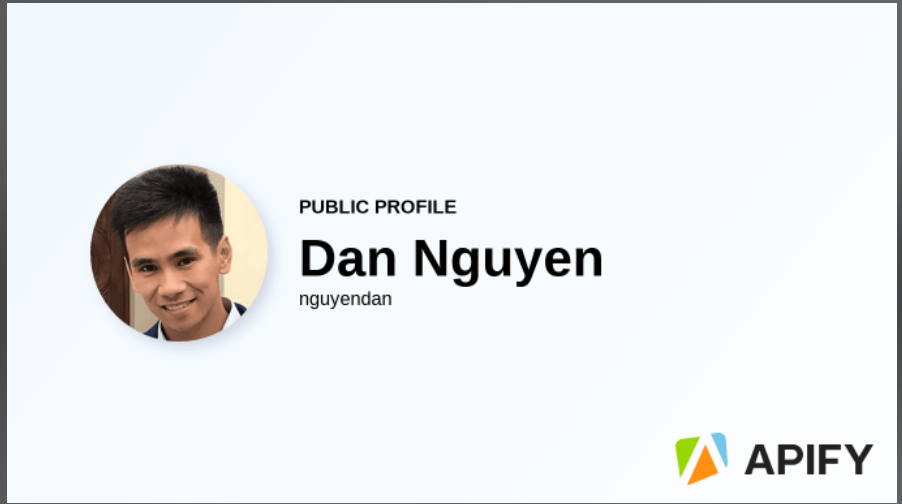
Here are a few examples of the OG images generated for our public users and public Actors. In this first one, text elements like name or username vary for every user. But we don't have to add those manually every time a new profile is added. Those elements, including the picture, the logo, the fonts, and the way it's all placed, are generated automatically.
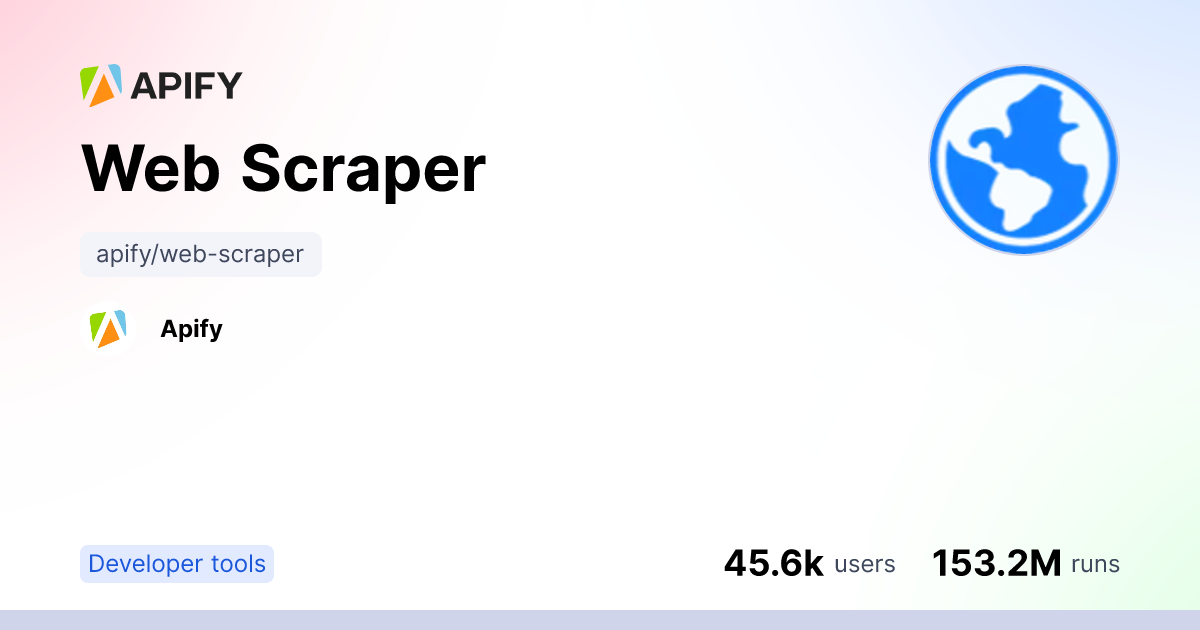
The same goes for the OG image of this Web Scraper tool below. The logo, tool image, tool title, URL, developer's name, button, fonts, and the way these elements are placed are generated automatically.
How we generate OG images
We use the Apify platform, which was made to facilitate automation of any activity on the web. The creation of OG images is a case-in-point of web automation activities. To automate OG graphics in our Store, we have built several free open-source Actors on the platform (one for user profiles and one for public actors). Based on the user input, these Actors generate an OG image and save it to the key-value store, where the OG image can be retrieved further on, and used directly on our website.
This whole chain is triggered automatically whenever the user creates or updates information relevant to their Actor. So nobody has to even watch over it (unless something goes wrong 😄).
How to create a dynamic OG image?
First, we need to configure some input based on the user information (e.g., username, full name, profile picture). Then we'll use Puppeteer via Apify.launchPuppeteer to open a headless browser where we insert the user information into the HTML and with some CSS magic, style it to our needs. Once that part is done, Puppeteer takes the screenshot of the result and saves it to the key-value store. Once your automated system generates the OG image, you can further refine or retouch it using a photo editor, adding filters or typography before publishing. Here's a simplified code example:
Apify.main(async () => {
		// Get input
    const { actorTitleInput } = await Apify.getInput();

    // Start the browser
    const browser = await Apify.launchPuppeteer({ headless: true });

    // Open page where we will add the elements
    const resultPage = await browser.newPage();

		// Creating the page for screenshot
		await resultPage.evaluate((actorTitle) => {
				// Creating HTML elements
				const actorTitleH1 = document.createElement('h1');
        actorTitleH1.innerText = actorTitle;

				// Adding CSS to the HTML elements
				actorTitleH1.setAttribute('style', "font-weight: 700;");

				// Adding HTML to the document body
				document.body.appendChild(actorTitleH1);

		}, actorTitleInput); // Passing the actor input as a argument

		// Taking the screenshot;
		const screenshot = await resultPage.screenshot({ type: "png" });

		// Save the screenshot to the default key-value store
    await Apify.setValue('OUTPUT', screenshot, { contentType: `image/${type}` });

		// Close the browser
		await browser.close();
});
A simplified code example of the process of creating an OG image
How do we use the OG image Actor?
The first iteration
Being strong proponents of automating everything, it's no wonder that our initial idea was to build an Actor that would do all the legwork for us. We'd just pass it a URL; the Actor would go to that URL, scrape all the data, assemble it into a nice HTML, and take a screenshot of it. The idea was fine but, as it turns out, worked really quite slowly. We had to first make a request to get the necessary information and then pass it to Puppeteer to generate the HTML, which took quite a while to start up.
Dialing in the performance
The Actor's next version required all the items you see in the OG image as input, so there was a bit more work required. But the final version was a lot more performance-friendly since it no longer had to do data web scraping every time.
Pre-generating the OG images
In search of even better performance, we decided to take advantage of our platform to pre-generate every Actor's and user profile's OG image whenever the information is updated. Once the information is updated, we trigger an event in our MessageQueue, which then runs the OG image Actor. We then upload the OG image to an s3 bucket and save the link to the OG image into the database. This link is then passed to <meta property="og:image" content="...">, so as soon as the Actor is shared somewhere, the image is ready to be downloaded.
Iterating OG images made easy
This automation tool ensures that all Apify OG images are always up to date with the information on the page. Iterating the OG images is also super easy because all we need is to update the actor without the need to tweak the application code.
Now you know what OG images are all about, why it's important to have them, why we decided to automate the process of their creation and how we made that happen.