Locked down, nowhere to go — then we get an unexpected request to scrape coronavirus stats in Los Angeles
Sometimes the timing is just right, even if the circumstances are not exactly positive…
Apify’s spring team building coincided with the beginning of an extremely strict coronavirus lockdown in the Czech Republic. Restaurants and pubs were closed. Only essential shops were open.
We couldn’t go to the pub to have fun, so we either stayed in our apartments or went to our country cottages (many Czechs have cottages in the countryside where they escape from city life) and just worked, worked, worked. We had some epic Zoom meetings, but those only last so long.
One evening we received a request to scrape COVID-19 stats for Los Angeles. It didn’t take long, maybe 10 minutes, but a few of us decided there and then that Apify could contribute to the fight against coronavirus by writing scrapers for at least a few countries. We wanted to give people, including ourselves, a way to get over the sense of powerlessness that comes from not knowing what’s really happening. So we found the public data and started scraping it.

Once we had completed our first few scrapers, we decided that we could do more. We couldn’t create all the scrapers ourselves, especially as the first COVID-19 wave seemed to have ended in the Czech Republic and we were returning to normal life, with everything open and relaxed — how the situation changed unexpectedly after summer!
How we used our own Apify Marketplace to expand our COVID-19 coverage by getting other developers to create scrapers
Apify Marketplace is our platform for connecting clients with experienced Apify-approved external developers. The customer posts an offer requesting a custom web scraping or automation solution and developers bid on it. Once the offer has been accepted, the developer keeps in close contact with the customer until the solution has been delivered, with Apify assisting in the background and keeping the whole process on track.
We felt that it was the perfect medium for asking developers to get involved. And they really did!
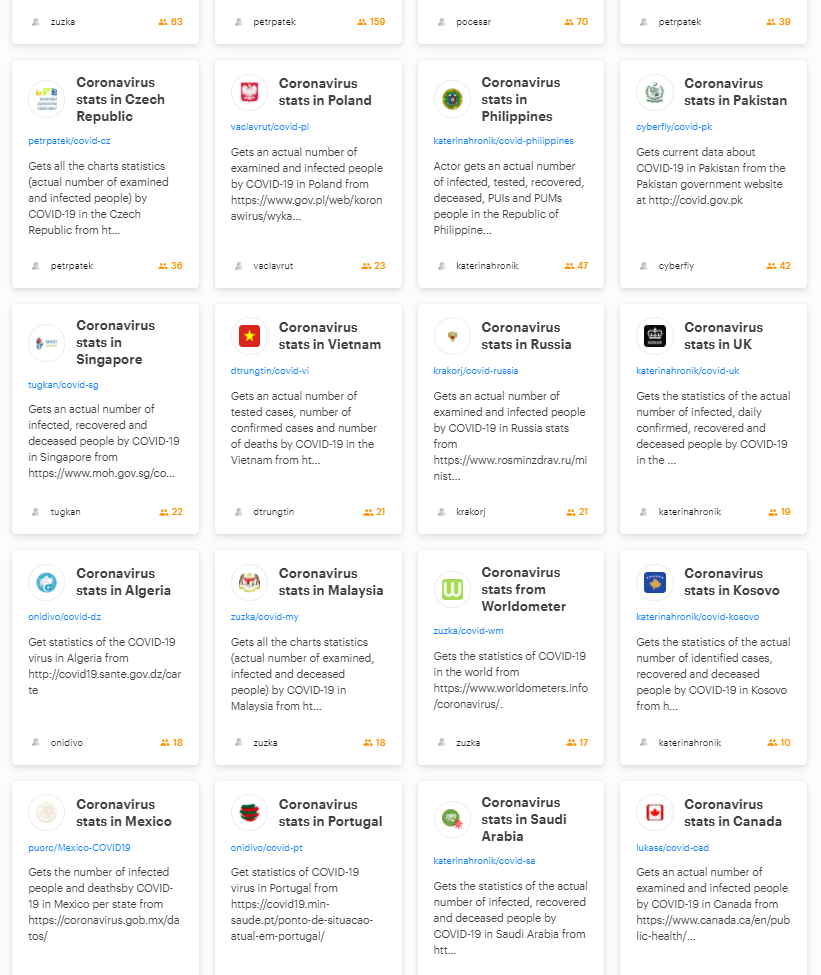
Soon we had over 30 countries covered, and even more were being requested. The way it worked was the way that everything on Apify Marketplace works. We created projects, approved external developers offered to work on them, they delivered the solutions, we tested them, and only then released them publicly. We’ve found this method to be incredibly efficient, as everyone is incentivized to do their best.
From the beginning, we set some ground rules for each (Apify scraping and automation tools are called Actors). One of our top engineers created a document outlining how a COVID-19 Actor should be created. We wanted them to run every 5 minutes so that everything was completely up to date, and we wanted them to return the latest data to the key value store, along with maintaining data history in the dataset. With something this important, we wanted a constant record.
Automating the process and making sure the data was accurate by comparing it to a reliable external source
As the number of Actors grew, it became crucial to automate the monitoring of the data. We needed to make sure that the information was correct. This data represented real lives and we had to make sure that it could be verified.
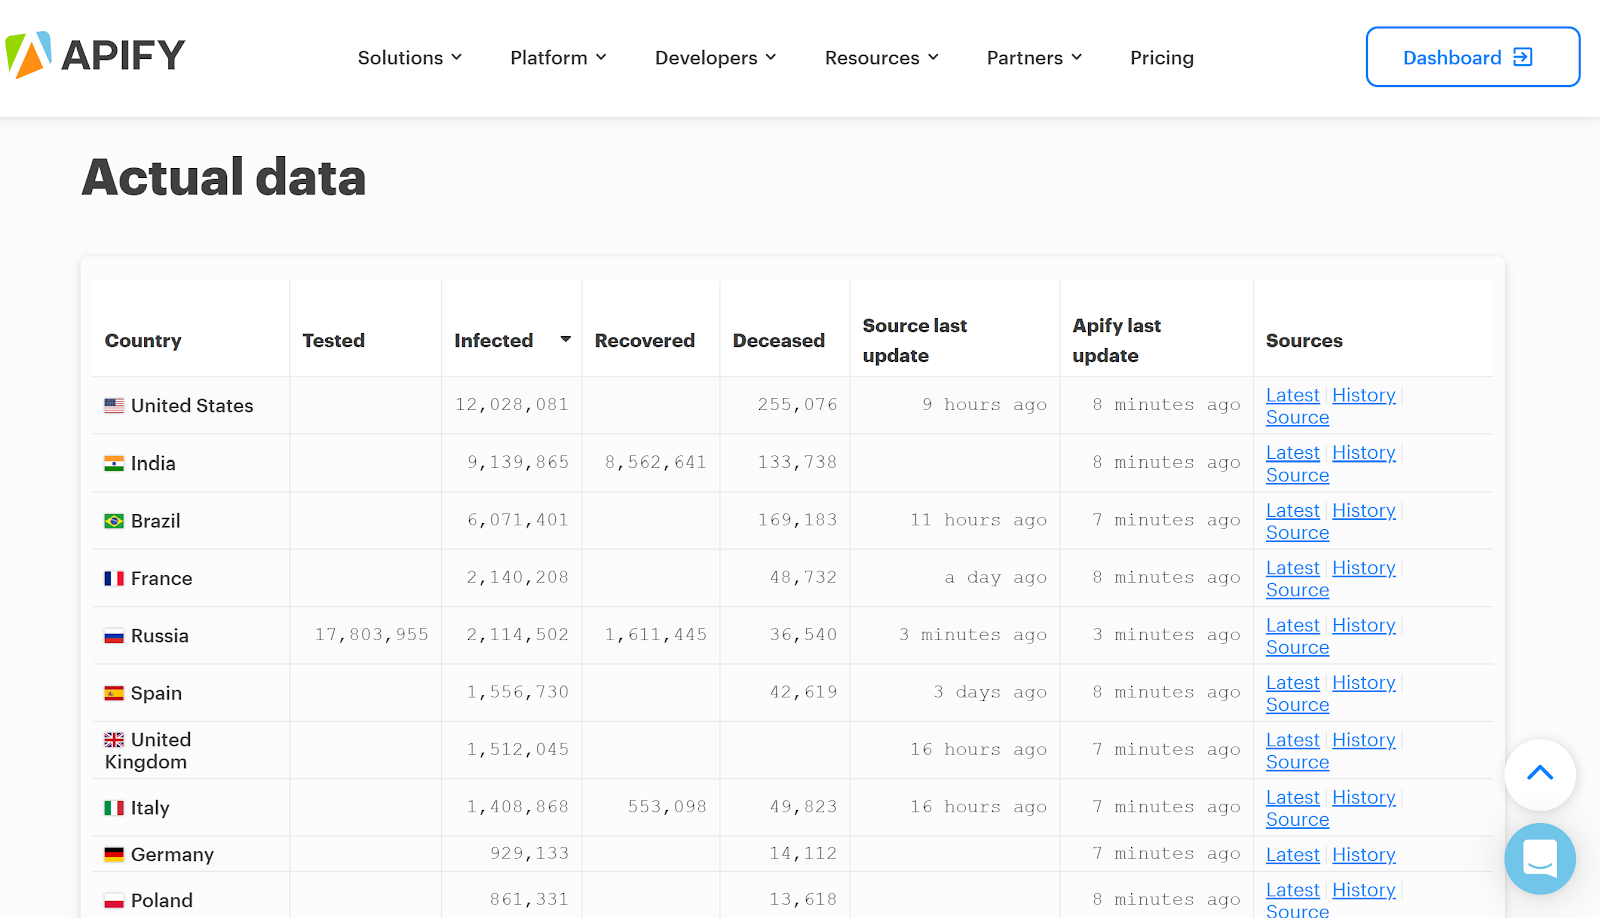
Apify is really into automation, so it was inevitable that we would find a way to automatically test the data. First we set up an aggregator that would go through all the datasets of COVID-19 Actors and — no surprise here — aggregate the results. So if some results were missing or the data was old it would send us a Slack message and we could fix the problem. Once we had aggregated the results, we created a special COVID-19 page that includes all the countries we cover. You can see the latest and historical data there.
The next step was to move all of the code to a single repository on GitHub. We now build the Actors from there so that everyone involved is able to rapidly fix a broken scraper. We’ve also automated messaging for pull requests on GitHub, so we’re on top of any issues.
We recently saw this community effect in action, when we received two pull requests from developers not connected to Apify in any way. They had independently made changes to the scrapers for official data in Slovakia and official data in Poland to get them to work better for their countries. Seeing that kind of organic effort was really satisfying and made us feel that our work had been worthwhile.
The last thing we did to test our Actors was to compare our numbers with a reliable external source. We went with Worldometer for that, as they’ve been exemplary in their COVID-19 coverage. So we regularly scrape data from Worldometer and compare it to our data. If the difference is greater than 5% either way, we again get a notification and start checking our numbers.
Creating open APIs for COVID-19 is part of our belief in making the web more open and equal for all
That said, there are some anomalies in terms of political differences. For instance, we record data for Kosovo, whereas Worldometer does not. Kosovo is only partially recognized worldwide, so it often falls off the radar. The number for Palestine is also very different, as Worldometer does not consider the Palestinian part of Jerusalem to be part of Palestine, whereas we were asked to create an Actor that does the opposite. Our standpoint on this is that these Actors were requested by people who wanted data on where they live, so we’ll provide it. We hope it helps them.
We not only wanted to provide COVID-19 data, we also wanted to provide APIs so that anyone could take that data and use it in their own websites and projects. Open data is a big part of what we believe the web is all about, and APIs area huge part of that goal. An API, or application programming interface, is essential for allowing computer systems to communicate. It’s why we’re called Apify. One of the things that our Actors do really well is to create APIs for websites that don’t have their own or that impose unreasonable limitations on usage of the official API.
We’re currently scraping data and providing APIs for over 50 countries. Most of the data is scraped from official local government websites, but for some we had to find alternatives once the government source stopped working.
At this point, the project is more or less self-sustaining. We fix bugs when they appear, address issues, or add new features and countries as requested. We merge pull requests, but most of Apify’s coronavirus stats coverage is now fully automated.
How creating covid scrapers turned into the perfect training exercise — and how we think it can inspire anyone to create their own Actors
An unexpected side-effect of this project was that it helped many people to go ahead and write their own Actors, not least some of the most recent Apify employees.
We think that the example of our unexpectedly effective coronavirus data coverage should inspire anyone to try creating Actors. If there’s data you need, you might be surprised at how easy it is to get it. We developed the Apify platform as a way for developers, and even amateurs, everywhere to create their own web scraping and automation tools. Our goal is to make data on the web completely open and make sure that everyone who needs that data can collect and use it.
We can’t tell what the long-term effect of COVID-19 will be, but we know that we’re doing our best to provide up-to-date, accurate information to countries around the world. That’s what Apify Actors were designed to do.
You can go to https://apify.com/covid-19 for Apify’s constantly updated coronavirus stats. There you can find APIs for COVID-19 sites that don’t have an API. The Actors are already scheduled and the data is available on public URLs. All endpoints are free to use and without limitations.
If you’re interested in the details of how to identify elements you want to scrape, read on for our quick start guide to rolling your own covid scraper.

How to create your own API for coronavirus stats — and source code for UK covid scraper
So you want to try making your own covid scraper? First you need to know how to get the official stats. We’ll start you off by showing you how to isolate the numbers that you want.
1. Find the source data that you want to scrape. We’re going to use official United Kingdom statistics for our example. Go to https://coronavirus.data.gov.uk/ to see the data.
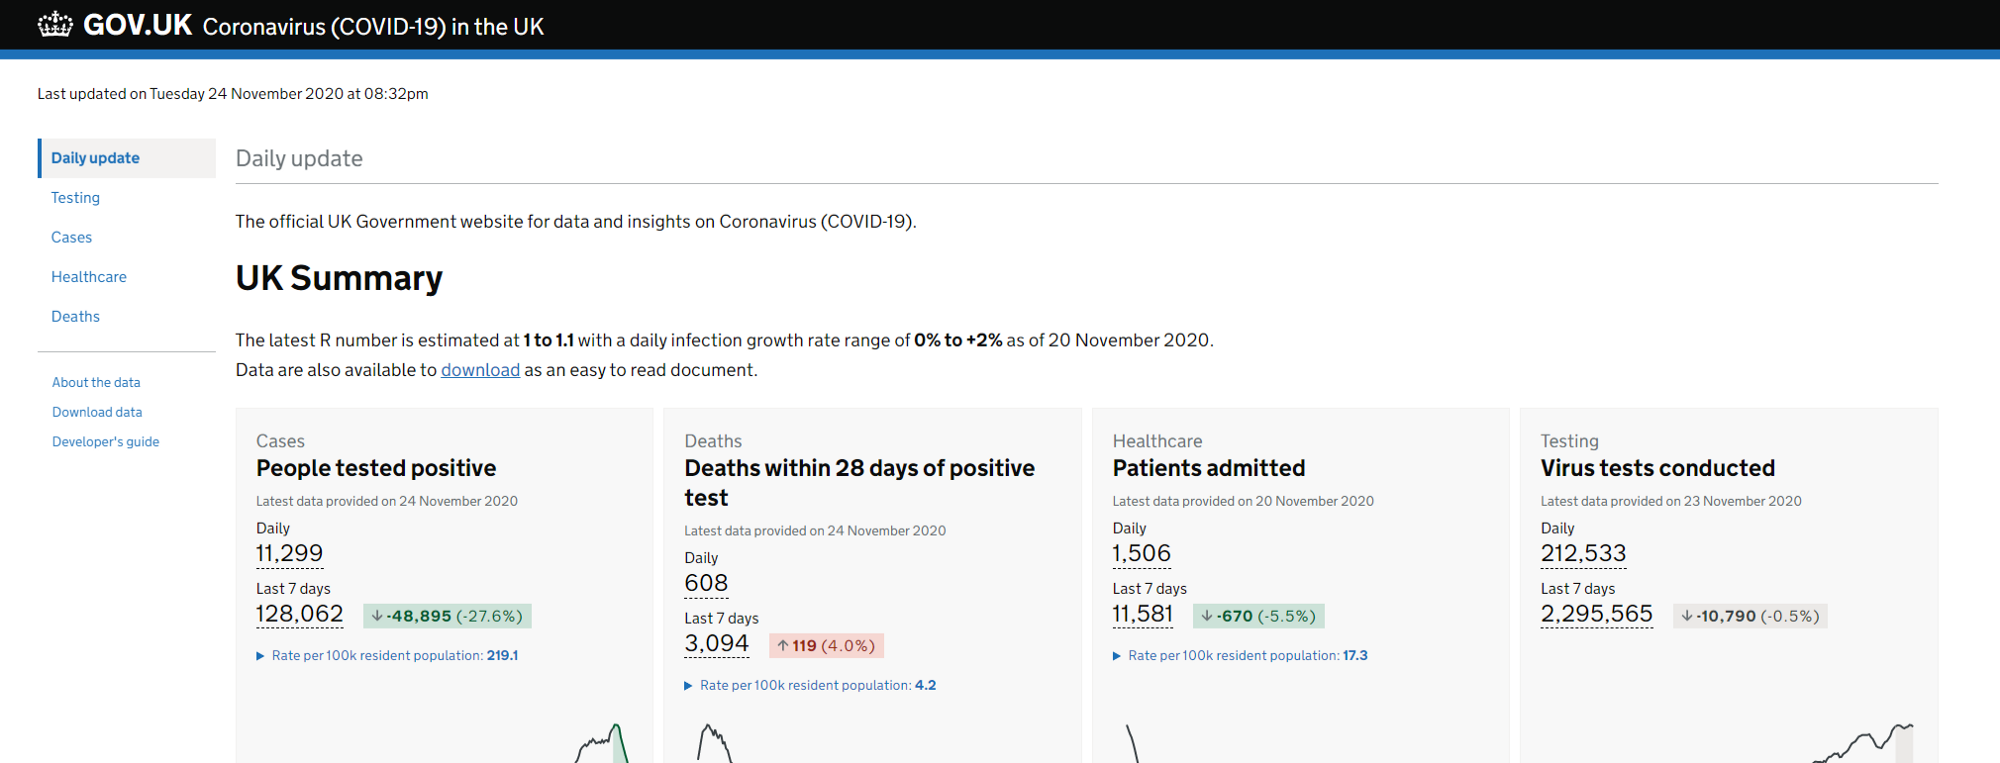
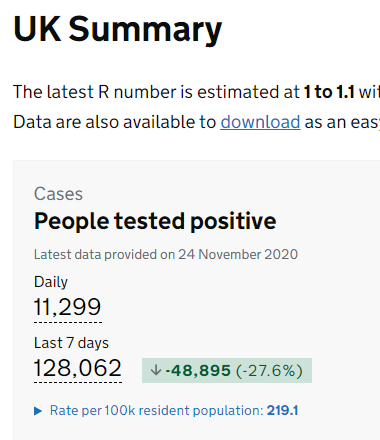
2. Decide which number you want to track. We’re going to scrape People tested positive — daily.
3. Open console in your web browser. You can either right click on the page and choose Inspect at the bottom of the menu that appears, or use Ctrl + Shift + I. The console opens on the right-hand side of your browser.
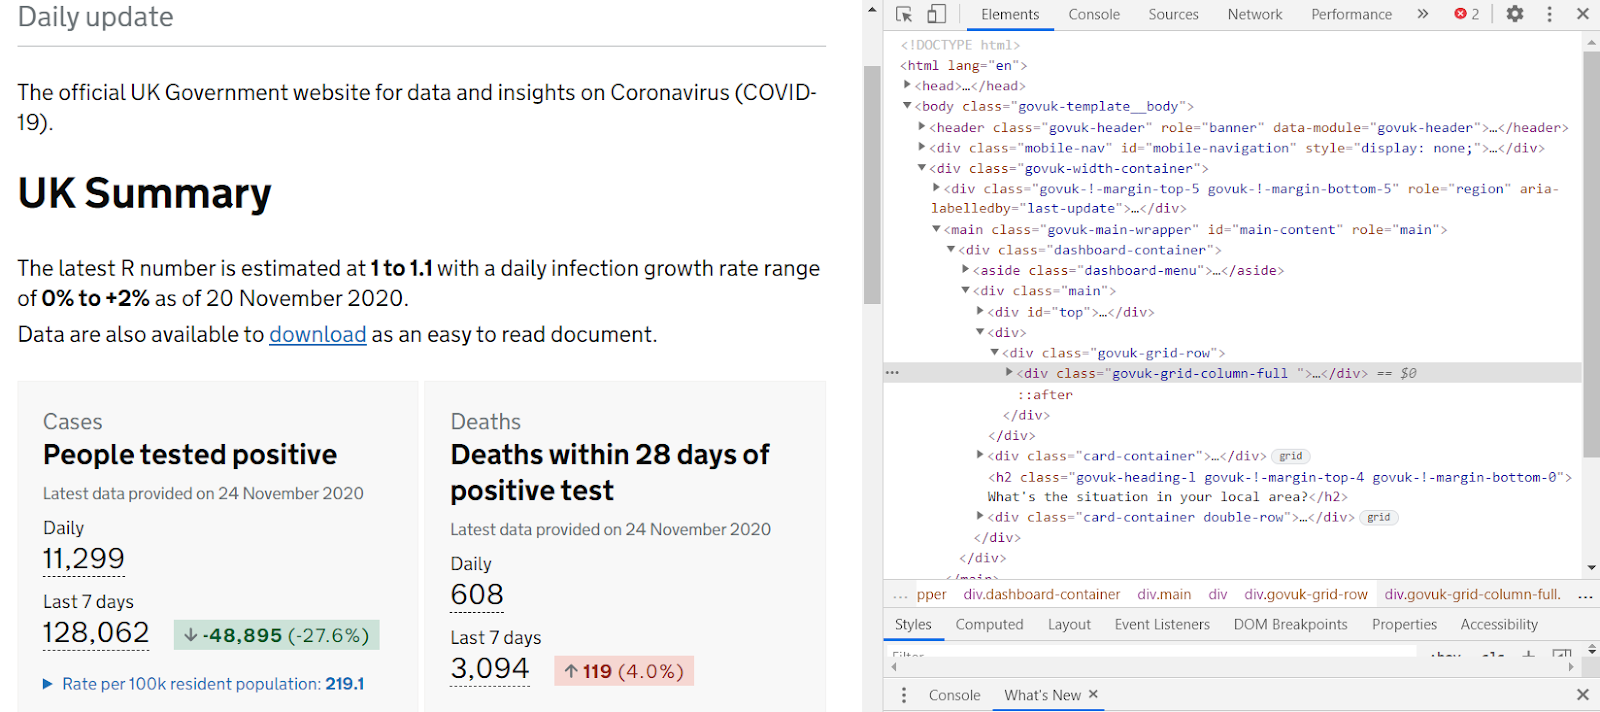
4. Right click on the People tested positive — Daily number and again click Inspect in the menu. The Elements tab, you can see where the number is in the HTML hierarchy.
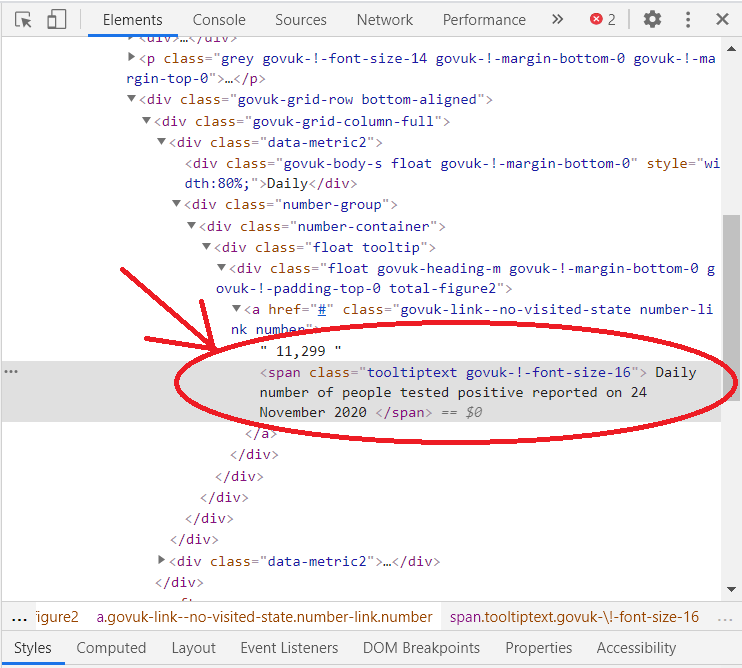
5. We can see that the number is in the same <a> element as a <span> element with the text attribute “Daily number of virus tests”. Now we’ll use a little jQuery in the console tab to get the number:
$( "span:contains('Daily number of people tested positive ')").parent().text();You might get the following error when you try this:
Uncaught DOMException: Failed to execute '$' on 'CommandLineAPI':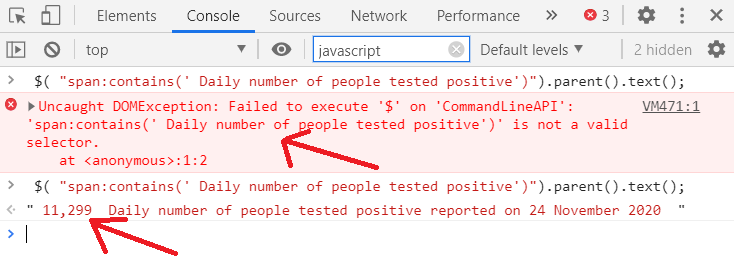
If you do get that error, it means that jQuery isn’t loading in the page. You can easily use a browser extension to fix this, e.g. jQuerify for Chrome: https://chrome.google.com/webstore/detail/jquerify/gbmifchmngifmadobkcpijhhldeeelkc
Once you successfully run the jQuery code, you should get the text (“11,299” on the day we created this guide) as well as the span text field. The next step will tell you how to deal with that span text field.
6. So that tells you how to get the number for your Actor, but it will need a bit of work before it will be useful to us as pure data, as there’s a comma in there and it’s followed by text. In our Actor, we just have to use the following function to remove all spaces and commas and return only the integer without the text.
const getInt = (x)=>{ return parseInt(x.replace(‘ ‘,’’).replace(/,/g,’’))};7. You can repeat the process for any other numbers you want to scrape, e.g. daily number of virus tests or daily number of deaths. In this way you can gather complete coronavirus data to be used in any way you want —for instance, on your own website, in spreadsheets, or as an RSS feed.
8. Once you know what you want from the web page, you can automate the process using Apify and Puppeteer. You can see the code that runs the Actor to track UK coronavirus stats at the very end of this article. A step-by-step explanation of all of it is a bit beyond the scope of this article, but if you want to get into using Actors, you can start learning more about how they work by reading our helpful Apify docs.
If you want to publish a COVID-19 Actor, please check out our guidelines over on GitHub. Let us know if you have any problems by emailing support@apify.com

And finally, putting it all together: the code you need to write your own COVID-19 Actor
This is code that you can use, with a little ingenuity, to create an Actor over on the Apify platform.
First get the Apify library:
const Apify = require(‘apify’);Here’s the constant that will be used for saving data to key-value store:
const LATEST = ‘LATEST’;The main function to download data and save it to key-value store and dataset:
Apify.main(async () =>{This opens the key-value store (we’ll use it to store the latest data):
const kvStore = await Apify.openKeyValueStore(‘COVID-19-UK’);And this opens the dataset (this will be used to store all historical data):
const dataset = await Apify.openDataset(‘COVID-19-UK-HISTORY’);Next we launch Puppeteer:
try{console.log(‘Launching Puppeteer…’);const browser = await Apify.launchPuppeteer();And we open a new browser page:
const page = await browser.newPage();Let’s go to the covid stats website:
console.log(‘Going to the website…’);await page.goto(‘https://coronavirus.data.gov.uk/', { waitUntil: ‘networkidle0’ });And inject jQuery into the page:
await Apify.utils.puppeteer.injectJQuery(page);We’ll give the page some time to load:
await page.waitFor(4000);Before starting to collect the data:
console.log(‘Getting data…’);The actual scraping on the web page is carried out by the page.evaluate function. Then we get the numbers we want and return them as JSON called data that’s saved to a constant result. By the way, check this link if you want more info onpage.evaluate function 😄
const result = await page.evaluate(() =>This is our helper function to get an integer for a string:
const getInt = (x)=>{return parseInt(x.replace(‘ ‘,’’).replace(/,/g,’’))};We also want the date:
const now = new Date();Now we get the data we want using the injected jQuery:
const dailyConfirmed = $( “span:contains(‘ Daily number of people tested positive’)”).parent().text();const dailyTested = $( “span:contains(‘Daily number of virus tests ‘)”).parent().text();const dailyDeceasedWithin28Days = $( “span:contains(‘Daily number of deaths within 28 days ‘)”).parent().text();We save the data in JSON format:
const data = {dailyTested: getInt(dailyTested),dailyDeceasedWithin28Days: getInt(dailyDeceasedWithin28Days),dailyConfirmed: getInt(dailyConfirmed),country: “UK”,historyData: “https://api.apify.com/v2/datasets/K1mXdufnpvr53AFk6/items?format=json&clean=1",sourceUrl:’https://coronavirus.data.gov.uk/',lastUpdatedAtApify: new Date(Date.UTC(now.getFullYear(), now.getMonth(), now.getDate(), now.getHours(), now.getMinutes())).toISOString(),lastUpdatedAtSource: $(‘time’).attr(“datetime”),readMe: ‘https://apify.com/katerinahronik/covid-uk',};return data;});If we get null, we need to throw an error. Otherwise we save the result:
if ( !result.dailyTested || !result.dailyConfirmed || !result.dailyDeceasedWithin28Days) {throw “One of the output is null”;}Assuming all is well, here’s the else to follow our if, where we save the result to key-value store:
else {let latest = await kvStore.getValue(LATEST);if (!latest) { await kvStore.setValue(‘LATEST’, result); latest = result;}delete latest.lastUpdatedAtApify;const actual = Object.assign({}, result);delete actual.lastUpdatedAtApify;We now check to make sure that the value has changed from the previous stats. If the up-to-date result is different, we save it to the dataset and finish up!
if (JSON.stringify(latest) !== JSON.stringify(actual)) { await dataset.pushData(result);}await kvStore.setValue(‘LATEST’, result);await Apify.pushData(result);}console.log(‘Closing Puppeteer…’);await browser.close(); console.log(‘Done.’);}catch(err){ console.log(err)}Here’s a link to the code in a single block: https://dpaste.com/8ZED2CJKE
That should be everything you need to get started. As always, feel free to contact us on support@apify.com if you get stuck 💪🍀