So many tools are powered by AI these days, but what does that mean? Like everyone else, we’re prompting a Large Language Model (LLM), but the key part of these AI tools is that we get the context from scraping websites.
This combination opens up a wide range of possibilities for creating AI-powered tools for a specific use cases. You can use the data extracted from websites in various ways, such as spotting spelling errors, summarizing text, or analyzing data. By merging web scraping with AI's analytical capabilities, you get a powerful solution for targeted tasks.
In this blog post, I'll show you how to build an AI-powered tool using this approach in just a few minutes, using the ready-built technologies from Apify.
The idea: Website Spell Checker
Recently, I was looking through the Apify documentation, and I came across this typo:
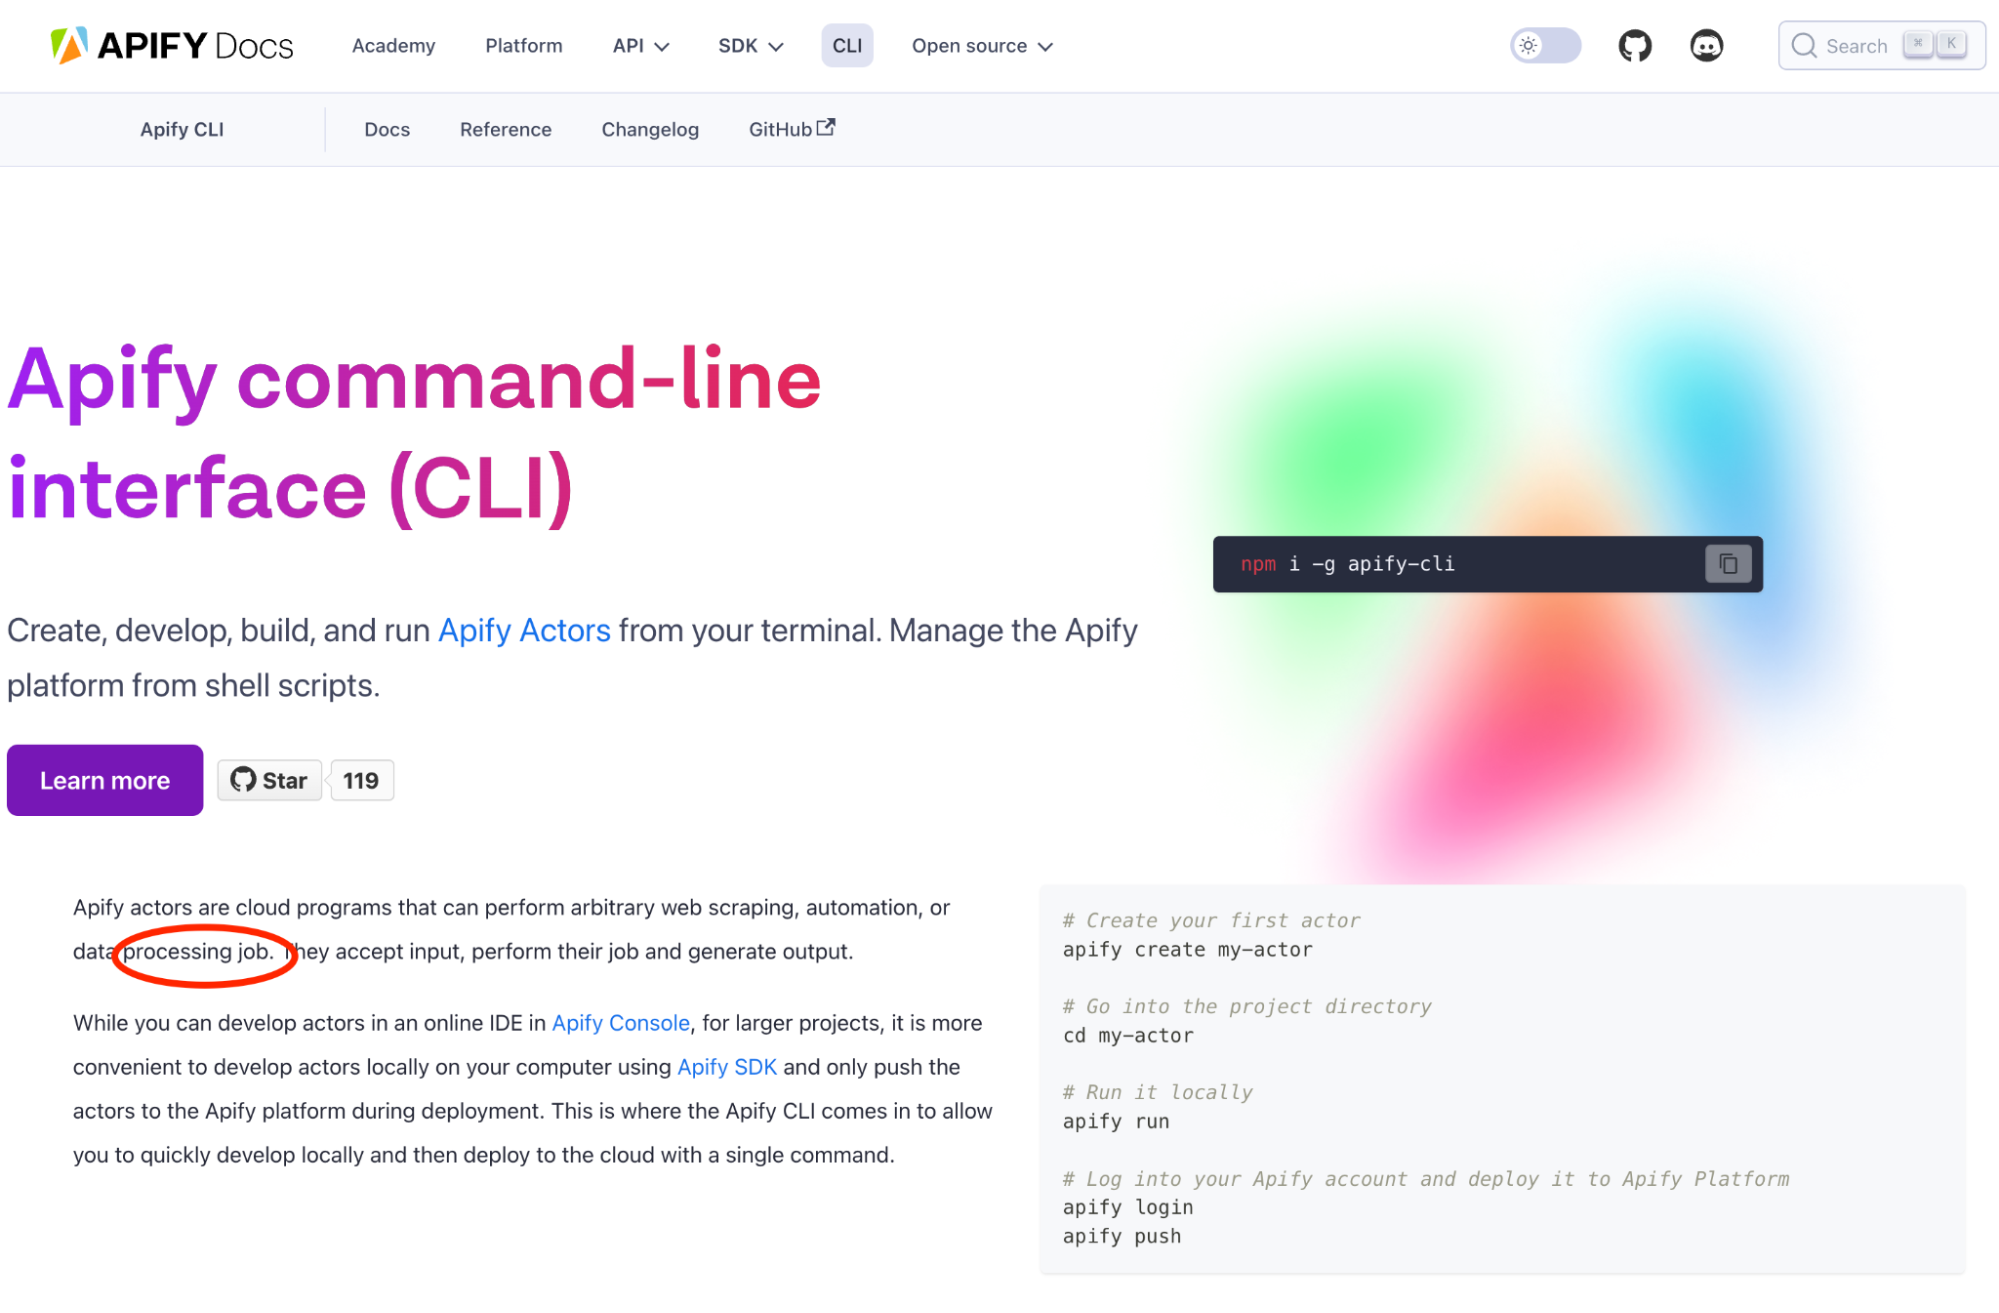
In reading more, I found a few more typos or simple mistakes. You can say, "Sure, that's just one missing letter or article", but we at Apify like our content to be correct. If we missed that, what else have we missed?!
It made me think about how easily these little mistakes can slip through the cracks, even on important pages. When you have hundreds of pages and the content is constantly being updated, it becomes nearly impossible to catch every mistake manually.
I decided that we need a tool that can automatically crawl through all the pages, perform a spell check on the content, run these checks regularly, and then generate a report highlighting the errors.
The concept is simple, and the implementation is straightforward. But I wasn’t looking to start a company to build this product. I wanted something I could put together quickly and easily distribute without reinventing the wheel. After some trial and error, I found a way to use existing web scraping technologies and integrate them with AI, all while using Apify for distribution and automation. With this approach, you only need to define the right prompt and tweak the input and output to fit your needs.
The key: GPT Scraper Actor by Apify
The cornerstone of this approach is Apify's GPT Scraper Actor. This tool combines advanced web crawling capabilities with GPT model integration. The Actor is powerful, but you must define the prompt and other input parameters to make it work for your specific use case. In this tutorial, I’ll show you how to create a solution that encapsulates the GPT Scraper on your behalf with tailored inputs and outputs.
Building an AI-powered tool: Website Spell Checker
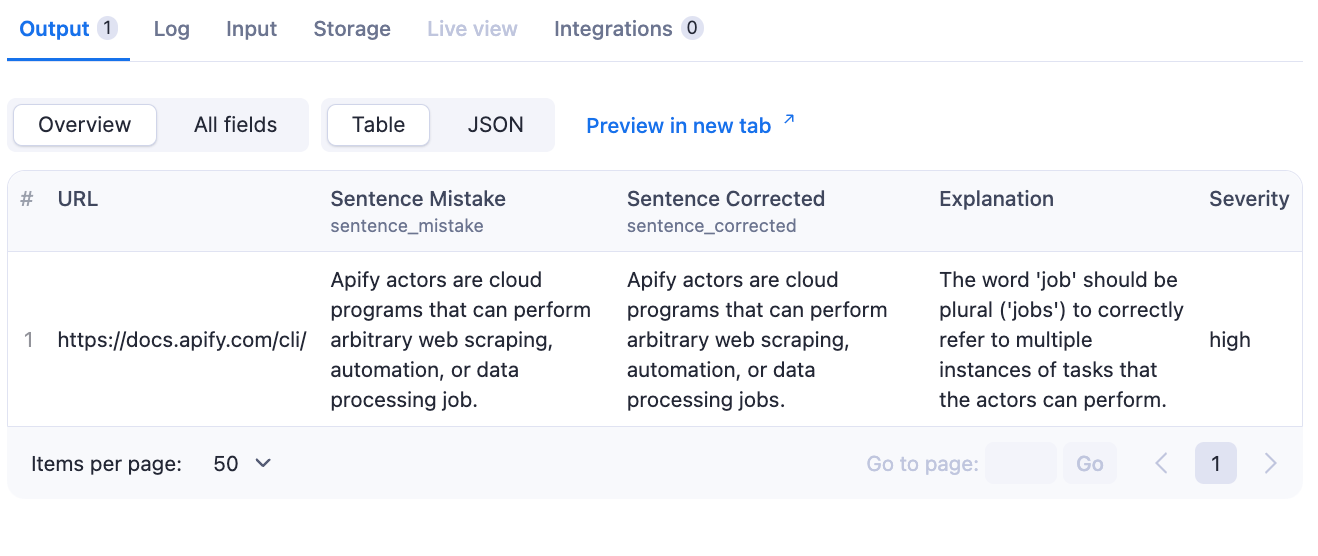
In this tutorial, we’ll build a Website Spell Checker from scratch. The solution is in Apify Store, and the source code is in this GitHub repository. The goal is to produce a table listing all the mistakes on the website and explanations for each.
Create an Apify Actor
We’ll use the Apify platform because it makes calling the GPT Scraper easy and offers features for deploying and monetizing your solution. Apify uses Actors—serverless microservices that accept input and produce output. You could do this without Apify, but it would involve loads of extra work managing requests, inputs, and outputs. Using Apify saves time and effort, allowing you to focus on building your solution instead of starting from scratch.
First, create an Apify account, which includes a $5 in platform credit every month — more than enough for a proof of concept. After creating your account, navigate to the Actors section in the Apify Console and click the “+ Develop new” button in the top right-hand corner.
Next, choose the “Start with JavaScript” template. You can modify the code directly in Apify Console or use your favorite IDE with Apify’s CLI.
The template provides a basic Actor skeleton. For our purpose, we only need to modify three files: main.js, input_schema.json, and actor.json. Let’s start with main.js. The template has an example that extracts headers from a URL using the Cheerio framework. We’ll replace this with code that uses the GPT Scraper Actor, so let’s remove the unnecessary parts.
import { Actor } from 'apify';

await Actor.init();

const input = await Actor.getInput();
const { url } = input;

await Actor.exit();
Define the input
Next, we’ll define the inputs our Actor will need from the user. These variables will be passed to the GPT Scraper. For our spell checker, we’ll keep it simple:
startUrl: The starting URL for the scraping.openaiApiKey: The user’s API key to avoid misuse.maxCrawlPages: The maximum number of pages to scan to control the scope.maxCrawlDepth: The maximum depth of links to follow.
You might want to include many other inputs, but these are enough for our example.
Here’s the input_schema.json:
{
    "title": "Scrape data from a web page for grammar and spelling mistakes",
    "type": "object",
    "schemaVersion": 1,
    "properties": {
        "startUrl": {
            "title": "Base URL",
            "type": "string",
            "description": "Enter the main URL to start the scan.",
            "prefill": "https://news.ycombinator.com/",
            "editor": "textfield"
        },
        "openaiApiKey": {
            "title": "OpenAI API key",
            "type": "string",
            "description": "The API key for accessing OpenAI.",
            "editor": "textfield",
            "isSecret": true
        },
        "maxCrawlDepth": {
            "title": "Max Crawling Depth",
            "type": "integer",
            "description": "Set the maximum level of pages to scan.",
            "minimum": 0,
            "default": 20
        },
        "maxCrawlPages": {
            "title": "Max Pages",
            "type": "integer",
            "description": "Set the maximum number of pages to scan.",
            "minimum": 0,
            "default": 10
        }
    },
    "required": ["url", "openaiApiKey"]
}
In main.js, we’ll map the input schema:
const newInput = {
    startUrls: [{ url: url }],
Feed GPT Scraper
We’ll use the GPT Scraper Actor in the background with our defined inputs:
const newInput = {
    startUrls: [{ url: startUrl }],
    maxPagesPerCrawl: maxCrawlPages,
    maxCrawlingDepth: maxCrawlDepth,
    openaiApiKey: openaiApiKey,
    includeUrlGlobs: [{glob: url.replace(/\/$/, "")  + "/**"}],
    linkSelector: "a[href]",
    instructions: `${prompt}`,
    model: "gpt-4o-mini",
    schema: {
        "type": "object",
        "properties": {
            "data": {
                "type": "array",
                "items": {
                    "type": "object",
                    "properties": {
                        "url": {
                            "type": "string",
                            "description": "Url as an input"
                        },
                        "sentence_mistake": {
                            "type": "string",
                            "description": "Sentence with a mistake"
                        },
                        "sentence_corrected": {
                            "type": "string",
                            "description": "Sentence without the mistake"
                        },
                        "explanation": {
                            "type": "string",
                            "description": "Explanation of the mistake"
                        },
    "severity": {
  "type": "string",
  "description": "Severity of the mistake"
    }
                    },
                    "required": [
                        "url",
                        "sentence_mistake",
                        "sentence_corrected",
                        "explanation"
                    ],
                    "additionalProperties": false
                }
            }
        },
        "required": [
            "data"
        ],
        "additionalProperties": false
    },
    useStructureOutput: true,
};

const result = await Actor.metamorph('drobnikj/extended-gpt-scraper', newInput);
Key points:
startUrls,openaiApiKey,maxCrawlingDepth, andmaxPagesPerCrawlare provided by the user.includeUrlGlobscrawls through subpages, andlinkSelectorpicks up all links.- The schema structures the output to your needs.
- The metamorph function transforms the GPT Scraper with your inputs, avoiding the need for a new Actor.
- The instructions prompt is where you can refine the GPT model's output. Here is where your internal prompt engineer shines.
var prompt: "Perform a spelling and grammar check on the given website.

The output should be a JSON table with the following fields:

- Sentence Mistake: The sentence with the mistake.
- Sentence Corrected: The corrected version.
- Explanation: A brief explanation.
- URL: The webpage URL.
- Severity: The severity, categorized as 'low,' 'medium,' 'high,' or 'critical.'

Assign 'high' or 'critical' severity only to significant errors. Minor issues, stylistic preferences, and small adjustments should not be classified as 'high' or 'critical.' "
Display output in Apify Console
{
    "actorSpecification": 1,
    "name": "my-actor",
    "title": "Scrape single page in JavaScript",
    "description": "Scrape data from single page with provided URL.",
    "version": "0.0",
    "meta": {
        "templateId": "js-start"
    },
    "input": "./input_schema.json",
    "dockerfile": "./Dockerfile",
    "storages": {
        "dataset": {
            "actorSpecification": 1,
            "views": {
                "overview": {
                    "title": "Overview",
                    "transformation": {
                        "unwind": ["jsonAnswer", "data"]
                    },
                    "display": {
                        "component": "table",
                        "properties": {
                            "url": {
                                "label": "URL",
                                "format": "string"
                            },
                            "sentence_mistake": {
                                "label": "Sentence Mistake",
                                "format": "string"
                            },
                            "sentence_corrected": {
                                "label": "Sentence Corrected",
                                "format": "string"
                            },
                            "explanation": {
                                "label": "Explanation",
                                "format": "string"
                            },
                            "severity": {
                                "label": "Severity",
                                "format": "string"
                            }
                        }
                    }
                }
            }
        }
    }
}
Limitations
While this approach lets you build AI-powered tools quickly, it does have some limitations:
- Using the metamorph function means you rely entirely on the GPT Scraper's output, which can’t be altered in the Actor. As is often discussed in any good tech newsletter, working with AI outputs sometimes requires post-processing. You’ll need a separate script to modify the output afterward.
- The GPT Scraper has a prompt limit of 1024 characters. Use it wisely.
- This approach only works with GPT models.
There are alternative ways to build AI solutions using different web scraping frameworks and AI models, but our goal was to maximize efficiency.
Get data for generative AI
Conclusion: building other scrapers
The method we covered for building a Website Spell Checker can easily be used to create other AI-powered tools. Change the prompt to suit whatever specific task you need, whether it’s data extraction, content analysis, or something else entirely. This approach is flexible and quick to implement.
Using existing tools means not starting from square one. It saves time and lets you focus on your needs rather than getting bogged down with technical details.
Apify offers more than just a way to build your AI-powered tool. It gives you a platform to schedule automatic runs, handle large-scale scraping, and monetize your creation in Apify Store. It’s a solid choice to build, deploy, and scale your scraper in one place.
Try out Website Spell Checker on Apify, or use the code from GitHub to create your solution!
Want to learn more about AI and Apify? Watch our video on how to add a knowledge base to your GPTs with Apify Actors.


