Web scraping with starter templates
Web scraping - the process of acquiring large amounts of data from various online sources, including websites - can be incredibly useful for various tasks, including tracking competitor prices and analyzing market trends.
The Apify SDK for JavaScript and Node.js provides a complete toolkit for such web scraping and automation tasks. It includes several starter templates you could choose from to quickly get started and test out various scraping features either locally or on the platform.
Watch this video for a more general overview of how to use Apify's code templates
Selecting the appropriate template for your web scraping project is crucial, as it hinges on the complexity and specific requirements of the project. It's critical to understand this upfront, given the evolution of web technologies—from simple static sites to more sophisticated web apps. For instance, unlike static sites, web apps may require additional scraping techniques, such as executing JavaScript code to extract data that may not be directly accessible in the initial HTML response. Consequently, it's essential to choose a template that can efficiently manage these processes.
In this guide, we’ll utilize the Puppeteer and Headless Chrome web scraper template to scrape stock data from Nasdaq. Read on to learn how to set up the template locally and explore the scraping features.
Understanding Apify's web scraping JavaScript SDK
The Apify SDK is a toolkit for building Actors. An Actor is a serverless app that can run computing jobs, including data scraping tasks. As it is, the Puppeteer and Headless Chrome template (or simply PuppeteerCrawler) is a ready-made Actor built using the JavaScript SDK that you can quickly configure, customize, and deploy to extract the data from any website(s).
The template utilizes PuppeteerCrawler, a lightweight framework provided by Crawlee, which makes it possible to use Headless Chrome with Puppeteer to crawl URLs and extract data.
How exactly does Puppeteer interact with Headless Chrome? Essentially, Puppeteer is a Node.js library that provides a high-level API to control Chromium over the DevTools Protocol. Headless Chrome, on the other hand, operates without a GUI, making it possible to run background processes, including automated tasks.
This setup allows the Actor to interact with websites by mimicking user actions, triggering JavaScript execution to render the necessary data for extraction. After completing the scraping job, if you had run the Actor in a different cloud environment, the results will be automatically stored in a default storage/datasets as JSON files. This ensures that you can easily access and analyze the data using any technology of your choice. Nonetheless, if you choose to run the Actor on the platform, you can access the results in Apify Console's storage tab.
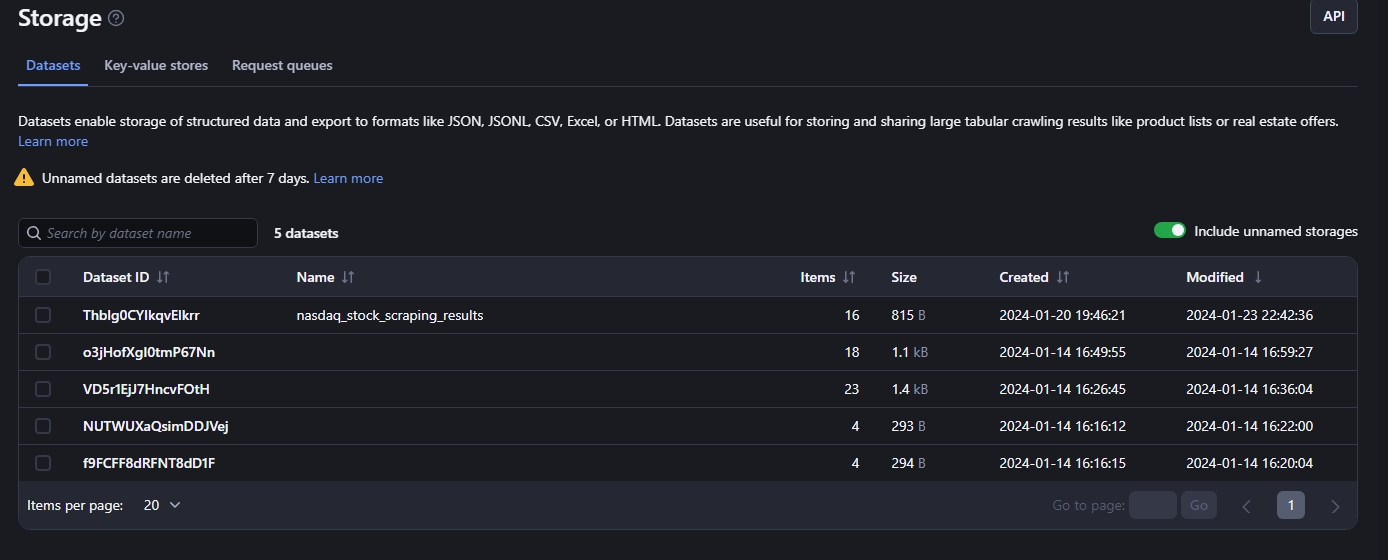
The storage section makes it easy to store and manage arbitrary amounts of data generated from the different automation processes.
Setting up the template in your development environment
To scrape stock data from Nasdaq, we’ll set up the template locally, make several code changes, and deploy it to the Apify platform.
To follow along, first, create a project directory that will house the template’s code files. Then, follow the steps highlighted in this guide to installing the Apify CLI and the template locally. With that, you've successfully installed the template in your local environment.
Exploring the template code
Now, let's make a few changes to that Actor's main code files: src/main.js, and src/routes.js. Generally, the code in the src/main.js creates an instance of the PuppeteerCrawler Actor, specifies the input URLs targeted for scraping, and configures a dynamic proxy setup. Additionally, the script defines a crawler to manage how HTTP requests are handled, ensuring the extraction and storage of data in an efficient manner.
Since we want to scrape Nasdaq for stock data, the only change we will make to this file is updating the default start URL that the Actor will crawl through—go ahead and make this change to your code.
const startUrls = input?.startUrls || [{ url: 'https://www.nasdaq.com' }];The startUrls variable is determined based on the input provided to the Actor. If the input object exists, the Actor will use the URL specified in the input object. However, the Actor will default to a predetermined URL if the object is not provided. In this case, the input object will be included when a user specifies the URL in the input console on the platform.
With that, let's proceed to update the src/routes.js file. This file contains the code that defines how the Actor handles and processes HTTP requests during the web scraping operation.
Ideally, the code initializes a router instance and defines a default routes handler function using the router.addDefaultHandler method. This handler is designed to enqueue URLs based on specified glob patterns—strings that precisely indicate which URLs should be included in the request queue for crawling.
Now, to make the Actor crawl Nasdaq-related URLs, we need to update the globs property within the enqueueLinks function by adding the Nasdaq stock route URL.
router.addDefaultHandler(async ({ enqueueLinks, log }) => {
  log.info(`Enqueuing new URLs`);
  await enqueueLinks({
    globs: ['https://www.nasdaq.com/market-activity/stocks/*'],
    label: 'detail',
  });
});
Now, for demonstration purposes, modify the router.addHandler function accordingly to retrieve the page title, company name, and stock symbol for each stock.
router.addHandler('detail', async ({ request, page, log }) => {
  const title = await page.title();
  const companyName = await page.$eval('.symbol-page-header__name', (element) => element.textContent);
  const stockSymbol = await page.$eval('.symbol-page-header__name--symbol', (element) => element.textContent);

log.info(`  Stock: ${companyName} (${stockSymbol}) `, { url: request.loadedUrl });

  await Dataset.pushData({
    url: request.loadedUrl,
    title,
    companyName,
    stockSymbol,
  });
});
Once the data has been obtained, the Actor will utilize the Dataset.pushData method to store the results in the dataset directory. With these modifications, you are now ready to deploy the Actor.
Deploying and running the Actor
To deploy the Actor on Apify, you need to first log in to Apify via the command line. To do that, you will need to obtain your Apify API token. Then, run the following command in your terminal to input the token and initiate the login process:
apify loginOnce logged in, use the following command to deploy the Actor on the Apify platform.
apify pushYou can then find your newly created Actor under the Actors tab on Apify Console.
Running the Actor on Apify
Now, simply click the Start button to build and run your Actor. While the Actor is running, you can view the scraped data in the Actor’s Output tab.
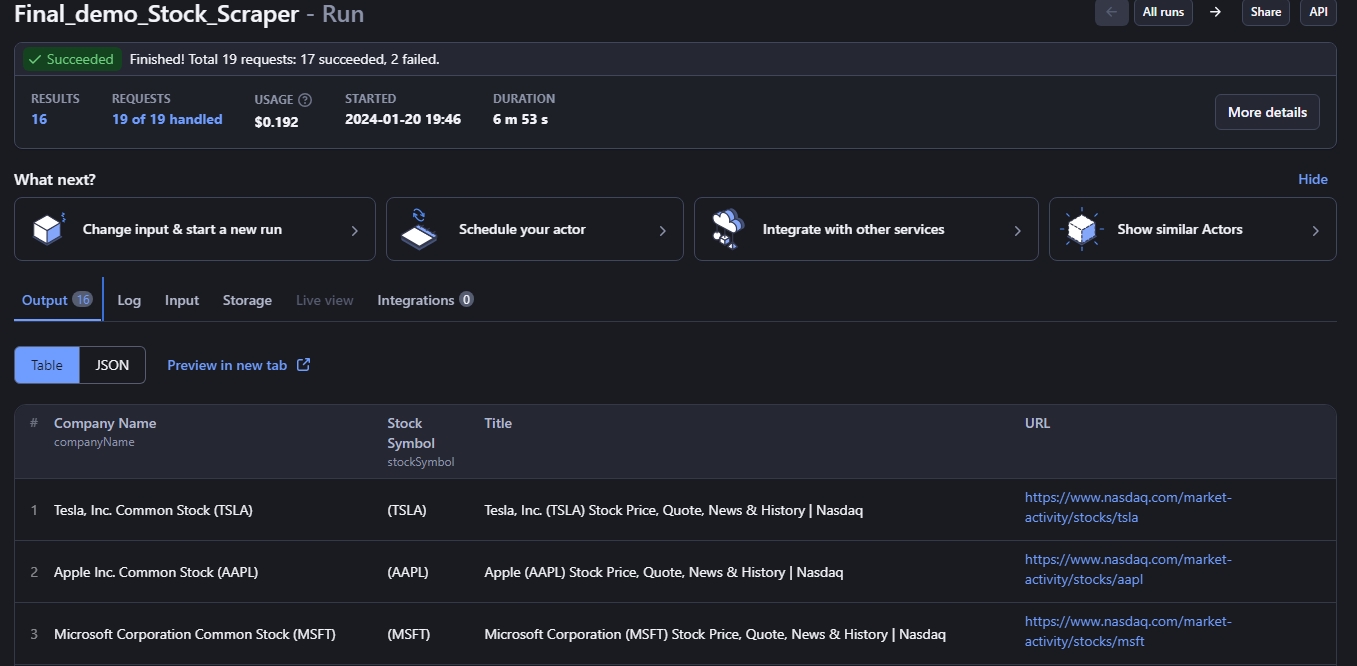
To access all the datasets, simply navigate to the Storage tab. You can choose to download the data, view the data in another tab, or preview the data. Additionally, you can export the data in any of the supported data formats.
Regardless of the project you're working on, the time it takes to ship a specific feature or an entire application is an essential factor. By utilizing this Actor, you can greatly improve your development workflow and accelerate the deployment process. For instance, consider a scenario where you're developing a stock prediction application. With this template, you can focus on building and training the prediction ML model using the scraped data rather than creating an entirely new service from scratch to handle this task. This approach saves time and resources, allowing you to optimize your efforts and expedite the time-to-market for your application.
Explore alternative automation and web scraping SDKs and templates
And that is it! You can now go ahead and explore other interesting ways in which you can customize the Puppeteer and Headless Chrome Actor to better suit your scraping needs. Also, consider exploring other available templates and SDKs to test out various web scraping and automation features. You might like to start by learning how to build a web scraper with the Apify CLI and Python templates.