Regular sentiment analysis helps individuals and businesses track public opinion, spot trends, and respond to feedback in real time. Facebook posts and comments are especially useful, as they capture large volumes of real, unfiltered user reactions.
If you spend hours copying comments by hand, annotating screenshots, or struggling with Meta Business Suite’s limited export options, you probably already know this approach doesn’t scale. Facebook conversations change constantly, new comments appear every minute, and sentiment analysis is most useful when tracked over time.
In this tutorial, we’ll show you how to build an automated, no-code Facebook sentiment analysis workflow using Apify, allowing you to collect comments, analyze emotions, and receive enriched datasets via email. Plus, with $5 of usage every month, you can get a significant amount of data for free.
An introduction to the Facebook sentiment analysis workflow
Facebook sentiment analysis is the process of identifying and categorizing the emotional tone of interactions on the platform by analyzing comments, posts, reviews, and reactions. That’s usually performed using NLP (Natural Language Processing) or LLMs. The goal is to have a system that:
- Automatically retrieves Facebook data, such as posts and comments for one or more profiles (e.g., via web scraping).
- Passes the collected data to a sentiment analysis engine, whether NLP-based, LLM-powered, or similar, to generate sentiment insights.
All of this can be achieved using Social Media Sentiment Analysis Tool - an Apify Actor.
- Built-in proxy management
- Anti-bot evasion support
- Integrated storage with structured exports in CSV/Excel/JSON
- Input configuration schema with standardized parameters (URLs, keywords, limits, etc.)
- REST API endpoint for start, stop, and data retrieval
Each Apify Actor is effectively a web scraping API that targets popular websites. They can be used with the default settings or as a starting point for custom scraping projects.
This particular Actor supports sentiment analysis workflows not only for Facebook but also for Instagram and TikTok. Specifically, that’s an Actor Bundle that combines several other Actors:
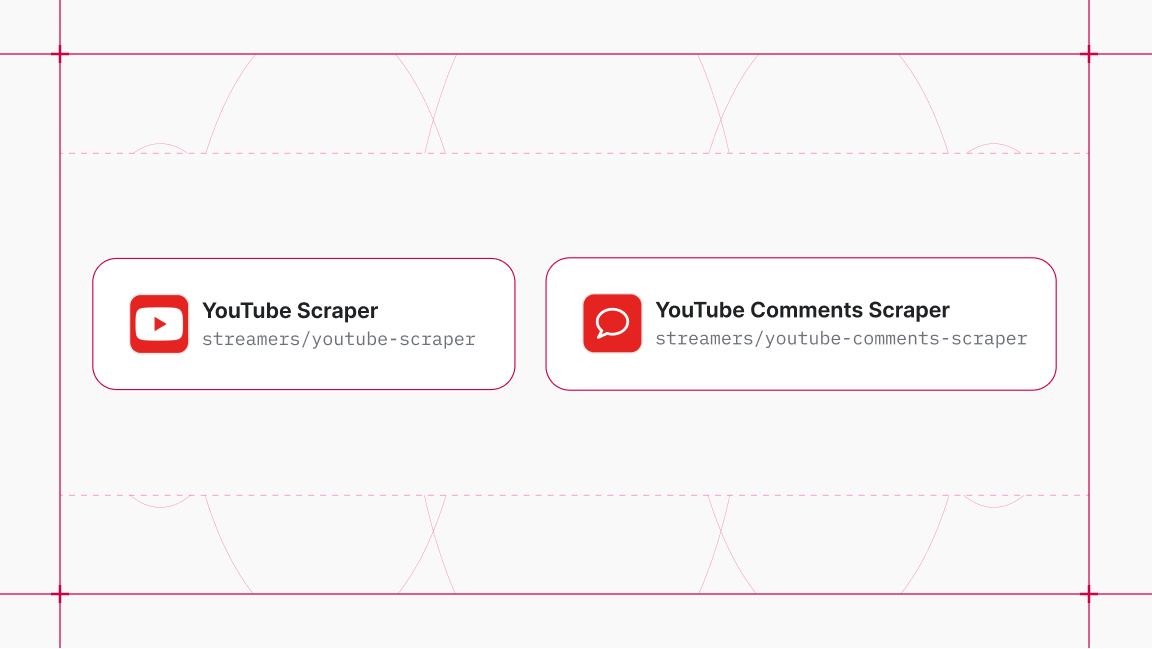
- Facebook Posts Scraper
- Facebook Comments Scraper
- Facebook Contact Information Scraper
- Instagram Scraper
- Instagram Comments Scraper
- TikTok Comments Scraper
- TikTok Profile Scraper
- Sentiment Analysis Online Tool
For more customized needs, you can connect LLM Dataset Processor to apply LLM prompt-based sentiment analysis to the data scraped by Social Media Sentiment Analysis Tool.
Apify also allows you to schedule runs, connect Actors, and integrate email sending directly from the platform. It equips you with all the tools to build a fully automated, no-code Facebook sentiment analysis workflow. Alternatively, you can achieve the same results using Apify nodes in Make, Zapier, or n8n.
How to do a sentiment analysis on Facebook?
The workflow uses Social Media Sentiment Analysis Too to automatically retrieve Facebook comments from multiple posts and perform sentiment analysis. You’ll then configure the results to be sent automatically to your Gmail account on a daily basis.
The main benefit of this approach is that it’s easy to set up, requires no programming knowledge, and enables you to get your first results in under a few minutes for multiple posts simultaneously.
Follow the steps below:
- Select the right Apify Actor for Facebook sentiment analysis
- Try the Actor
- Explore the Actor’s output
- Add Gmail integration
- Complete the Gmail Integration
- Schedule the workflow
- Verify that the workflow works
Prerequisites
To follow this guide, make sure you have:
- An Apify account.
- A basic understanding of how Apify integrations work.
- A Gmail account to send the Facebook sentiment analysis output to.
Note: The workflow doesn’t require a Facebook account, as it only targets comments from public Facebook posts.
Step 1: Select the right Apify Actor for Facebook sentiment analysis
To get started, log in to your Apify account. Open Apify Console, and choose the Apify Store option from the left-hand menu:
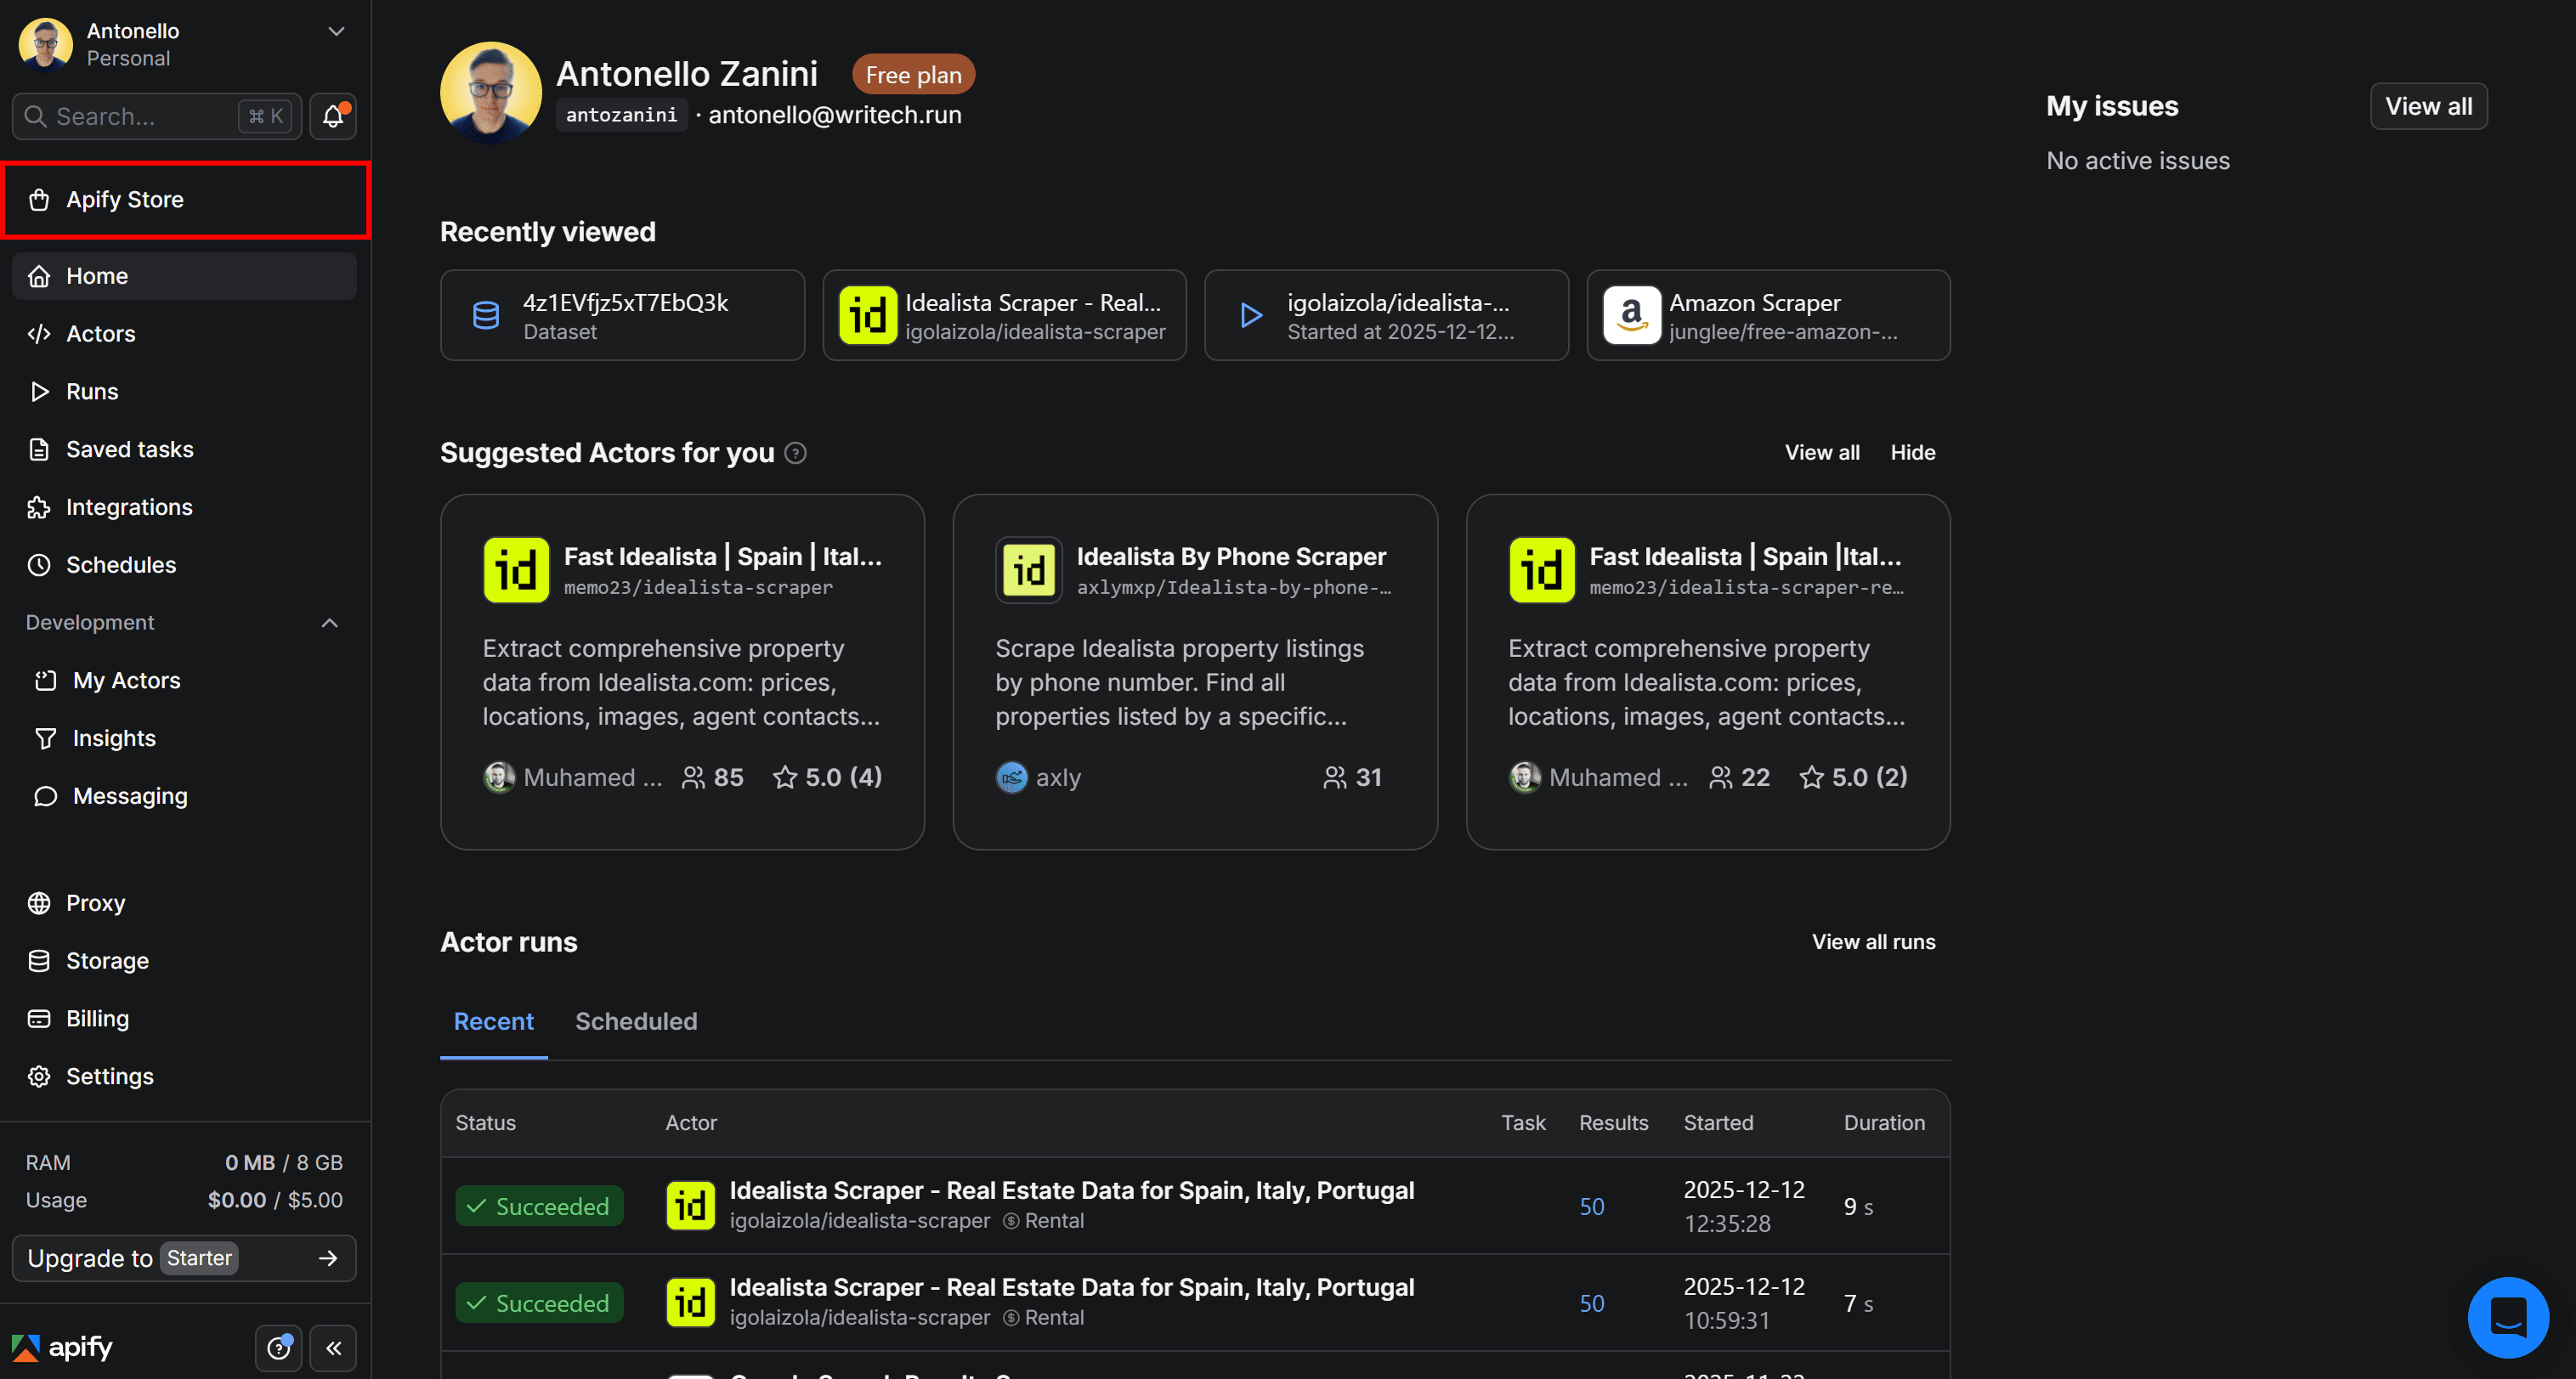
This will redirect you to Apify Store:
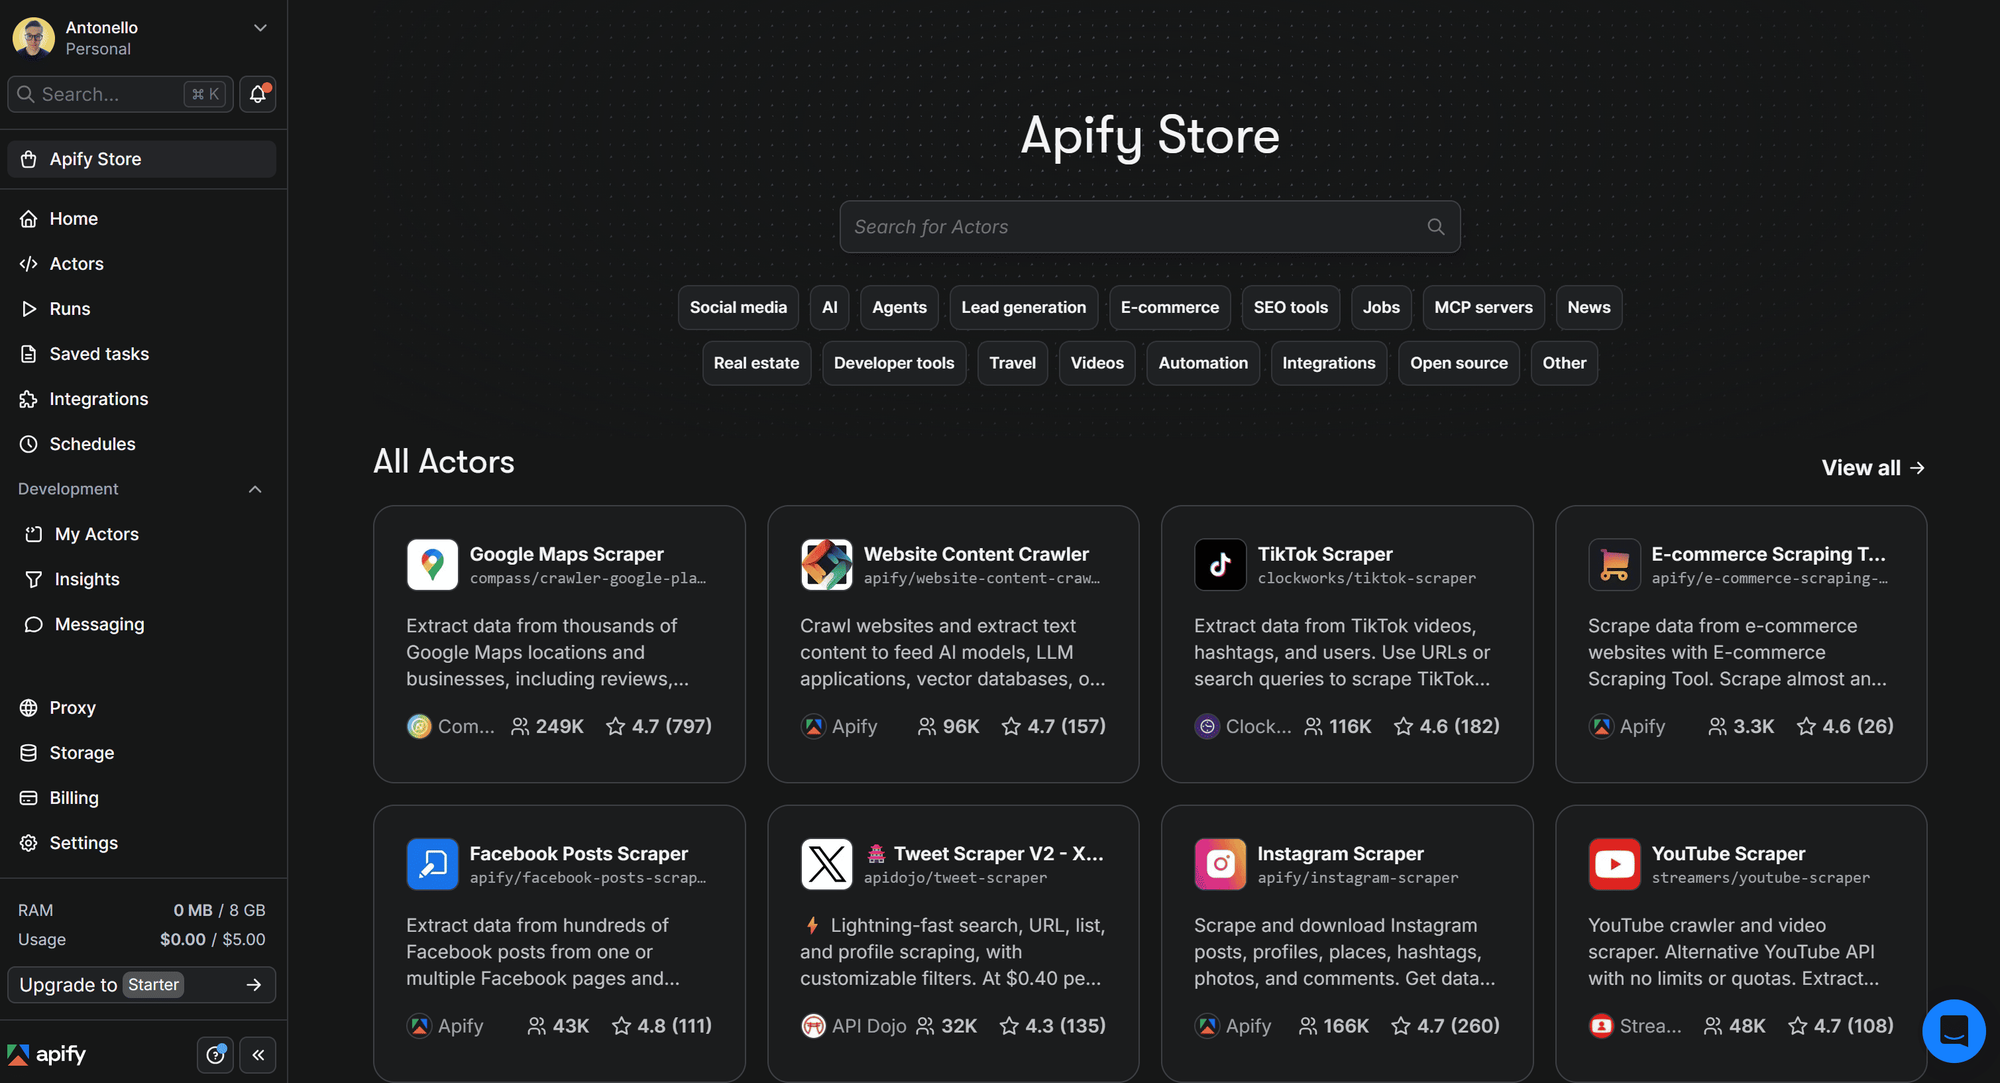
In Apify Store, search for “social media sentiment analysis tool” and select the first result:
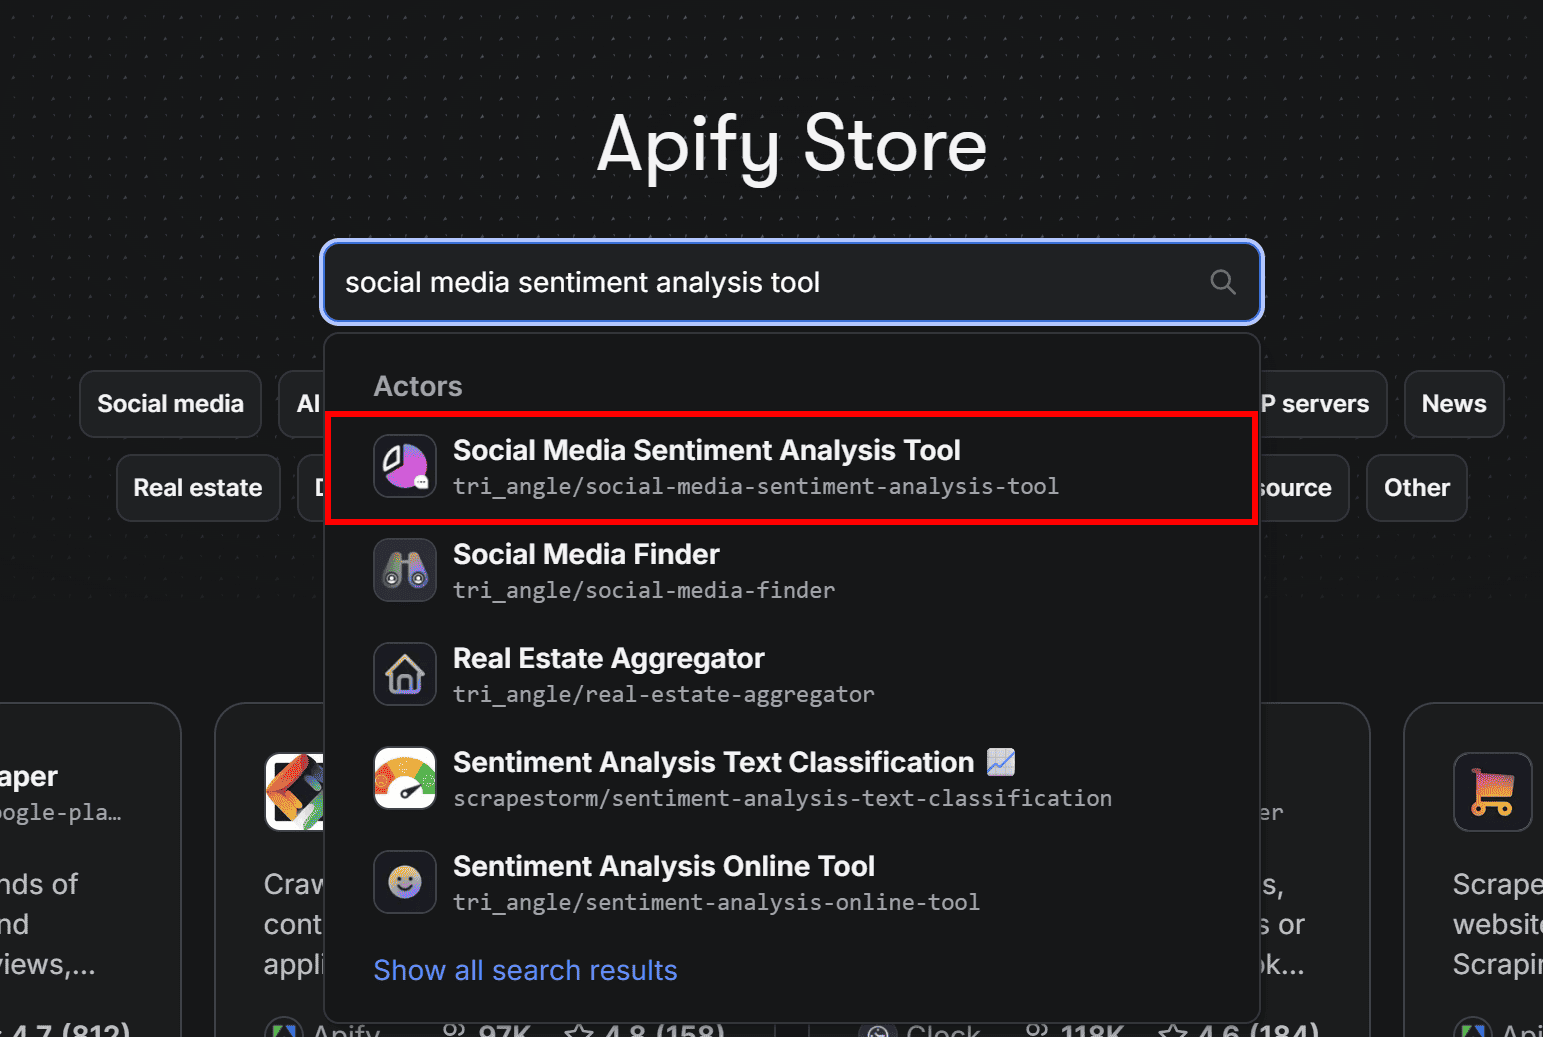
You’ll then be redirected to the Actor page for Social Media Sentiment Analysis Tool.
Step 2: Try the Actor
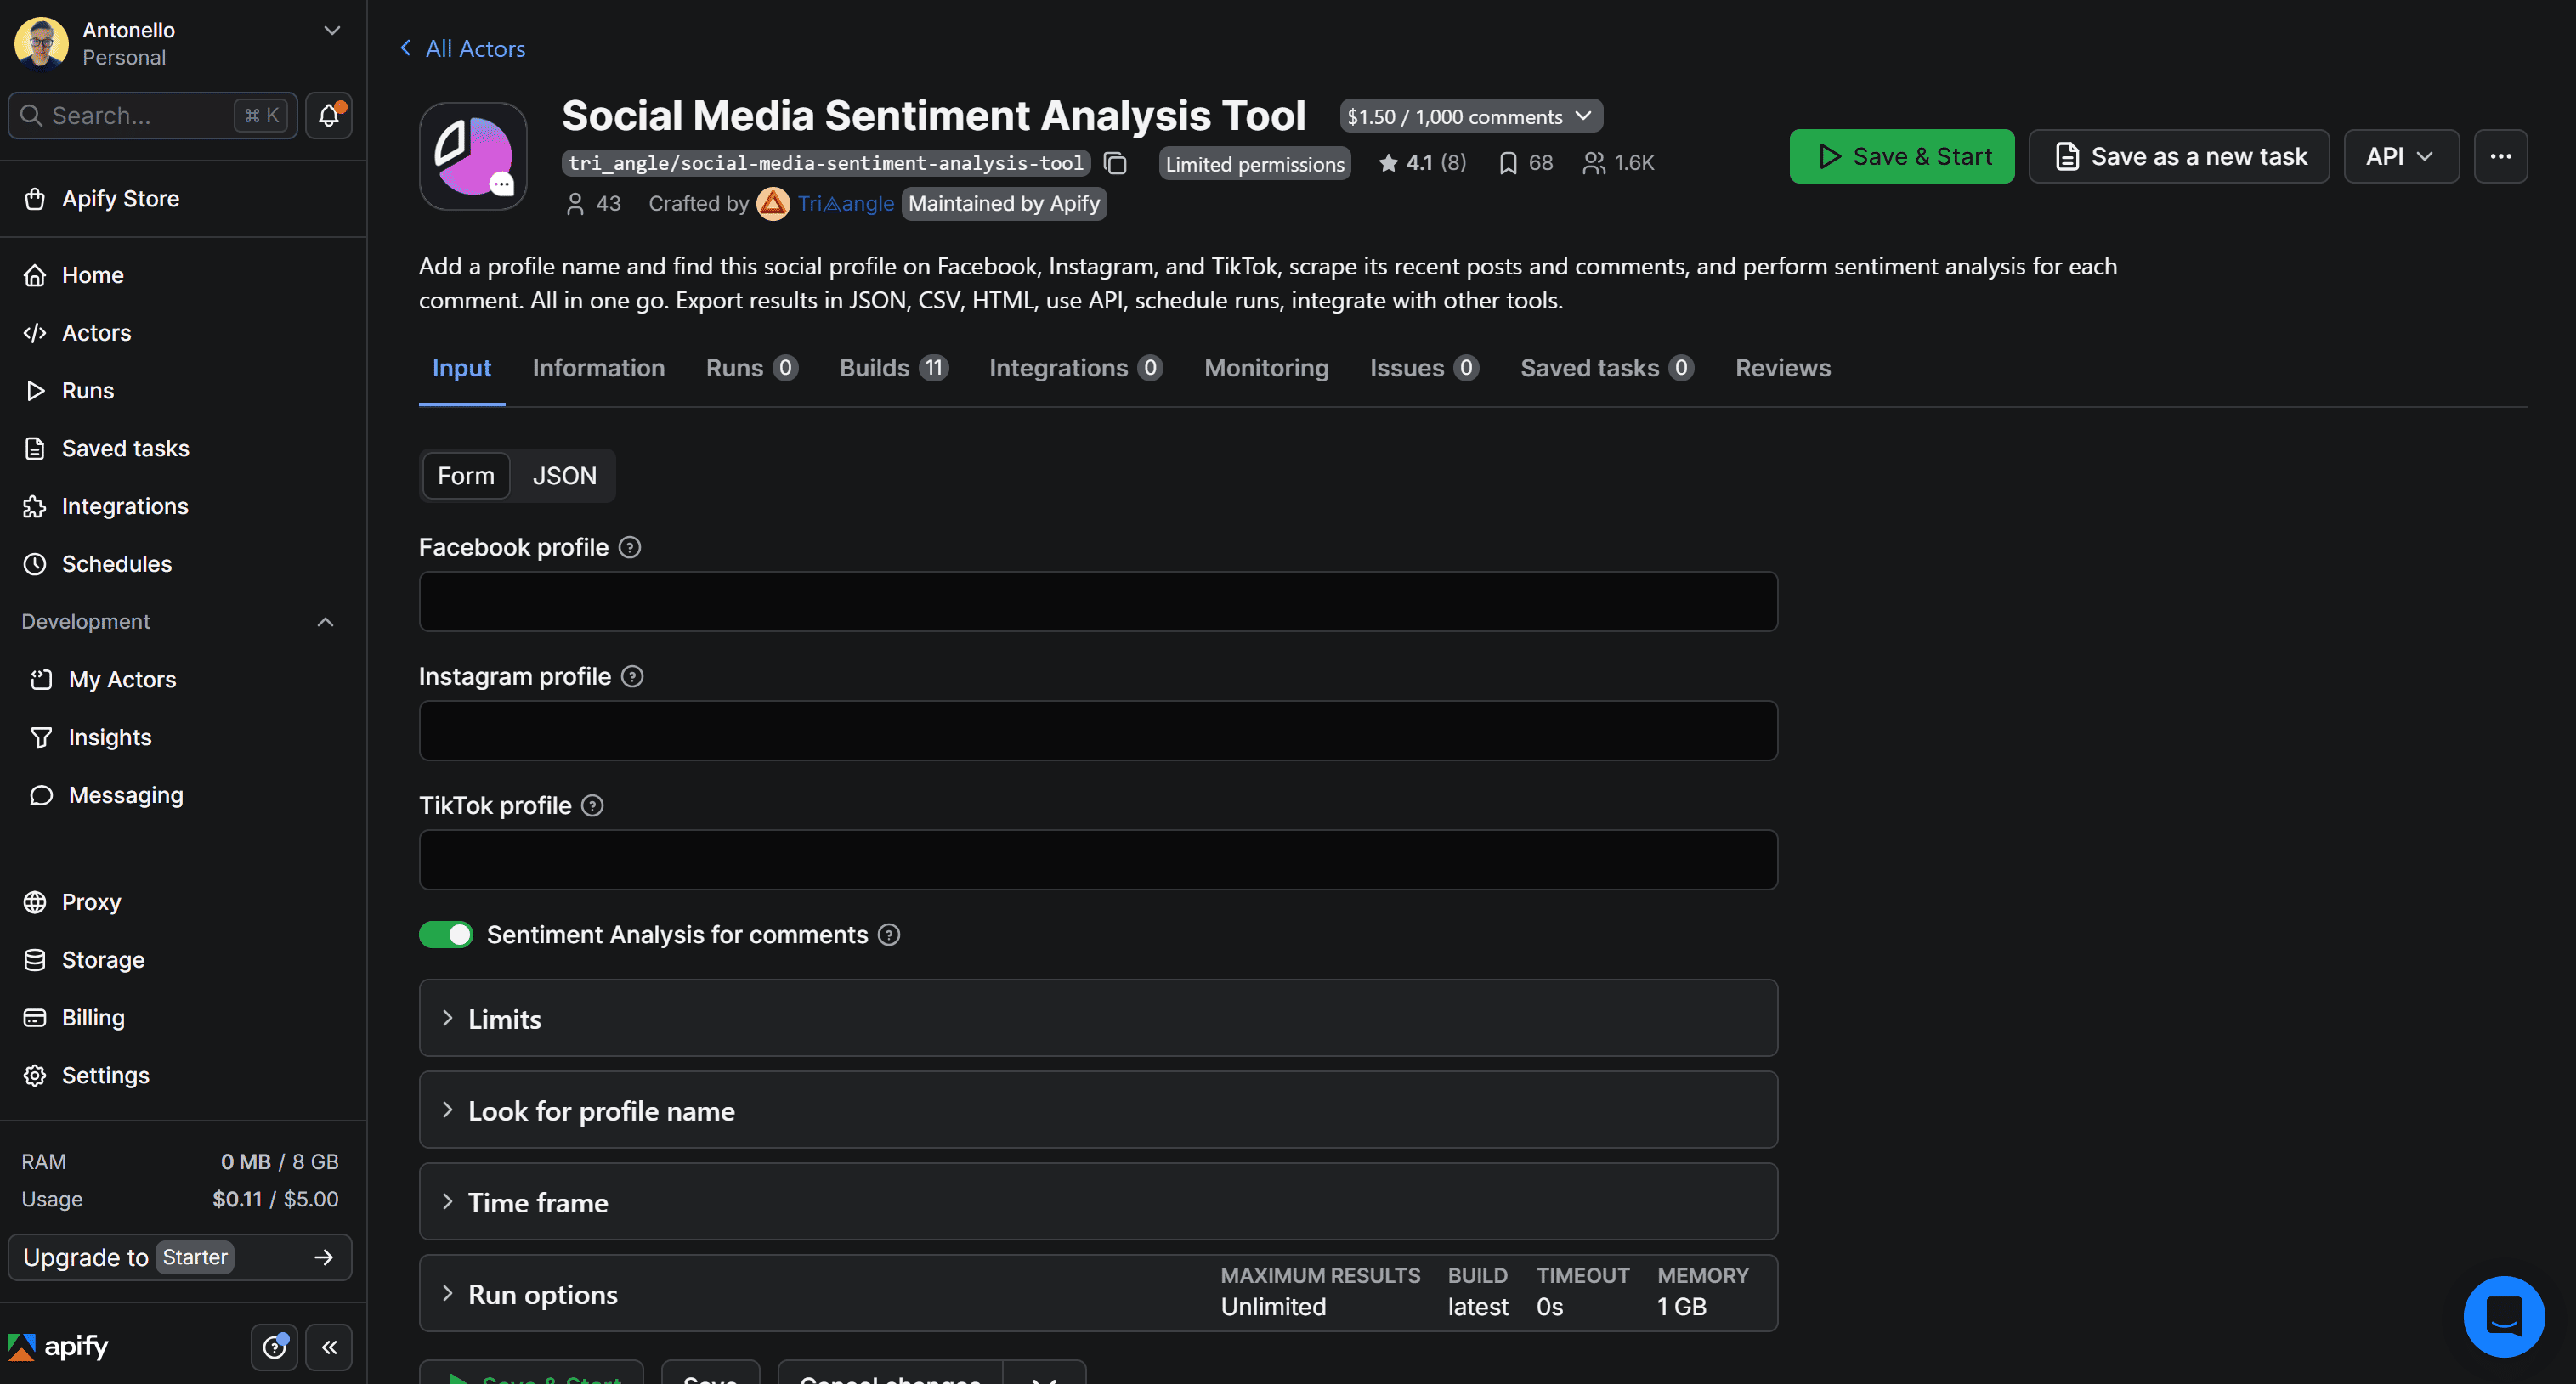
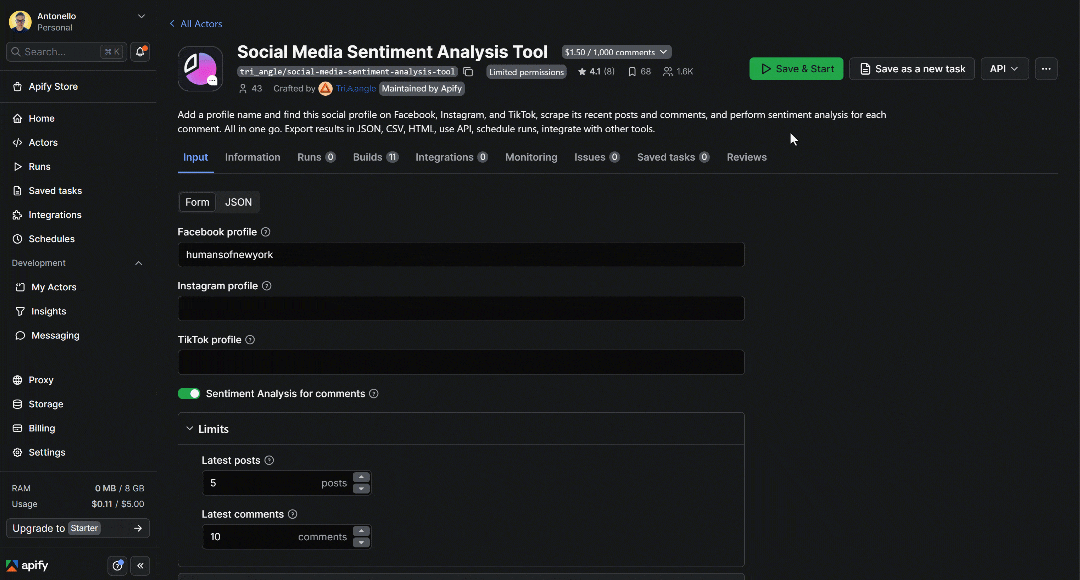
To verify that the selected Actor actually meets your needs, put it to the test. Assume you want to perform sentiment analysis on comments from recent posts on the Humans of New York Facebook Page (@humansofnewyork).
In the Input tab, populate the form as follows:
- Facebook profile:
humansofnewyork. - Latest posts:
5. - Latest comments:
10.
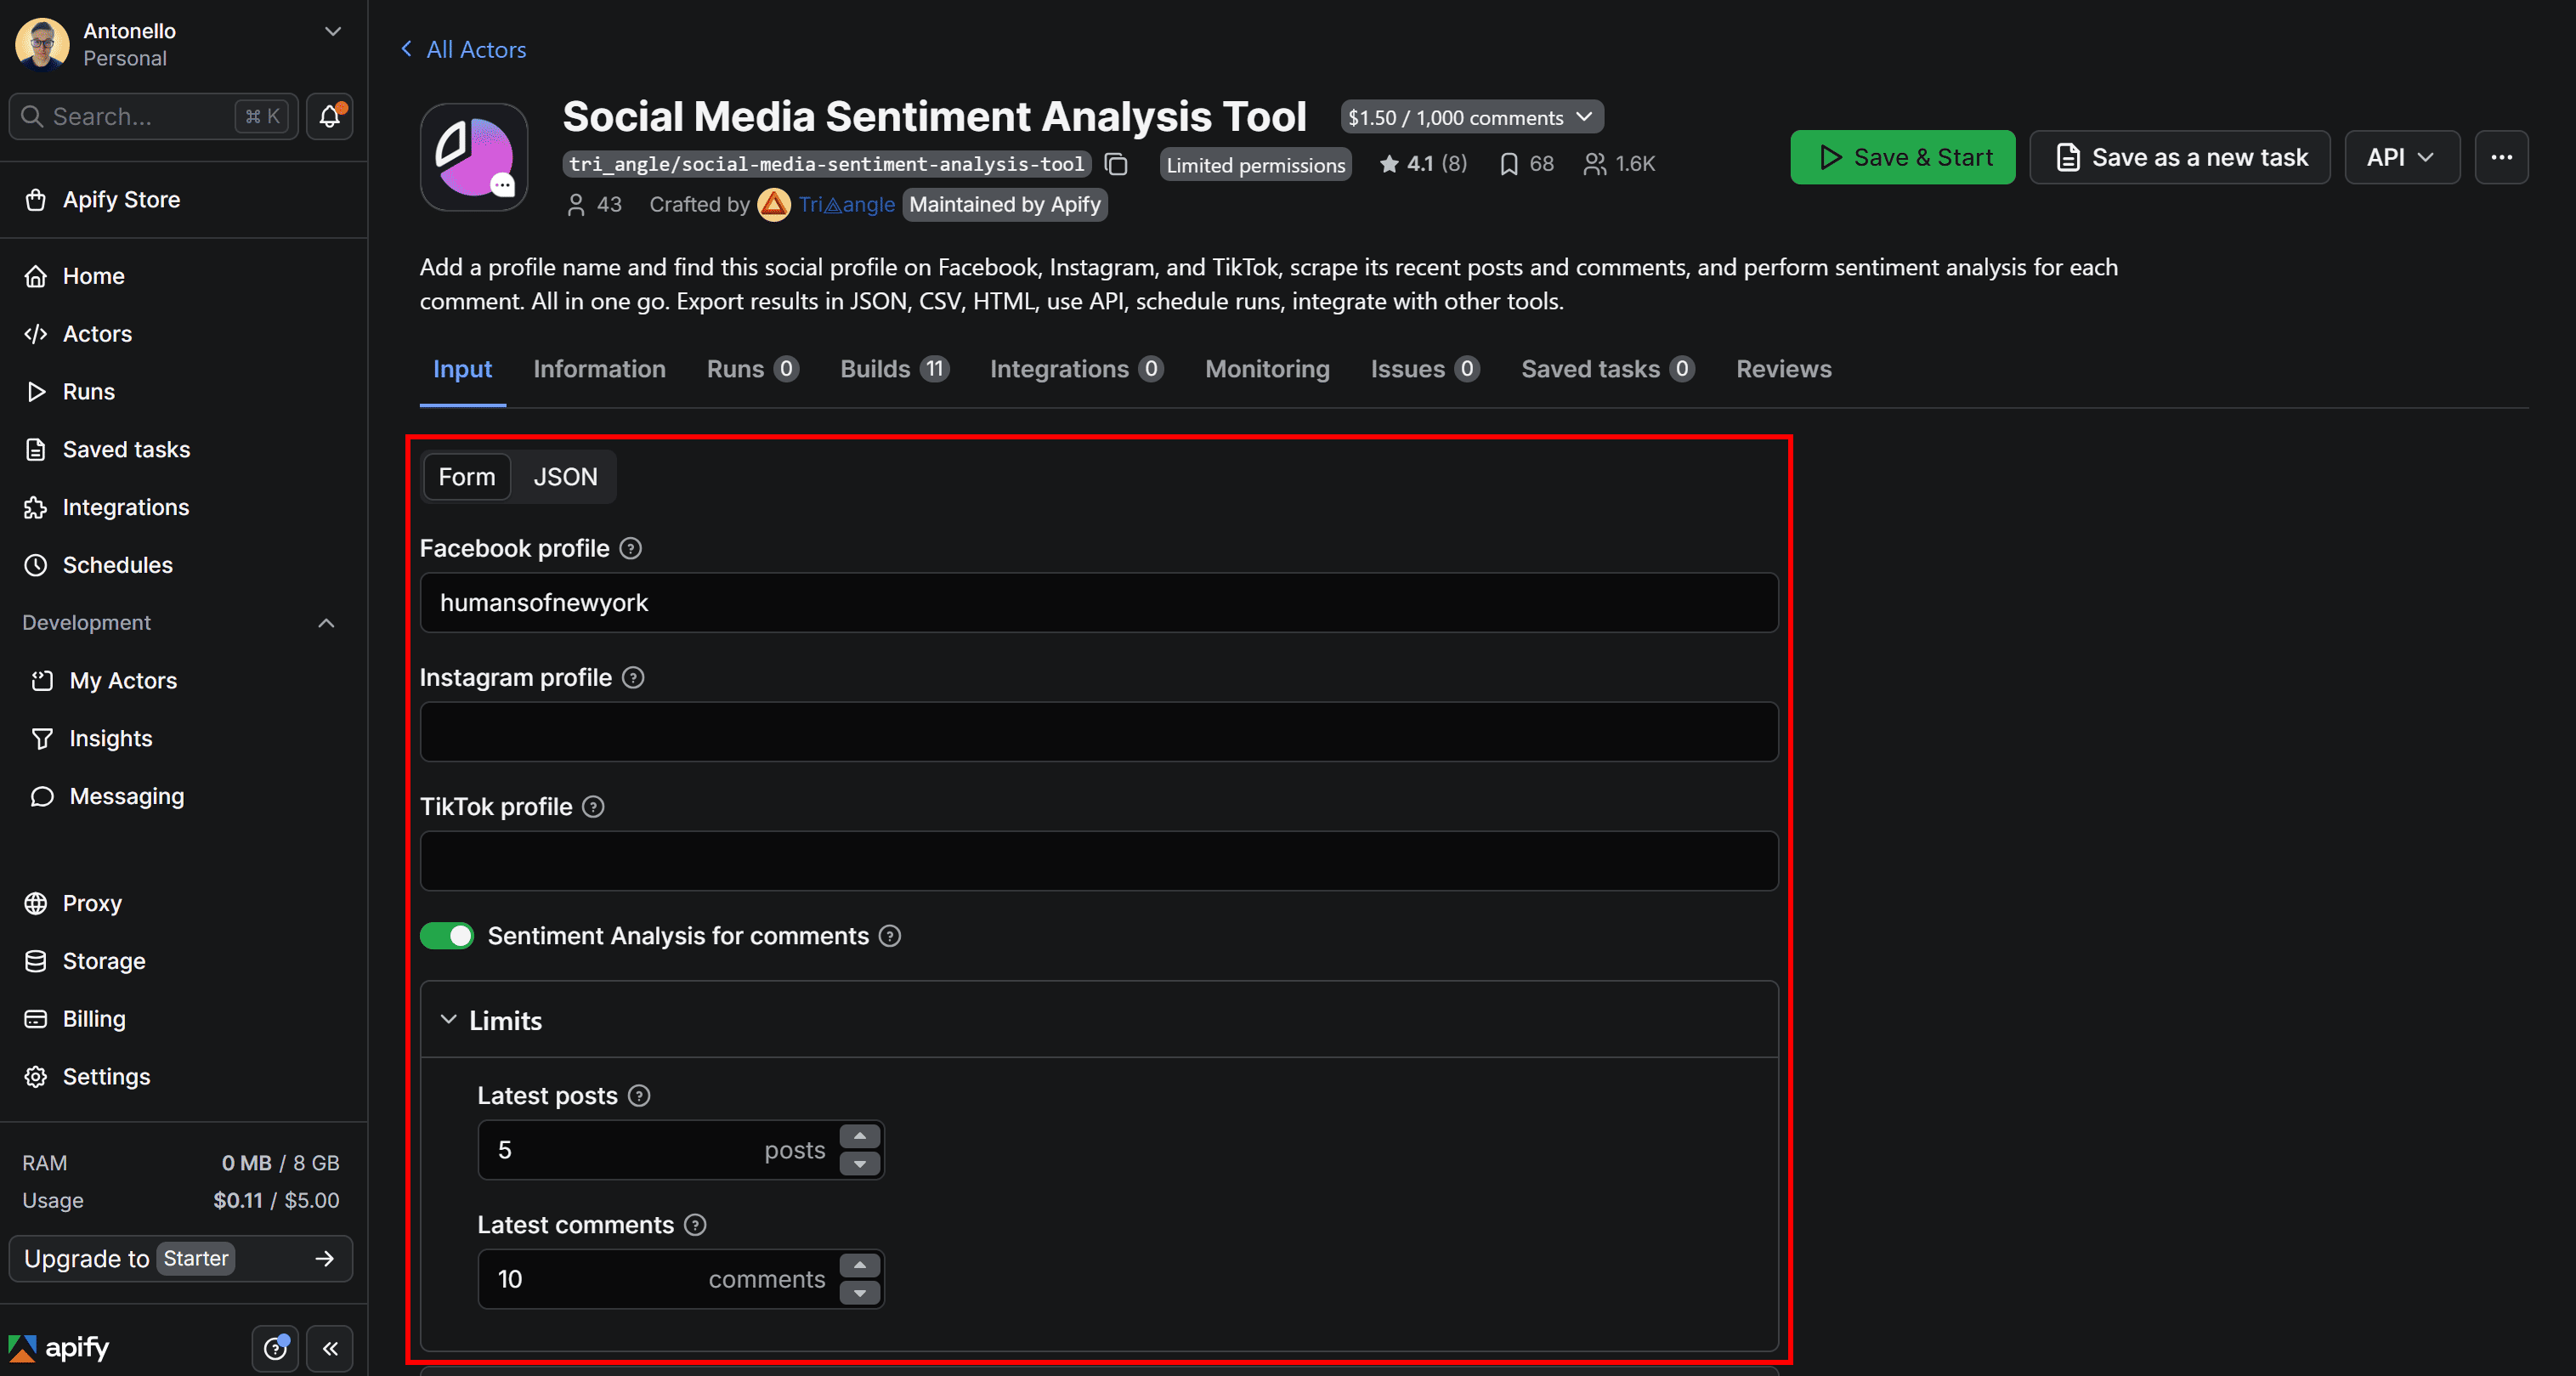
Leave all other available input options set to their default values (or adjust them based on your needs). These settings define how the Actor behaves when retrieving comments for sentiment analysis.
In this case, the Actor will fetch the latest 10 comments for each of the 5 posts from the specified Facebook profile and perform sentiment analysis on every retrieved comment.
Note: The sentiment analysis step is optional:
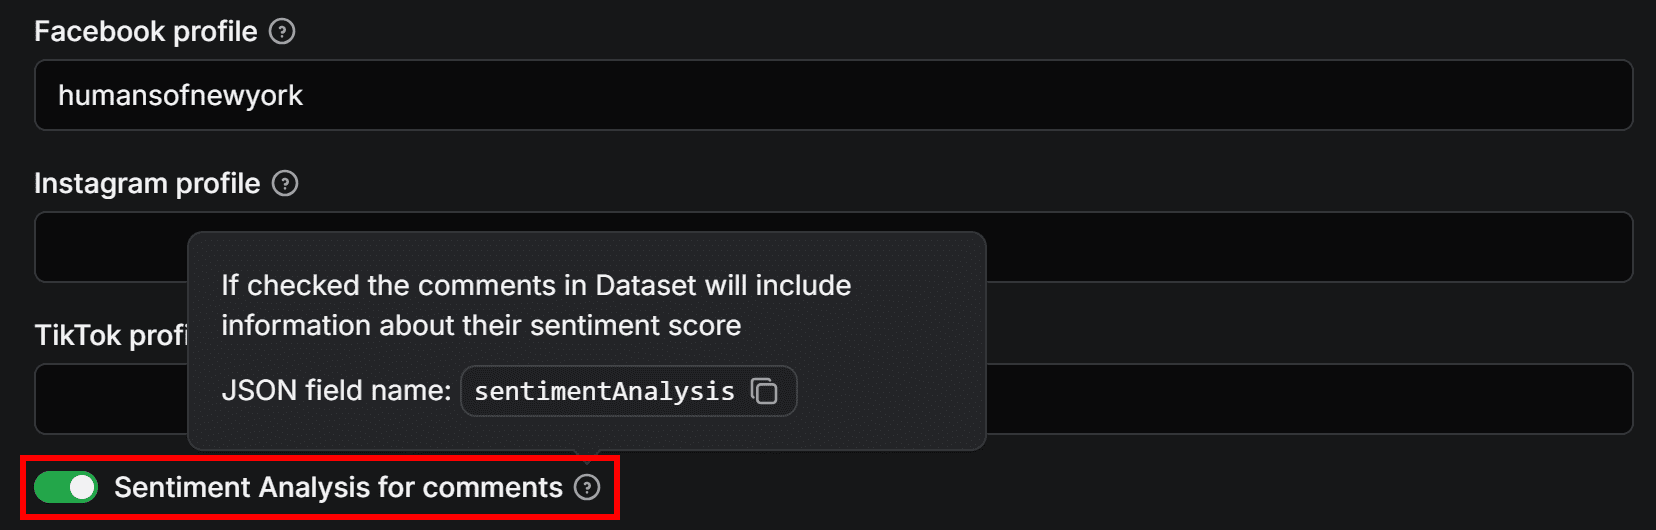
This means you can also use the Actor Bundle to retrieve Facebook, Instagram, or TikTok comments data and then analyze it separately. For instance, you could perform sentiment analysis via the LLM Dataset Processor Actor (as we’ll show in the next chapter). With this approach, you’ll have more control over the sentiment analysis process. Now, execute the Actor by clicking Save & Start in the top-right corner. Once it starts running, you should see something like this:
A notification will tell you that 50 results have been added to the dataset (10 comments × 5 posts). The output should look similar to the following:
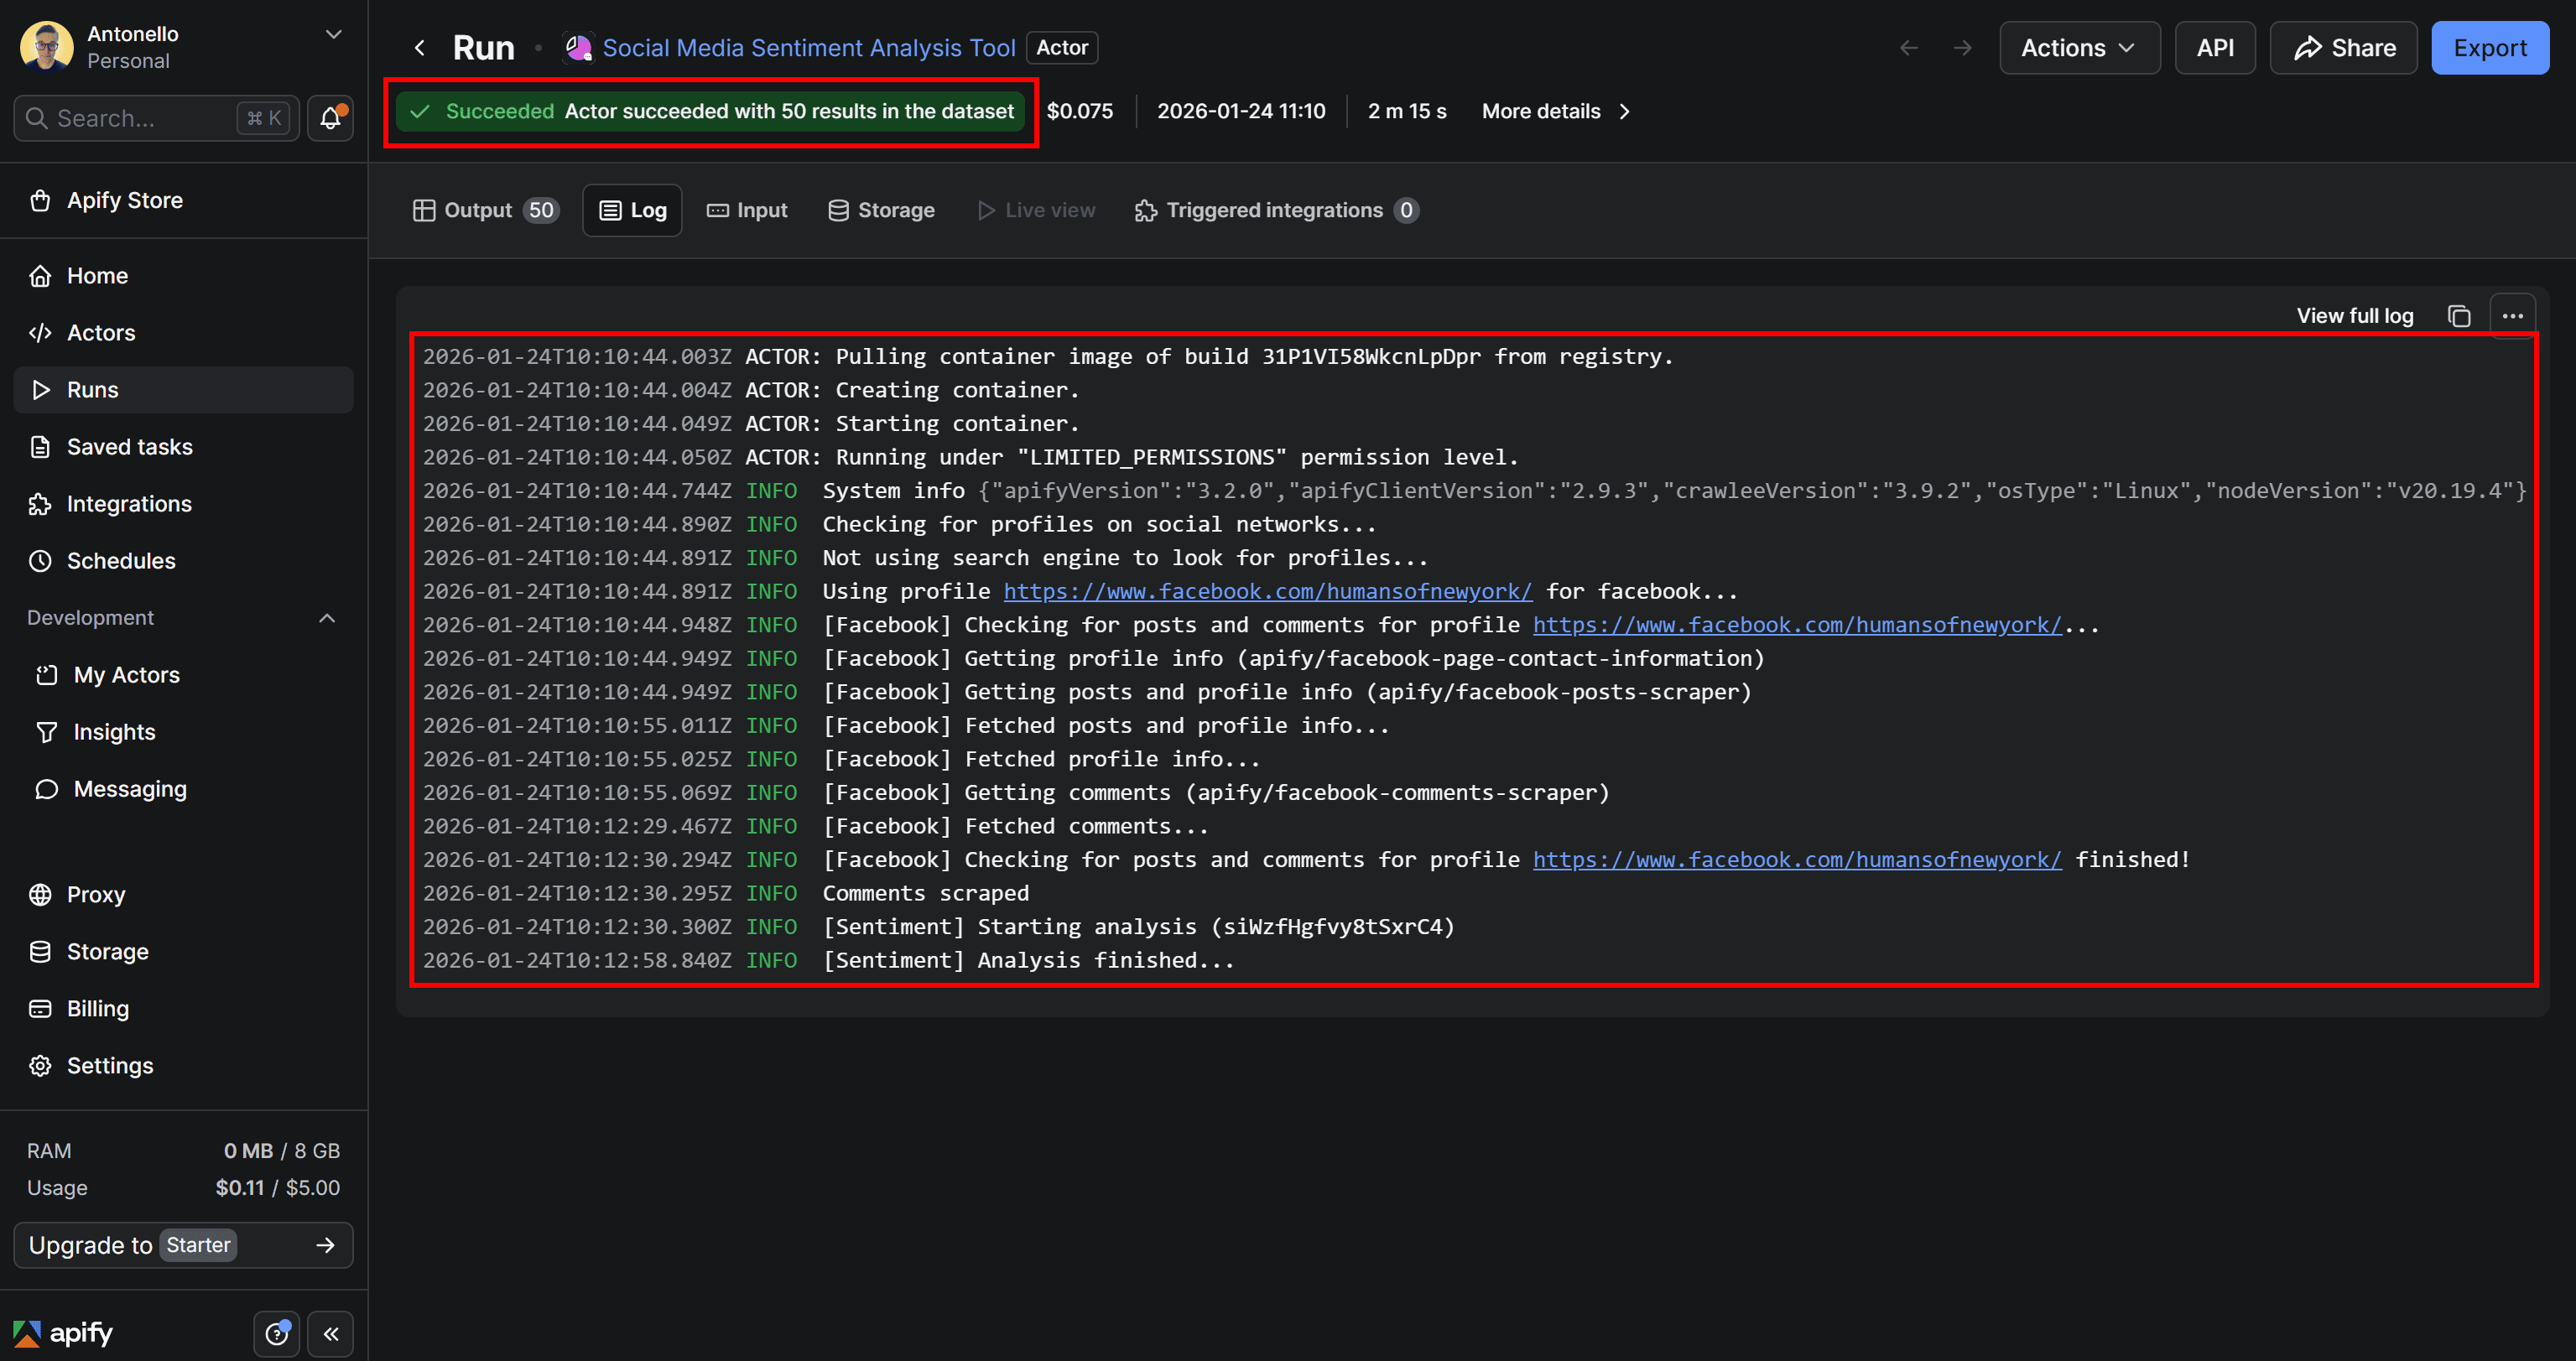
As you can tell by looking at the logs, the Actor:
- Retrieves Facebook profile information using Facebook Contact Information Scraper (
apify/facebook-page-contact-information). - Scrapes post and profile data via Facebook Posts Scraper (
apify/facebook-posts-scraper). - Fetches comments for each post thanks to Facebook Comments Scraper (
apify/facebook-comments-scraper). - Runs the sentiment analysis task on each collected comment.
Step 3: Explore the Actor’s output
Access the results of the Actor run by opening the Output tab:
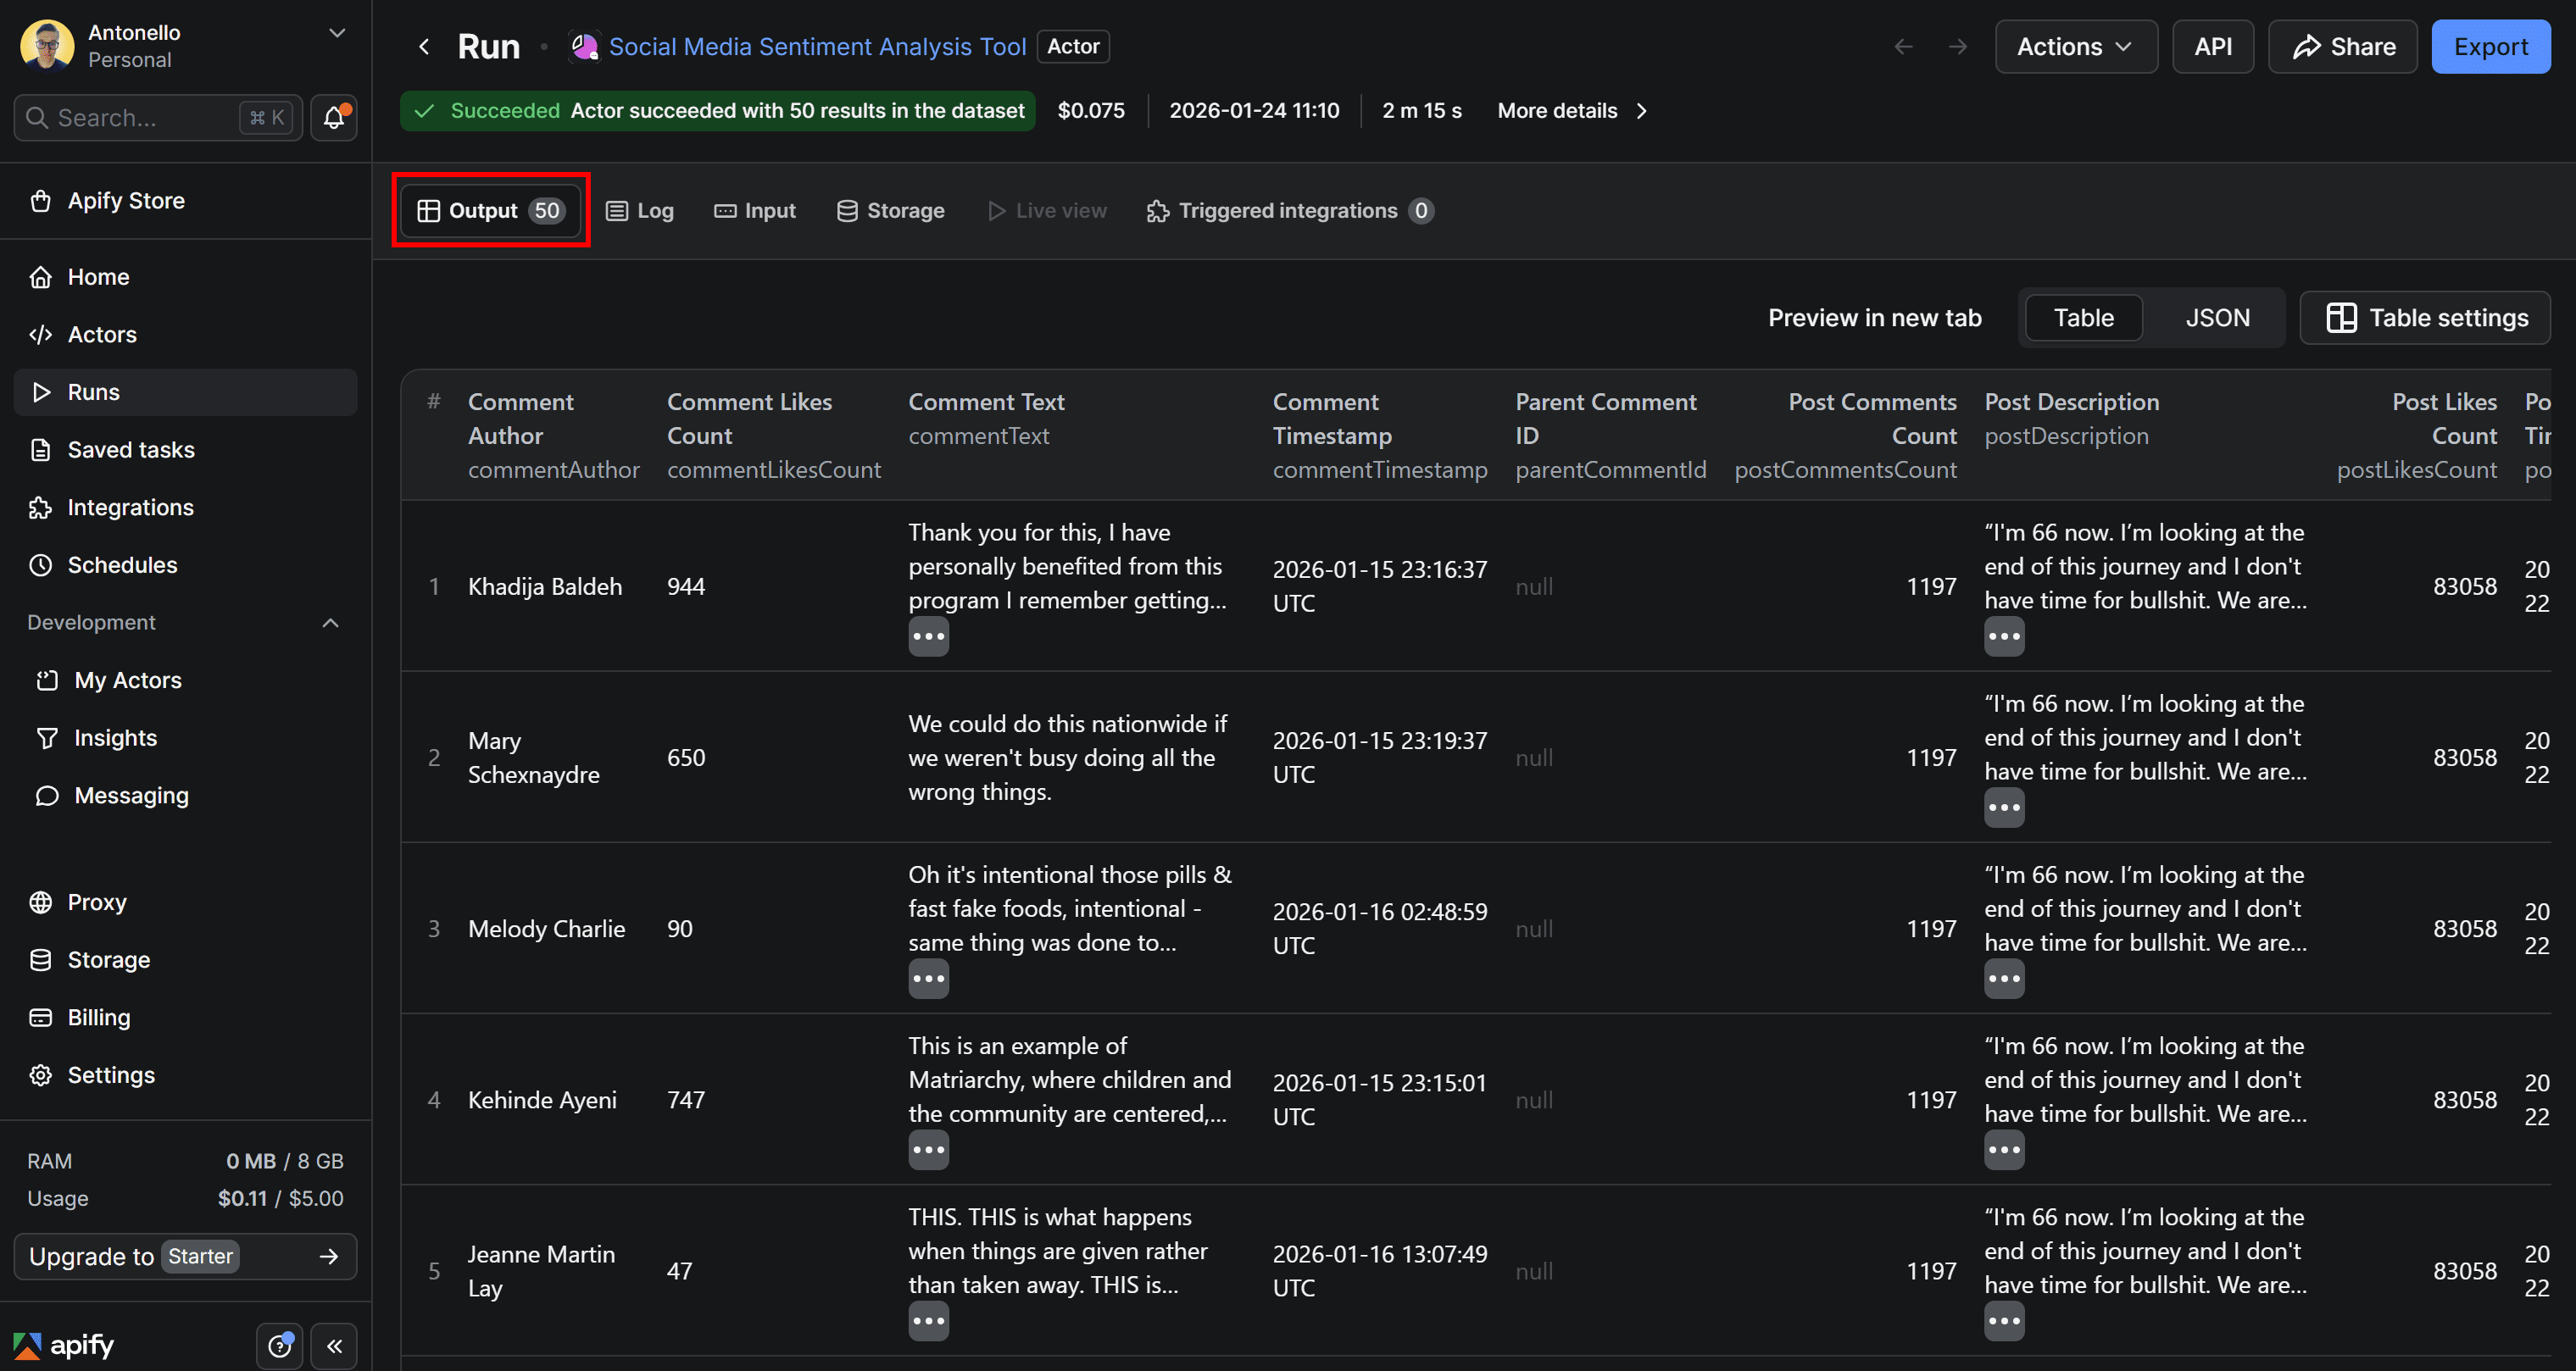
You’ll see a structured table containing 50 comments, each enriched with a sentiment analysis object. These comments correspond exactly to the latest 10 comments from each of the 5 most recent posts on the Humans of New York Facebook Page:
To better explore the results, switch to the JSON view:
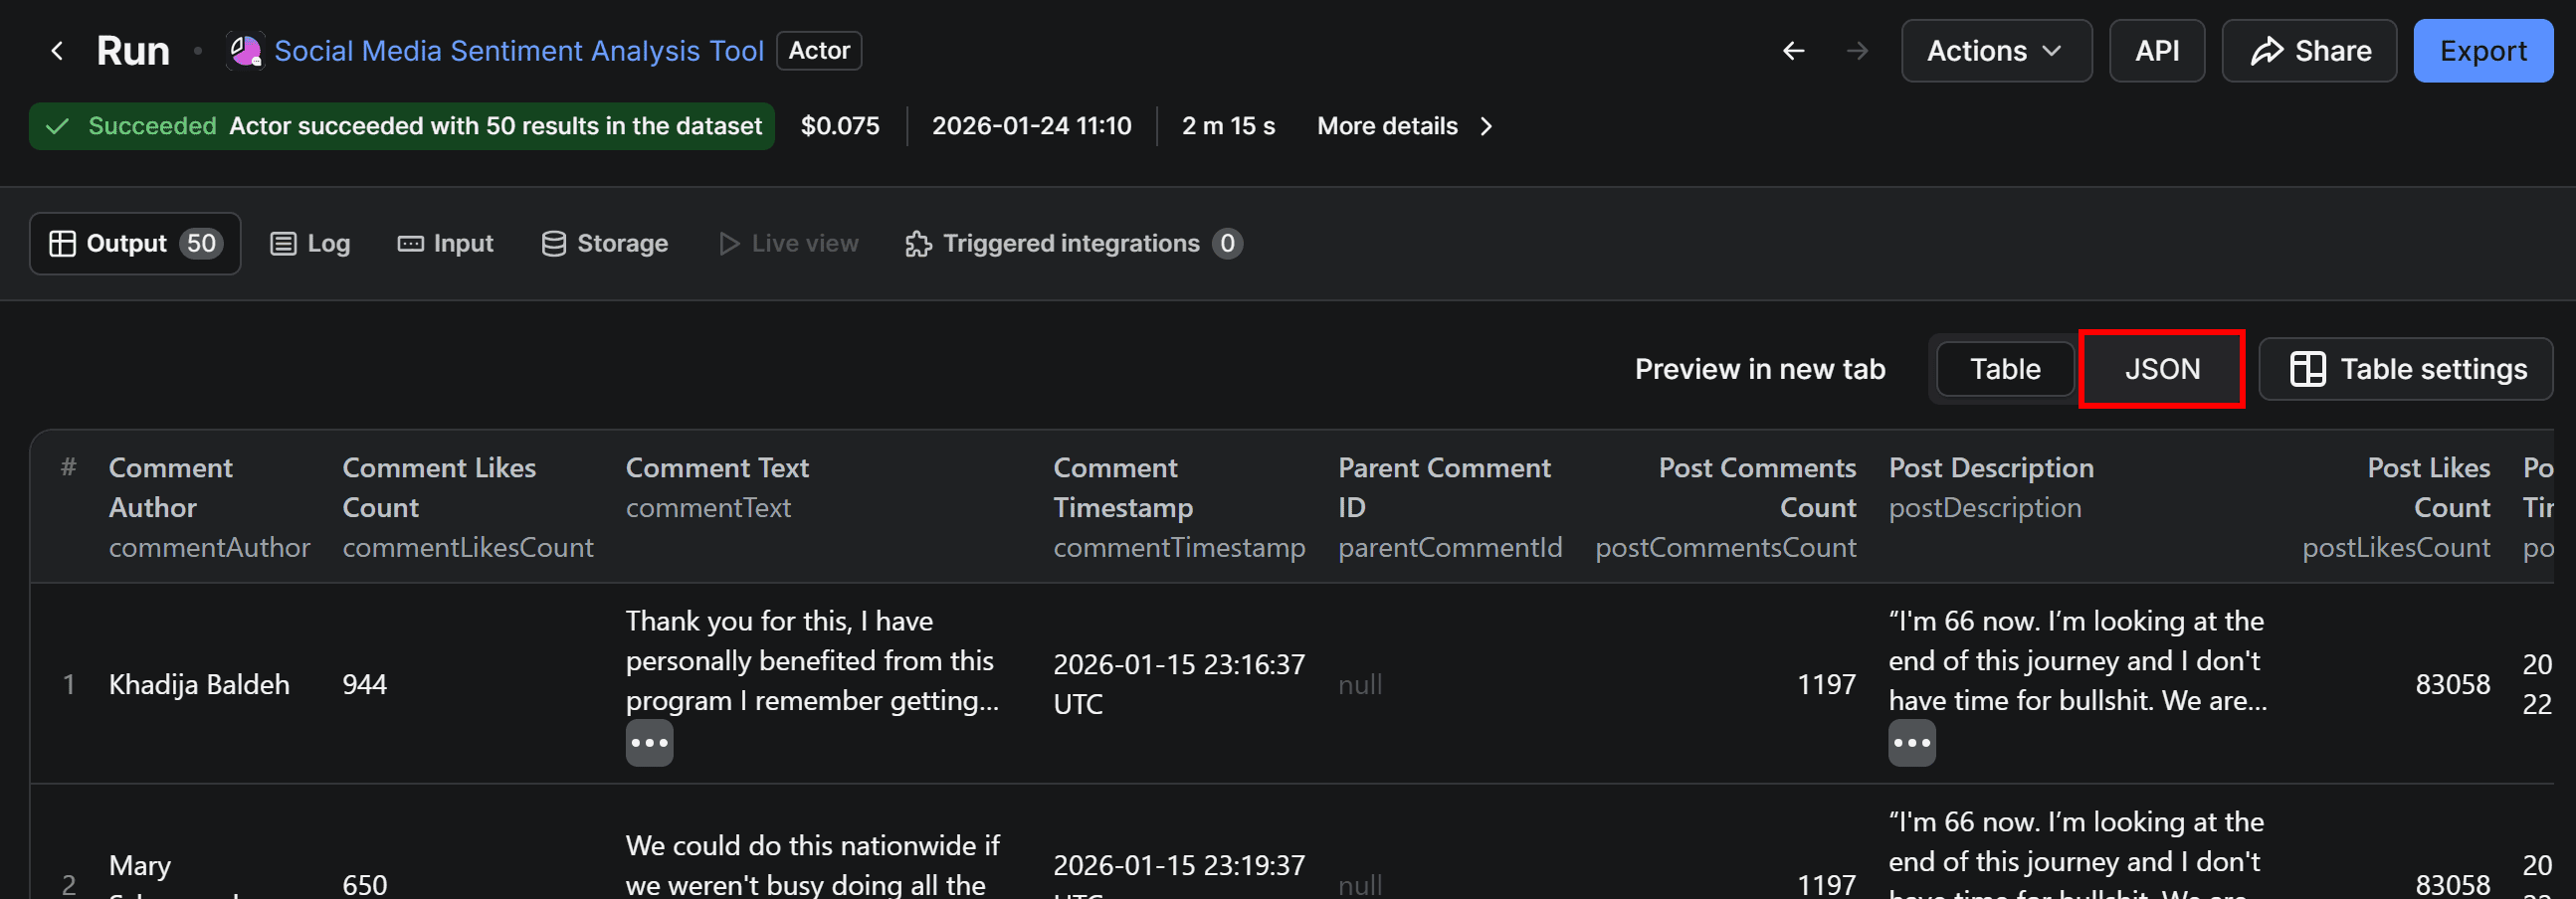
If you inspect the first few comments, you’ll view entries like the following:
{
  "targetPlatform": "facebook",
  "profileName": "Humans of New York",
  "profileUrl": "https://www.facebook.com/humansofnewyork/",
  "postDescription": "“I'm 66 now. I’m looking at the end of this journey ... (OMITTED FOR BREVITY)",
  "postTimestamp": "2026-01-15T22:52:14.000Z",
  "commentText": "Thank you for this, I have personally benefited from this program I remember getting vegetables ( my first time seeing collard greens) and rose Mary etc.. I honestly did not know what most herbs look like because I usually get them in powder form until I visited your farms",
  "commentAuthor": "Khadija Baldeh",
  "postUrl": "https://www.facebook.com/humansofnewyork/posts/pfbid09AatTxFgBjggwMKMLyciu6yXTzzCi1TCPbpdXPHNGcT6VXVKLmhqPHDKRzuD6on5l",
  "commentTimestamp": "2026-01-15T23:16:37.000Z",
  // omitted for brevity...
  "sentiment": {
    "finalClassification": "positive",
    "finalScore": 0.9522206783294678,
    "negativeScore": 0.005716362036764622,
    "neutralScore": 0.042062919586896896,
    "positiveScore": 0.9522206783294678
  }
},
{
  "targetPlatform": "facebook",
  "profileName": "Humans of New York",
  "profileUrl": "https://www.facebook.com/humansofnewyork/",
    "postDescription": "“I'm 66 now. I’m looking at the end of this journey ... (OMITTED FOR BREVITY)",
  "postTimestamp": "2026-01-15T22:52:14.000Z",
  "commentText": "We could do this nationwide if we weren't busy doing all the wrong things.",
  "commentAuthor": "Mary Schexnaydre",
  "postUrl": "https://www.facebook.com/humansofnewyork/posts/pfbid09AatTxFgBjggwMKMLyciu6yXTzzCi1TCPbpdXPHNGcT6VXVKLmhqPHDKRzuD6on5l",
  "commentTimestamp": "2026-01-15T23:19:37.000Z",
  // omitted for brevity...
  "sentiment": {
    "finalClassification": "negative",
    "finalScore": 0.5417249202728271,
    "negativeScore": 0.5417249202728271,
    "neutralScore": 0.36916011571884155,
    "positiveScore": 0.0891149491071701
  }
},
{
  "targetPlatform": "facebook",
  "profileName": "Humans of New York",
  "profileUrl": "https://www.facebook.com/humansofnewyork/",
   "postDescription": "“I'm 66 now. I’m looking at the end of this journey ... (OMITTED FOR BREVITY)",
  "postTimestamp": "2026-01-15T22:52:14.000Z",
  "commentText": "Oh it's intentional those pills & fast fake foods, intentional - same thing was done to indigenous. Happy to see the reclamation resistance and resilience ✨\\n\\nFood is meant to heal & be medicine & not sickness.",
  "commentAuthor": "Melody Charlie",
  "postUrl": "https://www.facebook.com/humansofnewyork/posts/pfbid09AatTxFgBjggwMKMLyciu6yXTzzCi1TCPbpdXPHNGcT6VXVKLmhqPHDKRzuD6on5l",
  "commentTimestamp": "2026-01-16T02:48:59.000Z",
  // omitted for brevity...
  "sentiment": {
    "finalClassification": "neutral",
    "finalScore": 0.40622276067733765,
    "negativeScore": 0.38107240200042725,
    "neutralScore": 0.40622276067733765,
    "positiveScore": 0.2127048373222351
  }
}
Each comment object includes a sentiment field containing:
- A final classification label (
"positive","neutral", or"negative"). - A confidence score for the final classification.
- Individual scores for negative, neutral, and positive sentiment.
This structure makes it easy to analyze sentiment at scale or feed the results directly into dashboards, alerts, or downstream workflows.
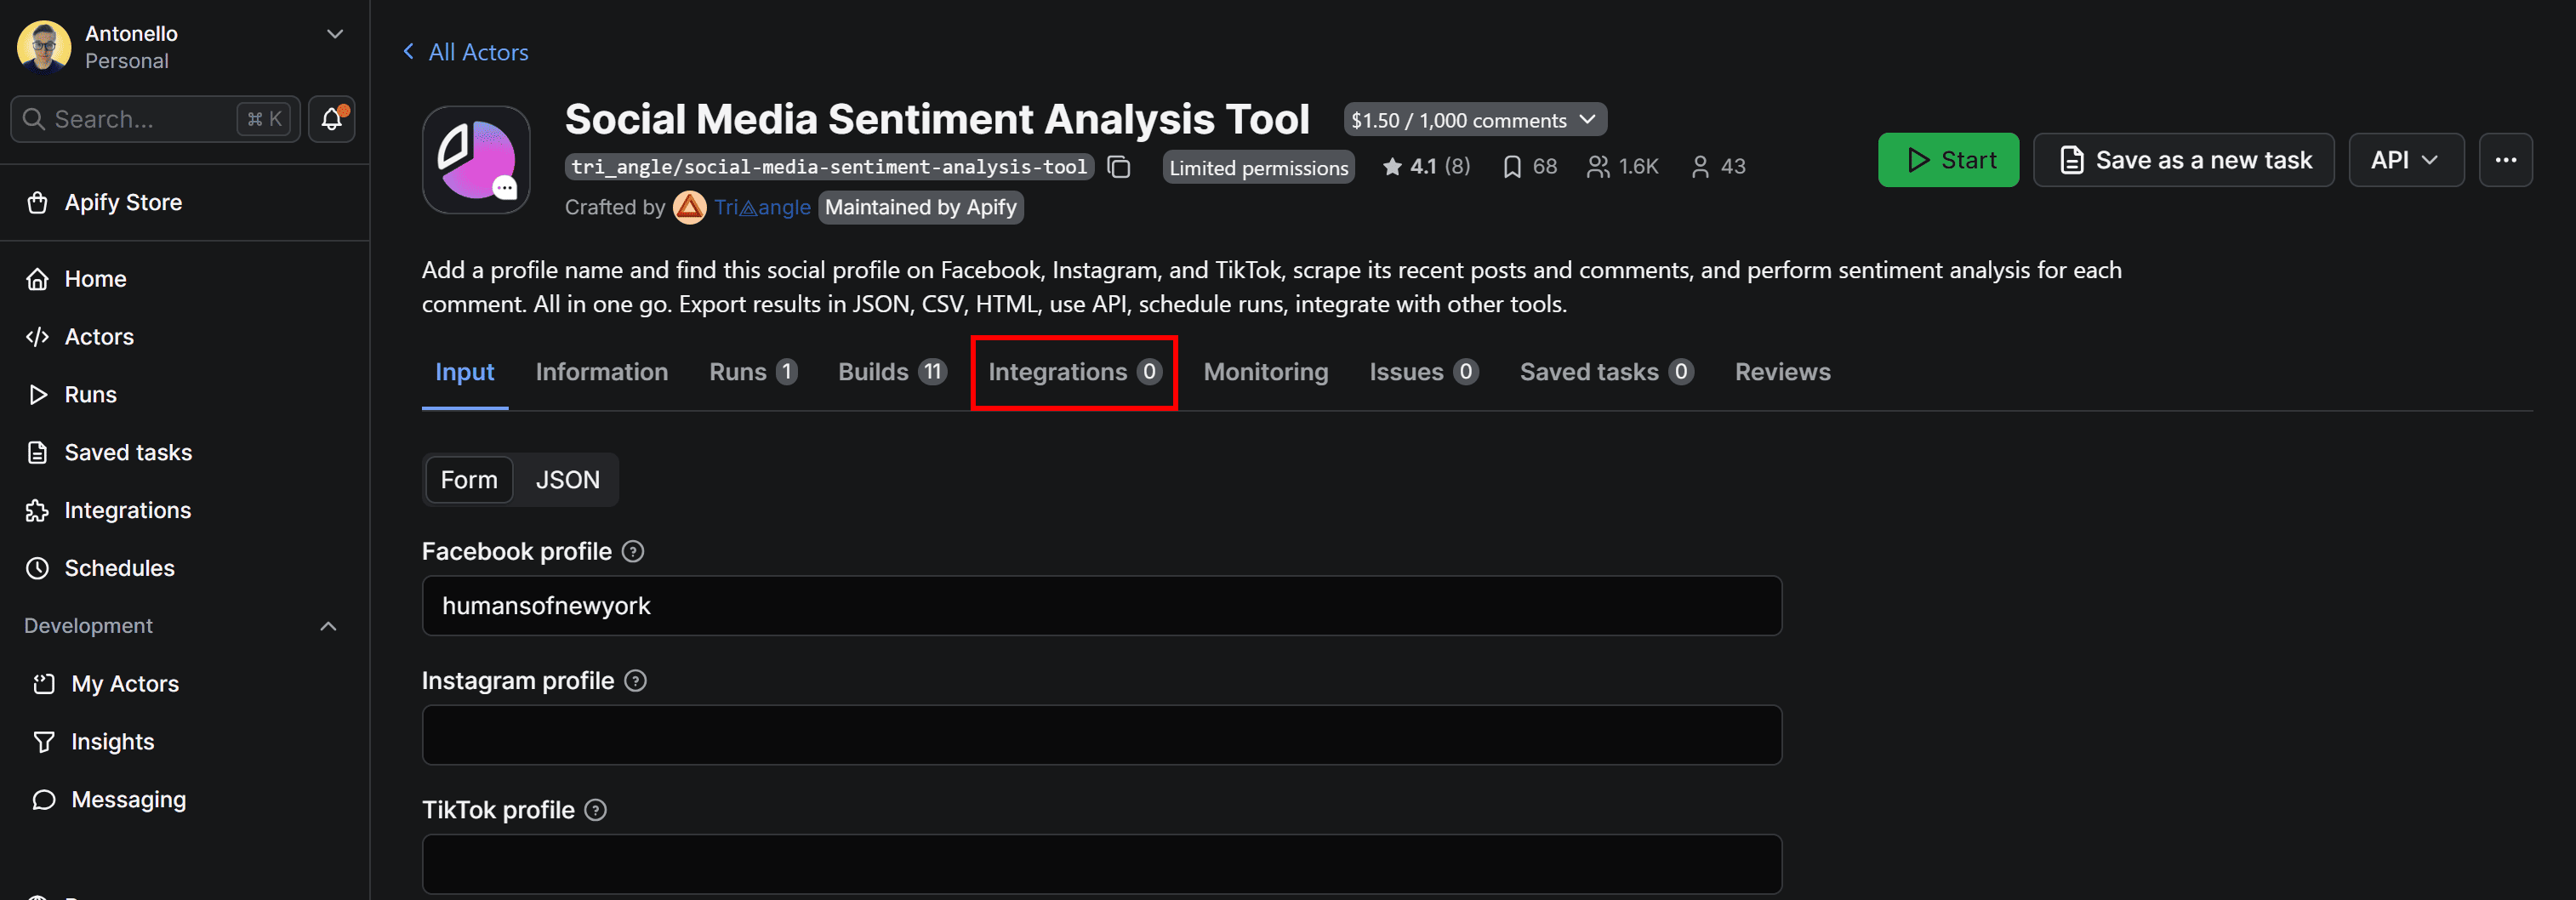
Step 4: Add Gmail integration
Right now, the output produced by the Actor is only available in Apify Console. Sure, you can export the dataset to JSON, CSV, XLS, and other formats. Still, it’s more convenient to receive the results directly via email.
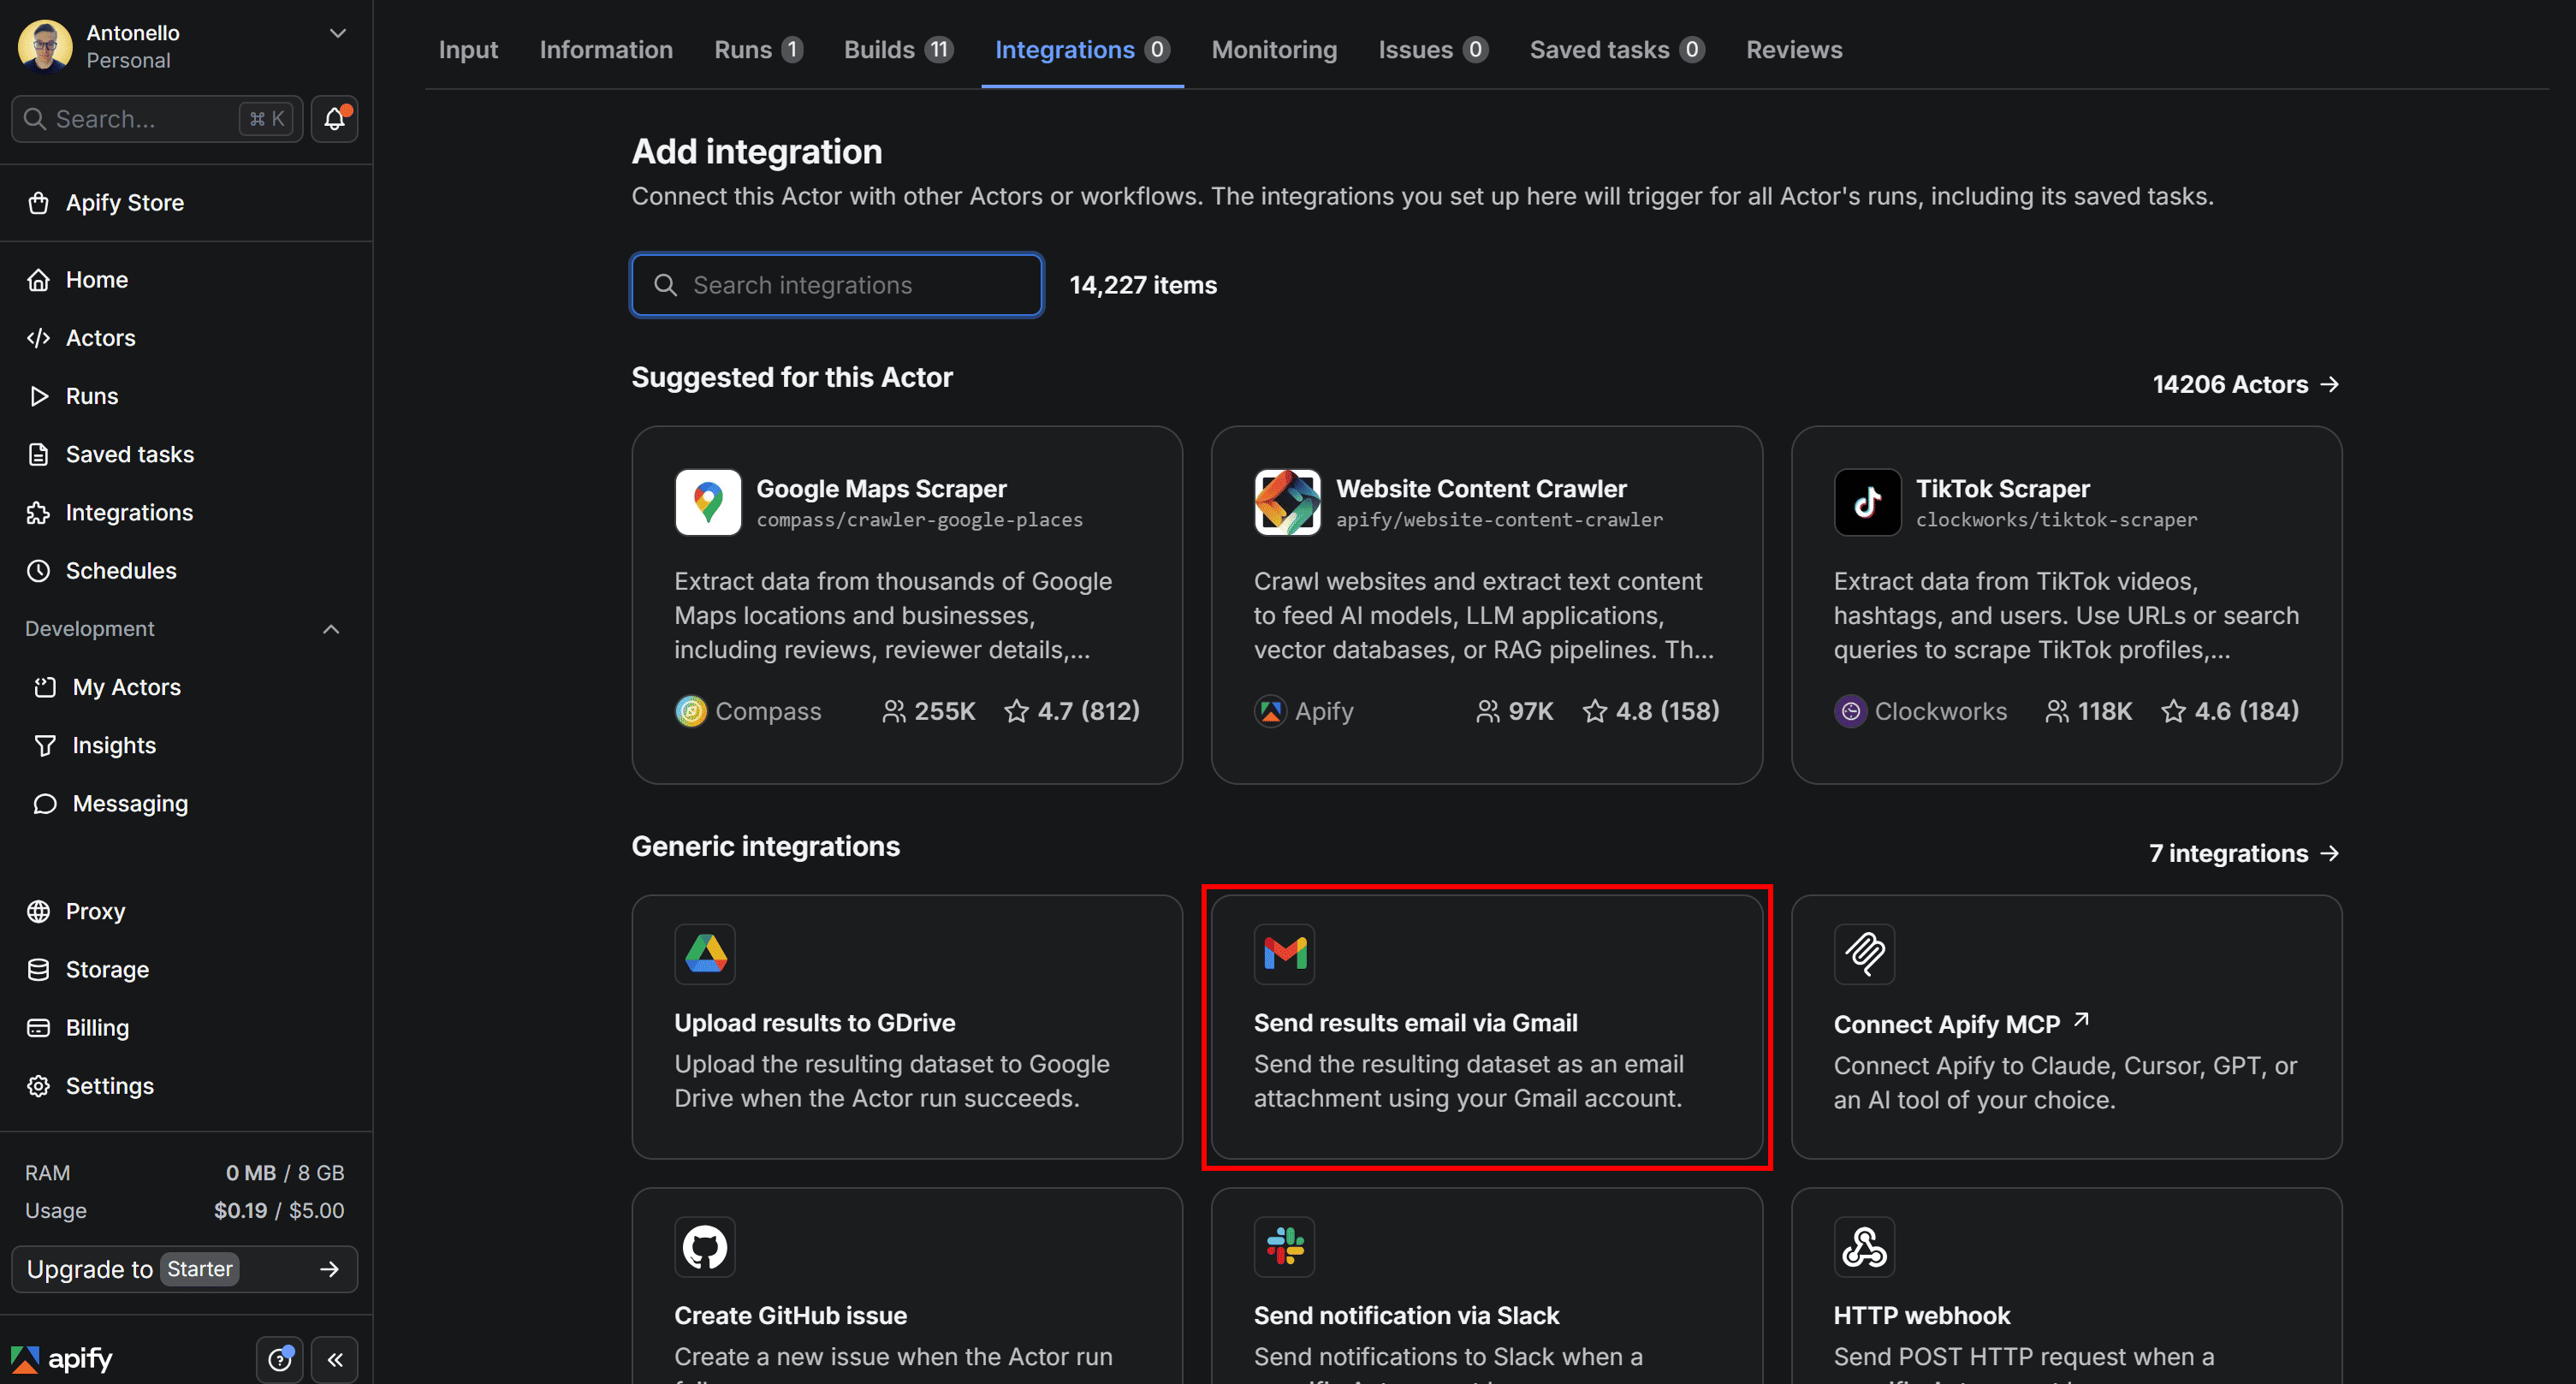
To do so, go back to the Social Media Sentiment Analysis Tool Actor main page and select the Integrations tab:
Here, you can browse all integrations supported by Apify (there are more than 14,000). In this case, select the Send results email via Gmail integration:
Next, you’ll be prompted to set up your Gmail account. Click Connect with Google and follow the instructions:
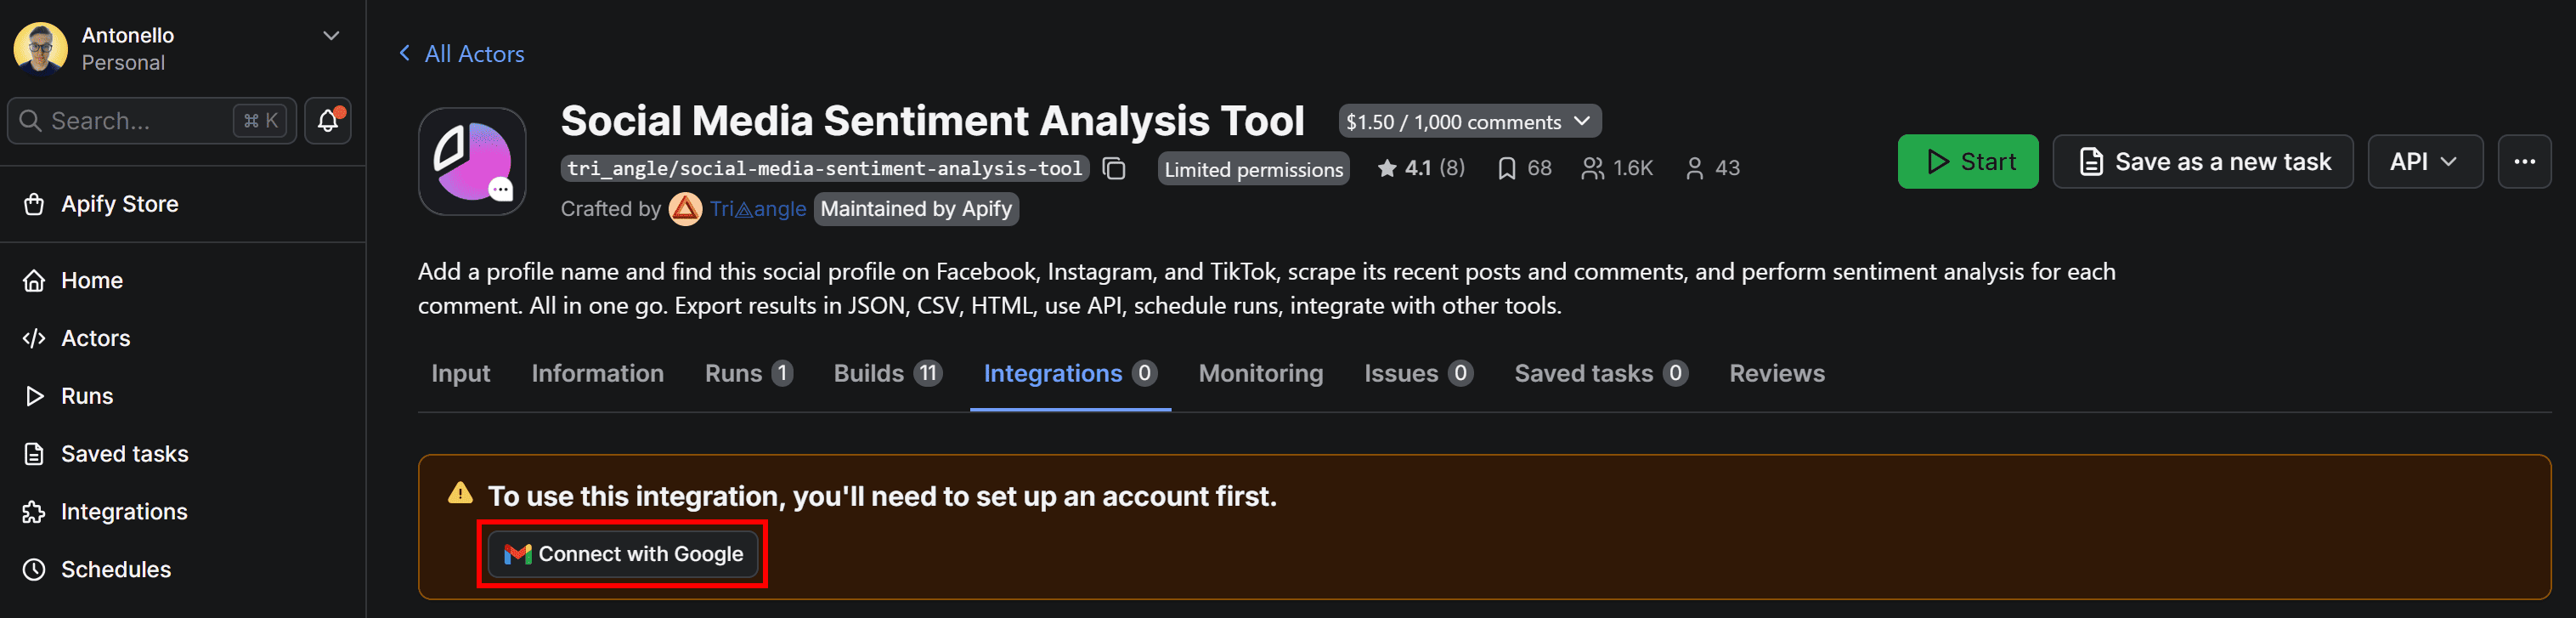
Make sure to grant the Send email on your behalf Google permission to Apify. Once the Google setup is complete, you’ll get access to the form where you need to configure the Apify integration:
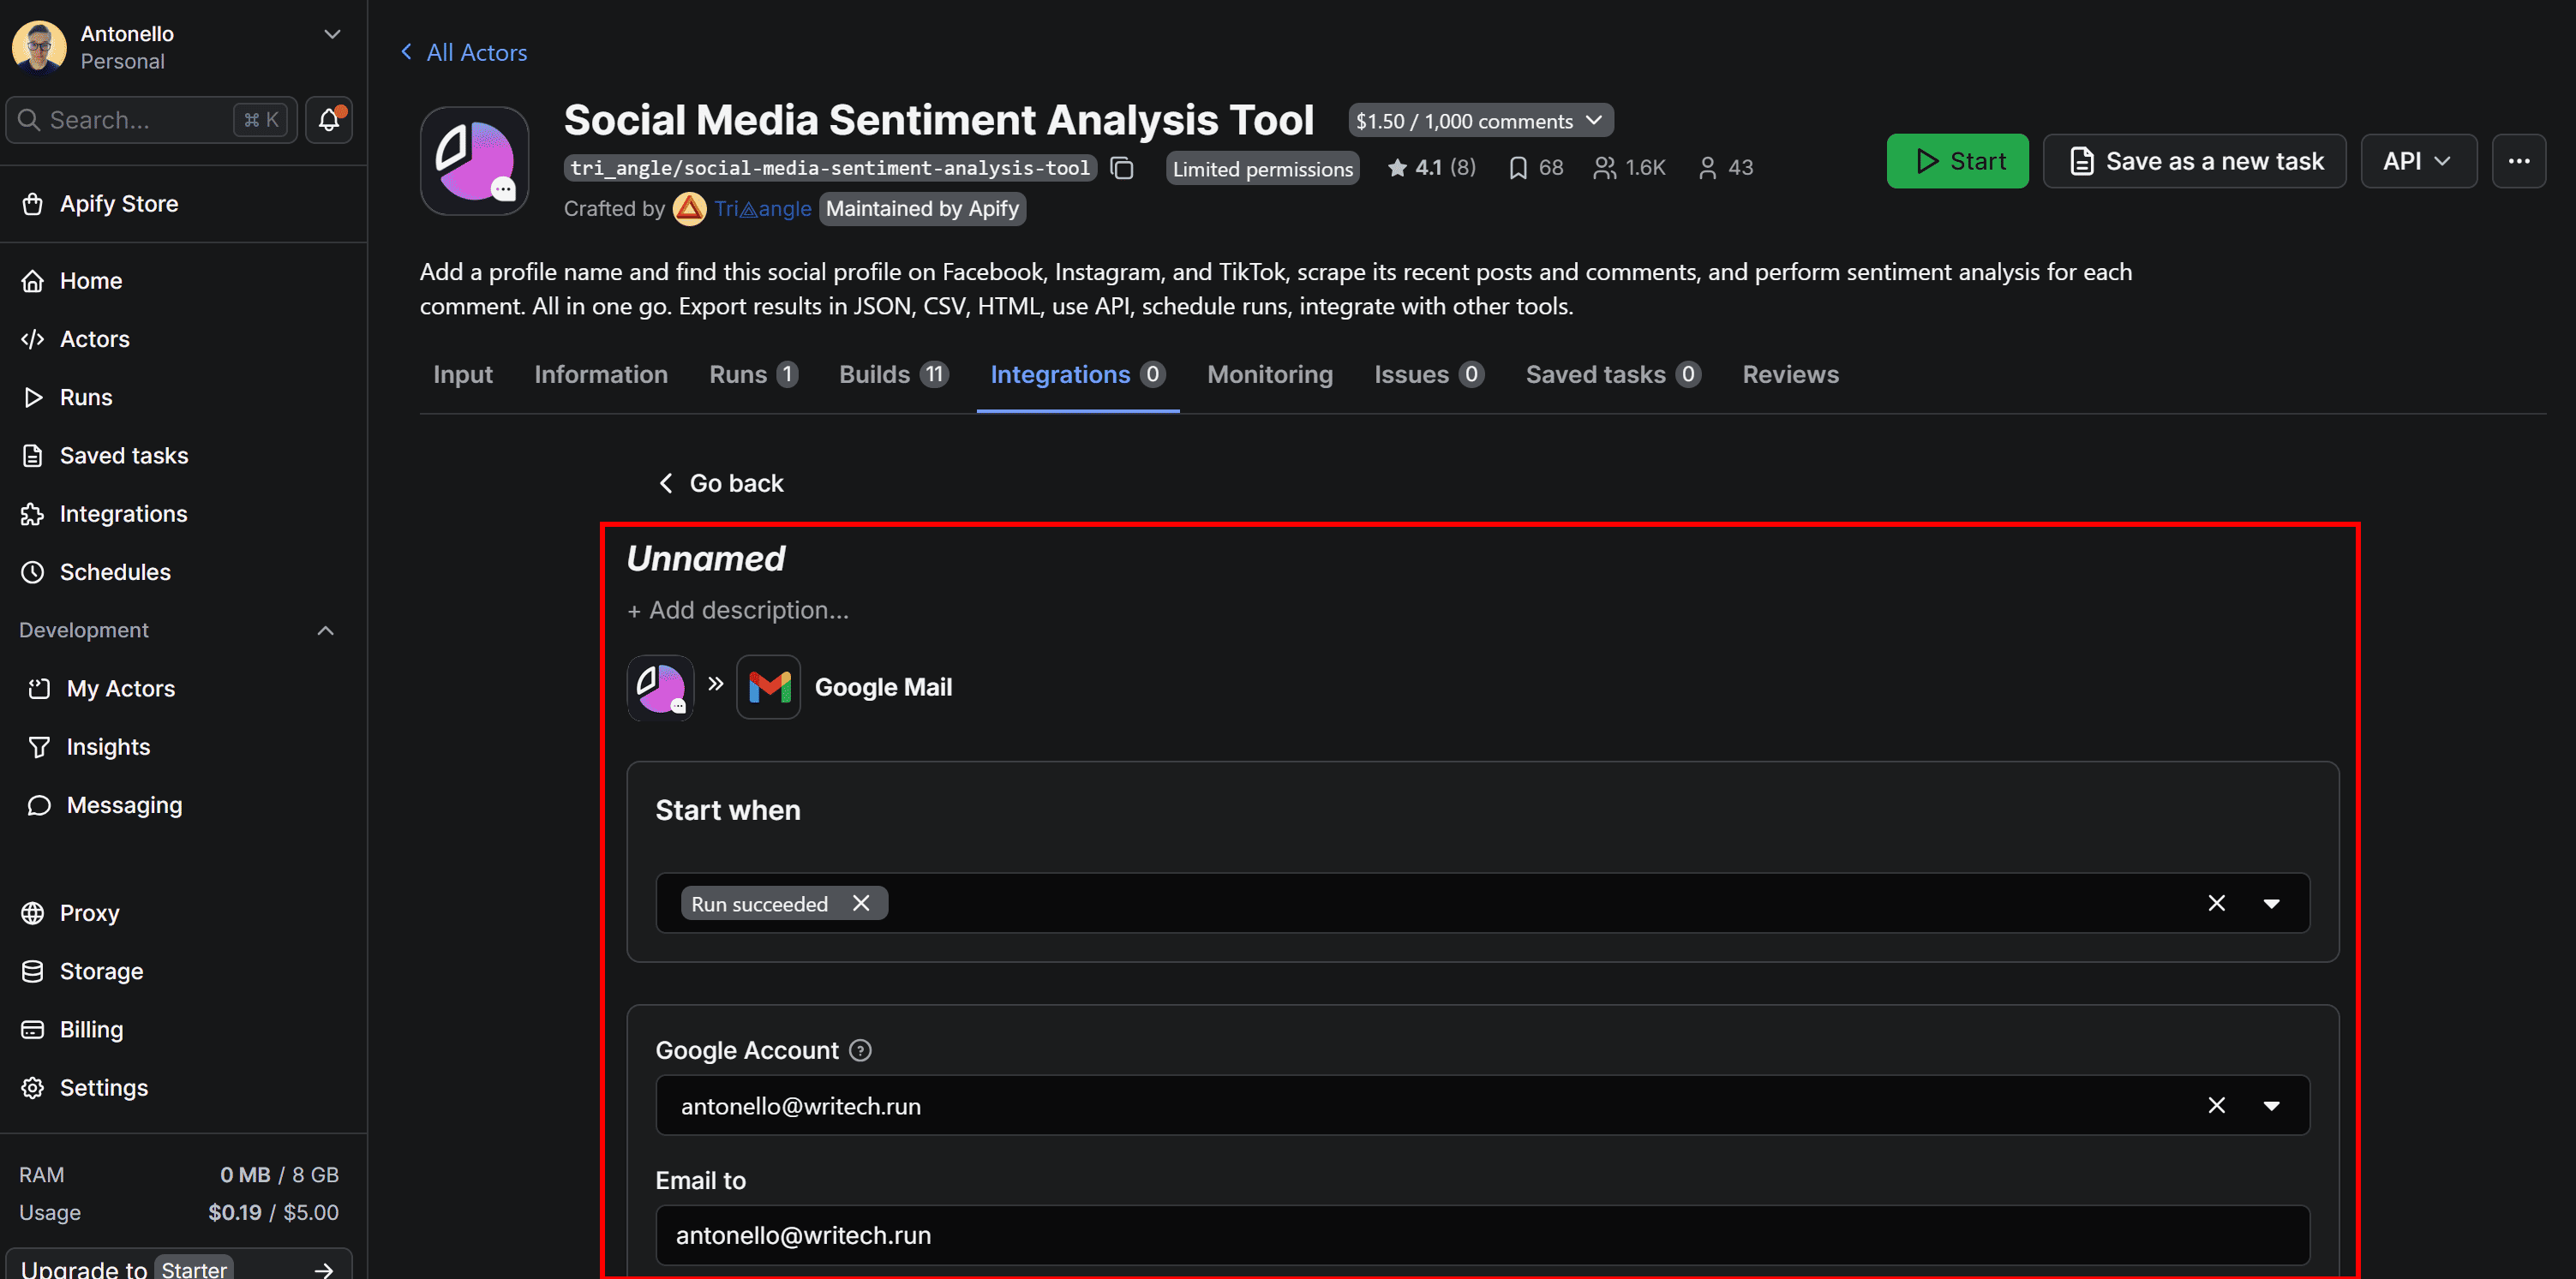
Step 5: Complete the Gmail Integration
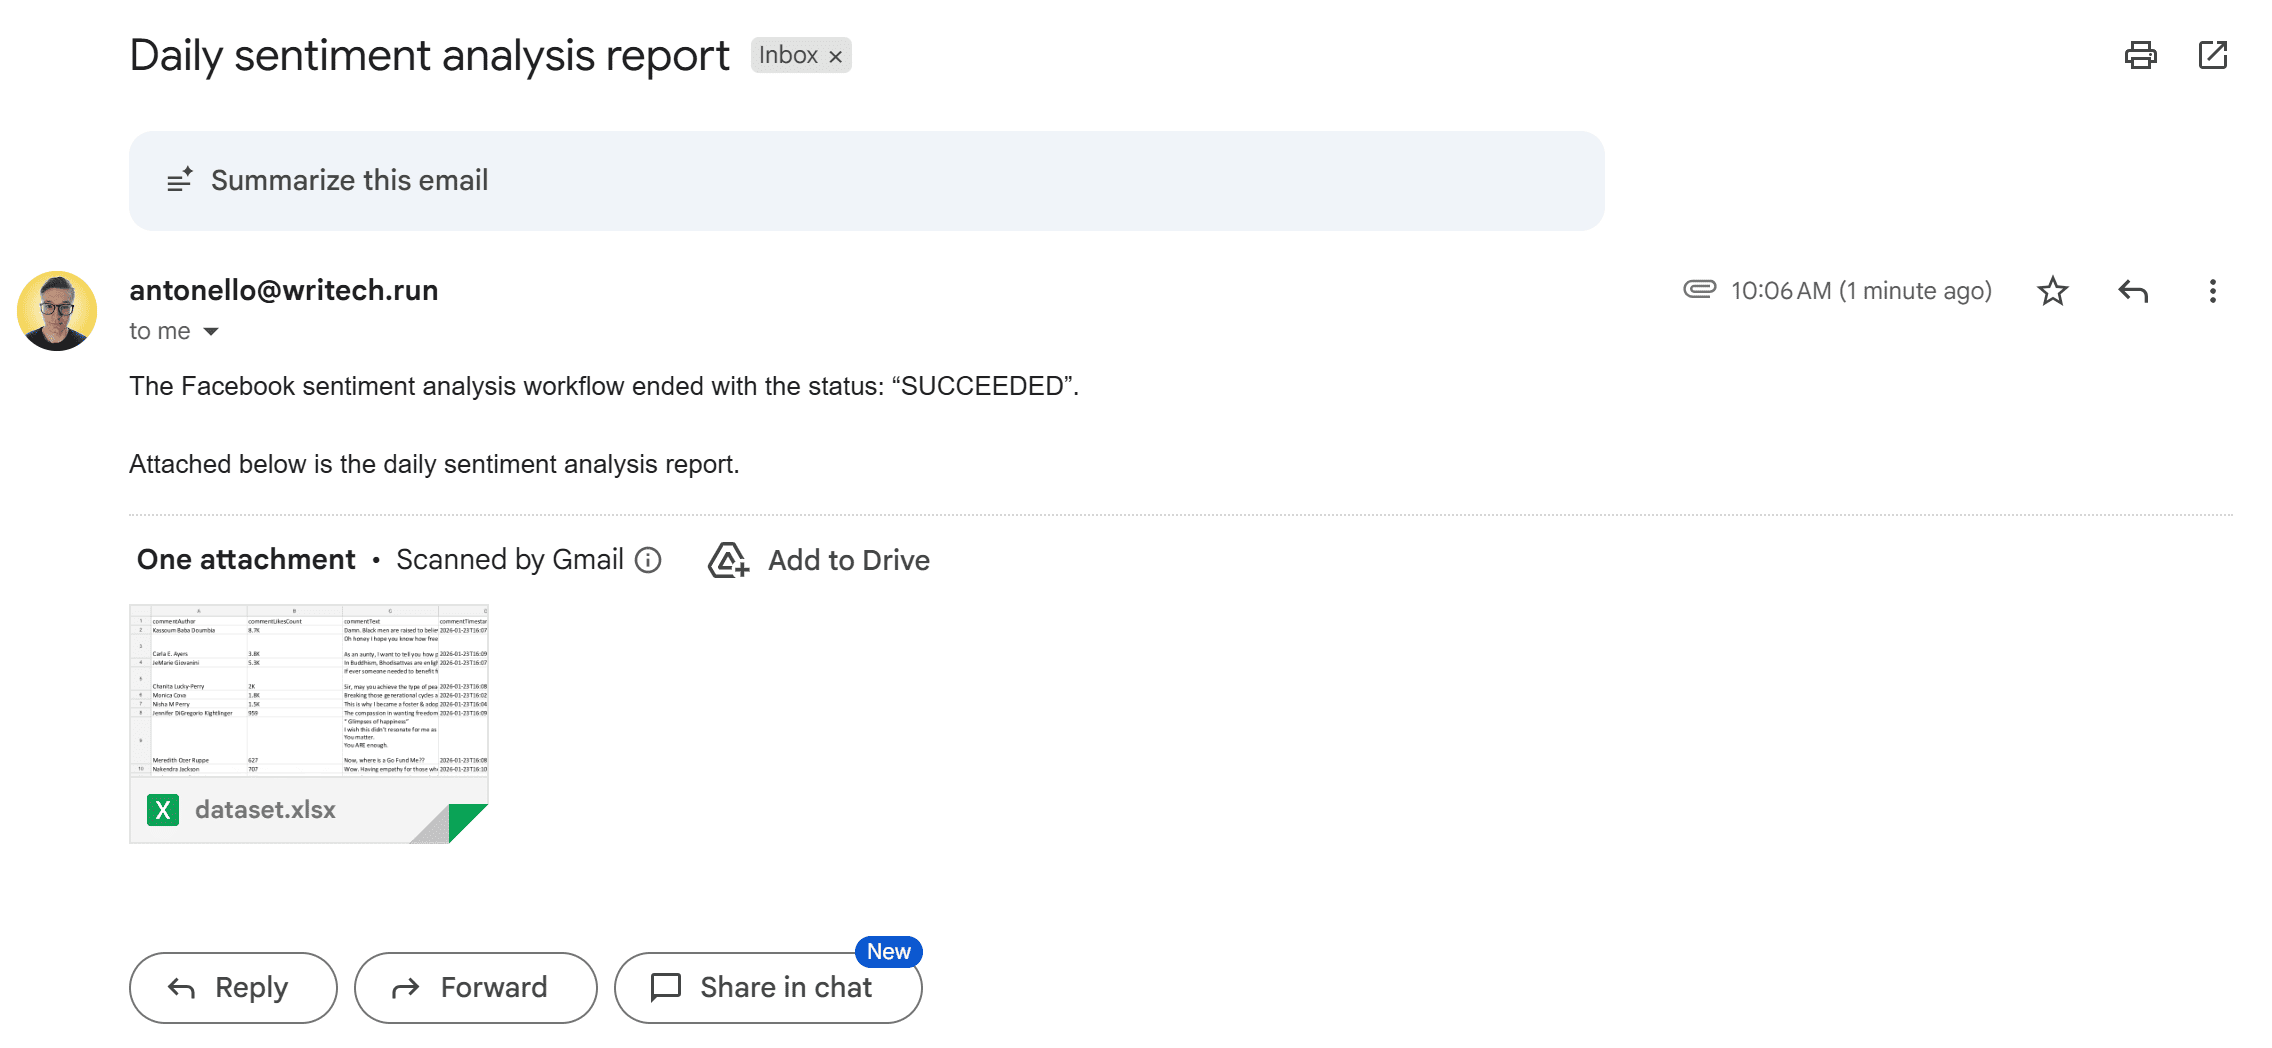
To finalize the integration with Gmail so that your Apify-powered Facebook sentiment analysis workflow sends the output directly to your email, give your integration a name (e.g., “Gmail Integration”), and fill out the form as follows:
- Start when: Run succeeds (this ensures the email is sent only if the Actor run completes successfully.)
- Subject: Daily sentiment analysis report
- Body:
The Facebook sentiment analysis workflow ended with the status: "{{resource.status}}".

Attached below is the daily sentiment analysis report.
Note: {{resource.status}} is a variable that indicates the Actor’s run status. You can use that, together with other available variables, to customize your email content with information about the Actor’s run, inputs, and more.
- Attachment format: xlsx (this helps you to easily import the report into Google Drive.)
Once done, save the integration by pressing the Save button at the bottom. After the first successful run, you’ll see the integration visually represented in the Integrations tab:

Before running the Actor again to verify that it works, there’s one more (optional) step.
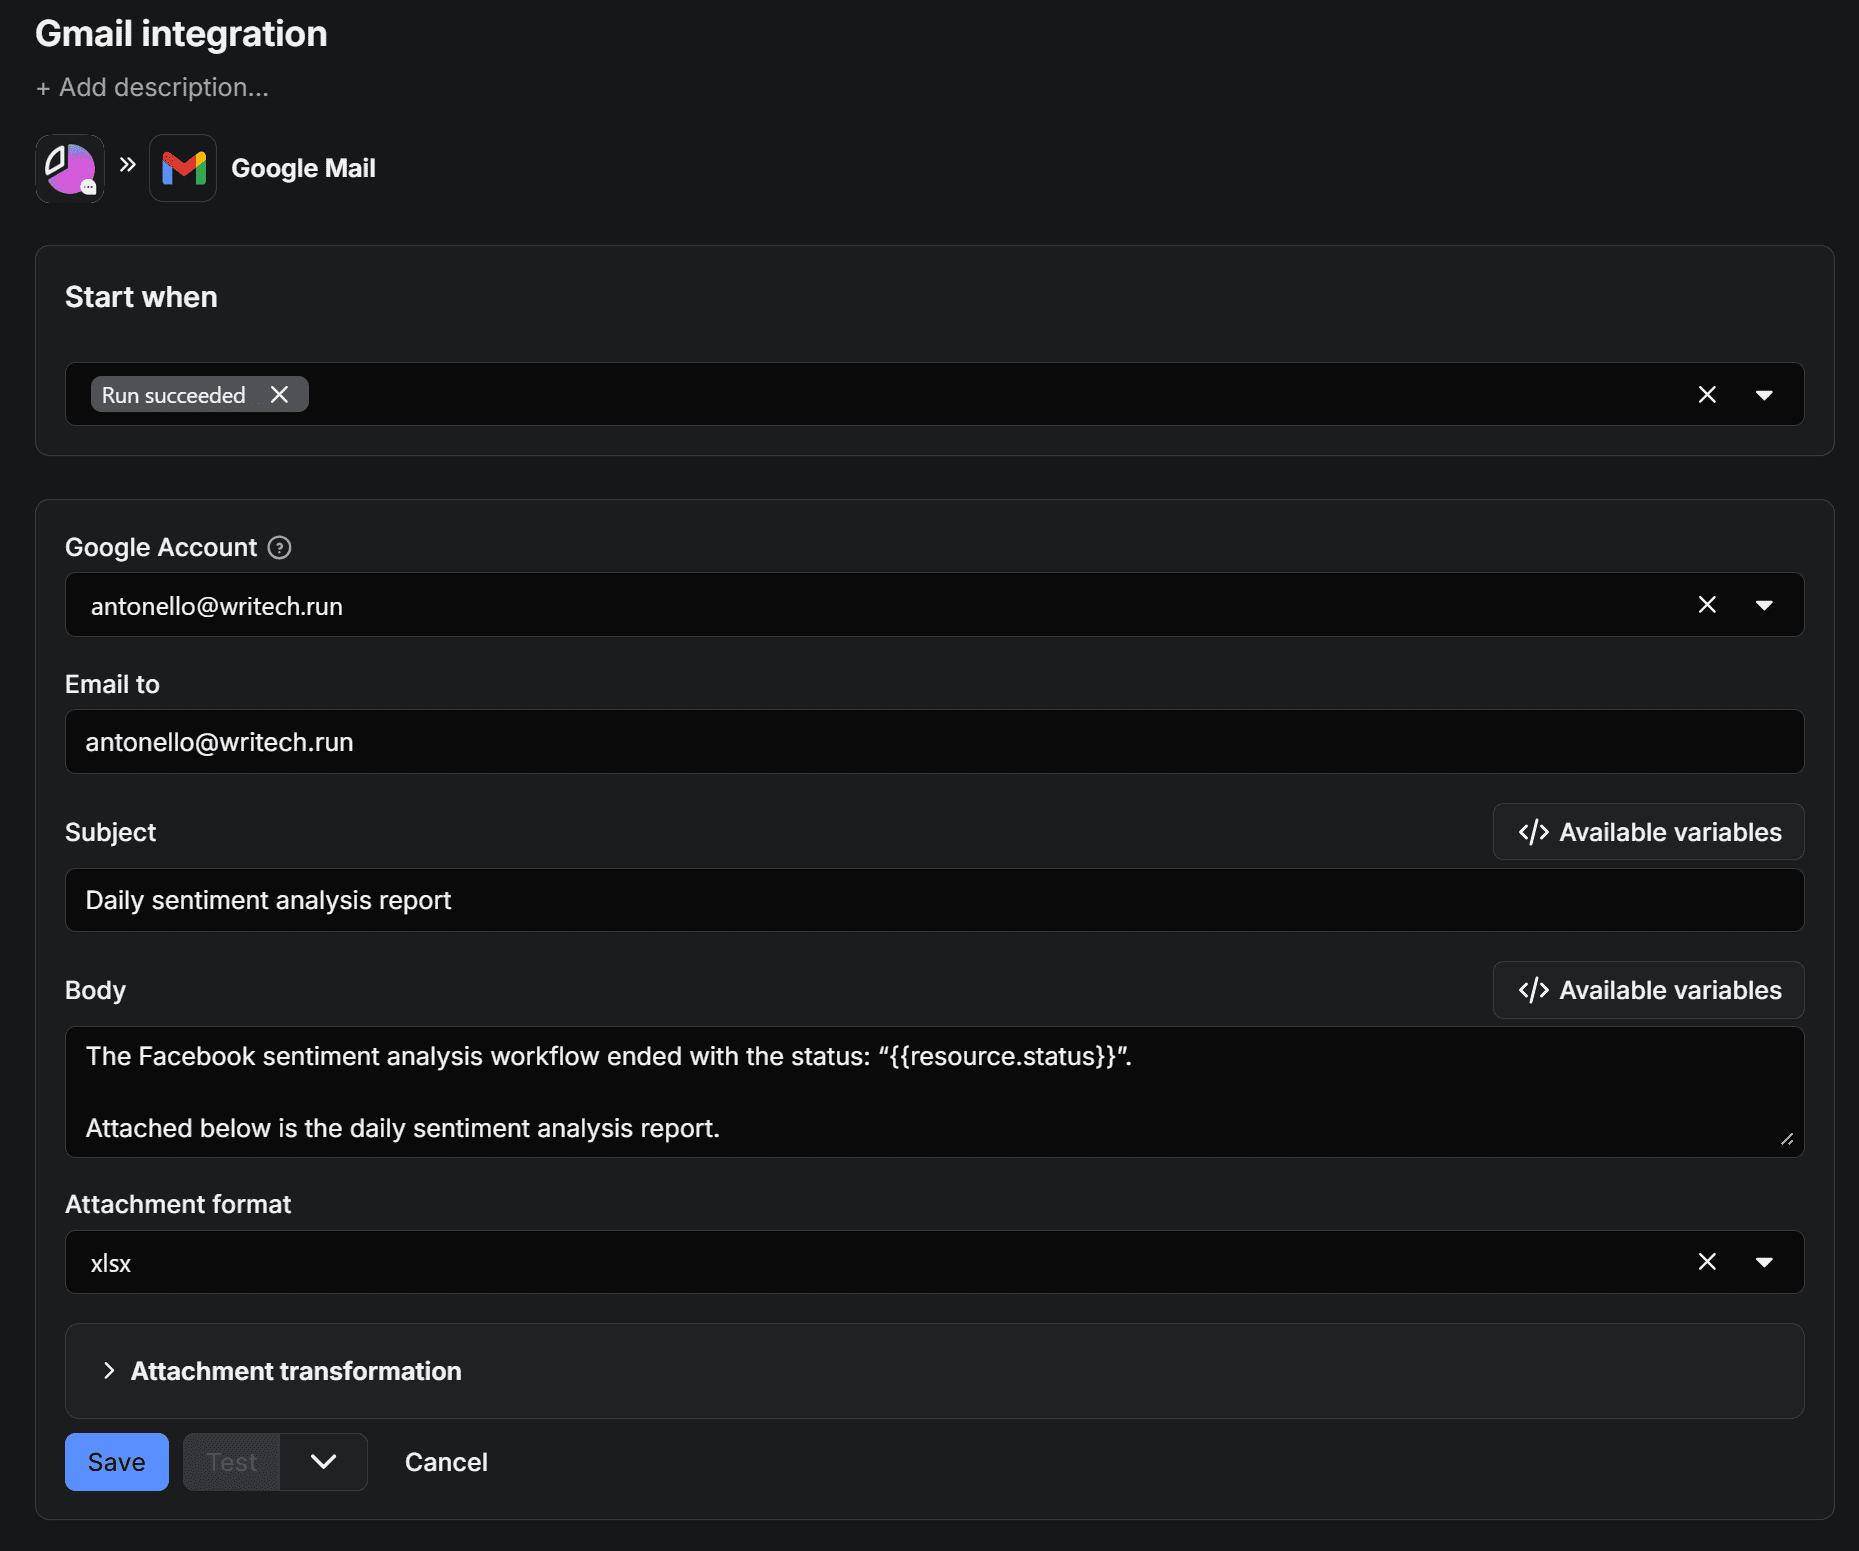
Step 6: Schedule the workflow
The email subject currently contains the word Daily, but right now the Apify-based sentiment analysis workflow doesn’t run automatically on a schedule. To enable scheduled runs, click the three dots in the top-right corner and select Schedule Actor:

In the Schedule Actor modal, configure the workflow to run daily (for example, at 10:00 AM):
Now, your Actor will execute automatically every day at 10:00 AM. The Social Media Sentiment Analysis Tool Actor takes around 5 minutes to complete, so you should receive the daily email with the sentiment analysis output right after 10:05 AM.
Note: The Actor is currently configured to scrape 10 comments for each of the 5 latest posts, but you can adjust these settings to fit your needs. Additionally, there are options to get only comments after a particular date, giving you flexibility to focus on more recent activity or specific time ranges. This opens up many possibilities for customization.
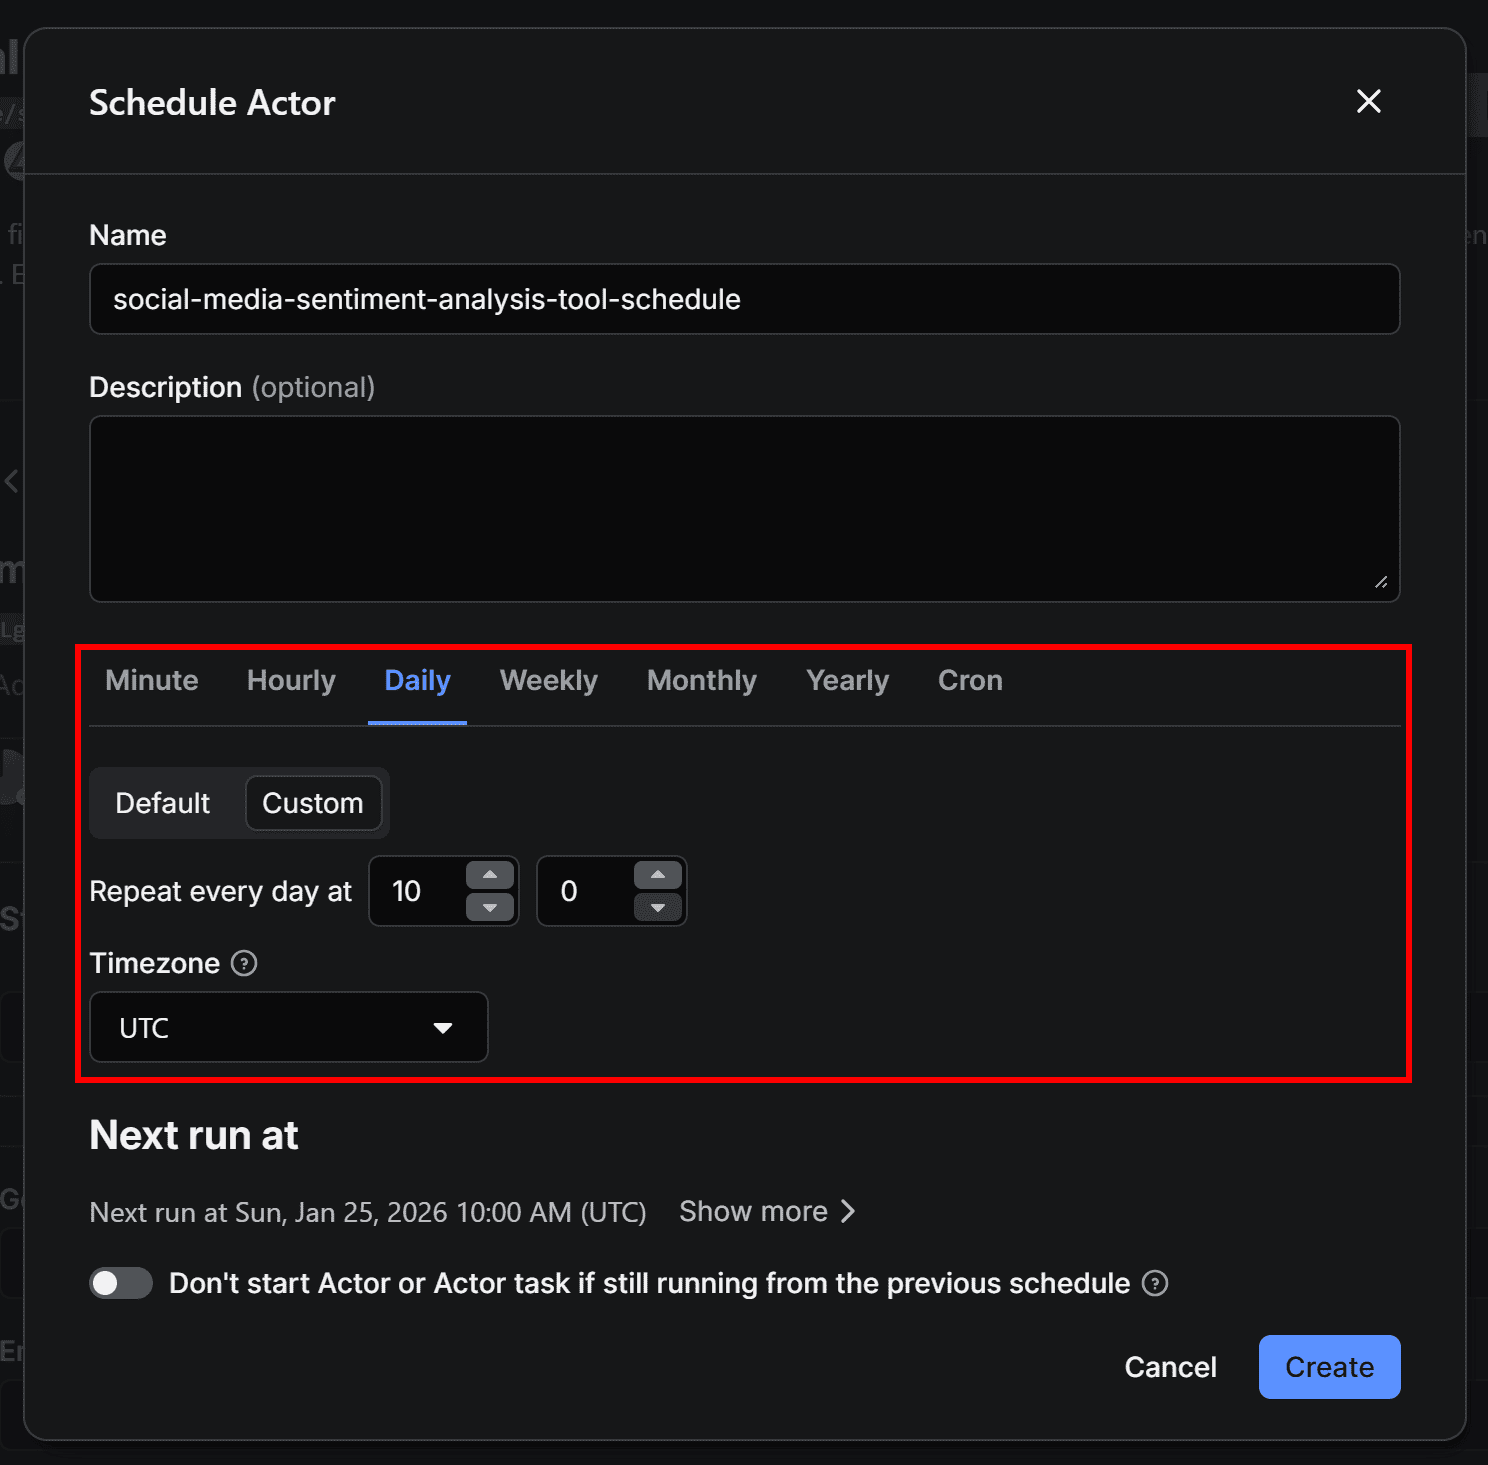
Step 7: Verify that the workflow works
Press the Start button in the top-right corner to manually trigger the Actor, or wait for the scheduled time you configured. Once the Actor runs, you’ll receive an email in your configured Gmail account:
The email will have the specific subject you set (and will arrive about 5 minutes after the scheduled time, as you can see by the arrival time). Open the email, and you’ll see:
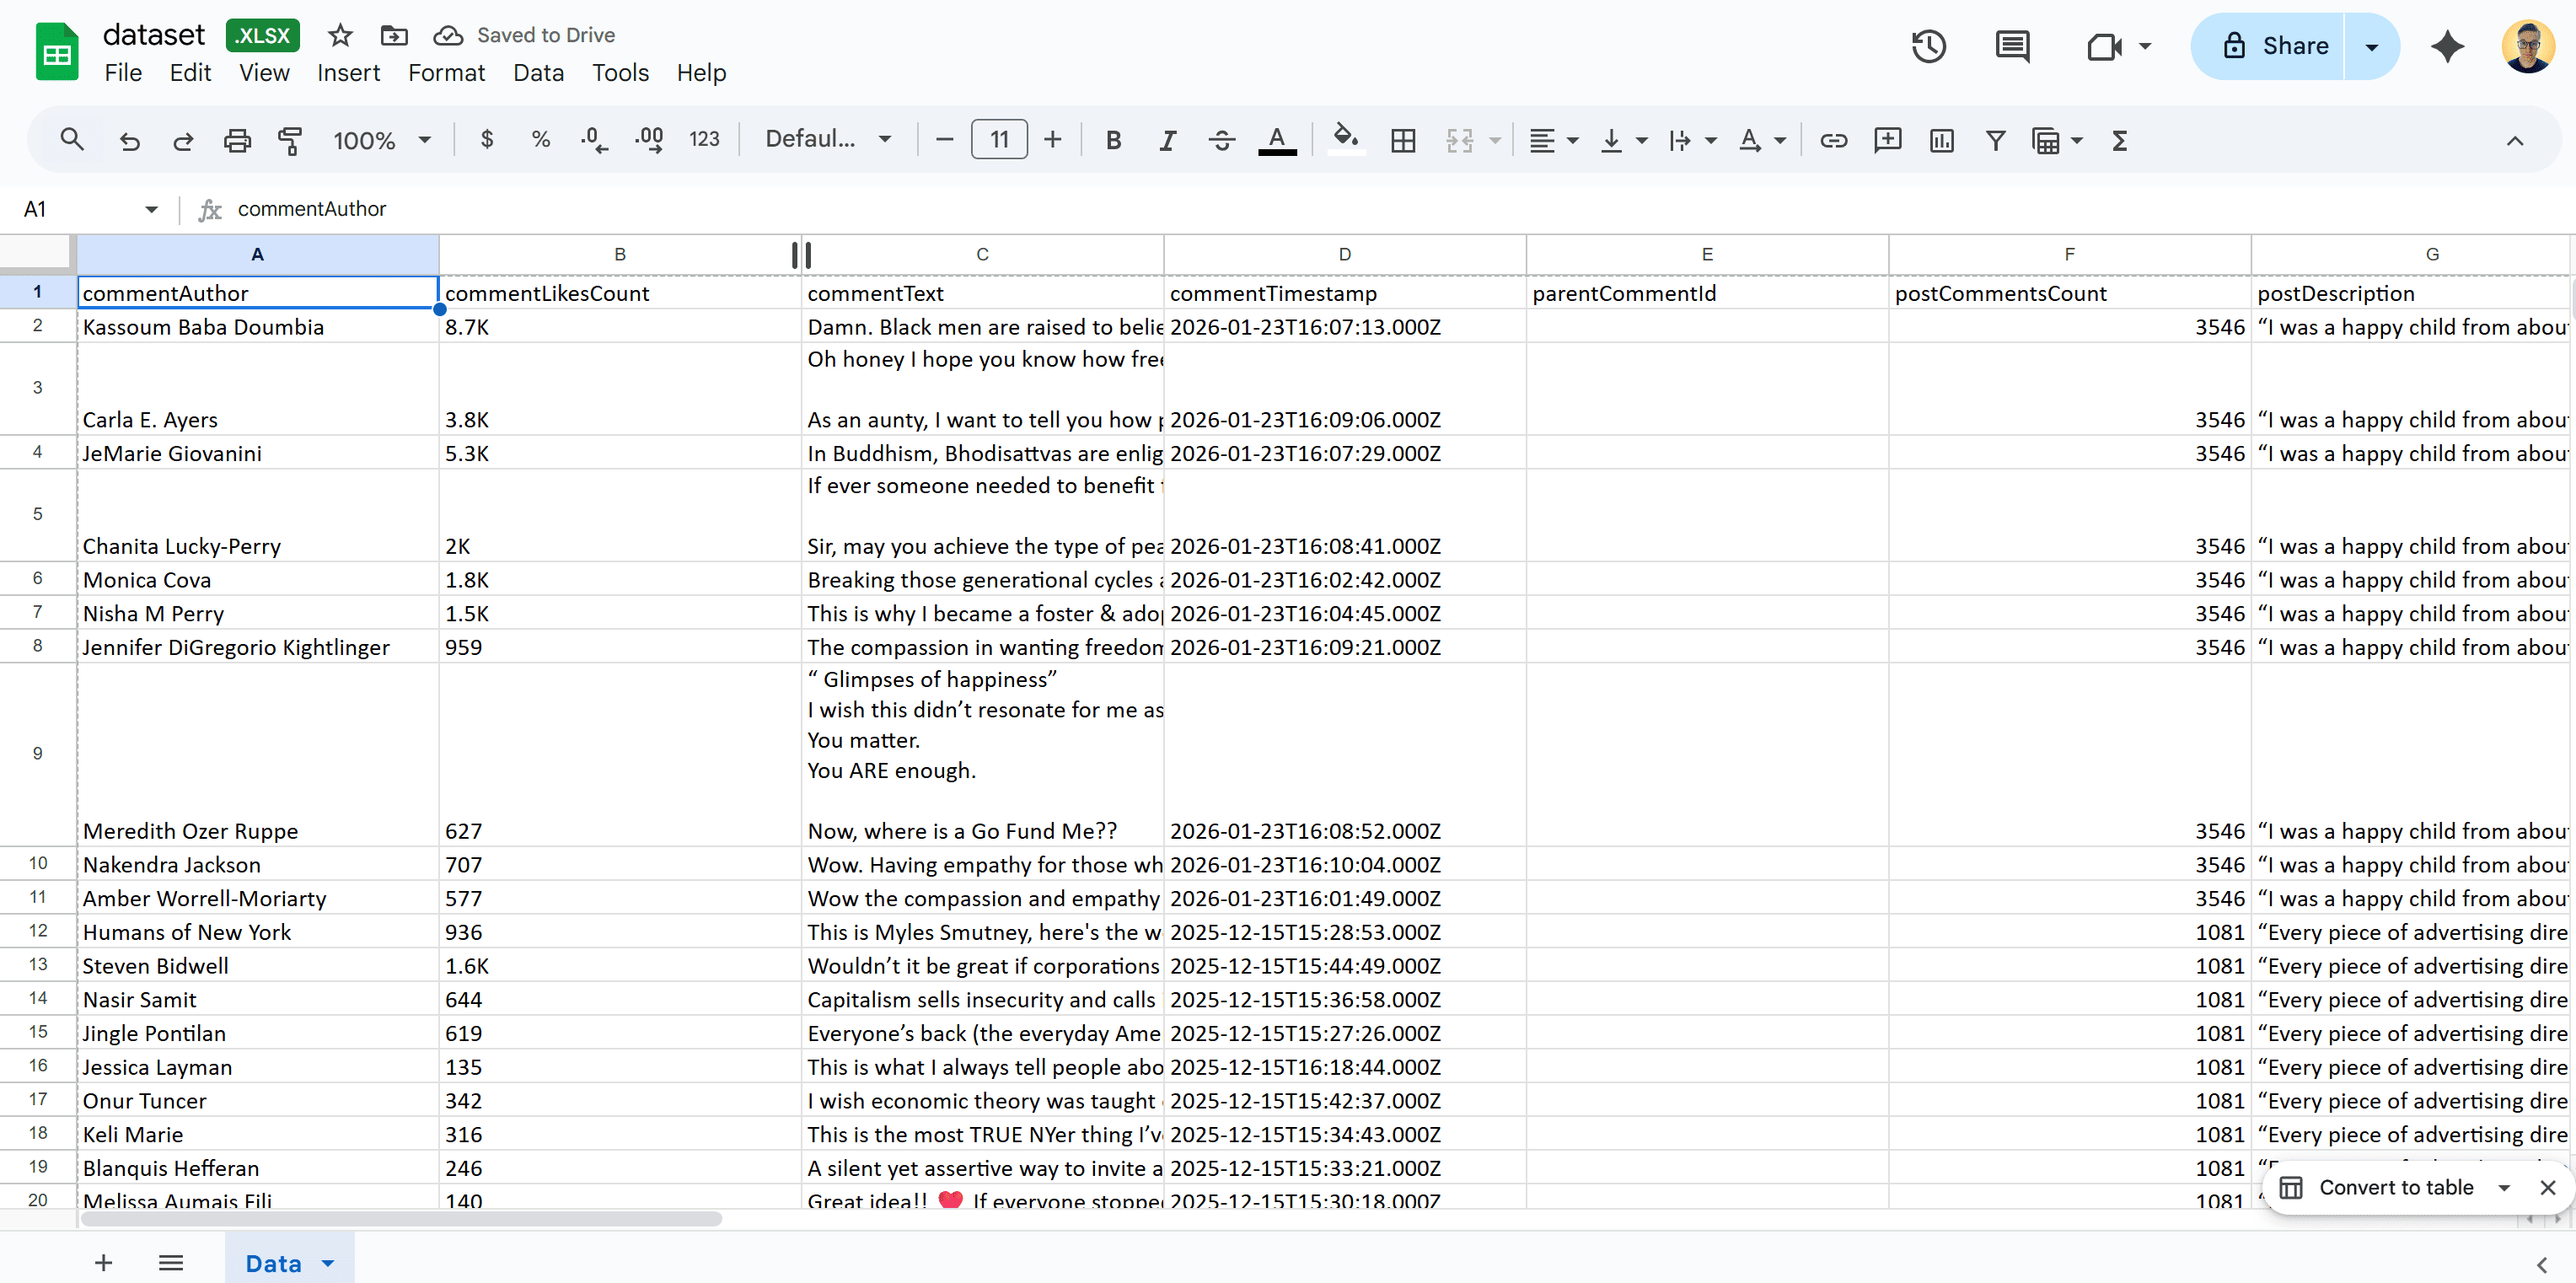
Open the attached dataset.xlsx file in Google Drive. You’ll see the same table-structured output you originally got in Apify Console, but now in an Excel-like format that you can easily explore, filter, and connect to downstream integrations:
That’s it! The automated Facebook sentiment analysis workflow is now complete. You started with a Facebook profile URL and ended up with an email containing sentiment analysis for the latest posts’ comments. This workflow only took a few steps, runs entirely in the cloud, and finishes in about 5 minutes.
[Extra] LLM-Powered Sentiment Analysis with LLM Dataset Processor
Currently, the sentiment analysis process is handled internally by Social Media Sentiment Analysis **as a black-box step. If you need more control for deeper, customized, or advanced analysis, you can instead rely on LLM Dataset Processor.
LLM Dataset Processor is an Apify Actor that lets you process the output of other Actors (or an existing dataset) using an LLM. In practice, it applies a single LLM prompt to all entries in a dataset. That makes it suitable for sentiment analysis (as well as tasks like data enrichment, summarization, data tagging, and more).
Follow the instructions below to extend the current automated workflow with custom sentiment analysis logic powered by an LLM.
Get started with these steps:
- Disable sentiment analysis in Social Media Sentiment Analysis Tool
- Configure the LLM Dataset Processor integration
- Finalize the workflow with email sending
- Test the workflow
Prerequisites
This section builds on the previous one, so all prior prerequisites apply here as well. In addition, you’ll also need:
- An LLM provider API key (e.g., OpenAI API key) from one of the supported providers from the LLM Dataset Processor Actor.
Important: Complete all steps up to Step #3 of the previous chapter before following the instructions below.
Step 1: Disable sentiment analysis in Social Media Sentiment Analysis Tool
By default, Social Media Sentiment Analysis Tool is configured to perform sentiment analysis automatically. In this case, however, you only want to use it to scrape source comments for a customized sentiment analysis process.
To do so, go to the Input section and disable the Sentiment Analysis for comments toggle:

That way, the Actor will only retrieve the comments data in a format suitable for sentiment analysis. The analysis will then be performed separately by the LLM Dataset Processor Actor.
Step 2: Configure the LLM Dataset Processor integration
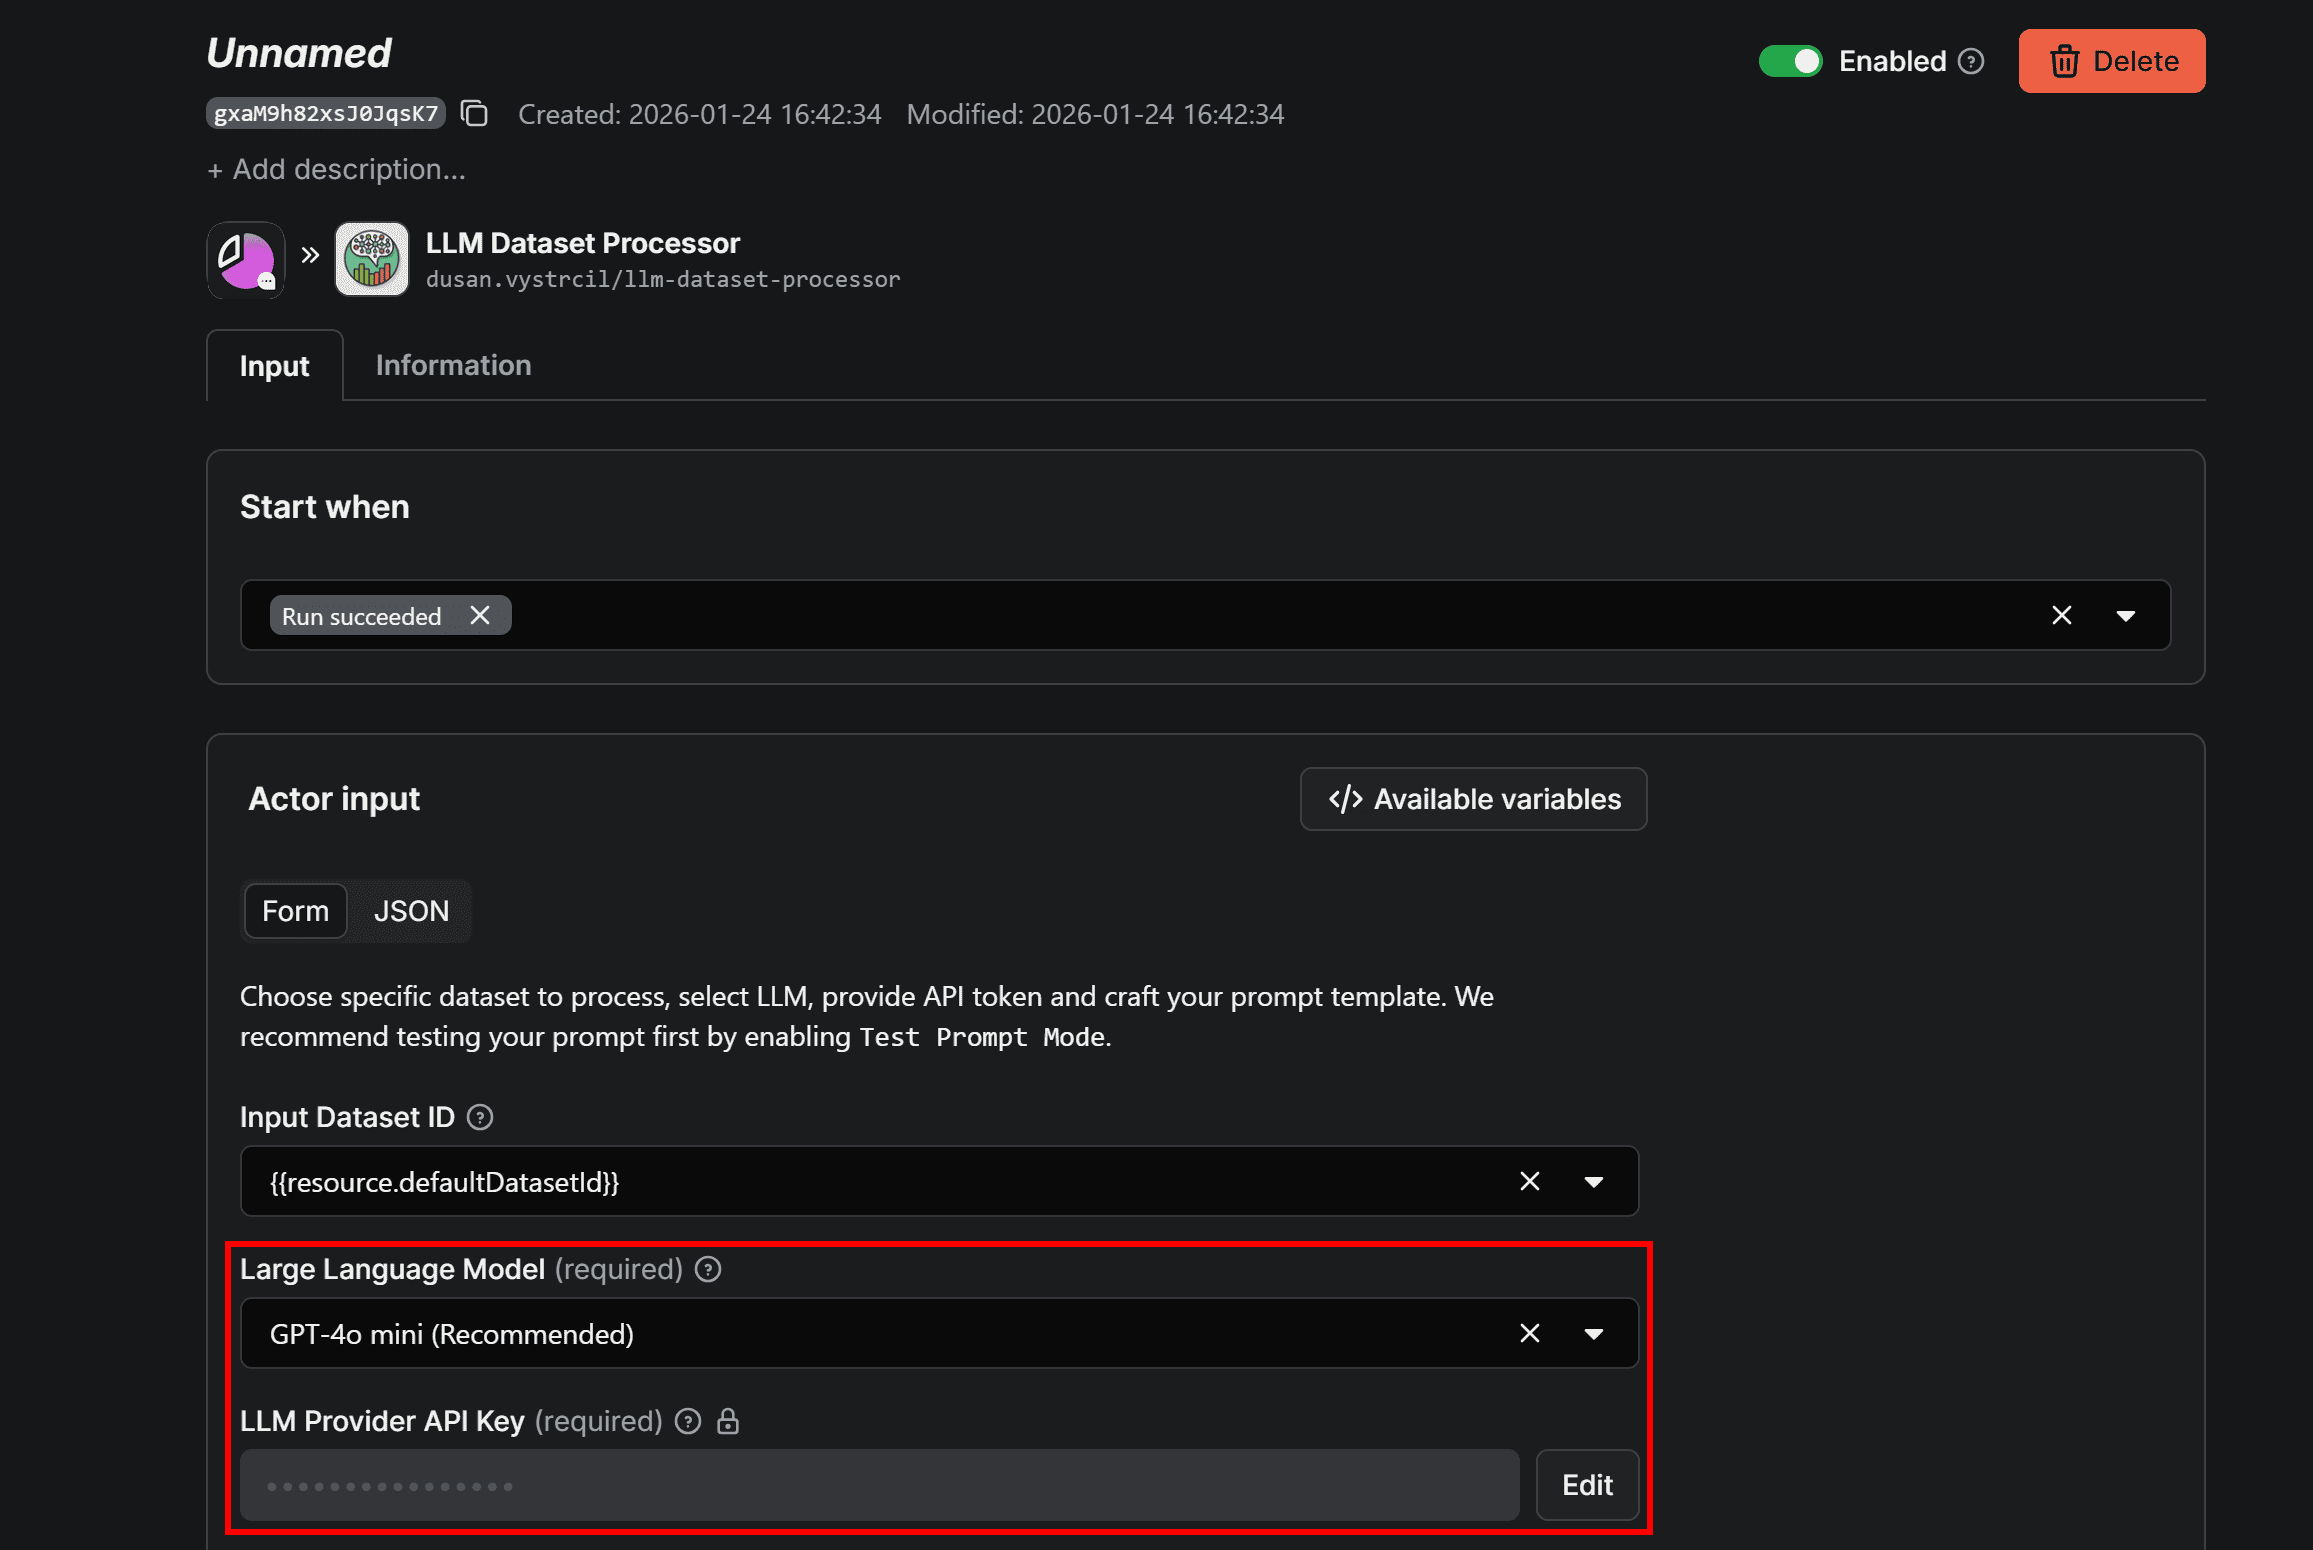
Go to the Integrations tab on the Social Media Sentiment Analysis Tool page and click the Add integration button. Search for “llm dataset processor”:
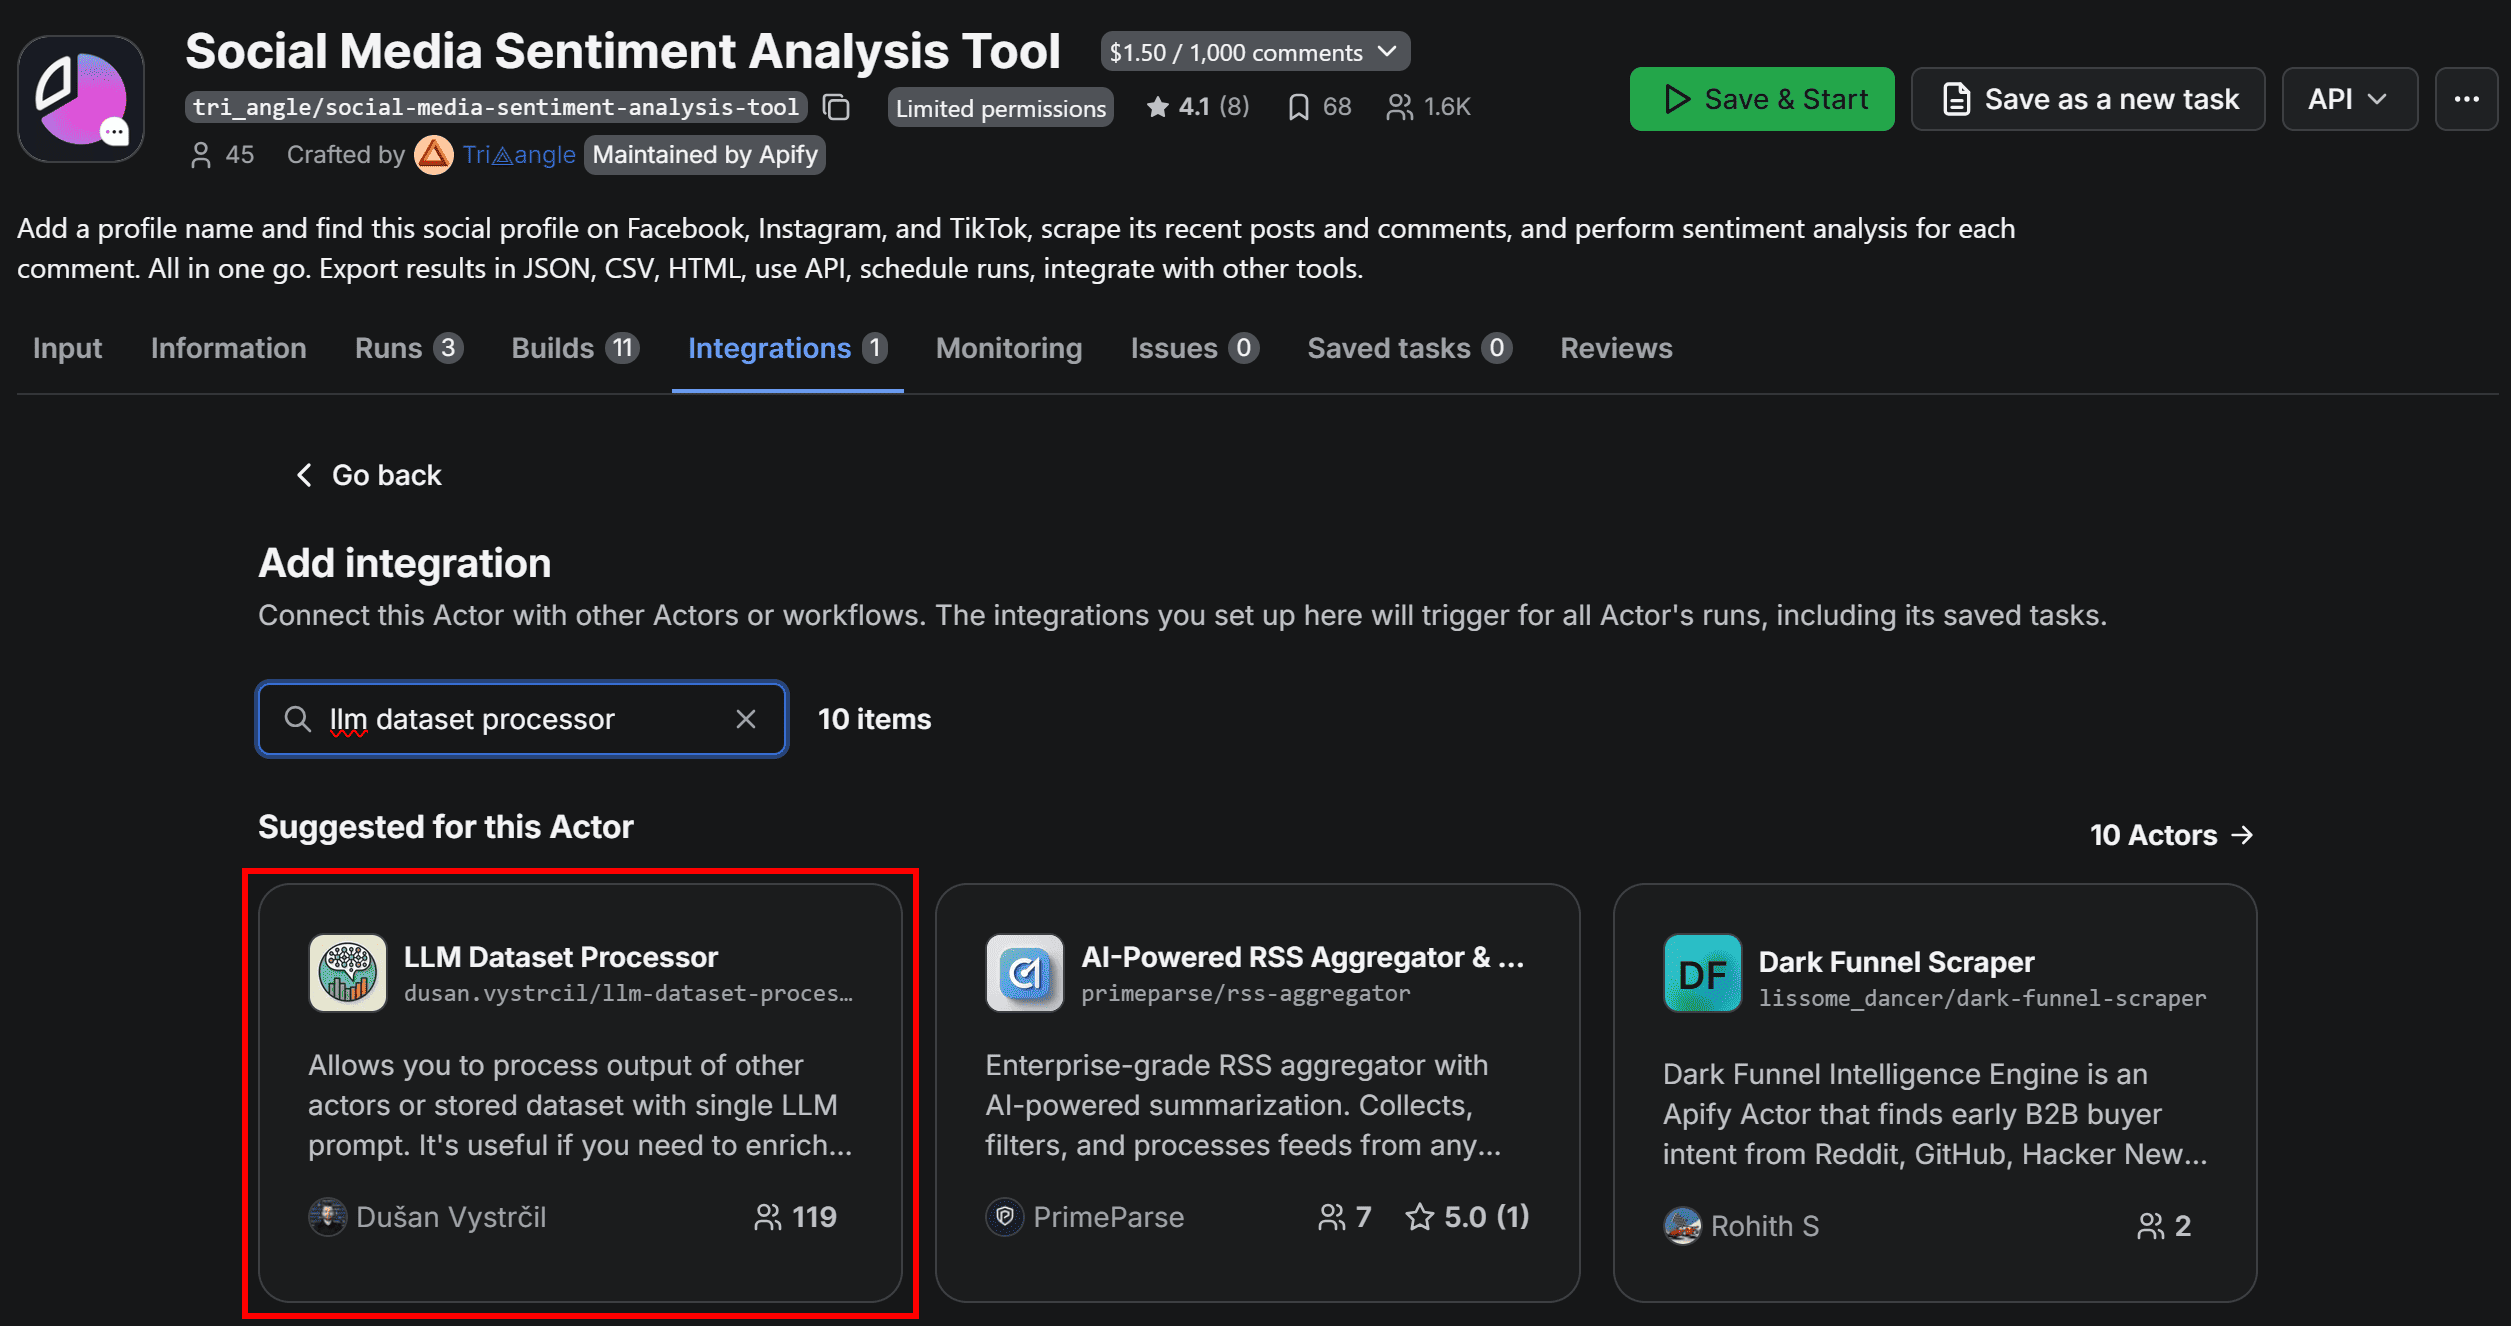
Select the “LLM Dataset Processor” card and fill out the form by choosing the LLM to use for sentiment analysis (in this case, GPT-4o mini) and providing your LLM provider API key (here, your OpenAI API key):
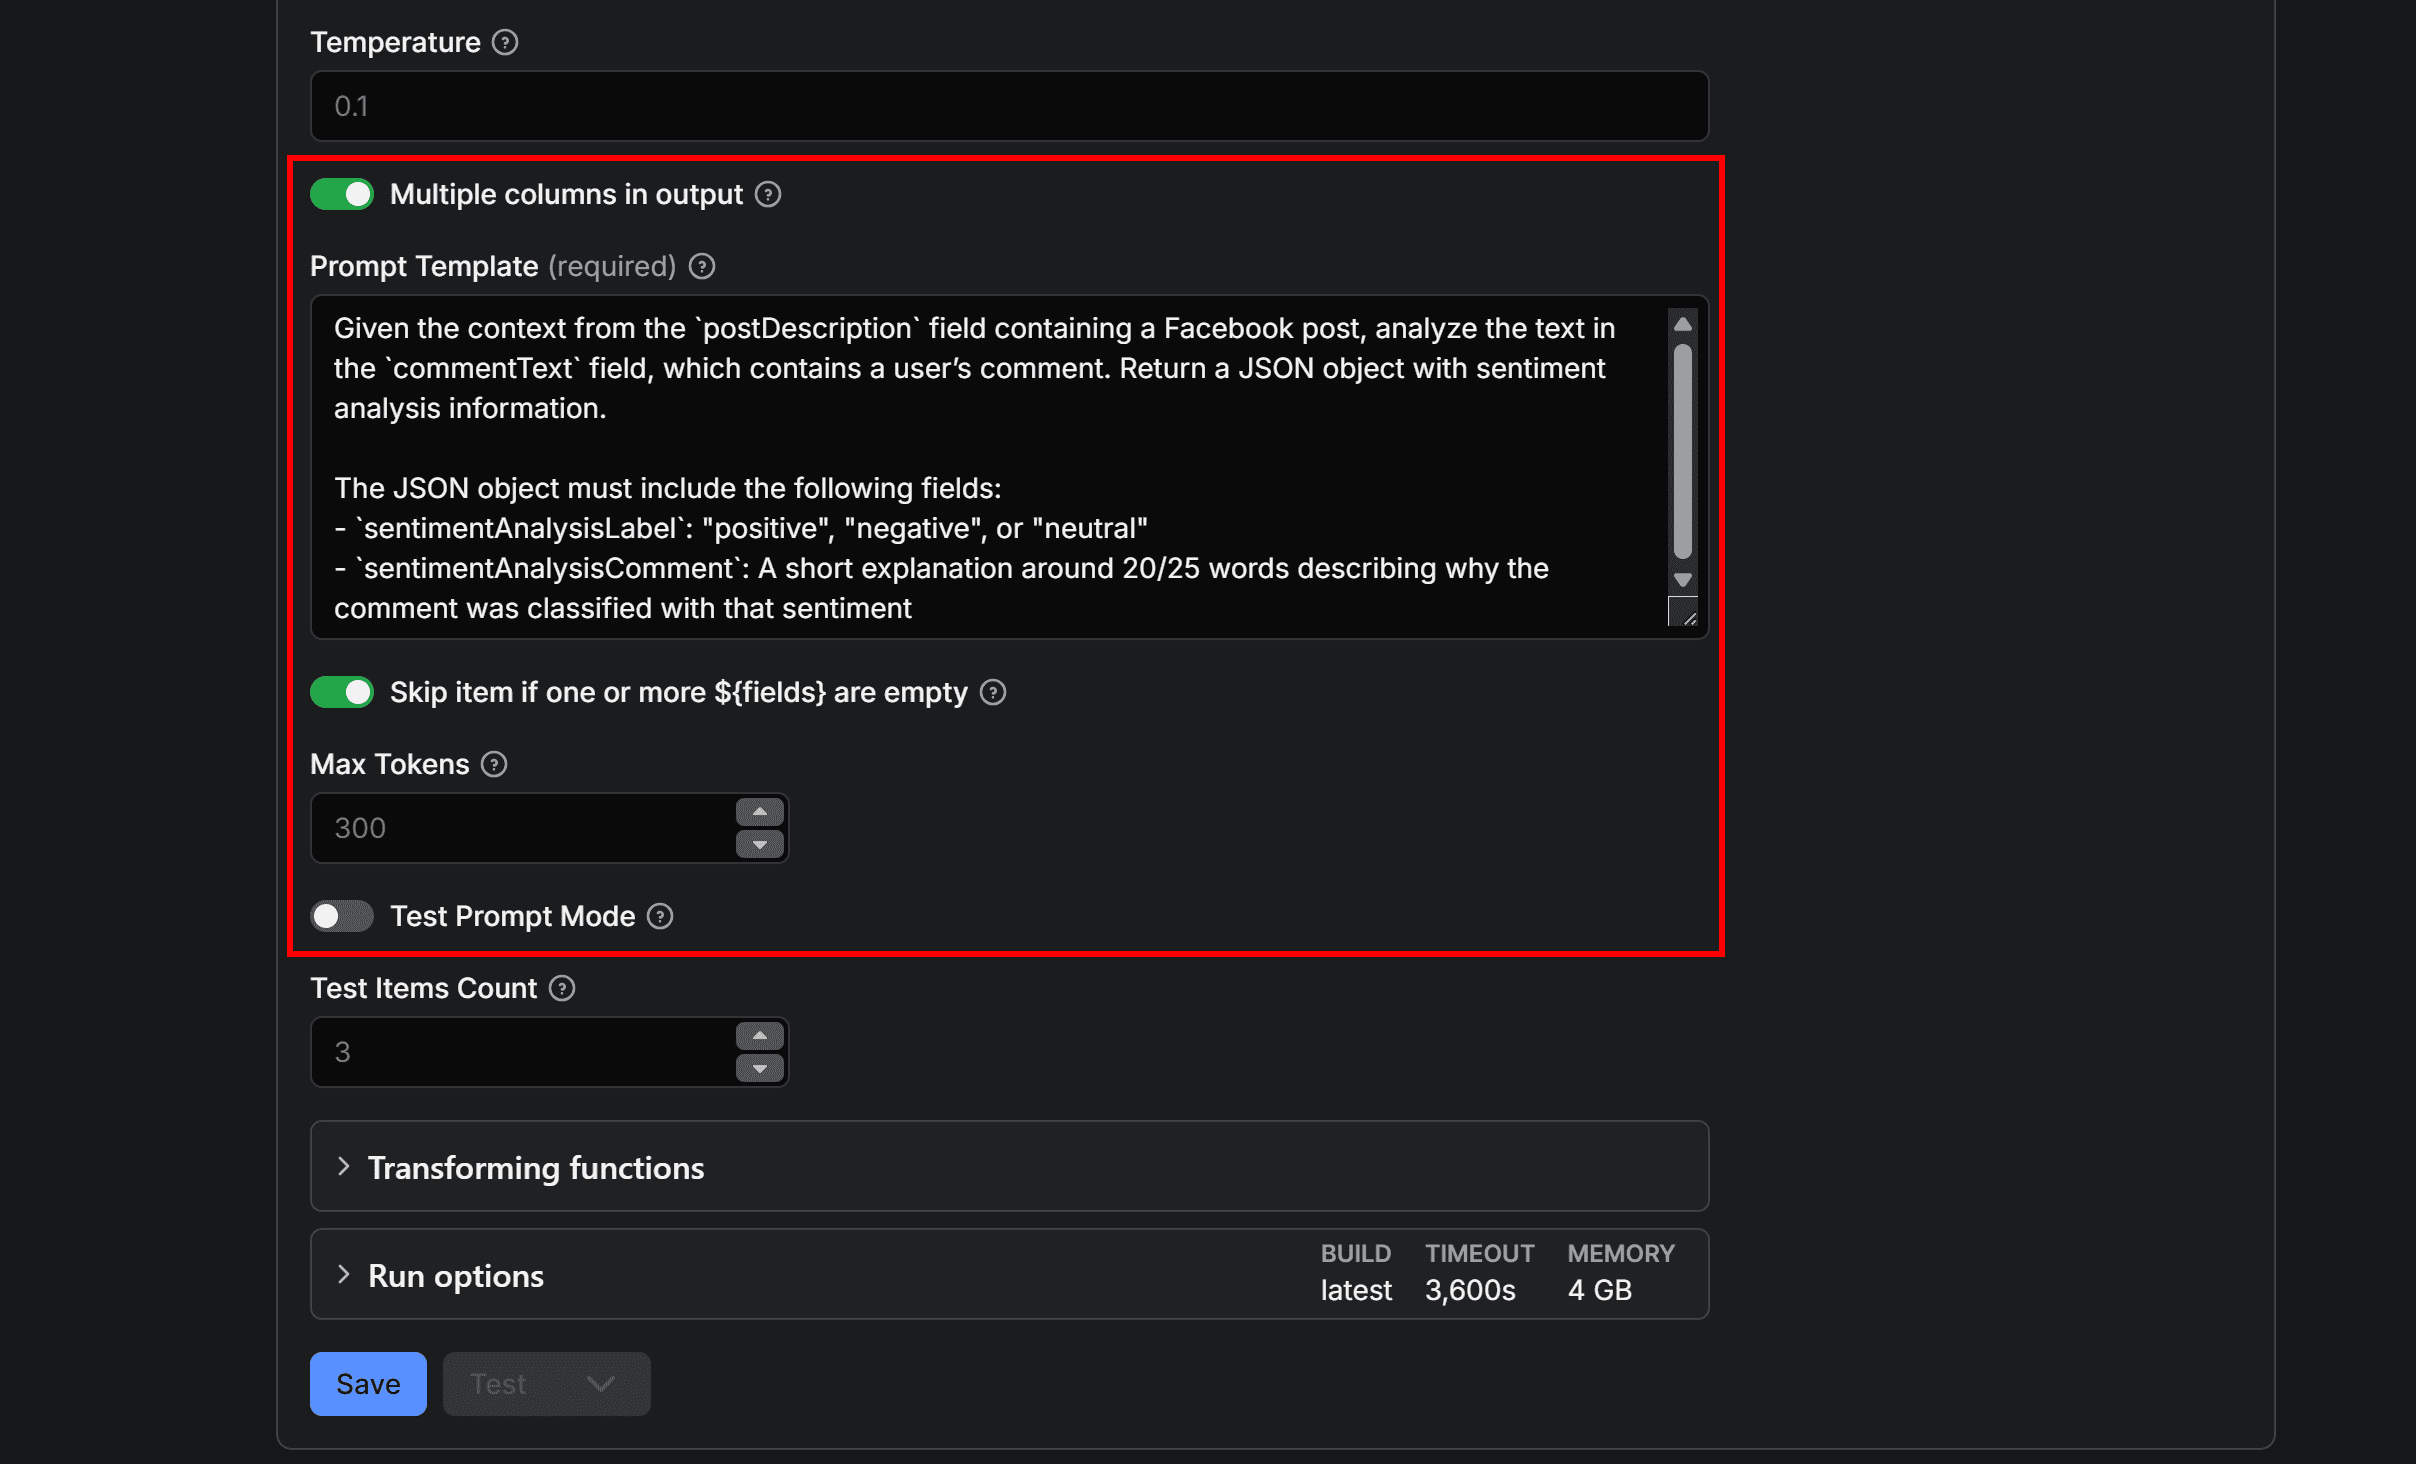
Next, enable the Multiple columns in output option to allow the LLM to add multiple columns to the dataset. Then, add a prompt like the following:
Given the context from the `postDescription` field containing a Facebook post, analyze the text in the `commentText` field, which contains a user’s comment. Return a JSON object with sentiment analysis information.

The JSON object must include the following fields:
- `sentimentAnalysisLabel`: "positive", "negative", or "neutral"
- `sentimentAnalysisComment`: A short explanation around 20/25 words describing why the comment was classified with that sentiment
This prompt defines the sentiment analysis task and explicitly specifies a JSON output (which is required when using the Multiple columns in output option). This ensures that sentimentAnalysisLabel and sentimentAnalysisComment are correctly added as separate columns in the dataset.
The first time you run the automation, consider keeping Test prompt mode enabled so that only three items are analyzed. Once you’ve verified that the prompt behaves as expected, you can disable this option.
Finally, click Save to add the integration.
Cool! The LLM Dataset Processor node has been successfully added to the Facebook sentiment analysis workflow.
Step 3: Finalize the workflow with email sending
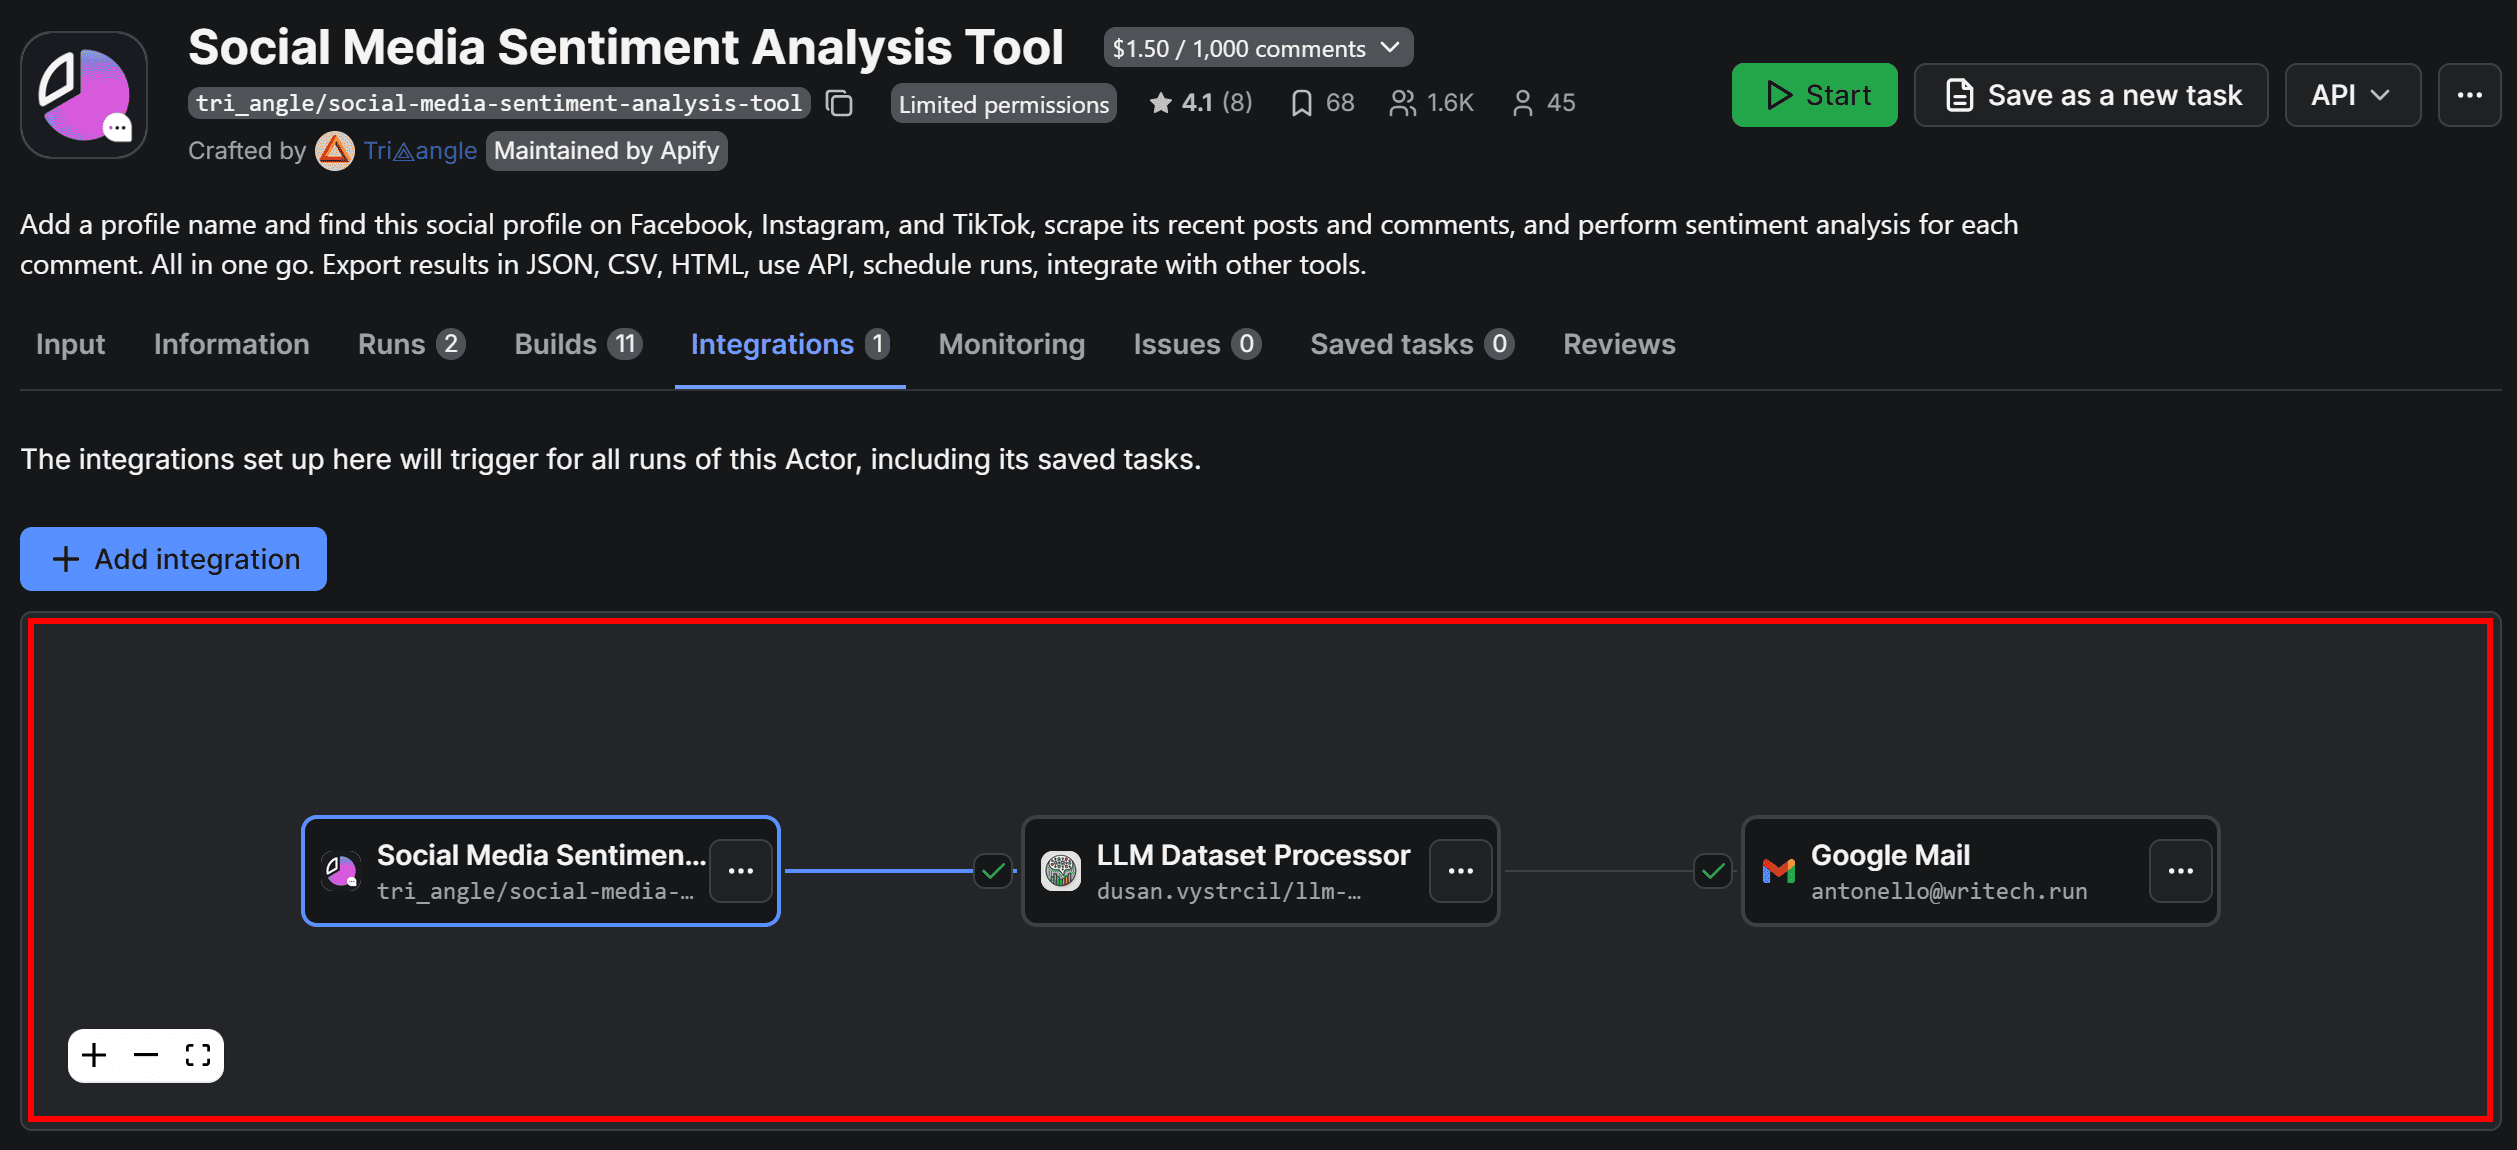
To send the sentiment analysis output by email, you need to repeat Steps 4 and 5 from the previous chapter. The key difference is that this time you must add the integration to the LLM Dataset Processor Actor page, not the original Social Media Sentiment Analysis Tool Actor.
After adding the Gmail integration to the LLM Dataset Processor, go back to the Integrations tab of Social Media Sentiment Analysis Tool. You should now see a three-node workflow similar to the following:
Step 4: Test the workflow
Run the workflow by pressing the Start button. Wait for the email to arrive in the configured Gmail account, then open the attached dataset.xlsx file in Google Drive. You should see something as follows:

Scroll through the columns and focus on sentimentAnalysisLabel and sentimentAnalysisComment. The sentimentAnalysisLabel column contains a simple classification (for example, "positive", "negative", or "neutral"), while sentimentAnalysisComment provides a more detailed explanation of why the LLM classified the comment that way.
Your automated Facebook sentiment analysis workflow - with fully customized sentiment logic - is now ready.
What is the purpose of Facebook sentiment analysis?
Sentiment analysis helps businesses understand public perception of their brand. It’s also utilized in influencer marketing to ensure audience alignment with brand values, and in market research to identify emerging trends before they become mainstream. Use cases include:
- Real-time reputation management: Detect spikes in negative sentiment quickly to address PR issues before they escalate.
- Enhanced customer service: Identify frustrated users to provide timely and empathetic support.
- Product optimization: Extract honest feedback to uncover flaws or requested features.
- Competitive intelligence: Benchmark your brand’s emotional standing against competitors to spot market gaps.
- Improved content strategy: Discover which topics resonate with your audience to create more engaging posts.
Conclusion
With Social Media Sentiment Analysis Tool and LLM Dataset Processor, you can build your own Facebook comment sentiment analysis workflow to automatically collect users’ comments from the latest Facebook posts of a specific profile, process them for sentiment analysis, and send the enriched dataset via email.
From here, you can extend the workflow however you like: track sentiment over time, add more data sources, or plug the results into dashboards.

FAQ
What is Facebook sentiment analysis?
Facebook sentiment analysis is the process of examining comments, posts, and reactions to determine users’ emotions or opinions. Typically, the goal is to classify content as positive, negative, or neutral, helping you understand audience perception and trends at scale.
How do I do sentiment analysis?
To perform sentiment analysis, you need to:
- Collect textual information, generally from users on social media posts via web scraping.
- Run the collected text through a sentiment analysis tool, usually powered by AI or machine learning.
Apify allows you to create cloud-based, automated workflows that handle the entire process, from fetching comments to analyzing sentiment.
How to get Facebook data for sentiment analysis?
You can get Facebook data via web scraping, the process of automatically extracting data from web pages. Apify comes with a collection of Facebook data scrapers to gather comments, posts, and reactions, making it easy to analyze sentiment at scale.