
Manipulating an Actor's output data to get the expected results can sometimes be tricky. But don't worry, Apify offers a whole range of tools for you to personalize the data as you see fit.
In this article, we will explore the available dataset options on the Apify platform, and give you some tips and tools you can use to make the most out of the data generated by Actors.
This article assumes that you have an Apify account. If that's not the case, then go ahead and sign up for free to start exploring the amazing web scraping and automation tools available on Apify Store.
Part 1 - Dataset functionality on the Apify platform
Once an Actor successfully finishes its run, it generates a dataset. You can then download structured data in different formats, such as HTML, JSON, CSV, and Excel.
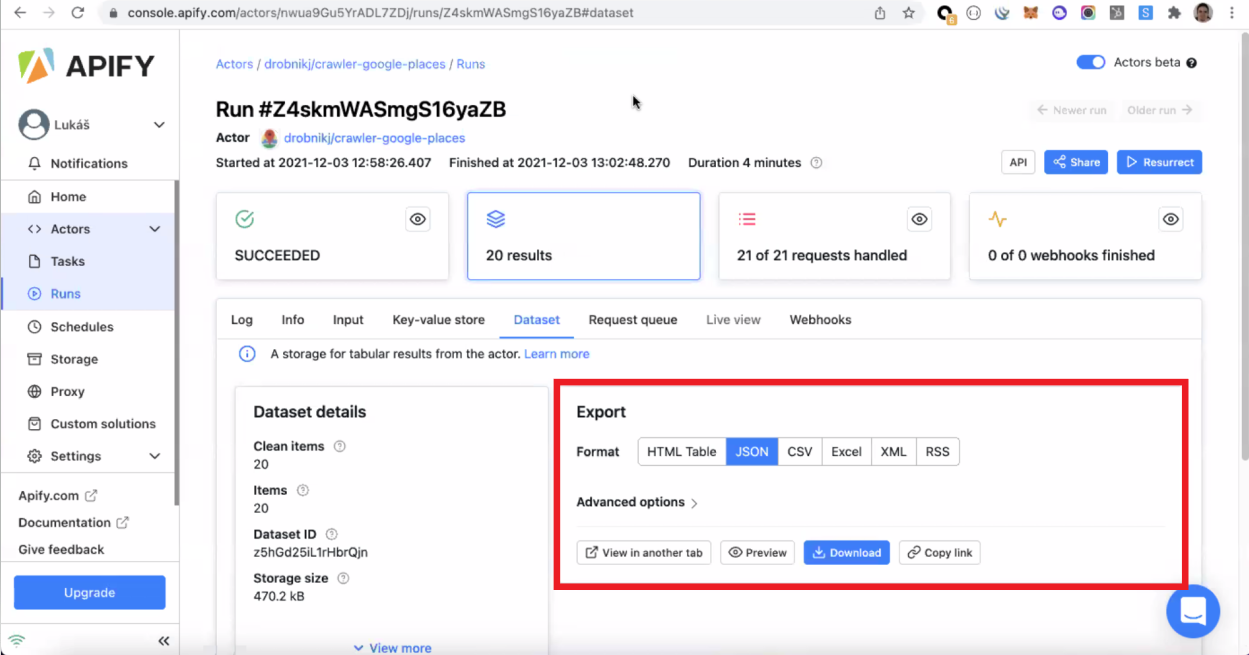
Some formats, such as JSON and HTML Table, have more options to visualize the results, such as "View in another tab" and "Preview." Other formats, such as Excel and CSV, will only allow you to download the data.
Advanced Options
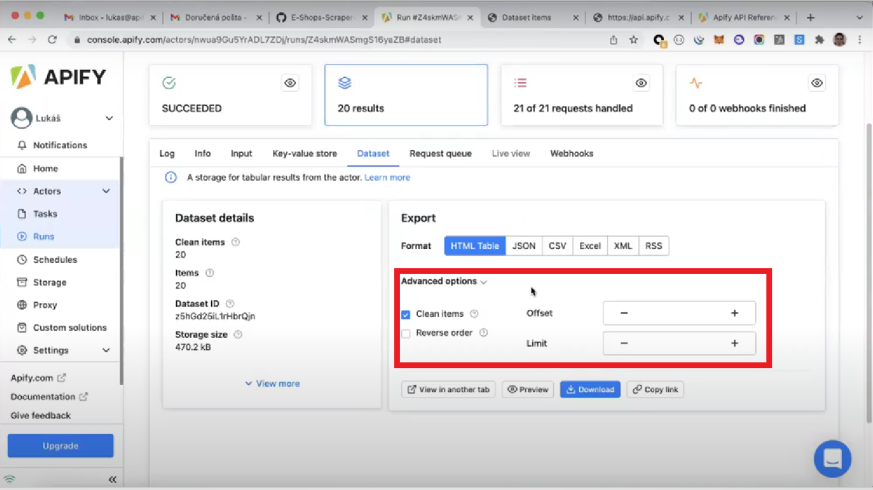
Besides the format, you can also further manipulate your results with the choices available in the Advanced Options section.
-
Clean items. When a dataset is generated, it contains not only useful, clean data, but also so-called "debug data", which is usually not relevant to the user. So you're usually better off ensuring that the "Clean items" option is selected 😉
-
Reverse order. If selected, this option reverses the default order of the items in the dataset.
-
Offset and Limit. Defining a limit and an offset to a dataset allows you to analyze the overall quality of the data before downloading the whole set of results. It is particularly useful when dealing with large datasets containing thousands or even millions of items.
Visualizing data in JSON
On the Apify platform, data is stored in JSON format, where the dataset is always an array of objects.
💡TIP: Download a JSON Formatter extension to have a structured view of data in JSON.
As a data format, JSON has a few interesting characteristics:
- JSON is simple text, allowing it to be displayed and edited by conventional editors. This makes it suitable and safe for transferring across platforms and operating systems.
- The JSON string's self-describing syntax and hierarchical nature make it easy to read and understand.
However, when dealing with large datasets, it can be complicated to scroll over thousands or even millions of results in JSON. To work around this problem, we can use Chrome Developer Tools to display our JSON output.
To do that, you need to first open Chrome DevTools (F12 or right-click + Inspect), copy the whole dataset (CTRL + A), and then paste it in the "Console" tab inside DevTools.
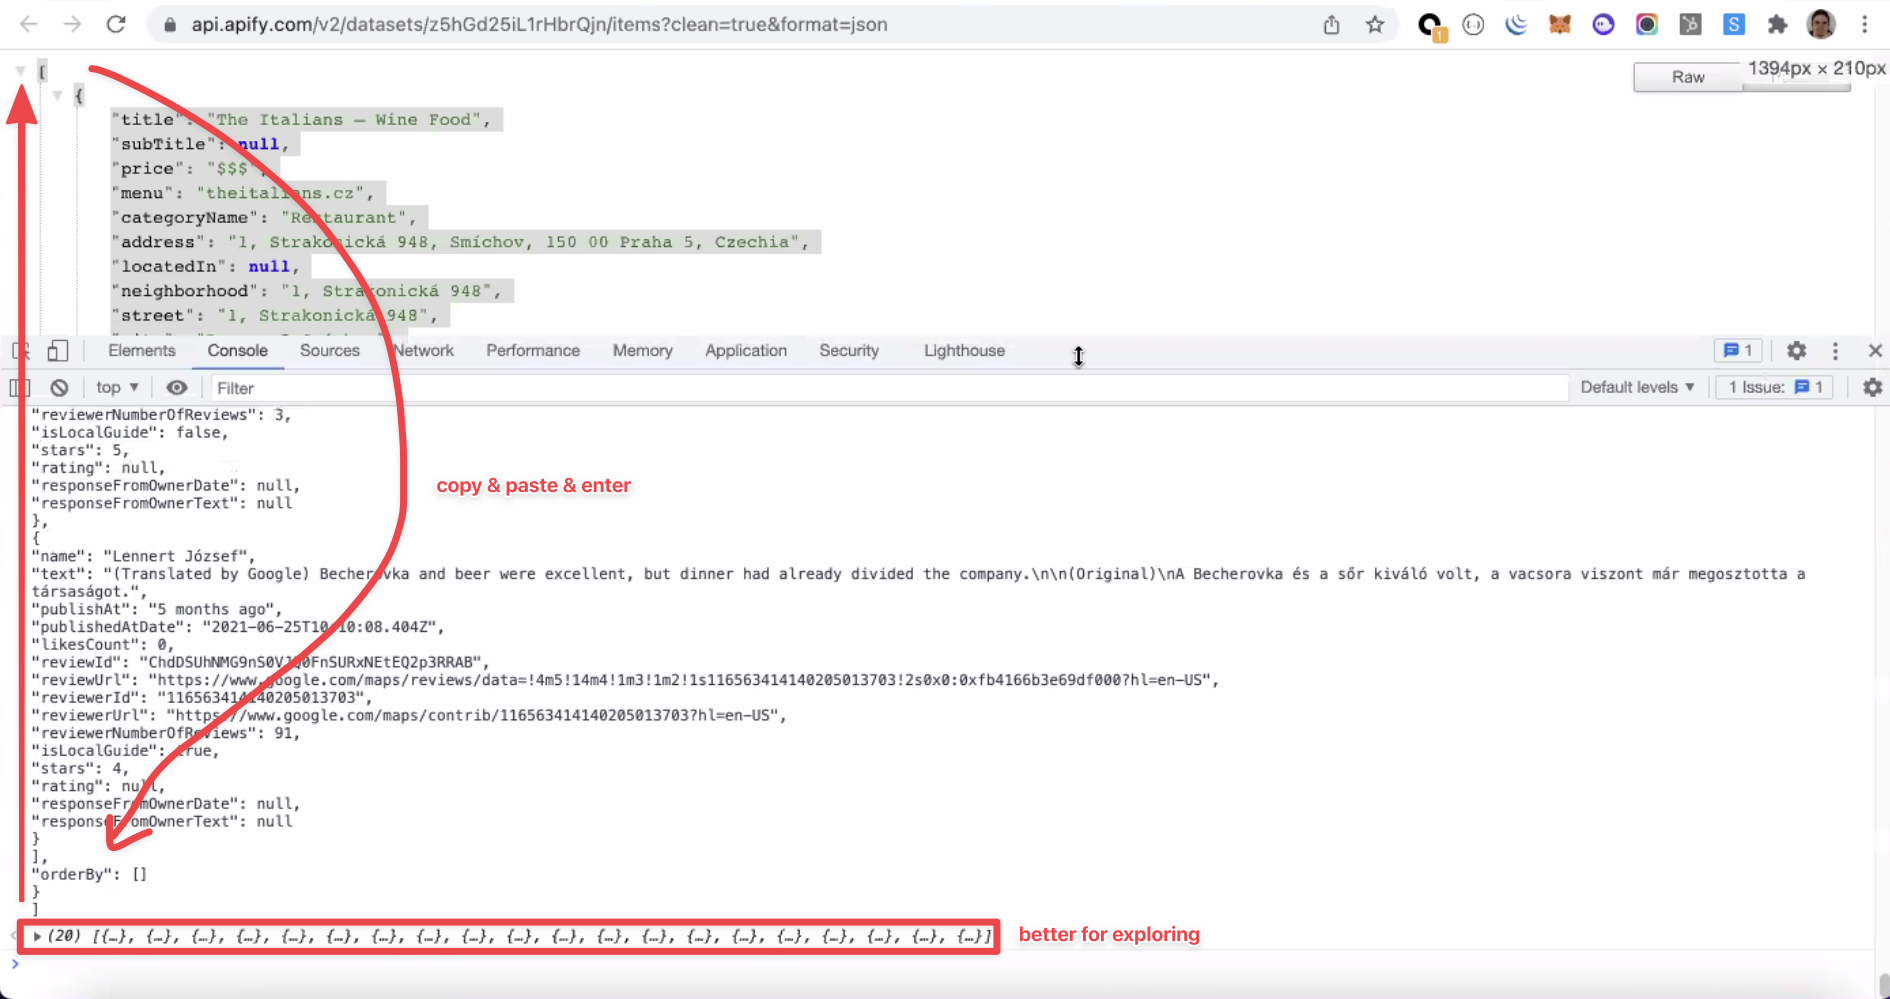
The dataset will now be organized in a drop-down collection of items, enabling you to easily navigate the Actor's results.
API dataset parameters
Apify API offers a wide range of parameters that can be added directly to the URL to determine the actions that will take place on the dataset. You can visit the Apify API Reference page to explore all the available options.
API endpoint + Parameters
https://api.apify.com/v2/datasets/datasetId/items?&format=json&clean=true&limit=1
A dataset URL consists of an API endpoint and the relevant parameters. You can easily add more parameters, regardless of the order, by typing "&" followed by the parameter's name (e.g., "&format").
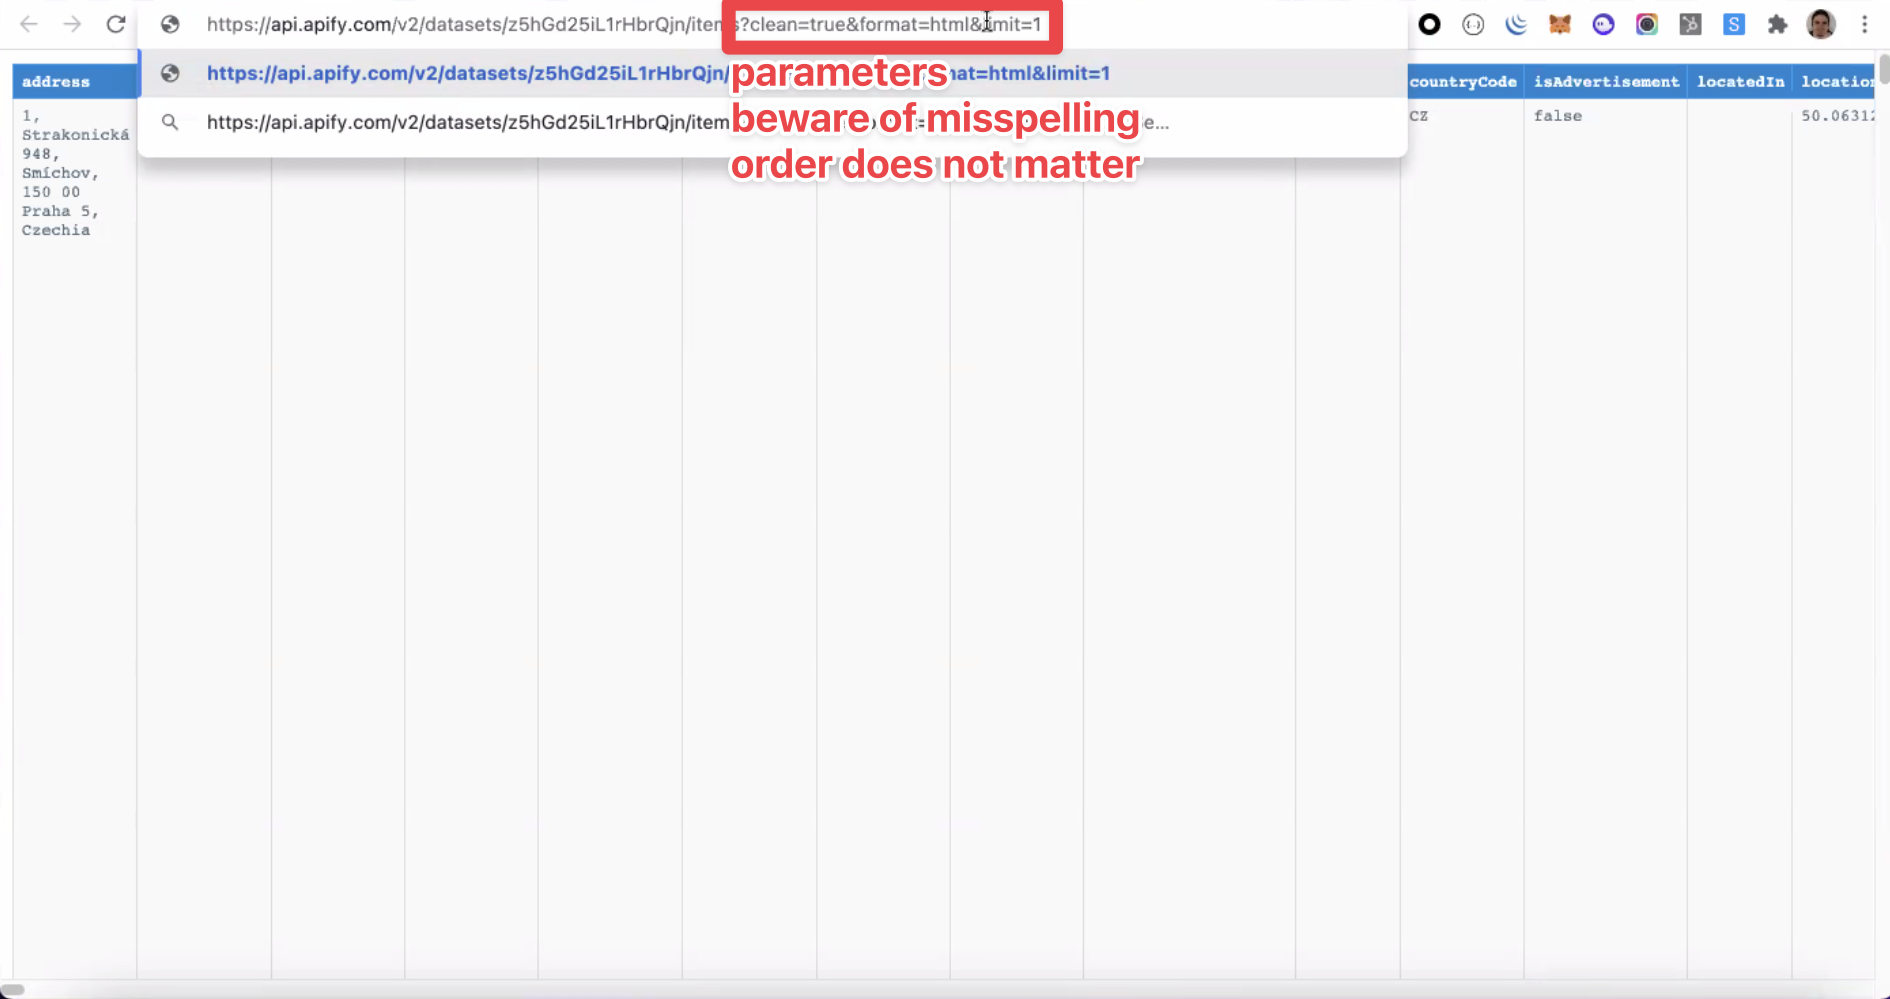
Pay attention to the spelling of the parameter names. Misspellings are not recognized and, consequently, do not apply any changes to the dataset.
Parameter's functionalities
To further exemplify the parameter's functionality, we will examine a few of the most commonly used parameters:
- Format. This parameter defines the format of the displayed data. Its default value parameter is "json". However, you can choose between all the other available options: json, jsonl, csv, html, xlsx, XML, and RSS.
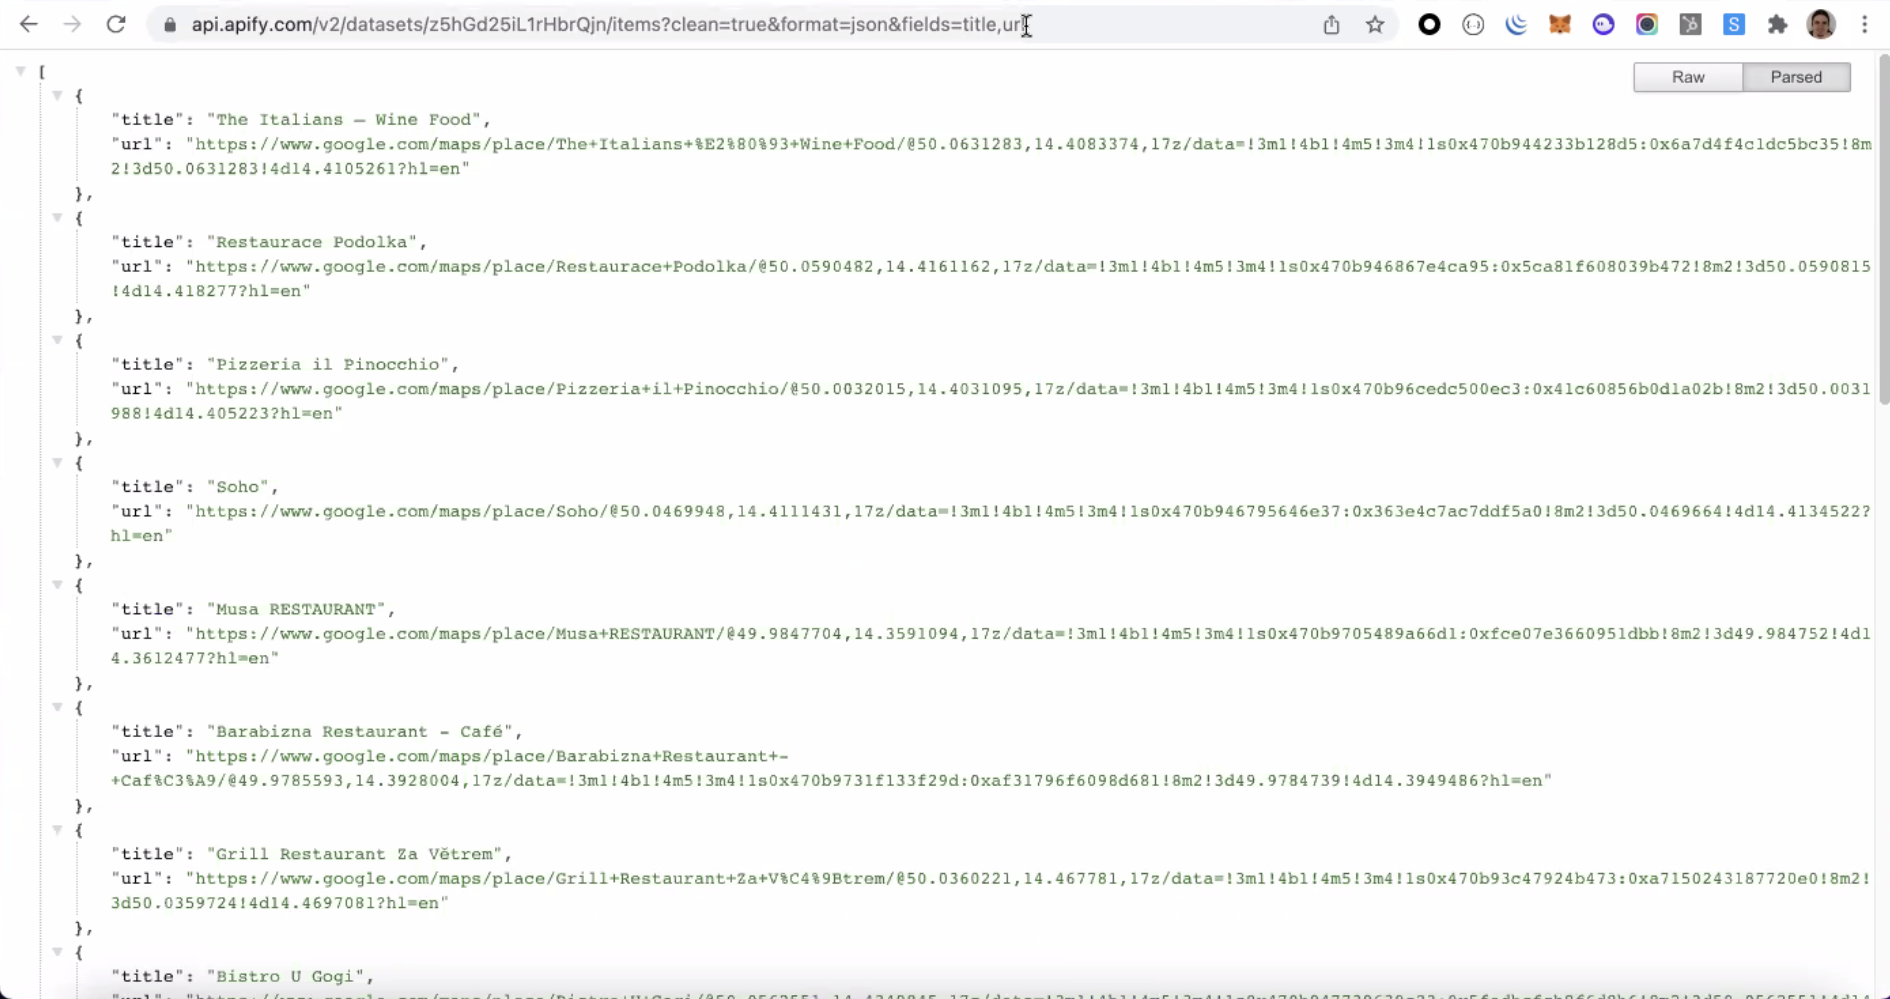
- Fields. This parameter can be written as a comma-separated list of fields that should be filtered from the output, where only the selected fields will remain in the resulting dataset. Additionally, the fields in the outputted items are sorted according to the sequence specified in the fields query parameter. Thus, this is a handy feature to adapt the output format to your specifications. See the example below.
TIP: You can use the fields parameter to sort data in the HTML table.

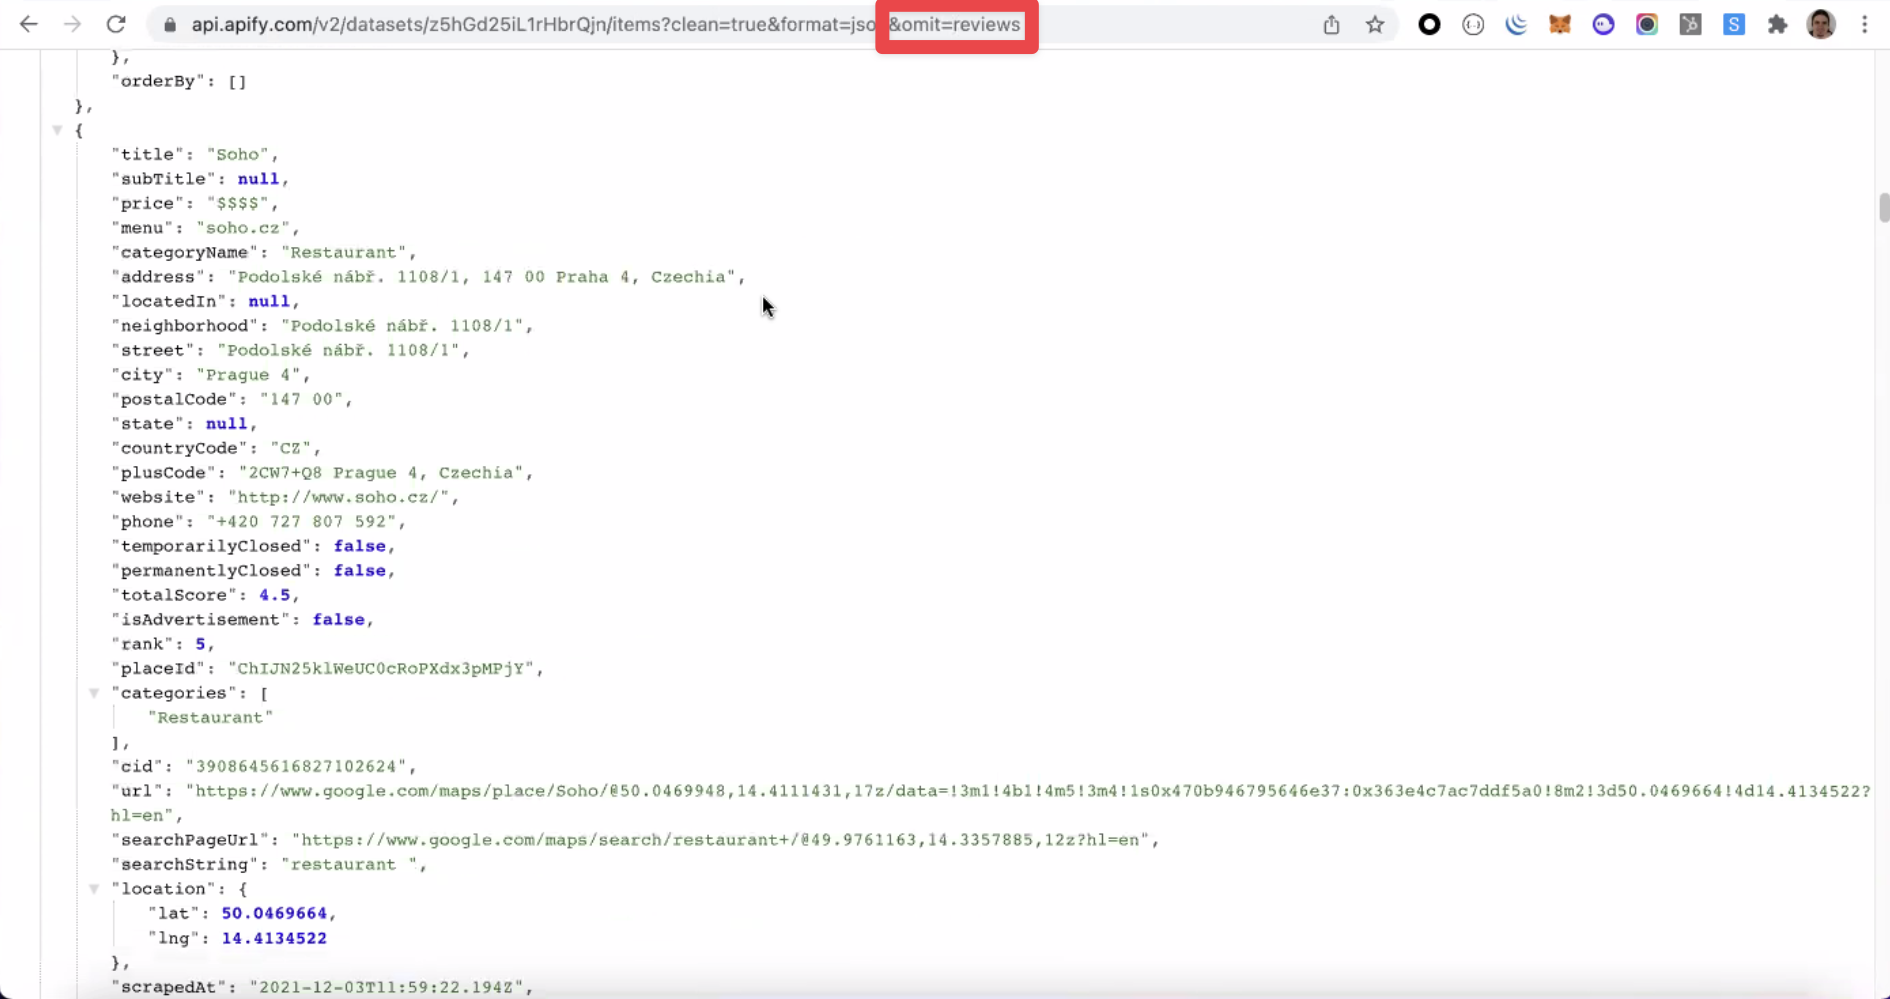
- Omit. This parameter can be written as a comma-separated list of fields that should be omitted from the items. In the example below, the "reviews" field is omitted.
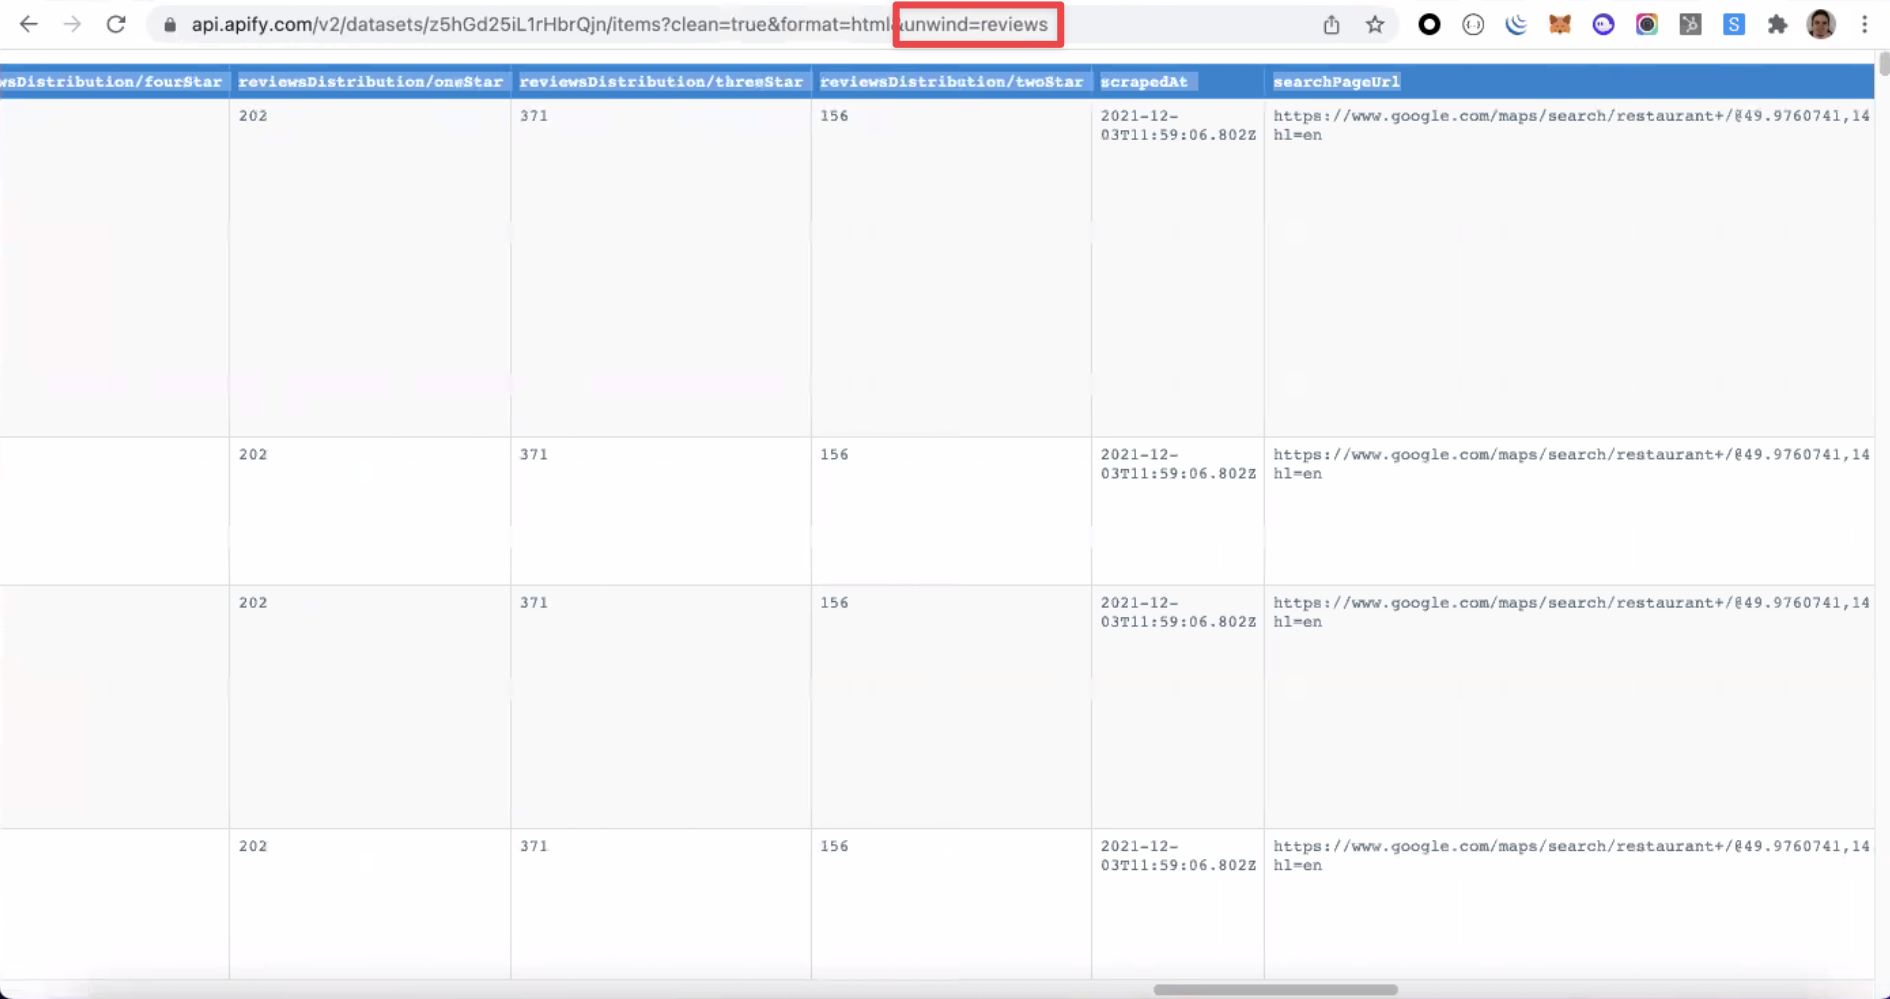
- Unwind. This parameter expands an array, merging every array item with the parent object. This parameter can come in handy when you need to display a nested array in an HTML table.
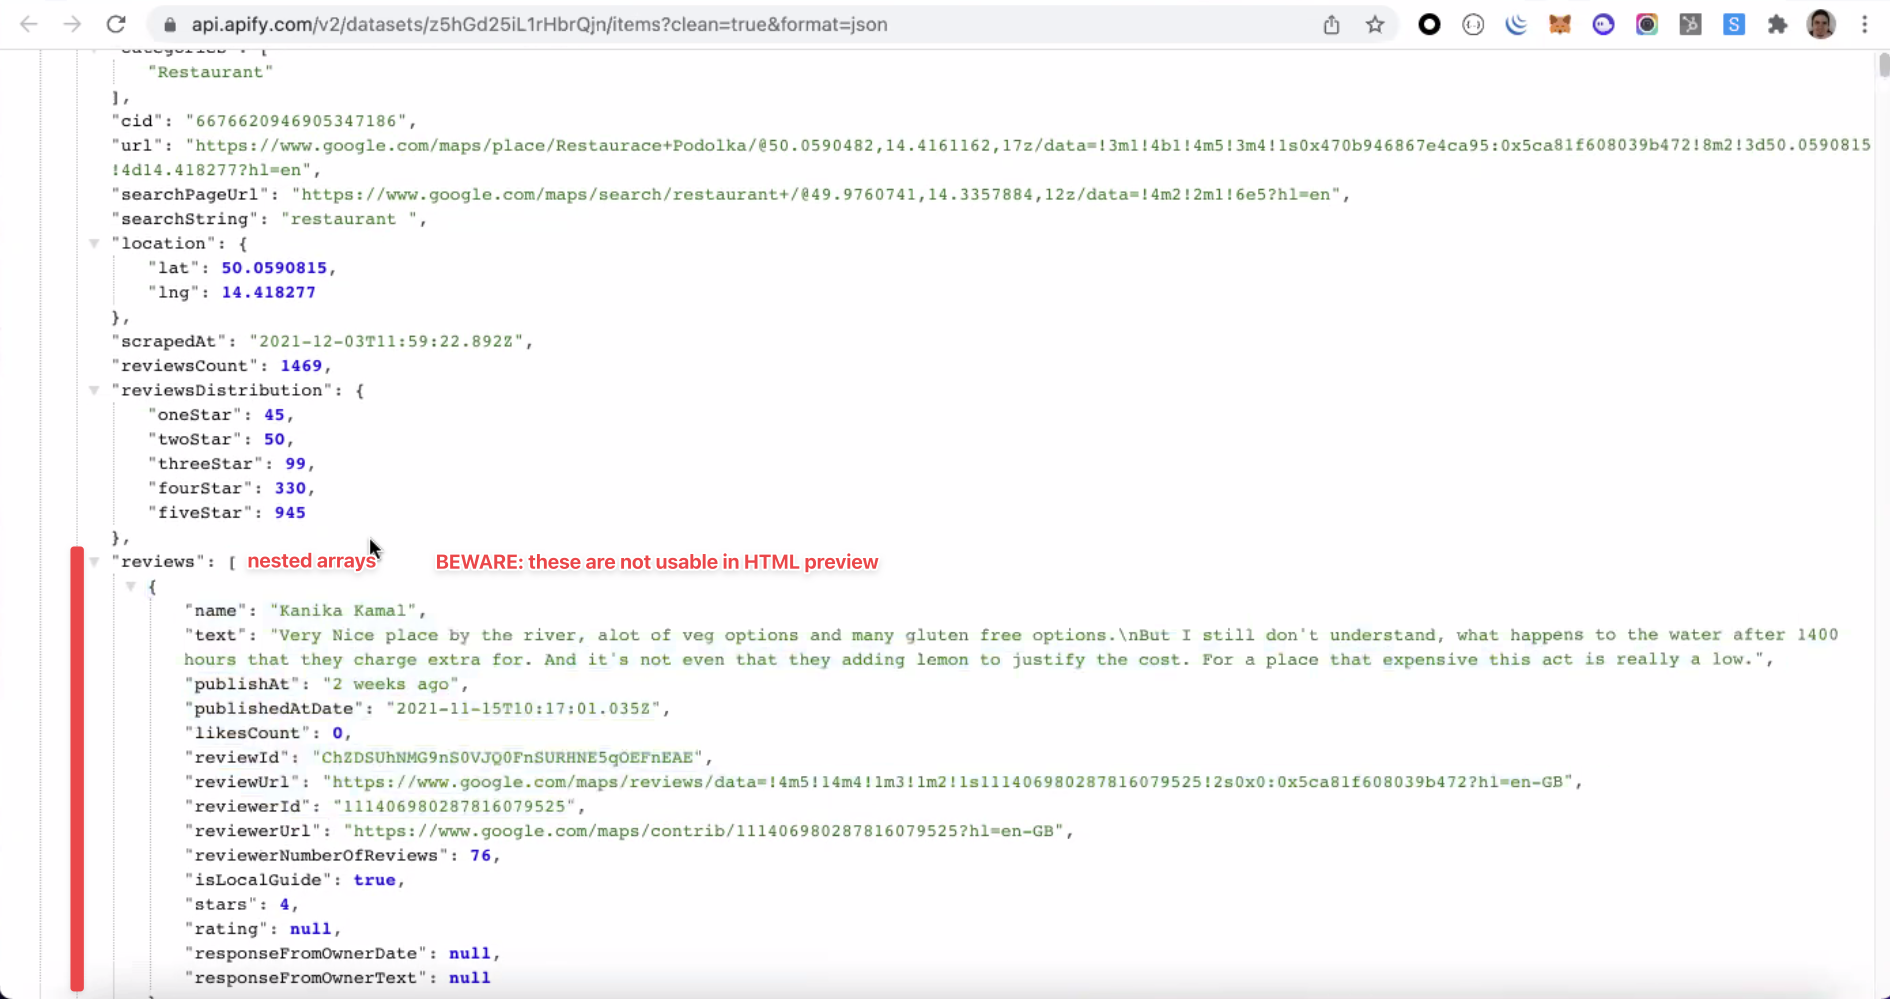
The image below represents the dataset view in the HTML table format before "Unwind." Because of the nested array, the data displayed is not well structured.
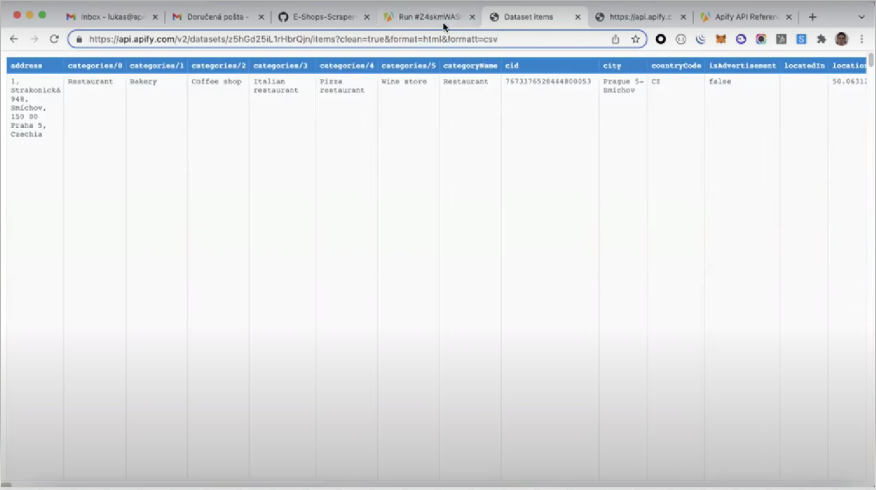
Unwind expands the nested array so the data can be adequately displayed in the HTML table.
- Attachment. This header is not present by default. However, if set to true, it will force the web browser to download the data in its current format rather than just displaying it.
A short video tutorial to guide you through the pitfalls of retrieving data using API
Part 2 - Merging, deduplicating, and transforming datasets with a public Actor.
Dealing with large datasets containing over a million results can be slow and inefficient. Merging, deduplicating, and transforming data at scale can take hours of your time.
Thankfully, there is an alternative to this lengthy process. Using the Merge, Dedup & Transform Datasets public Actor makes it possible to reduce the time these tasks take to complete, from hours to just a few minutes.
What are the benefits of this Actor?
- High-speed data processing thanks to parallelism in loading and pushing data (up to 20x faster than the default loading/pushing speed).
- Allows simultaneous reading of multiple datasets, which is ideal for merging data from various Actor runs.
- Actor migration proof - ensures that duplicated is not pushed.
Dedup as loadingmode allows for near-constant memory processing even for large datasets (over 10 million items).- Deduplication enables the combination of many fields, including nested objects and arrays (JSON.stringified for deep equality check).
- Allows data storage in Key-Value store records.
- High-speed blank runs to count duplicates in a dataset.
Running the Actor: input fields
- Dataset IDs (required). This is the only required field to run this Actor, and you can add as many IDs as necessary. As a result of the Actor run, the added dataset IDs will be merged together into one dataset.
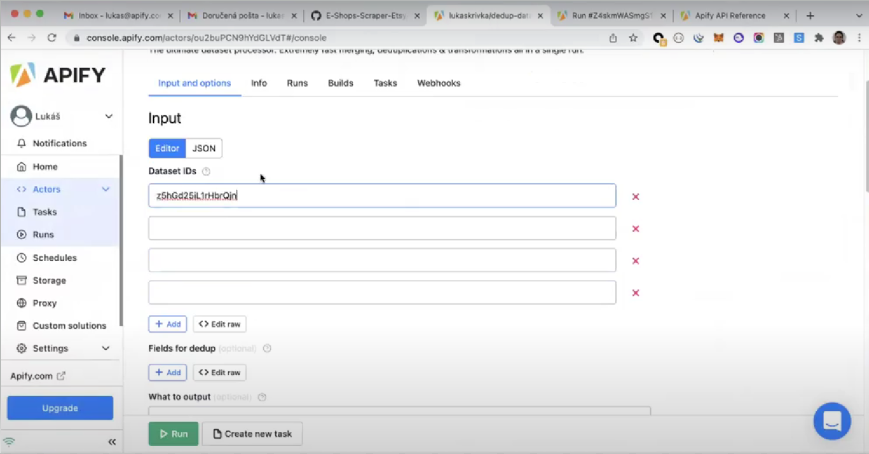
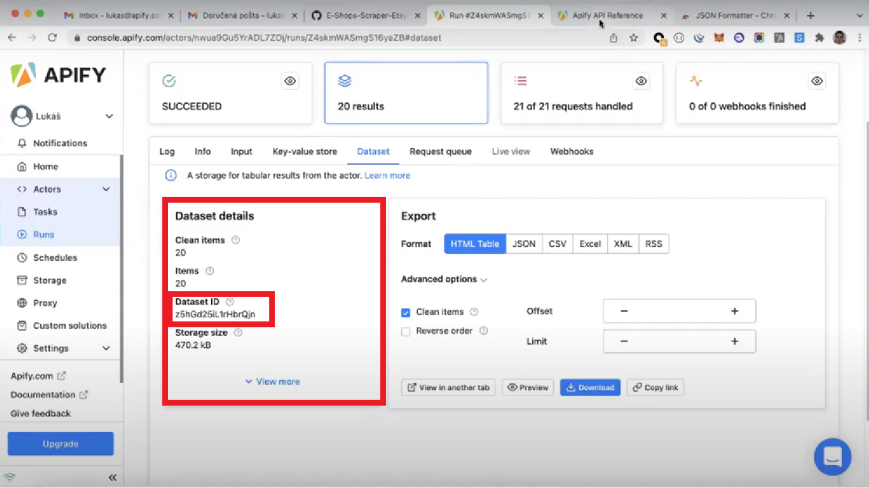
You can find your dataset ID in the "Dataset details" section of an Actor's run.
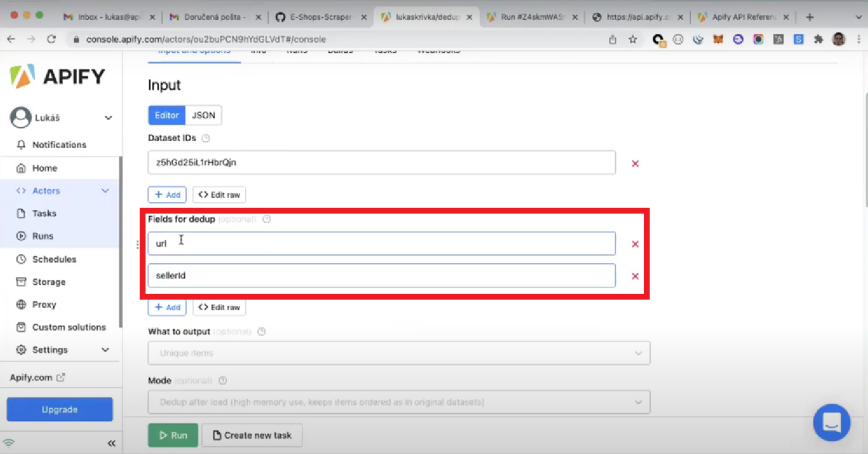
- Fields for dedup (optional). The Actor will scan the dataset for any items with duplicate values for the given input and merge them into one unique item. If more than one input is provided (see the example below), then the Actor will only deduplicate items with matching "url" and "sellerId" fields.
- What to output (optional). This field offers three options of output for the dataset, "Unique items", "Duplicate items", and "Nothing"(checking the number of duplicates). The first option will only return unique items, the second only the duplicate items, and the third one is used to analyze the output, for example, to find out how many duplicate values were in the original dataset.
- Mode (optional). Allows you to choose either "Dedup after load" or "Dedup as loading."
"Dedup after load" waits for the dataset to finish loading before pushing it, which has the advantage of maintaining the item order of the original dataset but at the cost of high memory usage.
"Dedup as loading" will deduplicate items while loading, drastically reducing the memory usage, enabling you to work with large datasets without extrapolating the memory limits. However, it will shuffle the items out of the original dataset's order as a minor drawback. - Where to output (optional). You can choose between "Dataset", the default option, and "Key-Value store", where the result is split into records.
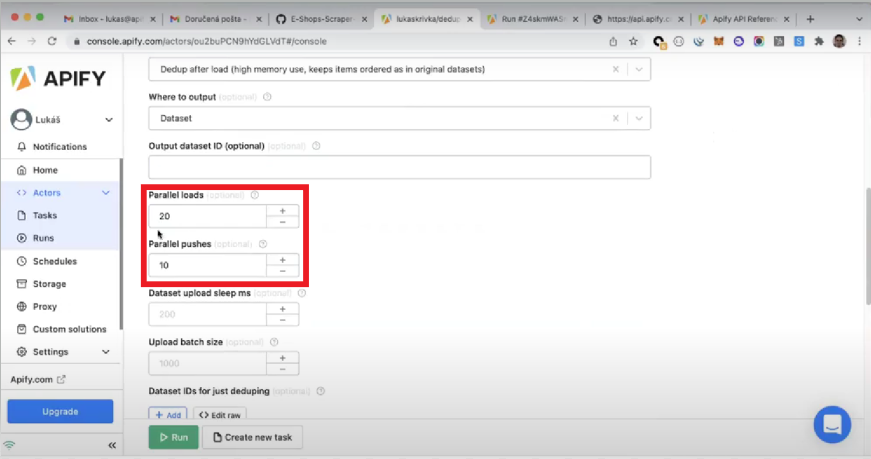
- Parallel loads and parallel pushes. In this field, you can choose the number of parallel loads and pushes performed by the Actor. The higher the parallelism, the better the Actor's performance will be.
Transforming items: pre and post dedup transform functions
Pre and post dedup transform function fields offer flexibility when dealing with the dataset items. Here you can write JavaScript functions to transform items according to your use case.
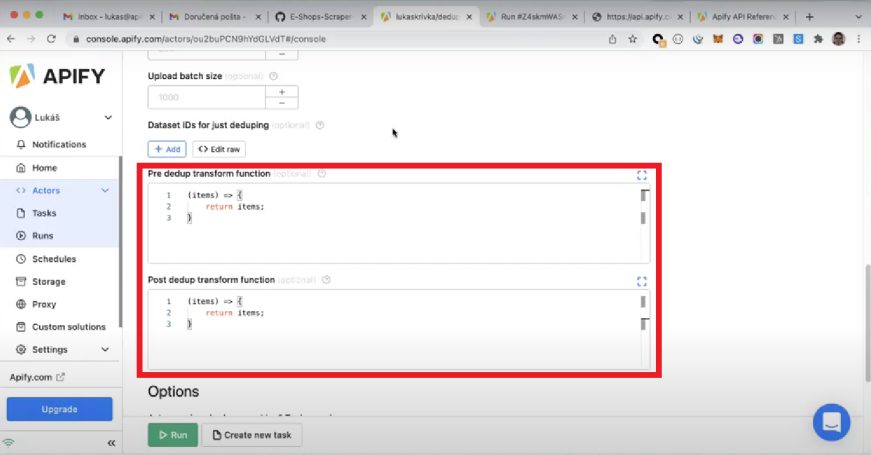
"Pre dedup" will apply the specified item transformations before deduplication and "Post dedup" after the items have been deduplicated.
In the image below, you can see an example of simple JavaScript code to transform items in the dataset.
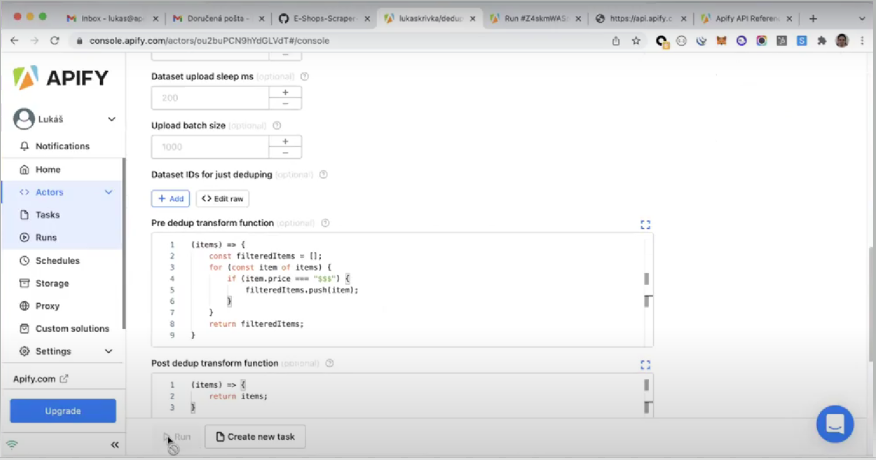
In the following code snippet, you can find a step-by-step explanation of the code displayed in the image above.
If you need help working with JavaScript objects or general guidance on understanding the JavaScript syntax, you can check the JavaScript MDN Web Docs.
(items) => {
// Initially an empty array, by the end of the code run, the "filteredItems" array will contain the items that obey the described logic.
const filteredItems = [];
// Loop through each item of the dataset
for (const item of items) {
// The "if statement" filters the items where the element price equals to "$$$"
if (item.price === "$$$") {
// Selected items are pushed to the "filteredItems" array
filteredItems.push(item);
}
}
// Outputs "filteredItems"
return filteredItems;
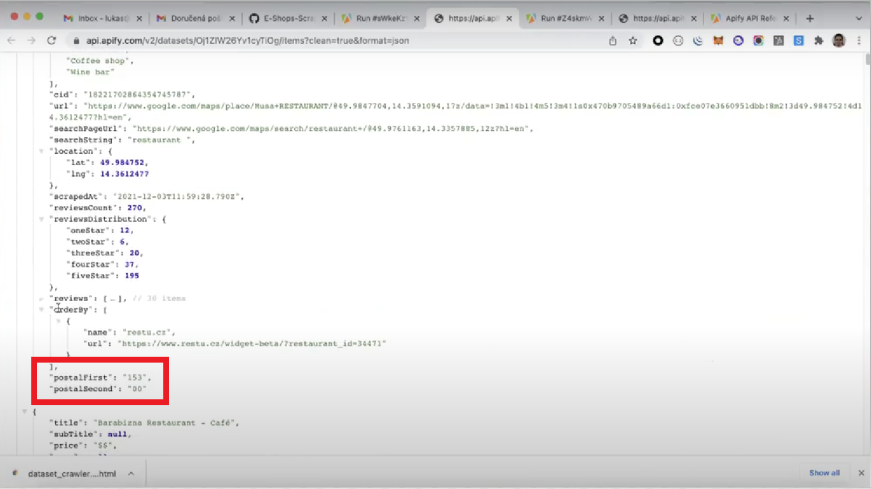
}It is possible to add new items to the objects in a dataset. For example, suppose you would like to select an existing field, "postalCode," and split it into two parts, displaying them as separate fields in the object.
(items) => {
	const transformedItems = [];
    for (const item of items) {
    	if (item.price === "$$$") {
			const { postalCode } = item; // Select the postalCode field
            splittedPostal = postalCode.split(' '); // The original postal code is "150 00". The split's output will be an array with two values ["150","00"]
        	transformedItems.push({
            	...item, // Add all the original item's values
                postalFirst: splittedPostal[0], // Select the first item of the array "150"
                postalSecond: splittedPostal[1], // Select the second item of the array "00"
                postalCode: undefined, // Excludes the original "postalCode" value from the resulting object by assigning an "undefined" value to it
            })
        }
    }
    return transformedItems;
}
As illustrated in the image below, the resulting dataset will include the newly added fields and their respective values.
You should now have a better understanding of the tools available in Apify to aid you with data processing. As a next step, we strongly recommend you try the steps in this article on your own and use this material as a reference and learning resource.
Make sure you check out our new Developer Homepage to learn more about web scraping and how to get more data. And don't forget to join our Discord channel. There you can freely ask any questions regarding the Apify platform and meet other web scraping and automation enthusiasts 🤖