Content
The primary goal of a QA engineer/tester is to simulate user behavior and make sure all possible human interactions on an application are being automated. Such behaviors include waiting for a page to load before using the app.
Simulating this behavior when writing automated test scripts is quite a complex process. This is because, in the real world, the wait time might be affected by race conditions. Failure to account for situations like this can lead to inconsistencies in test results, incomplete scraped data, etc. This is where "waiting" comes into play in Selenium.
In this article, you'll learn about the kinds of wait strategies available in Selenium, their differences, use cases, and how to utilize them effectively.
Why wait for a page to load?
One common challenge when performing automated testing or web scraping using Selenium is the dynamic nature of web pages, which often leads to race conditions.
A race condition happens when two or more processes or actions attempt to access a shared resource at the same time, resulting in unpredictable outcomes. In the context of web automation, a race condition occurs when your Selenium script attempts to interact with an element before the page has fully loaded or the target element becomes visible or interactive.
These race conditions result from certain factors, such as slow internet speed, web framework/libraries used, server response time, etc. Therefore, to achieve accurate results, you need to make sure that you consider these.
Because of this, you have to ensure that your test scripts interact with the web page only after it has fully loaded. If you attempt to access the elements or perform actions on them too soon, you'll encounter errors such as the NoSuchElementException and ElementNotVisibleExceptionerror errors.
The problem with sleep()
After reading this far, you might be wondering:
"Can I just make use of the time.sleep() function available in Python or its equivalent in other languages like Java (thread.sleep() )?"
The simple answer is "Yes." However, testers frequently and incorrectly utilize that to add fictitious delays to their scripts. Although it might be effective in certain situations, this is typically an unreliable option. The main problem is that they're both static waits, meaning that they wait for a certain period, whether or not the web page has loaded.
These delays may be too short or too long, depending on the web page's actual loading times. If the wait is too short, your script may still have race conditions. If the delay is too long, it may unnecessarily slow down your automation, potentially resulting in timeouts and other issues.
So, instead of just relying on the sleep() function, you can leverage the more robust and flexible wait methods provided by Selenium, which can dynamically adapt to an application’s behavior, thereby ensuring reliable tests and efficient executions.
Introducing Selenium waits
Selenium provides three waits, also known as wait commands, that can be used in various scenarios. They control the flow of execution in Selenium scripts and dynamically handle web elements. They include implicit wait, explicit wait, and fluent wait.
#1. Implicit wait
Implicit wait in Selenium is used to set a default wait duration between each successive test step or command throughout your test script. When an implicit wait is implemented in test scripts, the webdriver will try to find the element in the DOM during a specific amount of time before throwing a NoSuchElementException error if the element is not found.
As a result, the succeeding test step will only run once the previous test step/command has been completed. If the web element is located before the set time limit expires, the implementation moves on to the next line of code. This kind of selenium wait is recommended when the tester knows exactly how long the page will take to load.
Syntax (Python):
# Python
from selenium import webdriver

driver = webdriver.Chrome()
driver.implicitly_wait(10)  # Wait up to 10 seconds for elements to appear
Advantages of implicit wait:
- Ideal for rapid prototyping during testing.
- Easy to implement and maintain throughout the test suite.
- Particularly effective for handling dynamic content-related challenges.
Drawbacks of implicit wait:
- Imposes unnecessary delays since it applies universally to all elements.
- Lacks the capability to introduce specific conditions like explicit and fluent waits.
- Incorrect usage can extend the overall execution time significantly.
#2. Explicit wait
In Selenium, explicit wait is by far the most reliable and versatile method for waiting. It is a WebDriverWait object that tells the webDriver to wait for a specific condition to be met before proceeding with the next actions in the script file.
Unlike implicit wait, explicit wait is ideal when you know exactly what elements or conditions to wait for ahead of time before proceeding.
- Expected conditions
When using Explicit waits, it is required you make use of something called expected conditions. Expected conditions are pre-defined conditions that can be used with the WebDriverWait class to help target specific behavior of web elements.
These conditions cover a wide range of scenarios that testers will most likely encounter, hence removing the need to write custom conditions.
Here are some commonly used expected conditions:
title_istitle_containselement_to_be_clickablepresence_of_element_locatedvisibility_of_element_located
If these built-in expected conditions don't satisfy your unique use case, you can always create your custom conditions.
Here's an example of how to use an explicit wait in Python with Selenium:
from selenium import webdriver
from selenium.webdriver.common.by import By
from selenium.webdriver.support.ui import WebDriverWait
from selenium.webdriver.support import expected_conditions as EC
# Initialize the WebDriver
driver = webdriver.Chrome()
# Navigate to the apify.com website
driver.get("https://www.apify.com/")
# Wait for the "Sign up for Free" button to be visible
wait = WebDriverWait(driver, 10)
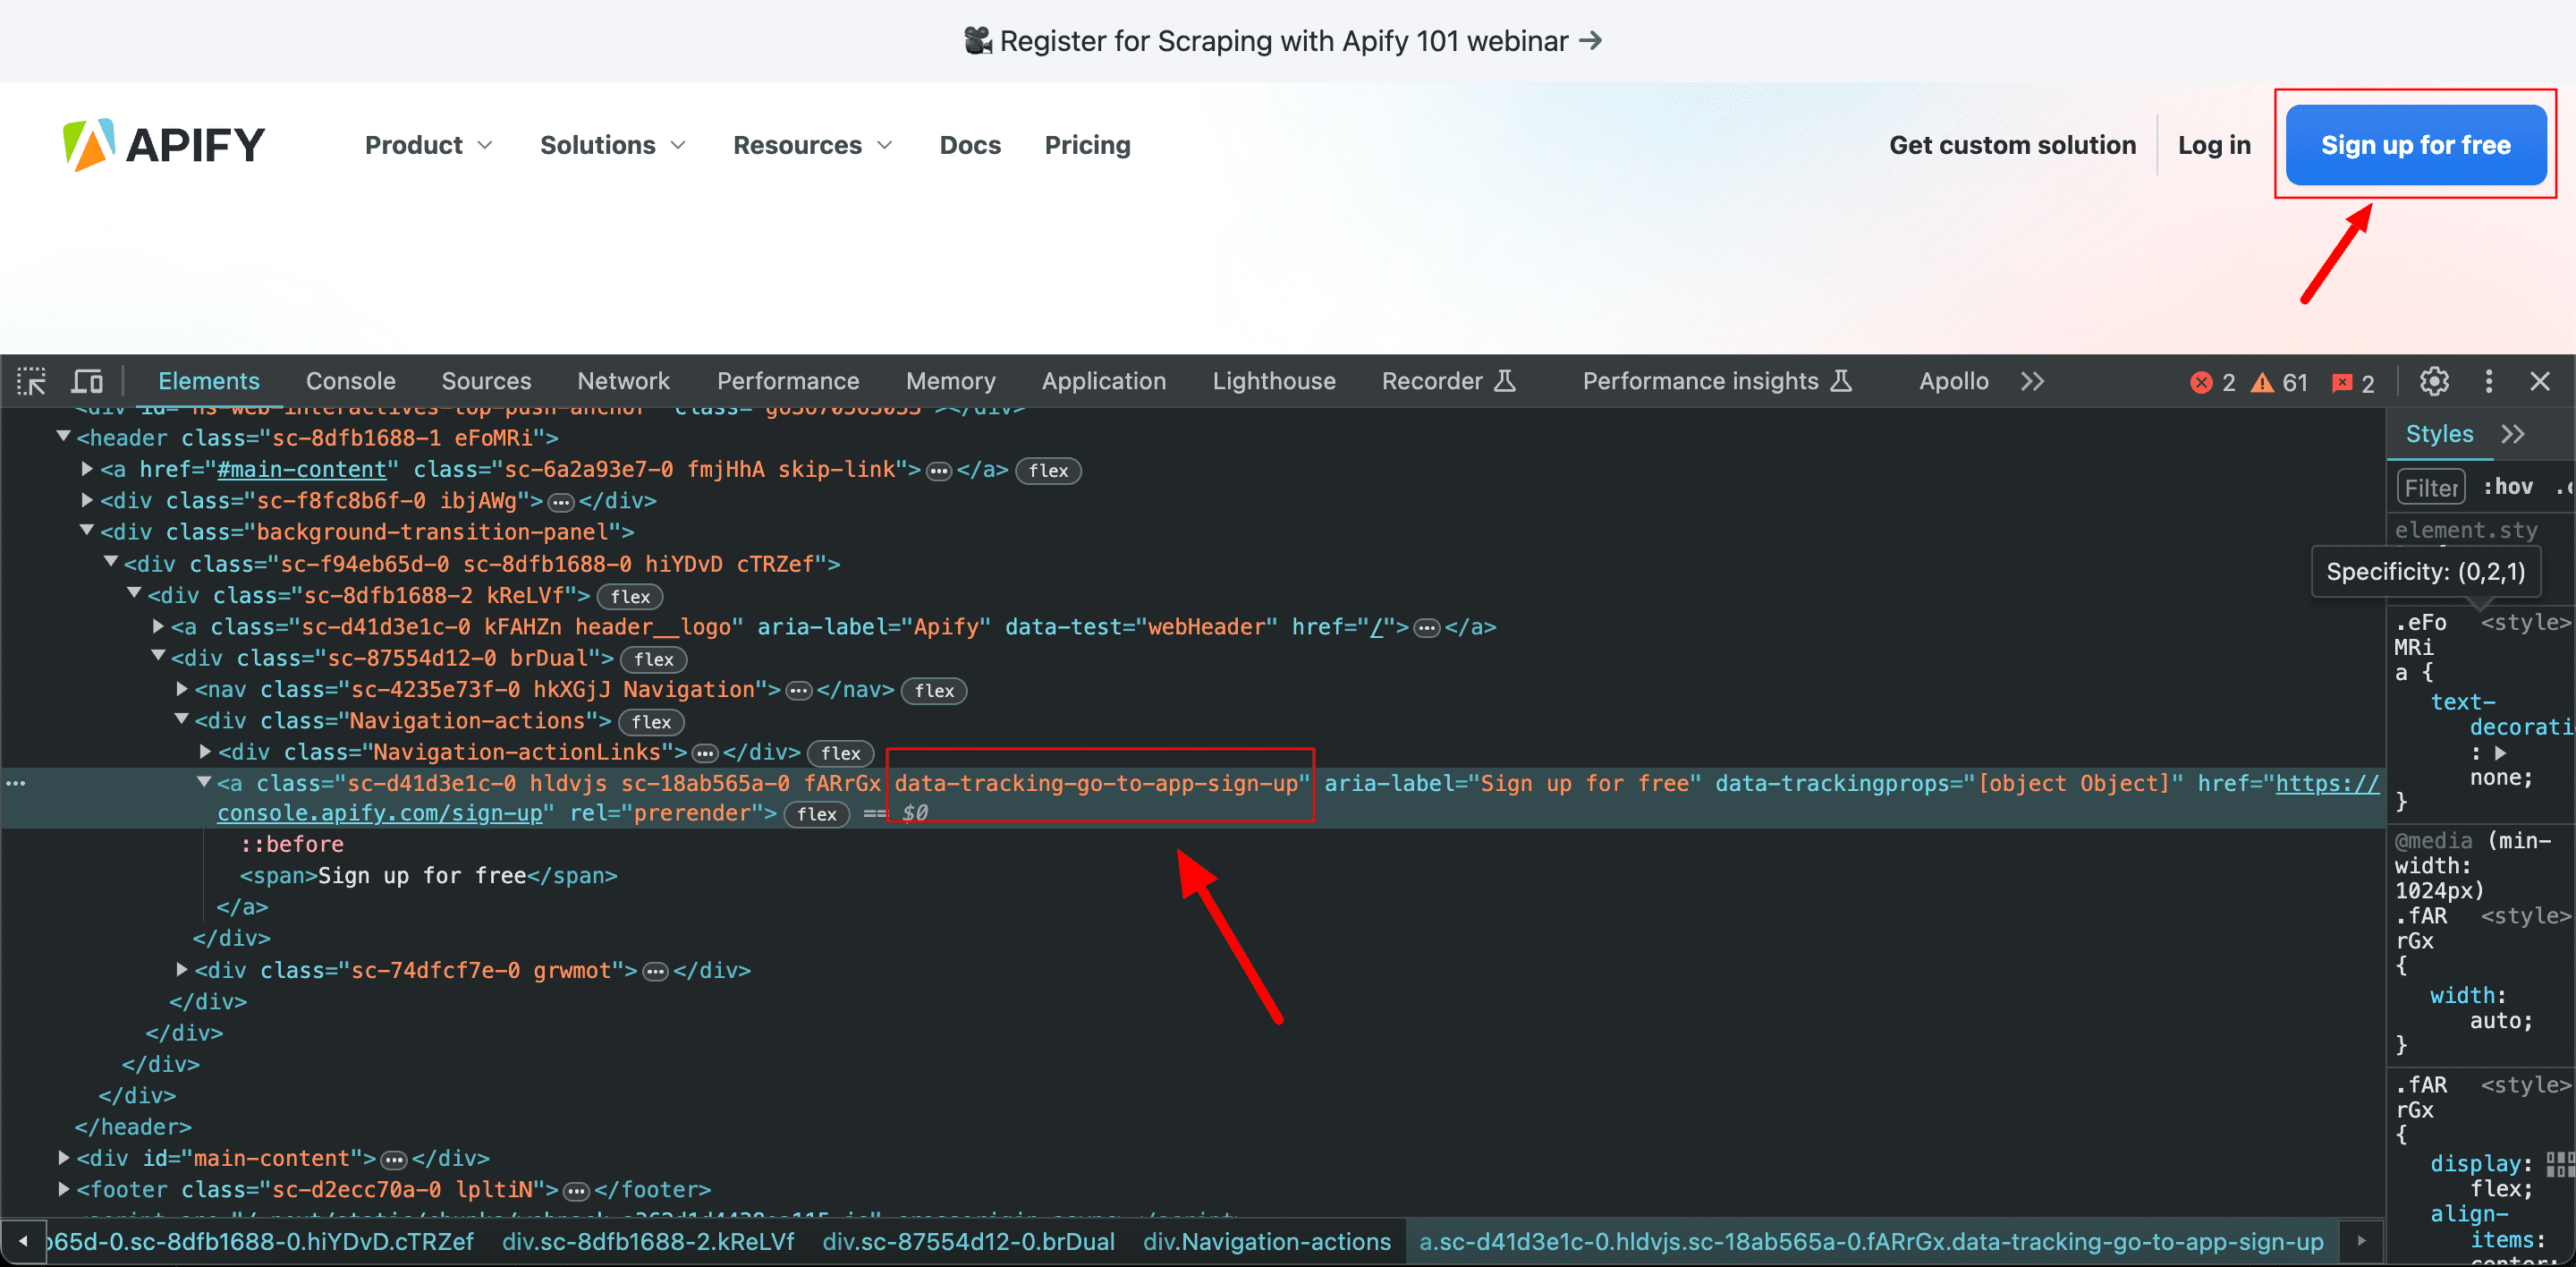
signup_free_button = wait.until(EC.visibility_of_element_located((By.CSS_SELECTOR, "data-tracking-go-to-app-sign-up")))
# Click the "Sign up for Free" button
signup_free_button.click()
# Wait for the "Sign up for free" form to be visible
form_container = wait.until(EC.visibility_of_element_located((By.CSS_SELECTOR, "div.sign_shared__SignForm-sc-thx54g-0")))
# Fill out the form (example)
email_field = form_container.find_element(By.ID, "email")
email_field.send_keys("example@email.com")
password_field = form_container.find_element(By.ID, "password")
password_field.send_keys("examplePassword")
# Wait for the "Sign Up" button to be clickable
sign_up_button = wait.until(EC.element_to_be_clickable((By.CSS_SELECTOR, "button.sign_shared__SignForm-sc-thx54g-0")))
# Click the "Sign Up" button
sign_up_button.click()
# Close the browser
driver.quit()
In the code above, you are attempting to automate the sign-up process on the Apify website. First, you start by navigating to the webpage using driver.get("https://www.apify.com/"). Then, you wait for the "Sign up for Free" button to be visible on the screen using the EC.visibility_of_element_located condition with a CSS selector for the element.
Once the button is visible, initiate a click() command and wait for the signup page to load.
After the form is visible, locate it using the same EC.visibility_of_element_located condition and fill out the email and password fields. Next, you wait for the "Sign Up" button to be clickable using the EC.element_to_be_clickablecondition, and then click it.
Pros:
- It gives you more control over the behavior of the wait.
- It reduces the risk of running into stale element exception errors.
Cons:
- It requires a lot more code to implement.
- Managing multiple wait conditions across your test suite can be very cumbersome.
#3. Fluent waits
Fluent waits (also called smart waits) in Selenium are a type of explicit wait that offers a more advanced and customizable way of handling race conditions. Unlike traditional explicit waits, which wait for a fixed period, fluent waits allow you to define a MAX timeout value, a polling interval, and customer wait conditions.
Basically, not only can you define conditions you also can define the frequency at which you want to check for the specified condition. It continuously polls the browser for a specific condition until the condition is met or a timeout occurs.
Unlike the Selenium Java API which has a FluentWait class, it is not still present in the Python API. However, you can implement a similar functionality using the WebDriverWait class along with some custom logic.
Here's an example of how to implement a fluent wait in Python Selenium:
from selenium import webdriver
from selenium.webdriver.common.by import By
from selenium.webdriver.support import expected_conditions as EC
from selenium.webdriver.support.ui import WebDriverWait

# Initialize the driver
driver = webdriver.Chrome()

# Navigate to a website
driver.get("[]()")

# Define a custom condition for waiting
def element_has_text(element):
return "Expected Text" in element.text

# Wait for an element to have specific text using a fluent wait
wait = WebDriverWait(driver, 10, poll_frequency=1)
element = wait.until(EC.presence_of_element_located(([By.ID](), "myElement")))
wait.until(element_has_text(element))

# Interact with the element
print(element.text)

# Close the browser
driver.quit()
Pros:
- You can control the frequency at which the conditions are checked
- Fluent waits provide a better way to handle exception errors by allowing you to specify which exceptions should be ignored during the wait period.
Cons:
- Properly implementing fluent waits can be a complex and daunting task compared to using implicit or explicit waits, especially when dealing with custom conditions or multiple waits within the same script.
- There is a risk of running into false positives; hence, if a condition is not specified correctly, fluent waits may return a false positive, which means the test will fail.
Implicit .vs explicit .vs fluent waits
Let's break down the differences between the three types of Selenium waits. Here's a comparison:
| Aspect | Implicit Wait | Explicit Wait | Fluent Wait |
|---|---|---|---|
| Usage | Automatically applied globally to all elements in the WebDriver instance. | Applied to specific elements or actions only when needed. | Applied to specific elements or actions but with added flexibility. |
| Wait Time | Has a fixed wait time, which is specified once for the entire WebDriver session. | Has a wait time that can be adjusted for each wait condition. | Wait time and polling interval can be adjusted for individual wait conditions. |
| Exception | It throws a NoSuchElementError if the element is not found after the specified time. | It throws a TimeoutError if the condition is not met within the specified time. | Throws TimeoutError if the condition is not met within the specified time. |
| Implementation | Implicitly waits for elements to appear before performing actions. | Explicitly defines conditions to wait for before performing actions. | Allows for more complex conditions and fluent chaining of conditions. |
| Best for | Simple scenarios where elements load predictably. | Specific cases where waiting for a particular condition is necessary. | Complex scenarios where conditions may change dynamically. |
| Performance | Can lead to longer overall test execution times if set too high. | Can be more efficient as it waits only when necessary. | Offers better performance optimization with adjustable polling intervals. |
Common pitfalls to avoid while using Selenium waits
- Overusing implicit waits: Though implicit waits can be convenient in simple scenarios, excessive use can lead to performance issues and prolong wait times. Hence, they should be used only when necessary.
- Incorrect wait condition: Even if you have the right waiting mechanisms in place, selecting an incorrect wait condition might lead to failed tests. Clear examples would be using the
visibilityOf()condition when the element is already present but not visible on the screen or usingpresenceOf()when you need the element to be visible and interactive. - Lack of specific locators: If the selectors you make use of in your scripts are not specific enough, Selenium may find it hard to locate the correct element, leading to false positives or false negatives in your tests.
- Inconsistent wait strategies: It's advisable to maintain the same wait mechanisms throughout your test. Having a mix of all three may cause conflicts and confusion.
- Poor error handling: Always handle exceptions such as
TimeoutExceptionorNoSuchElementExceptionthat may occur during waiting.
Alternatives to Selenium wait
Although Selenium offers a workable solution, it's not the only method for accomplishing waiting with Selenium. Other alternatives can be used for specific use cases or scenarios like asynchronous interactions etc. Here are some common ones:
1. JavaScript executor
This technique uses Selenium's execute_script and execute_async_script methods to allow you to run JavaScript in the context of your browser. The JavaScript executor can be used to implement custom wait conditions that are much more complex than what can be achievable through Selenium's standard built-in methods.
Here's a quick implementation:
from selenium import webdriver
from selenium.webdriver.common.by import By
from selenium.webdriver.support.ui import WebDriverWait
from selenium.webdriver.support import expected_conditions as EC

# Initialize the webdriver
driver = webdriver.Chrome()

# Navigate to the desired web page
driver.get("https://www.apify.com")

# Define a custom wait condition using JavaScript Executor
def custom_wait_condition(driver):
    # Execute a JavaScript script to check for a specific condition
    result = driver.execute_script("""
        var element = document.getElementById('my-element');
        return (element !== null && element.style.display !== 'none');
    """)
    return result

# Wait for the custom condition to be true
wait = WebDriverWait(driver, 10)
element = wait.until(custom_wait_condition)

# Perform actions on the element
element.click()

# Close the browser
driver.quit()
In the code above, we define a custom_wait_condition function that uses the execute_script method to run a JavaScript script in the context of the current web page. This script checks for the presence and visibility of an element with the ID ''. The function will return true if the element is visible and false if not.
2. BeautifulSoup
This is a parsing library that can be used in combination with other libraries, such as requests to extract information from HTML and XML documents.
A major advantage of using BeautifulSoup over Selenium waits is that it is generally much faster and lightweight, as it doesn't require the full page to load and interact with a browser. This method is especially useful when you are interested in only extracting specific data from a web page and are not focused on automating browser interactions.
Run the command below to install BeautifulSoup:
pip install beautifulsoup4 requests
Here's an example of how it works:
import requests
from bs4 import BeautifulSoup

# URL of the Apify website
url = "https://apify.com/"

# Send a GET request to the URL
response = requests.get(url)

# Parse the HTML content using BeautifulSoup
soup = BeautifulSoup(response.content, "html.parser")

# Find the main content section
main_content = soup.find("div", {"class": "main-content"})

# Extract the title of the page
title = soup.title.string
print("Page Title:", title)

# Extract the text content of the main section
text_content = main_content.get_text()
print("Main Content:", text_content)

# Find all the links on the page
links = [link.get("href") for link in soup.find_all("a")]
print("Links on the page:")
for link in links:
    print(link)

# Find all the images on the page
images = [img.get("src") for img in soup.find_all("img")]
print("Images on the page:")
for image in images:
    print(image)
Here, you make a GET request using the requests.get() to apify.com while using BeautifulSoup to parse the HTML. Then, proceed to find the main content section of the page using the find() method that searches for a div element with the class "main-content" and extracts the page title and the text content of the main section.
Lastly, find all the links and images on the web page using the find_all() method and print them out.
All good things come to those who wait
Remember that the objective is to strike a balance between waiting for the necessary page elements to load and ensuring that your tests are optimized for performance with little to no redundancy.
By carefully implementing the knowledge you've garnered from this tutorial, you'll be able to solve any problem with Selenium waiting for page loads, allowing you to construct more efficient and successful web automation tests.