Content
Hey, we're Apify. The Apify platform gives you access to 1,500+ web scraping and automation tools. Or you can build your own. Check us out.
What is the Page Object Model (POM)?
At its core, the Page Object Model (POM) is a design pattern used in Selenium automation to represent a web application's web pages or components as objects in code. Each web page is associated with a Page Object, and this object encapsulates the page's structure, elements, interactions, and intricacies.

Why is POM essential for Selenium automation?
Imagine a scenario where you have a sizable Selenium test suite. Web pages change, elements get updated, and your tests require frequent adjustments. Without POM, managing this can become a nightmare. Test scripts often get cluttered with web element locators and actions, making them difficult to read and maintain. POM addresses these challenges by introducing the concept of Page Objects.
Think of a Page Object as a blueprint for a web page. It contains methods and properties that allow you to interact with the page's elements (e.g., buttons, text fields, links) and perform actions (e.g., clicking, typing) on them. By creating Page Objects, you achieve a clear separation of concerns: your test scripts focus on test logic, while the Page Objects handle the web page's details.
Advantages of using POM
- Maintainability: In large-scale automation projects, web pages often change. Elements get updated, added, or removed. Without a structured approach like POM, maintaining your test scripts becomes a nightmare. POM allows you to isolate changes to Page Objects, making updates more manageable.
- Readability: POM promotes readable and maintainable test scripts. With Page Objects, your tests become more expressive, as you interact with elements using descriptive method names. This improves the overall clarity of your test cases.
- Reusability: Page Objects are reusable components. When multiple tests interact with the same page, you can use the same Page Object in each test. If the page's structure changes, you only need to update the Page Object, not every test case.
- Scalability: POM scales well with the size of your automation project. As you add more test cases and pages, the structured approach provided by POM keeps your codebase organized and maintainable.
Setting up your environment
Before we dive into implementing the Page Object Model (POM) in Selenium, it's crucial to ensure your development environment is properly configured. In this section, we'll cover the necessary prerequisites and guide you through creating a Python project for Selenium automation.
Prerequisites
To get started with Selenium and the Page Object Model, you'll need the following:
Python: Make sure you have Python installed on your system. You can download the latest version from the official Python website.
Selenium: Install the Selenium WebDriver library using Python's package manager, pip, by running the following command:
pip install seleniumCreating a Selenium Project
Once you have the prerequisites in place, you can create a new Python project for your Selenium automation work by following the steps below, or clone the GitHub repository with the final code for this tutorial.
-
Create a Project Directory: Create a directory in your desired location to store your Selenium project, and then navigate into that directory.
mkdir selenium-pom cd selenium-pom -
Initialize a Python Virtual Environment (Optional): It's a good practice to work within a virtual environment to isolate your project's dependencies. Inside the project directory we created in the previous step, create a virtual environment using the following command:
python -m venv venvActivate the virtual environment:
- On Windows:
venv\\Scripts\\activate - On macOS and Linux:
source venv/bin/activate
- On Windows:
-
Install Selenium: Inside your virtual environment, install Selenium by running the following command:
pip install selenium -
WebDrivers: Selenium requires WebDriver executables for different browsers (e.g., Chrome, Firefox). You'll need to download the WebDriver for your preferred browser and ensure it's accessible from your system's PATH. You can find WebDriver downloads and installation instructions on the official Selenium website.
-
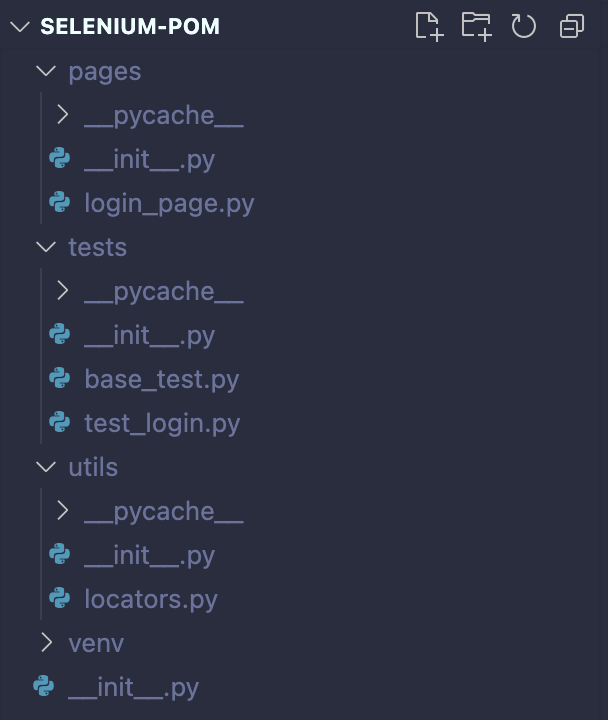
Create Python Files and organize your project: To organize our Selenium project, we will create Python files for Page Objects, test scripts, and any additional utilities we might require. We can structure our project by creating directories to categorize these components. This will help us keep our code base clean, easy to understand, and maintainable. As an example, here is the directory structure of the project we will work on during this article:
project_root/
├── page_objects/
│   ├── login_page.py
│   └── ...
├── test_cases/
│   ├── base_test.py
│   ├── test_login.py
│   └── ...
├── utils/
│   ├── locators.py
│   └── ...
├── ...
Great, your environment is now set up and ready for Selenium automation with the Page Object Model. In the upcoming sections, we'll take a deeper look into the practical implementation of POM, starting with creating Page Objects to represent web pages.
Creating Page Objects
What is a Page Object?
A Page Object is a Python class that represents a specific web page or a component of a web page. It encapsulates the structure and behavior of that page, including the web elements (e.g., buttons, input fields) and the actions you can perform on them (e.g., clicking, typing). Page Objects promote code reusability and maintainability by providing a clean and organized way to interact with web elements.
So let’s create our first Page Object:
Step 1: Define the Page Object class
Create a Python class for the web page you want to represent. Give it a meaningful name, typically ending with "Page," to indicate its purpose.
# pages/login_page.py

class LoginPage(object):
    def __init__(self, driver):
        self.driver = driver
In this example, we've created a LoginPage class.
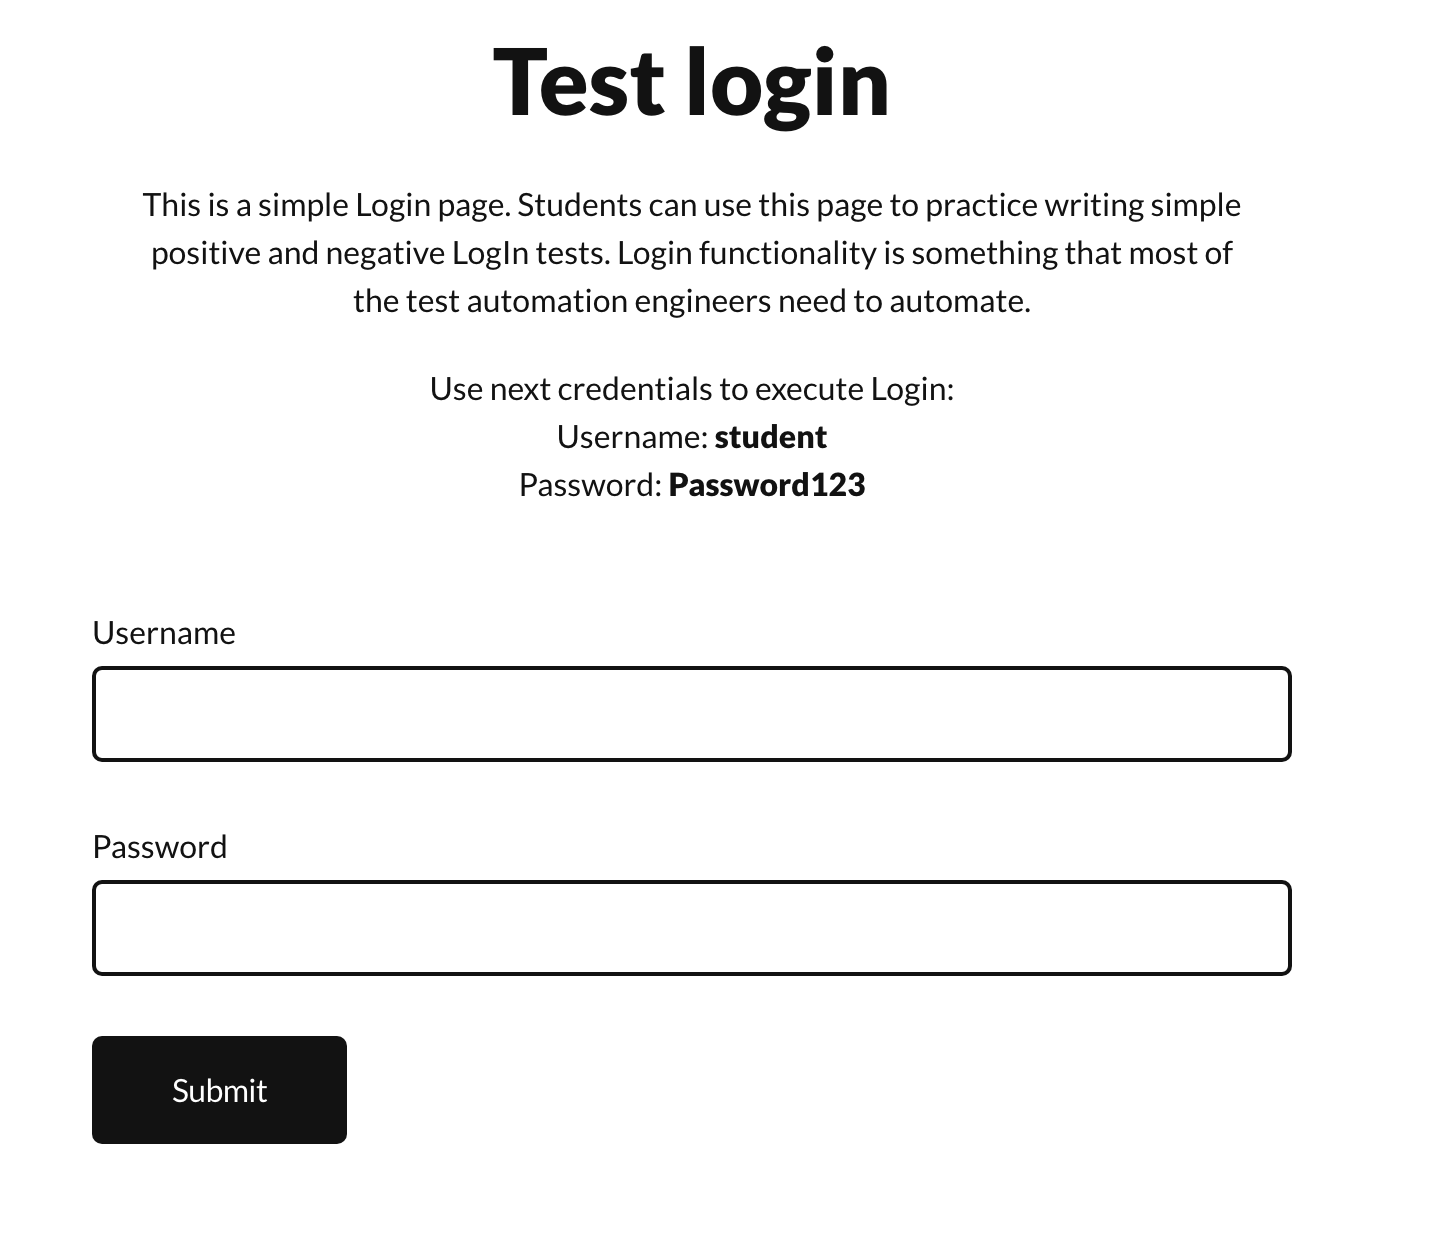
Our goal will be to implement tests for a dummy login page (thanks to Dmitry Shyshkin for the website). We will create tests for three distinct scenarios:
- Login successful: User entered valid credentials.
- Invalid username: User entered an invalid username.
- Invalid password: User entered an invalid password.
Step 2: Define web elements and actions
Now we need a way to access the web elements and actions from within the Page Object class. To keep things organized, we created a separate file under the utils directory to house all the locators we need:
# utils/locator.py
from selenium.webdriver.common.by import By
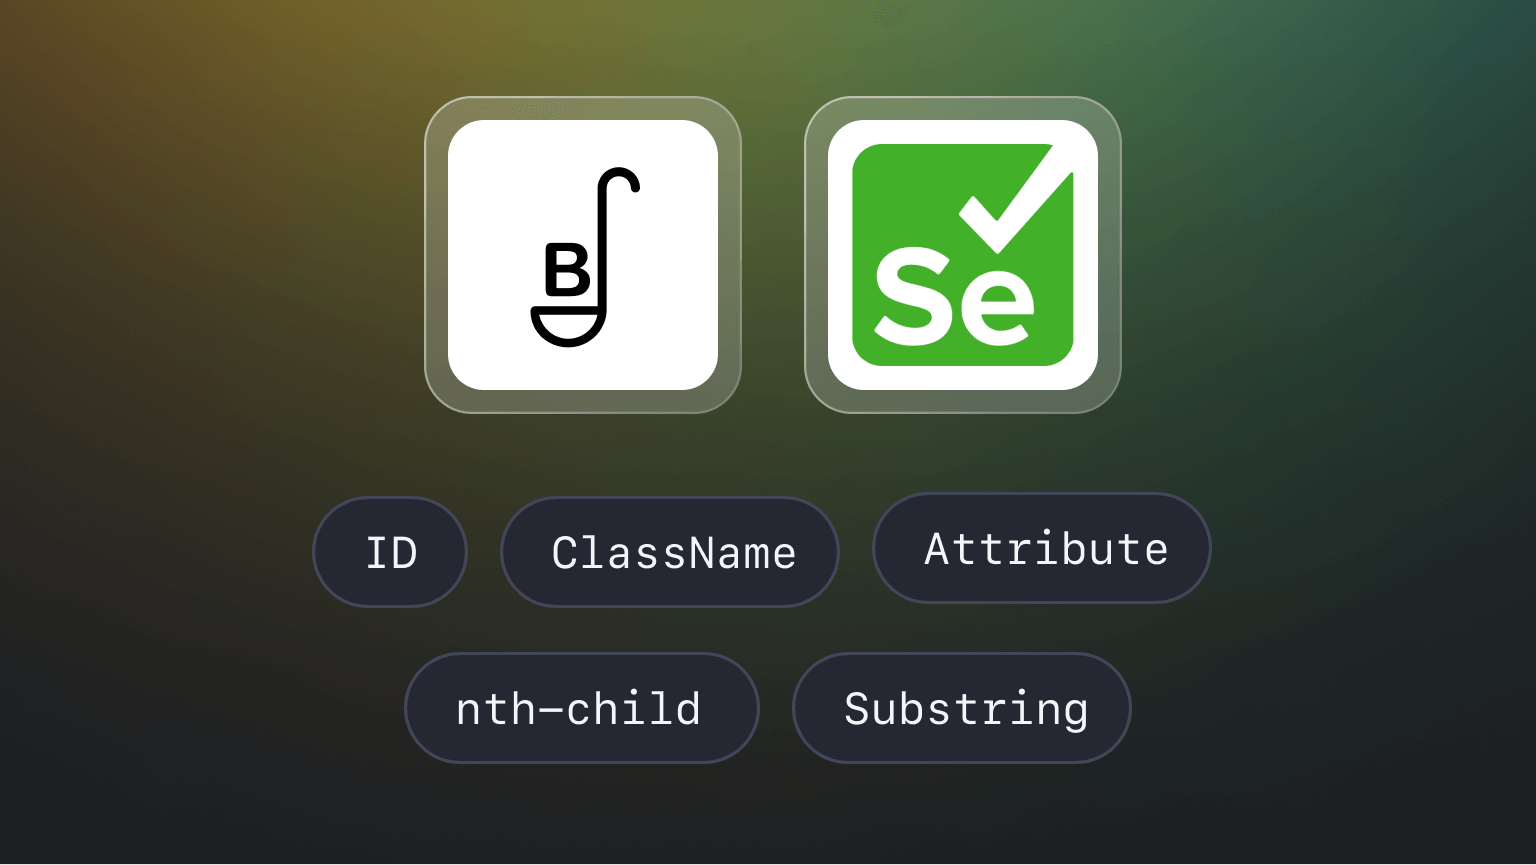
class LoginPageLocators(object):
USERNAME = (By.ID, 'username')
PASSWORD = (By.ID, 'password')
SUBMIT = (By.ID, 'submit')
ERROR_MESSAGE = (By.ID, 'error')
Here, we've defined the elements USERNAME, PASSWORD, SUBMIT and ERROR_MESSAGE based on the elements’ IDs found on the target website.
Once this is done, we have to import locator.py and its contents into the login_page.py file.
# login_page.py

from utils.locators import *

class LoginPage(object):
    def __init__(self, driver):
        # Initialize the LoginPage object with a WebDriver instance.
        self.driver = driver
        # Import the locators for this page.
        self.locator = LoginPageLocators
Step 3: Implement methods
Still, within the login_page.py file, our task is to define methods that represent the interactions we want to happen on the web page.
All three previously discussed test cases involve attempting to log into an account. This login process essentially involves entering the username, and password, and then clicking the "Submit" button.
With these requirements in mind, we can design methods that precisely execute these actions. For example, the enter_username method locates the username input field and inputs the provided username using the send_keys function. The other methods in this class follow the same idea:
# login_page.py

from utils.locators import *
from selenium.webdriver.support.ui import WebDriverWait
from selenium.webdriver.support import expected_conditions as EC

# Define a class named LoginPage.
class LoginPage(object):
    def __init__(self, driver):
        # Initialize the LoginPage instance with a WebDriver object and locators.
        self.driver = driver
        self.locator = LoginPageLocators

    # Define a function to wait for the presence of an element on the page.
    def wait_for_element(self, element):
        WebDriverWait(self.driver, 5).until(
            EC.presence_of_element_located(element)
        )

    # Define a function to enter a username into the corresponding input field.
    def enter_username(self, username):
        # Wait for the presence of the username input element.
        self.wait_for_element(self.locator.USERNAME)
        # Find the username input element and send the username string to it.
        self.driver.find_element(*self.locator.USERNAME).send_keys(username)

    # Define a function to enter a password into the corresponding input field.
    def enter_password(self, password):
        # Wait for the presence of the password input element.
        self.wait_for_element(self.locator.PASSWORD)
        # Find the password input element and send the password string to it.
        self.driver.find_element(*self.locator.PASSWORD).send_keys(password)

    # Define a function to click the login button.
    def click_login_button(self):
        # Wait for the presence of the login button element.
        self.wait_for_element(self.locator.SUBMIT)
        # Find the login button element and click it.
        self.driver.find_element(*self.locator.SUBMIT).click()

    # Define a function to perform a complete login by entering username and password.
    def login(self, username, password):
        self.enter_username(username)
        self.enter_password(password)
        self.click_login_button()

    # Define a function to perform a login with valid user credentials.
    def login_with_valid_user(self):
        self.login("student", "Password123")
        # Return a new instance of LoginPage after the login action.
        return LoginPage(self.driver)

    # Define a function to perform a login with an invalid username and return the error message.
    def login_with_invalid_username(self):
        self.login("student23", "Password123")
        # Wait for the presence of the error message element.
        self.wait_for_element(self.locator.ERROR_MESSAGE)
        # Return the text content of the error message element.
        return self.driver.find_element(*self.locator.ERROR_MESSAGE).text

    # Define a function to perform a login with an invalid password and return the error message.
    def login_with_invalid_password(self):
        self.login("student", "Password12345")
        # Wait for the presence of the error message element.
        self.wait_for_element(self.locator.ERROR_MESSAGE)
        # Return the text content of the error message element.
        return self.driver.find_element(*self.locator.ERROR_MESSAGE).text
You might have noticed that the three last methods are a little different. These methods use the high-level login method we defined to perform the login action with the specified username and password combinations. We will soon employ these methods to run tests to evaluate our test cases.
Writing test cases with POM
With the Page Object in place, we can now incorporate it into our test scripts. But first, in the pursuit of maintaining modularity and organization within our code, let’s create a base_test.py file.
The purpose of this file is to serve as a repository for all the shared logic used across our tests. By centralizing this logic, we establish a convenient reference point whenever we need to generate new test files.
## base_test.py

import unittest
from selenium import webdriver

# Define a test class named BaseTest that inherits from unittest.TestCase.
class BaseTest(unittest.TestCase):

    # This method is called before each test case.
    def setUp(self):
        # Create a Chrome WebDriver instance.
        self.driver = webdriver.Chrome()
        # Navigate to the specified URL.
        self.driver.get("<https://practicetestautomation.com/practice-test-login/>")

    # This method is called after each test case.
    def tearDown(self):
        # Close the WebDriver, terminating the browser session.
        self.driver.close()

# Check if this script is the main module to be executed.
if __name__ == "__main__":
   # Run the test cases defined in this module
   unittest.main(verbosity=1)
Test case 1: Logging in with valid user credentials
Now that our base test is set up, we can begin developing the logic for our login test.
## test_login.py
from tests.base_test import BaseTest
from pages.login_page import LoginPage
# Define a test class named TestLogin that inherits from BaseTest.
class TestLogin(BaseTest):
# Define the first test method, which tests login with valid user credentials.
def test_login_with_valid_user(self):
# Initialize a LoginPage object with the self.driver attribute
login_page = LoginPage(self.driver)
# Call the login_with_valid_user method on the login_page object
login_page.login_with_valid_user()
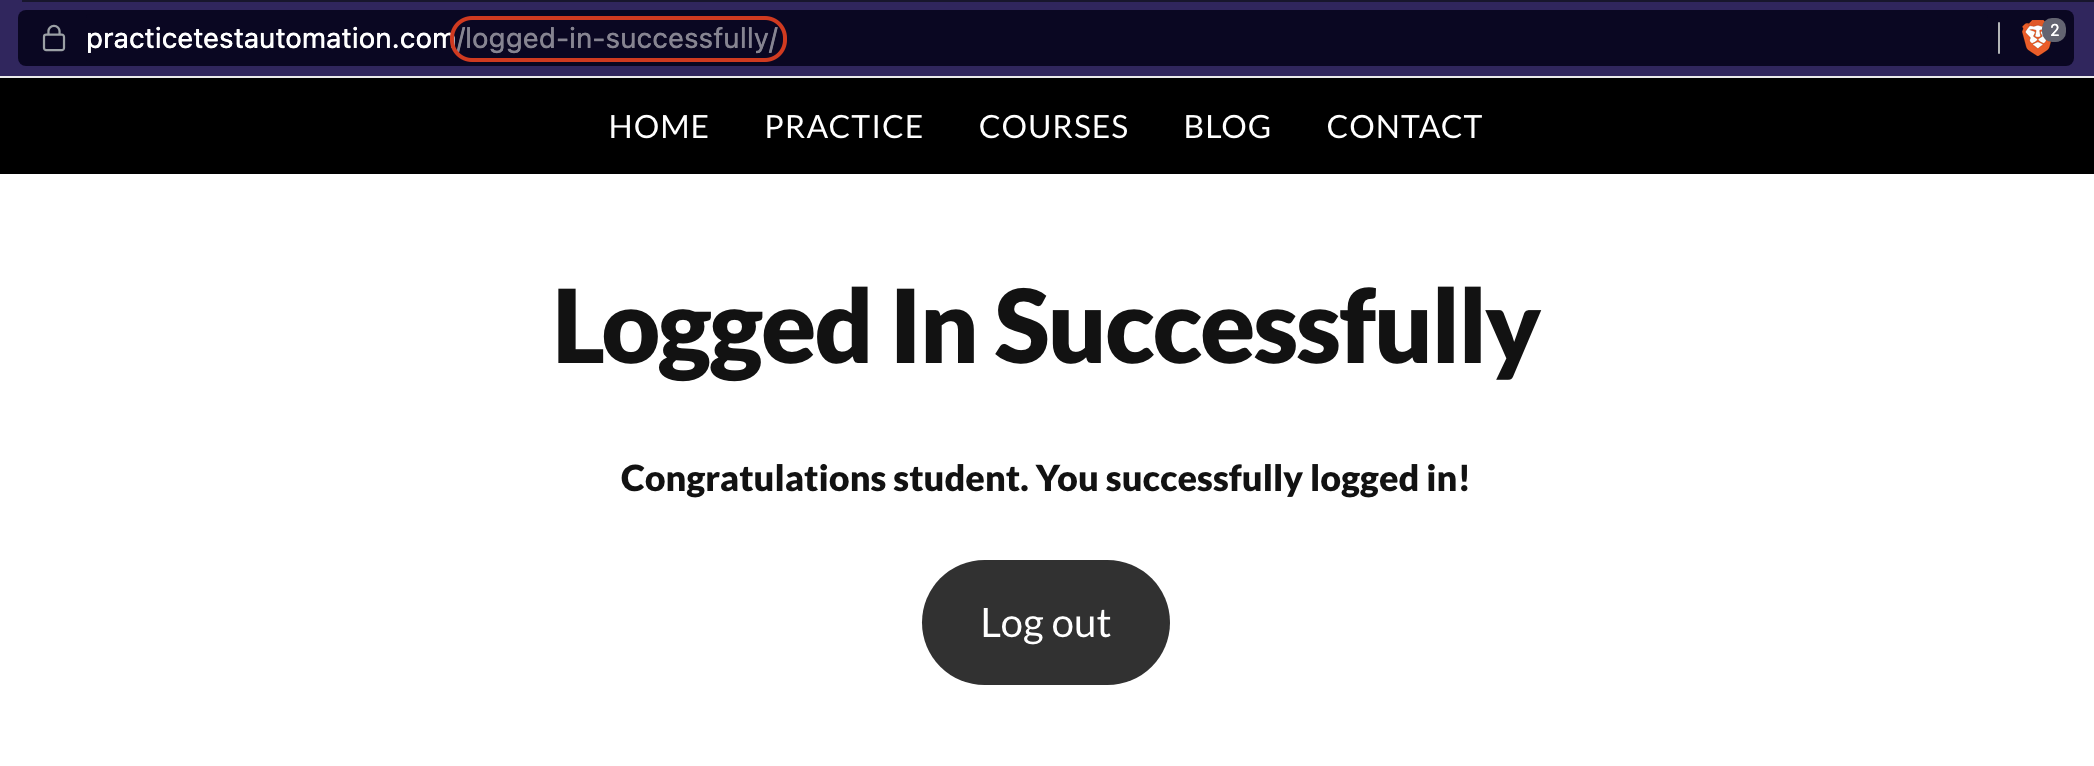
# Use self.assertIn to check if the string "logged-in-successfully"
# is present in the current URL of the driver. If present, the test passes.
self.assertIn("logged-in-successfully", self.driver.current_url)
The defined method test_login_with_valid_user serves as a test for our initial scenario: logging in using valid user credentials. For the test to succeed, we should see the text "logged-in-successfully" in the URL of the webpage right after submitting our credentials. If that’s the case, a positive test feedback message will be printed in our terminal.
To run the method, type the following command in your terminal:
python3 -m unittest tests.test_login.TestLogin.test_login_with_valid_user

Test case 2: Logging in with an invalid username
With the method for our first test case out of the way, let’s move on to the second scenario: logging in with an invalid username.
## test_login.py

# ...

# Define the second test method, which tests login with an invalid username.
    def test_login_with_invalid_username(self):
        # Initialize a LoginPage object with the self.driver attribute.
        login_page = LoginPage(self.driver)

        # Call the login_with_invalid_username method on the login_page object.
        # Assign the result to the variable result (error message).
        result = login_page.login_with_invalid_username()

        # Use self.assertIn to check if the string "Your username is invalid!" is
        # present in the result. If present, the test passes.
        self.assertIn("Your username is invalid!", result)
The method test_login_with_invalid_username tests for the second scenario: trying to log in using an invalid username. For the test to succeed, we should see the error message "Your username is invalid!" displayed on the screen right after clicking the “Submit” button. If that’s the case, the test passes.
To run the method, type the following command in your terminal:
python -m unittest tests.test_login.TestLogin.test_login_with_invalid_username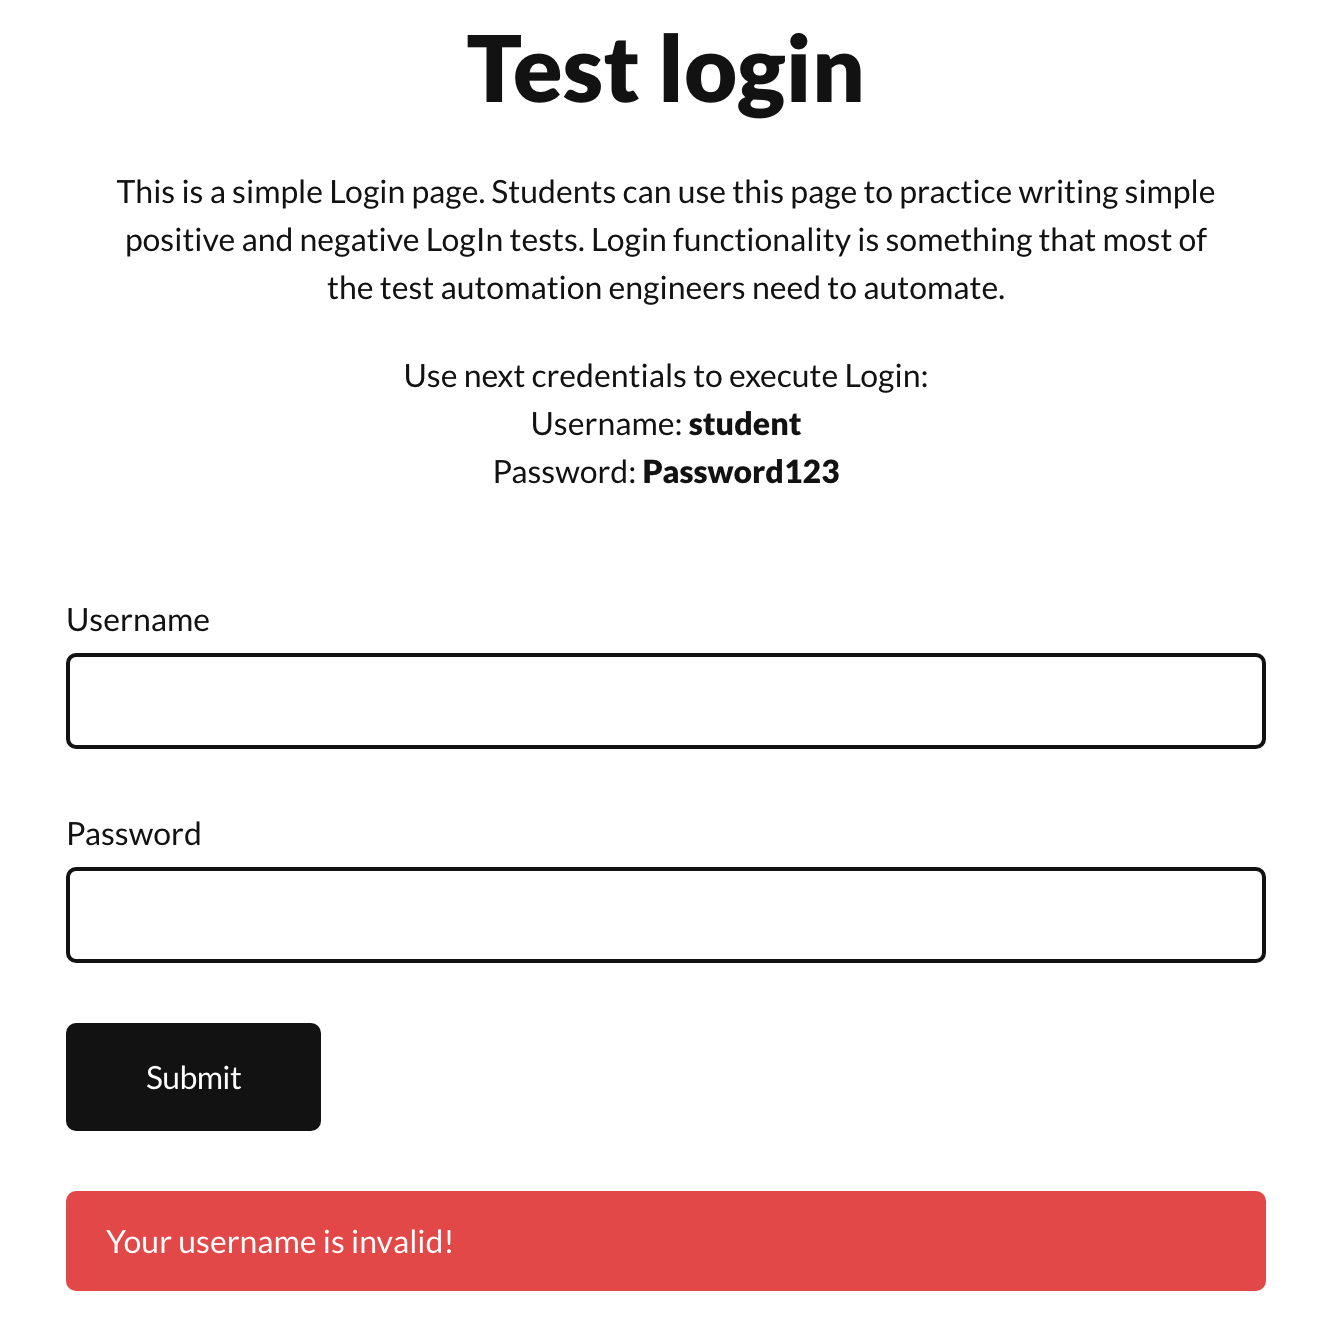
Test case 3: Logging in with an invalid password
Similar to the previous method, the method checks for a particular error message that should be displayed when the user enters a valid username together with an invalid password. The logic is almost the same, except that, this time, we should expect a different error message to be displayed.
# login_test.py

# ...

# Define the third test method, which tests login with an invalid password.
    def test_login_with_invalid_password(self):
        # Initialize a LoginPage object with the self.driver attribute.
        login_page = LoginPage(self.driver)

        # Call the login_with_invalid_password method on the login_page object.
        # Assign the result (error message) to the variable result.
        result = login_page.login_with_invalid_password()

        # Use self.assertIn to check if the string "Your password is invalid!" is
        # present in the result. If present, the test passes.
        self.assertIn("Your password is invalid!", result)
The method test_login_with_invalid_password tests for the third scenario: trying to log in using an invalid password. For the test to be successful, we should see the error message "Your password is invalid!" displayed on the screen immediately after clicking the "Submit" button. If this message appears, it signifies a passing test.
To run the method, type the following command in your terminal:
python -m unittest tests.test_login.TestLogin.test_login_with_invalid_password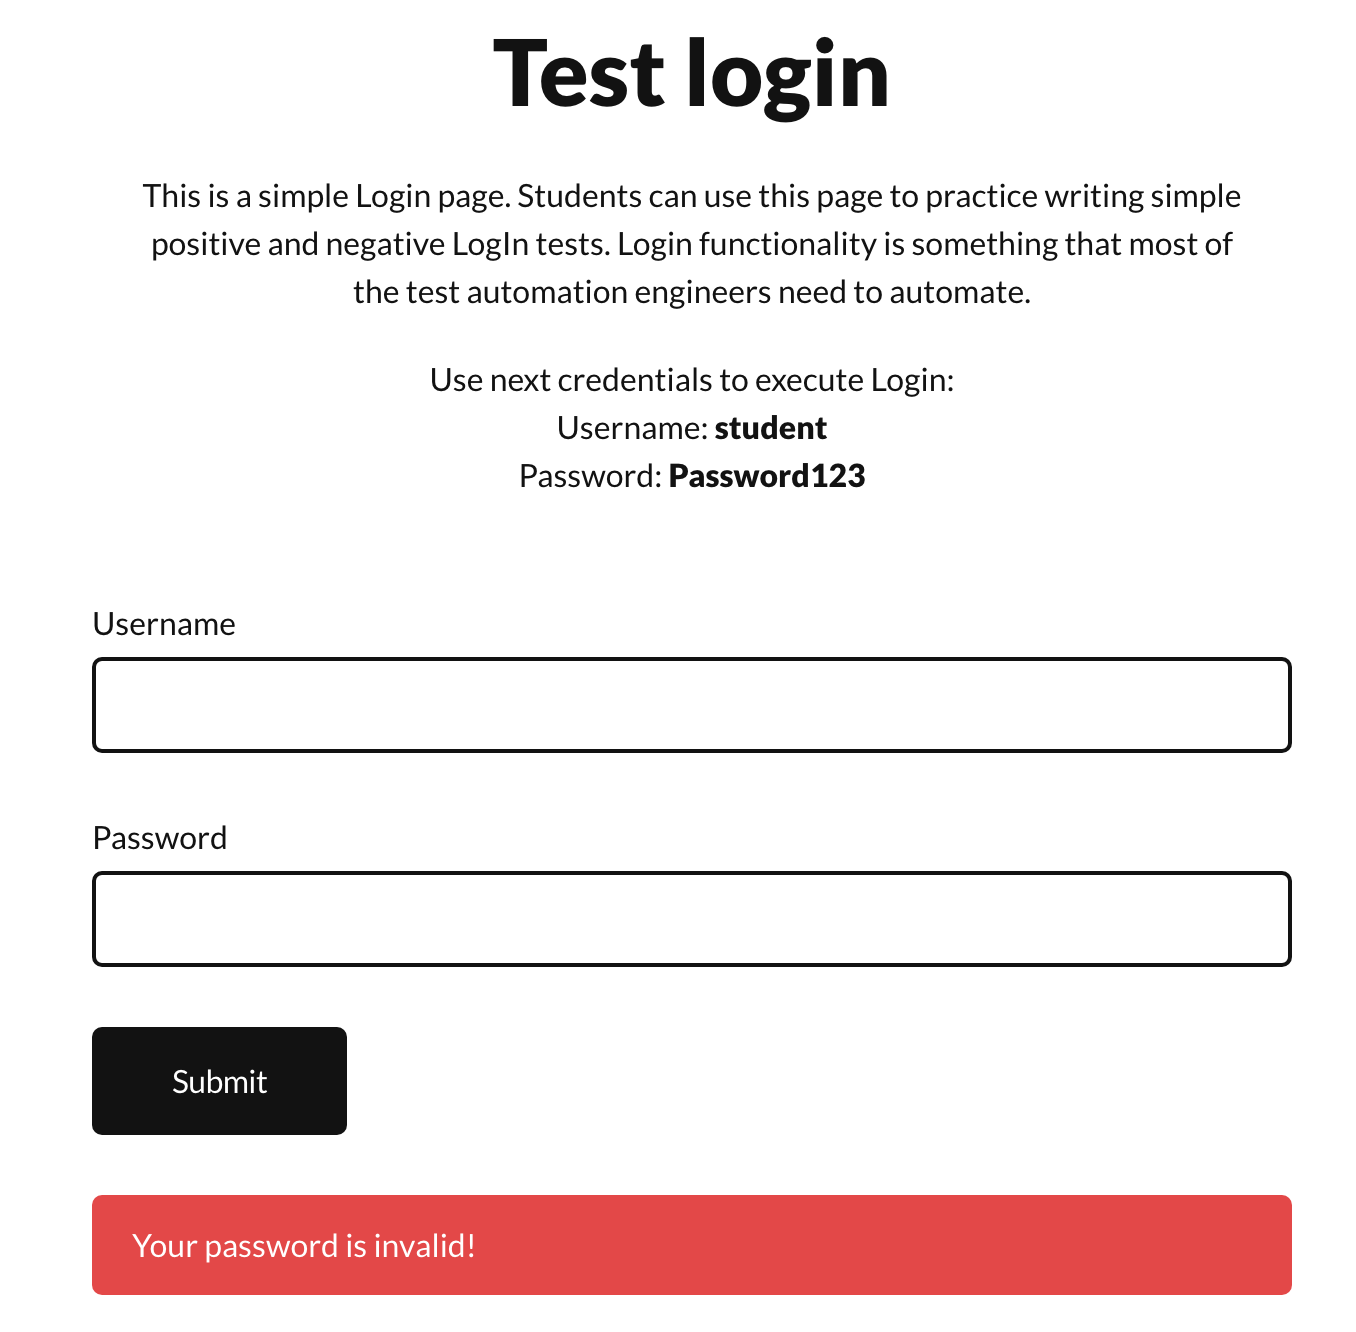
Running all tests
Now that we have all three methods ready, we may want to execute them all together to test all of our test cases simultaneously. Here is the complete code:
from tests.base_test import BaseTest
from pages.login_page import LoginPage

# Define a test class named TestLogin that inherits from BaseTest.
class TestLogin(BaseTest):
    # Define the first test method, which tests login with valid user credentials.
    def test_login_with_valid_user(self):
        # Initialize a LoginPage object with the self.driver attribute,
        # which is likely a WebDriver instance for interacting with web pages.
        login_page = LoginPage(self.driver)

        # Call the login_with_valid_user method on the login_page object,
        # which is expected to perform a login action with valid credentials.
        login_page.login_with_valid_user()

        # Use self.assertIn to check if the string "logged-in-successfully"
        # is present in the current URL of the driver. If present, the test passes.
        self.assertIn("logged-in-successfully", self.driver.current_url)

    # Define the second test method, which tests login with an invalid username.
    def test_login_with_invalid_username(self):
        # Initialize a LoginPage object with the self.driver attribute.
        login_page = LoginPage(self.driver)

        # Call the login_with_invalid_username method on the login_page object.
        # Assign the result (likely an error message) to the variable result.
        result = login_page.login_with_invalid_username()

        # Use self.assertIn to check if the string "Your username is invalid!" is
        # present in the result. If present, the test passes.
        self.assertIn("Your username is invalid!", result)

    # Define the third test method, which tests login with an invalid password.
    def test_login_with_invalid_password(self):
        # Initialize a LoginPage object with the self.driver attribute.
        login_page = LoginPage(self.driver)

        # Call the login_with_invalid_password method on the login_page object.
        # Assign the result (likely an error message) to the variable result.
        result = login_page.login_with_invalid_password()

        # Use self.assertIn to check if the string "Your password is invalid!" is
        # present in the result. If present, the test passes.
        self.assertIn("Your password is invalid!", result)
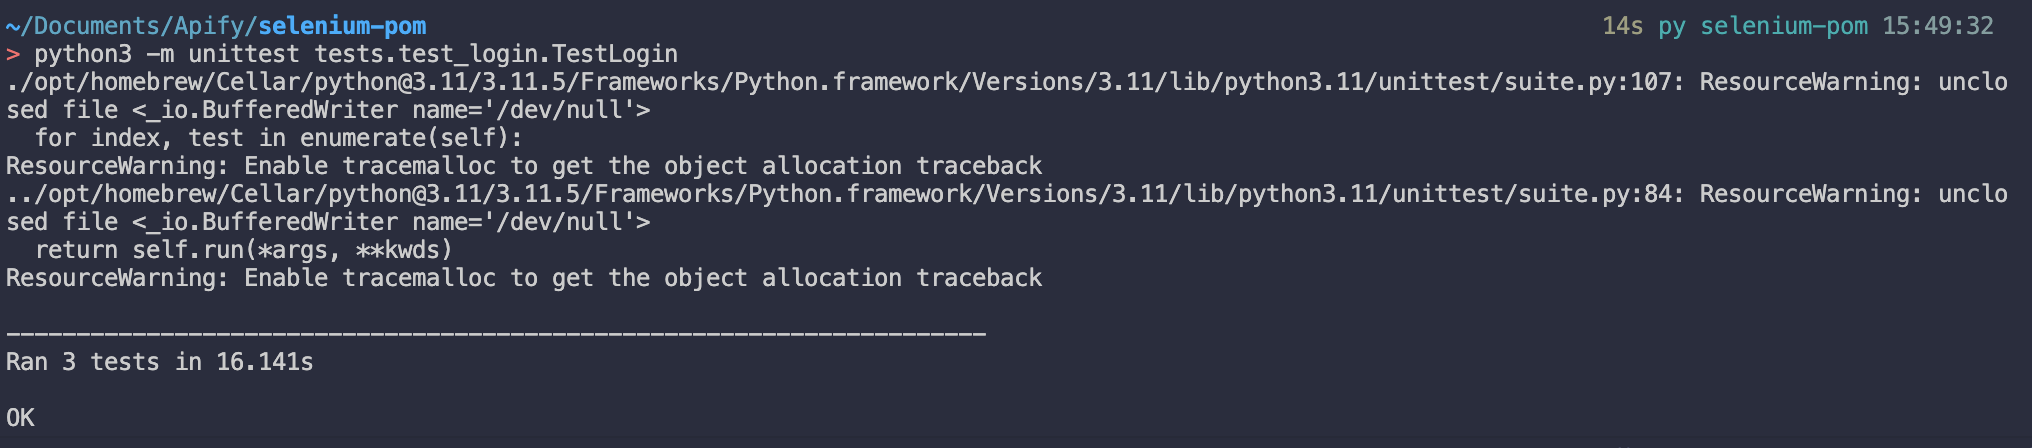
To run all methods in the TestLogin class at once, type the following command in your terminal:
python -m unittest tests.test_login.TestLoginAfter a few seconds, you should see a similar message displayed on your terminal:
Handling page navigation and dynamic elements
In web testing and automation, it's common to encounter scenarios where web pages have dynamic elements, or your test cases require navigation between different pages. The Page Object Model (POM) provides an organized way to handle these challenges.
Handling dynamic elements
Dynamic elements are elements on a web page that may load or change after the initial page load. Examples include elements that appear after a delay, elements generated via JavaScript, or elements with dynamic IDs or attributes.
To handle dynamic elements with POM:
- Include Dynamic Elements in Page Objects: In your Page Object class, include dynamic elements as attributes. You can locate these elements using Selenium locators just like any other element.
- Use Explicit Waits: To ensure that dynamic elements are fully loaded before interacting with them, use Selenium's explicit waits. Explicit waits allow you to wait for specific conditions to be met before proceeding with the test.
Here's an example of how we used an explicit wait within our login Page Object to enhance the reliability of the tests we've just created:
## login_page.py

from utils.locators import *
from selenium.webdriver.support.ui import WebDriverWait
from selenium.webdriver.support import expected_conditions as EC

class LoginPage(object):
    def __init__(self, driver):
        self.driver = driver
        self.locator = LoginPageLocators

    # Define a function to wait for the presence of an element on the page.
    def wait_for_element(self, element):
        WebDriverWait(self.driver, 5).until(
            EC.presence_of_element_located(element)
        )

    def enter_username(self, username):
        # Wait for the presence of the username input element.
        self.wait_for_element(self.locator.USERNAME)
        self.driver.find_element(*self.locator.USERNAME).send_keys(username)

# ...
In this example, the wait_for_element method waits for the element to be present using an explicit wait before running the rest of the code.
Handling page navigation
With POM, you can encapsulate page navigation within Page Objects, making your test scripts more modular.
To handle page navigation with POM:
Step 1: Include Navigation Methods in Page Objects: Create methods within your Page Objects for navigating to other pages. For example, you can have a go_to_dashboard method in a HomePage Page Object.
# home_page.py

class HomePage:
    # ...

    def go_to_dashboard(self):
        self.driver.find_element(*self.dashboard_link).click()
Step 2: Reuse Page Objects: After navigating to a new page, you can create an instance of the corresponding Page Object to continue interacting with that page. This promotes code reusability and maintains a clear structure.
Here's an example of navigating from the login page to the dashboard page using Page Objects:
# Import necessary Page Objects
from login_page import LoginPage
from home_page import HomePage

# ...

# Instantiate LoginPage Page Object and perform login
login_page = LoginPage(driver)
login_page.enter_username('your_username')
login_page.enter_password('your_password')
login_page.click_login_button()

# Instantiate HomePage Page Object after successful login
home_page = HomePage(driver)

# Navigate to the dashboard page
home_page.go_to_dashboard()

# Create a DashboardPage Page Object to interact with the dashboard
dashboard_page = DashboardPage(driver)

# Perform actions on the dashboard page
dashboard_page.view_orders()
dashboard_page.logout()

# ...
By encapsulating page navigation and dynamic element handling within Page Objects, you maintain a structured and organized approach to your Selenium automation, making your test scripts more robust and maintainable.
Running tests and reporting
Running your Selenium tests and generating reports are essential steps in any automation project. So far, we’ve been using running our tests using unittest . While Selenium test runners provide basic feedback, it's helpful to generate more informative test reports. We can achieve this by integrating test reporting libraries or frameworks.
For example, we can use pytest and the pytest-html plugin to create basic HTML test reports for better visibility into our automation results.
Generating Basic Test Reports
Install pytest-html:
pip install pytest-html
Run Tests with pytest and Generate HTML Report:
pytest --html=report.html test_login.py
This command will run your tests and generate an HTML report named report.html.
View the HTML report:
Open the generated HTML report in a web browser to see detailed test results, including passed and failed test cases, error messages, and timestamps.
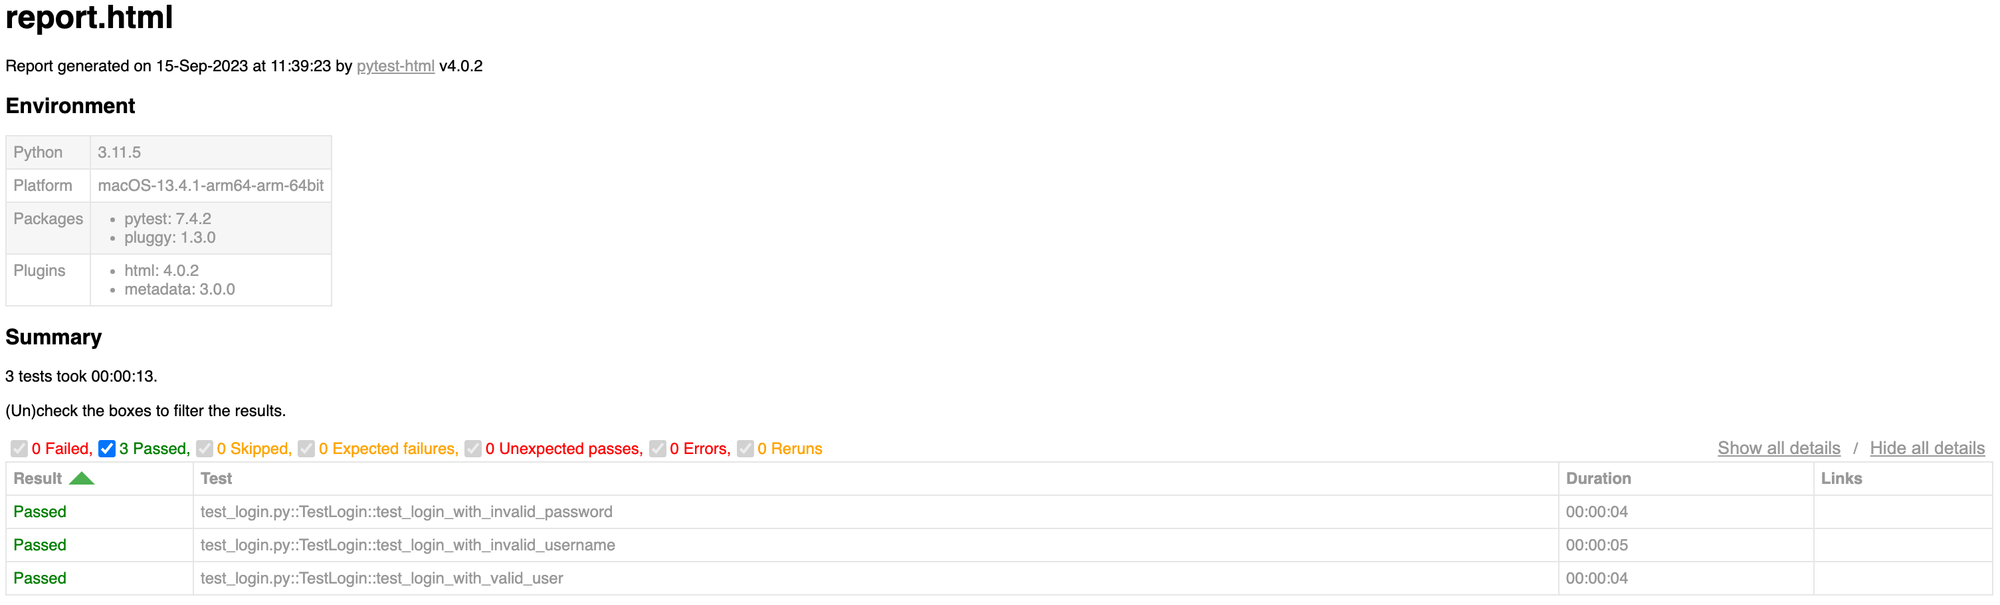
This basic reporting setup provides a visual representation of our test execution, making it easier to identify issues and share results with our team.
Remember that there are more advanced reporting and test management tools available that you can integrate into your automation framework for more comprehensive reporting, such as Allure, TestNG, or ExtentReports. But that’s a topic for another article 😉
Read more about Selenium
In this tutorial, we've explored the Page Object Model (POM) and how it can make our Selenium automation projects more scalable, readable, and, overall, more professional. But there's much more to Selenium and web automation, so check out our other Selenium posts:
🔖 Playwright vs. Selenium: which one to use for web scraping?
🔖 Puppeteer vs. Selenium for automation
🔖 Cypress vs. Selenium: choosing the right web testing and automation framework
🔖 Selenium Webdriver: how to handle popups
🔖 Selenium Webdriver: how to handle iframes
🔖 Selenium Grid: what it is and how to set it up
🔖 Web scraping with Selenium