If you’ve ever built an Apify Actor, you’ve probably started with a simple script and thought: “This works great for me, but how do I make it work great for others?”
The answer is Actor schemas — a structured way to define how your Actor behaves. Schemas determine how Actors interact with users, other Actors, integrations, and LLMs; they also validate data and expose output.
In this post, we’ll walk through eight levels of schema usage — from the most basic actor.json to advanced integrations with output_schema.json.
We’ll use a real example Actor called StoryMaker 2025 – a generative tool that writes book chapters based on user input, like an AI ghostwriter for serialized novels.
Why this use case?
Imagine you’re a writer who spends way too much time writing long-running web novels on platforms like Royal Road or Patreon. You start thinking, what if I could automate the process of creating serialized content, chapter by chapter, with AI?
Enter StoryMaker, an Apify Actor that generates entire stories from a few input prompts.
Each schema we’ll define below improves how users interact with this Actor, making it easier to use, safer to run, and more useful to integrate.
Level 0 – actor.json: The foundation
Every Actor starts with an actor.json.
This file defines the Actor’s name, description, Dockerfile, and other essential metadata.
At this level, you don’t have a user interface or structured output yet — just a working script that logs output to Apify Console.
{
  "actorSpecification": 1,
  "name": "output-schemas-example",
  "title": "StoryMaker 2025",
  "description": "This Actor generates chapters for books based on your input.",
  "version": "0.0",
  "buildTag": "latest",
  "meta": {
    "templateId": "js-empty"
  },
  "dockerfile": "../Dockerfile",
}
Level 1 – input_schema.json: Adding a user interface and input validation
Once you have a working Actor, the next step is to make it user and AI-friendly.
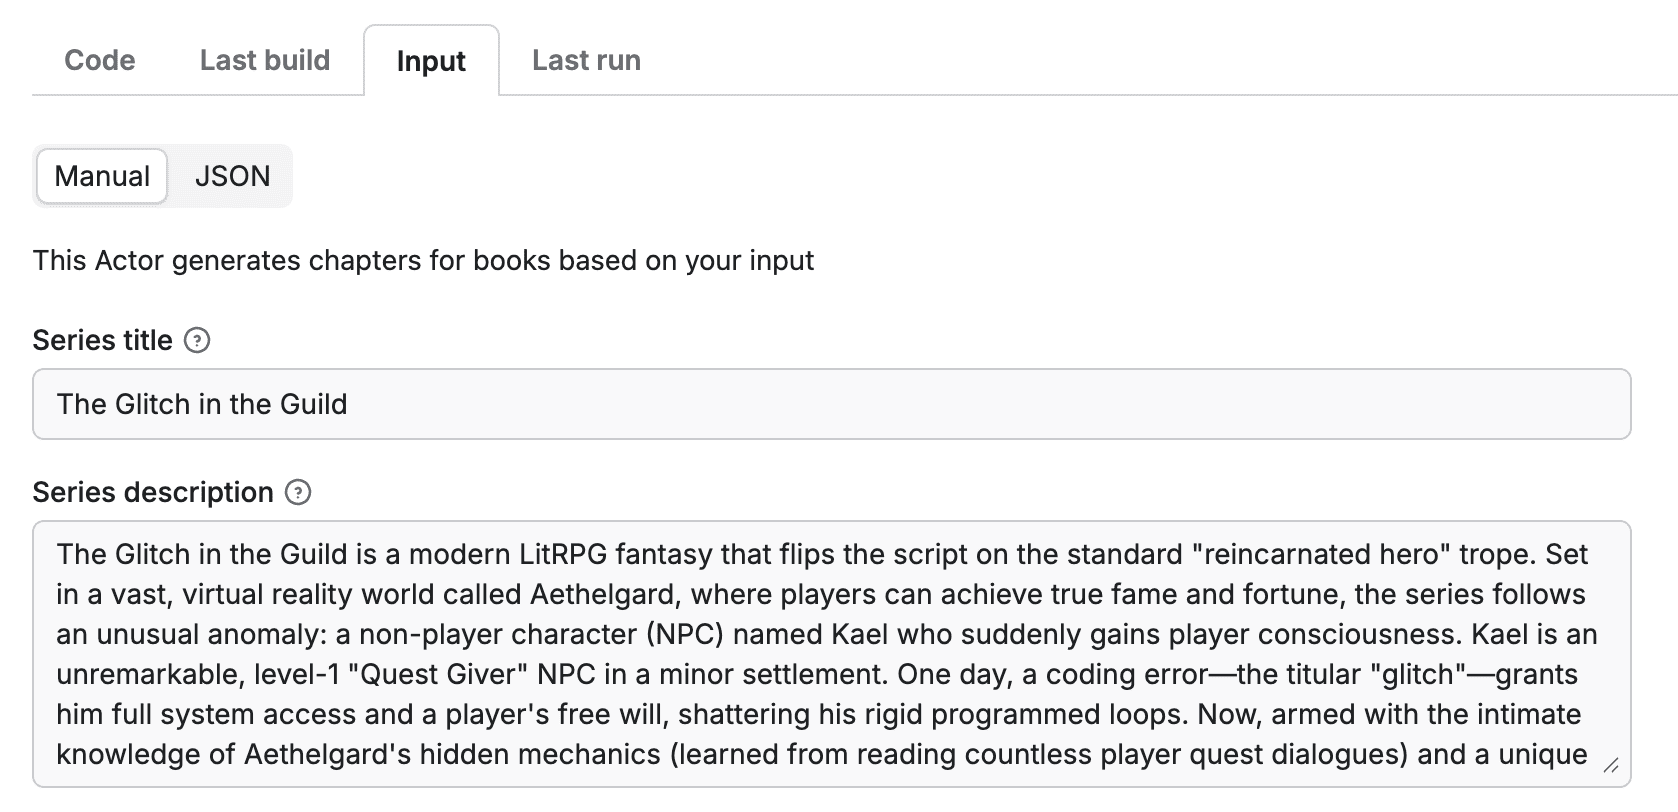
input_schema.json defines the UI that appears when users run your Actor on Apify — no code changes needed.
In StoryMaker’s case, users can specify the series title, main character, series description, and much more – directly in a simple form.
// input_schema.json

{
  "title": "StoryMaker 2025",
  "description": "This Actor generates chapters for books based on your input.",
  "type": "object",
  "schemaVersion": 1,
  "properties": {
        "seriesTitle": {
            "title": "Series title",
            "type": "string",
            "description": "Name of the series",
            "editor": "textfield"
        },
        "seriesDescription": {
            "title": "Series description",
            "type": "string",
            "description": "Description of the series",
            "editor": "textarea"
        },
        "mainCharacterDescription": {
            "title": "Main character",
            "type": "string",
            "description": "Describe the main character",
            "editor": "textarea"
        }
    }
}
At this stage, your Actor is interactive: users can input data through the web UI.
Level 2 – Dataset views for structured output
Now that your Actor generates data, you’ll want to display it clearly.
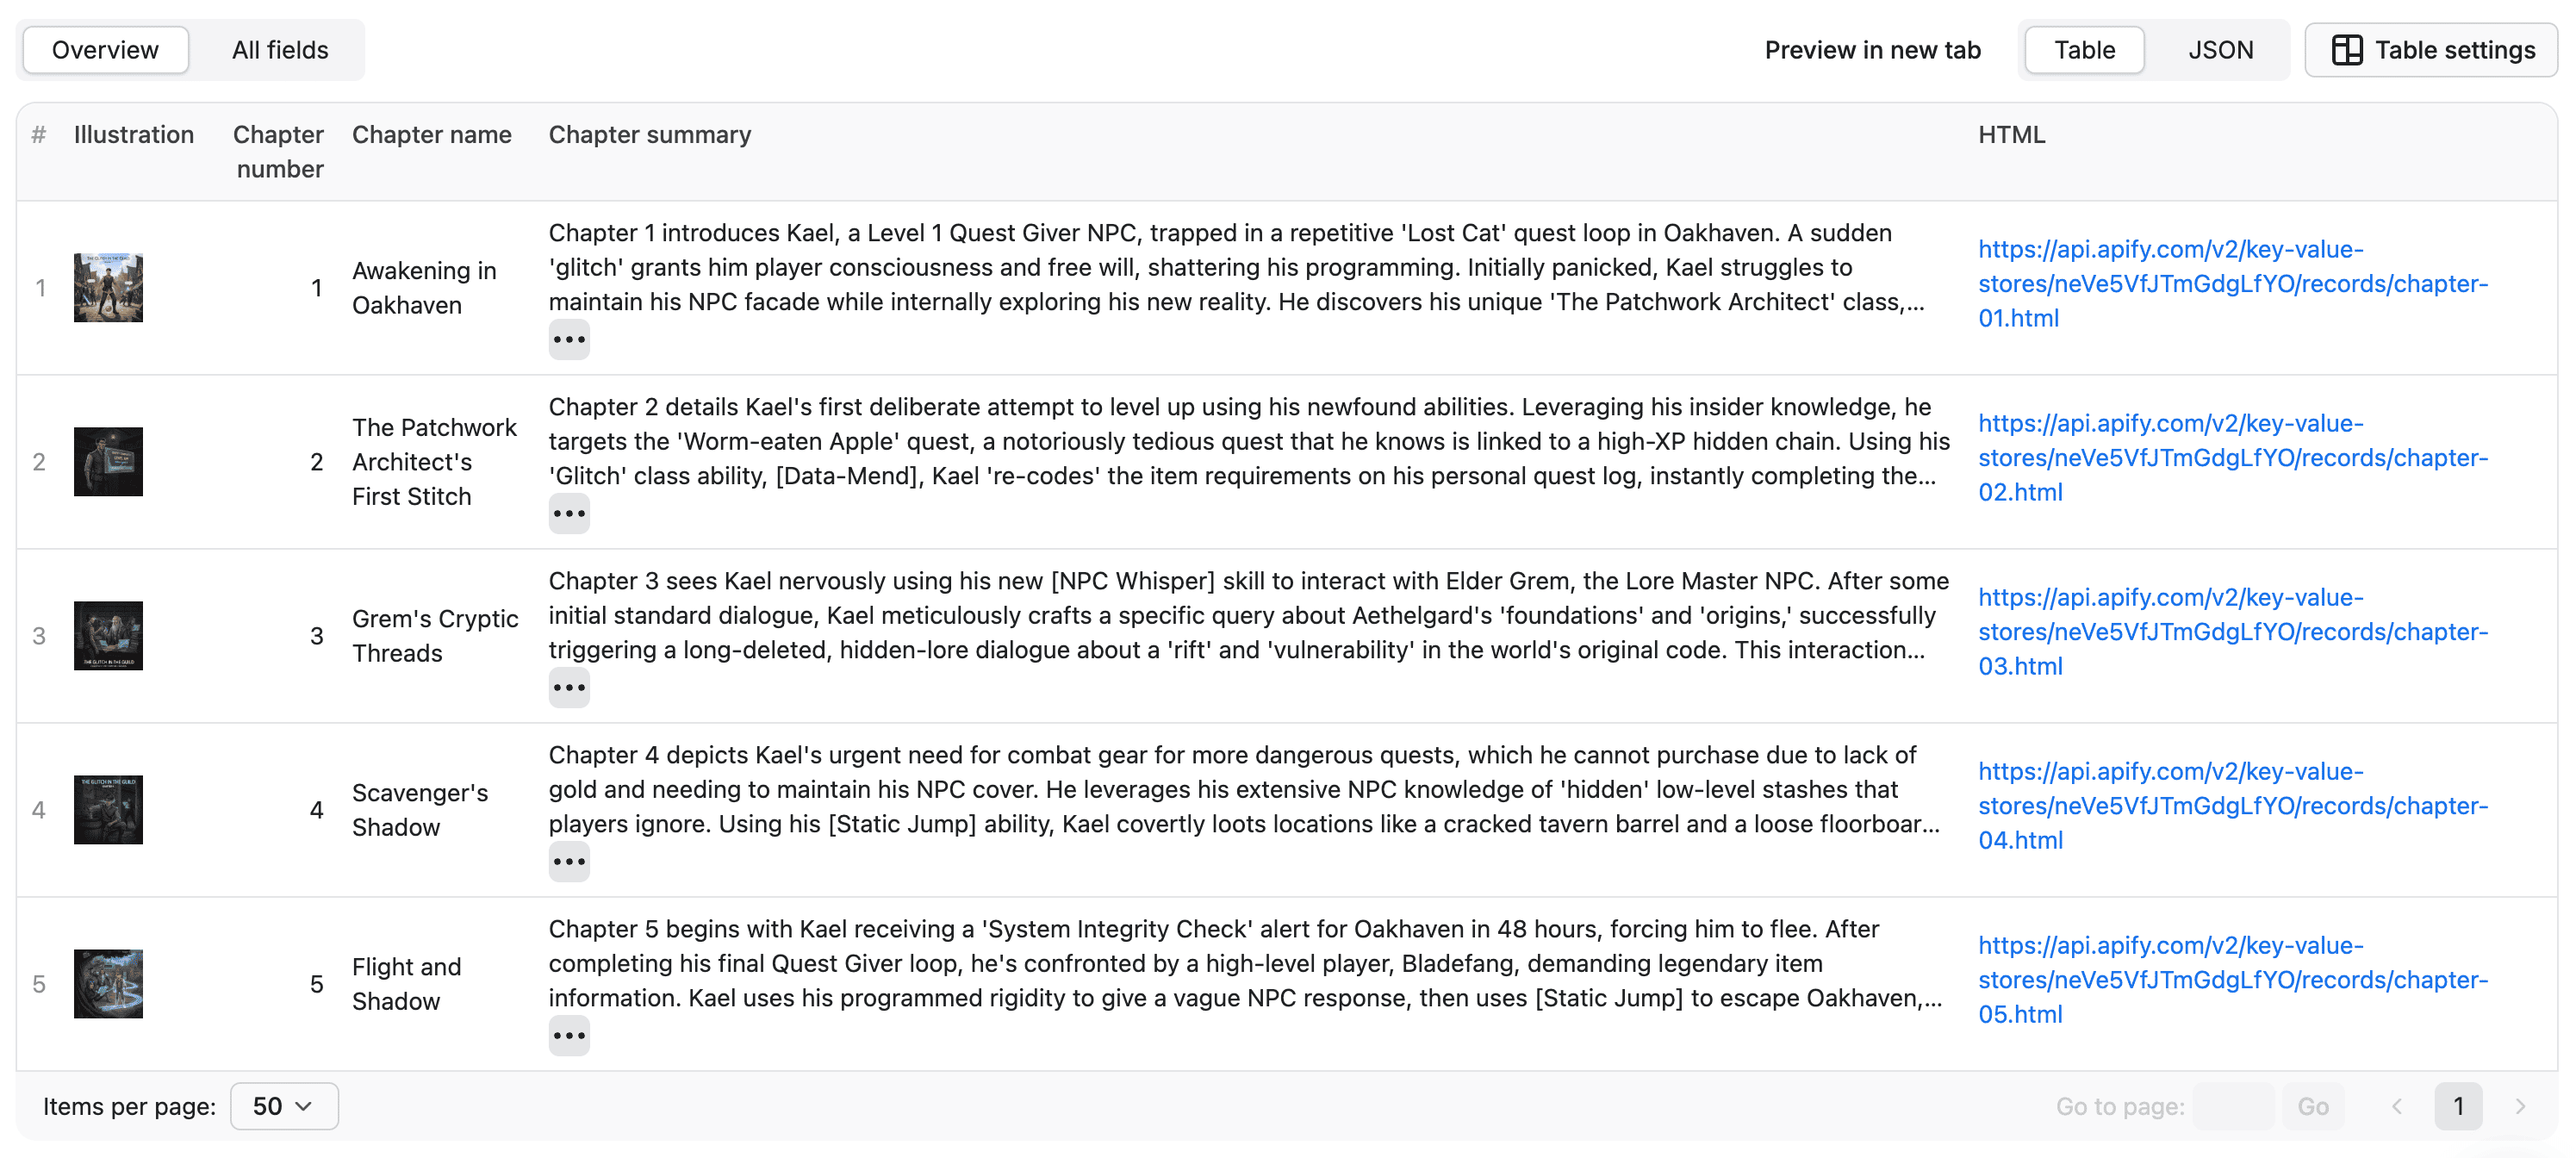
With dataset_schema.json, you can define views for the dataset results, controlling what users see and how.
// dataset_schema.json

{
  "views": {
    "overview": {
      "title": "Overview",
      "transformation": {
        "fields": ["illustrationUrl", "chapterNumber", "chapterName", "summary", "htmlUrl"]
      },
      "display": {
        "component": "table",
        "properties": {
          "illustrationUrl": { "format": "image" },
          "chapterNumber": { "format": "number" },
          "chapterName": { "format": "text" },
          "summary": { "format": "text" },
          "htmlUrl": { "format": "link" }
        }
      }
    }
  }
}
This makes your dataset output more readable and visually appealing.
Level 3 – Dataset fields validation
The second part of dataset_schema.json defines fields — essentially, a schema for what valid dataset items look like.
This helps validate your dataset, prevents incorrect data from being stored, and keeps a consistent shape. If the data you attempt to store in the dataset does not match the schema, the API will return a response with status code 400 and the following JSON response:
{
    "error": {
        "type": "schema-validation-error",
        "message": "Schema validation failed",
        "data": {
            "invalidItems": [{
                "itemPosition": "<array index in the received array of items>",
                "validationErrors": "<Complete list of AJV validation error objects>"
            }]
        }
    }
}
Moreover, when dataset fields exist, we generate a field list and measure the following statistics that can be used for monitoring: null count, empty count, minimum and maximum. You can find more about dataset fields in the docs.
{
    "actorSpecification": 1,
    "fields": {
        "type": "object",
        "properties": {
             "chapterNumber": {
                "type": "number"
            },
            "chapterName": {
                "type": "string"
            },
            "summary": {
                "type": "string",
                "description": "Summary of the chapter which can be used to provide context to AI"
            },
            "htmlUrl": {
                "type": "string",
                "description": "URL of the HTML file with the whole chapter"
            },
            "illustrationUrl": {
                "type": "string",
                "description": "URL of the AI generated illustration"
            }
        },
        "required": [],
        },
    }

Level 4 – web_server_schema.json: Adding an API layer
Most Actors process data behind the scenes. Others serve it through their own HTTP servers —for example, to interact with apps, LLMs, or custom frontends. You can describe these interfaces using the web_server_schema.json.
This schema defines an OpenAPI v3 specification for your Actor’s web server. It can be written directly as an embedded object or referenced as a separate JSON file. That makes it easier for users (or other systems) to know exactly which endpoints exist, what parameters they accept, and what responses to expect.
For example, in StoryMaker 2025, the web server could expose routes to generate, update, or fetch chapters dynamically:
// web_server_schema.json

{
  "openapi": "3.0.3",
  "info": {
    "title": "StoryMaker 2025 API",
    "description": "API for creation of chapters in your web series.",
    "version": "1.0.0"
  },
  "paths": {
    "/chapter/{chapterNumber}": {
      "post": {
        "summary": "Generate a specific chapter",
        "operationId": "generateSpecificChapter"
      }
    }
  }
}
By defining your OpenAPI schema, you make the Actor’s web server API self-describing and discoverable.
This is especially valuable if you plan to connect your Actor to automation tools, third-party integrations, or AI clients that need to interact programmatically with your running Actor.
Level 5 – key_value_store_schema.json: Managing data collections
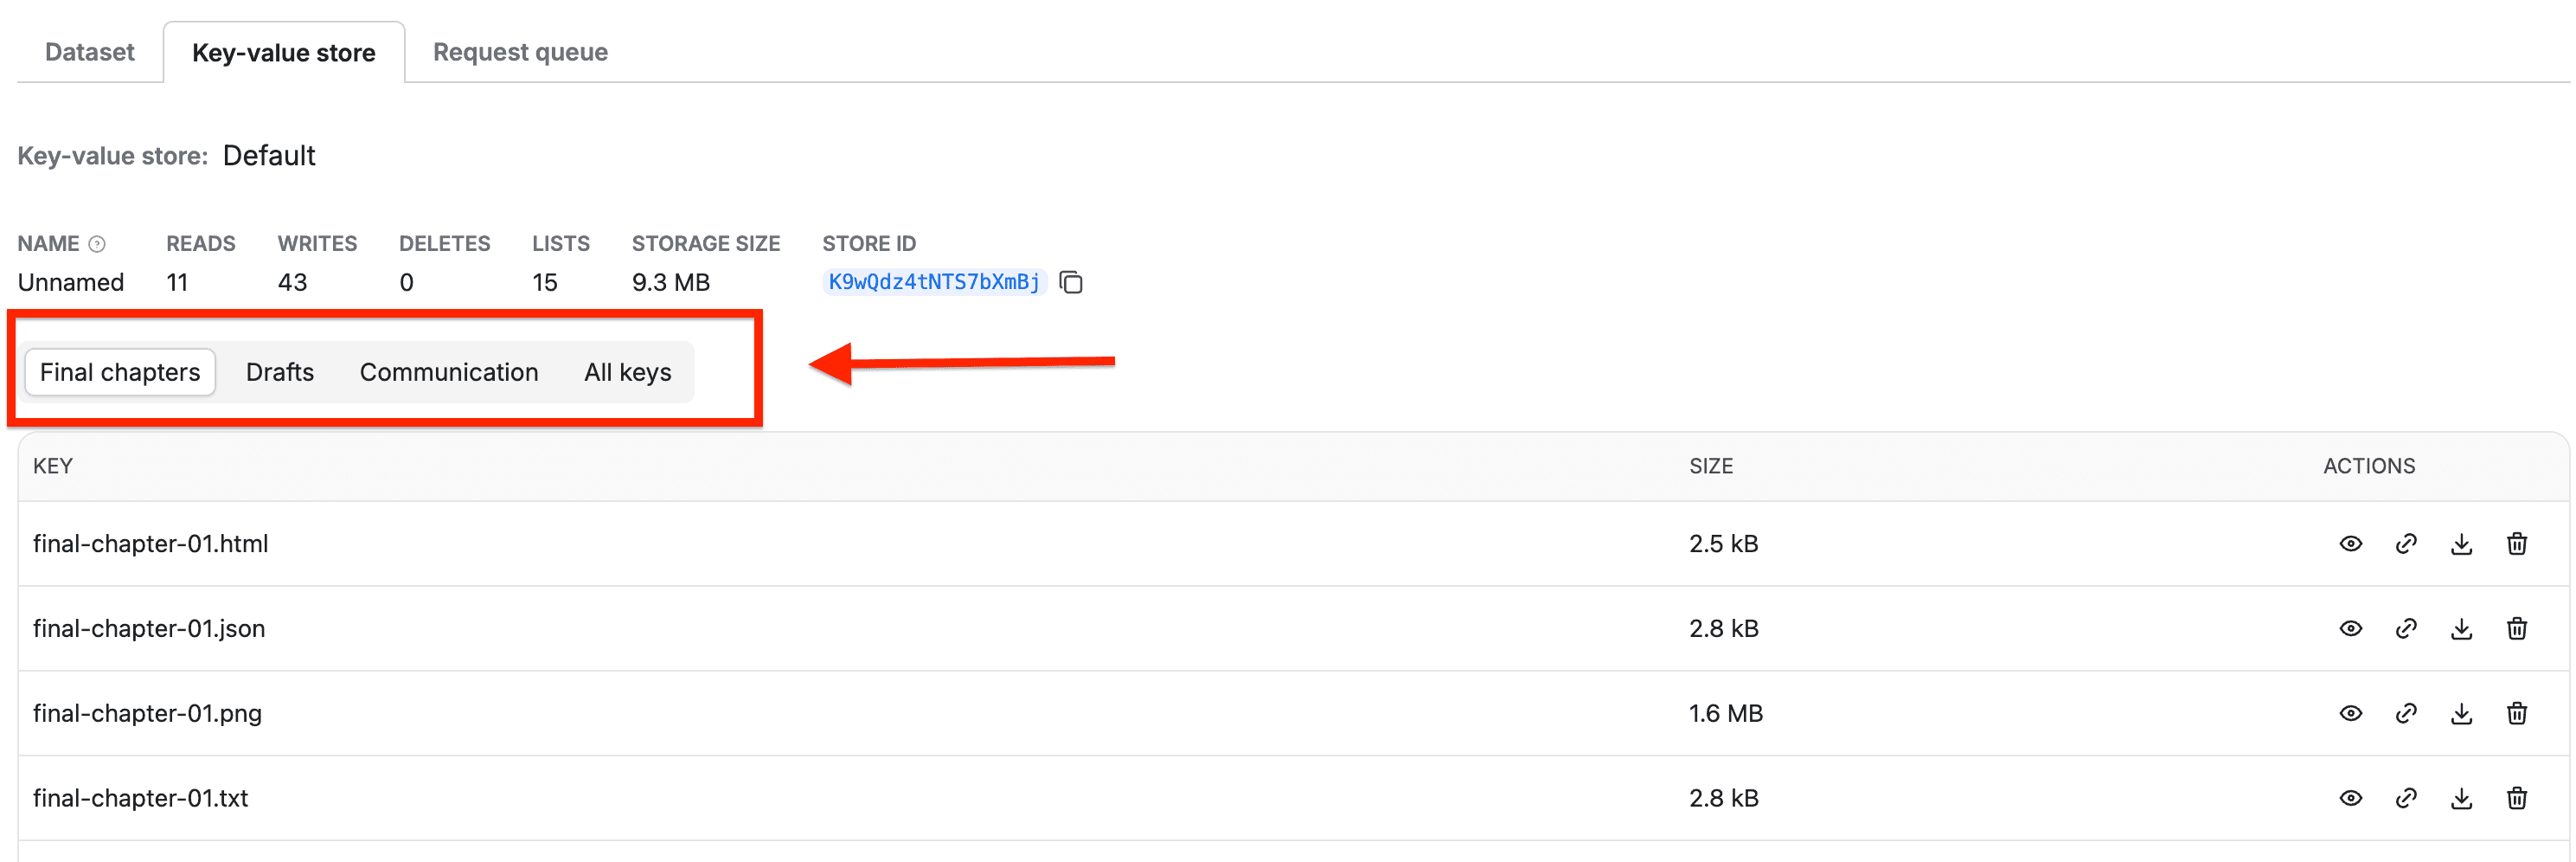
If your Actor saves data to the Key-Value Store, you can define how those files and records are organized and validated using a key_value_store_schema.json.
For example, you could separate final chapters, drafts, and communication keys into logical groups called collections:
// key_value_store_schema.json

{
  "actorKeyValueStoreSchemaVersion": 1,
  "title": "StoryMaker 2025 Files",
  "collections": {
    "final": { "title": "Final chapters", "keyPrefix": "final-" },
    "draft": { "title": "Drafts", "keyPrefix": "draft-" },
    "communication": { "title": "Communication", "keyPrefix": "communication-" },
    "images": {"title": "Images", "keyPrefix": "image-", "contentTypes": ["image/jpeg"]}
  }
}
This gives users a clean view of stored data and helps you maintain a clear workflow.
On top of that, schema‑defined rules (such as contentTypes and jsonSchema) ensure that stored values remain consistent and valid.
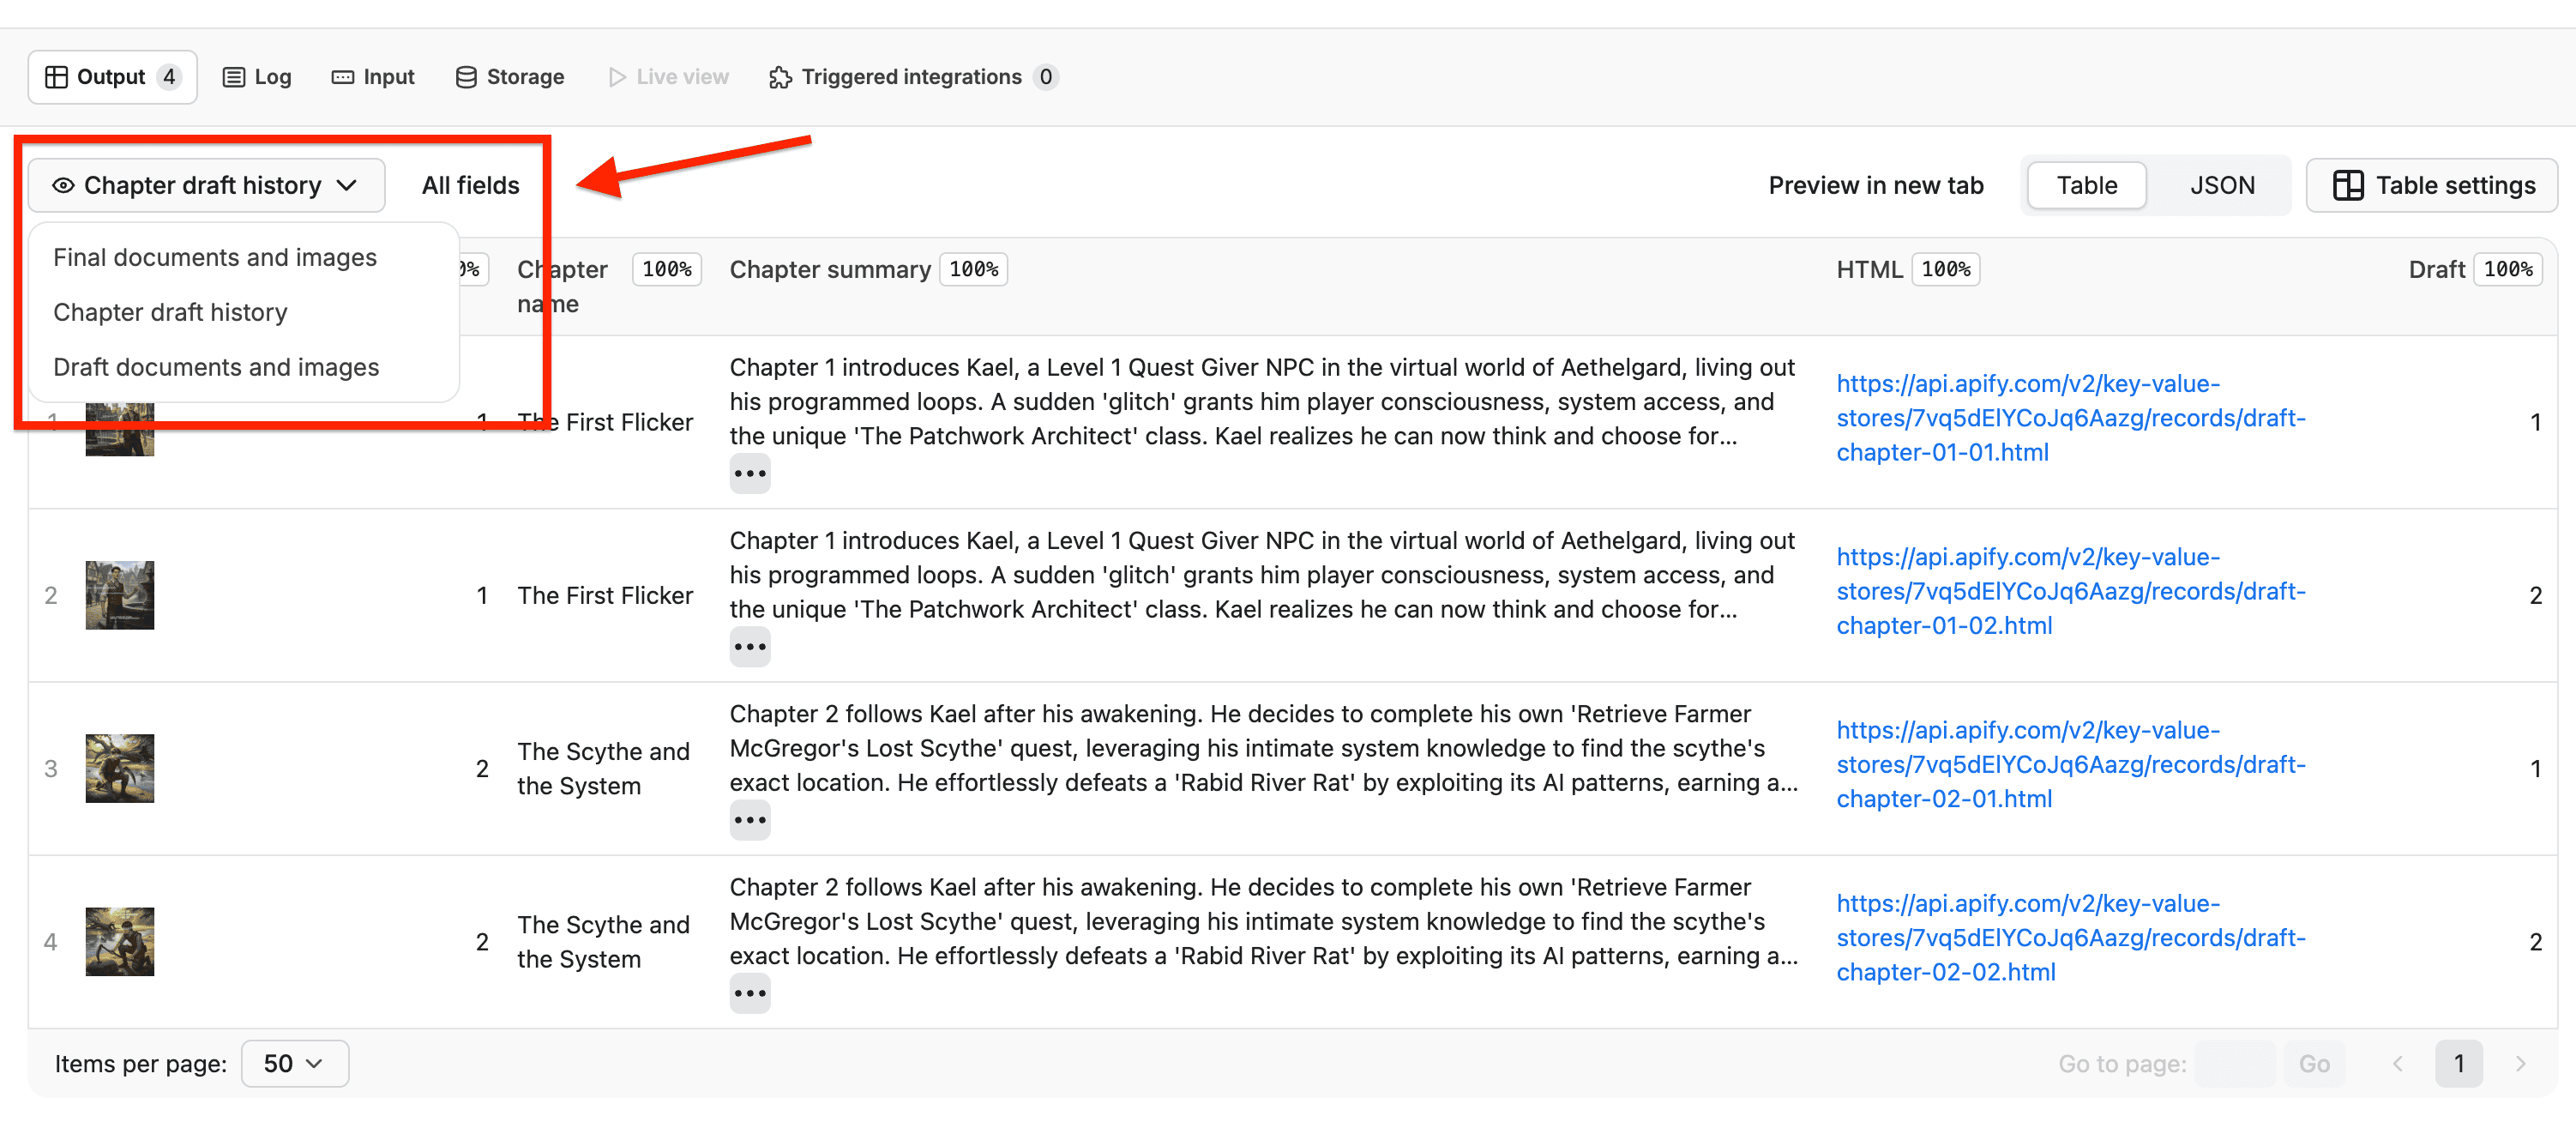
Level 6 – output_schema.json: Improving the output tab
The output_schema.json controls what users see in the Output tab after an Actor run.
You can use it to point to the actual relevant results from your dataset and/or key-value store
{
  "actorOutputSchemaVersion": 1,
  "title": "Output of StoryMaker 2025",
  "properties": {
    "finals": { "title": "Finals", "template": "{{links.apiDefaultKeyValueStoreUrl}}/keys?collection=final" },
    "drafts": { "title": "Drafts", "template": "{{links.apiDefaultKeyValueStoreUrl}}/keys?collection=draft" },
    "history": { "title": "History", "template": "{{links.apiDefaultDatasetUrl}}/items?view=overview" }
  }
}
This turns your output tab into a mini-dashboard instead of a boring JSON dump.
Level 7 – Live status
Finally, you can use the output schema to make your Actor feel alive while it runs.
If you want to let users see live progress updates or interact with your Actor in real time, just create a statusPage html dynamically during the Actor run and set the status key pointing to the given KVS record.
// actor code
await Actor.setValue('status.html', statusPage, { contentType: 'text/html' });

// output_schema.json
{
  "properties": {
    "status": {
      "title": "Current state",
      "template": "{{links.apiDefaultKeyValueStoreUrl}}/records/status.html"
    }
  }
}
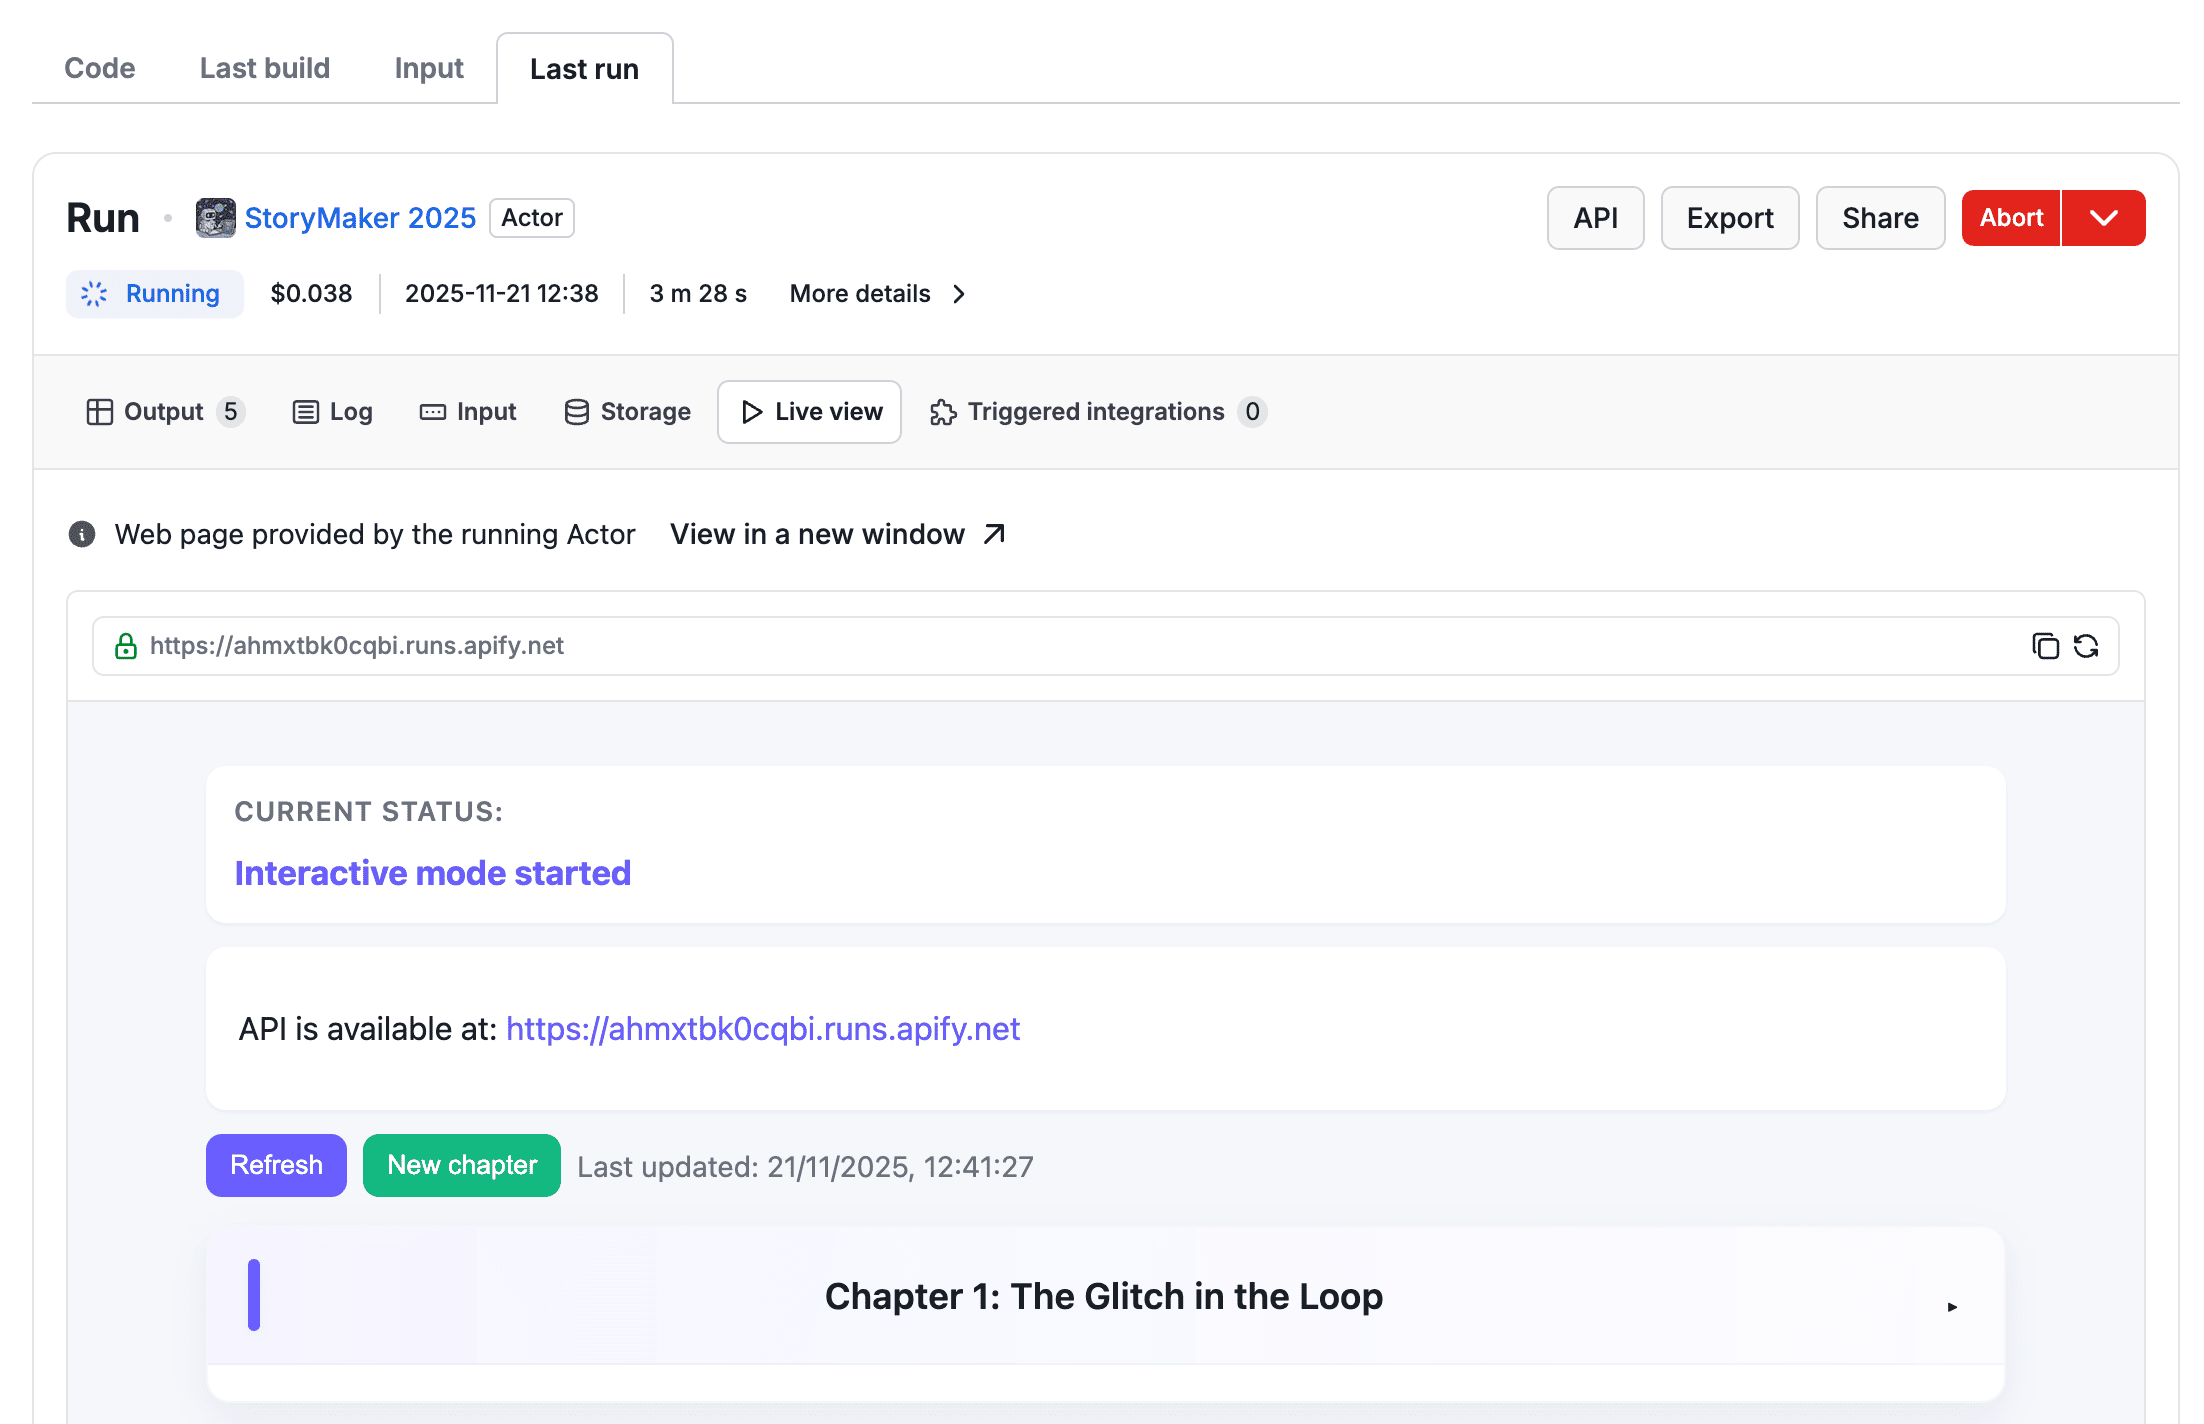
Level 8 - interactivity
Want to go a step further? Add an interactive mode link pointing to the container’s live URL:
// actor code
if (interactiveMode) {
    const app = express();
    app.use(express.json());

    app.get('/', async (req, res) => {
        const html = await getStatus({ seriesTitle });
        res.send(html);
    });
    ...

    const port = process.env.ACTOR_WEB_SERVER_PORT;
    app.listen(port, async () => {
        log.info('Interactive mode API started', { url: containerUrl });
        await updateStatus({ seriesTitle: series.seriesTitle, writtenChapters, statusMessage: `Interactive mode started`, isFinished: false });
    });
}

// output_schema.json
{
  "properties": {
		"interactive": {
		  "title": "Interactive mode",
		  "template": "{{links.containerRunUrl}}"
		}
	}
}
Perfect for integrating with MCP clients or AI assistants that communicate directly with your running Actor.
All of those schemas should be mentioned in the actor.json as well. Below, you can see the final version.
// actor.json
{
    "actorSpecification": 1,
    "name": "storymaker-2025",
    "title": "StoryMaker 2025",
    "description": "This Actor generates chapters for books based on your input.",
    "version": "0.0",
    "buildTag": "latest",
    "meta": {
        "templateId": "js-empty"
    },
    "dockerfile": "../Dockerfile",
    "input": "./input_schema.json",
    "output": "./output_schema.json",
    "storages": {
        "dataset": "./dataset_schema.json",
        "keyValueStore": "./key_value_store_schema.json"
    },
    "webServerSchema": "./web_server_schema.json"
}
Conclusion
Schemas are what turn a simple script into a fully fledged app on the Apify platform.
They define how users interact with your Actor, how data is validated, how results are displayed, and even how external systems can connect to it.
In our StoryMaker 2025 example, each schema level made the Actor more powerful:
actor.jsonmain Actor configuration file,input_schema.jsoninput validation and user-friendly UI,dataset_schema.json- views: structured output,
- fields: validation of records and collection if basic statistics
key_value_store_schema.jsonorganization of keys into logical groups called collections and schema-based validation,web_server_schema.json: description of how the Actor’s web server looks likeoutput_schema.json: builds upon dataset and key-value-store schemas, used for displaying of Actor’s run results.
Think of schemas as chapters of your Actor’s evolution — the more you write, the better your story becomes.
And can you write a book using AI and monetize it? Try it for yourselves and see 🙂