ChatGPT's new Atlas browser brings Model Context Protocol (MCP) support directly into your browsing experience. This means you can now connect AI agents with external tools and data sources while working in any browser tab - whether you're in Google Sheets, your project management tool, or browsing documentation.
In this guide, we'll show you how to connect Apify MCP servers to ChatGPT Atlas and use them to automate tasks directly in your browser.
Why use MCP with Atlas browser?
Atlas browser extends ChatGPT's capabilities by letting you run AI agents alongside your regular browsing. When you combine this with MCP servers, you get:
- Contextual automation: Run AI-powered tools without leaving your current workflow. Need flight data while planning in a spreadsheet? The agent can fetch and populate it directly.
- Access to specialized tools: Connect to more than 8000 of tools available through Apify MCP servers, from web scrapers to API integrations.
- An uninterrupted data flow: Results appear directly in your workspace, whether that's a Google Sheet, document, or any other web application.
- No context switching: Keep working in your tools while AI agents handle data gathering and processing tasks in the background.
How to connect Apify to ChatGPT Atlas step-by-step
Let's walk through connecting an Apify MCP server to ChatGPT Atlas. For this example, we'll use the Kiwi MCP server to search for flights.
Prerequisites
Before connecting Atlas to Apify, you'll need:
- An Apify account - Sign up for free if you don't have an account yet.
- An Apify API token - Get your API token from the Integrations section in Apify Console. This token authorizes the MCP server to run Actors on your behalf. Make sure to keep it secure.
- An OpenAI account with access to ChatGPT.
Step 1: Create your MCP server configuration
Go to mcp.apify.com and select the MCP servers you want to use. You can combine multiple servers into one configuration. For example:
- Kiwi MCP for flight bookings
- AI Agents for hotel searches
- Any other tools from the Apify ecosystem
After selecting your servers, save your configuration. The system generates a unique URL that connects to all your selected tools.
https://mcp.apify.com/?tools=actors,docs,apify/rag-web-browser,agentify/kiwi-mcp-server,harvestlabs/ai-travel-agent
Step 2: Enable developer mode in ChatGPT
- Open ChatGPT in your browser
- Go to workspace settings
- Navigate to Apps and connectors
- Open Advanced settings
- Enable Developer mode
Developer mode lets you add custom MCP server connections beyond the default options.
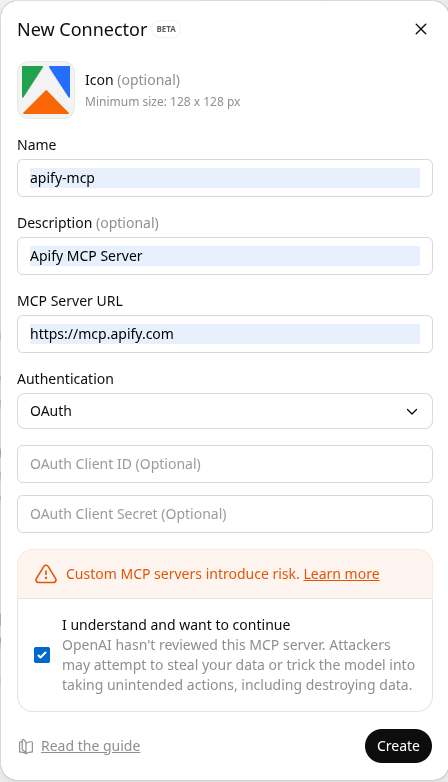
Step 3: Create a custom connector
Click Create to set up a new connector:
- Add an icon (optional but helpful for identifying your connector)
- Name your connector (e.g., "Flights and hotels MCP")
- Add a description (e.g., "Use this server to find the best flights and hotels")
- Paste the URL from your Apify MCP configuration
- Click Create
Step 4: Authorize the connection
You'll need to complete two authorization steps:
- Authorize Apify to connect with ChatGPT (redirects to Apify OAuth screen)
- Authorize ChatGPT to use your MCP server
Both authorization prompts appear automatically during setup.
Step 5: Use your MCP server in Atlas browser
Open Atlas browser by clicking the browser icon in ChatGPT. You can now use your MCP servers in any browser tab.
For example, open Google Sheets and ask ChatGPT:
I am looking for flights from London to New York. Please find me the best flights from Kiwi MCP and include the link for booking.
Atlas will:
- Recognize your request needs the Kiwi MCP server
- Call the appropriate tools from your connected server
- Fetch flight data with booking links
- Present the results directly in your conversation or workspace
You can see the MCP server executing in your Apify Console under active runs.
What you can build with Apify and Atlas
The combination of Atlas browser and Apify MCP servers opens up hundreds of automation possibilities:
- Travel planning: Search flights, hotels, and activities while building itineraries in spreadsheets
- Research workflows: Scrape data from multiple sources and compile it directly into your documents
- Data enrichment: Pull business intelligence, contact information, or market data into your analysis tools
- Competitive monitoring: Track competitor websites and compile insights without leaving your dashboard
- E-commerce automation: Search products, compare prices, and manage inventory across platforms
The key advantage is that these tools work contextually: the AI agent understands what you're working on and can use the right tools to help.
Monitoring your MCP usage
All MCP server calls appear in your dashboard (Apify Console):
- View real-time execution logs with the Actors that are called from the MCP server
- Monitor API usage and costs
- Track which tools get called and how often
- Debug any issues with server connections
Next steps
Now that you have MCP servers connected to Atlas browser, you can:
- Explore the full catalog of MCP servers on Apify Store
- Build your own MCP server using our TypeScript or Python templates
- Combine multiple servers to create custom tool workflows
- Share your MCP configurations with your team
The Atlas browser and MCP combination makes AI agents practical for everyday work. They're no longer isolated assistants, but are integrated into your workflow, working alongside you in the tools and browser you already use.